Last year, before it finally got too cold to work on cleaning and clearing the trees, I did manage to get some areas on the south side of the spruce grove done. Just a bit by the garage, and more more by the gate.
One of my goals for the day was to finally start working on clearing that middle section. Since we now have a working electric chain saw, which is the perfect size for the job, I figured it would be nice and quick. When cutting some of the larger trees, I’d made a point of leaving fairly tall stumps, so they would be easily visible and no one would trip over them. I intended to cut those flat with the ground, too.
This morning, my older daughter and I moved the gates and got started on prepping them for painting.
Those things are fekking heavy!
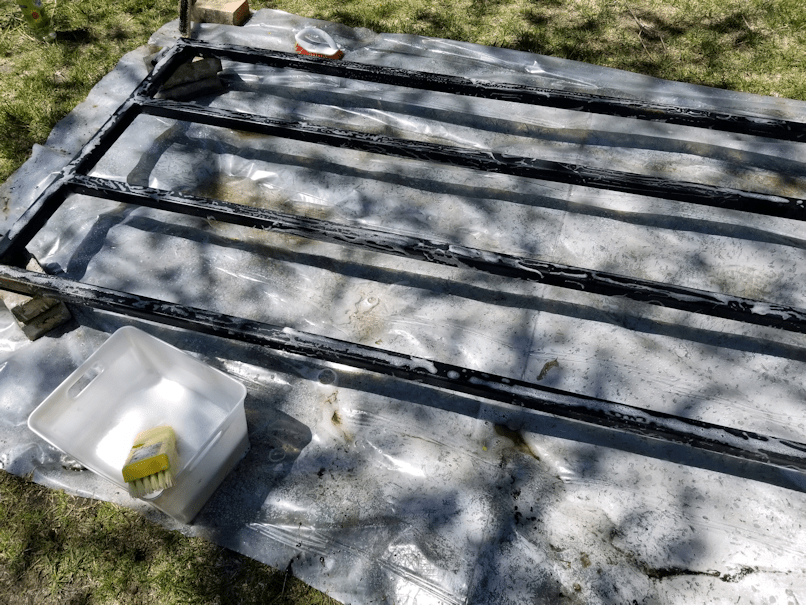
After considering our options, we ended up digging out a roll of plastic I found in the garage to use as a drop cloth and set one half of the gates up on bricks.
It’s hard to see in this picture, but even though I’d already hosed the gates down before we put it over the plastic, after hosing it down second time, the water puddled under it is really dirty!
We went over the gate on one side with a wire brush to scrub any areas that looked like the paint was peeling of, or were particularly rusted. Then we washed it.
We found an eco-friendly detergent for the job.
After doing the one side, we rinsed off the suds, flipped it over, then did it again.
We also took the sliding bar off the other half and that got scrubbed, cleaned and rinsed, too.
As of this writing, it’s still sitting in the sun, drying. We forgot to get paint thinner to clean our brush, so I will get some when I go to pick up my other daughter from work. By then, it should be dry enough to start painting. :-)
Once that one is done, we’ll do the same to the other half of the gate.
We’ll also need to do the gate posts, though for that, we’ll have to get those bottom broken hinges off, before we can clean it. We’ve been applying penetrating lubricant to them, every now and then, in hopes that that will finally get them loose.
While scrubbing and cleaning the gate, I could see that there was red paint under the black – and in some places, a bright blue! The gate construction is not very usual; gates tend to be made wither either a lighter material, or in a triangular shape, so they aren’t so heavy in the middle, which would stress the hinges and cause the posts to lean inwards. I’m thinking my late brother built the whole thing from scratch! As for the gate posts, which he designed so that they could easily be leveled as needed, they are actually starting to lean outward, due to the shifting of the ground. Heavy as the gate is, it’s not enough to overpower the forces of freeze and thaw!
I’m looking forward to how it looks when everything is all painted and fixed up.
I’m also looking forward to having a working gate again.
The Re-Farmer
Update: first coat of paint on the first side of the first gate is done.
That’s a lot of firsts. LOL
I am loving that blue!
The piece by itself on the brick is the slider bar. When the gates are hung back up, the bar will be placed on one side, with two bolts holding it place. One of them also acts as a stopper, when the gate is closed and the bar is slid across to hold the other side in place. At the other end is a hole for a pin to keep the bar from sliding back again. There had also been some electrical wire, used like a twist tie, to further secure the gate. We replaced the wire with a length of chain and a carabiner, before we had to start locking it.
For as long as I can remember, the pin was just a long screw tied to the opposite gate with some bale twine. When the gate was vandalized, the screw was bent into a semi-circle. Our vandal didn’t move the slider bar before he jacked the first side of the gate off its hinges. So we will have to think of what to use as a pin. Hopefully, we’ll find something nicer than a screw and bale twine. Not that that was anything to sneeze at. It worked for many years, after all!
The paint needs to cure for at least 6 hours, so tomorrow we will be able to flip the gate and do the other side. Then we will have to wait for all the paint to cure for 24 hours before we can put on a second coat. If all goes well, we’ll be able to move this one aside to cure while we prep and paint the other one.
I will have to find something soft to put over the bricks so as not to scratch the new paint after we flip it. :-)
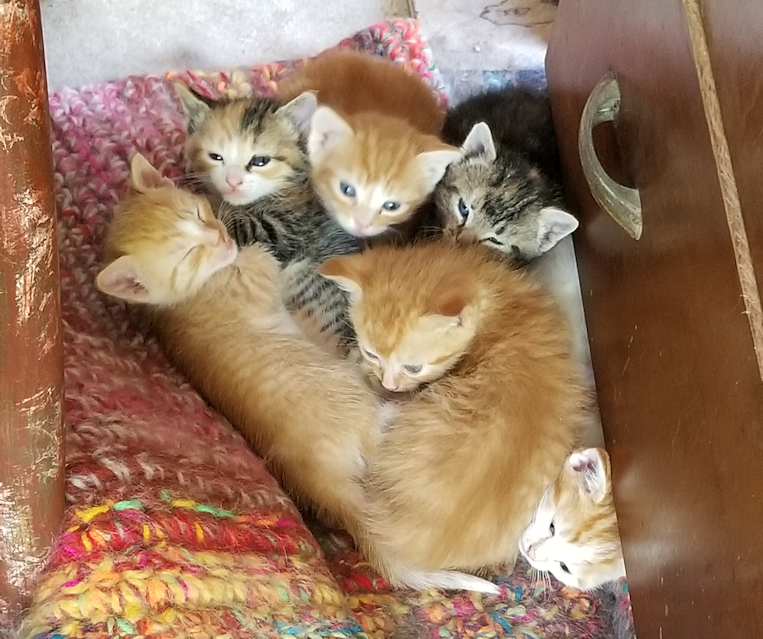
This is what greeted me when I went into the sun room this morning.
Two kittens came running as soon as I opened the door, but the rest were looking a lot more sluggish and sleepy! :-D
I’m quite amused by the one kitten’s face sticking out from under the tool dresser. :-D
You may notice some changes on the blog over the next while. We were finally able to upgrade our account, and now have the refarmer.ca domain name set up.
Hopefully, in the next day or two, I’ll be able to start up my critter of the day photos, now that I have plenty of storage again! :-)