The heat has kept us indoors, for the must part, but a daughter and I did make a trip into town for some errands. I took advantage of the trip to see if the dollar store had stocked up on pinwheels and whirlygigs. They have not, but I did get their last hula hoops, to use as supports in the garden beds.
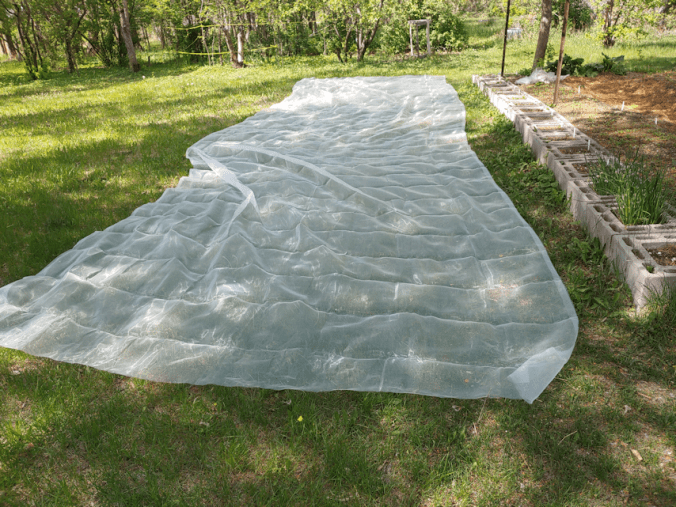
The post office was one of our stops, and happily, the mosquito netting we ordered has finally come in!
My daughter had ordered it to protect our lettuces in the retaining wall blocks, and the beets planted near them, from deer.
We used the T posts that I was never able to remove when we cleaned up the fence that used to be around this garden. Like most of what we’re doing this year, this is temporary, so we just used rope, tent pegs and clothes pins to drape it over the plants. It was long enough that we cut some off at one end, to use somewhere else. Holes and slits were cut into sections of it so it could be tied to the ornamental apple trees.
It should be interesting to see how it holds out if we get the potential storms over the next couple of days. I don’t expect the clothes pins to hold, but it’s attached to the trees solidly enough, it shouldn’t blow away completely. Meanwhile, it should be able to withstand normal rain and winds.
Even though we were doing this in the shade, it was still ridiculously hot, and we didn’t even try to do anything else outside.
I think the different things we’re using to startle away the deer seem to be working. The tulip cam is being triggered by wind blowing the dandelions in front of it. Other than that, we’re seeing the odd cat going by, or a bird on the ground in front of the camera. Nothing is going for the tulips, and aside from that one day, there have been no deer picked up by the camera. Not even a skunk, and I saw two of them in the yard, yesterday!
I’m thinking of moving the camera to overlook the big garden. Depending on where I set it up, it should be able to cover the beds near the house, as well as anything large enough that goes near the far beds. That should tell us if deer are still trying to go through the old garden area or not.
The forecasts have changed again, and they’re now predicting storms 2 days from now, instead of over the next couple of days. Once things cool down some more, and we go out to do the evening watering, we can move the trail cam over. The leftover mosquito netting is so light, I might just set it over the last spinach bed as a floating row cover, until we can build another wire mesh cover.
If this netting works out, we will order more. If not… well. We tried! :-D
We had a solid rainfall last night. With the sunflowers, tomatoes and bunching onions just transplanted yesterday, I was concerned over how they held up. I was happy to see that the tomatoes were looking very sturdy, and even the little bitty onions were looking stronger. It was the sunflowers that I was most concerned about, but they were also looking strong. Even the couple that were looking wimpy as they were being transplanted are standing strong, though the twine supports we added certainly helped that.
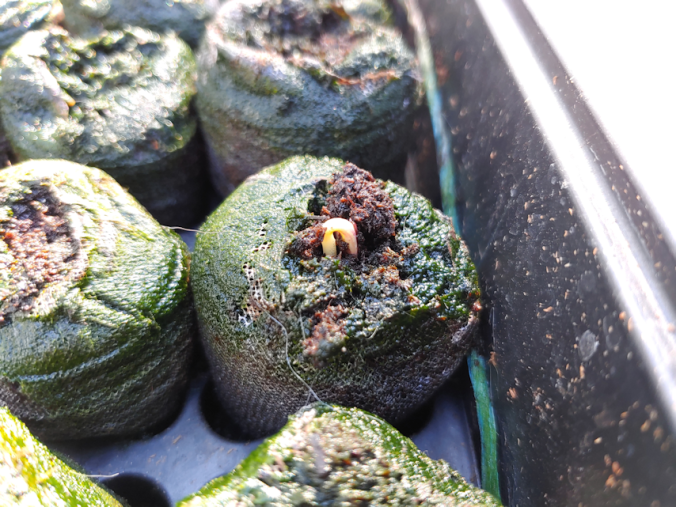
While moving seedlings out of the sun room this morning, I included the tray with the cucamelons. Not many of them germinated, but they are so prolific, we should still have lots. This same tray is where I’d planted the Hopi Black Dye sunflowers.
I had a surprise waiting for me.
The very first Hopi Black Dye seedling has emerged!! At this point, I thought for sure they were gonners. If I’d had any idea that they could take this long to germinate, I would have started them back in February!
I have no idea if more were germinate, or even if any will reach a point where it’s worth transplanting them. It’s so late in the season, but then, we do that the others that were direct sown, and who knows when those will germinate!
Meanwhile, we have another first this morning.
Our first harvest of spinach! Yes, we’ve been sneaking the odd leaf every now and then for a while, but they’ve reached a point where they need to be thinned out, so this morning I grabbed some from each bed. I could have had a lot more, but I could only reach so far under the two beds with chicken wire over top. Later on, when I have a second person to help out, we’ll move the covers off and thin them out properly.
After I finished cleaning the spinach, it was all I could do, not to just sit there and eat them all! Instead, I’m not eating some in an egg dish my daughters made for me for lunch. :-)
Things got hot really fast this morning, and it’s only going to get hotter. We’re supposed to hit 29C/84F this afternoon, 34C/93F tomorrow, which risk of thunderstorms, and 35C/95F with chance of thundershowers the day after. If we do get storms, we have enough things to use as cloche to protect the tomatoes, but I don’t know how we’d be able to protect entire rows of the sunflowers.
This type of weather is the sort of thing the squash would actually like – if they were already well established outside! We’ll continue making beds and transplanting, but will have to take steps to be able to protect them from storms as well.
For now, I’m just excited about our new sprout, and fresh spinach!!!
After we got the sunflowers transplanted, the girls and I decided we would transplant the tomatoes today, too.
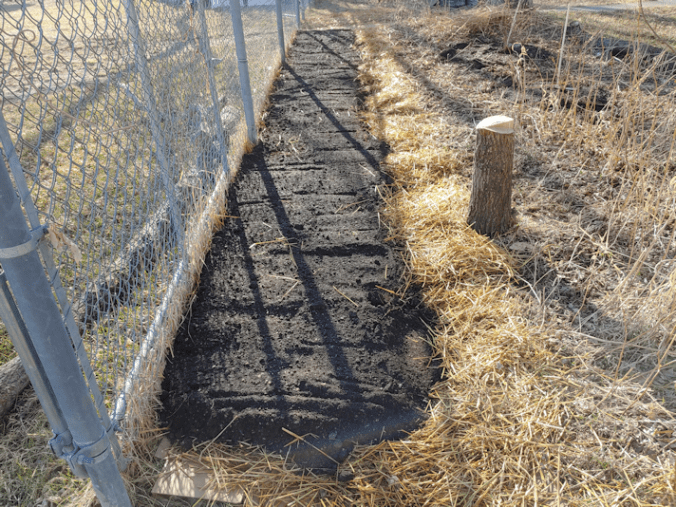
This is the area we prepared for the tomatoes, back in April, so that we can use the chain link fence to support them. You can read what we did to prepare it here. Though we have been wetting it down fairly regularly, there just hasn’t been enough moisture for the straw and cardboard to do much breaking down, and the soil layer was relatively thin.
Since the new garden soil is alkaline, and tomatoes like slightly acidic soil, we decided to make use of the last of our bale of peat. Before heading in for lunch and out of the heat, we took the time to mix the peat with garden soil and soak it down.
Basically, we made peat soup. :-D
The seedlings were brought over to wait in the shade, then we headed inside to let the soil and peat mixture absorb more water.
Do you see that cup with the itty bitty tomato plants in it? That is a cup with Mosaic Mix seeds in it. It took forever for one seed to germinate, so when the plants got moved to the sun room, we decided to keep it. Then, just about a week ago, the other seeds planted in the cup germinated! They’re really too tiny to transplant, but the girls wanted to, anyway. We’ll see how they do!
When we got back to it, the transplants were separated and laid out, after getting their bottom leaves and branches trimmed off. We did dig small holes for each one, but there wasn’t a lot of depth before we hit straw. Each transplant got some of the peat mixture built up around it, up to the lowest remaining leaves, so that the buried stems will grow roots and the plants will be stronger.
Then we added more garden soil in between each plant, to build up the soil depth in the bed, and to make sure the peat mixture won’t wash away when we water them.
The first things we started from seed were onions, but we lost all of our Red Baron bunching onions, due to cats. When we started using the Solo cups as pots, I decided to broadcast sow the last of the seeds we had in a couple of cups and see what happened. With one of them, nothing happened, but with another, they did actually sprout. They’ve been hardening off along with everything else, and onions are supposed to be good companion plants for tomatoes, repelling insects, so we decided to go ahead and transplant the onions, too.
Some of them are REALLY tiny, but the girls went ahead and planted them anyhow. They’ll either make it or not.
The onions got planted in where we added more soil, but you’ll notice a gap in the middle. The tomatoes in the foreground are the tiny Spoon tomatoes, while the ones at the far end are the Mosaic Mix tomatoes. In the middle are the super tiny, sprouted really late, Mosaic Mix tomato plants. They’re so small, no extra soil was added around them; they would have been buried completely! We’ll see if they survive or not.
As always, we thoroughly watered the soil before putting in the transplants, so when we did our evening watering, they only got a misting, to help settle the soil.
We did hit 29C/84F today. As I write this, it’s just past midnight, and we’re still at 20C/68F. Our expected overnight low is 17C/63F. Instead of having to watch out for a last frost hitting our transplants, we have to watch out for excessive heat! We’ll be doing a lot of careful watering over the next while.
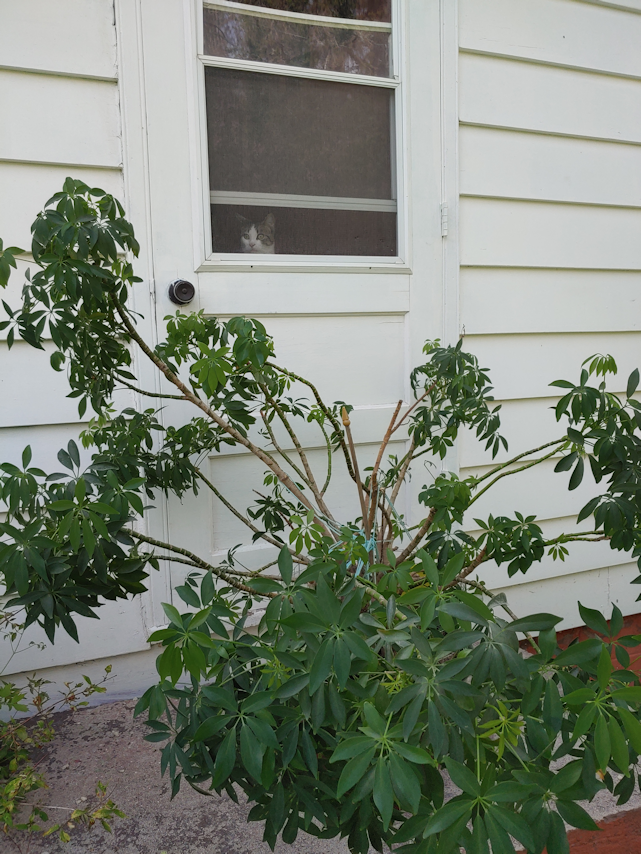
One thing the girls and I did finally remember to do; we put our poor, bedraggled umbrella tree outside. It took three of us. One to carry the pot, one to open and close the doors, and one to keep the cats away! :-D
Tissue was watching me through the door!
Yes, the plant is on the stairs in front of a door. In this spot, it will get full sunlight in the morning, while it’s still relatively cool, but be shaded during the hottest parts of the day. We don’t use this door, so it can stay there. Right now, during the day, we open the inner door and set up a little step ladder, so that cats can sit on it and look out the window. The window is open just enough to allow a breeze through the house to help keep it cool. The outer door has a tendency to unlatch on its own, so to make sure the cats don’t accidentally end up outside, we have it secured with some cord. It has become a favorite place for the cats to see and watch all the birds outside! :-)
So the tomatoes are now transplanted. Between them and the sunflowers, I had a lot fewer plants to bring back into the sun room for the night! :-) The rest cannot be transplanted until we finish the squash tunnel for the climbers, and build beds for them, but they are all hardened off and ready for transplanting. So we need to get those done as quick as we can! Friday and Saturday as supposed to be scorchers, too. Ah, well. Better the heat for transplanting, than frost!
Well, I’d hoped we could actually finish the squash tunnel today, or at least get the side cross pieces at the top done, but we didn’t get quite that far.
But, progress was still made.
Most importantly, we got the supports up in the post holes.
In refilling the post holes and tamping the soil down, a few of them did need to have more soil added. A good way to reduce some of the lumps in the old garden, left from when it was last plowed before we moved here.
It’s very… rustic looking. That’s a trend now, right? :-D
And no, that middle pole isn’t actually tilted. The tree it’s made from is bent. All the pieces are wonky in shape! :-D
It’s also still very flimsy right now. Joining them at the sides with cross pieces should fix that.
It was already starting to get hot by the time this was done, so we took advantage of the morning shade to transplant the Mongolian Giant sunflowers. It wasn’t until evening that I was able to work on the next step for the squash tunnel. I cut a total of 8 of the 16 cross pieces needed at 5’6″, then trimmed matching flat pieces at each end.
I also trimmed one side of the flattened ends a bit; just enough to have a narrow flat surface on what will be the top.
The flat parts are intended to butt up against the upright and the top cross piece. It will wait until tomorrow, but the plan is to screw the cross pieces to the upright, then add one more screw through the top cross piece, down into the side piece – and hopefully not hit another screw in the process. This should give it some more stability. The other 8 cross pieces will be attached a few inches from the bottoms, which should strengthen it even more, as well as provide a place to attach mesh for the vines to climb.
There are a couple of problems we need to figure out how to get around, to finish the job. We do have a cordless drill, but both batteries no longer hold a charge, and the company doesn’t make them anymore. Until we get around to buying a new one, we have several corded drills to choose from. Getting extension cords to reach this far, though… that’s going to take a bit! We have a pair of 100′ extension cords, which won’t reach reach from the outdoor outlet on the side of the house. I remember how far I could reach while using the electric weed trimmer, and three extension cords. We’ve since gotten more cords, so I think we’ll have enough to reach around the structure.
The next challenge is, we’re short. Well, except my husband, and he’s broken. ;-) To be able to drill a pilot hole through the stop cross piece will require clambering up and down a step ladder. For our gimpy household, that is somewhat risky!
But, it’ll need to be done. With this structure, we can’t get away with tying the cross pieces on with twine, like with the pea trellises.
With 5 uprights and 4 cross pieces per side, only two cross pieces can be placed up against the overhangs at the top, so each side will have two cross pieces mounted just under the other two. Which will hopefully also contribute to the stability. If that’s not enough, we’d have to add supports on the inside of the corners, and I really don’t want to get that finicky with a temporary structure.
We may not have finished the squash tunnel, but we accomplish other things, but that is for my next post! :-)
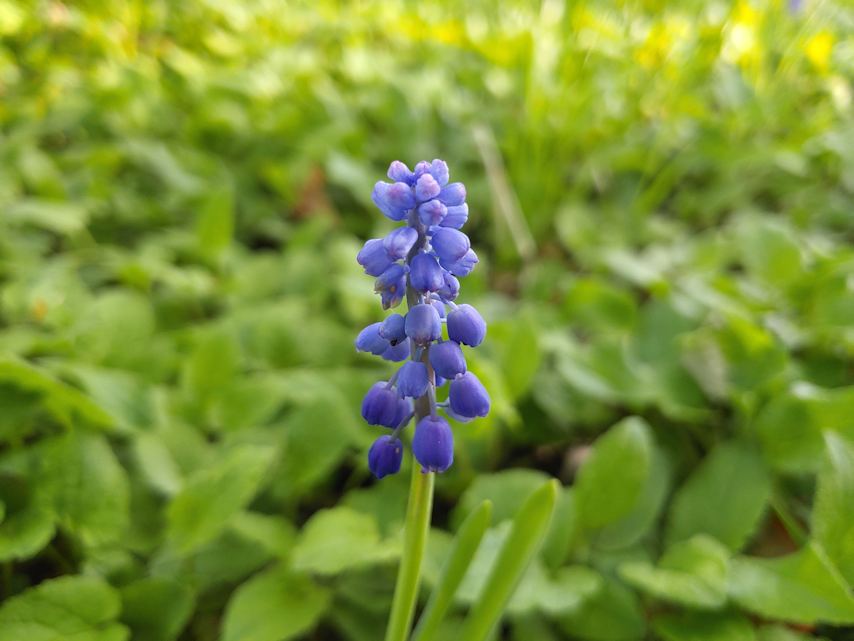
I’m so loving how the grape hyacinths are looking! Tiny little clusters of purple, in a sea of green. In a few years, we’re hoping there will be a lot more purple! :-)
Today is our last frost day, and we’re in a heat wave! :-D If the long range forecasts are to be believed, we’ll “cool down” to the mid 20’s (Celsius) and stay there for the next couple of weeks.
Which means we should be safe.
We headed out early, while it was still cool, and set up the supports for the squash tunnel, which I will post about later today. That area is full sun, right from sunrise, so things warmed up fast. The corn and sunflower blocks were still in shade, so we took advantage of it.
Transplanting has begun!
I’ve really been wanting to get those Mongolian Giant sunflowers out, as they were getting so very tall and leggy.
They certainly did well with the beer cups for pots!
Each sunflower block had one free row and, since we have no Hopi Black Dye sunflowers to transplant, all the Mongolian Giants went into both. We marked spaces off at 18 inches apart to fit them all; the packet says 18-24 inches, and the seeds were planted 24 inches apart, but if we stuck to 24 inches, we would have had plants left over. Next, we put three bamboo stakes in line with the middle of each row. Once the spaces were marked, we dug holes through the added soil, and into the sod beneath, taking out any roots and rocks we found in the process. Each hole then got a watering before the seedlings were transplanted.
As added support, two lengths of twine were strung across with the bamboo stakes as support. The twine was crossed around each of the stems, as if we were supporting tomatoes, to help hold them up until they settle in and start growing again. As the seedlings get bigger, there is plenty of space for them to grow, so we could leave the twine if we wanted to. With the holes being thoroughly watered before the seedlings were transplanted, we did not water them again. Instead, we will give them a misting when we do the evening watering.
Yellow rope was also strung across the bamboo stakes. We are hoping the rope and the twine will act as deer deterrents. I’m going to have to look around to find something to tie to the rope or the bamboo states that will flutter or sparkle or make noise, as well.
While the girls strung the twine and rope, I washed out the beer cups, and they are ready to be used again, next year.
We then moved to the south yard, and started to prepare for more transplanting later today, plus we will need to continue working on the squash tunnel. More on that later.
We are so excited to finally be able to start transplanting!!
Not that long ago, we were dealing with freezing temperatures. Now we’ve got a heat wave!
Today’s high was predicted to be 24C/77F. Instead, we reached 28C/82F. Tomorrow’s high is supposed to be 28C… does that mean we’ll be going to break 30C/86F? :-(
Hot as it was, we needed to get started on the squash tunnel. Thankfully, we could at least work in mostly shade.
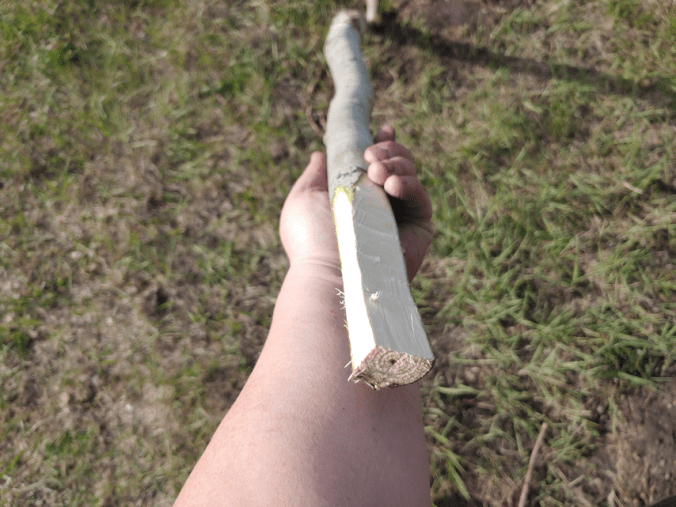
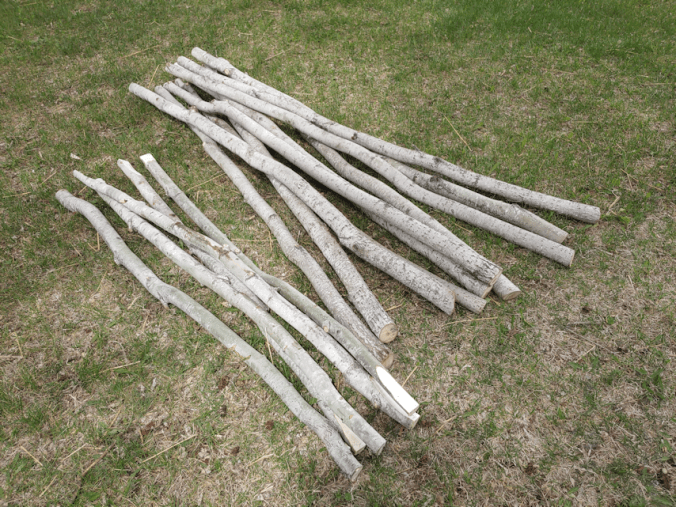
The first thing to do was go through our pile of poplar we’ve cleared out of the spruce grove, and pick the strongest, straightest ones. Straight for the first 7 feet, at least!
The upright supports were cut to 7 feet, but there was still enough from each of them to cut cross pieces at 5 1/2 feet. Of those, the strongest ones were selected, and at least 3 inches was trimmed from each end to have a narrower, flattish part to attach to the uprights.
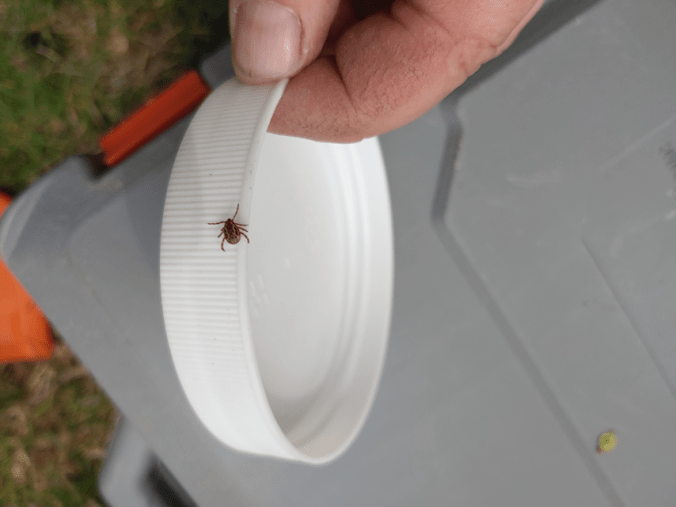
While preparing to screw the pieces together, I found our first wood tick of the season! We ended up finding a couple more, later on.
Time to dig out the bug spray to go with the sun screen… :-(
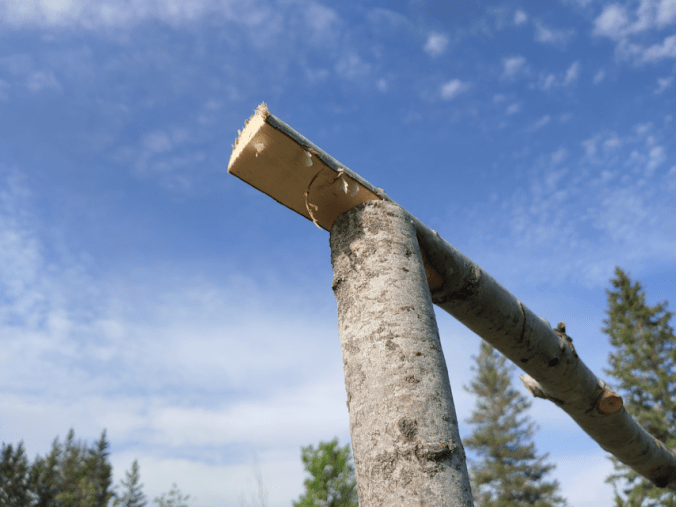
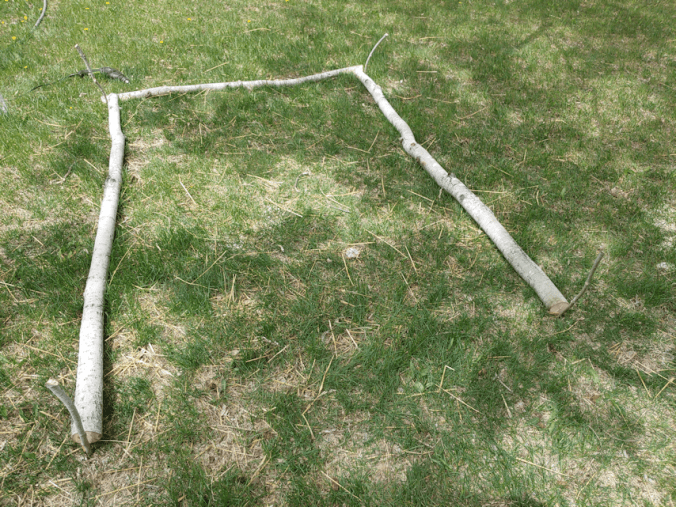
The uprights need to be 5 feet apart, and the cross pieces were to be attached to their tops. I measured out and shoved some sticks into the ground as guides. The bottoms of the uprights would be centered at the pegs at their based, while the tops would be placed with the two sticks at the top on the outsides, to have them lying parallel at 5 feet. The cross piece could then be laid out and the flat sides lined up to the tops. Pilot holes were then drilled and they were screwed in place.
Which sounds a lot easier than it actually was. A few cross pieces needed extra trimming to rest against tops of the uprights. Sometimes, the uprights needed to be turned until they all fit together as flush as possible. Still, it got done.
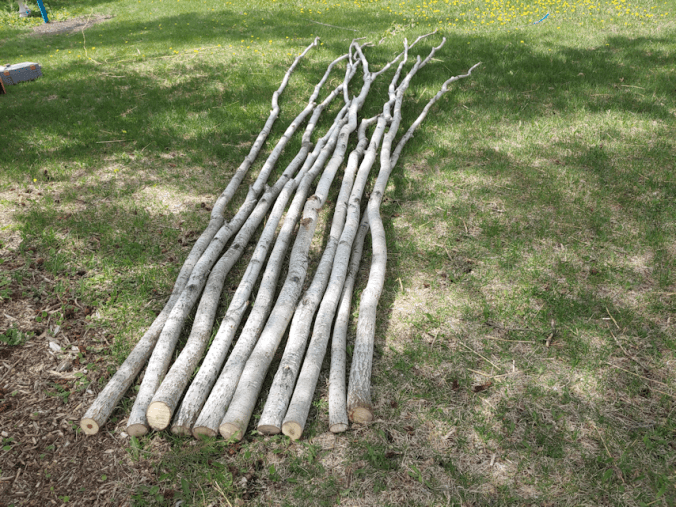
There they are! Five sets up upright supports for the squash tunnel! They just needed to be dragged out to where the squash tunnel will be set up.
At this point, they are very rickety. Unfortunately, with some of the screws pulled right out of the wood, so we had to redo them with longer screws. Which, thankfully, we had!
By this point, we’d reached that 28C/82F, so once we finished with these, we packed everything away and went indoors to get out of the heat for a few hours. The next stage was to dig the post holes, and there wasn’t any shade to be had, so we waited.
When I finally did head out, I first took the time to water the garden beds and blocks from the rain barrel by the peas. I was able to use the watering can to water everything but the Dorinny corn before the barrel was too low for me to refill the watering can anymore.
While I was watering, I found a friend.
Such a cute little frog!!
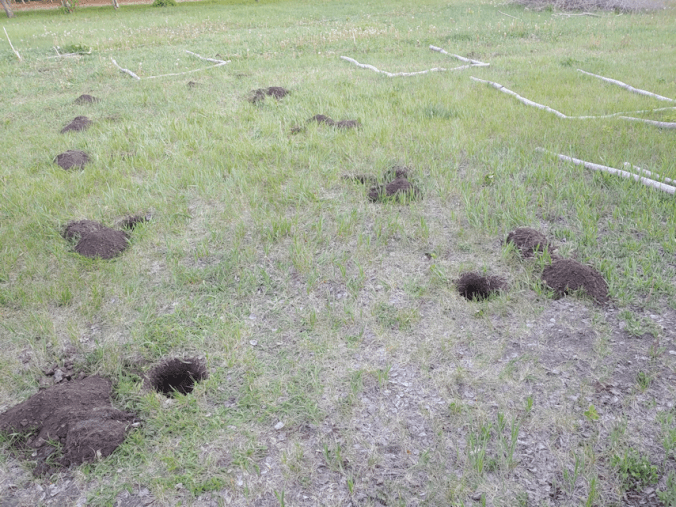
Then it was time to start the post holes. Each spot was marked with a flag, so I started by using the space to stab out a circle around each flag, then moving it so I could remove the sod. Once the sod was out, I went in with a hand trowel to take out the bigger rocks, then used a lopper to take out the many roots I found.
I had company.
I love how Rolando Moon will just hang out while we’re working outside. She doesn’t want us to pay attention to her. She just wants to be close by. She even settled down for a nap!
Finally, I brought over the post hole digger and got to work. It’s pretty much a one person job, so the girls took care of the evening watering, refilled the rain barrel by the peas, and watered the last corn block. Once the barrel was full, I decided to set up the sprinkler over the corn and sunflower blocks, to make sure the seeds got the moisture they need to germinate. Going over them with the watering can may or may not have been enough, so I wanted to make sure they got a thorough soaking while I continued digging post holes.
All done! Ten post holes, all 5 feet apart.
That was it for today!!
Getting those supports in will be a three person job. Particularly since they are still so wonky. Two people will be needed to place the supports into the holes, while the third person will back fill the holes. They will still be rather fragile until the cross pieces are added to the sides. We weren’t able to pick up a cordless drill on this month’s budget, so we’re going to have to string together a whole bunch of extension cords to drill the pilot holes! The cross pieces at the top should have enough extra length that we can put a screw through them, into the side cross pieces, too. We’re all short, though, so we’ll need a step ladder to do that!
I want to add cross pieces near the bottoms of each side, too. We’ll need a total of 16 pieces to do tops and bottoms of both sides, and then we can put either wire mesh or netting for the vines to climb up and over the tunnel. Then, we can start making the beds themselves, to transplant the winter squash, gourds and melons into. These will be on the outside of the tunnel supports only, keeping the tunnel nice and wide on the inside. If all grows well, it should create a nice shaded space that we can put chairs in, to rest and enjoy while tending the garden. :-)
Next on the list are the beds for the summer squash, and the block for the Montana Morado corn. They’re getting quite big in their cups, and hardening off nicely. I hope they handle being transplanted okay! I do with the toilet paper tubes had worked out. That would have been much better and less disruptive to the roots. Well, we’ll know for next time: pre-soak the growing medium before putting it into the tubes!
The next week or so is going to be very, very busy!
One of the down sides of having so many cats in the house is how much they “love” our houseplants! We’ve had to get increasingly creative to protect them. The smaller ones ended up getting hung up. Thankfully, my daughter’s orchid kokedama are very light, as they ended up being hung from a curtain rod we don’t use. I had several succulents, one of which was apparently delicious to cats. I’ve managed to save two, while a third ended up being totally destroyed.
The problem is with the larger plants. I have a big umbrella tree, we have a whole bunch of aloe vera (less than we started out with) and several jade trees. We’re down a few jade trees, too. :-( I also had 5 avocados growing in one large pot. They had been doing very well, too.
Then Cabbages happened.
She has a thing for digging in dirt. She’s not interested in the plants themselves. She just wants to dig. The other cats like to bite the aloe vera leaves, which at least won’t harm them, but they also like to break of jade tree leaves, and play with them like cat toys. Jade trees are not good for cats! None of the other cats have Cabbage’s obsession with dirt digging. Thank God for that, or I wouldn’t have any plants left!
We’ve tried many things to deter them. Our aloe vera now all have protective rings of plastic around their bases (except the biggest one, which is so big, with so many babies growing under it, it can protect itself!), cut from those cheese ball and pork rind containers from Costco we’d been keeping to use as garden cloche. They’ve been coming in handy for a lot of other things!
The umbrella tree got a ring of 1 inch wire mesh around its base. The kittens would still jump over it and sit in the middle of the umbrella tree but, as they’ve grown bigger, they seem to have stopped doing that. The smaller plants got the plastic containers put over them as cloche, but some of the cats figure out how to knock those off – and the pots under them. The larger jade trees got various things stuck into the soil to both support their stems, which were being pushed over by cats sitting in the middle of the pots, and to make things difficult for the cats to get in.
The pot the avocado were growing in is a large double-layer pot. The inner pot holds the soil while the outer pot has a reservoir for water, so the roots can be watered from below. In one corner is a triangular piece that holds a float in place, and covered the opening where water is poured into the base.
This pot is on a shelf by the dining room window, along with a number of other plants. Eventually, though, we were down to just one other plant on the shelf; another jade tree. To stop the digging, we tried things like putting duct tape, sticky side up, over the dirt. The jade tree got a plastic collar, which kept getting knocked out of place, so we tried wrapping it with plastic, and even sticking in dozens of bamboo skewers in all directions, to dissuade the digging. Nothing worked for long. We even ended up putting the pot on top of an upturned bucket to raise it higher above the window ledge that cats like to lie on, but Cabbages is very determined, and still managed to get in to dig!
The remaining two avocados got a shield of hardware cloth around the perimeter of the soil. That worked for a while, until Cabbages discovered she could just jump over the top. We ended up putting a box over the top, but it was too late for the avocado. We just needed to stop her from making a mess. When she started digging, she throws dirt everywhere! She knows not to try for it while we’re around, too, so we’d find the mess in the morning, of after we’d been outside for a few hours.
Well, she still managed to get the box off the top and get into the dirt again. She also got into the jade tree again. So today, my daughters got the pot outside. The remains of the avocado were removed, and the jade tree was transplanted into the bigger pot. The hardware cloth got wrapped around it again, and the extra piece I had left from the roll got folded over the top as a cover. Then it went back to the shelf at the dining room window.
This evening, I went into the dining room only to find David lounging on the table – they are not allowed on the dining table – so at first I missed it. My husband was coming in behind me and saw it right away. The hardware cloth that was on top was gone, the rest was askew, and there was dirt, everywhere.
I was not a happy camper!
This time, it looked like Cabbages got under the mesh. The cover for the water reservoir was knocked completely off, too. We found the wire mesh that had been on top, rolled up under the dining table, with Tissue curled up inside. !!
Desperate times call for desperate measures.
The hardware cloth got placed around the jade tree again, but instead of putting it on the inside of the put and pushing it into the soil, it was jammed between the inner and outer pots. Unfortunately, it wasn’t long enough anymore, so the piece that had been over the top was squeezed in, too. Then, we got the remains of a roll of 1 inch wire mesh and used that to create a top.
The wire mesh on the sides has been pushed down quite far between the two layers of pots, so there’s no way a cat is getting under it or lifting it out. The 1 inch mesh on the top is wider than paws, so if a cat tries to jump on top, it will hold the weight, but little paws will tend to slip through, which will be a deterrent.
The down sides are, we can no longer use the opening in the corner to water into the bottom of the reservoir, and watering from the top is going to be a challenge! We also can’t reach the plant to tend it. The top is held in place with a couple of twist ties, but the wire ends along some edges were also bent inwards, to help hold it in place. It can be taken off, but it’ll be a pain in the butt.
It should, however, finally be safe from Cabbages and her digging!