I remembered to get a photo of our onions in their new location in the sun room.
I ended up removing the plastic on the mini-greenhouse frame, so it wouldn’t get too warm, and so there would be air circulation from the ceiling fan.
This is early enough in the morning that the room is still “dark”, but once the sun comes around, it gets many hours of sunlight. The ceramic heater is just enough to keep the seedlings from getting chilled overnight. We’re supposed to get snow starting tomorrow night, at with point I might put the plastic cover back on.
There should have been trays for three types of onions in here by now, but the shallots died off and I had no seeds left to try again, and the reseeded bunching onions are still in the aquarium greenhouses inside, for a while longer. By the time those are ready to be moved over, we’ll be bringing the tomatoes and gourds into here, too.
I have a question for those who grow onions from seed.
Should I trim these?
I’d read that onion seedlings should be trimmed when they reach about 6 inches, to about 3 inches, while they await transplanting. I would have done it by now, however, I’ve since heard from people who say to NOT trim them, because then you get smaller bulbs. They were pretty adamant about it, while others were just as adamant about the opposite.
I’m inclined to trim them, but I wanted to hear from anyone with more experience than me with growing onions from seed. I am more than eager to listen to the advice of others!
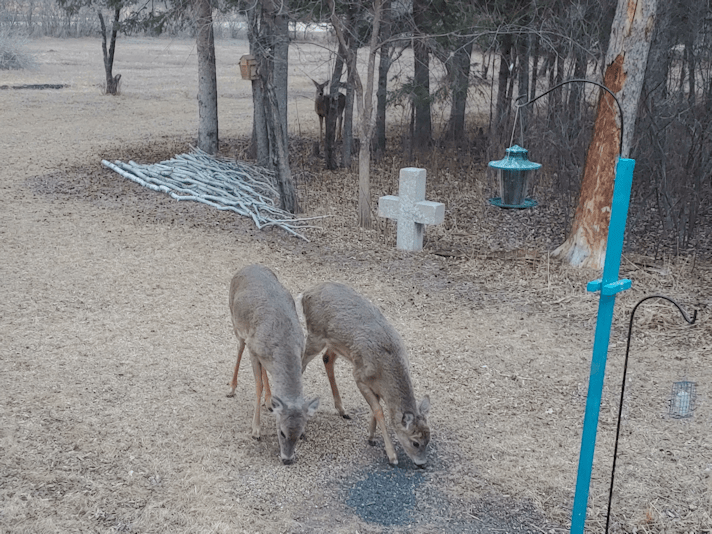
They tend to show up near the end of the day, when the light makes is hard to get good photos! You can still see, at least a little, the growing antler nubbins on the deer on the right.
If all goes well, this will be the last bag of feed for the deer that we buy until the fall. Looking at the long range forecast, we’re expected to dip below freezing again, with snow on Monday (three days from now). They’re predicting 3-6cm. After a couple more days, the temperatures will be back above freezing during the day, though we’ll have below freezing temperatures overnight for a while longer.
I’m hoping we actually get that snow, and that it slowly melts. The deer should have fresh growing things to eat after that. We were supposed to have rain over the past couple of days, but once again I watched on the weather radar, as the system moved right past us. We didn’t even get a sprinkle.
Yesterday was a very lazy day for me. There is something about it being overcast that leaves me feeling like I’m ready to fall asleep, all day. Plus, with the cooler temperatures and hopes of rain, I didn’t want to be working outside with power tools. ;-) I did make a trip into town, though. Our darling daughter treated us to pizza for our anniversary. My husband and I celebrated 33 years together this month. :-) While driving into town to pick it up, there actually was a bit of rain, but it was nothing but a tease!
Today, I finally made the trip to the smaller city to pick up the last few things I wasn’t able to get during my Costco trip. They were actually sold out of cat litter, of all things! While there, I started chatting with another customer, who is also feeding a lot of cats. Mostly outside cats. He estimates he spends about $3000 a year on cat food – and spent another $5000 to get 40 cats fixed. !! That’s through some sort of program, where getting a female done is only about $80-$100, instead of the $350 we’re paying. I’ve had all sorts of organizations recommended to us, but either we can’t get through to them, or they don’t operate as far out as we are. :-(
(Oh, just got a phone call. The people who are adopting Two Face are on their way to pick her up. :-) )
While talking to the other customer, he mentioned using wood pellets instead of litter. I’ve heard of people using them, and talking about how much better it is, so I asked him more about it. It turns out that these are just the wood pellets sold as fuel for pellet stoves. He told me that when the cats use the pellets, they absorb all the moisture and break apart into sawdust. They also absorb the odor, so the only thing you smell is wood. When cleaning the litter pans, you simply dump out all the pellets in the pan and replace it with fresh – and the old pellets can still be burned. !! I don’t know that I’d want to do that. At least not in the fire pit (or a pellet stove, if we had one!), but we do still have a burn barrel. Or compost them, while burn bans are in effect. That would save us from having to haul those heavy bags to the dump. He told me the pellets are a lot cheaper, too, and they come in 40 pound bags, so they last a long time, too.
I think it’ll be worth trying it out. Maybe start with just a few litter pans, first, and see how the cats like it.
The conversation got me thinking about just how much we spend on critters. With the cats, it’s about $350-$400 a month in wet and dry cat food, plus litter. So, about $4,800 a year, on the high end. Plus the deer, which we do only for about 6 months, which works out to about $300 a year. Then there’s the bird seed, which we do all year, and works out to about $1000 a year.
Which we’re doing my husband’s disability payments.
Thank God for private health insurance!!
There are a lot of things we are doing without, to keep the critters fed. We include it all in our grocery budget. If, however, we were just setting that money aside, we’d have been able to save enough to replace the roof in only 2 years.
Now, we’re not going to stop feeding the animals, but we really need to find a way to address that expense. This is not sustainable. The problem goes back to my not simply being able to go out and get a job, since any income I would make would get deducted from my husband’s disability payments. If I ever made enough to bring that replace my husband’s disability payments, he would lose his insurance entirely (since he would no longer “need” it) – and he’d no longer have coverage for his prescriptions. So it’s a lose-lose situation. That’s why we had to be so careful when fund raising for Ginger’s vet care. We can accept gifts. We can’t have additional income.
*sigh*
Reducing the costs will help, which is why I want to try the wood pellets instead of cat litter. Cat food isn’t going to get any cheaper, though. It’s another reason why we want to grow and preserve as much food for ourselves, as well.
Slight interruption in writing this, as the people adopting Two Face arrived. As a thank you for Two Face, we were gifted with a bag full of brand new, still in their wrappers, Tupperware! Looks like the lady is a distributor. :-)
I hope Two Face is happy in her new home. We’re going to miss her!
Well, with the weather getting colder again for the next while, we’ll be slowing things down as well. At least, outside. Not so much, inside. The tray of bulb onions are now in the sun room. It’s warmer in there, but with the cooler temperatures coming, we’ve got them heated from below. By the time things warm up again, we should be ready to move more seedlings from the aquarium greenhouses to the sun room, then use the aquariums to start the summer and winter squash.
If all goes to plan, we should be ready to start direct sowing some things near the end of May, then do the final direct sowing and transplanting after our last frost date of June 2.
Oh, my goodness, but our internet connection has been bad tonight! It’s taken me forever to finally be able to load the editor to start this post! It’s not done giving me grief yet, either!
Still, I wanted to get this posted before calling it a day, since I’m basically using this blog as a journal that I can reference later on, if I need to.
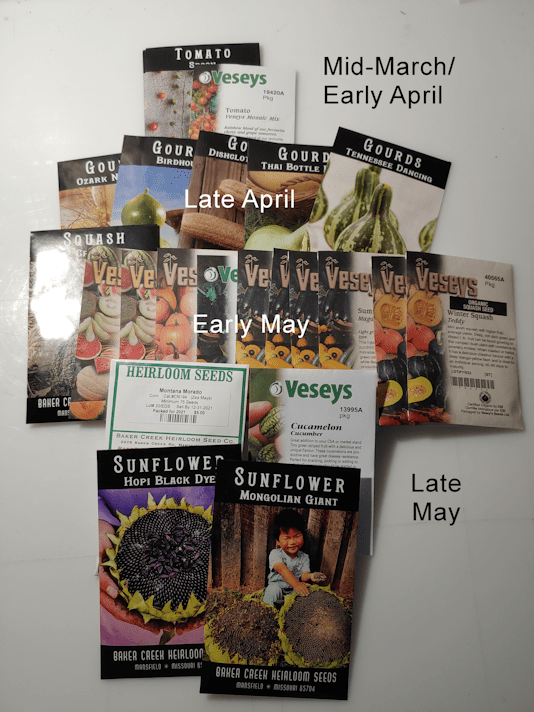
The last 4 varieties of gourds have been started!
The luffa are the three pots together on the right. The one sprout at the top got visibly bigger, just today! You can see a second one coming up at the bottom. The pot inside the red solo cup is the Tennessee Dancing gourd. On the left are the Ozark Nest Egg, Thai Edible and Birdhouse varieties. The light fixture inside the tank is, as before, just there for its warmth.
Next on the list to start indoors are the summer and winter squash.
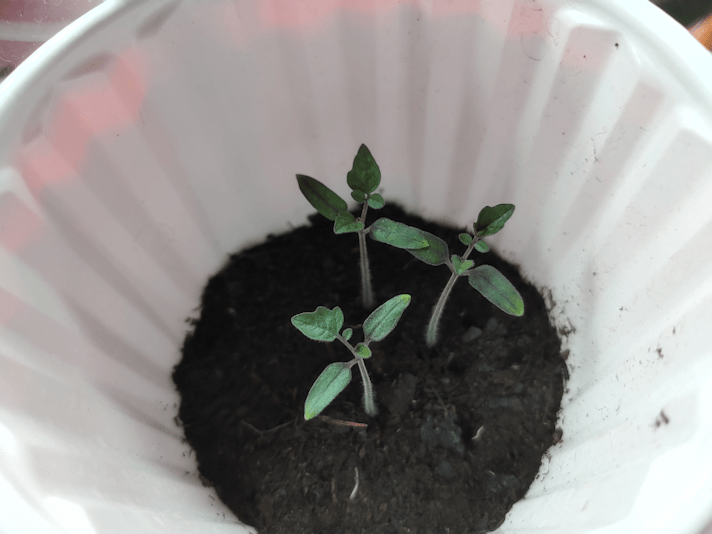
While tending the seedlings last night, I finally remembered to take one of the tomato pots out, so I could actually get a picture.
These are the Spoon tomatoes (from Baker Creek). I planted three seeds in each of four cups, and so far there is one that has not shown any growth at all, while all the seeds have sprouted in the others, for a 75% germination rate – though it’s still possible something might show up in the fourth cup. The Mosaic Medley seeds (a mix of cherry and grape tomatoes from Veseys) were also planted with three seeds in each cup. Three of them all sprouted at close to the same time as the Spoon tomatoes, and all look pretty much identical in size and health. In the last cup, two finally did sprout, though they are looking much weaker than any of the others.
I would be happy with only 3 plants from each seed pack, since only half of us actually like tomatoes. We’ll see how they look when it’s time to transplant. In the future, we plan to grow varieties suitable for making tomato paste or maybe for drying, but not so much for fresh eating or even canning. A lot of gardeners in groups or channels I follow get so excited about growing massive amounts of tomatoes. I don’t see us ever going that far with tomatoes! We hardly even use them as an ingredient.
Last night, we broke out the rest of the gourd seeds.
We had seven of the Jiffy pots left, and four types of gourds. We decided we will do the Tennessee Dancing Gourd in just one cup (each cup will get three seeds). Someone on the Baker Creek website had left a review stating that their one plant had at least 250 tiny gourds on it. If they’re that prolific, I think we’re good with fewer plants! :-D
We’ll be planting two cups of three seeds of the other varieties. I had to do some searches to find the maturity information for them, as there’s nothing on the seed packets (they’re all from Baker Creek). It’s different with the Thai Bottle Gourd, as they are meant to be eaten like zucchini, while very young, though some will be left to fully mature. I’m sure the other varieties could be eaten while very young, too, but those are all intended to be dried out and used for crafting purposes.
The peat was saturated with water already, and added to the Jiffy pots at the same time as we set the seeds to soak, so the pots themselves would absorb excess water. After finding how much the cardboard egg cartons sucked the moisture out of the growing medium with our bunching onions and shallots, we don’t want any chance of that repeating, and I want to make sure these pots are in trays or containers to allow watering from below. We’ll be wanting to keep those pots damp.
So these will be planted later today. Until then, they are inside an under-bed storage container with a lid, to protect them from cats.
Meanwhile…
… when the girls went out for a walk last night, they managed to extricate this old wooden ladder from where it was sitting by the storage shed. It was a bit difficult to get to, and it’s been there for so long, I was sure it would fall apart if we tried to move it. It turns out to be surprisingly not-rotten!
It’s interesting to see how each step is supported by steel wire!
The girls are thinking it could be used as a trellis. I’d like to find some way to preserve it, if we can, so it doesn’t degrade too much. At the very least, find a way to protect where it will be coming in contact with soil. I’m sure the only reason this thing didn’t rot away is because it was sitting on top of other things, well above the ground.
I think the girls are pretty excited about gardening this year. :-D
It was very exciting last night! We spotted our very first luffa seedling!
I am not surprised that it is closest to the light we’ve got in there for its heat!
There was just one this morning, but when I turned the tray so the others would get a bit more direct warmth, just before starting this post, I found a second one, in a different pot, had broken ground!
Tomorrow, I will start planting other gourd seeds.
Today, a daughter and I headed into the city for our monthly shop (except some things we needed were out of stock, so we’re going to have to make another trip). I made sure to pick up a shelf for the sun room. It’s time to transfer the tray of bulb onions to the sun room, to make room for more seed starts in the aquarium greenhouses. The tomatoes and the new batch of bunching onions to replace the ones that failed will stay in the aquarium a bit longer.
When we got home, we quickly unloaded the van, then I headed out again to the post office, where I could also pick up more deer feed and bird seed. My new monitor arrived in the mail, and I’m using it now. What a difference! Unfortunately, there are still some pages that do the weird colour thing that is why the monitor was replaced. It’s better, but not gone. Which means the monitor was only part of the problem.
I must say, though, I’m glad to have it. It’s quite a bit bigger than my old one! Meanwhile, my husband tested my old monitor, and it worked just fine while hooked up to his computer. My younger daughter has been wanting to have a second monitor for a while, so she’ll be able to use it.
Which all means it was a while before I could set up a corner of the sun room in preparation for our seedlings.
While Ginger was in isolation in here, we used the frame of the mini-greenhouse to hold the terrarium heater bulb above the bed we set up for him, since it still got pretty chilly in the sun room overnight. I didn’t realize until I put the plastic cover back on that the cats had torn it at the back. It will still work, though.
Some seed trays will be moved here after being started under the lights of the aquarium greenhouses, but later in the season, less delicate things can be started in the sun room. This room gets long hours of sunlight, so while I will probably have to rotate trays, I shouldn’t need to add supplementary light. The lights we have are designed to fit over fish tanks. I might be able to rig them up, if necessary, but it would hardly be ideal.
As for temperatures, the thermometer in the sun room has been reaching as high as 30C/86F during the day. Granted, the thermometer is hanging at the top of a pair of windows, so it would be hotter there than head height, but it’s still quite roasty toasty in there. If for some reason we feel the overnight temperatures would be a bit too low for the seedlings, we do have the ability to warm things up at least a little bit.
So the luffas are started already, which I now know should have been started back in January (we’ll see how those turn out!), which leaves the remaining gourds to start. I know they’re supposed to be started “late April”, but gourds have such long growing seasons, and our frost dates can be so early, I’m going to take the chance and start them a bit early.
Starting the summer and winter squash should be interesting. With the gourds, we’ll be planting just a few seeds of each, but with the squash, we intend to plant most, if not all, the seeds in their packages. We have two packages of the patty pan squash, which we enjoyed so much last year, and intend to plant all the seeds! :-D
If all goes well, we’re going to have squash coming out of our ears. ;-)
By late May, if all goes well, we’ll have our garden soil in and will be able to direct sow those things that can be planted before our last frost date.
I’m really looking forward to seeing how the gardening goes this year! Right now, as we start things indoors, we’re also praying for some rain! Fire bans are already in effect (and likely were in effect before the grass fire that started near our place last week), and not a lot of farms were able to do controlled burns.
A while back, I wrote about two areas we were considering building a permanent, accessible raised bed garden outside the inner yard, and asked for feedback. You can read about that here.
While walking with my daughter this evening, it occurred to me, we could start in a very different location.
I hadn’t considered this area before, because I had something else in might for it.
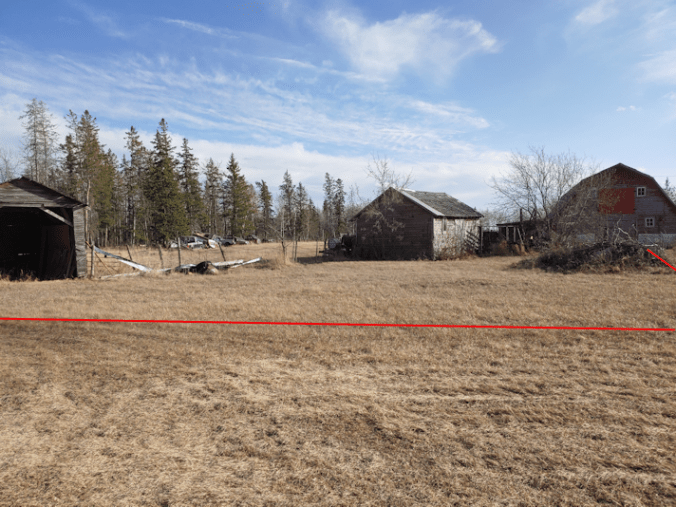
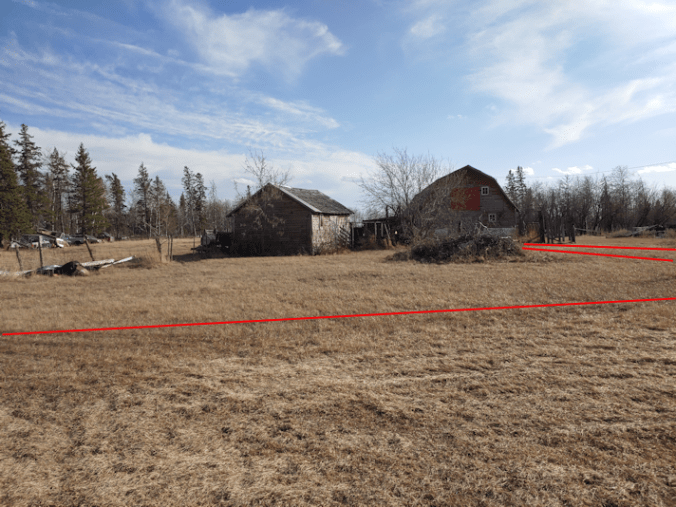
This is the space.
This is the area in front of the garage, where I’ve been able to keep up with the mowing. As you can see by the tire tracks in the foreground, there is traffic here. The red lines mark where we tend to drive, either as part of our turning radius to get in and out of the garage, or in the access lane to the barn, and the “gate” in the fence beside it. The opening has a chain across it, as well as the renter’s electric fence. I found the remains of the barbed wire gate that used to be there, buried in the tall grass. :-/
This is actually where I was thinking we’d want to build a new fire pit/outdoor cooking area. Our current fire pit is too near trees and a collapsing log building. A wide open space like this would be much safer for a fire pit. With the winds we get, we were thinking of building a sheltering wall of around the fire pit, as well as making sure the ground around the pit was fire proofed with bricks, stone, gravel, sand or even just bare soil. I’d also like to build an outdoor clay oven, and a shelter of some kind, and turn the whole arrangement into an outdoor kitchen. The practical purpose is to have somewhere we can cook if power is lost.
These plans, however, won’t come into fruition for some years yet, and can either be moved, or be integrated into any garden layouts we end up doing. I’ll go further into that in a bit.
The most obvious advantage of this location is that it’s flat and dry. There are also no buried pipes we need to work around, no rough soil to level, and now low spots that gather water in wet years. While the one shed, with the wide open front, is not worth salvaging, it can still be sort of used until it finally collapses, or we take it down. The other shed is worth salvaging, and we can use it for storing garden tools and equipment.
There is that pile that needs to be dealt with. While it has branches on top, those branches are on top of what I was told is a pile of insulation. !! I believe my late brother salvaged it from a demolition job or something, and had plans for it that never came to fruition. We need to clear it out. However, there is enough space that we could probably build a few raised beds around it, even taking into account the dimensions needed for accessibility, until we can figure out what to do with it.
Getting water to it will be a bit harder than the area to the west that I was thinking off, but not as difficult as the area even further west that we were considering. Plus, it’s an area we can see from the house.
We will still need to figure out how to deal with deer, of course. In fact, as I started writing this post, I saw some movement on the security camera, flashing through this area. A look out the door, and I could see two deer standing by the pile. The deer cut through the old hay yard at the fence between the two shacks, as well as going through here to reach the “gate” by the barn. That’s one downside to this space. It’s a higher traffic area, both for humans and animals!
We have broader plans for this part of the outer yard, as we work towards getting rid of most of the fencing around the inner yard, making the inner and outer yards are one, large, usable space.
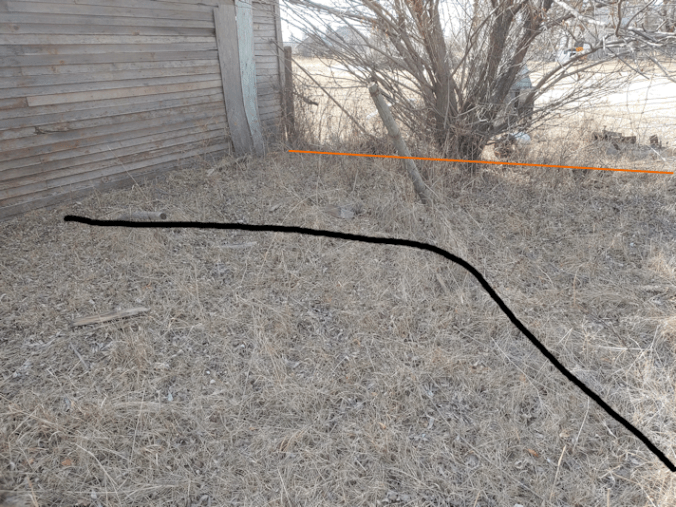
This is the other area we want to work on, in the short term.
In these photos, I am at the North end of the old hay yard. In fact, we never had hay stacked this far from the barn, and it was used as pasture. When hay wasn’t being store here, this area was used as a corral and/or pasture area. The orange lines in the above photos mark the fence around the area that is functional. The black lines mark a collapsed fence line. I believe this second fence line was added after some trees were planted, to keep the cows away from them. Here and there, I can see the dead remains of trees that look like they were planted in a row, rather than self-sown.
I want to get rid of the fence marked in orange, but that can’t be done until we have something to replace it. In the short term, I want to put temporary fencing where the fallen fence marked in black currently is. It needs to be strong enough to hold back the renter’s cows, but it will eventually be removed, too.
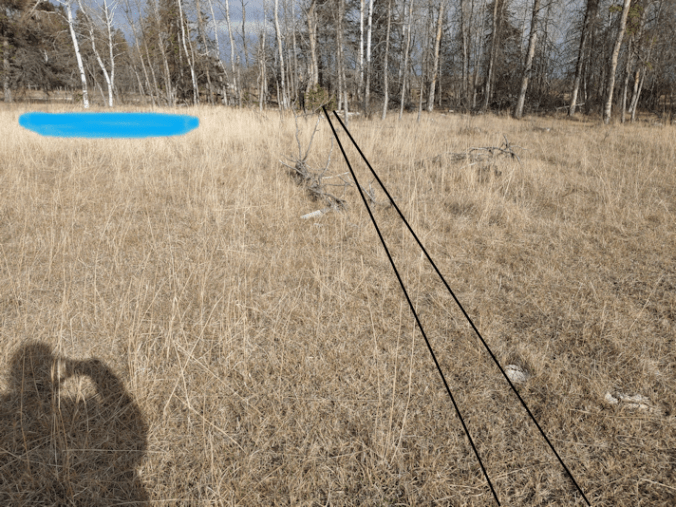
This is an area I want to get worked on.
The blue is a low area that used to be a dugout, and should be filled with water right now. It’s so dry this spring, there isn’t even mud in there. One of these years, I want to hire someone with an excavator to dig it deep enough to be a pond in all but the driest of years. It’ll be a nice water feature, and the intention is to allow bull rushes (aka: cattails) and other aquatic plants to grow, and hopefully have a little haven for other creatures.
Trees would be planted along the property line in the background for privacy from the road, to keep out road dust from vehicles driving by, and as part of a shelter belt from those wicked south and south-easterly winds. The trees that are there now just aren’t enough to shelter from those winds!
The black lines in these photos mark more or less where a permanent fence would go.
As you can see, some clean up needs to be done behind the shed. What the shed hides is the space in front of the barn, where the fence surrounding the outer yard ends, and where there is a collapsing ramp for loading cattle onto a truck.
Shelter belt trees would also be planted along or near these lines, though not all the way to the barn. There would likely be a gate of some kind, there, too. We may shift the whole line so that it lines up with the corner of the barn, instead of lining up with the shed. That decision can be made when we are in a position to start building the fence, which will be a few years from now.
So if we build the permanent fence here, there will be plenty of room to build the outdoor kitchen/fire pit area, if we wanted it to be closer to the future pond site. Or, as mentioned before, we could integrate it in with the garden beds, which I think it more likely to happen.
So, what do you think? Is this a better idea than what was written about here?
Ooh… I just had an idea. That old shed that’s starting to fall apart will eventually need to be cleared out. It could some day be replaced with a greenhouse! Again, no need to level or raise the ground. It’s already flat and dry.
My older daughter and I headed out for a walk, and we decided to go ahead and remove the plastic covering our garlic beds.
When looking up how to plant winter garlic, all the resources said to cover the garlic with a heavy layer of mulch.
What none of them did was mention when to take off the mulch in the spring. I knew the mulch was removed, because all the videos and photos I saw that were taken later in the growing season showed the garlic growing out of bare soil. No mulch in sight. It took some dedicated searching, but I finally found resources that said to remove the mulch after overnight temperatures were consistently above -6C/21F. Looking at our long range forecasts, we seem to be at that point, as overnight temperatures are generally supposed to stay above freezing. We’ve started by just removing the plastic for now, though. We’re supposed to get some much needed rain tomorrow, and have decided to leave the mulch a bit longer. Right now, it’s keeping the beds from drying out, like everything else has done this spring. With so little snow over the winter, and very little precipitation so far this spring, every little bit of moisture is precious.
When I dug these beds out, I moved the soil to one side, put the contents of our compost heap on the bottom, added straw on top, then put the soil back, including the soil that was in what are now paths. I dug those areas down to the gravel, using it to raise the garlic beds higher, then filled the space with scrap wood to create the paths.
I won’t be adding another path on the other side of the third bed, which means I’ll only have what soil I take off the top. I’ll be emptying out our compost heap into the bottom, then add in the mulch from the garlic beds, before putting the soil back. I don’t think it’ll be as high as the other beds, but hopefully we’ll have our loads of garden soil delivered soon, so I’ll be able to top it off with that. The mulch will probably be removed before then, and I’ll just move it onto the paths at first.
We’ve had quite a few warm days. I think I’ll call the company up in the next day or two and see if their soil is thawed out enough to load into their trucks or not.
I might be just a little bit excited about getting that soil! :-D
It’s cold with blowing snow outside. What better time to prepare for this year’s garden!
I had been doing some research on how to grow luffa for some time, but it was just a few days ago that I found someone who had managed to grow luffa in zone 3.
After reading this post, written by someone in Saskatchewan, I certainly wished I’d found it earlier.
MUCH earlier!
Realistically, the chances of my being able to successfully grow luffa here are very, very low. They have a 150-200 day maturity range. All the resources I’d been looking at suggested starting the seeds indoors 4-6 weeks before last frost date, but from this person’s experience, I should have started them in January! Ah, well. I’m going to try them, anyhow!
These required some advance preparations.
First, I set a few seeds to soak for 24 hours. Then tucked the bowl into a container I could seal, to protect them from cats. Like Susan, whom you can see at the bottom of the photo!
I was going to use the Jiffy pots in the red solo cups to collect drainage, but I found that three pots fit into a take-out container I’d saved. This will make watering from the bottom easier. I had some pre-soaked peat and filled the pots well in advance, so that the pots themselves would absorb some of the moisture.
I also prepared the small fish tank-greenhouse. I raised the level closer to the light, and added the light with the incandescent bulb to warm it up, since I don’t have a heat mat. The light has a full spectrum bulb in it, so it will be useful for the seedlings later, on, too, but for now, it’s the warmth that’s needed.
These are the seeds after soaking for 24 hours.
I was really surprised when I saw them, as every resources I’ve looked up showed black seeds!
I know there are different varieties, though, so if anyone knows anything about luffa aegyptiaca, please do leave a comment!!
I planted three seeds into each pot, pushing them into the peat to the required depth with a drinking straw. I am hoping to have 3 good transplants, but honestly, I’d be happy if I get just one!
Then, it was into their little greenhouse.
I think they need to be raised closer to the lights above!
The little light is staying in the tank for the warmth.
Yet another item repurposed from when we had fish; I’m keeping the aquarium thermometer in the tank, too. It’s reading about 24C/75F, which is impressive, considering the top is now just covered with a screen. The rigid insulation and aluminum foil definitely helps. We shall see how things go!
The other gourd seeds will be started after Easter, though I’m tempted to just go ahead and start them now. Which I might still do! ;-)
On a completely different note, I have come to the realization that a problem I thought was with our crappy internet connection is actually my monitor giving up the ghost. Images not loading is a common problem, but I was having them only partially load, and the parts that didn’t finish loading tended to be bright, neon green. Or entire backgrounds of web pages would have blocks of this eye-blinding green. Then text started not loading completely, though I could still read it if I highlighted it, or it would sometimes work if I reloaded the page. When I started having this happen, or letters of text randomly showing as magenta or that green instead of the default colour, even when I wasn’t online, I figured I couldn’t blame shoddy internet anymore! My husband has already ordered me a new ergonomic keyboard (it’s a good thing I can touch type, because the letters are worn off most of the keyboard) that should have arrived weeks ago. Now he’s gone and bought me a monitor already! Now those are some sweet anniversary gifts. :-D
Hopefully, this monitor will last long enough for the new one to come in! :-D
As we plan this year’s garden, we are also looking towards the permanent, accessible garden beds we plan to make, both near the house, and in the outer yard.
The satellite image I used to plan things out for this year’s gardening was cropped from an image that included the outer yard and beyond. Looking at the image, I figured out the line where the pipes run from the house towards the barn. Back when my parents still had cows, they set up water to the barn, and to a pair of water fountains for the cows. There is also the pipe from the septic tank by the house, to where it drains well away from both house and barn.
I was thinking of putting the permanent raised beds directly south of the house, making sure not to do anything above where the pipes are, in case they some day need to be excavated. Looking at the satellite image, I figured that would require putting everything to the West of the pipes. My sense of perspective is really off when looking at the satellite image, though. This morning, I stood right where the pipes should be, and realized we might not have to do that.
The lines mark approximately where the pipes should be, under my feet and running towards one of the fountains (the little bit of orange you see in the distance). The pipe from the septic tank diverts off to the West (to the right, in the photo). The grey water gets pumped to an outlet hidden by the collapsing log building. The water pipes go to the fountain, to the barn and to a second fountain on the other side of the barn. I have zero memory of how pipe was laid to get to the fountain behind the barn. I only remember the trench from the house towards where the fountain is. I would have to confirm with my brother to get a more exact idea of where the pipes are.
The yellow line going to the left is running through a power pole, holding the electrical lines that power the barn.That is about midway between the barn and the main power pole, so while it looks far away, it’s actually not much past half way to the outer fence, from where I’m standing to take this shot. There is a vehicle gate through the fence, though, so we wouldn’t be going much beyond that post. It still leaves us with a lot of space.
There is a shut off valve at the well pump in the basement, for the water to the barn and fountains. I don’t know how many decades it’s been shut off, but I do know that, at some point, a smaller pressure tank was installed, so even if we did dare turn it on, we don’t have an adequate pressure tank to supply water to the barn and the house at the same time. The fountains are designed to be refill continuously as cows drank the water, so they have no “off” switch, other than the float that keeps them from overflowing. One of the fountains looks to be in pretty good shape and probably still works, but the other – the one in the picture – looks like it’s been bashed around. It used to have a box built around it, but that has been falling apart. I think the renter’s cows have knocked it about.
I have no idea how they are powered, nor how the power to them is turned on and off.
Which is all my roundabout way of saying that, any gardens in this area would be watered from the house, not the barn.
In the distance, you can see the fence for the outer yard. At some point, we want to make sure that is fixed up and cow proof enough to eventually remove many sections of the fences around the inner yard, so it’ll all be one big yard around the house.
One of the reasons why I want to set up in this area is because it’s fairly close to the house, we can see it out our windows, and it would be easy to water it. There’s a tap on the south side of the house, and it’s basically a straight line over the chain link fence to this area.
The area in the above picture is shows quite a bit; I had to set my phone to wide angle to get as much as I did, which is partly why the perspective is so off. It doesn’t show all of this area, though.
Here is the rest of it.
The yellow lines mark roughly where the pipes run.
I think you can see some of the problems with this area. It’s not just overgrown, but rough, with low patches. That patch of brighter coloured tall grass is basically marsh grass growing in one of the lowest spots. The area needs to be leveled, or at least smoothed out. That antique tractor needs to be moved, and the trees trying to grow through it taken out. There’s an old disk rake beside the tractor, and other miscellaneous parts and pieces floating about. Of course, there’s also that collapsing building. That’s a log building that was the second of three log cabins previous owners had built, with the third one being the old part of the house we’re living in now. Sadly, no effort was made to preserve it. It is full of all sorts of stuff that was “stored” there until the roof collapsed on top of it all.
At least the old chicken coop, behind the tractor, is still pretty solid, though the entire roof structure is slowly sinking.
We wouldn’t need to go as far as the stuff that needs cleaning out until we’re starting to build greenhouses or some such.
So this area is where I was thinking we could set up the permanent garden beds, and maybe even a greenhouse or poly-tunnel, some day.
While walking around the area with my daughter, however, I found out she thought I meant somewhere else.
She thought I meant on this side of the pump shack and old chicken coop. That yellow line, marks where there is a buried cable providing power to the storage building. Which, some day, I’d like to empty of my parents’ stuff and turn back into a workshop. My late brother had a marvelous set up in there, but it’s now stuffed full of my parents’ things that we emptied from the house. It’s so full, that when we finally cleaned out the basements and the old kitchen, we had to use the barn and the “extra” house in the inner yard to store things.
So… not someplace we can put garden beds (though if we cleaned it up, we could use the space between the pump shack and the old chicken coop).
My daughter then suggested this area.
In the foreground is where we need to be able to drive, and you can see the start of what is a very rough driveway to the back gate. It’s the area between that driveway and the shed that she is talking about. We’d have to remove the pile of stuff there, which includes a stack of massive steel doors and what I think are pieces of steel door frames. There are also what look like steel balcony rails. They’re quite large and heavy, too.
This area would be easier to clean up. It’s rough, but not as rough as parts of the other area. The shed does create some shade, but most of the area gets full sunlight. The main problems are that this is getting pretty far from the house, we can’t see if from the house, and it’ll be harder to get water to it.
Unless we can get the old well and manual pump in the pump shack going again. Which we want to do, anyhow, so that we have a back up water supply if we ever lose power.
The yellow in this photo marks the “driveway” to the back gate, with a turn off that leads to a gate in the outer fence line. Someone drove through here when it was muddy, leaving deep ruts that are still a problem. We will be cleaning up the dead and dying trees in that shelter belt row there, and will be planting nut trees in the area closer to the fence, and behind where that pile of branches is – one of several piles we need to get chipped.
This photo shows where the drive leads to the gate in the outer fence. It’s hard to see the fence line, but in the corner there is roughly where we would like to someday build a small, barrier free house for my husband and I, and the girls will get the main house to themselves. That is many years in the future, however, and may never happen. Meanwhile, we could start putting garden beds in the foreground area.
Also, that’s a cat path cutting through the grass! :-D
For these permanent garden beds we are planning, they will be designed for accessibility. That means the beds themselves will be about 3-4 ft high (roughly a meter) and no more than 4 feet (1.2m) wide. The lengths are flexible, but the paths in between must be at least 4 ft wide as well. This is enough room for a walker or wheelchair to go through, and be able to turn around. Which means the paths also have to be level and solid for wheels. Handily, that will also make it easier to move around with wheel barrows or wagons, too. The space needed for the paths means that everything will be pretty spread out, compared to your typical raised bed garden layout. Space, we have. Functional space… that’s a completely different issue.
If we can get the old well going again, that solves a lot of problems. The old chicken coop used to be a “summer kitchen” before my parents bought the property from a family member. It had a wood burning cook stove and was used to do the canning and cooking, without over heating the house in the summer. If the old well can be fixed, it would be worthwhile to rebuild the pump shack, and I’d love to turn it into a summer kitchen. Maybe not with a wood burning stove (that would increase the property insurance rates for my brother, significantly), but I like the idea of having a place to cook outside of the house, that’s still sheltered.
A moot point, if we can’t get the well going. We will test it out this spring, once we can move things around in there to access the pump again.
Okay. These are our options.
There’s the area between the house and the barn.
Pluses:
Southern exposure: gets full sun all year.
Easy to get water to by running the hose straight from the house.
Can be seen from the house.
Easy to get to from the house. It’s straight from the main doors.
Minuses:
No wind protection from the south. We’ve found the southern winds to be much more of a problem than any other directions.
Must work around pipes running underground.
The ground is very rough and uneven in parts. Will need to be smoothed and leveled. We’d likely have to hire someone with heavy equipment to get the area to the West of the pipes leveled.
Then there’s the area by the storage shed.
Pluses:
Relatively easier to clean up. Does not need as much leveling.
Does have some shade, but most of the area gets full sun, all year.
More potential space, if we decide to continue adding beds along the “driveway” to the secondary gate.
Minuses:
Further from the house.
Can’t be seen from the house.
Harder to get water to (unless the old well can be fixed).
No protection from winds from both South and North.
With vehicle access needed to the storage shed and gates, there is less flexibility in space.
Personally, I’m leaning towards the space I can see from the house, but my daughter thinks the other area would be better.
What do you think? Can you think of other pluses and minuses for either area? Any suggestions?
Well, it was time to throw in the towel on some of our seed starts.
The bunching onions in the small fish tank never recovered from the cats being able to get at them, there were mold issues, and watering problems. At least with those, we still had seeds left and could start more.
The shallots (in the background, out of focus) are another loss.
This is one of the potential problems of using whatever was on hand. We started them in the cardboard egg cartons, but had no way to put a tray of any kind under them, where we could water them from below. Even though we did take them out and give them a thorough watering from below, it wasn’t enough. I regularly sprayed them with water, trying to get the cartons themselves wetter, but again, it wasn’t enough. The shallots are a complete loss, and I have no more seeds to try again. So we’ll be down from four types of onions to three. :-( Unless I find and buy sets later on.
In the future, I would not use the cardboard egg cartons to start seeds in again, unless I were able to keep them in a tray of some kind, and keep the cardboard wet all the time. In spite or watering them every evening, when I pulled them out of their makeshift greenhouses this morning, they were pretty much bone dry. So, they went into the compost heap this morning. :-(
The little tank is now empty, and the tomatoes and bunching onions have been shifted around in the big tank. We are seeing more and more seedlings pop up, though there are still a couple of cups that have no seedlings at all. We’re not after a lot of tomato plants, but I am hoping for more of the Red Baron onion seeds to germinate. At least the bulb onions seem to be doing all right. From what I’ve read, I should be trimming them a few inches, about now.
Yesterday, I picked up some Jiffy pots. I’ve been looking things up about growing luffas, which have a very long growing season to reach that sponge stage I’m after. I’ve decided I will start a few seeds of those in the next few days, and set them up in the little tank. With the screen I found in one of the sheds as a “lid”, we’ve solved the cat problem, so I can raise the level closer to the light, too. From what I’ve been reading/watching, luffa doesn’t like to be transplanted (more so than other gourd types), so using pots which can be buried should help reduce transplant stress. With the size the pots are, I should be able to still double cup them with the red solo cups, which would allow me to water them from below.
So that’s a goal for the next few days, and I will also be preparing to start the other seeds that need to be starting in April.
Meanwhile, as I do my morning rounds, I’ve been studying the different areas we intend to garden in this year.
This strip has never had a garden in it. You can see where the ground starts to get rough on the left, where the old garden started. That rough part is from the crappy plow job that was done before we moved here.
This stretch will have alternating blocks of three varieties of Peaches ‘n Cream corn and two varieties of sunflowers.
In years where we had more snow, where I’m standing to take this picture had a large puddle of water from melted snow. This year, there is only that whitish patch you can see on the left foreground. That’s ice from the small amount of water accumulated this spring. This is something to keep in mind when we are planting food trees here, as we don’t want saplings being drowned out in the spring. So part of our goal when growing here is leveling things out a bit more.
The further out we go, however, the drier it gets. By the time we reach the corner, past the low hanging spruce branches I will have to prune away, it’s very dry. Weeds and grass barely grow there. Which means that, when we have corn growing there, we are going to have to find ways to keep them well watered. This entire area is going to be a challenge to water, simply because it’s so far from the house.
This time of the morning is the only time this area is in shade. It gets full sun for most of the day, and also gets incredibly hot. To the left of where the corn and sunflowers will be planted is where we will be having beds of melons and gourds. They’ll get the heat they need (especially if we have summer like last year!). We just have to make sure they get the water they’ll need. The winter squash will also be more on this side, while the summer squash will be planted closer to the house, where they will be closer for continual harvesting over the summer.
We’re also going to have to work on keeping the deer out. There are a number of options we can try. If we make use of several of them together, it should work out.
The fence line the trees on the right are hiding is pretty much toast. New posts had been put in along the spruce grove, which I’m guessing my late brother did, but he never got to finish the job. The remaining stretch of fence has rotting fence posts, some of which are held up by nothing but the barbed wire. My late brother had a soil auger attachment for the Bobcat, and we still have the post pounder he built, but the Bobcat and its accessories are with our vandal now, and the post pounder had been sitting, exposed to the elements and covered in junk, for so many years, there’s lichen growing on the belts. So if we’re going to be putting in new fence posts, we’re going to have to do it the old fashioned way. I’ve found a couple of post hole diggers that we can try out. One of them is a very different design, and I’m curious as to how it would be used.
Meanwhile, that entire strip along the West fence line needs to be cleaned up. I might have to take the remains of the fence out entirely. The North fence line, which runs behind the lilac hedge, is in even worse shape, but at least the lilacs are there to provide some privacy and a bit of security. Once the strip along the West fence line is cleared out, it’ll be pretty open.
It would be nice to not need a fence there at all.
Since these fences mark the property lines at the roads, these are areas where we can consider putting in something very permanent for fencing. Something along the lines of a hedgerow, perhaps, or a “palisade” type of wall that would give both privacy, and keep the deer out! The corner at the far end is one of the places they regularly jump the fence (well… what’s left of the fence…). The road on the North side is very busy (as such things are in this area), and in the summer, a LOT of dust gets kicked up. On a windless day, it just hangs in the air like a fog, slowly drifting across the property, for a surprisingly long time. The lilac hedge helps keep that out of the garden area quite a bit, so that’s another thing to keep in mind as we work on the area. Dust control!
When it comes to gardening in this area, it’s all temporary. If things go well, it’ll just be for one year, and then next year, we’ll be able to start planting food trees here, while permanent garden beds get placed to the south of the house. The area we intend for permanent beds is very rough, though. It might be easiest to clear it as much as we can, then get someone in to plow and smooth it out as much as possible. We’ll be building accessible raised beds there, so it’s the leveling that’s more important to our needs. It would be good if we could get the old farm equipment moved, and the collapsing building dismantled and cleared away, but that might be just too much for this year!
We’ve got a lot of work to get done! Last year, with first the heavy rains, then the excessive heat, we didn’t get anywhere near as much done as I wanted. Hopefully, this summer will be not be as extreme.
So much of what we want to do depends on the weather!