I remembered to go out in the dark and take a flash picture of the sign I’m working on. Looking at it on my phone, I didn’t think I got very good coverage. It wasn’t until I uploaded the photos onto my desktop that I could see how funny it was.
On the sign itself, you can see spots that are reflecting more than the rest. They were the same in each of the photos, which I took at different angles, which tells me that yes, it’s the covering, and not, say, the LED flash on my phone.
It’s what I see around the sign that is funny. All those white looking spots around the sign? Even on the grass? That’s the reflective paint! It’s everywhere! :-D It was a bit windy when I was spraying it. I expected a bit on the wall of the cat’s house, and a smattering on the posts below, but I did not expect to see that much on the grass or on the ends of the sledge the cat’s house is resting on!
So… if it’s calm enough tomorrow, I’ll give it another coat, then check it again! :-D
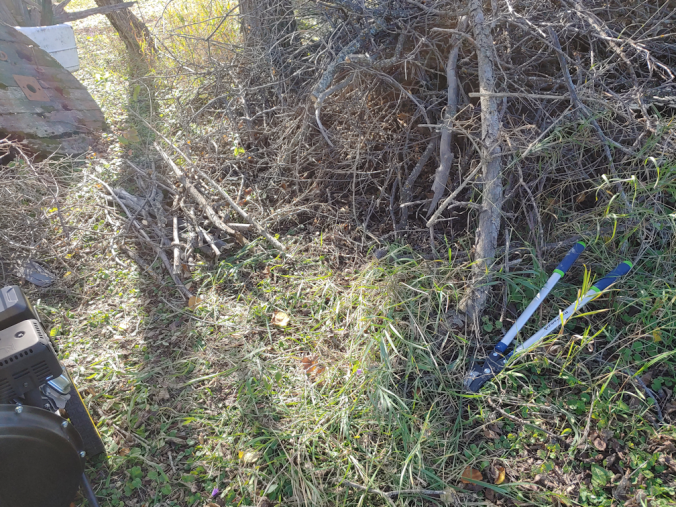
With the lovely weather we’ve had, the branch piles are dry enough that I went out to do some chipping.
This time, I took the chipper into the maple grove to start on one of the branch piles near the old garden shed. In this location, I didn’t bother bringing the collection bag, since the wood chips would be used in the nearby garden beds.
Before I started chipping, I sorted and pruned through the branches for those small enough to go into the shredder chute, and those big enough – and straight enough – to go into the chipper chute. Just enough to clear space around the chipper and get started.
The first thing I discovered once I started it up without the collection bag is, there is a LOT of air pressure coming out of that thing!
This photo is after I’d chipped the first batch of sorted branches. Look at that hole the air made in the soil! That was after only about 15-20 minutes of chipping.
Here I’m working on the second batch of branches. When I started, the branch pile had extended out to where you can see the larger stick pile, and where you can see the taller grass in the foreground.
Getting the branches ready for chipping or shredding took a lot more time than expected. This is a big part of why…
The red lines in this picture trace a single branch. This was pruned from an apple tree, and they are the worst for branches and twigs going in all directions! The branches that were big enough to go into the chipper chute not only had to be cleared of any twigs or side branches that might get hung up in the opening, but they also had to be relatively straight, to avoid getting jammed.
After chipping and shredding a second batch, I sorted through the branches until my daughter came out to tell me supper was ready, which was my cue to stop for the day.
In the photo, pile 1 is the larger branches for the chipper. Pile 2 are the twigs up to 1/2 inch in diameter for the shredder. Pile 3 is the wibblely, wobblely, twisty branches that can’t go into the chipper. There is also a pile 4 started, well away from the work area, for the larger branches and tree trunks that are larger than 3 inches in diameter.
When I started the second batch, the chips were being blown around so much, I rifled through the junk pile behind the garden shed and found a piece of rotting plywood to use as a deflector. By the time I was done, the hole was so much deeper, I put the brick down. The next time I bring out the chipper, it will hopefully prevent the air pressure from making the hole even deeper.
Also, there’s basically no chips! All those branches, and there’s next to nothing. Yes, a lot of the chips are blown around the area, but even so, the branches got reduced to a very small amount of chips. I did make quite a dent in the pile, too. It basically shows that these branch piles are more air than wood!
The amount of time spent trimming and sorting the branches to fit is much more than I expected. It’s not that big of a deal when working on one of the little piles in the trees, but it’s going to be insane when working on one of the big piles. For those, it might still be worth hiring the tree company with their massive chipper. They don’t need to do any trimming at all, and can shove whole branches into the chute. When I got an estimate done, the guy figured it would take 6 hours to do the two big piles in the outer yard, the one by the garage, and the piles in the maple grove. It took me about 1 1/2 hours to do the amount of sorting and chipping I did today. At that rate, if the girls and I were all sorting and chipping at the same time, we might be able to finish the pile I was working on today, in maybe 4 hours – and we would still have the bigger pieces and twisted branches left over to deal with, most of which their chipper could handle.
I will continue to focus on the smaller piles in the inner yard. Hopefully, next year, we will have the budget to get the tree guys to come out with their monster machine to do the big piles. :-) Meanwhile, we can also use the chipper each time we work on cleaning up the spruce grove, cutting down those dead trees, and not be adding to the piles anymore!
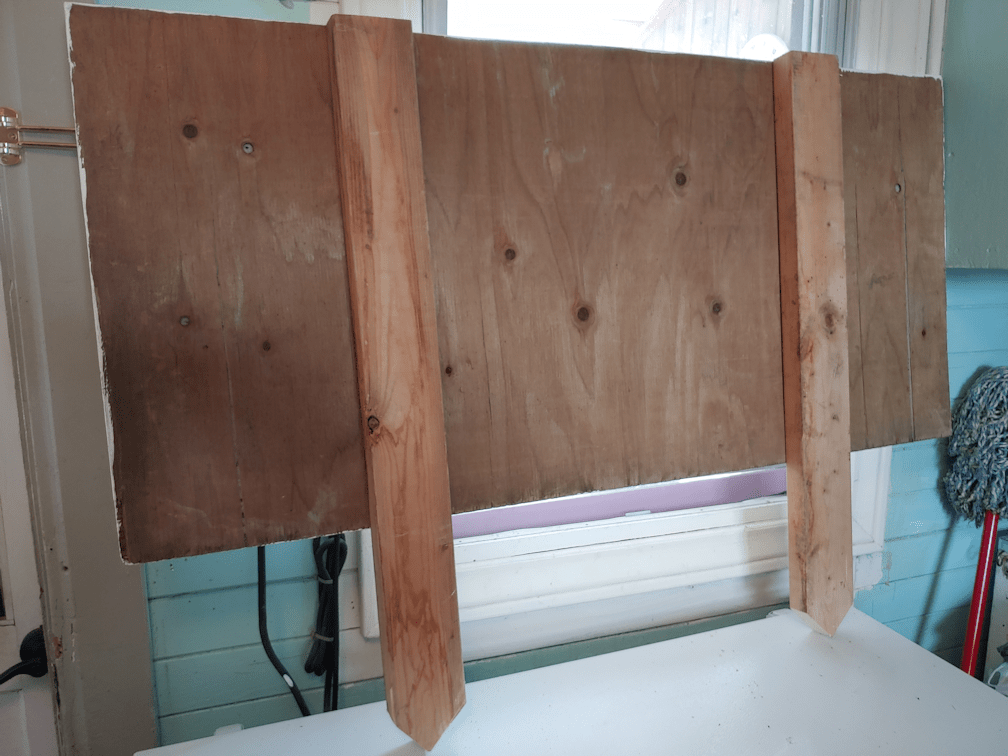
One of the tasks I got a bit of progress on yesterday, was the sign I am making to replace the one with my late father’s name on it, that identified this farm.
Before adding the second coat of paint, I cut a scrap piece of 2×4 from the wood we found in one of the sheds and brought to the basement a while back, and made “legs”. They are short, but they are something I can work with when we are finally able to put the sign up. Mostly, I wanted them screwed in place before the second coat of white paint was added. That way, I could brush over the screws to make them less visible, while making sure not to fill in the holes for the screwdriver, so they can be taken out easily, if necessary.
They also did a better job of keeping the sign above the top of the freezer while I painted, than what I was using before. :-D
There is one problem with working in the old kitchen, though.
The wasps are somehow getting in from the hive in the crawl space.
So far, they are staying at the north window, trying to get outside; the south window faces into the sun room, and the west window is covered with foil, so there is actually more light from the north. Plus, the old kitchen is not heated in any way and is always a few degrees colder than the rest of the house, so the wasps were pretty groggy. Still, when I first came in to start working on the sign, I did have to move a wasp off that had landed on it, while the paint was still a bit wet. If it had been warmer and the wasp less groggy, it probably could have flown off on its own. As it is, when I gently brushed it loose, it just fell to the floor, where I could no longer see it.
They won’t last long, as wasps die off over the winter, but it does mean my husband has to be careful going into there, since he is allergic to stings.
With the second coat of white paint done yesterday, the next step on the sign for today will be to take it outside and use the reflective spray paint on it. I’ll have to read the label on the can again, to see if it should have more than one coat or not.
I can do this part outside, as we are not expected to have rain again for a while. With how much we got recently, this morning I decided to check out the old gravel pit that the renter got dug deeper, so see how it was. Along the way, I checked a pond, and there was no standing water at all, though the bottom has a lot of green growth at least.
The old gravel pit is wonderfully full of water! This is the most it has had all year. Thankfully, there is a lot of clay to keep it there, too.
The hill created when the pit was deepened has been noticeably affected by the rain, as well, and I could see where actual rivulets had formed, washing things away.
This is the bottom of one of the rivulets, where you can see a deer had made its way through the clay and silt. All around the bottom of the hill, there are now patches of clay and silt like this, but this is the only one that had tracks in it. :-)
I’m really glad the renter was able to get this pit dug deeper. Even with all the rain we’ve been having, the water table has not recovered yet, so this is the only water around for wildlife. Of the dugouts in the area that I can see from the roads, only one, about two miles away, has any water in it, and it was also dug deeper this year, too.
Well, things have warmed up nicely – it’s currently 15C/59F right now! – and it’s time to get outside and get some manual labour done! :-)
Yesterday, looking at the weather radar, I had expected that we would catch the edge of a weather system that was being pushed up from the southeast. Which is what usually happens.
Instead, the system ended up going right over us, and we had heavy rain all day and most of the night. We are expected to continue to get rain today and tomorrow, and remain cool until the day after.
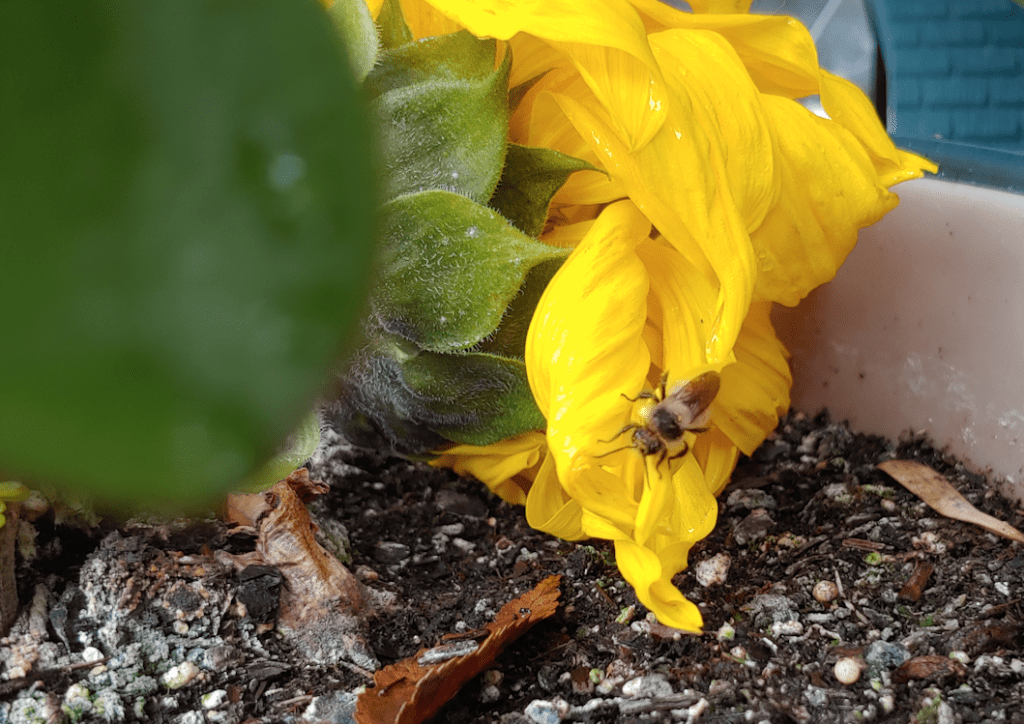
I didn’t think the bee on the sunflower would survive that long.
We have a mini greenhouse in the sun room, so I lay the cover of a seed starter kit upside down on the top shelf, and had a sieve ready to use as a cover, then went to cut the sunflower off and bring the bee over. It had actually moved a bit since I last looked at it, which was encouraging. We had set up a light fixture on the top of the mini greenhouse with a full spectrum, incandescent light bulb in it, to keep our seedlings warm. The sun room wasn’t much warmer than outside, so I turned the light on to add a bit of warmth, making sure the fixture was tilted away, so it was more indirect.
The bee is hidden by the petals on the sunflower, in the above picture.
If the bee were sluggish and staying on the sunflower only because of the temperature, I expected to see it become active fairly soon. If that wasn’t the reason it was still on the sunflower, I expected to find a dead bee.
Since it’s too wet to work on outside projects, I set up in the old kitchen to start an inside project. Since the sign with my late father’s name on it got disappeared from the corner of the property, I decided we needed a new one, as it had been a landmark we could use to give directions to our place. Yesterday, I went rifling through the barn and found a scrap of half inch plywood that was in decent shape, brought it over and gave it a cleaning. Today, it was dry and ready for painting.
We still had some white paint from when we fixed the door into the sun room and repainted the frame as well, and there is enough to do at least two coats.
It’s just a bit bigger than the top of our freezer! :-)
The first coat is done, and tomorrow I will give it a second coat. I will also look for wood that I can attach to the back to make posts that can be driven into the ground. The sign that disappeared had been attached to the corner post of the fence, but all those old fence posts along there are falling and need to be replaced, so I want to mount the sign independently from the fence.
After the paint is dry, but before the lettering is painted on, I plan to give the whole thing a spray with some reflective paint I picked up a while back. This way, the background should highlight the lettering when hit by headlights as people turn the corner towards our driveway.
We’ve been talking about coming up with a name for the farm, just for fun. It has always been really important to my parents that the farm stay in the family name, which is why it went to my older brother, who has sons and now grandsons, to carry on the name. So out of respect for my late father, I have decided to simply use our family name on the sign, however I will also include our driveway marker number, with the municipal road name, which is also our family name, and an arrow towards our driveway. The road sign with our family name on it that disappeared when the stop sign it was mounted on was broken, never got replaced, so having that road name on the sign will be helpful for our neighbours, too. Which means I will have two lines of lettering, plus an arrow, on this sign when it’s done.
I think we might also need to set up another camera on it, just in case. I have no proof that our vandal stole the old sign, but if we put up a new one, with our family name on it, I suspect it will infuriate him, and our restraining order against him is still going through the court system.
After I finished with the first coat of paint, I checked on the bee, and was happy to find it crawling actively around the sunflower. I’m very glad we had it covered!
We tucked the entire sunflower into a plant pot (our houseplants are still outside), where it would be more protected, both from the weather and from curious kitties. Happily, it immediately began crawling around even more. Hopefully, it will be able to make its way back to its hive, wherever that may be. Most local bees are more solitary, and have hives underground, so there is no way to know where it came from. At least now it has a chance, and we need all the pollinators we can get!
As much as I appreciate the rain we are having, I’m looking forward to when it clears so I can get back to work outside. I got a transaction notification from my bank, showing that Veseys has charged us for the garlic we ordered. That means they will be shipped soon. Possibly even today or tomorrow. I’ll get an email notification when they do. They will need to be planted soon after they arrive. That means we are running out of time to prepare a bed for the garlic. If the weather prevents me from finishing the high raised bed we are working on, then I will top up the low raised beds we made where the garlic was planted last year. With the new dimensions, we might even be able to plant all three varieties in one bed. It’s typically advised to rotate alliums into different beds every year, but in building the low raised beds, the soil has been amended a lot, and they will be topped up with fresh soil, so it should be just fine. We shall see what we have time for.
Meanwhile, we’ve got a couple of days to work on indoor projects, instead. Like the bread baking I can hear my daughter working on as I write this! :-)
I got the chipper assembled, and we’ve tested it out. Here’s how it went.
This is after lifting the box off, and removing the bubble wrap around that biggest chute. It was deep in that chute, under other stuff, that I found the instruction booklet.
Which included detailed instructions on how to remove the chipper from the box. :-D
Time for assembly!
The tops of the shredder chute had to be put on first, then the handle. It wasn’t until that was on that I could grip it well enough to manhandle the chipper over the blocks holding the wheels in place, and the rest of the assembly was done outside.
Which didn’t take very long at all. :-)
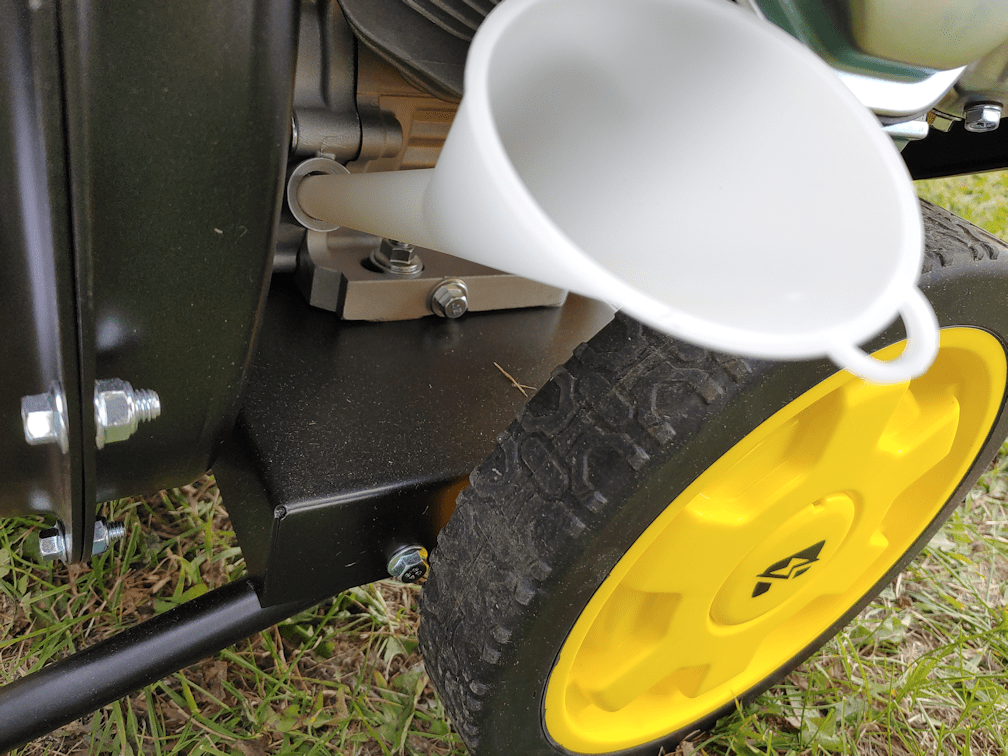
Once it was together, I had to go and get fuel and oil. We had only a few litres of fuel left for the lawnmowers, so I had to refill the 20L jerry can anyhow. This thing takes 10W30 oil, and everything else we’ve got – including our van – uses 5W30. Oh, except the new push mower. That uses 0W30.
In reading the manual, it said to put in about 1.1L of oil, no more.
The oil, however, comes in quarts, or 946ml Which meant needing 1.16 quarts to max the oil level.
I bought two and filled it with one. The level should be checked before each new use, or at least waiting until after it has had several minutes to cool down, so I’ll see if it needs to be topped up the next time we use it.
It came with its own oil funnel, which was greatly appreciated. The opening is tucked well under the engine, and the oil funnels I already have would not have reached, nor fit in the space!
The fuel tank on this thing is pretty massive! If I had not gotten more fuel, I would not have been able to fill it.
A couple of appreciated features. One is the removable gadget in the tank opening, with the red fuel level marker. The instructions made a big deal about not overfilling, and this makes a very handy visual reference. The other appreciated feature is the fuel gauge. Love it!
There was just one down side to the fuel tank, and that was with the cap itself. It takes a surprising amount of uumphf to turn the cap, and I couldn’t do it with my right hand at all, due to a combination of arthritis pain and that injured finger. My left hand has arthritis pain, but I still had enough hand strength to open the tank. Hopefully, over time, it will get easier to open.
Once it was all filled up with oil and fuel, I spent a bit more time going over the instructions before we were ready to test it out.
Ear protection is a must!
We also need to get more safety glasses. The pair I have got all scratched up somehow, to the point that I couldn’t see through them!
My daughter brought over the loppers and starting breaking down branches for me, while I set up the collector bag. It’s attached with only a drawstring. It held well enough once the chipper was started, but there were gaps that allowed chips to go shooting out over the fuel tank and around the engine. I’ll have to figure out if there is some better place to attach it. There is nothing in the instructions other than saying to put it over the diverter.
The collector bag is very durable, and I love the zippered bottom that makes it very easy to empty.
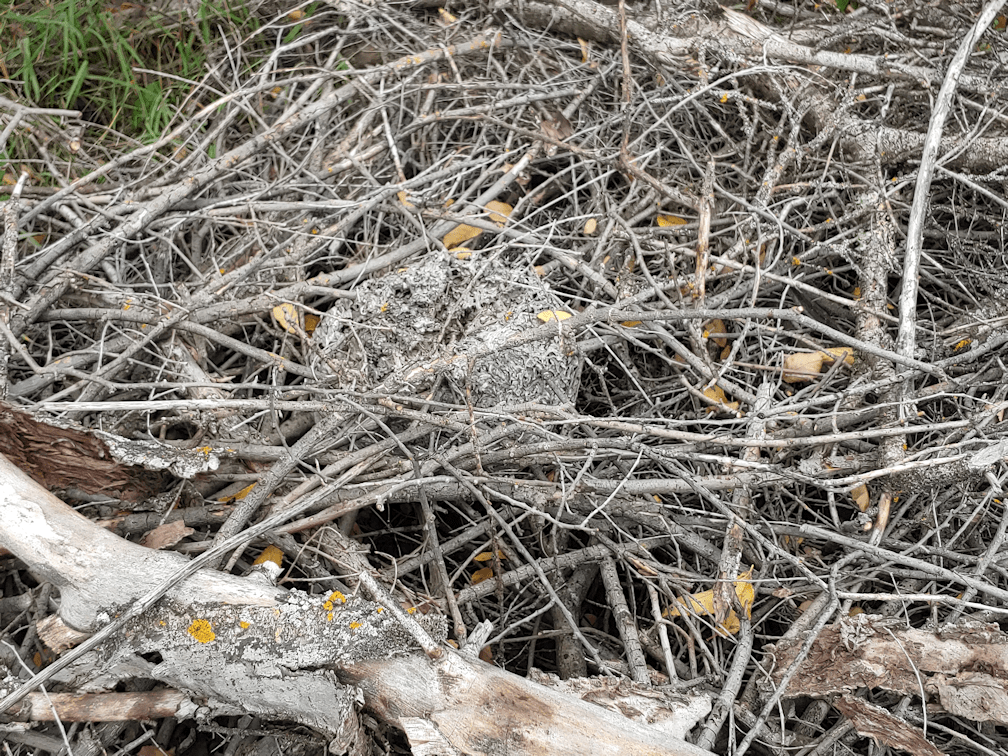
My daughter and I started on the branch pile closest to the garage to test it out. She had a bit of a surprise!
There was an old wasps nest in it. It was an active nest last year, so there were no wasps in it this year, but she didn’t know that when she uncovered it!
The chipper is also a shredder. The larger chute at the top is for leaves and small things, including branches no more than 1/2 inch in diameter. With this pile, that’s the chute we ended up using the most.
With the smaller chute, the maximum diameter is 3 inches, however that’s not just the width of the branch. If there is a bend in the branch, or any knobby bit from a smaller branch that was pruned off, it could be enough to prevent the branch from fitting.
The pile had a lot of very bent branches.
The worst of them, plus any pieces we had to cut off to allow the remaining branches to fit, got set aside. They will likely go into the burn pile.
We went through about 1/4 to 1/3 of the pile in about an hour. We did have to stop to take apart the smaller chute and remove a piece that got stuck. There was a little bit of a side branch sticking out just enough to catch on the opening under the rubber guard.
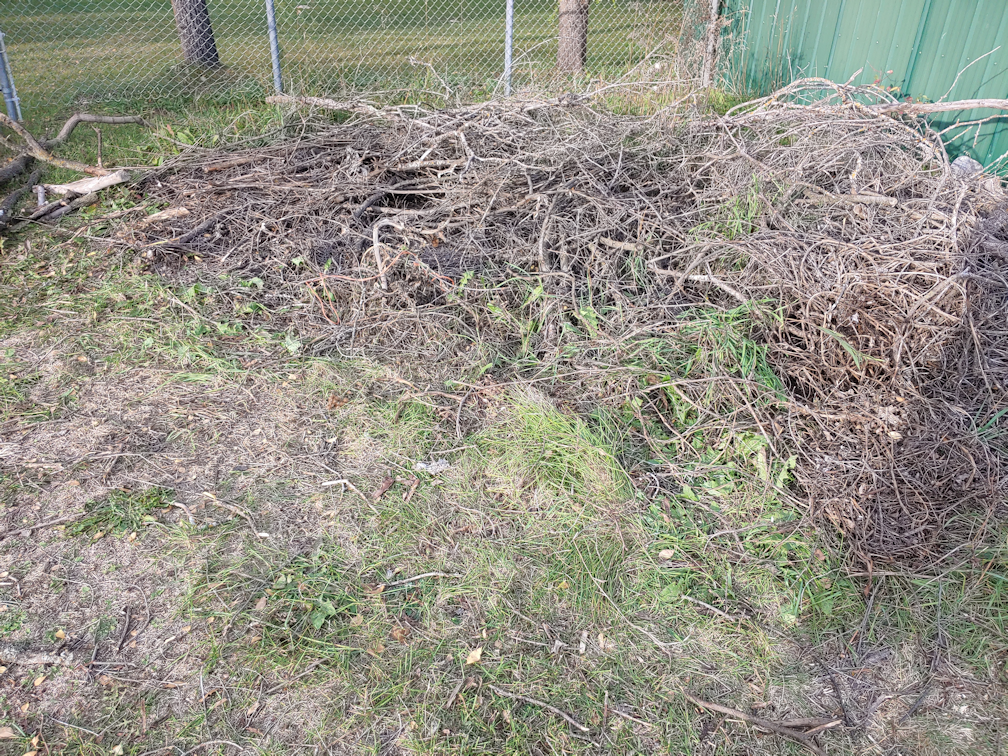
All those branches gave us this.
The larger pile is in the garden, near the high raised bed I am working on. The small pile is what built up under the chipper itself, that had blown out the top of the collection bag.
The chips are quite small. Smaller than the chips we had when the arborists came and cleared trees from the power lines and roof. I am quite happy with that. This will be used as we layer organic matter in the high raised bed, and will also be used as mulch, so the finer the better!
I’m also happy with how much less space the chips take up, compared to the branches they came from!
Another thing I really like about it; how easy it is to move around! This chipper is designed only to be moved manually; it’s not of a size that can be towed by, say, our riding mower. Which is perfect, because some of the places we will be using it in, don’t have space for a tow vehicle.
This thing is going to make such a HUGE difference in our clean up progress! It’s going to take quite a while to chip away the branch piles, but we have been adding to those piles for four years now, so that’s to be expected! Best of all, as we continue clearing away dead trees, we’ll be able to chip the branches right away, rather than dragging them over to the piles and making them even bigger.
Yesterday was Thanksgiving Day, and WOW! do I have a wonderful gift to be excited for!
A few days ago, I wrote about a proposal I’d made to my mother. Instead of spending thousands of dollars on a garden shed we do not yet have a prepared space for, I suggested she give us the money to put towards getting the tools and equipment needed to clean things up (things she is constantly complaining about). She said she would only discuss it with my brother. Not because he’s the one who now owns the property, but because he’s a man, and I shouldn’t be doing “men’s work.”
The day before Thanksgiving, my brother made the drive out to join my mother for church and go out for lunch. Among the things they talked about was the farm, and what we were doing. Of course, my mother was complaining about what a terrible job we are doing, and apparently my daughters don’t sweep the floor.
???
How she would even know that, one way or the other, I have no idea. It’s an assumption she’s making. My husband is Metis, which means he’s an Indian, and all Indians are dirty and have dirty houses, therefore we are dirty and never sweep the floor.
Aint’ racism fun? :-/
The irony is that, when I was a kid, my mother made a big deal about teaching me my “duties as a woman” and I was forced to do not only the housework, but things like making my brother’s beds – and hers! Basically, I was expected to be a little household slave. It was very much an abusive situation, though I didn’t understand that at the time, just as I didn’t understand for many years that my reaction to housework after having a family myself was what we now know as PTSD. I was fine if it was just me. I even had a job as a housekeeper at a resort hotel without any problem. As soon as other family members were part of the picture, however… well, let’s just say it was unpleasant. It took many years for me to recognize what was happening and work through it. I still have that response, but I now know how to spot it happening and take steps. What it comes down to, though, is that I am a terrible housekeeper directly because of the trauma she caused when I was a child. I couldn’t even begin to explain it to her. She wouldn’t be able to grasp it.
But I digress.
As my mother criticized me and my daughters for her perceived ideas of how we run the household, my brother tried to tell her to encourage me, rather than attack me. He even asked her outright if she were punishing me for not sweeping the floor, and she said yes!
Well, my brother is an amazing man, and he continued to defend me and tell her she needs to encourage me rather than attack me. She brought up about the “mess” in the yard – most of which are the branch piles – and in the end, she actually agreed to pay for a wood chipper.
!!!!
More specifically, she told my brother to make the arrangements, and she would pay for it.
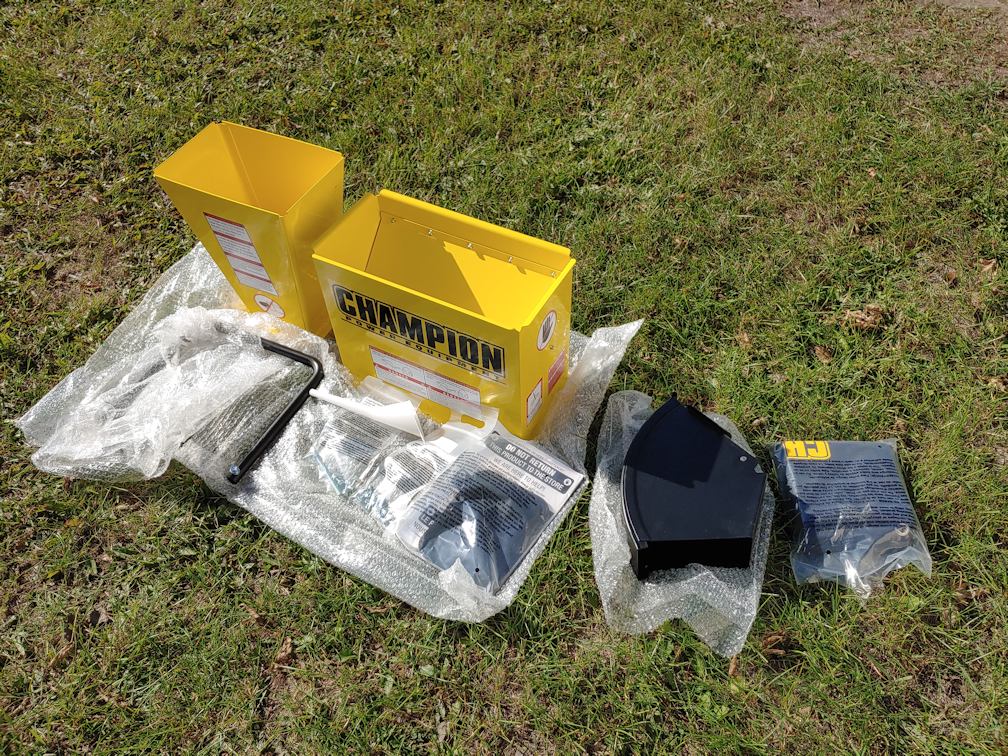
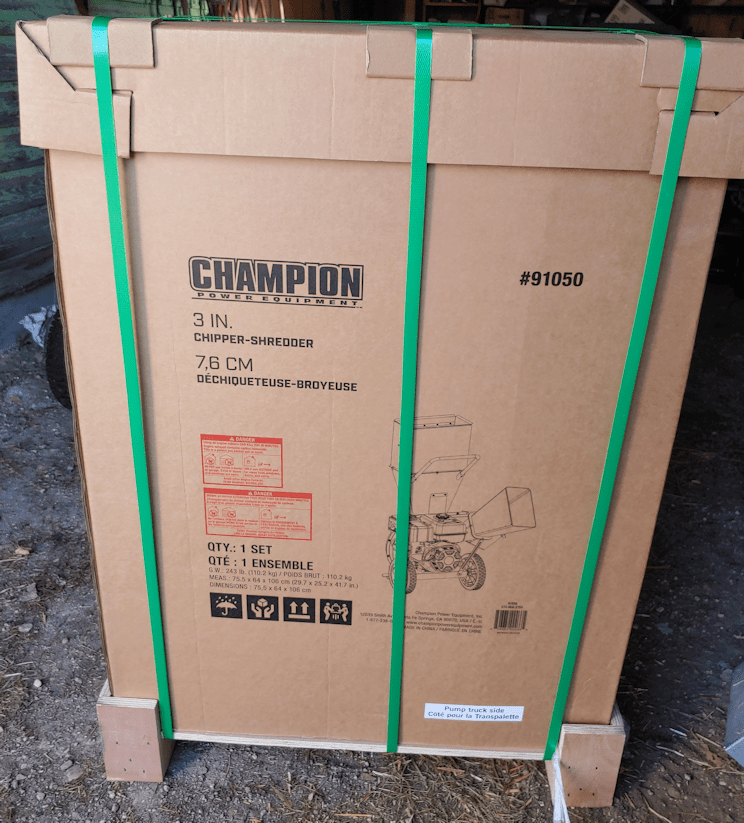
Since equipment like this tends to be on short supply this time of year, my brother and his wife went shopping yesterday. They had to go to a bit far afield to find one in stock, but they did get one. Then, since it was already loaded in the car, they came over last night to drop it off!
This baby will chip branches up to 3 inches thick, and he made sure to pick the version with a more powerful engine.
It was starting to get dark by the time they got here, so I took a picture this morning. Yes, it’s still in the box. Today, I plan to spend some quality time with the instruction manual and assemble it. Hopefully, we’ll be able to start using it tonight. I will probably have to pick up more fuel, but it should already have the oil it needs. If not, I probably already have the right kind.
This morning, I phoned my mother to say thank you. She knew nothing about it, yet! My brother will bring her the full receipt (he left a gift receipt with me) later.
Of course, my other had to try and bring me down and made sure I knew that this actually belongs to my brother. Which is a given, as far as I’m concerned. What’s on the farm belongs to the farm, and the farm belongs to him. It’s just a matter of semantics, really. Still, he made sure to get this for me, because it’s a tool we need to do the job, and I am over the moon with excitement. We should be able to make a massive dent in all those branch piles, before winter sets in!
We used to have big Christmas bows on our main gate. When they started wearing out last year, I wanted to replace them but it was a time when we weren’t allowed to buy “non-essential” goods during Christmas. So my daughter and I used things we had to make a wreath. Since there was only one, it would have gone in the middle of the gate somehow, but we never did figure out a way to attach it securely. It’s been sitting in the sun room, taking up shelf space, ever since.
Until this morning.
It juuuussst fit between the shelf and the ceiling beam, snug enough that it holds itself in place.
More colour in the outhouse is definitely a good thing. :-)
I’ve also figured out where I want to put the second shelf. I just need to pick up some shelf brackets for it. :-)
Yesterday evening, I was able to head out and finally work on the dead tree that’s stuck. While I was getting tools out of the sun room, I discovered I was being watched!
They were not only watching me, but they did NOT run away, and one of them looks almost relaxed!
I’ll take that as progress. :-D
Then it was time to get to work.
For the tree that’s stuck, the first thing that needed to be done was to brace it before I started cutting. Then I measured a little more than four feet from the bottom and cut it most of the way through. Then, just to be safe, I used a rope to pull out the brace from a distance, then used the rope again, to pull out the cut piece.
Now that this has been cut shorter, the tree can be pulled out with the van, once we have something we can use to safely haul it out. We do actually have chain handing around but 1) I won’t want to use chain, because if it breaks, the damage could be catastrophic and 2) the chain I’ve found is so big and long, I would have to use a wheelbarrow to bring it over! :-D At this stage, though, the tree can wait until we get some strong enough rope. It’s also now low enough that I could remove the rope that was wrapped around the trunk, from when I tried to get it to roll off the branches it’s stuck on.
The four foot length was moved to join the others by the main garden beds. Then I took down the third dead tree in this group.
This tree was a fair bit thinner than the other two, and was faster to cut down. When it fell, it landed on the stuck tree, which basically guided it away from the trees it’s stuck on, and down to the cherry trees.
All of those cherry trees will be cleared away, as they are not right for our climate zone, so the first order of business was to start clearing enough of those away that we could access the trunk. Dead branches were also cleared off the trunk. Then, while I continued to clear more of the cherry trees away, using loppers for the thinner ones, and the baby chainsaw for the few larger ones, my daughter started to measure off the trunk to cut the first four foot length.
We got two four foot lengths and a nine foot length before it got too dark to work, so I got these photos this morning.
As with the other two trees, the wood is nice and solid, with no sign of rot. That means, not only will the wood be used to build our high raised beds, but the stump will be used to support a seat or a table.
With so many dead trees to clear away, we’re going to have a lot of those by the time we’re done!
While cutting lengths from the trunk off, we were able to pull the rest of the tree out a bit, but at this point, it’s too hung up on the cherry trees that haven’t been cut away, yet. I had thought to be doing more of that today, but it might have to wait. Pain levels are high, which is no surprise, but as I write this, it is also 30C/86F right now!
One more nine foot length, and I’ll have enough wood to make a raised bed that’s 3 logs high. With how thick the trunks are, that might be high enough! :-)
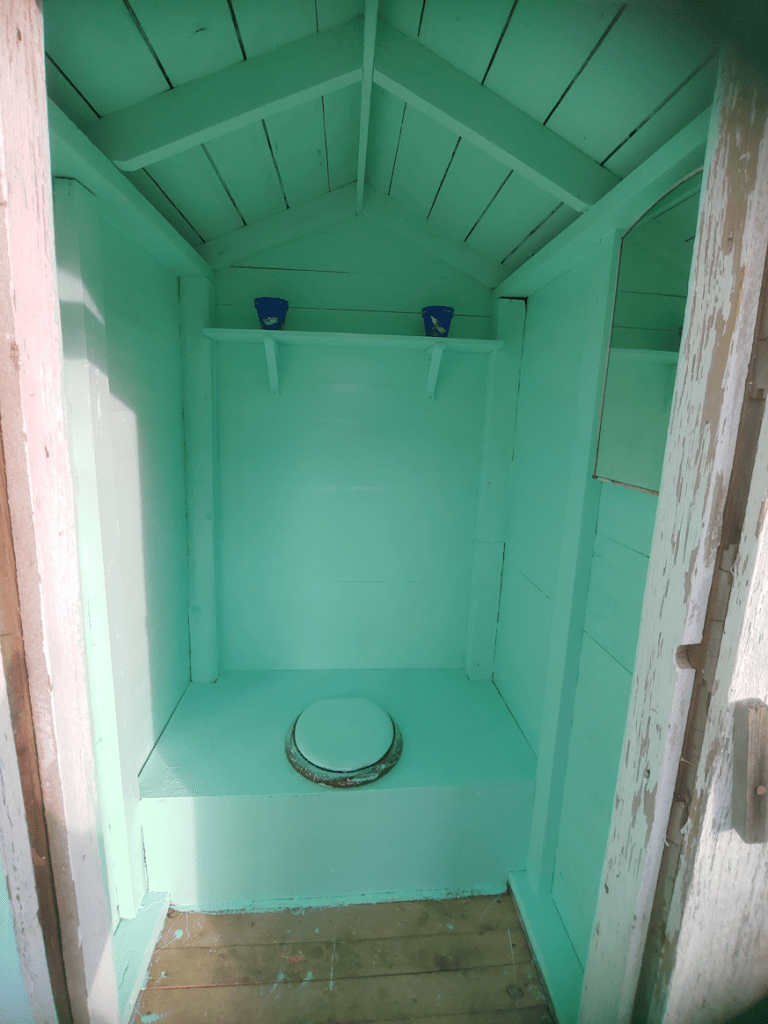
Well, we’ve done as much as we can with the outhouse for now, and I think it’s turned our rather well!
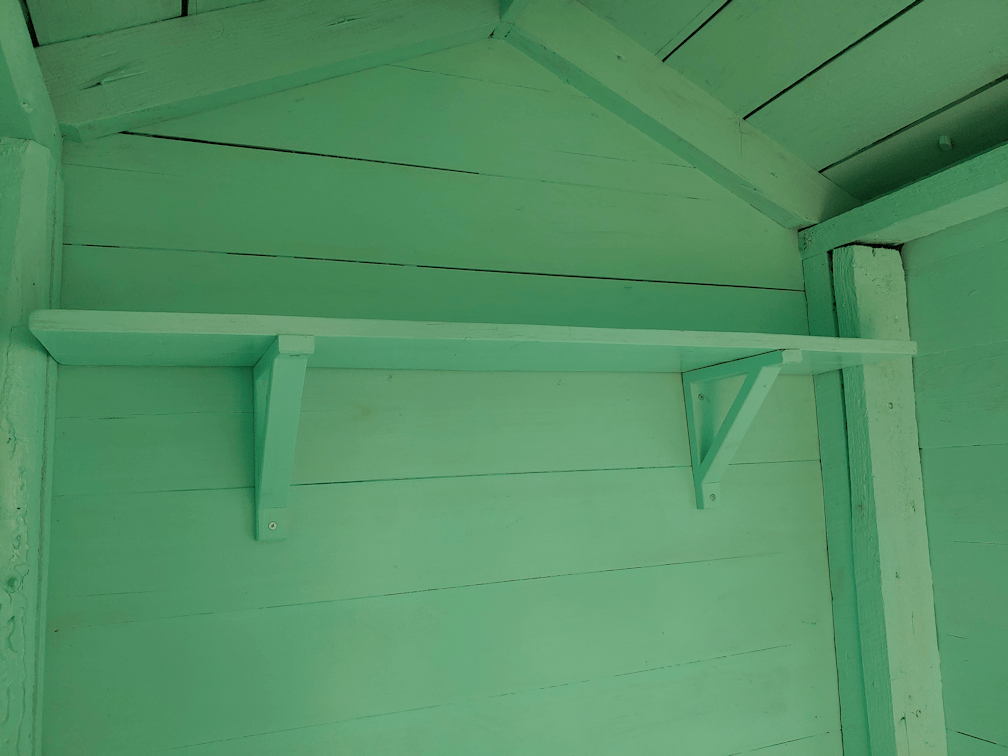
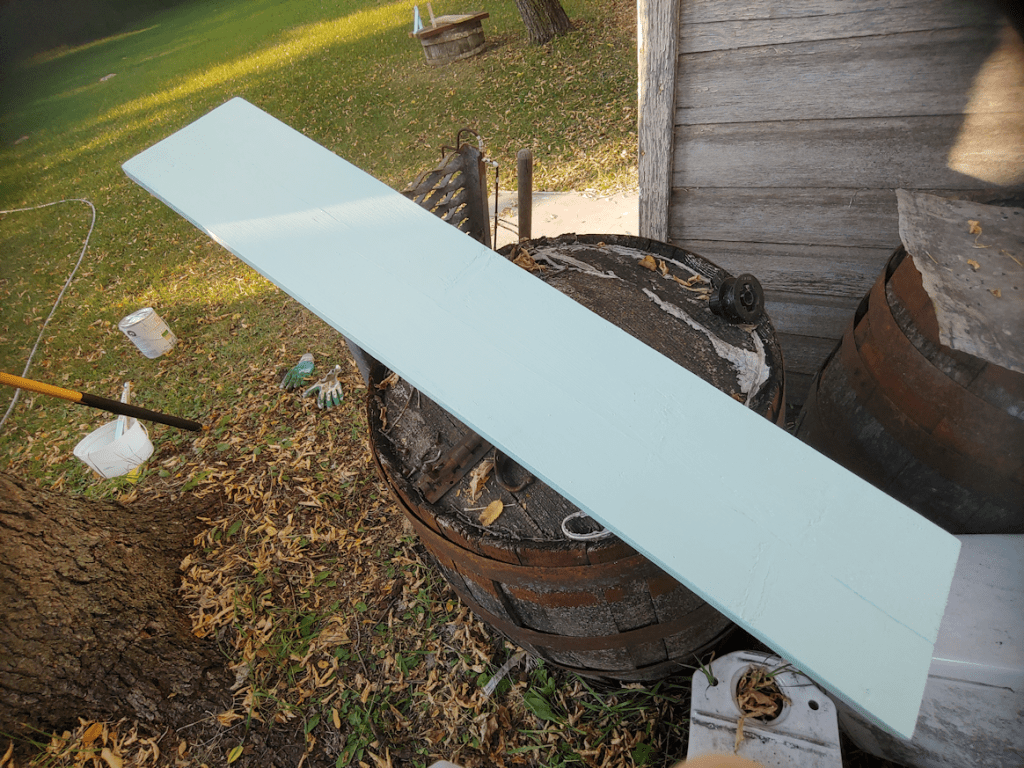
The first order of business was to paint the shelf boards.
The longer one was the one that got painted on one side, and the edges, yesterday. I decided to paint the remaining section of the board, too, for a future shelf after we get more shelf brackets. After a cleaning and a sanding of the rougher edges, it gone one side and the edges painted, too.
Leaving those to dry, I put up the shelf brackets, living them up with the top of one of the boards.
That screw in the top corner was a real pain in the butt to do. There’s almost no space for the screwdriver! I also put the screws to attach the board part way, so that when I came back later, I’d only need to bring the screwdriver.
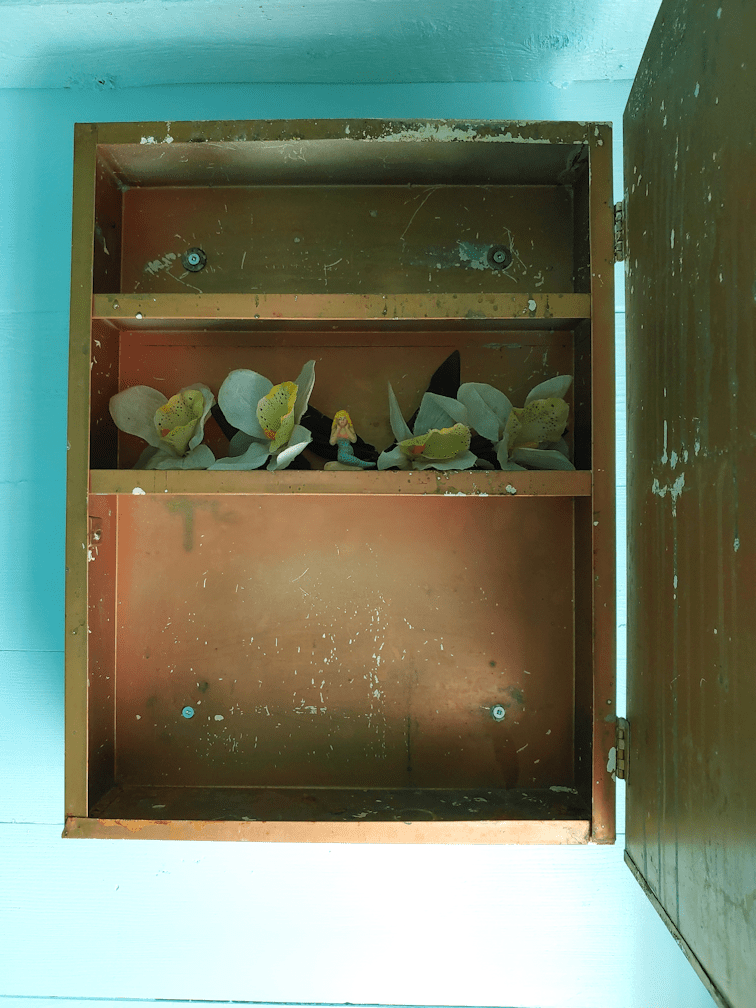
I noticed one of the girls had moved the mermaid toy into the middle shelf (I’d put it on the bottom). Remembering that there were some fake flowers in the garage, I went digging around and found some small ones to put beside her. :-D
After giving the shelf boards a couple of hours to dry, I came back later to put up the longer shelf board.
We wanted the shelf to be pretty high up, but when I tried to put it in place, I found it was narrower than where I’d checked the fit, before! Not by much, though, and I was able to jam it in and screw it in place.
That done, it was time to paint. Since there was so little paint left, the first thing that got done was the other side of the second shelf board, then the inside of the door. The back wall was done as high as the shelf, and the wide walls on either side of the seat box were done.
There was just enough paint left to do the wall joists in the middle, and the final dregs were used to paint the inside edges at the bottom boards under the joists. I’d painted the tops, but not the inside edges before. One of the boards only had half an edge along most of its length; a chunk seemed to be missing! LOL
Then I cleaned off the paint brush on the toilet lid again. :-D
After washing up the paint supplies (including the empty can; I figure we can reuse it for something), I took a couple of decorated terracotta plant pots we’d found when we first cleaned out the sun room and put them on the new shelf.
Gosh, that looks so much better!!
The girls are already talking about getting another gallon of paint to add another coat in the future. Other than adding the battery operated light inside, whatever we figure out for the floor, and eventually replacing the toilet seat, it’s basically done on the inside. Oh, and the latch for the inside.
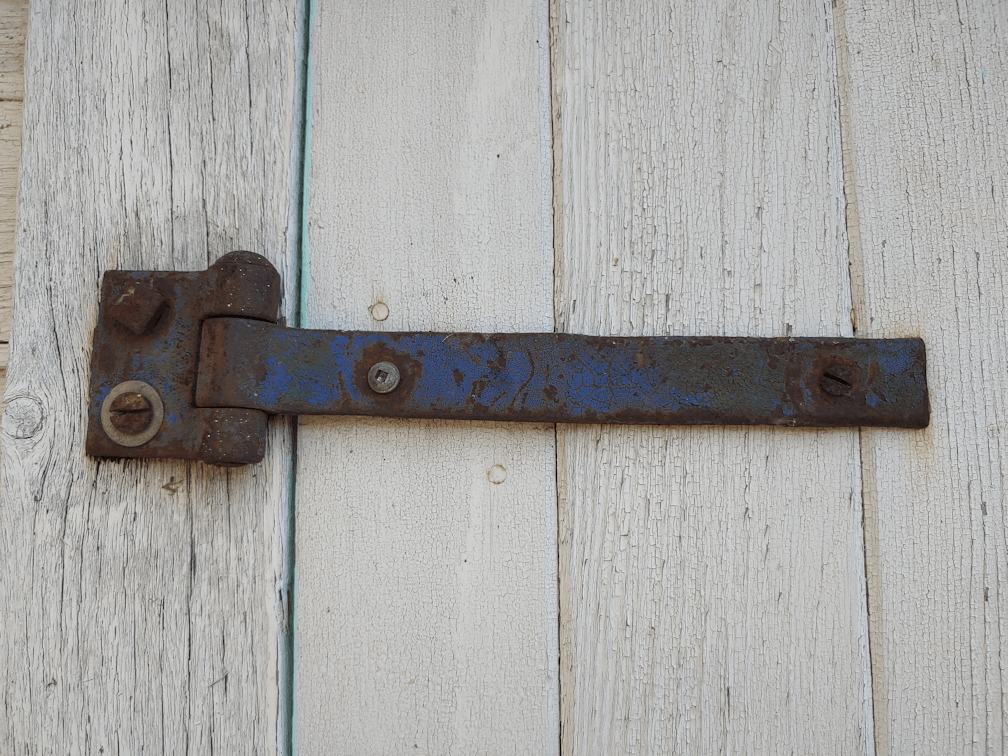
While waiting for the painted shelves to dry, I took a closer look at the outside.
This is one of the hinges that needs to be replaced.
Why does it have four different screws???
The other one has three different screws.
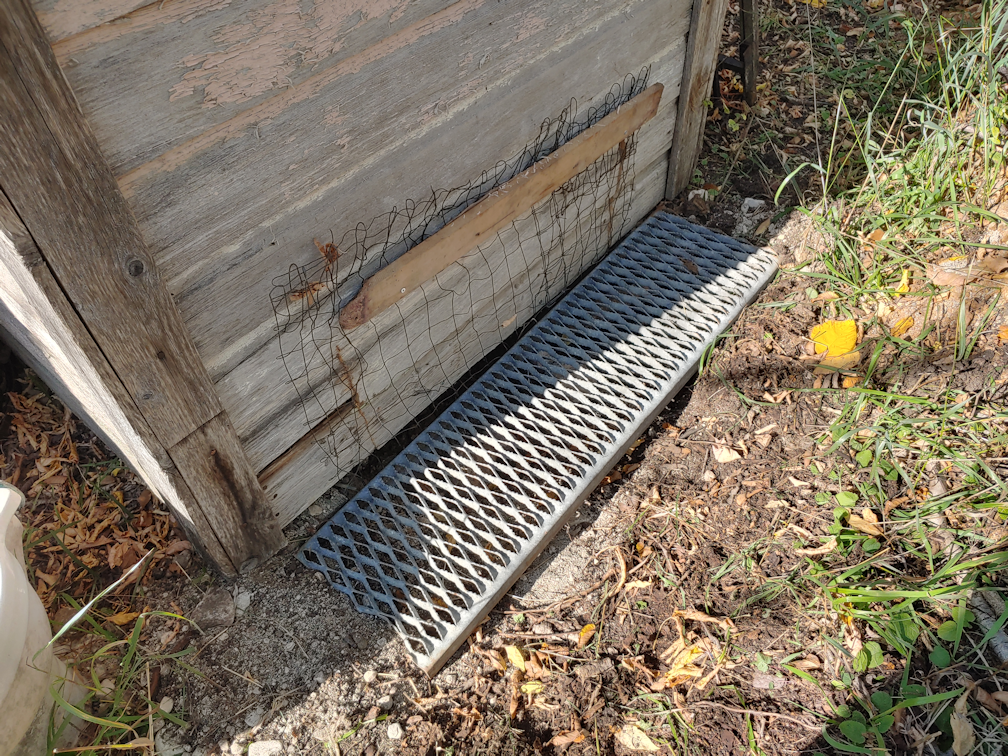
I also took the metal thing that had been in front of the door, to cover the hole that was getting bigger, over the wire mesh at the back. I didn’t even bother to level it or anything. That can wait for when we actually paint the outside.
I also looked at the roof, thinking ahead to when we fix it up. There’s quite a lot of rotted edges on there. :-/ One of the things I wanted to do in repairing it was making an overhand above the doorway. We definitely want to have it overhang the roof trusses, too. After they have been reinforced because of the rotten edges!
It would be good if we can get that done before winter, but we shall see. After the roof is done, we’ll work on painting the outside. The front of the outhouse is white, but the other three sides are a pink. It may have started out as a red, but there’s so little left, it’s rather hard to tell. You can see some of it in the above photo.
The girls want to keep the pink. :-D
By the time we’re done, this thing is going to be downright adorable. Plus, it will last longer, until we build the outdoor bathroom we have planned.
The plan was to head over to the outhouse, quickly do a second coat of paint until we ran out, then get back to working on the bread baking.
Instead, I kept adding more things to do, and by the time I got inside, I had to get my daughter to continue the bread baking, as I was no longer physically able to do it. Which is what she is working on now, as I write this blog post!
While looking for something else entirely, I found a pair of wooden shelf supports and instantly realized that they could be painted and used to put a shelf in the outhouse. So when I headed out to do the second coat of paint, I also poked around the barn and a shed to find a thin board wide enough for the supports. It was about six feet long, though, so I basically held it up to the outhouse door from the outside, and eyeballed where to cut it to fit along the back of the outhouse. It ended up being just over half the length of the board, so I figured if I was off with the longer one, I could still use the slightly shorter one.
It ended up being just a hair too wide to fit between the corner posts. A few swipes with a micro plan and some sand paper was enough to get it to fit perfectly!
That done, I sanded the rough edges, then scrubbed and hosed it down before setting it aside to dry. Then I added a second coat of paint, just to the seat box inside, before painting the shelf supports.
I’m thinking I might paint the rest of the board, too. If we get more shelf supports, we can add it onto one of the side walls.
It took a while for the washed shelf board to dry, so I decided to give the mirrored shelf a scrub down, too, then once that was dry, I hung it back up inside the outhouse.
Rolando Moon decided she absolutely had to be on top of where I was putting the tools and screws! The violent beast went from demanding I pet her, to attacking the hand that was petting here, making me bleed! I did manage to get the screws with washers out from under her, though.
I just wanted the washers, though. There were just two, for the top screw holes, which are slightly wider than the bottom ones. I used new screws to hang the mirror back up. After washing the blood off the new screws and washer, from the wound Rolando Moon gave me!
Previously, it had been hung up right against the centre joist, but I chose to centre it between the corner and the joist, instead.
Then, I just had to do it…
I just had to put the little mermaid I found while I first emptied and cleaned out the outhouse, inside the cabinet.
She lives here now.
:-D
Once we’ve picked one up, the LED battery operated light switch will be mounted directly opposite the mirror.
By the time this was done, the shelf board was dry.
After removing Rolando Moon, I got the one side painted. Tomorrow, I will paint the other side. By then, I should be able to mount the shelf supports, using the boards on the wall to make sure they are level, then attach the shelf board once the paint is dry. Only then will I continue doing the second coat of paint inside, until the can is empty. If I end up not doing the ceiling, or the narrow parts around the door, that’s not going to be a problem. As long as the areas that are most likely to get scrubbed in the future get a second coat, it’s all good.
Since I could no longer work on the inside, I decided to work on the outside, and empty the pit of groundhog gravel.
The wire mesh on the back was held in place by being hooked onto two bent nails, that were nowhere near each other. You can see one at the top right. The other is barely visible, near the bottom left. It didn’t take much to remove the mesh.
There was a second, smaller piece of mesh, partly buried until a thick layer of grass and roots.
*sigh*
That took some doing to move out of the way.
I thought I would be able to remove the two bottom boards by taking off the smaller pieces on the side, then pulling them off. They where, however, thoroughly nailed in place, with old and rusted nails that were not about to come out. So, I instead dug out my jig saw and used it to cut a piece off the bottom.
As you can see, it’s solid gravel against it! I ended up having to cut a second piece off. I was then able to start shoveling the gravel out, and when I could no longer get the shovel far enough in before the 2×4 across the bottom stopped me, I used a garden hoe to move more gravel closer, then shoveled some more.
I never did reach the … compost… layer. I did hit a lot of rocks, though! I emptied it as best as I could, without removing the more recent… deposits.
Then it was time to cover the hole back up.
I put the two pieces of siding back, then screwed the bottom one to the 2×4 behind it. The next time we need to get under there, we can just remove the screws and the boards will easily pop out again.
I then folded the smaller piece of wire mesh to fit the opening. I found a scrap piece of board with screw holes already in it, so I used that to fasten the mesh in place. The wire is folded at the bottom and weighted down with rocks. Critters can still get in if they really wanted to, but this is temporary. When we get to painting the outside, we’ll make things more permanent, perhaps replacing the cut boards with a hinged flap that can be latched to keep the critters out. Who knows.
I have no idea why that other large piece of wire mesh was used to cover almost the entire back of the outhouse. It really served no purpose, since only the gap at the bottom needed to be covered. Even the smaller one on the bottom couldn’t keep the critters out.
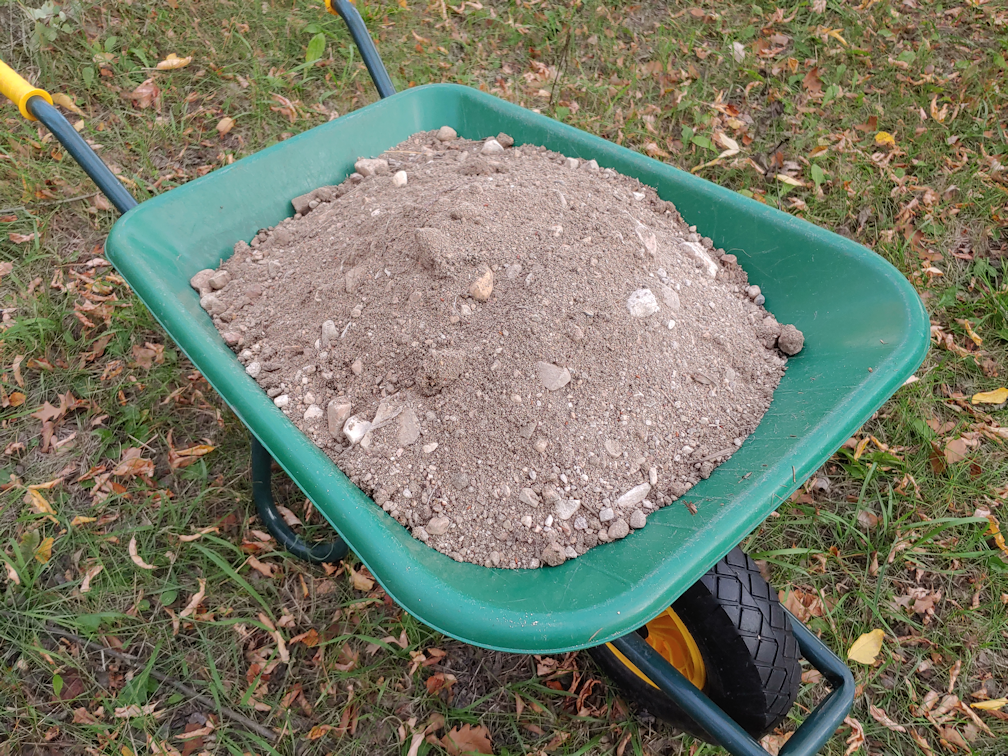
I was able to fill the wheelbarrow with clean groundhog gravel! If there was any chance the shovel full I pulled out wasn’t clean, it went onto the nearby cat litter compost pile, instead.
The clean gravel was put to good use.
It was enough to make a thin layer on top of the boards in the path between the new low raised bed boxes. The bigger rocks went up against one of the boxes, where there is a larger gap, then it all got spread out and hosed down, so that the finer particles would wash into the gaps between the boards below. It seems to be more clay than sand and gravel, though. We will still need to add more, but this is a good start.
And that was it for today!
Deciding to include a shelf added at least an extra day to finishing the inside, but I think it will be worth it. I’m more happy about getting the pit clean up over and done with for now!