Finally! Several times over!

Thankfully, there was no rain today. The installers were able to get our new door in!

I headed out quite early to feed the outside cats, then make sure the gate was open for the installers. We have had the folding table I made out of folding legs and a piece of plywood I found in the basement set up under the kitchen window for some time. The hand rail to the door runs past it, and the isolation shelter needs to be set up there for the winter, so I moved the table out and cleared the patio space under it. Then, since it was clear anyhow, I set up the pieces of insulation that go against the basement wall for the winter. The table itself, I set up next to the elm tree outside the kitchen window, keeping it handy for the installers, if they needed an extra surface. It will be folded up and put away for the winter, later.

They did end up using it, along with one they’d brough themselves that was almost identical in dimensions!

Once inside, the makeshift barricade to keep the cats out of the entry while they worked was set up. Then I made myself some breakfast.

I was settling down to eat when I heard their truck and trailer backing up to the house. I headed out to greet them and touch base, then went back in. After I finished eating, I found I had a decent amount of time before I needed to go to my mother’s, since we worked out that I would do her grocery shopping after the meeting with the home care coordinator in the afternoon.

I took advantage of it and started working on what was originally supposed to be a wattle weave wall in the old kitchen garden.

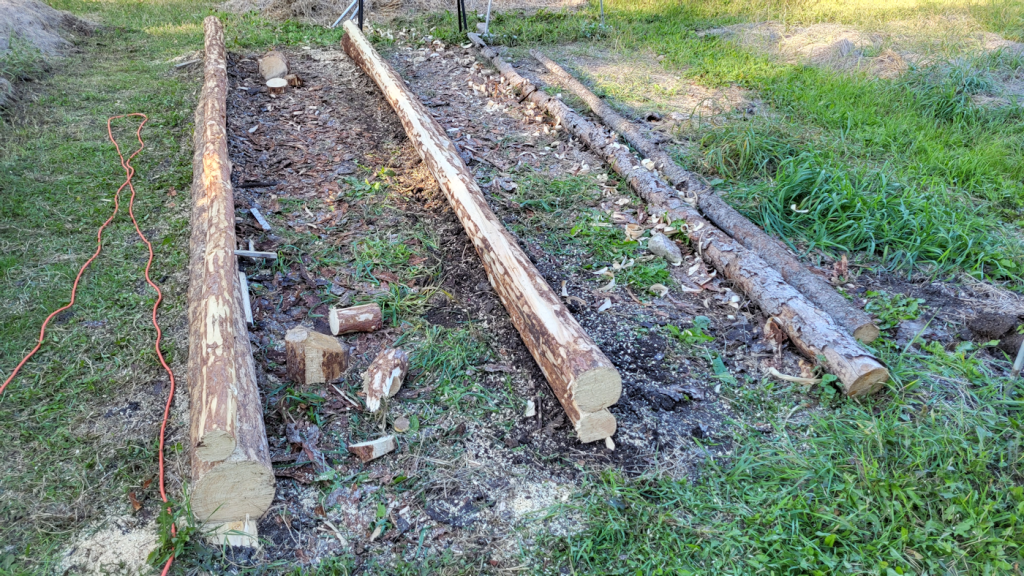
The first photo was before I started working on the bed and had brought the stakes over.

Hard to believe that those black looking stakes are also maple, and were as bright as the new stakes, originally! They turned black after the first major rainfall.

You can see my initial attempt at wattle weaving in that first picture, too. Removing those was my first order of business. Once they were clear, I raked away any leaf litter that had blown into the area I would be working on, and clear out a few weeds.

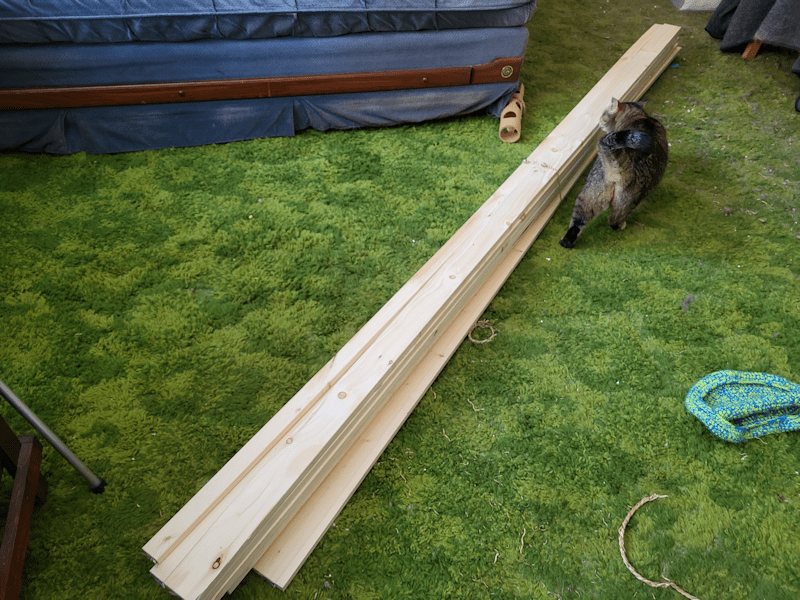
Once that was cleared, you can see in the second picture that I wrapped twine along all the uprights. In the third picture, I’d laid out the first stakes that would be pounded in. These would be placed in the middle of each of the ones already in place, using the twine to keep them in line with the other stakes.

In the first photo above, the next set of stakes were laid out, with my spare on the side. These would go between each of the stakes already pounded in, in a slightly offset row, which you can see in the next two photos.

You can also see the hammer and board I used to pound them into the soil. The board was set at the top of each stake, and I used the flat side of the hammer on the board to pound them in. That pretty much assured I’d never miss, and wouldn’t be damaging the tops if I did.

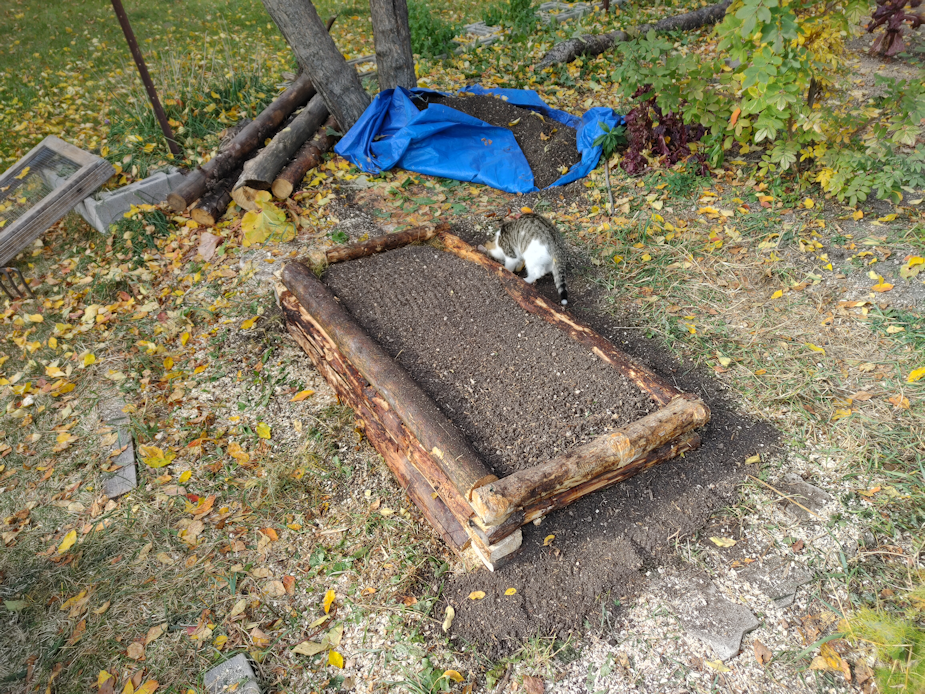
With all the stakes in place, I started putting the pieces I’d tried to wattle weave, back, running them in between the offset rows. Some of them were rather bent from being woven around the stakes for so long but, for the most part, they went in fairly well. Some pieces were pretty wonky, though, leaving gaps. Once they were all in place, I went to my pile of smaller willow switches and use them to fill in gabs, making for a thicker and more solid wall. You can see how that looked in the first two photos.

Then I grabbed the loppers and headed into the spruce grove. In our first years here, I’d cleared up and cleared out the poplar growing in a few spaces along the edge of the grove. Poplar being poplar, they’ve been growing back. I found the straightest ones in the size range I needed, cut them down and trimmed away their branches. I also gathered some much smaller, narrower pieces to weave into the ends of the garden bed.

In the last picture of the slide show above, you can see the wall with the new lengths added. The pieces woven into the sides helped lock in the larger pieces in the deadwood fence at the ends.

Then, I forgot to take pictures of the rest. I’ll do that in daylight, tomorrow!

As the deadwood was laid between the rows and pushed down to the bottom, the stakes started to get pushed outwards slightly. I decided to secure them with twine, basically joining the stakes together in a zig zag pattern, making sure they were snug against the tops of the deadwood as I packed them down as much as I could.

I should have waited on the twine.

My original thought was to cut the stakes to just above the height of the deadwood, so they weren’t sticking up too high above it. I decided to see if I could get them pounded deeper into the soil, and more secure. For that, I headed to the garage for a sledge hammer.

Which did a mighty fine job of getting the stakes deep enough that I didn’t have to trim any of them! I was even able to pound in some of the original stakes a bit, too. Those ones I am keeping taller, though. They have matching height stakes on the opposite side of the bed, and will be used to hold hoops or whatever gets used to add protective covering to things growing in it, if needed.

Unfortunately, in the process of using the sledge hammer to drive the stakes deeper, I ended up snapping the twine in two places, and I had to take care of that before I could call it done.

Building the walls on this bed is now FINALLY finished! Now all it needs is another weeding, and it’s ready for next year’s garden.

By the time I was done and putting things away, I had time to change and get ready to head to my mother’s.

The installers were also finishing up! By then, they were putting the hand rail against the wall back. I couldn’t believe how well it worked out (there was minimal water staining visible when they took the old frame out, and everything else was still sound), and how quickly they got it done.

We finally have a proper front door again!

What they were NOT able to do was put the storm door back. It’s too tall for the new frame. It was handy for when we run the drainage hose from the washing machine out the window, but is no longer actually needed. The new steel door itself is built for Canadian winters. We won’t be getting any more frost at the bottom, or at the hinges!

The door now swings from the opposite side of the original door, by my request. That meant the arm bar had to be moved to the other side, too, since it needs to be opposite the hinges. It had to be mounted slightly higher because of where the handle and deadbolt are located, compared to the original door. The screen on the door can be removed, so we can still run the hose out the window when we do laundry, and the cats can’t get at the opening anymore.

I am very happy.

Then, it was off to my mother’s.

*sigh*

Short form. Honest.

I showed her a picture of the new door, thinking she would be happy. Instead, she was at first confused about which door it was (even though we’ve talked about it several times), then she didn’t seem to like the look of it (??), then she got really angry when I told her they couldn’t put the storm door back on because it wouldn’t fit. I got a lecture about how, if they’re not willing to do it, I should go find real professionals who would do it for me.

My mother makes a big deal about planting garlic, so I tried showing her pictures of the finished garlic bed with planting of spinach and Swiss Chard between the rows of garlic before covering the bed for the winter.

She became thoroughly disgusted when I mentioned buying seeds. I should be saving seeds (and planting spaghetti squash; that’s essential, suddenly). Which I have been, but apparently, seeds for things I’ve never grown before should magically appear or something, and spending money on seeds is stupid. Also, I need to plant spaghetti squash. Basically, she was really happy about insulting me for not gardening like she would. Practically chortling with glee in the process.

I tried showing her other pictures of the garden beds I’ve been preparing for winter, but gave up. She started ragging on me about how I keep talking about all the work I do in the garden, but never the benefits. I told her, the work is the benefit! I enjoy the work.

Turns out, that wasn’t what she meant.

Apparently, I get nothing from the garden. Ever. Not any of the stuff I’ve brought for her, even though we had so little produce this year. Things like drought and heat waves and a summer of endless smoke from wildfires means nothing. I should magically have a successful garden, every year, and it should be just like she used to have (or, at least, how she now imagines she used to have).

We tried talking about the upcoming meeting about her home care need and, in the process, I found out our vandal had visited again. He had shown up at the same time as her supper med assist, so he went into the common room. Even from her apartment down the hall, with the door closed, she could hear him loudly talking to people there, though not what he was saying. Knowing him, he was slandering me and my mother about this property. After the home care worker left, he came to her apartment and started ranting at her about the usual; that she “gave” the property to me (which she hasn’t), and so on. He wouldn’t let her respond to anything, of course, and didn’t leave until she started crossing herself repeatedly.

I asked when this happened, and she really struggled to remember. She did remember that it was after their exercises (which is why there were people in the common room), which meant Tuesday. Which was yesterday. But she couldn’t remember that it was yesterday.

We talked more about my mother accepting more med assists, like meal preparation, dress assists, bathing assists – basically, all that they’re allowed to do for her. She really does need the help, but her refusal to accept it is part of what’s keeping her from being approved for a nursing home, like she wants. She started getting angry at me, saying “I’m not used to having servants”. I told her, they’re not servants. They are helpers. Let them help!

That sent her off on a racist rant about the male home care workers, all of whom are apparently from India. I cut that off and told her, she can’t be saying stuff like that to the workers.

We also got her shopping list worked out in between all that.

Then the home care coordinator arrived, right on time.

The poor woman. She’s trying so hard to help my mother.

In the end, we were able to get her to accept allowing them to do meal assists on those days when she’s not feeling well, and we talked about the sorts of things they can do – quick cooking, reheats, etc. She said she would accept a shower assist once a week (she sponge bathes only), and she actually requested help with getting things set up so she can soak her feet once a week. She would accept dress assists, if needed, too. She might not need all of this every day, but we stressed, the more help she accepts, the better. We don’t want her to fall and hurt herself.

The coordinator also had to explain to her that she can say things like “I don’t want a man touching me”, in refusing their assistance with certain types of care, but she should NOT be going on about their race or country of origin. My mother tried to say, “I’m not going to lie.” I told her, you don’t have to lie. Just don’t say anything! The coordinator concurred.

It was a long and difficult meeting, but we did get progress.

There were a couple of forms that need to be signed every year, so when the coordinator was done, I followed her to the home care office, where I signed on my mother’s behalf. One of the forms was a list of what the clients needed to do for the home care workers, ranging from making sure driveways and sidewalks were clear, to ensuring the clients had no access to guns or knives. No using illicit drugs, no smoking within an hour before they are scheduled to arrive, no verbal or physical abuse…

Much of it didn’t apply to my mother, but a few lines where highlighted in regards to how the workers are to be treated!

She also gave me an emergency responders kit to replace the one on my mother’s fridge. My mother’s was incomplete for some reason. So when I got back to my mother’s, I went through her copy of one form, then filled in the information for the first responders sit. If she needed to be taken to the hospital by ambulance, they would grab this package and have all the info they need, from her meds list to my contact information, and signed permission for me to be her advocate, doing all the things I’m already doing on her behalf now.

That took quite a while to finish off! But it’s done. Finally!

Hopefully, my mother will behave.

I’m not holding my breath.

The paperwork done, I went to do her shopping. After I got back and put everything away, I had the idea of making a list of what she typically eats for her meals. This way, if she asks them to make her toast, they will know if she wants butter or jam or whatever on it.

Unfortunately, my mother just started to get angrier and angrier. She doesn’t trust people to make her food. She can do it herself. She doesn’t want to be a bother (ha!). Etc. I don’t know what she thinks they’d do to her food, but she even started saying that if this is what she has to do to get into a nursing home, maybe we can set aside getting her into a nursing home for now.

I was not impressed.

She is determined to sabotage herself. It’s so hard to help her, when she does this. Then, of course, she blames everyone else and has no understanding that her own actions are the problem. She simply can’t grasp it, and it’s getting worse as she gets older.

She and our vandal are very much alike is many things.

I finally set the list aside for later. By then, I’d been there for over 4 1/2 hours. The meeting was finally done, and I could finally go home!

Well… after a stop at the grocery store for a few fresh items we were out of.

At least coming home to our nice new door cheered me up a bit! I am so happy with it!

We need to find someplace to store the storm door, though. It’s still leaning against the house.

Things are supposed to warm up over the next few days; especially on the weekend. We are no longer getting rain in the forecast. Which means I’ll have almost a week of good weather to get more garden beds ready and do more winter sowing. We also need to winterize the bottom of the cat isolation shelter before moving it by the house, where we can plug in the heat lamp and heated water bowl. The catio needs to be moved, too. Pinky no longer uses it. I think she’s returned to the rafters in the garage, where she used to hang out last winter.

I plan to take advantage of every pleasant day we’ve got, before the end of the month stock up trips need to be done!

For now, however, I am mentally and psychologically exhausted. It doesn’t help that my eyes are still achy from the dilation drops and vision tests I had done, yesterday.

I think today is a good day to get to bed early!

The Re-Farmer

Finally building the new wattle weave bed

Spoiler alert.

It’s not finished, and won’t be for a while!

The first thing I did was harvest our unexpected maple coppice by the pump shack. It’s been a few years since I cut the suckers back from the old tree stump, so they were getting pretty big – big enough to start getting into the power line for the pump shack.

Time to take them down.

I cleared out all of it, including the smaller suckers. It’ll grow back, as maples tend to do, and the first ones should grow pretty straight, without having others to grow around.

The two stacks in the last picture of the slideshow above are the largest, longest and straightest ones. All the rest went onto the branch pile for future disposal.

The ones I was keeping got dragged into the inner yard, where I could work on them in the shade. I’ve been setting aside things in two piles there. One of longer, straighter poles and branches that can go into the chipper chute. The other is leaves, branches, etc. up to 1/2 inch, which can go into the shredder chute. Once I’ve got quite a bit built up, I’ll be bringing the wood chipper over to clean them all up.

The first thing to do was cut away all the little side branches and twigs.

The resulting pile looked so much smaller!

Since these are going to be in contact with the ground, my next job was to debark them.

Which took such a very long time.

It had to be done, though. Otherwise, the maples could start growing again. Willow and poplar – the other two materials we have for this – do the same thing. In the current wattle weave bed, I used stripped wood on the bottom layers, while the rest still had their bark. Amazingly, even without contact with soil, I spotted some fresh leaves growing!

I have to admit to feeling conflicted on this job. The job itself went well; stripping the bark on freshy cut wood went quite well and was almost meditative. I still felt like I was wasting time, when I could have been working on the bed so much faster, if I just left the bark on! I’m glad I took the time to do it, but gosh, it took forever.

I started stripping bark from the largest ones, leaving the shortest pieces with their bark on. By the time I was getting to the last few, the thinner ones were starting to dry up enough that I had to use my utility knife to strip the bark off, more and more.

I’ve got quite the pile of leaves, twigs and bark started for the shredder chute!

The largest of these were going to be the vertical supports. I measure the bed and worked out that I needed 12 for the long sides. I debated whether to just have one more for the ends but decided to have three smaller verticals at the ends, slightly offset from the long side’s posts. I decided to make the verticals a bit taller than the other bed, too, and cut them to 2’6″.

The posts then needed to have points made. For that, I went into the side of the garage where we store the lawn equipment. My late brother had set up a workshop in there, and there’s still an old vice on the counter. I was able to use that – wrapping the posts with an old cloth grocery bag to protect the wood from the vice – and the draw knife. That green wood cut so nicely!!

Ideally, I would then have treated the wood with oil, or charred the points, but I didn’t have oil for that sort of thing, and we’re under fire bans. So they went in as they were.

I’ve decided to add some wattle weave on the retaining wall blocks as well. With the spaced in the old chimney blocks, it was easy to evenly space out where the verticals would go, then hammer them into the soil. I then had to re-level the edge of the bed, since critters have been playing in the lose soil. I used one of the posts to measure roughly 2 feet from the retaining wall to set the corner posts, then set a line between them. I then used the line and the posts in the retaining wall blocks to set the remaining posts, before hamming all of them into the soil.

Then I dragged over the remaining maple pieces to start weaving.

The longest ones were used up in no time. Two were needed for each level.

The verticals are roughly 2 feet apart, like the other bed. In videos, etc. that I’ve seen about it, they tend to recommend 1 foot apart. When they’re that close together, it’s harder to bend the horizontals around the posts, and they are more likely to crack. However, with them being about 2 feet apart, the narrower ends get pretty loose before they stop. I’d do one from each end per level, which meant running out of length in the middle, making for loose ends and a bit of a mess. Some of that will be hidden once the soil it returned. Adding extra length per level would be more secure and less messy in the overlaps if the posts were just 1 foot apart, though. Which doesn’t help much if the wood ends up snapping, trying to bend them around the verticals that close together. Even using flexible green wood. In fact, I still ended up snaping one, trying to secure it, so the end wouldn’t be sticking out.

I’m glad I decided to do the ends as separate little walls. I was able to use those to help secure the ends of the long side pieces.

I ran out of the longs ones quickly, and the shorter ones were too short to be able to secure them between the verticals. They’d weave between 3 posts and just sit there, loosely.

Which is when I decided it was time to harvest some willow.

Once again, this was needed to get branches away from the power line to the house. I took only the largest ones for now; the smaller ones will need to be done, but I don’t have a use for them just yet.

After stripping off the leaves and shoots, there was a very small looking pile left behind! However, several of them were more than 12 feet long. I was able to weave those in from end to end, and just trim the tiny bit of excess with loppers.

But first, they got debarked.

The kittens LOVED playing with the ends while they were being debarked, and had a blast in the pile of leaves and bark.

Once I got as much as I could, woven in – leaving quite a few shorter pieces behind – it was time to call it a day.

I’m going to need a LOT more material to finish this.

The problem is finding lengths that are long, thin, flexible and straight.

The “straight” part is the hardest to find. Typically, the branches and suckers grow straight for maybe three feet, then branch off. Or there’s been some sort of damage that cause them to grow a new “top”.

For the retaining wall side, I could probably get away with adding more vertical posts, then use up all the skinnier, shorter pieces to weave onto there.

Tomorrow, if I’m up to it, I’m going to go into the edges of the spruce grove to start hunting down some of the poplar that has regrown. Hopefully, I’ll find some nice, long, straight pieces.

We have so many willow, maple and poplar suckers that I’d hoped to harvest for this, but the majority of it isn’t actually useable. I need to really hunt for what will work.

Which means this bed is going to take quite a while to finish. Which is fine. It’s not being used this year, and will be ready for next year. I also plan to leave the vertical supports tall, so that things like hoops or whatever can be added, if the bed every needs to be covered, to protect anything that gets planted there.

I am so tired and sore now, though, I might have to take tomorrow “off” and give my body a change to recover.

For now, I’m ready to take some pain killers and go to bed!

The Re-Farmer

Trellis bed progress

I headed out to check the garden as the day warmed up, to get a better idea of how much frost damage there was. As things warm up, the damaged/dead parts turns a lot darker, which showed me that the tomato plants in the main garden area did get killed off. Not the ones in the old kitchen garden, though! The melon plants might make it. Lots of dead leaves, but not the entire plants.

Tonight, we’re looking at a low of 5 – 6C/41 – 43F which, if things go the way they have been, lately, may actually end up being 3 – 4C/37 – 39F.

The high for today ended up being 18C/64F. I took advantage of it and got some work done on the trellis bed. It was actually feeling too hot while I worked! This is where I stopped for the evening.

The first thing I needed to do was finish off the wall on the left. I rolled the top log off, then used a chain saw to try and smooth and flatten things a bit, mostly to get rid of odd lumps and bumps, then putting the top log back. I still ended up with some gaps, but those will be filled with pieces of wood from the inside

The next thing was to use an auger to match the size of the pieces of rebar I have. Thanks to my husband, I have a nice set of long auger bits for my drill. They’re a touch shorter than the rebar, so after drilling holes through both logs, I removed the top log again, then drilled further through the bottom log. Once that was done, the rebar got hammered through the holes in the top log until it came out the other end, which I could then use to position the top log back again before hammering the rebar flush with the top.

The base log for the other wall was already debarked, but needed some clean up to remove bits of branches and other lumps and bumps. Then I got out the garden fork and loosened the soil between the markers where the log would be positioned. I found a large rock in the process that would not move. Since it’s under a wall, I left it. Once the soil was loosened, and the worst of the weed roots removed, I spun the log around so that the wide end was facing the other way. The ground is a bit lower on that side. I should have laid the base log in the other wall that way, but didn’t think of it until I’d already positioned it.

This base log itself has a long bend in it. I made sure it was positioned to bow outwards. That will be taken advantage of later in the build. Once in place, I used the chain saw again to remove any parts that looked too uneven and lumpy, and trimmed a few branch stubs a bit more.

The top log then needed to be debarked and prepped. This wood actually took the knife a lot better, so I went ahead and shaved a flat strip, so it would lay flatter on the base long.

That didn’t quite work out!

While the top log is a lot straighter than the bottom one, when I put it in position, the narrow end of the top log, which is set above the wider end of the base log, was floating at least 8 inches above! After rotating the log until it finally set the most evenly, the shaved part was now on the top!

There were still some lumps and bumps in the way, though, mostly on the base log. The wood on that tree did not take to the draw knife well, so I used the chain saw to level it off some more, then made another matching flat area on the top log.

With the bend in the base log, though, the top log is lined up on each end, but almost completely off the bottom log at the bend! It wasn’t going anywhere, though, so I repeated the process for inserting the rebar, more or less matching where the ones in the other wall are set.

With the rebar holding the logs together, I used a board to line up and mark the ends for cutting, then removed the jagged ends of the logs. I had to be careful with the bottom logs, so as not to be cutting into the ground!

The two logs you can see set aside in the photo will at least partly be used to close up the ends of the beds. These beds are meant to be 18′ long and 4′ wide on the outside. With the ends trimmed, they are no longer 18′ long, but the end pieces will be used to make up the gap. It doesn’t have to be exact, but I’d rather they be a bit longer than shorter. With how the logs taper, I might have to find thicker pieces of logs to finish the ends and get that 18′.

Once the end pieces are in place and secure, I’ll start working on attaching the 4 vertical supports for the trellis, which will then get horizontal supports across their tops. They’ll be added after the verticals are in place. The ground is uneven, but I want the horizontals to be level. Since I’m not going to be digging post holes as originally intended, and just attaching them to the outside of a wall, I’m no longer going to be losing about a foot of height on these 7′ posts, so I will likely mount the horizontals at 6 1/2′ rather than 6′, then trimming off the excess height. When the second bed is built at the other markers, it will have matching trellis supports and, eventually, they will be joined at the top to create a tunnel.

If all goes well, we’ll make at least one more trellis tunnel set up in line with this one. My priority, however, is going to be making more high raised beds, once this is done. Mobility, reach and pain reduction while tending the beds are becoming more of an issue for me.

Not before this bed is finished, though, and that will include filling it and preparing it to plant in, next year. That means layers of carboard on the bottom, maybe some small branches, wood chips, fresh green material such as the frost bitten bush beans I pulled earlier today, grass clippings and topping it with some of that purchased garden soil we still have left. Last of all with be a grass clipping mulch to protect the soil over the winter.

The bed the Roma tomatoes were in needs to be prepared for the winter, and if I could at least make that into a high raised bed, that would make life easier for next year!

The Re-Farmer

Trellis bed progress, and we have a soot sprite

Since I ended up driving around again today, once I was home to stay, I took advantage of the cooler temperatures and calmer winds to work on the trellis bed.

One larger base log was ready. The next step was to use a garden fork to loosen the soil from one marker to the other. Aside from pulling out as many weeds and roots as I could, I was also able to use a hoe to try and adjust the soil height. The log is, of course, wider at the base, plus the ground has a slight dip at one end, so I brought loosened soil from one end to the other, to try and make it to the log would be more or less level once on the ground. Plus, with the loosened soil, it wasn’t going to roll around out of position on me. Once that was on place, I could start debarking the log that would be set on top of it.

Debarking is pretty fast. It’s all those branch bits and lumps that slow things down!

After doing the top half, it started to get pretty painful on the back, so I used one of the poplar logs that will be vertical posts to raise the end. It worked for helping the back, but the saw horse kept rocking, and the poplar log kept wanting to roll! 😂

Once the smaller log was debarked, I use the baby chainsaw (electric pruner) to sort of flatten the base log from end to end. Mostly to get rid of some lumps where branches used to be. The smaller log was naturally flat next to a couple of branch stumps, so I took advantage of that and flattened the rest of the lot a tiny bit, to match the naturally flat part. It’s not a perfect fit, but I wasn’t really trying for one. I might level things off a bit more, but if I do, it’ll be when I have the chain saw set up, so I’m not killing the batteries on my mini chainsaw so quickly.

Next, it was time to work on the large log that will be the base log for the other wall of the raised bed. It had more branch bits to cut off than the other two, but once those were trimmed, debarking went quickly.

At that point, it was time to stop for the day – and for the draw knife to get a good cleaning and sharpening!

I expect to actually be home all day tomorrow, so I’ll be able to finally make more tomato sauce. When I get back to working on the bed, I plan to make use of the pieces of rebar I’d picked up for the shelter we could never get set up. I’ve got auger drill bits in that size. Once I’m satisfied with out the side logs are resting on each other, I will drill a pair of holes, then hammer in the rebar, so hold the logs together. When the time comes, the ends will be joined with 4′ logs, but first the ends of the side logs will have to be trimmed even. That will be much easier if I can do that while they are already secured into position.

As for the vertical supports, I am changing my mind on how to do those, again. I’d been planning to set the posts inside the raised bed, before they were filled. Setting them in the middle of the beds would result in a trellis tunnel that is 6′ apart across the top, and would give access to both sides of the bed for planting and weeding.

The more I think about it, though, the more potential problems I can see with doing it that way. Primarily, I’d have to treat the bottoms of the posts to prevent rotting. I was planning to debark and char them. With the winds we’ve been having, though, the chances of being able to get a fire going to do that don’t seem pretty good. Also, finding straight horizontal pieces that are 6′ long is going to be harder. I have enough vertical supports to have 4 posts for each of what will be 4 beds like this. I could try to harvest more poplar to have more verticals, but finding nice straight ones in the right size has not been as easy as I thought it would be, and I don’t want to be wasting trees. So if we have 4 verticals per bed, they would need to be 6′ apart, and I would need three 6′ pieces per bed – or 12 in total, for the 4 beds we plan to build here. If the trellis tunnel sides are also 6′ apart, that adds another four 6′ pieces needed per tunnel, making 20 horizontals in total.

Now I’m thinking I should attach the vertical supports to the outside of the beds, along each side of the tunnel space. I can see a few advantages to this.

First, I won’t have to dig any post holes.

Second, if they are attached to the outside of the beds, they won’t be buried in soil and I won’t need to treat them to keep them from rotting.

It will also be easier to find shorter, straight pieces for the horizontals, plus it will be easier to reach and work on the tops to attach them. Right now, I’m just aiming to do one low raised bed with a trellis wall. Even if we manage to get the second half done, the horizontals at the top don’t need to be until later. Plus, it will be much easier to attach 4′ lengths onto the verticals later on, than 6′ lengths with half a garden bed to work around.

By not having the verticals in the middle of the beds, they won’t take up growing space. Also, these beds are 18′ long, and 4′ wide on the outside. Our raised bed covers are intended to be interchangeable, at 9’x3′. Without the verticals inside the bed, we’ll be able to fit a pair of them over one 18′ bed, if needed. The logs are wide enough that the actual growing space will be closer to 3′, so the covers will have frame support.

The main reason I wanted to put them down the middle of the bed was to be able to reach the growing space from both sides. It had been my intention to reuse the hardware cloth and chicken wire from the old squash tunnel for this. However, as long as we use something with large enough openings, we’d still be able to tend the bed, through the trellis, just like we’ve been able to do with the cover currently on the high raised bed, made with the stronger fence wire and larger openings.

The one real drawback is now to secure the verticals to the walls. I might still have to dig post holes.

I’ll figure that out, when the time comes.

In other things…

I did the running around I had to do; since I had to go to Staples to get the printer ink we needed, and it shares a parking lot with a Walmart, I took advantage of that and picked up a few things, including more of the shredded cat food the cats in the isolation ward prefer. Or maybe it’s me that really prefers it. It’s much easier to divide into bowls than paté.

Once we had the printer ink, we could print off the label we needed (frustrating to have to buy colour ink to print something that is black and white text!), then pack up the RAM that didn’t work with my husband’s computer and drive to a Purolator depot.

There is one thing that’s new right now.

When feeding the cats outside for the evening, I was able to catch a little black kitten.

I brought it inside.

It’s just the tiniest little soot sprite!

My younger daughter has always wanted an all black cat. Now, she will have one.

So far, it is not too keen on this whole “indoors” thing, and being surrounded by strange kittens. It doesn’t even seem to recognizes its brother. However, it quite enjoyed its first taste of wet cat food! I can hear it wandering around behind me, sometimes giving out a strange, hoarse little meow.

It will take time, but Pom Pom is starting to warm up to attention now, and hopefully that will encourage Sprite to accept attention from humans, too. If things go well, I hope to have it well socialized by the time my daughter gets back from house sitting. 😊

The Re-Farmer

Fourth raised bed cover done – mostly – and my conclusions

After yesterday’s lumberjacking, we were pretty sore this morning, but not as bad as I expected. Still, my daughters were sweet enough to feed the outside cats in the morning, so I could sleep in a bit before doing my morning rounds.

My daughters had some shopping to do in town, so my younger daughter and I left after my morning rounds were done. One of her stops was the pharmacy, forgetting that today is a statutory holiday in Canada, and the pharmacy was closed.

I did notice that a BBQ food truck was out so after our last errand, I checked it out. I had enough cash on hand to get some take out to bring home as a treat. I miss food trucks! 😄 There’s actually quite a few in the region, but where we are just doesn’t have the population base to support one.

One thing I noticed while I was waiting for the food was a sign on the nearby hardware store. Along with cycling through their hours, specials, etc., they show the local temperature. According to my apps, the hottest I was seeing was 26C/79F with a “real feel” of 29C/84F at home. The sign, however, was showing a temperature of 32C/88F! Judging by how I was feeling while standing in the shade, I’d say the sign was right.

We really ought to get ourselves a weather station. I did find the parts of one while we were cleaning up the house, but the outdoor reader was (still is, actually) mounted to one of the steel clothes line poles, so the readings would be quite off!

Speaking of the weather, we started to get alerts for severe thunderstorms this afternoon. Looking at the weather radar, I could see spots of storms, scattered like confetti, sweeping across the prairies.

So far, none have hit us. The most we got was a smattering of rain. I was outside at the time, working under a tree, and never noticed until I saw parts of the sidewalk were wet!

This is what I was working on.

The last frame for a raised bed cover now has wire on it.

Of course, it was more of a pain than expected.

The wire I used was 2″ hardware cloth salvaged from the old squash tunnel. The roll is 4′ wide, so I could just use the length, rather than cutting strips, like I had to with the fence wire and the plastic hardware cloth. I was going to cut it to 9′ until I realized I had close to double that, so I folded it almost in half.

Putting the first side on was fairly easy. I used the steel strips again, as they are a lot more secure. In the past, for wire like this, we used staples, and there’s no way staples would hold this in place while being manhandled on and off raised beds.. The only real hard part of attaching the first side was having The Phantom suddenly decide she absolutely had to have attention! She’s been making strange lately, and I thought she was getting more feral, but not today!

Also, as she rolled around, I could see a single active nip. I had been wondering, as she never looked pregnant, if perhaps she were infertile, but she does have a single kitten somewhere.

Speaking of kittens, they were all over the place, and more of them are showing red and/or sticky eyes. None as bad as the two we regularly bring inside to wash their eyes, thankfully, but my goodness, it’s bad this year!

Anyhow… where was I? Oh, yes… the wire.

Once the first side was attached, getting the second side done was a real pain. The two layers of wire mesh kept getting stuck on each other and misaligning. After fighting with is for about half an hour, at least, I finally got some jute twine and wrapped the length of it near one edge, from the fold to where one end was a few inches shorter than the other, then secured the short end as well. Only then could I finally attach the other side to the frame.

Unfortunately, I started to run low on the short screws I was using the attach the steel strips. I had just enough to secure the length, but only on the bottom edges. What it needs is more of them to secure the wire to the top edges, to keep it from pulling away.

So… more of that size of screw is on my shopping list. I did try to secure it a bit better using the staple gun, but didn’t finish. Even with the steel straps, they will easily pop out.

Aside from securing the wire to the frame some more, I am thinking it will probably need more support. The wire can hold itself up, but it bends very easily. It would take next to nothing to crush the arch. If a cat decided to jump on it or something, it would collapse completely. I think I have a couple more lengths of the PEX pipe, but I would want at least 4 preferably 5, to support the wire.

So the cover is done to the point that it can be used, but needs a bit more to make it stronger.

For this one, I’m glad I decided to fold the hardware cloth in half rather than cut it too length. If it were 1″ squares or less, it would be stronger, but with 2″ squares, it’s relatively flimsy. It will be okay when we use other strips of the 2″ hardware cloth on the box frame to protect the bed with the popcorn in it, but not so much as a self supporting arch.

So, here are our experimental results.

The first one we built was the box cover, designed specifically to go over taller things like the Tom Thumb popcorn. It is intended to support wire, shade cloth, etc., as needed. It is probably the most structurally sound of the frames we made. It is unlikely we will need to build more like this, simply because things we grow that are taller are more likely to need other types of support or protection.

I can see two problems with this design. 1) Once the sides are wrapped in wire, there is basically no way to tend the bed without removing the entire cover, and 2) for anything needing a cover this tall, removing it would require 2 people, to avoid damage. If, however, it were wrapped in fabric mesh or netting, it could be done in such a way that the netting could be lifted for access. Fabric won’t keep the racoons out, though.

Conclusion: I’m happy with it. This frame is worth making again, if we ever need to protect tall plants, but there would be little need for more, based on our current garden needs.

The second one used fence wire we found in a shed. The fence wire turned out to have varying sizes of openings, from 6″ square to 6″ x 3″ The roll was just over 3′ wide, so we had to cut 3 strips to fit into the frame, with overlaps. I went with 5′ long strips to create a high arch, which worked out well for the bush beans.

The first problem we found was with how the vertical and horizontal wires were joined. Each intersection has a wire wrap, adding significant thickness to those spots. We were using U nails to attach them, hammering them diagonally over the joins to secure them. Between the nails themselves and the thickness, this was far more difficult than it should have been.

The wire itself was stiff enough that a couple of screws snapped in the frame’s corners, which resulted in them starting to rotate. Thankfully, we had a couple of scrap 9′ lengths that cut wonky, and were able to add those to the inside of the frame, sandwiching the fence wire in between. That also strengthened and secured the corners.

We currently have the frame over our bush beans, with netting on top, to protect the beans from critters. The wire wraps at each intersection is a problem, as the net catches on them, but aside from that, it’s ideal. The net strip is wide enough that I’ve even been able to secure the edges with ground staples into the soil under the frame, too.

Conclusion: I’m really happy with this one. I’m able to lift the netting and harvest through the fence wire without having to move the frame. If I can find 6″, or even 4″, square welded wire fencing, instead of the wrapped wire, that’s what I would use to make the majority of future covers. It’s strong enough to support itself. I could probably use 6′ lengths for an even higher arch, and it could still support itself, plus any shade cloth, insect netting, greenhouse plastic, etc. Though we would not use U nails again, and go with the steel strapping, I would still be good with that double thickness of wood on the long sides, which makes the whole thing much more structurally stable, while also securing the wire. In the future, I can see most of any new covers we make to be like this one, with a few modifications.

The third one is the one with the “rigid plastic” hardware cloth. Which turned out to not be very rigid at all. This is when I remembered I had the steel strapping and used that to secure the mesh. After the first hoops I tried to use, snapped screws in all the corners, I had to add extra pieces of wood inside the short ends. Switching to PEX pipe hoops worked much better, and the steel strapping worked well to secure the hoops, too.

The plastic hardware cloth rolls came in 3′ widths, so it took three lengths to cover the frame, which then had to be lashed together. I went with 4′ lengths this time, for a lower arch compared to the fence wire cover. Once the hoops were snugged in place and trimmed to size, I used garden twist ties to secure them to the mesh and prevent them from being pushed sideways.

With the outward pressure of the hoops, this frame had a couple of screw eyes added to the middle of each long side and cord strung across, to keep the sides from bowing outwards.

Conclusion: This frame is definitely the most aesthetically pleasing of them all. It’s easy to move around with 1 person, and the lower arch is good for shorter crops. I would not, however, use this plastic hardware cloth again. It creates too much shade. Which is great if I have it over a bed of lettuce, but obviously, it wouldn’t be good to use over something that needs full sun. I also would rather have the flexibility of using whatever cover I need for a particular bed. I want these frames to be interchangeable as possible, whether a bed needs shade cloth, greenhouse plastic, or frost protection. If I need to use hoops for support again, the PEX pipe is definitely the way to go.

Last of all is the frame done today, so I’ll just go straight to the conclusion:

Conclusion: As this one didn’t need any extra wood added to the sides or ends, it is the least structurally secure, but that’s an easy fix. I would not use this 2″ hardware cloth again, though, for the same reason I wouldn’t use chicken wire. It’s just not strong enough, and bends too easily, even doubled up.. It will also need support hoops added at some point. It’ll be used, but that’s about it.

As we build more high raised beds, we will also build more covers Experimenting with the different materials has shown me a lot of what works best for our needs – and what to avoid! Armed with this information, I’ll know what to keep an eye out for and pick up as the budget allows, to have on hand for when we have more beds to protect!

The Re-Farmer

Project progress: finally getting started!

Today, after many, many delays, we finally got some progress on those raised bed covers we need to build!

My daughter and I set up the folding table we made using the legs we found when cleaning up the new basement, and a section of 3/4 plywood found in the pump shack. The hard part was finding level enough ground for it, and still be close to the outside outlet. We ended up putting it almost against the house, and that’s where we set up the miter saw. Then we moved the swing bench that’s been sitting on the sidewalk block patio under the kitchen window for the past while, so we could set up the table saw close enough to plug it in without an extension cord.

The first thing we tried to do was cut the 12ft long 1″x4″ boards in half, lengthwise. My daughter, sweetheart that she is, found where the saw blade could be adjusted up and down. My husband and I had tried everything to raise that blade and finally concluded it couldn’t be raised. Turns out, it was just badly rusted and that’s why it wasn’t moving. !! I wonder how many years it sat in that shed before I found it?

The first two boards we cut in half did not go well! My daughter was feeding the board from one side while I supported it from the other, but it just did not want to stay against the guide. We ended up with some wobbly cuts! So we cut the others shorter first, then cut them in half. We measured the beds first to confirm the dimensions. The side boards total 9′ long, but then there’s the width of the end boards; I forgot I’d attached those to the ends of the side boards, and not to the insides. That made the beds 9′ 2″ long. The end boards were 3′ 1/4″ long.

So we will be cutting 9′ and 3′ for the cover frames.

The boards were exactly 12′ and 1/4″ long, so we just measured off the 9′ and cut it. The cuts take off a fraction of an inch, so the remaining sections should be almost exactly the right length for the short ends.

It was much, much easier to cut the shorter lengths in half on the table saw!

All the pieces are now cut. The 3′ lengths are in the front, then the 9′ lengths. In the back is one of the two first 12′ boards we cut in half, with the wonky cuts. The other one was used to cut more 3′ lengths, since being a bit wonky won’t be an issue for some parts of the build.

There is also one board at the top of the photo that was set aside because it has damage on it in two places. We will still be able to use the undamaged parts at some point.

As for the plans, I sketched what I had in mind out for my daughter.

We will be building four 9’x3′ frames, but two of them will be used in one cover. The Tom Thumb corn is going to need taller protection from deer, so two frames will be joined by 3′ vertical supports. One more support will be added across the top in the middle, to keep it from bowing outwards. I also plan to add screw eyes inside the middles and tie a cord across, to keep the sides from bowing out. A cord that close to ground level will be less in the way of growing plants.

At this point, we could just put a net around it, though if we wanted this over a bed with taller plants in it, we could potentially add hoops to the top for extra height.

That box frame is the one we need to get done first, as the corn is most at risk for getting eaten. Between the deer and the racoons, it’s going to become an issue in the near future! If we want to keep racoons out, though, we’ll have to use hardware cloth and find a way to secure the cover to the frame, so they don’t just knock it off.

The other two frames will have rounded tops. We have some wire fencing with 4″ squares that I plan to use with one of them, making a slightly higher cover. The fence wire can then support things like netting, plastic or shade cloth, as needed.

With the other, I was thinking of using the hoops that are currently still over the carrot bed, but… now that I’m looking at the plans, I realized we have enough of that wire fencing to use on both frames. We could make them different heights, for different needs. A shorter one, for example, would be handy for shorter produce, or to create a mini greenhouse over newly sown beds. A taller one would be great for plants that grow higher, but not high enough to need that box cover we’ll be putting over the corn.

As we build more high raised beds, the plan is to stick to the 9’x3′ size, so that these covers can be used interchangeably on any of them. We’re doing three covers for now. One of them should be useable on the high raised bed we have now, which currently has hoops to protect the beans from the deer. The box bed with the red onions does not really need a cover, except maybe to keep the cats from lying in it, or the birds from digging in the mulch. Over time, we plan to build enough covers for all the raised beds we make.

As for cutting the pieces, I was really happy. We will definitely need to get a new table saw, as this one was having issues. It will do for now, though. What I was really excited about was the miter saw. I bought it at a garage sale, and this is the first time we’ve tried to use it. Of course, it didn’t come with an instruction manual! Which is fine. It’s easy enough to figure out.

Up until now, I’ve been using a hand saw to make cross cuts. No matter how careful I am, I always end up making crooked cuts, and there are always those little bits of wood that break before the saw can cut them that need to be sanded. So excited to get beautiful clean cuts! Plus, the speed of it was fabulous!

Once the cutting was done, I realized we would not have enough screws to assemble them all, so we decided to go into town and get more. The table and miter saws got put back into the sun room, and the cut pieces went onto the table we used for the miter saw. We were getting hints of rain, and we didn’t want to take a chance. It’s a good thing we did, because there was a downpour while we were out!

When we got to the hardware store, we drove around the block a couple of times but could find no parking, so my daughter offered to buy us lunch! By the time we were done, things were no longer so busy, and I was able to park and run in.

Before we left home, I took a pair of calipers to the water pipe leading from the house to the garden that needs to be repaired. It’s a 1 inch pipe. After finding the screws we needed at the hardware store, I went looking for a flexible PVC coupling with metal clamps. The smallest size they had was 1 3/4″. That would leave too big of a gap for the clamps to be able to seal it on a 1 inch pipe. I talked to an employee, and showed her the picture I took of the calipers on the water pipe, which also showed the crack in the pipe very clearly. She tried to find something else that would work, but there wasn’t anything they had. In the end, she recommended I talk to a plumber.

What I will most likely do is go to the hardware store in my mother’s town, which is where I first had the flexible coupling recommended as a possible fix. They are a bigger store with a larger plumbing section, and may have a smaller size coupling in stock. If worse comes to worse, we can order them online. In fact, I’ve already found some sized specifically to fit on 1″ pipe.

As you can tell, I’m really hoping to avoid having to dig up and replace the entire length of pipe!

By the time we got home, the downpour my other daughter told us about was done! I don’t know if it’ll be dry enough for us to start assembling the first cover today. We’re supposed to get more rain, too.

This is where I really wish the storage shed wasn’t full of my parents’ stuff, that my mother insists we keep and is constantly afraid someone might come in and steal. As if anyone would be interested in the bags and bags of their old clothes, boxes and boxes of household stuff, or their old furniture. My late brother had used that building as a workshop, but that was more than 10 years ago. We never had a chance to even see what all was still in there, as my brother and his wife had already started moving my parent’s things into there before we moved in, and it was being used as storage for other things even before then.

So we make do with working outside, when the weather allows!

Well, this project has been delayed repeated for about a month now. One more day won’t hurt, if it comes to that!

The Re-Farmer

Another step forward

First, here’s a beautiful lady, saying hello!

Tissue is quite enjoying the warmth of the sun – and so far, none of the cats seems to have tried to destroy the smaller plants that have been temporarily moved onto the shelves that will soon be holding seedlings.

Soon, she will not be able to spend time on the window sill in this room! My daughter and I finally made it to the city to pick up what we need to make the cat barriers (which my other daughter is paying for, sweetheart that she is!).

And I’m looking forward to having a carpet that doesn’t get completely covered in cat hair and the bits of rope torn off their scratch tower, immediately after vacuuming.

We’ve got three sizes of boards. We were going through the cheap contractor grade pieces, and it was hard to find any that weren’t damaged, or wonky.

We also got chicken wire, aka: hex wire, instead of the hardware cloth I wanted to get. It was the only thing they had that was wide enough and long enough for this.

We’re actually doing a simplified version of our original plans. Instead of a box frame for the entry, then a door frame inside, and finally the door, we’re just going to do a box frame and a wide door.

For the box frame, we’ve got 1″ x 4″ boards. The frame is meant to slide into the entry into the living room, with self adhesive foam on the sides to hold it in place, but still allow us to remove it, if necessary. The problem was, we couldn’t find the thickness we needed. There is moulding at the top and bottom of the entry, so the foam was supposed to fill that gap. After debating our options, we decided to go with the thickest they had, and we’ll remove the molding from the bottom of the entry and make the box fit top to bottom more snugly. It won’t be completely snug; when the girls measured the space, they found a half inch difference between the top and the bottom!

For the door, we’ve got 1″ x 3″ boards. We will also need to create a barrier for an opening in one of the shelf dividers, so we got 1″ x 2″ boards as well – one of which will also be used a side jamb.

We spent some time looking at our latch options and ended up going with a simple hook and eye latch. We decided against getting a handle. We had use the latches as handles, but if we really wanted a handle, I’m sure we’ve got something lying around the house somewhere.

Unfortunately, it does look like the hinges I picked up will be too wide. Possibly. If we do have to get smaller ones, I’ll be sure to pick up three hinges, not a set of two.

Securing the chicken wire was another thing we had to consider. We’d both bounced around the idea of sandwiching the wire between boards, but we’d basically double the wood need for the door, so we’re going to make it the same was as the barriers we’ve made for the basement doors; The horizontal boards will overlay the verticals, with the wire sandwiched between, and the rest of the wire will be secured with something else.

My thought had been to use small U nails (I think some places all them staples), but they didn’t have any small ones. The alternative is to use actual staples, but our staple gun isn’t very strong, and we’ve found the staples pop out way too easily. So we looked at staple guns, only to find that ours was there, and is a heavy duty gun. So we ended up getting stronger staples, instead! We’ll see if that works. If it doesn’t, I know where to go in town, where I can get what I was originally thinking of, in bulk.

I might need to go into town, anyhow. I think what we have at home is all too large for the size of wood we are using. The cats have knocked most of the boxes off the counter in the sun room, anyhow, along with all sorts of other things now scattered around the floor in there – and we won’t be able to clean it up until we can take things like the table saw and my husband’s walker, outside, so we can get at it all.

Meanwhile, construction starts tomorrow. Hopefully, we’ll be able to get both the doorway and the shelf opening done, and we can finally have cat free space for more seedling trays, and not worry about them being destroyed! And hang the shop lights we will be using as grow lights from the ceiling without worrying about cats jumping on top of them. We have seeds that need to be started indoors 12 weeks before last frost, and that’s in four days.

In other things, I got an email from my bank this morning, congratulating me on getting approved for the low limit credit card I applied for (and approved for) last week, and letting me know it just got mailed. I was also informed that I could start using it right away – if I just get the Apple Pay app and set it up through my online banking.

No, thankyou!

For the card I chose, there is no annual fee, however there is also a 21 day interest free grace period on new purchases. As long as I pay off any and all new purchases within 21 days, and never use cash back, I could theoretically never pay interest on this card. Since I plan to only use it for purchases within budget, and pay it off right away, that should actually work out.

On another unrelated note…

One of the things we got done today was set up an eye exam appointment for my younger daughter. I was going to wait until my husband and I got our tax returns, and we’d get glasses for all four of us (which we planned to do last year, but ended up with unexpected bills, instead). Unfortunately, my daughter’s glasses have gotten so scratched up, she can actually see better without them than with! I’d been told that in our current province, eye exams are covered by the provincial health care plan, once every two years. When I called and asked about it, however, it turns out that it’s only partially covered – and the remainder that we would pay is $105. !!! I hate to think how much it would cost if it wasn’t partially covered! That is massively more expensive since we last got our eye exams. At least I’m still covered 90% by my husband’s health insurance, and I confirmed that they direct bill.

We just have to get our taxes done. I picked up different software than the TurboTax we usually use and did try to get it started, but quickly gave up. I had to manually include the T4A to their list of different T4s (I had no idea there were so many), but while I could input how much he paid in taxes, there was no line for his disability income. The line number on his T4A simply doesn’t seem to exist in the software, which makes no sense at all. There was also nowhere I could input that I qualify for the caregiver’s tax benefit, nor anywhere for my husband to include that he gets the disability tax credit.

It takes a lot to be even worse than TurboTax.

Frustrating.

Ah, well. It’ll get done, and the sooner the better!

The Re-Farmer

I made a video

I put together images of the wattle woven raised bed and made a video out of it. This time, I borrowed my daughter’s microphone for the narration, and WOW was it better! I didn’t have to use background music to camouflage the background noises my headset microphone always made.

Something got glitchy when I saved it. I had to save it several times to get rid of some strange coloured stripes that showed up. They were only visible after I saved the file and checked it, never in the editing software. I uploaded the video, only to find the glitch had simply moved to the very beginning of the video. I had to re-save it and re-upload it, and I think this one worked.

Please let me know if you can view it all right!

The Re-Farmer

Progress on the old kitchen garden bed and water bowl shelter

To continue working on the low raised bed in the old kitchen garden, I couldn’t use the mini chainsaw any more – the batteries just don’t last long enough for a job like this.

It was time to break out the electric chain saw. It’s very handy. The only problem is that I was moving around so much to reach the corners, the extension cord was in the way.

It still made the job much easier and faster. There was one log that was so bumpy, I spent more time trying to smooth it out than all the rest of the work put together!

You can see in the background that the kittens had been playing in the soil on the tarp, spreading it out quite a bit!

The whole thing wasn’t very stable, though. Something needed to be done to stabilize it, so it wouldn’t fall apart when the soil was added.

I decided to sacrifice some of the plastic coated metal stakes that I’d used to hold hoops supporting netting over the spinach bed.

I used an auger bit to drill holes into each corner of the bed, then hammered in a length. A couple had to have excess length broken off, but I think the other two actually went all the way through and into the ground below.

This made the whole thing quite sturdy. Now I could start filling.

On top of the wood chips I’d added earlier, I added some of the contents of our compost pile. Vegetation, apple pieces from straining the apple cider vinegar, coffee grounds, and even a few eggshells went in.

Next was a layer of dry grass clippings. One of the logs at the end had a fair bit of space under it, so I stuffed it with some grass clippings, too. Then it all got a thorough soaking before the soil was returned.

Once the bed was full, soil was added around three side of it, to fill in the gaps left from digging out a larger hole than the bed itself.

Which, of course, a kitten promptly tried to use as a litter box!

Finally, some grass clippings were added to mulch the top, and it got another thorough watering. I was also able to clear off the stepping stones at each end.

This bed is now done, and ready for planting next year.

My next job will be to try and weed along the whole side of this garden, before we start figuring out the low wall we want to edge it with (my daughter wants to use rocks – we have lots of those!) and top it up with some of the leftover sifted soil. The next bed I want to work on, though, is the L shaped bed that goes around the double lilac. Even if it only gets a supporting wall on the inside of the L shape, that will help. Trying to work about that lilac bush is a pain, and there are so things trying to grow into the space from there. We’d already tried to remove so many roots over the past couple of years, but it’s just getting worse! As with this bed, the L shaped bed will be only 2 feet wide, except possibly the tip of the short part of the L shape, where it can be accessed from three sides and is already wider than the rest of the bed.

Little by little, this garden will eventually have all walled, low to middle height raised beds. I was wanting to make this our kitchen garden, with things like herbs and salad vegetables that get used the most often over the summer, in here. My younger daughter wants to make it into a flower garden. Considering most herbs have lovely flowers, I’m sure we can come up with a compromise. 😊

Speaking of my younger daughter, when I was done working here, I helped my daughter out with her project.

By stealing kittens.

You’ll notice one of them has yellow paws. My daughter was painting the water bowl shelter, and that kitten would NOT leave her alone! The only way to keep him out of the paint was to put him on her shoulders – which means her skin and the tank top she was wearing got paint, too!

The first coat is done. The underside won’t need another coat, except for the legs. She was able to crawl inside and paint there, too. Carefully, as the roof is resting on bricks to hold it off the ground, and it’s not particularly strong. I think she even got the floor done, as well as the underside of the roof. After the legs and walls get a couple of coats, we’ll flip it right side up again to do the roof and whatever else can be reached at that point.

I’m surprised more kittens didn’t end up with paint all over them. They really, really love playing in this thing! Once it’s done and set up with the water bowls, they’ll have three roofs they play on. 😁

When I picked the colour, I tried to get a yellow as close as I could to the colour used on the kibble house. I couldn’t remember where we’d bought the original paint from, so I figured it was a different brand’s colour and would be slightly different. My daughter remembered that we bought it at Canadian Tire, too. It turns out I really did pick the exact same colour! We used up an entire gallon on the kibble house, but the water shelter is smaller, so we should have enough left over to do the tree stump bench out by the main garden area, too.

It feels good to have visible, tangible progress done! A lot of the fall clean up work doesn’t look like a lot got accomplished, because things get taken away, rather than added.

Little by little, it’s getting done!

The Re-Farmer

Water bowl house, in progress

My younger daughter starting working on a shelter for the water bowls, and we got some more progress on it last night. This is being built with whatever scraps we can find in the barn.

Construction is almost complete. A couple of floor boards are not nailed down yet. It got too dark to see. The scrap boards used for the floor and walls are pretty old, and there was a fair amount of rot on the ends. For the walls, I laid the boards so that the strongest wood could be nailed in place, then the rotted ends were sawed off. The same boards were used for the floor. Since this is to hold water bowls, there are spaces left in between, so that if any water spills, it’ll run through the gaps and not accumulate inside.

I might be able to cover those triangle shaped gaps at the sides. I was originally going to just leave them, but they are pretty big. Big enough that I think too much snow might blow in during the winter.

Once the construction is complete, it’ll get a scrub down and a paint job.

It’s big enough to hold the four water bowls we have, though it won’t fit as many cats at the same time as the kibble house can. That won’t be a problem, as they don’t crowd around the water bowls the way they do for the kibble.

Once painted, this should actually last a few years, in spite of how bad some of the boards are. The frame is made with sturdier wood, so it’s actually pretty strong.

It will be good to not have to dig the water bowls out of the snow this winter!

The Re-Farmer