Well, it finally got done! At about 1am, the video I meant to post yesterday was finally uploaded to YouTube, which then was going to take another hour to process it, in three different quality options. I waited until the lowest quality one was done, so I could select a thumbnail, then went to bed!
The question is, was it worth it?
I’ve watched the video myself, selecting the highest quality option, but I really can’t see much of a different.
Here is the video in question.
Could I ask a huge favour?
Could you please watch this video on YouTube, selecting the highest quality option, then compare it to this one…
… also on highest quality option?
Then let me know in the comments how you watched it, and if you could see any difference in quality or play.
I’m using my new desktop to watch these, and the YouTube settings for both allow me to watch them at 2160p/4K.
When exporting the older video in my software, I used the default “good” quality setting. There is little difference in file size with either “good” or “high” options, so it should not have taken so very long to upload. I don’t know if it was an issue with our internet, or with YouTube itself. Or both. I’ve had this happen before where the upload took so long. it was basically stopped. I gave up and started over again. The problem with doing that is, no matter how far along the upload was, trying again starts at the beginning, not from where you left off. In that case, when I tried it again, it uploaded much faster and without any problems the second time around. I seriously considered doing that again with this one, and probably should have.
First, thank you for the kind words I received after my last post yesterday. I’m happy to say I did actually get sleep, and am in much less pain today. I’m going to take it easy for a day or two, so I don’t have a relapse, but I did take the last step in preparing the bed I’ve been working on.
I got a couple of hoses set up to give it a soak and grabbed the first nozzle I found.
It promptly broke. The threaded portion cracked right off!
I couldn’t find the new nozzle we got last year, but I did find another older one (these were nozzles we found when we moved here, and they outlived others I’d bought new!) and that one got the job done.
I took all the plastic off again. There was condensation built up under it, as we had a touch of rain last night, but the soil beneath was still dry. I spent about 20 minutes going back and forth, giving it a deep watering. With the melting snow and water actually being absorbed by the soil instead of washing away, I know there is moisture close to the surface, so the amount of watering I did should be enough.
I ran out of ground staples while putting the plastic back, so I had to find weights for the last section.
The bricks being used to retain the soil is temporary. We will be gathering materials for something more permanent. I’m thinking something about 3 times the current height with the bricks. When that’s done, we’ll take the extra time to make sure everything is in a nice, straight line. In the process, we’ll replace the boards that are holding the soil from falling through the chain link fence with something better. The path itself will eventually have bricks or something, so it’s not to muddy.
A path we will make sure doesn’t get buried like those sidewalk block chunks I’ve been finding!
Looking at the forecast, I’m thinking the earliest we can plant the Purple Caribe potatoes in here will probably be next weekend. We’ve got a couple of warm days, then the temperatures are supposed to drop to freezing, then take a few more days to warm back up to double digits (Celsius).
I’m already feeling time slip away from me. Half of April is almost gone already!
I was able to get a few things done outside today, and I am so happy!
While waiting for the septic guy to arrive and replace the pill switch in our tank (yay! That’s done!), I took the time to remove the mulch in the old kitchen garden beds. At this point, the mulch is insulating the soil from the warmth instead of the cold, so it needs to come off.
There is garlic planted in the tiny raised bed with its own cover, the long and narrow bed against the retaining wall, the short part of the L shaped wattle weave bed, and down the centre of the rectangular bed in the middle.
In front of the tiny raised bed is some walking onions. I’d planted bulbils for last year, but basically just left them be. They produced new bulbils and now both the onions from last year, and their bulbils, are starting to send out new shoots! I could plant the new bulbils somewhere, but the whole point of walking onions is that they plant themselves.
While uncovering the long section of the wattle weave bed, I found what looks like surviving thyme and strawberries! I wasn’t sure if they’d make it through the winter. It should be interesting to see if the chamomile self seeded or not.
These had a grass clipping mulch, which has just been set aside for now. We’ll use it again, after the ground is thawed an as we are able to plant things.
By the time this was done, it was coming up on 2pm, which is when the post office opens for the afternoon, so I headed out. Not only did I get the packages I was expecting, but the missing pieces from the shelf I got to make into a multilevel cat bed came in. A job for tonight will be to take care of that.
When I got home, the septic guy was here, so I stayed around the area as he went in and out from the tank to the basement, so make sure no cats got too curious about the open tank! That gave me the opportunity to move the mulch over the saffron crocuses we planted in the fall, and I got a real surprise, there!
They had already sprouted – and look how long those leaves are! This mulch should have been removed awhile ago. Hopefully, the shock of being exposed to sunlight won’t set them back too much. I’m really surprised they were already growing, considering the soil under the mulch is still quite frozen! These are supposed to be hardy only to zone 4, but our mild winter seems to have been excellent for them. So far, it looks like one corm didn’t make it, but now that it’s uncovered it might still show up.
After the septic guy was done and headed out, I was able to keep working on the bed by the chain link fence. I ended up finding another buried piece of sidewalk block! I was able to get the entire bed reworked and somewhat weeded, then replaced the brick border to make the narrower bed. I was able to pull out quite a few weed roots, but not everything, so when it was done, I covered the entire surface of the bed with clear plastic from bags we normally use for our recycling. Because the bed is now so narrow, I cut the bags along the sides to make long pieces. It took 4 of them to cover the bed, to solarize them. Something else I learned from Gardening in Canada that I want to try.
The idea is the direct contact plastic will basically cook those roots. Hopefully, this won’t take too long. Once I can remove the plastic, I want to plant some of these…
I’ve decided I will plant the Purple Caribe potatoes in this bed. I won’t be able to hill them, but if I plant them deep enough – something that can actually be done in this bed – I won’t need to.
Oh! I’m just watching that video again and she says the soil should be deep watered first. I haven’t got any hoses set up, since we still dip below freezing some nights. It’s too late in the day to do that now, so I’ll get the water turned on from the basement and set up a hose in the morning.
We’ve got a few more warm days, then in the middle of next week we are supposed to get a bit chilly with some rain and possibly some snow. By next Sunday, we should start getting highs in the double digits (Celsius) again, and stay there.
I wasn’t planning on chitting the potatoes but, after looking at the forecast, I think we can go ahead and do that, while waiting for better conditions to plant them in. That will give us time to prepare the area we want to plant the German Butterball potatoes, and even do some solarizing there, too.
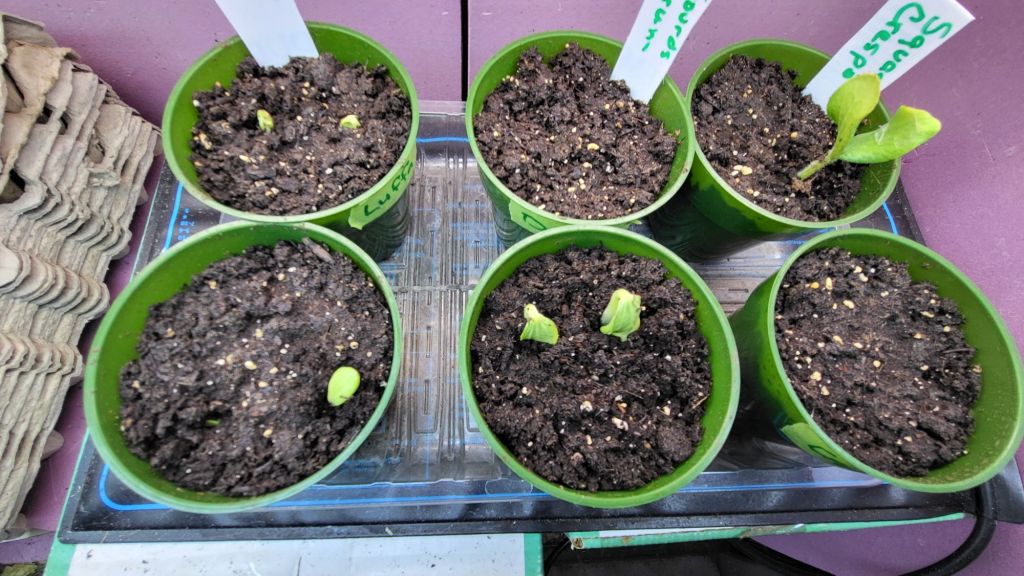
The first seedling to break soil surface was a drum gourd – one of the two in the middle pot – but then a Crespo Squash, on the right, burst through and exploded out of the soil. It seems like every time I look at the pots, there’s more visible growth.
What I’m really happy about is that not one of the seedlings emerged with the outer shell of the seed stuck on the leaves. Last year, there was more than a few times that I had to very carefully remove the shell, because the seed leaves were being killed off. As careful as I was, sometimes pieces of the leaves would break off, because the shells were so tightly encasing them.
I really like this pre-germinating technique!
The heat mat will need to be unplugged very soon. I won’t move them off right away, as I need to arrange space. I won’t need it until I start more seeds.
This weekend will be 7 weeks before our last average frost date. I will go through some of my seeds to see what I want to start first. The seeds we have left are pretty much all supposed to be started 3-4 weeks before last frost, but if I started all the ones I want to, I’ll run out of space in no time at all – and I will have way too many things that need to be transplanted, all at once. So I plan to stagger them.
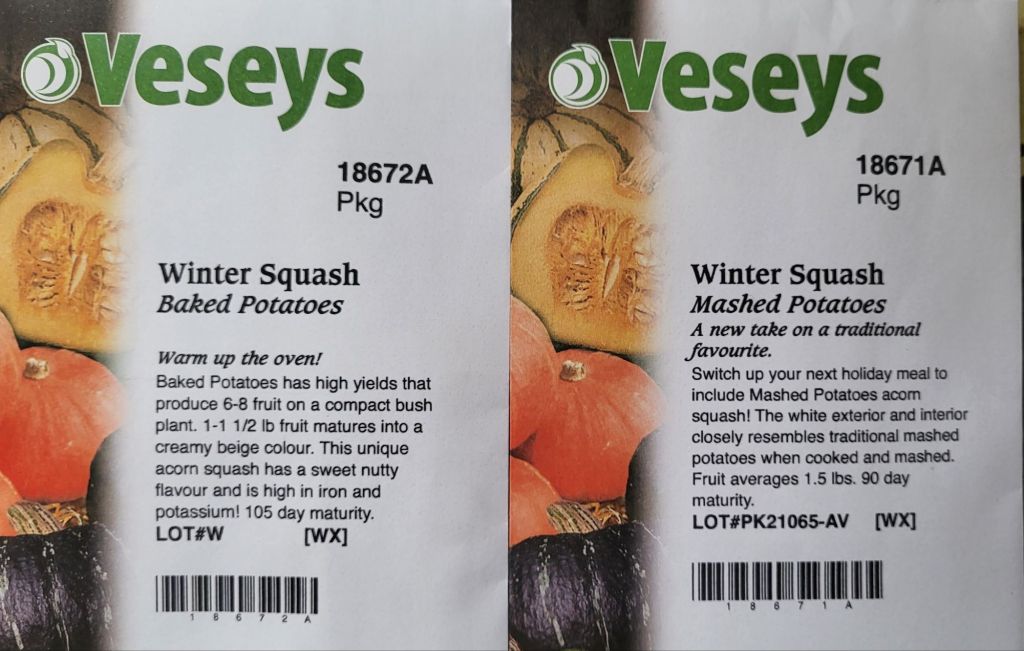
I might even start some of these.
Baked Potato SquashMashed Potato squash
I had to go to town today and finally picked up the mail. There were probably in and waiting for a while. Since we have so many varieties of winter squash seeds, we will probably start just a couple of seeds of each. At this point, we’re still after trying out different types to see what we like the most, and will then probably drop it down to one or two varieties.
Who am I kidding. We’ll probably be constantly trying new ones! Just maybe not quite so many different types, all at the same time.
That’s one thing about having the luxury of space like we do. We can spare some to try growing new things we don’t even know if we’ll like, yet.
It’s been a while since we could get to the bed with the carrots in it. Previously, we had no issues harvesting them, and the bed did have a nice thick layer of mulch.
One of the first things I did was detach the arched cover from the box cover in the centre, and switch it to the bed on the left. This way, we could put the cover on the carrot bed onto the box frame, making it much easier to attach the plastic.
The painter’s cover sheets I got are 12’x8′. My daughter and I folded them in half to make them 12’x4′. Once we had the plastic over the arched cover, she went to start removing the mulch for me while I attached the plastic to the frame. This is temporary, so I just stapled it down. The staples didn’t want to go in all the way, though, so I had to go around and hammer them in.
I can see wind is going to be a problem with the plastic.
As for the carrots, I had a bin all ready to collect the last of them, but it was not to be. Not only was the soil frozen solid, so was a lot of the mulch! My daughter got off as much as she could, then we put the cover, now with plastic over it, back on the bed.
We then took the other arched cover and set it back on the box cover. The mesh on this one is temporary. The chicken wire I used is too bendy and easily misshapen, so it will be replaced with stronger welded wire or something, later on. For now, though, it’s enough to hold some plastic. It went faster this time, as I went around stapling the plastic down, and my daughter followed with a hammer, tacking the staples down so the were actually holding the plastic in place. Very frustrating.
The second arched cover’s wire is a bit smaller than the first one we did, so there was more excess plastic to tuck under at the ends, and a bit more on the sides. This one went onto the bed next to the compost ring, which still has quite a bit of snow on it. It also did not get weeded or reworked as thoroughly as the one in the middle, before things got too cold.
So now we have two beds with plastic “greenhouse” covers on them. We’ll need to check on the carrot bed regularly over the next few days. As the ice in the mulch thaws, we’ll remove more of it, until the soil itself can finally start thawing out – and we can finally harvest those carrots!
Note for future reference. If we use this method to store carrots again, we need to either use a lot more mulch, or have it covered in plastic like this – or both!
It’s 10C/50F right now, making for a gorgeous day to work outside.
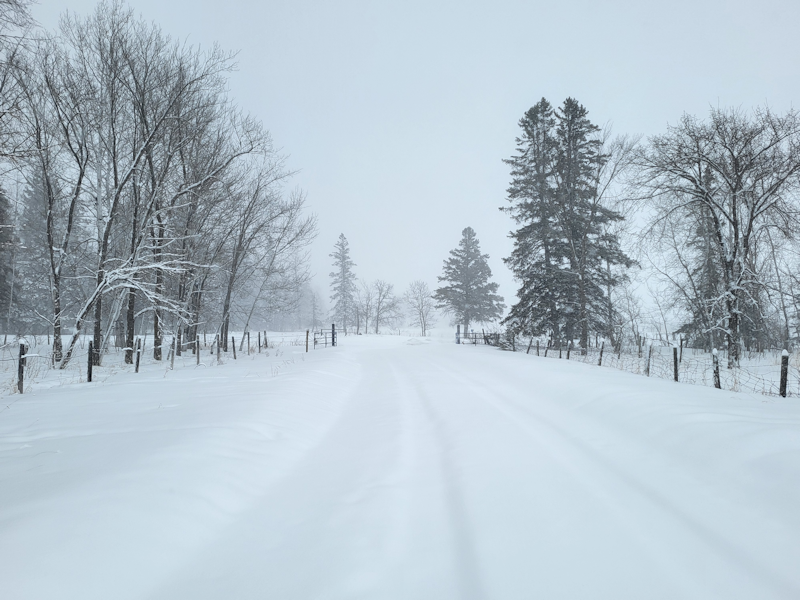
This is what it was like, a year ago today!
We were having to dig ourselves out and were still expecting a blizzard.
It’s not at all unusual to have at least one last blizzard in April. We aren’t expecting anything but warm days and mostly sunny skies for the rest of April, this year. In fact, if the long range forecast is at all accurate (ha!), May will be chillier than April.
Gosh is feels good to be able to work outside right now! Yes, I know, we need more snow, and we’re expected to have drought again this summer, but I will enjoy what I can, when I can!
This first video from Gardening in Canada is a bit more generic – a look at what gardening supplies are worth getting at Dollarama.
For those of you in the US, I’ve been told that your Dollarama stores have a LOT more than ours do, but I’m sure there are at least some overlap.
Personally, among the things I’ve found there that I’m really happy with are their ground staples, the wire twist tie spools with built in wire cutter, and their metal stakes. Especially the metal stakes! We’ve also tried their “instant raised garden” which, while somewhat small and quite shallow, turned out to be remarkably durable. Same with some grow bags we got from there. They also have a type of spray bottle suitable for misting plants that are really good quality, but I find they tend not to be in stock as often as the cheap versions. We can’t seem to have enough of those, both for use as misters for plants, and on the stream setting to deter cats from things!
This next video is from MI Gardener. It’s not relevant to most of us in Canada right now, but we’ll be there in a few weeks!
I hope.
Talk about intense planting! The concept of making sure there is no exposed soil is similar to how square foot gardening is planned out. He’s just doing rows instead of squares.
I do find it amusing to see him out there planting, while it’s snowing! Of what he’s planting here, the only things we will be doing are carrots and spinach. I think we’ll be skipping the beets and radishes until we get further ahead in improving our soil, as the last few years have not been good for either of them. We also will probably not do lettuces, though we should have some self sown greens show up. We found they got bitter very quickly for some reason, even though they weren’t bolting.
With some of our raised beds, they are sheltered enough and get enough warm sun hitting them that we might be able to plant cool weather crops nice and early. Especially if I can find some of the plastic drop cloth GIC mentioned, to help warm the soil up faster.
Looking at our 10 day forecast, we’re supposed to get a bit of snow tonight, and the high over the next few days are supposed to hover just above freezing, but a week from now we’re supposed to go into the double digits. Not only that, but next weekend, our overnight lows are supposed to stay above freezing! Just for a couple of nights, though. After that, the overnight lows are expected to stay below freezing until May. Most things can’t be planted until the overnights lows consistently stay 6C/43F or warmer. Of course, it would be better to plant based on soil temperature, but we don’t have a soil thermometer.
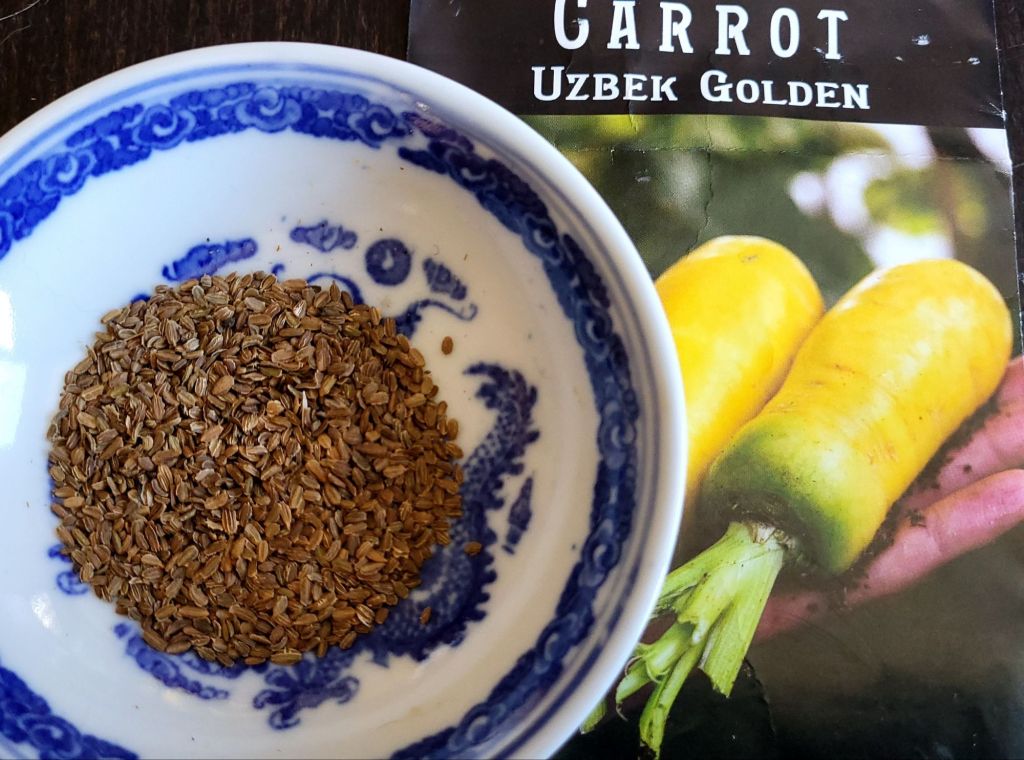
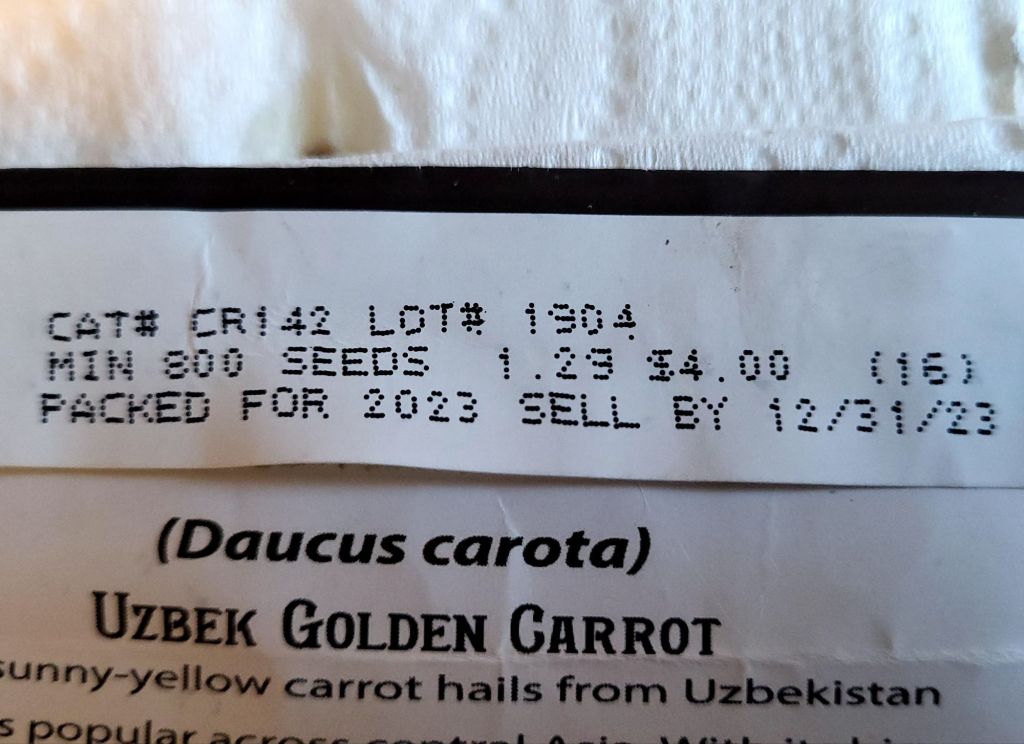
So I went through my seed bin again – main bin, not just the smaller bins organized by “direct sow” or “start indoors” – and found my package of Uzbek Golden Carrots from last year. I really liked these carrots, so I want to plant more this year. I also found my leftover Napoli carrots. Those are pelleted seeds, so no need to do anything with those, but after how well it worked out with our Naval carrots last year, I wanted to make seed tape with the Uzbek Golden Carrots. I also found some other things, but more on that later.
The package still had quite a lot of seeds in it. We planted only one row, about 14′-15′ long, last year, so we didn’t use much.
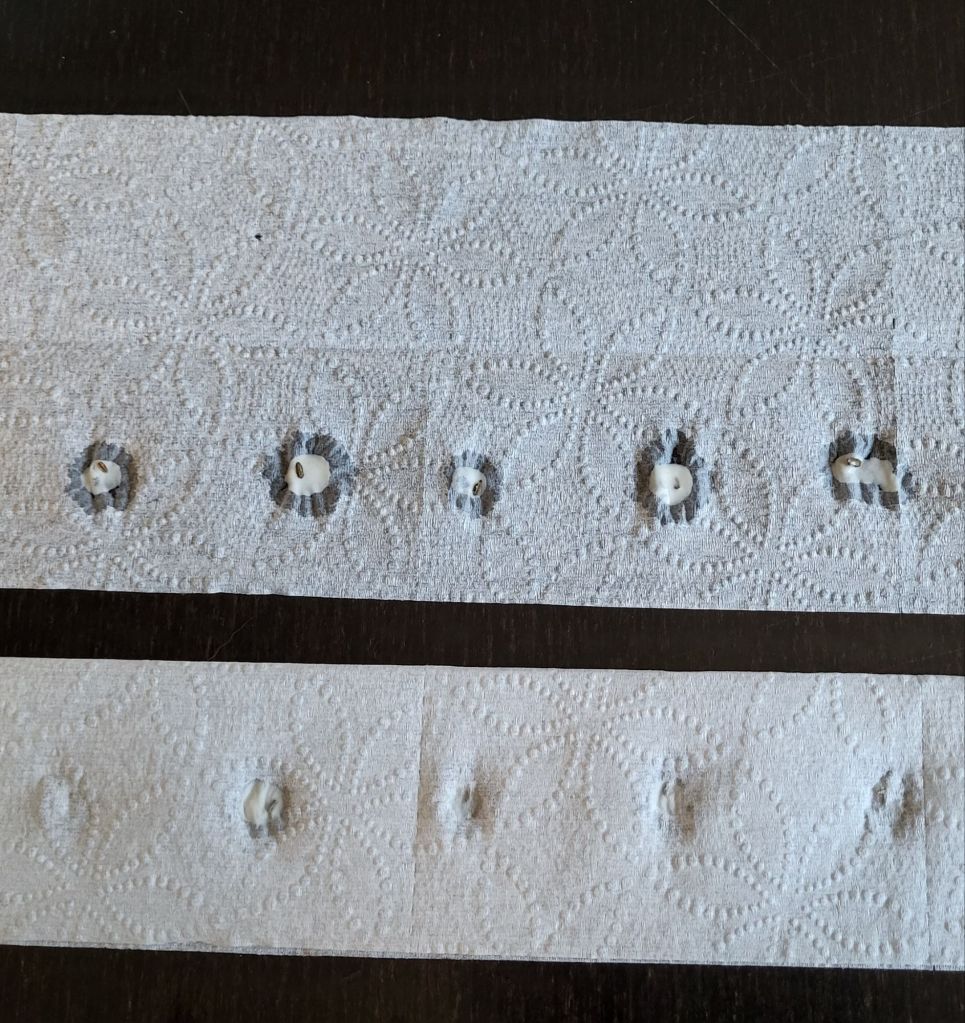
Like last year, I used strips of toilet paper the length of the end of our dining table, split into single ply. I pre folded the toilet paper, lengthwise, to make it easier later on. A flour and water paste was used as the “glue”, and I used a bamboo chopstick to apply the paste with the thick end, and to pick up the seeds with the narrow end. Once the seeds were in place, the toilet paper strip was folded over, pressed into the flour paste, then set aside to start drying while the next batch was done.
After a while, the stack of drying strips was getting rather thick. There were still plenty of seeds when I stopped, so I took another look at the package.
A minimum of 800 seeds! Wow!
Each strip has 20 seeds in it (a few got pairs of seeds stuck together, but I’m counting those as one). I counted the strips, and had another 20.
I think 400 seeds will be enough! I’d estimate there’s still close to 300 seeds left in the package.
The seed tape is now draped around the cat free zone in the living room to finish drying, before they get rolled up and stored until it’s time to plant.
As for the other stuff I found…
I confirmed that I do have a few Crespo squash seeds left. I really want to grow those, as they are supposed to be quite delicious. I got the seeds from Baker Creek, but they don’t seem to carry them anymore, so I want to be able to save my own seeds. I also am thinking of trying the African Drum gourds again. Last year, I had issues with the gourd seedlings and replanted a few times, to the point I started getting the pots mixed up. By the time the survivors were transplanted and started producing fruit, we discovered none of them were drum gourds! Hopefully, I’ll have better luck this year.
I also was surprised to find I still had luffa seeds! Last year, they also had issues and got replanted a couple of times, but it’s also the first year we actually had a luffa develop. So I think I will try those again, this year. Being in the old kitchen garden was so much better for it compared to our previous attempts, so I will take that into consideration when it comes time to transplant them. It’ll be the same thing with the Drum gourds and Crespo squash. I’ll need to really think about where they need to be planted, as much to protect them from the deer as anything else. The first year we grew Crespo squash, they did fantastic, until then got eaten by deer and groundhogs three times before we could get them sufficiently protected! They recovered very well and started developing fruit like crazy, but there just wasn’t enough growing season left for them. Last year, we had one develop to about the size of a smallish pumpkin, but I think their location got too much sun, and the plants got baked.
Anyhow.
I will try starting the three of them within the next couple of weeks. I still have some larger peat pots left from last year, so they’ll go straight into there. Hopefully, that will mean there will be no potting up needed. The pots didn’t break down after transplanting the Crespo squash, like they were supposed to, but they can be broken up without disturbing the roots at transplant time. The main thing will be to keep the pots moist until then. Otherwise, they dry out and suck the moisture out of the seed starting mix!
I’m still waffling about whether or not I will try growing corn again this year. We have some short season varieties, but I don’t know that we’ll have enough space prepared for them. They are not a priority, compared to some of the other things we want to grow this year. A lot will hinge on being able to get those new beds built in time for planting. We’ll be growing potatoes where we grew winter squash last year, so we’ll be needing space for the squash we want to grow this year, and I hope to grow quite a bit of both winter and summer squash. We’ve got a melon mix this year, too.
Well, we’ll see how it works out when the time comes. For all the plans we’ve made, I’ve found it’s awfully easy for things to side swipe them!
Still, I’m happy to at least have the seed tape done and ready for planting, once the ground is thawed out enough. Carrots, at least, can be planted before last frost, and I can hardly wait!
For us, building our raised beds is a matter of using what materials we can get without having to buy anything. We’re scrounging and salvaging whatever we can.
If, however, you are in a position to actually purchase raised beds, there are a lot of options, kits and companies out there to choose from.
Gardening in Canada covers some of the things to think about – and a few things I didn’t think about at all, since they’re pretty irrelevant to our situation. This video is well worth a watch.
After we’ve built more of our raised beds, I think I might do a video about them. Everyone has their own very individual situations to consider. Perhaps it might be useful to people if I go through my thought processes as to why we made the choices we did, and apply that process to their own situation.
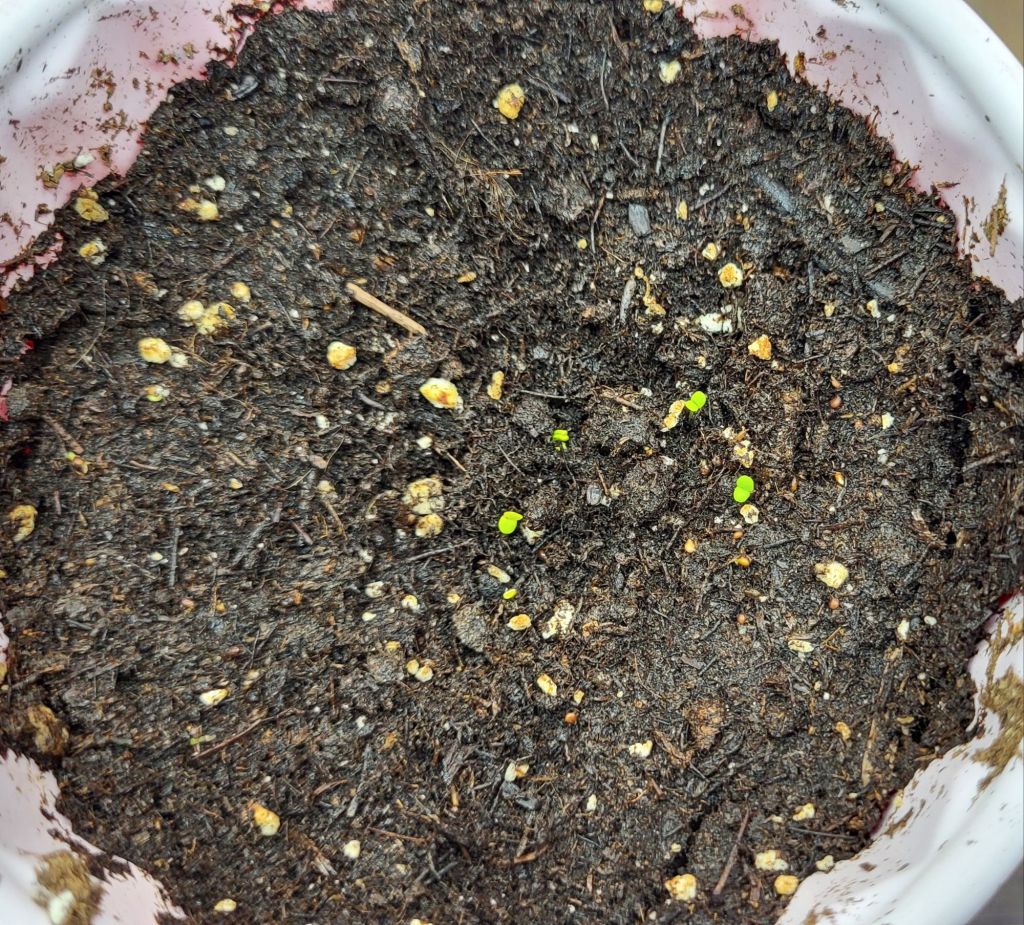
The German Winter Thyme has sprouted. Gosh, they are so tiny! I actually had to wait a day before I could get a picture where they could be seen for what they are.
I expect the oregano to sprout next – unless we have problems like last year. It will be a while longer before I expect to see the peppers sprouting.
We made the living room a cat free zone to protect our house plants. It has a huge east facing window and gets lots of light for a brief period in the morning. After that, it’s a pretty dark room. It’s not too bad for the plants near the window, but our huge jade tree… well… one of them… is against a wall in the middle of the room. We have another that’s gotten just as big, but with needing the window for seedlings, it’s off to one end of the shelf it’s on, and no longer in front of the window. The only light it gets is from the shop lights I have over where the seedlings and small plants are.
Then there are the aloe Vera. They’re on plant shelf near the older jade tree, which puts them pretty low down.
The old jade tree is not doing well. I regularly rotate the pot, so all sides eventually get light – not easy to do, with such big branches, so close to the wall! Unfortunately, I can see the leaves are getting thinner and less succulent, and a lot of leaves are simply shriveled up. It does get adequate moisture, and is in a self watering pot. It’s just not thriving in this location.
There is no room for it, anywhere else.
What we need is a light fixture along that back wall. When we moved here, there was a light fixture in the corner where the big aquarium greenhouse is now. It reaches floor to ceiling, held in place with pressure, and has 3 lights that could have their directions adjusted. It’s in the storage shed now. If that thing still works, we could set it up with standard bulb sized grow lights, near the Jade tree. Those types of grow bulbs are more affordable, anyhow.
Looks like I need to trek through the snow and see what I can find in the storage shed. I hate going in there, though. Every time I do, I’m afraid a cat might sneak in behind me and accidentally get closed in. That shed is so full of my parents’ stuff, we can’t even access most of it, anymore. Lots of places for a cat to hide!
I should grab a daughter to go with me and stand guard!
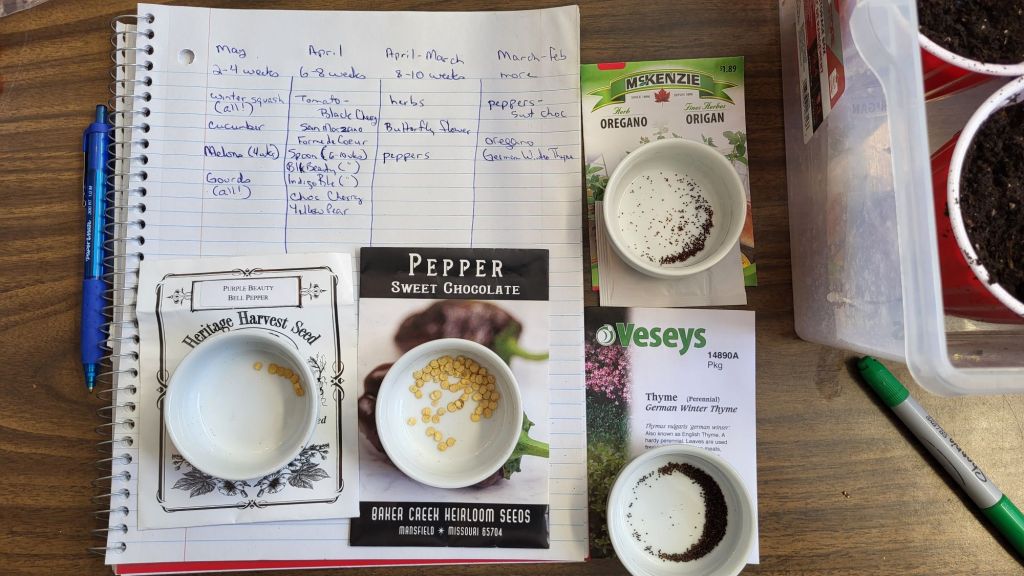
After marking out the weeks backwards from our June 2nd last frost date on our calendar, I then went through my bin of seeds and organized them by when they need to be started indoors. Then I picked out the ones I could get started now.
We won’t be starting everything that we have seeds for.
Starting from the 3-4 weeks list:
I still haven’t decided if we’re going to plant any gourds at all this year. There are several I really want to grow, but we just don’t have the space. With the winter squash, we have the new packet of mixed winter squash seeds to try, plus one type for pies my daughter asked for. With the mixed seeds pack, we will of course want to plant the entire package, and see what we’ve got! I would still like to try the Honeyboat Delicata squash again; the few we got didn’t get a chance to fully mature, but they were great in the pie my daughter made! We also really liked the Pink Banana and Georgia Candy Roaster. There are other varieties that didn’t do well that I want to try again, just so we can decide if we like them or not, but that will depend on how much space we have. The problem is, there are a LOT of things that need to be started in that 3-4 week time span. I’m still not sure if we’ll do cucumbers this year. I’d rather use the space for the melons and winter squash. We’ll be skipping the hulless seed pumpkins this year, but I really want to try the Crespo squash again. Last I saw, Baker Creek didn’t carry the seeds anymore, so I want to successfully grow at least one to collect seeds from!
As for the tomatoes in the 6-8 week list, we’ll not be planting all that we have seeds for. We’ll do the San Marzano paste tomatoes for preserving and the Black Cherry for fresh eating. The free seeds we got are tempting me greatly, and I always want to grow more Spoon tomatoes! They’re just fun. I want to start quite a lot of the San Marzano, but not as many of the cherry tomatoes. I don’t want a situation like last year, where we ran out of space and had to give away so many transplants!
From the 8-10 week list: the Butterfly Flower is a type of milkweed, so I definitely want to get those going. We have three varieties of “early” peppers that I waited to start last year. They have such a short growing season, technically we could direct sow them. It didn’t work out. They didn’t get to produce, though with most of them I now know that the grow bags they were planted in were invaded from below by roots from the nearby Chinese elm. So we’ll definitely need to keep that in mind, when deciding where to transplant them this year. I will be starting fewer seeds, shooting for at least 2 plants per variety in the garden, but between the 6 varieties I’ll be starting this year, we’ll still have plenty for our needs. Hopefully, my family will have peppers of each kind to try, so we can decide which varieties we like enough to keep growing, year after year.
You’ll notice there are no summer squash on my list. Those got moved to the direct sowing bin. I’m not going to have the space to start them indoors. As long as I can keep the slugs away from them, they should be okay to start outdoors.
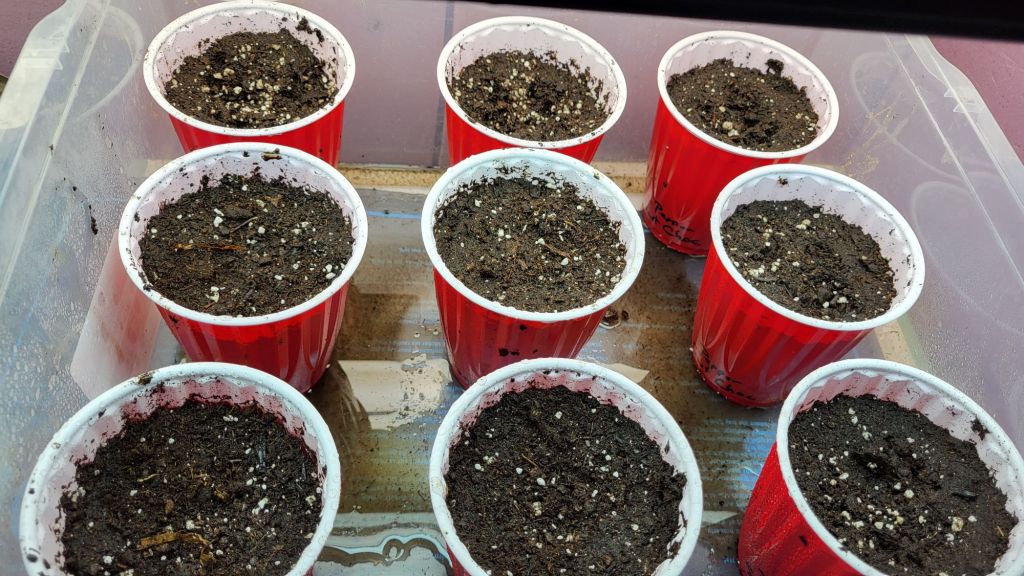
There were four things I could start today. Since I was after fewer plants per variety, I decided to go with the Red Solo cups to start them in, rather than the larger trays with smaller grow cells.
With the herbs, I’m just doing the oregano and German Winter Thyme again. The chamomile we planted last year should have self seeded, and we’ll see if the spearmint survived the winter in their pot. We ended up not using the lemongrass at all, so I’m not trying them again this year. We’ll plan out our herbs more, as time goes by. The herb seeds are so incredibly fine – especially the oregano! They got surface seeded over the pre-moistened seed starter mix, then covered with a light dusting of dry starter mix to just barely cover them, followed by a spritz to moisten the tops. Vermiculite would have been better, but I don’t have any. The herbs went into two cups each. With such tiny seeds, there’s no way to know how many I managed to sprinkle onto them. I still had seed left over, too, so if they don’t take, I can try again. The oregano really struggled last year, and I ended up with only one surviving seedling to transplant. That one plant did well, at least! They were started in the little Jiffy pellets last year, so I hope they do better in the larger cups and a different growing medium.
I decided to go ahead and plant the last of our Purple Beauty seeds, which are two year old seeds. The first time we planted them was a year of drought and heat waves, and they did very poorly. Last year, what was planted in that bed also struggled, so I think it’s more a problem with the soil in that bed. I split the last 7 seeds of Purple Beauty between two cups.
The Sweet Chocolate peppers were the one pepper that we were actually able to harvest mature peppers from last year, and they were also the only ones I started quite early. We saved seed from them, too, but there was still plenty in the packet, so I used those. There was enough to plant three seeds into each of three cups, with plenty of seed left over. I had intended to do just two cups, like the others, but the bin they’re in for bottom watering holds 9, and I just had to fill in that last space! Yeah, it’s a bit OCD, but I have an excuse. If there are gaps in the bins, the cups tend to fall over more easily when the bins get moved around.
So these are now in the big aquarium, on the warming mat.
The next seeds don’t need to be started until the second half of March, at the earliest.