I did my morning rounds as usual, today, which includes checking on the various garden beds. I even did some watering as, at the time, we were expected to get quite hot. Instead, we had a slightly cooler, dreary day, with some parts of the province hit with thunderstorms.
I’m really surprised by how some things are going in the garden. Things I though for sure were killed by the early frosts are blooming!
I think the Arikara squash is the most surprising. They look completely dead, and yet there are new blossoms!
In the next photo, you can see our one pumpkin this year is changing colour. Next, you can see that the pumpkin vines themselves, as frost damaged as they are, are blooming. I’m even seeing little flower buds all over.
It was warm enough last night that I didn’t cover the winter squash, and they’ve started blooming more, too! We have two Baked Potato squash developing, plus one Mashed Potato squash. Nothing on the Sunshine squash, though.
In the flower bed, there’s still the odd nasturtium flower showing. The Cosmos should have bloomed long ago. Some have got frost damage to their tops, but they do actually look like they’ll be showing flower buds soon – if the weather holds. The asters are also way behind, but a few plants are now showing where flower buds will be forming. I really want to be able to collect seeds from the asters, as they are from a packet of memorial seeds.
The smaller crab apples have gotten so very red, and so very delicious. They are that perfect combination of sweet and tart that I like. In the next photos, I’ve got one next to the crab apples in another tree with edible apples. They form much larger apples, as you can see. I don’t think they are quite ripe yet, but they are edible now. They are much milder in flavour and, as my daughter describes them, have a floral taste to them.
One of my weather apps still says we were supposed to hit a high of 21C/70F. Which we did not. We probably didn’t go higher than 18C/64F. The overnight low is supposed to be 15C/59F, so I’ll be leaving the winter squash uncovered for the night again. It’s supposed to keep getting hotter over the next few days. Today, however, didn’t get the sun and heat we were supposed to. Just clouds and a smattering of rain.
After soooo much wonderful rain yesterday, I really wanted to see how things were going in the garden while doing my rounds.
When I got to the bed with the ripening Sub Arctic Plenty tomatoes, I decided to go ahead and harvest them. They’re a touch on the green side, but they will continue to ripen inside. I also grabbed the few bush beans that were available to gather.
I rather like the effect of the tomatoes reflected in the stainless steel bowl I put them in!
The next photo is of the one developing pumpkin that I hand pollinated; there’s another on that vine, but its flower has now opened yet. I’ve added support to the vine itself, to take some of the weight off the plastic trellis netting, but the pumpkin has already gotten heavier enough to start pulling down on it again. We will construct a sling for it soon. The vine can handle the weight. The temporary plastic trellis netting cannot.
The Hopi Black Dye sunflowers have had a lovely growth spurt and are getting quite tall. They should have seed heads by now, though, so it’s unlikely we will get anything to harvest. Even the Red Noodle beans have started to show signs of growth. Just barely. I don’t expect them to even start climbing the trellis before the growing season is done.
Of course, I checked on the new food forest transplants. Especially the Opal plum, with its fresh new growth.
And newly missing leaves.
I guess all that rain washed off the anti-deer spray I used on it, and the protective frame.
I went and got the piece of chicken wire I’d used to try and protect the Albion strawberries last year. It turned out to be just long enough to to around the frame. This, at least, the deer will not be able to get through!
The big crab apple tree that has the small but delicious apples is just reaching its peak period. Many of the apples are looking very red right now, though there are still plenty that aren’t ripe yet, among them. We could probably start harvesting some crab apples now, though they’re so small, it’s a lot more work to use them for any cooking. I grab a few on the way by to munch on as I do my morning rounds.
I was debating which project to work on today, but everything it still so wet, I might just stick to indoor projects and start some laundry. No hanging on the line, today, even though we’re not expecting rain. It’s still too humid. We’re also still under an air quality warning for smoke, though we are now on condition yellow instead of condition red.
We have had enough rain that even the grass has come out of dormancy and had started to grow again. We might even have lawn to mow, instead of having just a few patches growing. The overgrown area where the old garden used to be is going to need cleaning up soon. I’d left the alfalfa that was coming up to bloom for any pollinators we might have – there’s a lot less these days, than in the spring, probably because of all the smoke. Their bloom time is ending now, and the burdock is starting to get big, will start flowering soon, so we need to cut all that back before the burrs get too nasty. We might be able to start on that tomorrow. Depending on how things go today, I should be able to go in with the loppers and cut back the poplars saplings that are trying to take over.
I didn’t get a picture but the rain came down so yard yesterday that the almost white lengths of maple used in the wattle weave bed in progress are now grey with splattered soil from inside the bed! Which is saying something, since the soil is all pulled into the middle, to make room to work on the wattle weaving.
According to the forecast, today and tomorrow are going to reach a relatively cool high of 19C/66F, but the day after, we’re expected to scream up to a high of 28C/82F, with a possible small rainfall in the early evening. Then its supposed to drop down to more humane highs, hovering around 20C/68F, for the next while. No more rain, though. The monthly forecasts sees only one more rainfall between tomorrow and the end of the month. It also says we can expect the temperatures to climb up to 31C/88F on the last day of the month, and 33C/91F by Sept. 1st.
We’ll see what actually happens.
If we’re going to get any sort of harvest with the winter squash or pole beans, we need to have all of September to be warm. Especially the overnight temperatures, and that’s where things get dicey.
What this does show me is that, as we build our raised beds, we’ll have to think ahead to including ways we can cover them to protect them during cold nights, or even create mini greenhouses, with frames that can go over relatively tall plants. I couldn’t cover the radish bushes to protect them from the deer, for example, because none of the covers I have had room for them, except the box frame which is currently protecting the corn bed. We are working to keep the same dimensions on all the beds, so the covers can be interchangeable. The beds in the East yard are all 3’x9′, and that’s the size we’re working with. The log beds in the main garden area will all be 4′ wide on the outside which, with the thickness of the logs, means about 3′ of growing space inside. They will all be 18′ long, so two covers will fit on each bed. Once we have chickens, some of those covers will be mobile chicken coops, too, so we can let the chickens clean up and fertilize the beds after they’ve been harvested from.
Every year has been a different gardening year – especially weather wise! – and every year, we learn a bit more of what conditions we can expect, and can plan around in the future.
That is a process I expect will never quite end, and I’m okay with that!
I have to admit, I’m feeling disoriented right now, looking at the time. It’s still morning??
It was another mostly sleepless night, so I did my morning rounds, then went back to bed. I did get some sleep, but my brain just wouldn’t shut off. I’m starting to feel rather ill at this point.
Thankfully, we did cool down during the night, and today is not as hot. We’re supposed to have some rain in about an hour, and it should keep raining for a couple of hours. Which is good, because I wasn’t able to water the garden this morning.
I started off feeding the yard cats, as usual. This morning, little Colby – the fluffy orange and white feral – was actually in the space between the cat shelters, meowing for food! What a brave little one. Even the other three were in the grass, heading towards the cat shelters near the house. As I came closer, the tortie ran into the isolation shelter and watched me go by with the kibble from the bottom level, rather than running away. Alas, my hands were full, and I wasn’t able to get any pictures!
After the dry kibble is set out, the bowls of kitten soup get set out. Some of the cats have started to actually wait for the kitten soup before they start eating! I have to set a couple of bowls up higher for the four socialized kittens, then quickly set out more bowls in various spots outside, so they have a chance to eat before the grownups push them away. One of the larger two-sided bowls goes to the shrine feeding station for the Colby and his sibling. I also have the mixing bowl and add some kitten soup to some of the dry kibble bowls before taking the rest of it to the garage for the kittens and their mom living in there. These days, they are almost always outside and seem to have moved out of the garage and into the area directly behind it. This morning, I spotted the two kittens were making their way through the sun choke and asparagus beds. They seemed to be aiming for the shrine feeding station! It would be great if they did that.
After the cats were fed, I did my usual rounds, which includes switching out trail cam memory cards. For one of them, I get to check on the crab apple trees along the way.
There are lots of apples forming, and some of them are starting to blush. The apples on this tree still have a long way to go. They get larger and tend to be ripe in September, or even October. The big tree with smaller edible apples tends to ripen a month earlier.
Checking on the garden beds, there was this blooming pumpkin. Of the five plants, this one is the largest. It has one primary vine that is long enough that I’m starting to train it up the bean trellis – since the beans clearly will not grow large enough to start climbing it. You can see how yellow they are, in the background.
In the top right corner, you can see the sunflower that got its top eaten by a deer. It is sending up a pair of new tops that grew out from the bases of the remaining leaf pair.
The onions from last year are blooming nicely, and one of them was serving as a bed.
I could not resist getting a bunch of pictures of the sleepy bee!
While doing my rounds, it’s not unusual for me to be followed by one or more cats. Usually, Stinky comes along and wants all sorts of attention. Lately, though, I’ve had a tabby hanging out and calling to me. He has a high pitched, peeping sort of meow, and he meows at me like he wants attention. He’s feral, though, and will not let me near him. Instead, he circles around, lays on the ground when I stop, but if I move towards him, it’s a big NOPE!
This morning, he was rolling around adorably in the grass. He stopped when I tried to get video of his cuteness, though. 😄
It’s hard to be sure, but I do think I actually have been able to pet this cat – when it was a teenager! I think he’s the one that would hang out in the upper level of the isolation shelter, when it was set up against the house for the winters, waiting for me to fill the food bowl. That was the only time he allowed me to pet him, and he stopped doing that after the isolation shelter was moved to its summer spot. He’s much bigger now, but he’s got a mark on the side of his nose that makes me think it’s the same cat. That might explain the almost-socialized behaviour.
Today being Sunday, I do normally try to make it a day of rest, and it seems like today, I won’t have much choice. Lack of good sleep is doing me in. I do hope things improve, since I need to go to my mother’s for her evening med assist.
Ugh. I just checked the weather. According to two of my weather apps, it’s raining right now (it’s not). We’re at 26C/79F right now, and the humidex is 29C/84F. We’re supposed to cool down a bit, then reach our predicted high of 27C/81F at about 6 or 7 pm. Checking the weather radar, more thunderstorms are happening to the south of us. There’s still that huge, out of control fire across the lake. It has crossed provincial borders. Then there are more fires to the north, including an ever bigger one, also still out of control. There are so many fires, in a big swoop along the Boreal forest, starting from Alaska, all the way down into Northern Ontario.
We could really use a whole lot of rain right now!
The cherries at the edge of the spruce grove are blooming like crazy right now. We might actually have berries from them this year. The one by the house – the one we plan to keep – is just starting to bloom. Usually, it blooms before the ones in the bushes.
The different types of lilacs are showing flower buds, but only the double lilac in the old kitchen garden is starting to show a few open blossoms. Most of the crab apple trees have buds, but the one big one that has tasty apples just sort of exploded in flowers this morning.
The grape hyacinths have their flower cones up. Little spots of purple, all over the area they’re in. Unfortunately, they are almost completely hidden by the purple bellflower that has taken over every open space among the trees. The area is too large to weed by hand, but I don’t want to use tools or the weed trimmer, and risk accidentally taking out the grape hyacinths.
I’m really looking forward to when the lilacs start opening. We’ve got five different kinds that my mother planted, and they all bloom at different types. Everything smells amazing for weeks!
I also made sure to check our little strawberry patch. Something – likely the cats – keeps digging into the mulch, but not the strawberries. I just need to put the mulch back in the morning, and everything else is okay.
It looks like 8 out of 9 are doing quite well right now. The 9th one does have leaf buds on it, so it will hopefully recover soon. Considering we ordered a package of 8, that one’s a bonus, anyhow!
Hopefully, these will do quite well where they are – as long as the bed doesn’t get invaded by those Chinese elm roots again!
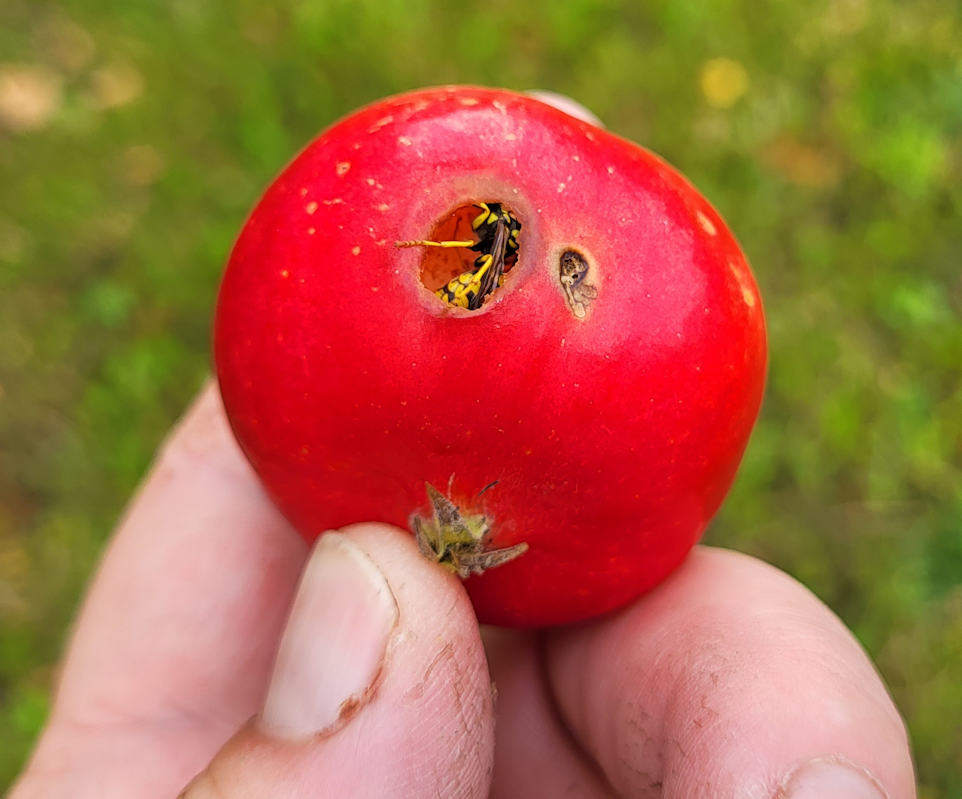
While doing my rounds this time of year, I like to grab some crab apples from the one tree that has tasty apples to nibble on as I walk. High winds have knocked down a lot of the apples, so I don’t know that we’re going to bother harvesting them this year, but there are enough in reach that I can snack on them.
I grabbed a couple this morning, buffed the dust off one of them on my shirt, and was about to take a bite, when I saw something move!
This wasp had been asleep in the apple! It was still very groggy in the cool of the morning, and eventually squeezed itself out and promptly fell to the ground. 😄
This afternoon, I headed out to see what I could get from the one crab apple tree that has tasty apples. Most of the apples were well out of reach, but after trying a couple of things, I found I could use the hook at the end of the extended pole pruning saw, at its longest, to grab branches and give them a shake.
Then ducking, so I wouldn’t get beaned in the head. Those things are hard!
Then it was just a matter of gathering them off the ground. The damaged ones got tossed towards the spruce grove, so I wouldn’t have to pick through them again when I had to shake the tree again. With so many apples, I could afford to be picky.
The deer and any other apple eating critters will be in for a treat, tonight!
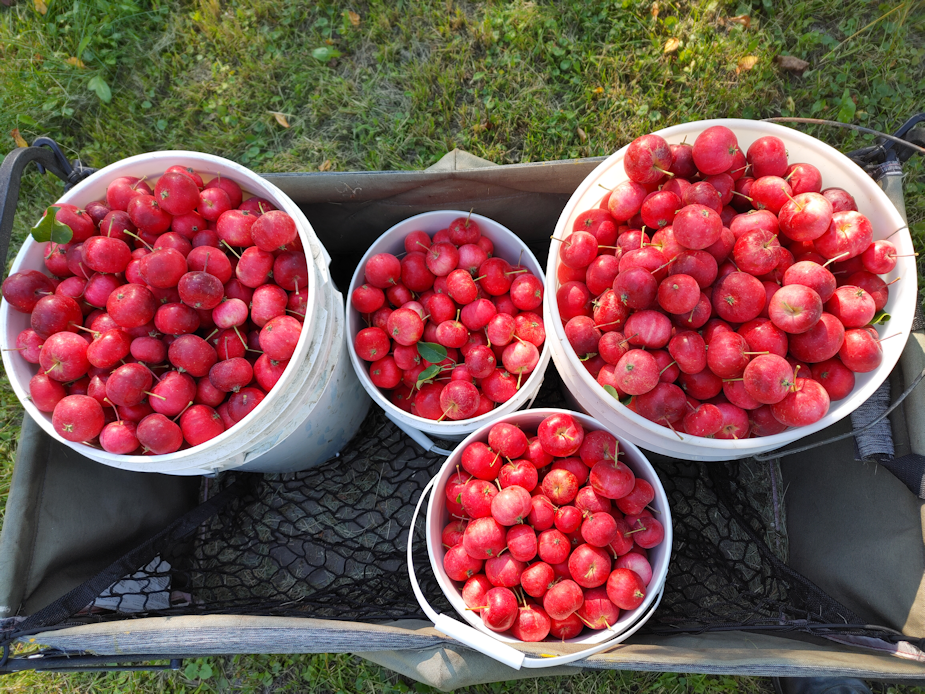
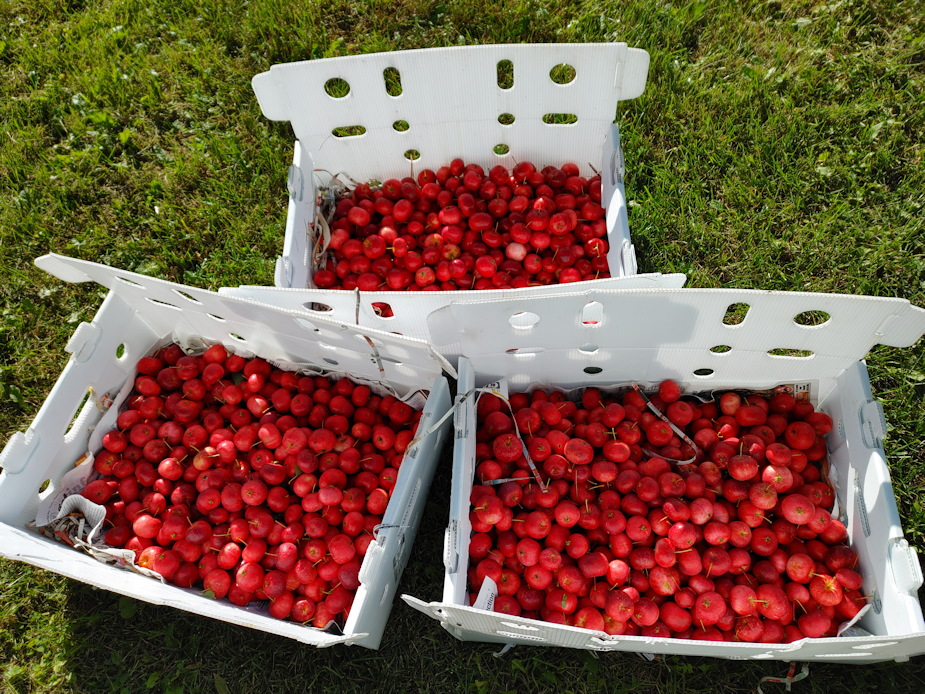
I got somewhere between 15-20 gallons of apples, and I only shook the tree twice. There are still lots on the tree, but I was out of buckets.
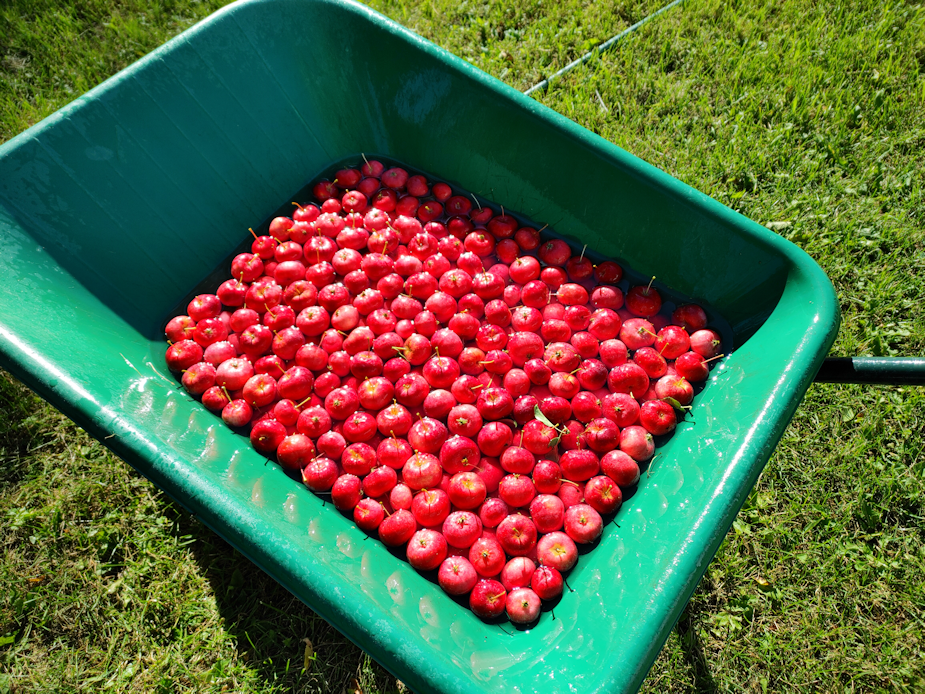
With so many apples, I scrubbed out the wheelbarrow, then used it to give the apples a cursory wash with the hose. The amount in the photo is from the two smaller buckets.
I had to prep a third bin to hold them all.
I love these bins! They interlock to hold together, and even when stacked one on top of the other. They are still just corrugated plastic, though, and can only hold so much before they start bending under the weight while being carried.
For now, the bins are sitting in the dark and relatively cool of the old kitchen. I’ll set aside a bucket for my mother. When she was last here, she insisted in picking apples into her walker, but they were nowhere near ready for picking. They are in their prime right now, and taste so much better. We do have crab apples on some of the other remaining trees, and I do try them every now and then (except the one tree with apples so small, it’s basically an ornamental tree). They don’t taste very good when ripe. When not quite ripe yet, they’re pretty awful. There was one tree that tasted pretty bad right up until the ripened, when they suddenly became tasty and sweet, but that part of the tree died over the winter, leaving only the suckers that had been allowed to grow, so only the not-tasty parts of that tree are still alive. 😕
Tomorrow, I will start de-stemming the apples and cutting them up, and will be using the fermentation bucket from our wine making kit to make a large batch of apple cider vinegar. There will be apples left over, even after taking some out for my mother. We haven’t decided what to do with them. In the past, we’ve made apple jelly, but our Bernardin canning book with the recipes we used is still missing.
I wonder if I lent it out to someone? I can’t remember. I do remember offering to lend it to my SIL, but she just took photos of the recipe she wanted and left the book. I do have other cookbooks with canning recipes, but I’m less sure of their safety.
I suppose I could just go look at their website, but having the book is really handy.
Anyhow, we’ll figure out what to do with the surplus. Then also decide if we want to harvest more, or leave the rest for the birds.
While the girls worked on the cats’ house, I did my morning rounds. No harvesting in the garden today, but check out this pumpkin!
It’s almost completely changed colour! The second one is just beginning to show the tiniest change in colour at the blossom end, but is otherwise still very dark green.
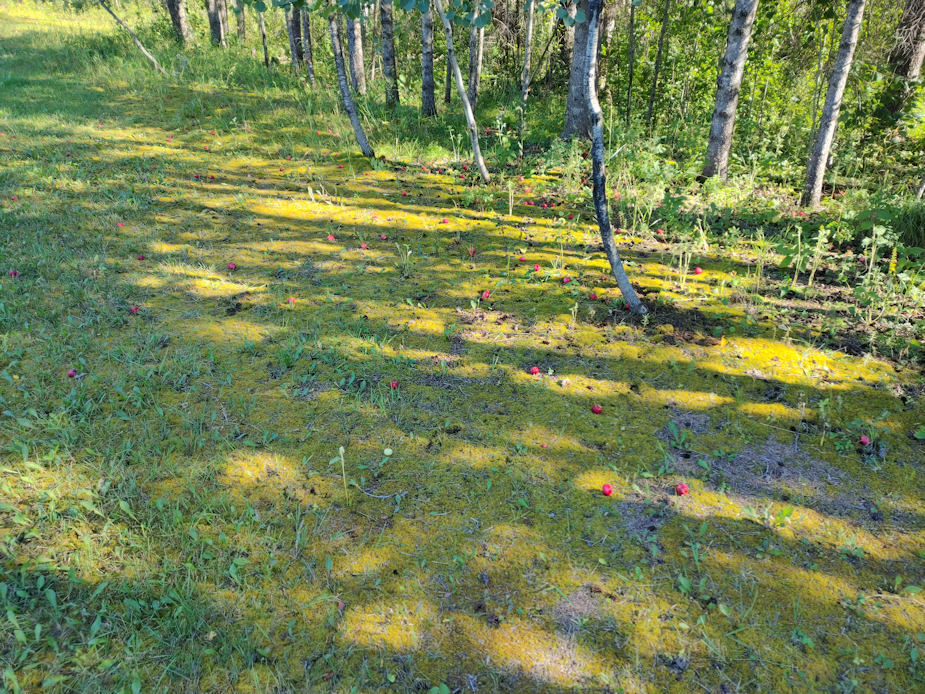
Once the regular rounds were done, I headed out with some buckets and started our first harvest of crab apples. Mostly, I just shook the branches that I could reach, then picked up what fell.
I got about 10 gallons of crab apples that way. There are still lots on the tree, but I couldn’t reach the branches to shake them. Plus, I don’t have any more buckets available.
After bringing the buckets to the house, I used the hose to fill them with water to do a cursory wash.
I had curious company.
I help!
Then the apples got transferred out of the buckets.
These corrugated plastic bins are the handiest things!!
They have holes cut into the bottom, like what you can see on the sides, but a good layer of shredded paper made sure no apples fell though, while also absorbing water from their rinsing.
Shredded paper is something else we’ve been finding very handy. We shred only paper that is compostable, like fliers and the like. Printers switched to vegetable based inks decades ago, so they’re fine. Just no glossy paper or anything like that. Those go for the burn barrel.
We’ve used the shredded paper as mulch, as compostable layers buried in new garden beds, as a base under tomatoes ripening indoors, and now for crab apples. We even keep the shredder, sitting over a recycling bag on a wire frame holder, in the dining room all the time for convenient shredding.
The first thing we will be doing with the apples is to make crab apple cider vinegar again. That is the fastest and easiest thing to get started. Then we will be making more hard crab apple cider. We have so many crab apples on the one tree this year, we should be able to make more of both this time.
The “mother” left from our previous ACV is still around, but I don’t think it would be safe to use, so I bought some apple cider vinegar with mother to use as a starter. After experimenting with using an airlock or just covering the fermenting jars with cheesecloth, I’m just going to use cheesecloth this time.
The other thing we will be able to do differently this time is to use the big aquarium to hold the fermenting jars. It is already lined with rigid insulation from when we used the space as a greenhouse, so the temperature will remain quite even, and it has cat proof covers over it. It’ll be easier to keep an eye on it in the living room than in the old kitchen.
As for the hard apple cider, we should have enough crab apples to make it worth digging out the wine making kit and using the 5 gallon bucket and carboy for fermentation. We’ll make that decision after the vinegar is started, and we see just how many crab apples we end up with. We’ll probably need to break out the step ladder to pick more apples.
A good problem to have! Especially after having none, last year.
It still might not survive the winter, but for now, it’s doing just fine.
Unlike this one.
This is the crab apple tree by the old compost pile. Last year, it had good eating apples. This year… well, the ones that aren’t infected taste good. :-( About half of the tree has yellowing leaves with brown spots, and even the apples on those branches are more yellow have have spotting on them. I’d hoped to have cut away the infected branches in pruning it, but the fungus had clearly already spread further.
I’ve been looking at some of the other crab apple trees and thinking of what to do with them. Like many trees here, they were planted too close to each other. Some had already died and were cut away, others show signs of fungal infection, and most… well, they’re just not good apples. When I do my rounds and check on them this time of year, I do taste the occasional apple. One tree had me spitting it out right away. Another has the most bizarre combination of being really sweet and really sour at the same time – so sour, I end up spitting that one out, too. Others are so tiny, they’re just ornamental. The grosbeaks and deer eat them, so even though we can’t use them, they are still feeding critters. In that respect, I’m okay with them.
However…
Partly because they are so close together, partly because of the spreading fungal infection, I am increasingly thinking of cutting most of them down to save the two trees that have good eating apples, and are still healthy. I hate the thought of cutting them down at all. There is even the sentimental side of things. My late father planted these, though it looks like the parts he grafted have died and only the suckers from the bases are still growing.
If they do get cut down, they won’t go to waste. One tree with particularly disgusting tasting apples is quite large. If that one were cut down, I’d find all sorts of ways to use the wood. It’s base is large enough, I can see carving some decent sized bowls out of the wood.
In the long term, we are intending to plant a nut orchard in the area, having found a place that specializes in trees that grow in colder climates such as ours. We will also be planting hardy varieties of different fruit trees. Hopefully, we will have apples, pears, and plums in this area, too. Taking out any sick trees, poorly placed trees, or any fruit trees with inedible fruit, would free up space needed for food trees.
*sigh*
I know we’ll need to take them down. I just don’t like having to do it.
All in good time. Aside from the diseased ones, there is no urgency to it right now.
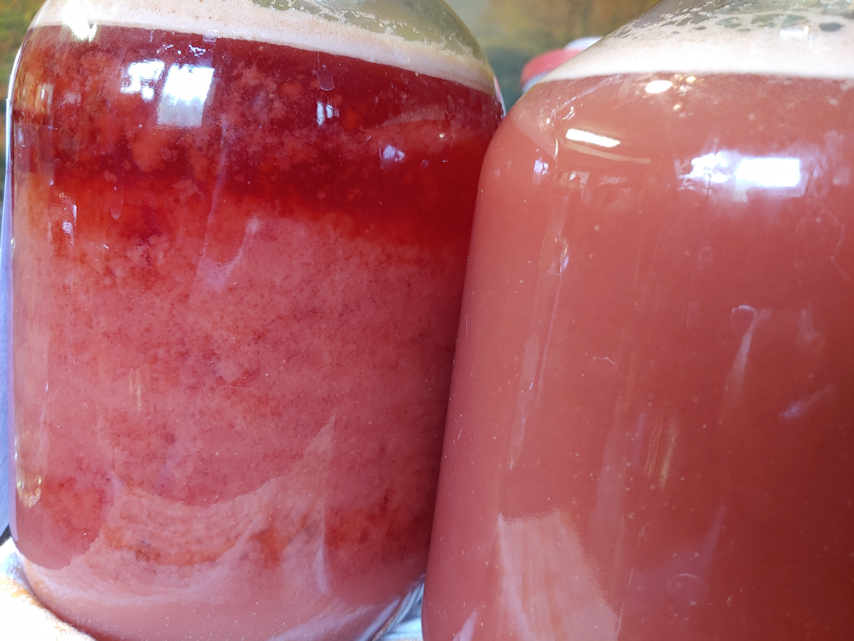
This is how the crab apple juice looked, right after we got finished setting up the fermentation.
This is how they looked this morning.
The photo does not do justice to how bright the colour is!
When I was checking these last night, the tops were full of dense foam, which has mostly collapsed, but you can certainly see how high it got.
Their temperatures seem to be holding at between 18 and 19C, and – most importantly! – we are seeing activity in the airlocks. Not a lot, but it’s definitely started to bubble!