So far, we still have just one developing eggplant right now – a Little Finger Eggplant, and it is getting noticeably bigger. Still very small, but at this stage, growth should be quick. This variety grows long and thin.
I also spotted a couple of lady Crespo squash blossoms! Which, of course, got hand pollinated. There are so few of them, I won’t take a chance and leave it to the bugs to pollinate!
Before I headed out this morning, we tended to the sick kitties. The orange and white one spent the night indoors in the carrier with eyes baby. He likes to use her as a pillow. They could keep each other company – and keep each other warm!
While my daughter was in the shower, I brought the orange and white kitten into the bathroom to enjoy the steam while I washed his eyes, then just held him. He nose is as leaky as his eyes, poor thing.
After a while, I set him in the sun room, in baby jail, then got eyes baby. Her eyes are still so very swollen, and one of them looks like it’s popping out of her skull. They don’t seem to be leaking, but I don’t know if that means much. She got her eyes washed and a feeding. Since she can’t seem to see to eat, and we don’t have a feeding syringe, we took the kitten baby bottle and put very thin cat soup in it – with supplements mixed in – and chopped the tip off of one of the bottle nipples. The opening is large enough for the more solid food to get through. Eyes baby was definitely hungry, and even tried chomping on the bottle, but was also finished very quickly.
Around when my daughter started running out of hot water, we did the eye drops. The kitten was very wet and messy, so I’d washed her fur a bit, so I spent some time sitting with her in my arms, rubbing her down with paper towel, until she stopped shivering. Then I put here in baby jail with the orange and white kitten, before I did my morning rounds. When I came back, I found the two kittens, still snuggling.
Unfortunately, neither of them is getting better. In fact, later this afternoon, the orange and white kittens eyes were oozing and stuck shut. I washed them, which he really didn’t like, but at least he could see again! Eyes baby likes to sleep in the sun, but a few times I went past her, I stopped to see if she was breathing. She really looks bad. I have no doubt that if we took them to a vet, they’d recommend putting both of them down. I keep expecting to find them gone, but they manage to keep going!
How is it that these obviously sick kittens are managing to hang in there, while I buried so many kittens this year that never looked sick at all?
We do the best we can for them. Unfortunately, it isn’t much. When the Cat Lady took Button to the vet, it cost her almost $700. I don’t even want to think how much it would cost to treat these two!
Some of the other kittens have leaky eyes that are looking messy, but nothing like these two. Hopefully, they will recover on their own, because we can’t catch any of them.
If all goes well, we should have the cat isolation shelter ready, and will be able to use it to house any of the more feral cats for treatment or convalescence.
Which is what I’ve been working on today. More on that in my next post!
After I did as much as I could on the cat isolation shelter build, I finally got around to harvesting some of our garlic. In particular, I wanted to get the garlic that was sharing a bed with tomatoes. The tomatoes are getting so huge and bushy, the garlic was barely visible!
The challenge was to find them and dig them out without breaking any tomato plants!
Not all of the garlic planted there in the fall emerged, but I think I found all the ones that did. The soil was surprisingly compacted, and the head buried much deeper than I expected. I could actually hear the wood on the handle of my digging tool making cracking noises if I went to deep, trying to loosen the soil.
Unfortunately, when I got them all out, I discovered they were just crawling with black ants!
After trimming the stems, most of them got strung up and are now hanging in the garage. Normally, I would have hung them under the market tent, but that broke over the winter. Right now, the garage is the only place that’s out of the elements, but still has air circulation. Since I’m using it as a workshop right now, I can at least be sure they won’t be forgotten about!
Before I headed in for the evening, I finally went out and took progress photos of the winter squash, melons, pumpkins and gourds. It’s been quite a while. The last time I normally would have done it, I did our garden tour video, instead.
If you want to see how they looked earlier, you can visit these links.
It’s now the 14th, so there is quite a lot of difference since I last posted photos. We lost a few things, and some look like they will also be losses, but I also found more melons, including a couple I found just this evening, while taking the photos!
With that in mind, I will start with the melon beds. First, the east bed. There were so many, I had to divide the photos between two Instagram slideshows.
This Summer of Melons mix is really prolific – though with where we are in the growing season, it’s likely we’ll only be able to harvest the earliest varieties, whatever they are. The mid and late varieties are unlikely to have enough time left to fully mature.
Then there is the west bed of melons, which also had to be split up between two slideshows.
In the above slideshow, you can see the only two Cream of Saskatchewan watermelons we’ve got right now, and the older one is dying off. The plant has more female flower buds and is blooming like crazy, but it’s probably way too late. While I was giving my sister a tour of the garden, she was telling me things are late in her garden, too. She’s not growing melons or squash this year, but she says her tomatoes are way behind. She barely even has tomatoes forming right now! That wet, wet spring we had has really affected so many people’s gardens, all over the province.
There are other drum gourds on the vines, but it’s still too early to tell if they were well pollinated. There are lots of male flowers, but I haven’t been seeing the female flowers when they first bloom, so I haven’t been able to do any hand pollinating.
Next is the east winter squash bed. This one has the most squash developing on it.
It looks like we’ve got two surviving squash developing. I’m seeing at least one more female flower bud, but it’s too early to know if it’ll be a survivor. Again, we’ll see if they have enough growing season left. These are supposed to get very large.
I’m kinda regretting not watering this morning, even though the forecast is now more sure about us getting rain overnight. Looking at the weather radar, the trajectory of the weather system has changed, so it no longer looks like it’s going to go right past us. Instead, it’s heading towards us – and looks like it’s going to split in half and maybe miss us on two sides, instead of one! Still, we’re supposed to be getting right starting tonight, and continuing through to mid afternoon tomorrow. We shall see what actually happens!
Anyhow… that’s the status of things right now. I’m quite happy with things so far. In all honestly, considering how many winter squash we planted, I would have expected more – I don’t think there are any hiding under the leaves anywhere that I haven’t spotted. It does seem like some plants have more than one squash developing, while others have none at all. In the future, when we have our permanent trellises built – trellises strong enough to hold winter squash like these! – it’ll be easier to see, one way or the other. The squash in this Wild Bunch Mix really want to climb, too!
I’m quite impressed by how many melons we’ve got developing! They have a trellis to climb in one bed, but seem to prefer to sprawl on the ground, instead.
As late as things are, I’m happy with the Crespo squash, too. Last year, we had four struggling plants that ended up being baked in the sun in there location, and only one small, immature squash to harvest. It still made good pie!
They are definitely doing better in the new bed I made for them this year.
Lots to keep in mind for when we plant any of these again, in the future! Every year is a learning experience, and I don’t expect that to ever stop. That’s part of what makes gardening so fun!
I was able to get some progress mowing the southeast yard. I was stopping and starting a lot to empty the bag. The area I was mowing is not infested with creeping Charlie, so the clippings went directly for mulch of the strawberry and asparagus bed, and around the sunchokes.
I’d gotten through maybe 2/3 of the southeast yard when I ran out of gas. As the engine sputtered and died, it backfired, which is the only thing I can think of that was out of the ordinary.
After filling the tank, I tried to start it, but it wouldn’t start.
I failed to start it several more times before I decided to let it cool down for a while. This has happened before and we were able to start it again after awhile.
As I waited, I puttered around with some other things around the yard, before trying again.
It still wouldn’t start.
Worse, as I was pulling the cord to start it, I could hear rattling noises.
I ended up putting it away in the garage and got the riding mower out. I decided it was worth a try to see if it would cut.
It wouldn’t start, either. The battery was dead again.
This battery was replaced just last year.
I put the charger on it, then puttered around the yard some more. Tried to start it again, but it hadn’t charged enough, so I went inside to have a meal.
The next time, it started fine, and I tried mowing.
I don’t know what’s going on with that thing. It will cut for a while, and then… not. As far as I can tell, everything is working the way it should. When it stops cutting, I can reverse it, then try and cut the stuff that was missed. Usually, it starts cutting again, but sometimes I have to reverse and try again a few times.
What makes it even more confusing is that when I got to the end of the strip, I would increase the speed to maximum and drive back to the other end, so that while cutting, the grass was always being expelled over grass that was already cut. I didn’t bother disengaging the mowing bed, and it was set lower than the push mower. While going around, and I could see the mower was actually cutting grass as I went over the grass cut with the push mower. However, once I was back at the taller grass and moving at the slowest speed, it would just for a short while, and then stop.
After a while, I just stopped. It was taking way too long and I was wasting too much gas.
So now we have a broken push mower, and a riding mower that doesn’t always cut. This is on top of three desktop computers in the household that had to be replaced, plus a laptop that is out of commission but will not be replaced. Which is also on top of having to replace the van, my mother’s car is making banging noises – and now has two flat tires, one of which has a broken bead at the rim and can’t be pumped up at all.
All of this is less than 12 months.
This has got to be the worse year for expensive things needing to be replaced or repaired – and things we can’t afford to replace or repair anymore!!
Well, I at least was able to end my time outside on a positive note. I did the semi-daily growth comparison photos of all the squash and melons.
I do see a couple of female flower buds near this one, but it will be a while before they bloom. This is on the side where two vines are growing. The third vine is growing between this new bed and the bed with the peppers and eggplant beside it. That one has shown no side of any female flowers, yet.
I did, however, find some tiny green Seychelle pole beans starting to develop on the trellis netting!
Next is the easternmost bed with the Summer of Melons blend of melons.
I had to split the Instagram slideshow photos into two batches. These is from the east facing side.
The problem is, I can barely see my screen in the light, so I couldn’t tell if the camera was focusing properly or not.
I had actually finished taking all the photos and was going back through the beds when I spotted another drum gourd, so I got a picture of that one, too. For all I can tell, there are more of them hiding among the leaves!
Next is the winter squash bed with the peas and beans.
I found a new one on the other side, too. After I took the photos, I found a couple more pieces of scrap wood to put under them. As with the Summer of Melons mix bed, I can see quite a lot of developing melons that are still too small to be sure they are pollinated. There is certainly no shortage of pollinators, though, which bodes well for future productivity!
I was definitely feeling better by the time I was done going through the garden.
Now to figure out what to do about our broken lawn mowers.
The thermometer in the sun room was reading 39C/102F. This thermometer is against the west wall, about 3/4 of the way up to the ceiling. It does not get direct sunlight on it.
The thermometer outside my husband’s bedroom window was as high as the needle could go. If the numbers went that far, it would be about 60C/140F. This thermometer get blasted with the full sun for most of the day, in a mostly sheltered corner of the house. No shade and rarely any breeze.
The last thermometer is stored in the top of a cat shelter shelf. The shelf is in full sun, but the thermometer itself was in shade inside. It was reading 43C/109F. Of all the thermometers, I’d say that one is the most accurate to how it felt while walking around the garden beds.
Wow.
Honestly, I’ll take that over matching temperatures on the other side of freezing. Not that we see -60C/-76F, but we do see -40C/F at times, and that is far more deadly.
A couple of evenings ago, I took photos of our squash, pumpkins and melons, using my hand for perspective. Today, I did it again – but this time, I found more to take photos of! Since Instagram allows “only” up to 10 photos in a slideshow, I split the squash and melon photos up by beds.
Yes, I was able to find melons in the second bed this time! I had spotted one before, but today I moved the leaves around and found others.
I dug around in the leaves and found some “new” ones, too. In one photo, there are two melons, but the leaves and vines prevented me from getting a photo of them both, individually, so one of them is only half in the frame.
They’re getting big enough that they are starting to look like distinctively different varieties, too.
The smaller ones are getting noticeably not-small anymore!
The pumpkin vines are getting intertwined with the drum gourd vines. Those have many male flowers, but I have yet to find a female flower anywhere. It’s possible I can’t see any under all the leaves, but I think that’s unlikely. I’m wondering if they are getting enough water? These have a buried gallon water bottle buried next to their bases, so they get watered slowly and deeply, but a gallon of water might not be enough for something like this. I don’t know. It seems to be sufficient for the pumpkins, though!
The next bed is the winter squash interplanted with shelling peas and pole beans.
The first and largest one is among the few Summer of Melons mix transplants that were left over. The others, I’m not sure. They look like they are the same variety, but one was on the far side of the single surviving Cream of Saskatchewan water melon, which I know for sure are not from that mix. That would make them Sarah’s Choice melons. We grew those last year, but they were grown in a bed next to two other varieties and the vines were so mixed up, we lost track of which were which. The other melons in this bed would be the Pixie melons.
Oh, wow. I just linked those to where I bought them, and my goodness, the prices have sure gone up!!! Especially for the Pixies!
If you want to compare how fast these have been growing, you can check out the comparison posts I made on July 30 and July 28.
We may not have anything to harvest on a daily basis this year, but we sure to have a lot growing!
If the warmth keeps up, though, we might actually be able to have things to harvest. The bush beans first had to survive the slugs. Then they had to survive the deer. Amazingly, there are some that have recovered enough that they are starting to bloom! So Royal Burgundy bush beans are a possibility.
There aren’t a lot of pole beans, either, but they are also starting to bloom, so we might be able to harvest both the green Seychelles and the purple Carminate beans at some point. Which isn’t going to be easy, with all those winter squash vines growing around them! The shelling peas seem to be very prolific, with lots of flowers and developing pods, but it will probably be at least a couple more weeks before any of those can be harvested. The corn is also going to be a bit longer; they are sure releasing a LOT of pollen right now!
We also have green tomatoes developing, but nothing is even close to ripening, yet. Then there are the summer squash. I have no idea if we’ll get any green zucchini, Magda, Goldy zucchini or White Scallops, but I think we’ll definitely be getting some of the G-Star patty pans to harvest at some point. They’re not blooming yet, but there are buds starting to form, at least.
What a strange, strange gardening year. That rain we had in the spring really messed things up and set things back. We had Saskatoons blooming, but there are no berries – it was probably too wet for the pollinators. The cherry tree by the house isn’t going to have many berries, though there are some that are ripening. One chokecherry tree in the spruce grove is showing berries, but the one next to the main garden area has almost nothing on it. Even among the crab apples trees, there are a couple of trees where I’m not seeing any apples! These are the ones that have small apples the birds like to eat. The ones with apples that we like to eat do have apples on them, so the timing of blooms and pollinating seems to have been just right for those trees, but not the others.
We have plenty of pollinators, though. I don’t usually see them, but when I’m going through the garden, I can hear them buzzing. I will still hand pollinate the squash if I spot a female flower, but the melons have so many flowers that are so small, hidden among so many leaves, it’s all on the pollinators for those!
With the spring set backs, we can only pray to have a long and mild fall to make up for it!
As my SIL once told me some time ago; if we depended on our garden for food, we’d be starving! 😄
I just got back in from taking comparison photos in the garden. It’s just past 7pm now, and we’re just barely starting to cool down. We most definitely broke 30C/86F today, though I don’t know by how much, or what the humidex was. As I write this, we’re down to 28C/82F, with the humidex putting us at 30C/86F – which I think is off by a few degrees! It certainly feels hotter than that out there to me!
But, everything is looking good in the garden. The morning watering is keeping everything from wilting away in the heat. The corn has reached pollination stage, but we don’t have much wind today, so I’ve been shaking them to pollinate the silks, and can see clouds of pollen coming off the tassels! I am so looking forward to trying this variety of corn. Such a short growing season isn’t worth much if we don’t like the corn! 😄 I see some potential problems with growing them in with the winter squash, though; some of the vines have started to climb the corn! The stalks will not be strong enough to hold that kind of weight!
I did not do any comparison photos of the developing melons, squash, etc., using my hand as perspective, yesterday. So we’ll be looking at two days growth from the photos I last posted.
This is our first Crespo squash! I hand pollinated it, and it took, so I put a brick under it to keep it from potentially getting a rotten spot on the grass. I would love to get even just one fully grown Crespo squash, but it’s the end of July, so chances of that are pretty low, unless September ends up another warm one without frost – which may be possible, this year.
Digging around in the leaves, I found at least one more Summer of Melons Blend melon developing. There are lots more female flowers and probably more developing melons hidden by the leaves, but these are the largest ones that I can find, so far.
In the pumpkins, where I’d put a board under two smaller ones, you can see that the smaller one is turning yellow and withering away. Pollination didn’t take on that one.
I’m really impressed by how many pumpkins we have from just these two vines!
Among the winter squash, I found one that looks like it took and put a board under it. I also got shots of a couple that may have taken, but they haven’t dropped their flowers yet, so I might be jumping the gun to include them here.
I’ve been looking through the Vesey’s squash selection to try and determine what the varieties are, but it looks like the seeds in their Wild Bunch Mix are not sold separately! At least not all of them.
This is the image from their website for this product. I recognize Red Kuri in the photo, which we’ve grown before and really like. The image includes a squash I know is called Turks Turban, which is one of the squash we’ve got developing, but that one isn’t sold separately.
Oh! I just realized I forgot to get a photo of one large one! Excuse me while I go back out and fix that…
I can’t believe I forgot one of our largest developing winter squash! It is completely covered by leaves, so getting to it, and getting a photo, is a challenge. I think I can see which it is in the product image, but I don’t see that one among the seeds they sell individually.
Well, once they are ripe, I’ll have to look around online to see if I can identify the other varieties. The main reason we got this mix was to see which ones we like the most, so we can buy just those in the future. Eventually, I want to get ourselves down to just a couple of varieties – three at most – that grow well here, and that we enjoy eating – so that we can save seeds. That’s sort of the goal for most of the things we are growing, really, including the Summer of Melons mix.
Anyhow. I’ll probably take these comparison photos every couple of days, even though some of them show visible growth just from one day to the next. Especially when they are smaller. I like being able to go through the photos later on and really see how much they’ve grown in such a short time!
Tomorrow morning, I’ll be doing the early watering again, before heading to the city for our Costco shop. It’s also local election day for our municipal council, so I’ll be sure to vote before heading to the city.
As an aside, I’ve been playing with the AI assistant function on WordPress. The “generate feedback” keeps telling me I need to break up my long paragraphs. So often, I’ve taken another look at my posts to see if my paragraphs are really that long. I don’t think they are, in the posts I’ve done this with, but the AI sure seems to think so! It also keeps telling me to use subheadings to break things up. I’m not that kind of blog! It suggests adding images, too, though a few times it does recognize that I’ve used Instagram to include images.
What’s really funny is using the AI to generate images based only on the content of the posts. The AI does not know what a vegetable garden looks like. Or strawberry beds. Or a grocery store! At least the cat and kitten images look not too bad. 😄😄 The post I wrote about the washing machine being somehow turned on by the cats and flooding our entry was probably the funniest. I wrote about draining the water with a hose extending through the door.
It decided we had a washing machine sitting outside the door, with decorative nic nacs on top. 😂😂
None of them have been useable for my posts, though. I haven’t tried to tell it what to make for an image manually since I tried to get it to create an image of a mosquito some time ago.
The AI doesn’t know what mosquitoes look like, either.
Too funny!
The Re-Farmer
[Ahahahaha!!! I just tried the feedback option for this post, and it suggested I use the AI to generate images for it. 😂😂😂]
I should probably prune it off for now, so that more energy should go into the plant itself getting bigger, but it’s just one of three plants blooming, and it looks so pretty.
We do still have a lot of standing water all over, but the area around the garden bed I needed to work on was much improved. Still very wet, to be sure, but at least workable.
The weather forecast predicted a quick thunderstorm and rain at about 8am, so I was out there by about 7. There was a good chance the tiny storm on the radar would miss our location entirely, so I wasn’t too concerned. Mostly, I wanted to get things done before it got too hot – and things were getting hot pretty fast!
The main thing I wanted to get done was to break and turn the sod in the new area. That ended up taking a bit longer than expected. The wet ground did make it a bit easier to remove some of the bigger tap roots and rhizomes. This area, however, turned out to have a lot more tree roots under it – most of which were deep enough to leave alone, but shallow enough for the garden fork to get hung up on them. It also has a lot more, and bigger, rocks. Again, a lot were deep enough to leave after the sod was turned, but in many places I couldn’t push the fork into the ground without having to fight to get around rocks.
But that part is now done, and I left it to go in for breakfast. It’s supposed to be very hot today, so I don’t mind leaving the exposed roots to bake in the sun. The stalks from corn that was grown here last year were still around, so those are going to be buried when the soil that needs to be moved, gets shifted over.
I had the hardest time falling asleep for some reason, but woke up at 5am, so I’ve only had 2 or 3 hours of sleep. I can barely keep my eyes open right now.
Napping through the hottest part of the day is probably a good idea, anyhow!
After I finished my post earlier today, my daughter and I headed out for a dump run, then errands. We ended up going to the smaller city for her shopping, so that I could pick up some cat food at a better price at Walmart. By the time we got home, it was well past 3 and, I’m happy to say, starting to get a bit cooler!
After having a late lunch, I headed outside to finish at the new low raised bed.
Before I got started, I prepared a 4L size water bottle by removing the top and punching holes in the bottom, then brought over protective rings and support posts. The support posts were long enough to reach from corner to corner on the bed, so I used them to find the centre. That is where I partially buried the water bottle. This way, we can add water into it, and it will drain out the bottom and water the roots of the plants nearby. We’ve done similar in the past, including the first time we tried to grow Crespo squash, and it has worked well.
The pot with the single Crespo squash was the one where the stem had broken when the cats knocked the bin holding the pots off the table. I had it supported with a pair of bamboo skewers. Unfortunately, as soon as the skewers were removed, it immediately bent over at the break, almost snapping off. I had intended to plant it deep enough to cover the break, as the squash will develop adventitious roots, but I had to be so careful not to break it completely! I planted it in a protective ring and ended up filling the ring to the top with soil to support the stem. It still ended up lying on the soil. I just made sure it was running towards the side I wanted to train it towards, as it gets bigger – if it survives!
The other pot had two squash in it. I was planning to separate them, but the roots were too entwined, so they were planted together. They, too, ended up with their protective ring filled almost to the top with soil. They both got well watered, and I added water to the reservoir in the middle – which drained much faster than I expected! I ended up filling it again, a couple of times. before I was done.
With how the light hits this area, I decided to plant a row of beans along the east and west sides of the bed. I chose Seychelles pole bean seeds left over from a couple of years ago, that did so well for us when so many other things did not! These are a very straight green bean, and they were quite prolific.
Once the beans were planted and well watered, I set up supports to create an A frame, then added 4″ square netting. This will be enough to keep the deer from getting at the squash, while still being open enough to reach through to weed or pick beans. The beans themselves are planted about 8 or 10 inches from the side, so they will also be protected by the netting until they get tall enough to start climbing it. Hopefully, we’ll have a decent germination rate. The germination rate was excellent when we grew them before, but after a couple of years, I would expect it to be far less.
Though it was starting to get late, the days are so long right now, I decided to do more transplanting. The San Marzano tomatoes needed to be transplanted, and I decided to see if the retaining wall blocks could be used for that.
Aside from the chives in the corner, I planted mint in alternating blocks. Unfortunately, there’s some sort of plant in this garden that is more invasive that even crab grass or creeping Charlie! The mint is struggling to come back this year, and this plant is choking them out! I pulled as much as I could around the mint, but they’re so mixed together, there really isn’t much I can do.
In the other blocks, there was a lot of this plant to clean out as well. A couple of blocks still had some onions growing in them. There had been more, but they were choked out by this invasive plant.
I was able to clean up 10 blocks for the tomatoes, including two of blocks with a pair of onions in them that still had room for a transplant. I used my pH meter and was surprised the soil was just as alkaline as everything else. These blocks have been amended with peat in the past, and the cement itself can increase the acidity of soil. That meter’s needle was a hard 8. So I worked some sulfur granules into the prepared blocks, too. I wonder, at times, what the reading would be if I had a meter that went higher than 8! Even the solution in my soil test kit maxed out at 7.5. Ah, well.
In the tray that had the biggest, healthiest tomatoes, there should have been 9, but there were only 7 surviving. One of them was even starting to bloom! The last three blocks were planted with the smaller tomatoes that almost didn’t survive being moved to the sun room. This was the tray that had tipped and spilled after I’d topped up the soil in the cells, so they’ve had just a rough time, over all! After transplanting the three strongest looking ones, there’s maybe 5 or 6 left. There’s one, I’m not sure is going to last much longer. I don’t know where I’d transplant these right now, but being as small as they are, they can stay in the tray longer.
Each of the transplants got a bamboo stake that will be used to support them as they grow. They will likely need more as they get bigger, but that can be added later. Last of all, they got a very thorough watering. Hopefully, they will do okay here. The ornamental apple trees cast quite a bit of shade, even with the pruning we’ve done over the years, but we’ve grown tomatoes in these blocks before, and they did okay.
Once everything was put away, I did one last prep. There are three pots on the landing outside the main doors. Last year we grew herbs in them. I have decided to grow summer squash in them this year. This way, even if we don’t end up having the space to direct sow in the main garden beds, we’ll at least have some summer squash in the pots to enjoy!
One of the pots had spearmint in it, but it did not survive the winter. Another had a mix of thyme and oregano. The one oregano that survived to be transplanted had bloomed and gone to seed, and I was going to see if any of the self-sown seeds germinated, but decided having summer squash was a priority. The biggest pot had lemon grass in it and, wow, were those roots every hard to clean out!
One of the new seeds we got for this year were are a white patty pan, so I’ll plant some of those, for sure. We have both green and yellow zucchini, and I haven’t decided which of those I will plant, yet. If we still have some Magda seeds left, I want to plant some of those. We really like them, but they are the ones that have been the hardest to grow! With some of the seeds being a few years old, I’ll plant at least three per pot, and see how many germinate.
The pots are prepped, but the planting will be done tomorrow.
With so many winter squash that need to be transplanted, they are a priority for the low raised beds that are already shifted, with or without frames. Tomorrow, my daughter and I will finally drag the second 18′ log out of the spruce grove – between the rain and the high winds, we haven’t gone into the spruce grove since she got this last one cut to size! We have enough logs to frame one bed, so that will make things a bit easier.
Things may change, but I’m thinking of planting the winter squash in the middle of the bed, in a long row, then planting more pole beans on either side. We won’t be able to do an A frame support structure, like over the Crespo squash, but we should still be able to rig up a quick trellis for them, later on.
With how many winter squash we have, and how far apart they need to be planted, the two shifted beds might not be enough for them all. The drum gourds and the pumpkins will probably need their own hills. I’ll figure that out, later. We’ll be transplanting melons into the first of the trellis beds, all along one side, where the trellis supports will be added, later, but again, we probably won’t be able to fit them all in. Since they will have a trellis to climb, they can be planted closer together, but I don’t expect to fit them all in that bed. Something else we’ll need to figure out!
Still, today was a productive day, and it feels rather good to have fewer trays to return to the sun room for the night!
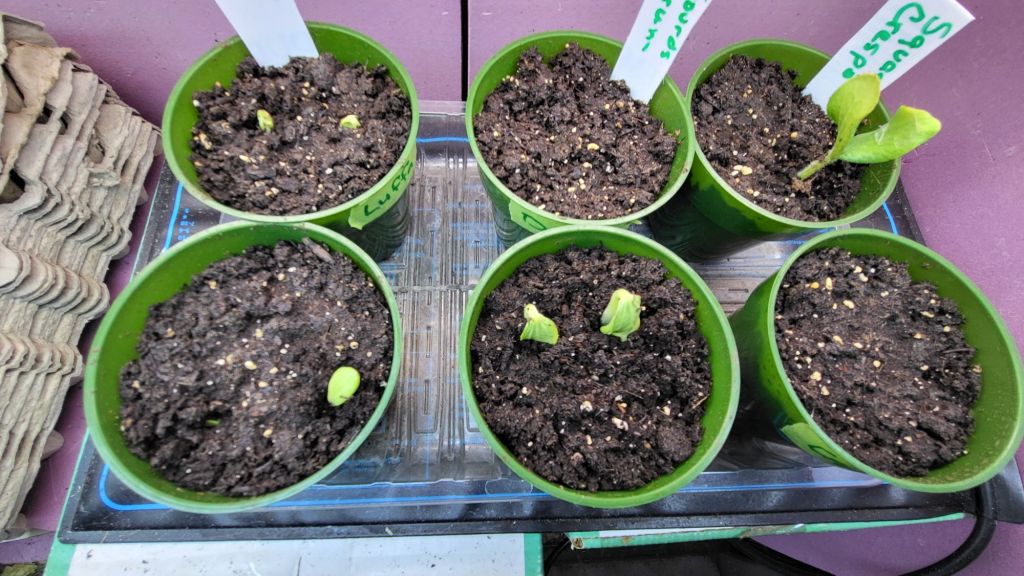
The first seedling to break soil surface was a drum gourd – one of the two in the middle pot – but then a Crespo Squash, on the right, burst through and exploded out of the soil. It seems like every time I look at the pots, there’s more visible growth.
What I’m really happy about is that not one of the seedlings emerged with the outer shell of the seed stuck on the leaves. Last year, there was more than a few times that I had to very carefully remove the shell, because the seed leaves were being killed off. As careful as I was, sometimes pieces of the leaves would break off, because the shells were so tightly encasing them.
I really like this pre-germinating technique!
The heat mat will need to be unplugged very soon. I won’t move them off right away, as I need to arrange space. I won’t need it until I start more seeds.
This weekend will be 7 weeks before our last average frost date. I will go through some of my seeds to see what I want to start first. The seeds we have left are pretty much all supposed to be started 3-4 weeks before last frost, but if I started all the ones I want to, I’ll run out of space in no time at all – and I will have way too many things that need to be transplanted, all at once. So I plan to stagger them.
I might even start some of these.
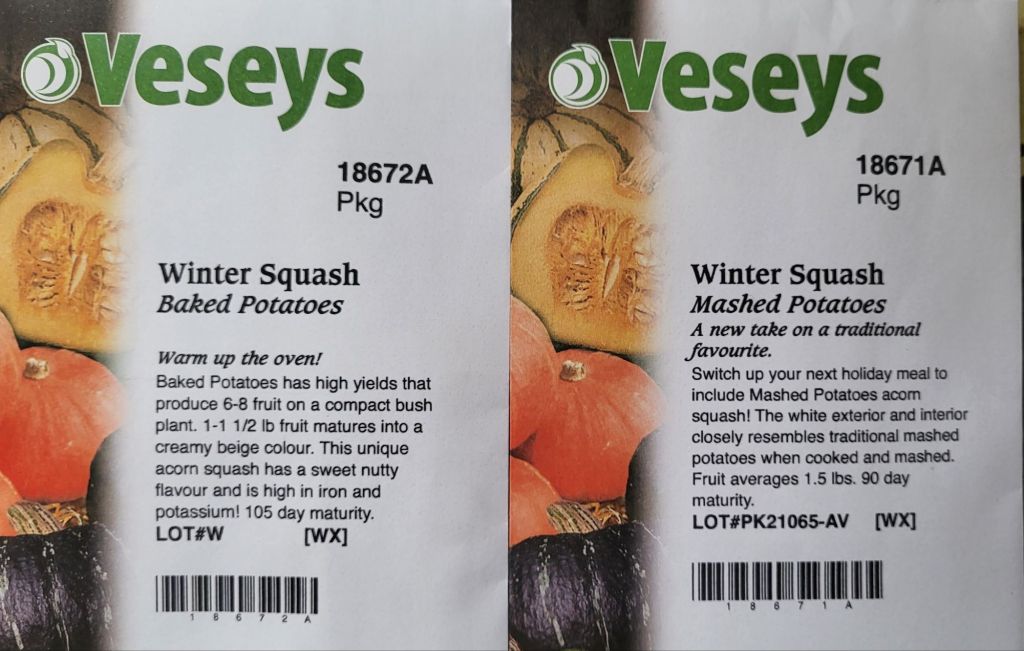
Baked Potato SquashMashed Potato squash
I had to go to town today and finally picked up the mail. There were probably in and waiting for a while. Since we have so many varieties of winter squash seeds, we will probably start just a couple of seeds of each. At this point, we’re still after trying out different types to see what we like the most, and will then probably drop it down to one or two varieties.
Who am I kidding. We’ll probably be constantly trying new ones! Just maybe not quite so many different types, all at the same time.
That’s one thing about having the luxury of space like we do. We can spare some to try growing new things we don’t even know if we’ll like, yet.
Recently, I was going to start some new seeds in pots, but at the last moment, changed my mind. We had such trouble with these last year, and these seeds were anywhere from 2 to 4 years old. I decided to try pre-germinating them, and if some of the seeds turned out to be dead, I’d know right away. Plus, I could avoid our situation last year, where so many seeds didn’t germinate, or died soon after.
Here is a video from Maritime Gardening about the planting process.
Typically, pre-germinating seeds is done in slide lock baggies, but he does it in reusable plastic containers, and I liked that idea better. The take-out container I used was big enough to hold all the seeds I wanted to start, and they are all so different there was no concern about getting them mixed up.
Today – after only 4 days, with only a couple of those on the heat mat (I had the container elevated, so the wouldn’t get too hot) – they germinated! When I turned the lights on this morning and checked them, I saw a few little roots poking out. By the time I was ready to put them in pots this afternoon, every seed either had a root emerging, or just visible.
Before I got to that, though, I saw this new video from Gardening in Canada. Excellent timing.
Almost all plastic containers have that triple arrow reduce-reuse-recycle symbol, with a number in it. She goes through all of them, from 1 through 6. All the plastic containers she looked at are considered food safe, but some are better than others, though the green tray sets with the LED lights, which I now have, too, have no number on them at all.
When it was time to plant, I made sure to check the bottoms of the pots I’d bought for these, and was happy to see a number 5. Discovering that the Red Solo cups (which have a 6 on them) are made of a plastic that is among the worse for shedding was a bit of a surprise. I still have a lot of those!
Honestly, though, I’m not too worried about it. If I worried about all it all, I’d never do anything. Still, if I am in a position to choose one over the other, I now have the information to made an educated decision.
Thanks, Ashley!
So here is my little video of today’s progress!
The seeds had already been soaking for a while when I decided to take clippers to them and scarify the outer shells. Normally, I’d have used sandpaper. All the emerging radicles found their way through the clipped openings. It likely would have taken several more days for them to break through, otherwise, and even longer if they’d gone straight into pots.
I’m quite impressed that every single seed sprouted. The luffa are the oldest seeds of them all, so I was really expecting to have at least a couple of duds.
So now they are on the heat mat, and I expect to see them emerge from the soil in a few days. Theoretically, I should have given each seed its own pot, but we’ll see how they do, first.
Before I was able to get started on this, though, I had to finish cleaning up after my near disaster with the San Marzano tomato tray, yesterday. The remaining soil spilled onto the floor had finally dried enough to vacuum, though I was actually able to salvage some of it, first. As everything was put back in front of the window, I made sure to top up the soil on the onion tray that got knocked over. Mostly, it was filling in around the edges, since the roots held the soil together in the middle.
I’m really at a loss as to how I’m going to set up more seed trays as they get moved out of the big aquarium greenhouse. We won’t be able to do the same set up as we did last year. Hopefully, things will stay mild enough that I can start using the sun room, early. The outside cats won’t be happy, though. They’ll be losing their lounging spaces! We’ll probably have to start closing the sun room door completely. At least for the night.
If the door can close all the way. Things are still shifting, and I recall having trouble getting the outer door to fully close because of it.
The sun room certainly gets warm enough during the day – today, I saw the thermometer at about 25C/77F – but it loses pretty much all that heat, overnight, and that would be cold enough to kill seedlings. It’ll be a few weeks before we’re going to need the space, though, so it might be warm enough overnight, by then. We shall see.
For now, I’m really happy with how pre-germinating these seeds worked out. When it comes time to start things like the melons and winter squash indoors, I think it would be worthwhile to do it again!
I had a much interrupted night last night, so the girls took care of the morning rounds for me, so I could sleep in.
Well. As much as the suddenly cuddly cats would let me! 😄
I did end up having to go to the post office to pick up some packages, and ended up going into town to run some errands while the post office was closed over the lunch hour. I finished too quickly, so I used up time by going to the local dollar store – I forget which franchise it’s actually part of.
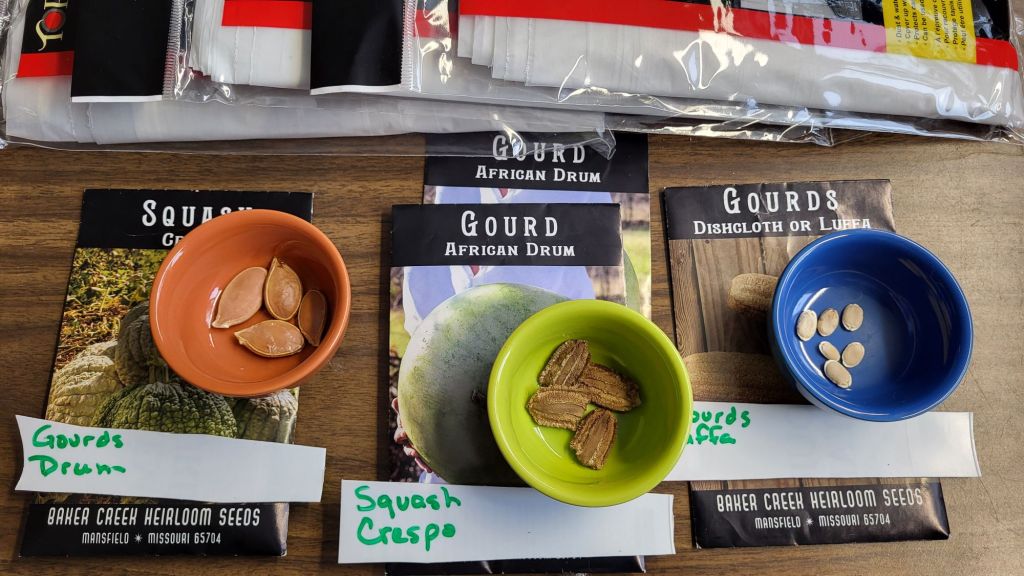
The tomatoes and peppers on the heat mat are ready to be moved aside, so today I prepared the next batch of seeds to start.
Oops on the labels on the left and the centre!
The packages across the top of the photo were my dollar store find. After watching the Gardening in Canada video about useful Dollarama garden finds, I went looking to see if they had clear plastic drop cloths. They did, so I picked up three of them; one for each of the raised bed covers we have, with the curved tops. This plastic is quit thin – about half the thickness of actual greenhouse plastic – so I don’t expect them to last more than a season but, at 12′ x 8′, they should be just the right size to cover the frames. If we can get at the frames and cover them early enough, they will made nice little greenhouses for the three low raised beds next to the spruce grove. The sooner we can warm up the soil, the sooner I can direct sow those seeds that can be planted before our last frost.
Until then, I got my gardening fix by preparing Crespo squash, drum gourd and luffa seeds, all of which have a long growing season. There were only 6 luffa seeds left in the package and they’re pretty small, so I’m using all of them. With the drum gourds, I still had some left in an open package, plus I have an unopened package. Because the seeds are so large, I chose only 4 of the drum gourds and the Crespo squash seeds. There are still more seeds left in the Crespo squash seed package, too.
Yes, I did catch on that the plant labels are under the wrong seeds! The smooth seeded Crespo squash’s bowl is on the correct seed package. The drum gourd seeds look like they have a rough texture, but have a soft surface that’s almost fluffy.
Usually, I would scarify the seeds and plant them after only a short presoak, mostly because I would forget to let them soak overnight. Last year, I had such trouble with them and had to reseed the pots several times. This time, I am making sure to do a longer pre-soak. I got them going in the mid afternoon so, by morning, they should have about twice the soaking time compared to leaving them overnight.
I plan to split the seeds between two pots per variety. Hopefully, we’ll have decent germination. If only one seed each manages to germinate and survive transplanting, I’ll be happy!
Now that I think about it, this would be a good time to try doing it the way Maritime Gardening suggests; leaving the seeds on wet paper towel until the start to germinate, the planting them. Hmmm… Yes. I think I’ll do that – after they’ve had their overnight soak. With big seeds in particular, I think that would be especially helpful.