Shoot for the stars

Last night was supposed to be the height of this year’s Perseids meteor shower, so I headed out again to try and get some photos.

This time, I actually played around with the manual settings on my phone’s camera a bit, so I will include that information the photos in the captions, for those who are interested. I resized the following photos by 50%, but the images are otherwise untouched.

f/1.5
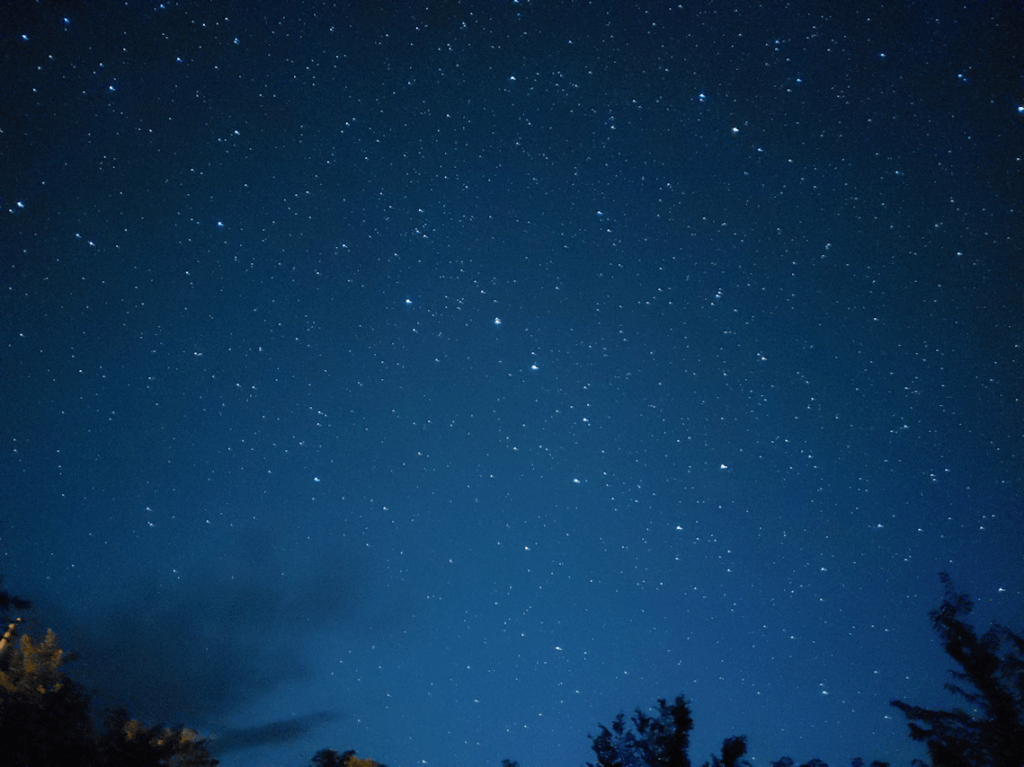
Exposure time: 13 seconds
ISO 1600

This time, I headed straight to the old garden area, which is the darkest areas that is close to the house. As before, I had my phone on a GorillaPod and used voice commands to take the photos after positioning it.

In the above photo, you can see I caught a meteor on the bottom left. I did not actually catch many meteors in photos, and while I did see (but missed getting a photo of) one really bright meteor, followed by a flash when it hit the atmosphere, I didn’t actually see most of the meteors I managed to catch during the long exposures!

I think I may have simply gone out too early in the night, and it may have still been a bit too bright.

f/1.5
Exposure time: 20 seconds
ISO 1600

In the above photo, you can see some clouds, looking like a smudge on the bottom right. They were so thin and sparse, we could not actually see them ourselves.

f/1.5
Exposure time: 20 seconds
ISO 1600

After taking a few shots with the phone on the ground (and being tackled by a Potato Beetle, desperate for attention!), I ended up using the top of the straw bale as a surface.

This was good enough for Potato Beetle, too. After sniffing the phone, he laid down nearby and kept me company.

Much nicer than him jumping half way up me, and hanging on with his claws… :-o

f/1.5
Exposure time: 30 seconds
ISO 3200

While I was taking photos with my phone’s camera, my daughters came out with the DSLR on the tripod to give it a try.

I haven’t uploaded the card yet, but my daughter was very frustrated. Even at 30 seconds exposure time, the camera preview showed nothing but black. While it may not have been as light as the above 30 second exposure shot, it still shouldn’t have been black!

f/1.5
Exposure time: 30 seconds
ISO 1600

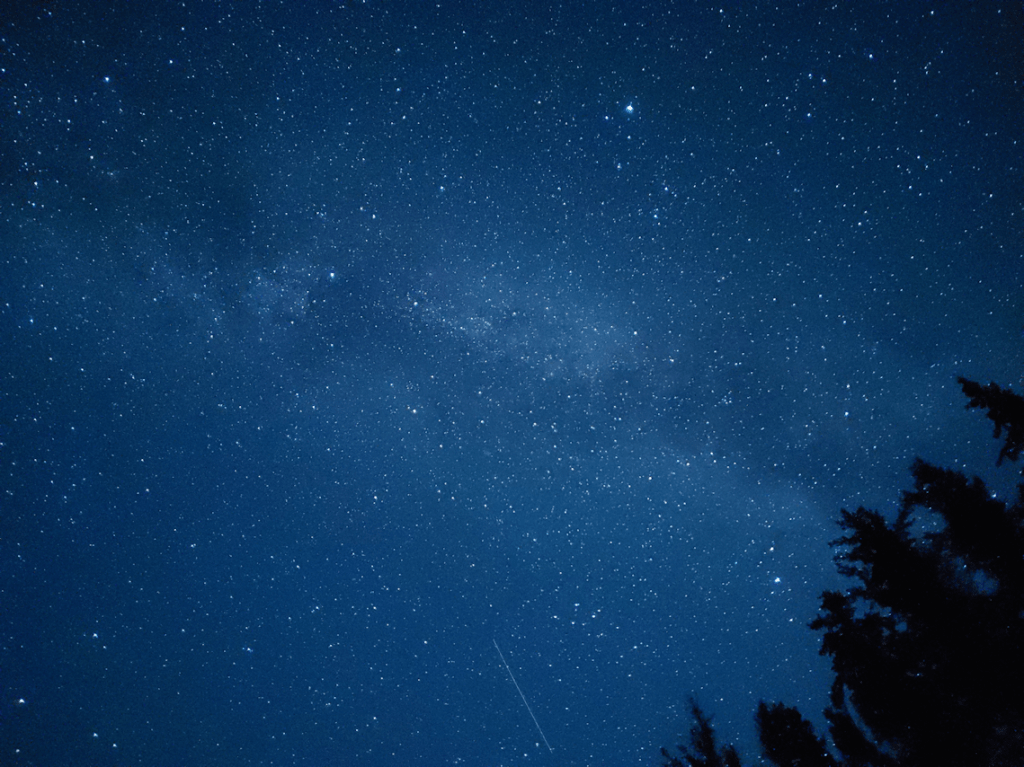
I just love how the Milky Way shows up. Especially in contrast with the trees.

f/1.5
Exposure time: 30 seconds
ISO 1600

One of the frustrating things about trying to take the photos is how many of them ended up being out of focus. The camera was on auto focus, so I finally switched that to manual. There is a sliding bar between a flower (macro) and mountain (landscape) icons. I set it as far as it would go towards landscape, but for some reason, the bar would adjust itself just short of that, on its own. I’d take a good picture, then the next one would be out of focus and, invariably, I would find the manual focus had changed on its own.

f/1.5
Exposure time: 30 seconds
ISO 1600

It took me many tries, but I finally got one where the Big Dipper could be clearly seen!

f/1.5
Exposure time: 30 seconds
ISO 1600

Before heading into the house, I couldn’t resist taking a few more photos from the East yard – and caught another meteor! :-)

Hmm. Interesting. I selected what I thought were among the best photos from the many I took last night, and they all ended up having almost exactly the same properties. I know I adjusted the F stop, as well as trying out different ISO and exposure times. I guess f/1.5 and ISO 1600 for 30 seconds simply gave the best results!

It’s a pain in the butt using manual settings on a smart phone. Especially with how I have the GorillaPod set up so it lies almost parallel to the ground, resulting in a Pod leg blocking the part of the screen the adjustments are made. It is, however, worth it. I am so happy with how these photos turned out!

The Re-Farmer

Not quite a recipe: three cheese scalloped potatoes with kielbasa and carrots

While making scalloped potatoes yesterday, I wanted to find a way to use the carrots from our garden I had picked that morning.

If they had been larger, I would have just sliced them thin and layered them with the potatoes, but these were on the small side.

So I got creative.

Here is how I ended up making the the scalloped potatoes.

For the cheese sauce, I used 1 medium onion, sliced thin, butter, flour, seasonings, whipping cream and cheese.

We already had old cheddar and grated Parmesan in the fridge. I also picked up a cheese that has recently showed up in local stores that is just awesome. BellaVitano Reserve. We’ve tried the three different varieties we have available, and I picked up Tennessee Whiskey this time. They have an Espresso one that it really good, too. I shredded this, plus the cheddar, and mixed it all together with some grated Parmesan. I used most of it in the sauce, saving some for later.

For the seasonings, I used mushroom salt, freshly ground pepper, garlic powder and paprika. For the liquid, I like to use whipping cream, but it can be made with milk or a lighter cream, though why anyone would want to, I don’t know. ;-)

To make the sauce, the onion first gets slowly cooked in about a tablespoon of butter until soft. Then, a couple more tablespoons of butter is added. When that’s melted and bubbling, the flour (about 2 tablespoons) is added and cooked, stirring constantly with a whisk, for maybe a minute. Then 2 cups of room temperature cream is added, little by little, with pauses to whisk it smooth. For the first while, the flour thickens the cream very quickly. After all the cream is added, the sauce is simmered, while constantly stirred with a whisk, until it is slightly thickened. Then the seasonings are mixed in. Finally, the heat is turned off, then the shredded cheese mixture is stirred in until melted. After tasting to see if the seasonings need adjusting, it is set aside.

For the rest of it, I had potatoes peeled and sliced thin and the carrots were peeled and shredded. I didn’t count how many potatoes I used. They were on the small side, so it was probably around a dozen. The shredded carrots made about 3 cups, loosely packed.

In a buttered baking dish, I put a layer of potato slices, topped it with 1/3rd of the shredded carrots, then added 1/4th of the onion and cheese sauce. This was repeated two more times, then the top layer was just potatoes and the last of the sauce.

It then went into a 350F oven for about 40 minutes.

Shortly before the time was up, I took a ring of Polish sausage and cut it into slices. The slices were then laid on the top of the potatoes.

I hadn’t originally planned to use the sausage, but I happened to have it, so why not? :-)

I did have some concerns at this point. We’re still getting used to the new stove, and haven’t used the oven much at all in this heat. When stabbing the potatoes with a fork before adding the sausage, they were still surprisingly hard. I had forgotten to cover it with foil at first, so that might be why.

I covered with foil at this point, but it really should have been added right from the start.

With the sausage on the top, I put them in for another 10 minutes. Most recipes for scalloped potatoes that I’ve seen say to bake for 40-50 minutes, and I was shooting for 50 minutes in total. After that, I added the rest of the cheese mixture on top.

Back in the oven it went, though without the foil. I didn’t want the cheese to stick to it. I then baked it until fork tender.

It ended up taking a lot longer to cook than I expected.

Also, handy hint. Put the pan on top of a baking sheet, in case the sauce bubbles over.

We’ll be testing out the oven’s self cleaning function, next…

:-D

When it was fork tender, I took it out and topped it with chopped parsley I’d picked from our garden that morning.

This was quite an experiment from how I usually make scalloped potatoes. They are usually just the potatoes and onion-cheese sauce, these days. I was very curious as to how the carrots worked.

They pretty much disappeared!

I used some of each type of carrot we have; white satin, rainbow (orange, pale yellow, and white), and deep purple. The purple carrots left colour on the potatoes, but with them being shredded, and such a long cooking time, they all pretty much disintegrated and disappeared into the sauce. I could taste a hint of their sweetness, but that was it.

I would definitely be up to including them again.

The addition of sausage… well, you can’t go wrong with adding kielbasa!

The cheese mixture worked really well, too. That Tennessee Whiskey cheese added to the flavour, but did not overpower.

All in all, this was quite a success!

The Re-Farmer

First attempt at wood carving

I just couldn’t wait to try out the new carving knives! I ended up using only two of them, though.

After looking at the bits and pieces in the basement, I chose a small piece of lilac to practice on.

It is resting on the leather breastplate my husband made for me.

I was not about to use the carving blades on that bark, though…

I used my K-Bar instead. The wood was surprisingly green, for something that was cleaned up from storm damage some 8 months ago!

I didn’t think to get a picture of the safety glove. There is a pair of them, and they can be worn on either hand. It fit remarkably well, considering I have big, wide man-hands.

Hhhmmm… that may be why it fit well… :-D

It was also very comfortable to wear. I thought it might be really coarse and scratchy, but not at all. It felt like a normal glove.

These are the two carving knives I used. I can’t remember what either of them are called right now.

I started by practicing push and pull cuts to flatten a piece at each end…

…though only one end showed the colours inside; the stick was slightly thicker at the other end.

Then I practiced different methods of making V cuts.

Detail work is going to need a lot more practice. ;-)

After that, I worked on the spiral around the piece, using that to practice different ways of cutting and switching up between the two blades.

I’m rather happy with how it turned out, considering I’ve never carved before. The lilac would was nice to carve with. The blades themselves…

I can see myself wanting to pick up higher quality ones in the future, if I find myself carving more often. While not the cheapest set I saw, it was hardly the highest end, either. I found myself sharpening them almost from the start. The edge held fairly well after I did, so it seems they didn’t arrive as sharp as they could have. Still, they did the job quite well for the learning process it is.

Next time, I’ll find something different to use that curved blade on. :-D

Altogether, I’m glad I picked this up!

The Re-Farmer