Manual labour is good therapy, and a court update

I headed out early today, for my court date with our vandal. It’s been a year, minus a day, since my first court date regarding my application for a restraining order was scheduled.

It was a very, very long day.

No, it’s not resolved.

But before I get into that, I will talk about something more therapeutic. I was so mentally exhausted by the time I got home, I needed to do some good old manual labour to get some “rest”.

I feel so much better, now!

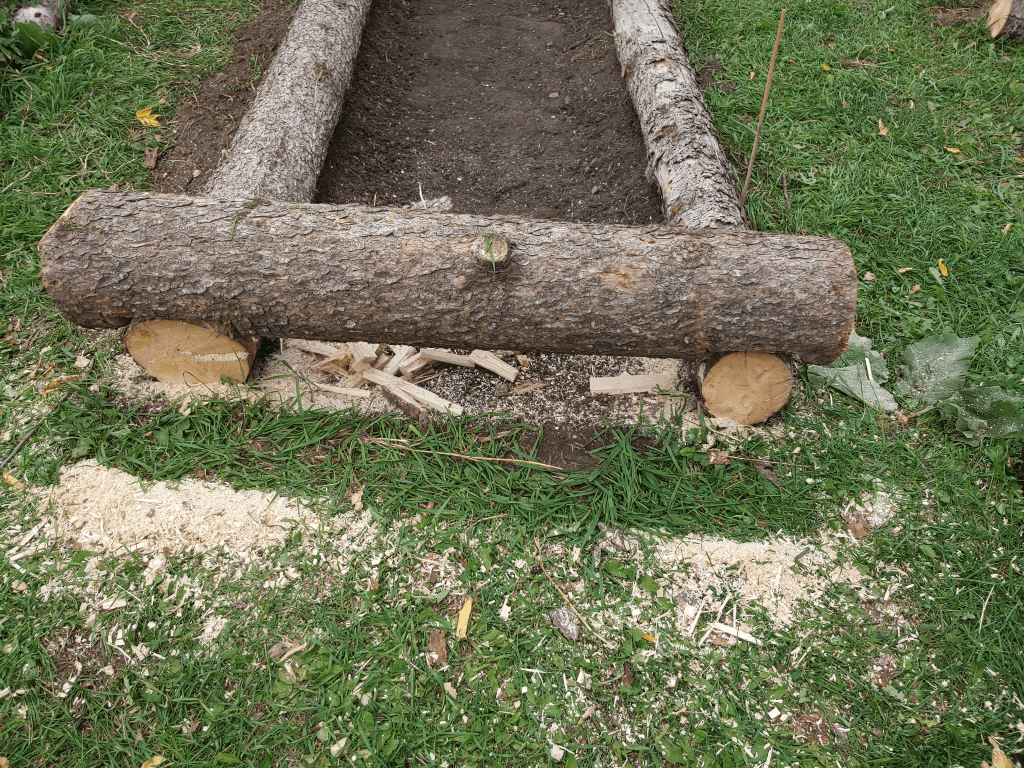
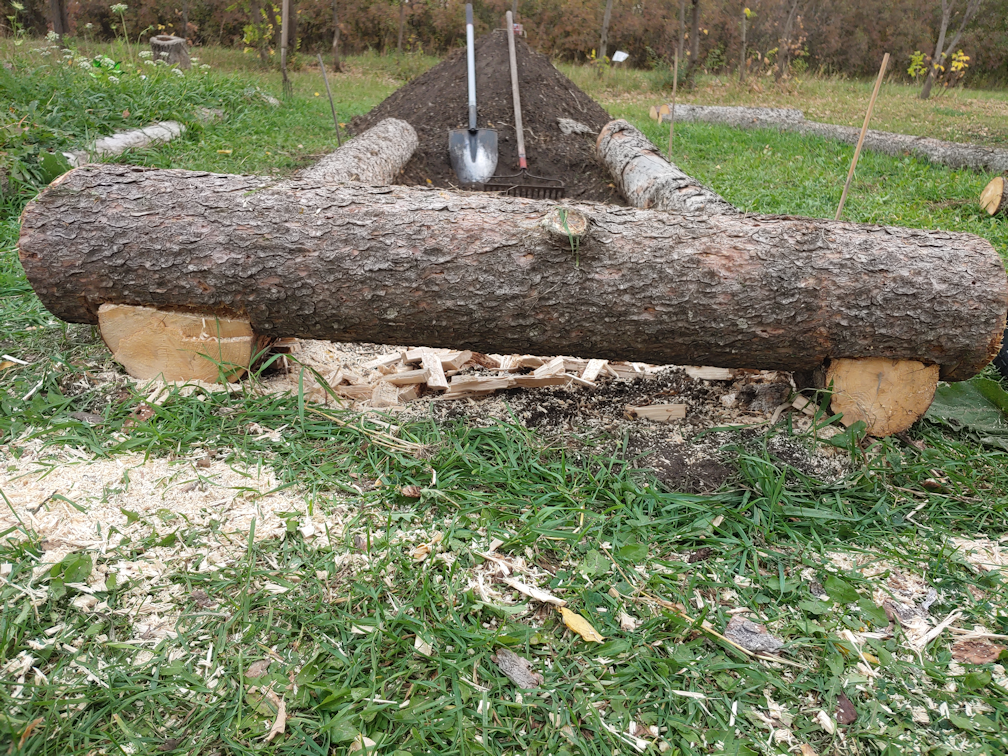
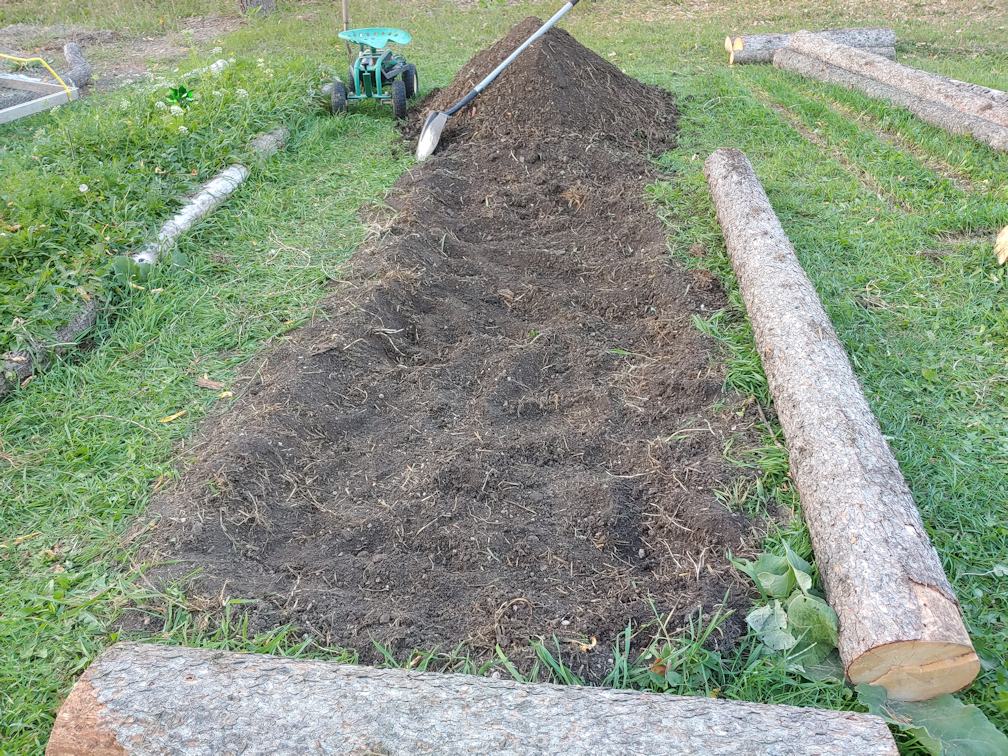
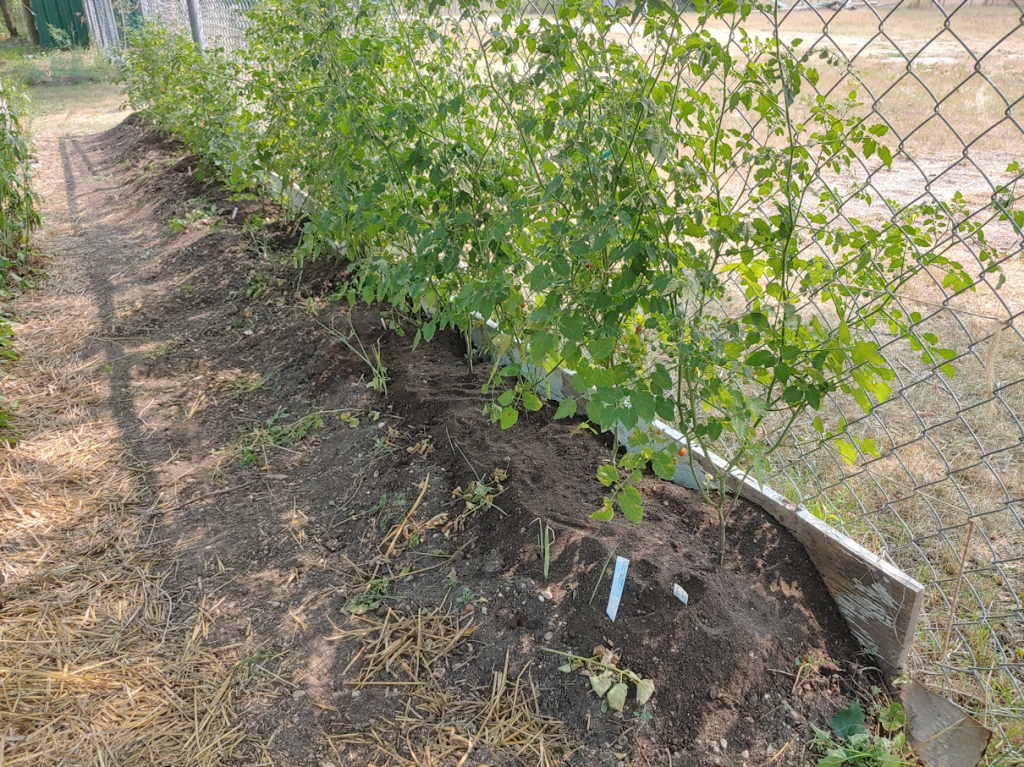
With the day being several degrees warmer than forecast, I focused on the area that caused problems before, because the ground was too frozen. The old kitchen garden.

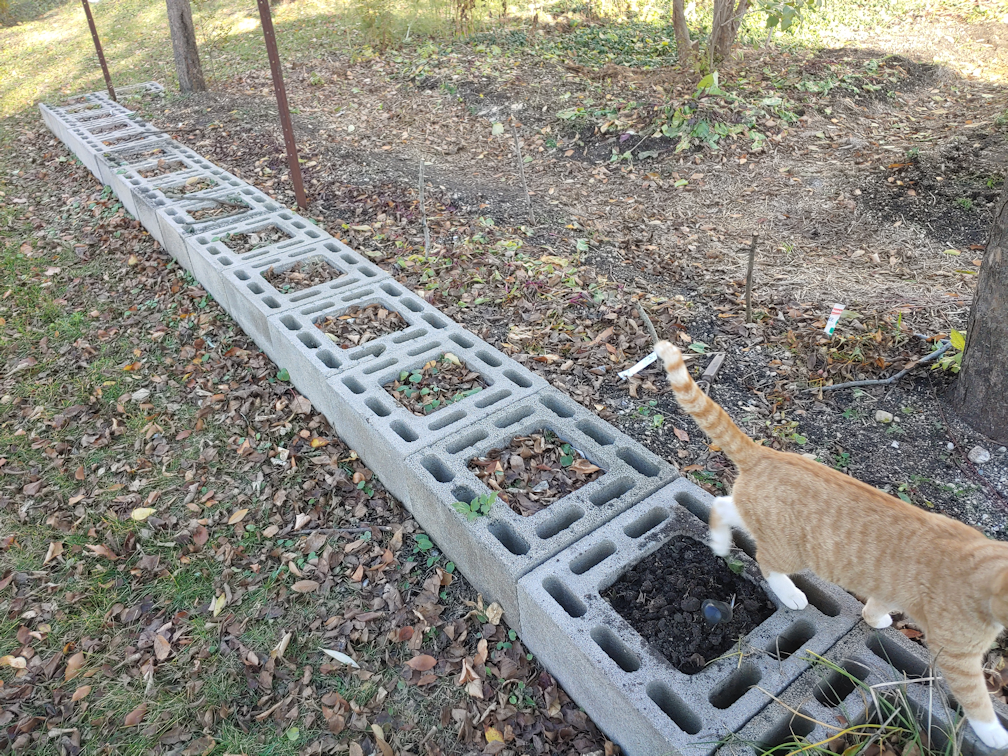
Before our old garden fork finally bent from the mostly frozen ground, then broke when my daughter tried to straighten it, she did get a start on the retaining wall before moving to an area where the ground was not frozen. This is the area that gets the most shade, plus I wanted to transplant some mint out of another bed into some of these, so the blocks got first priority. The ground was quite thawed out, today.

After the groundhog ate the lettuce that was planted in these, they basically got abandoned until now. Happily, there wasn’t too many weeds and roots to dig out.

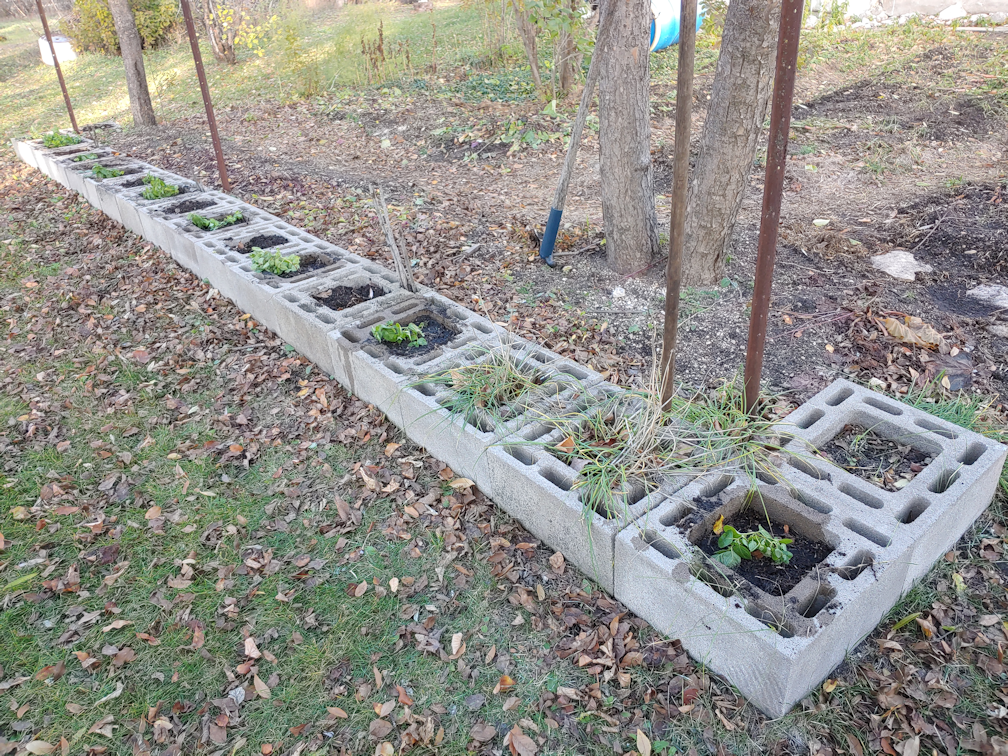
After I did the blocks from the chives to the opposite end, I dug up some mint and transplanted them into every other block, again starting from the chives. When I thought I was done, I walked back and found some mint that got dropped from the bunch as I moved along the retaining wall, so I cleaned up one of the blocks in the foreground and planted it there. We had buried a mystery bulb in it, earlier in the year, but there was no sign of it when I dug into that block, so mint it will be!

I don’t know if they will take, but we shall see. After they were transplanted, they got a thorough watering, and that section is now done, unless we decide to mulch it with straw, now that there is mint in the blocks. We shall see how things go over the next couple of days.

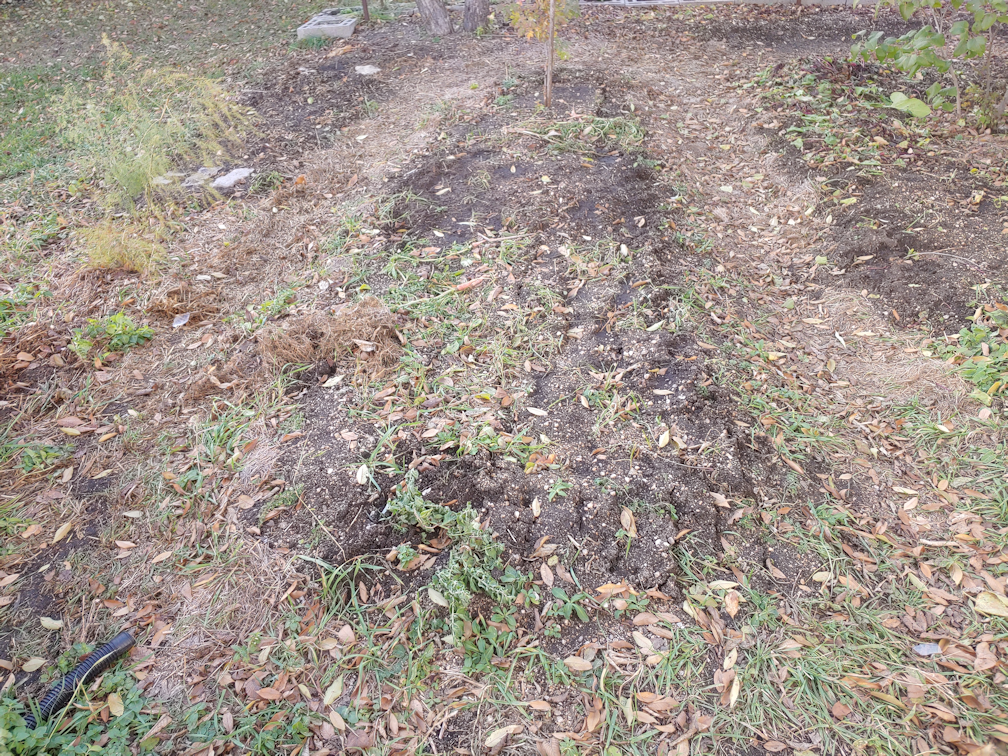
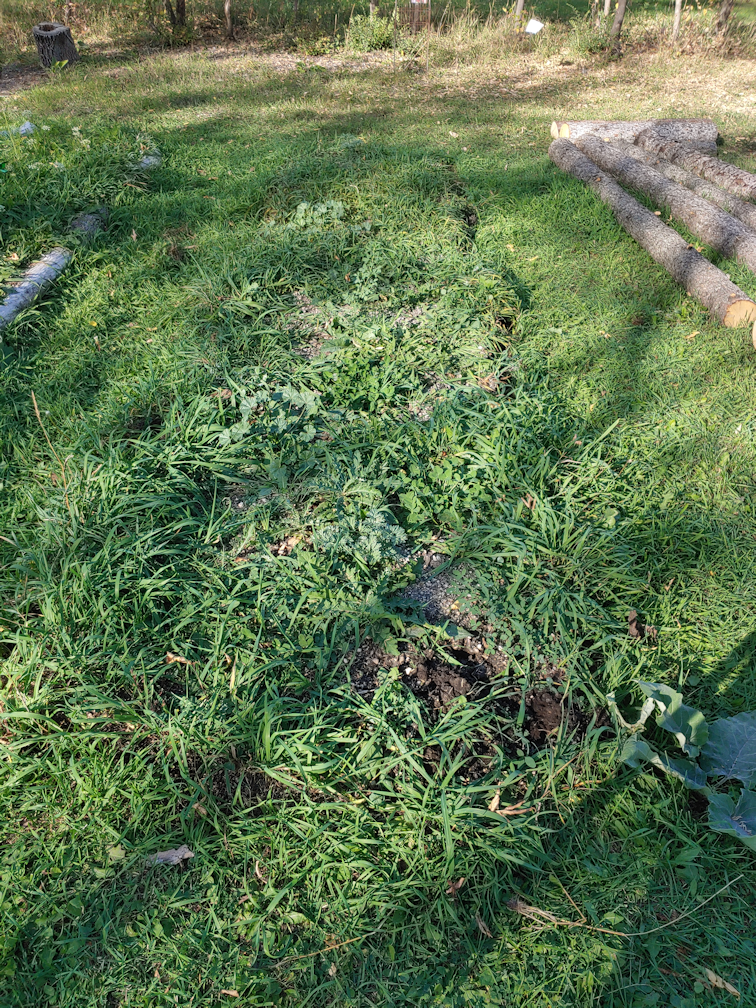
This is the somewhat triangular bed we had planted carrots in, and where the garden fork met its match. The bed is too wide in the foreground, and that is also where the mint was coming up. Mint was even coming up through the paths we covered in straw and were walking on! There was one mint plant visible in the foreground that looks frozen, so I didn’t try to transplant it.

For this bed, the carrots that had bolted got buried in the middle, while the wider end was narrowed.

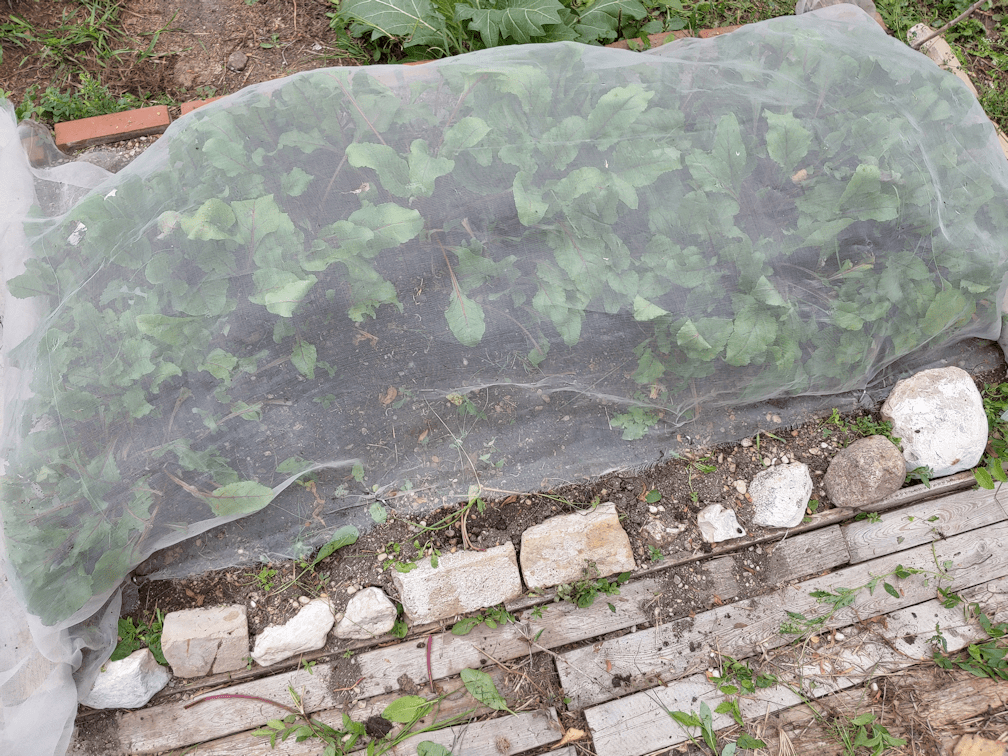
I stopped before getting too close to the pink rose bush at the “point” of the triangle. We’ve pruned the ornamental apple tree that was overshadowing it, and last year it finally bloomed, but this year, like so many other things, that one cold night in May killed off any developing flower buds, and it did not bloom at all. Hopefully, next year, it will have a chance to do better!

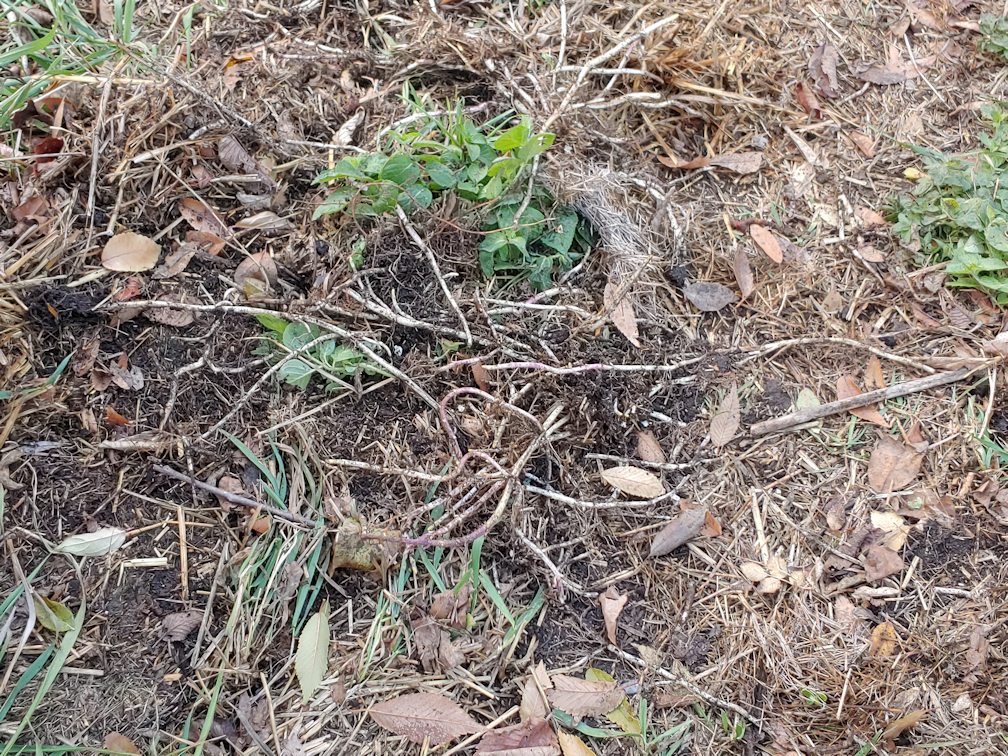
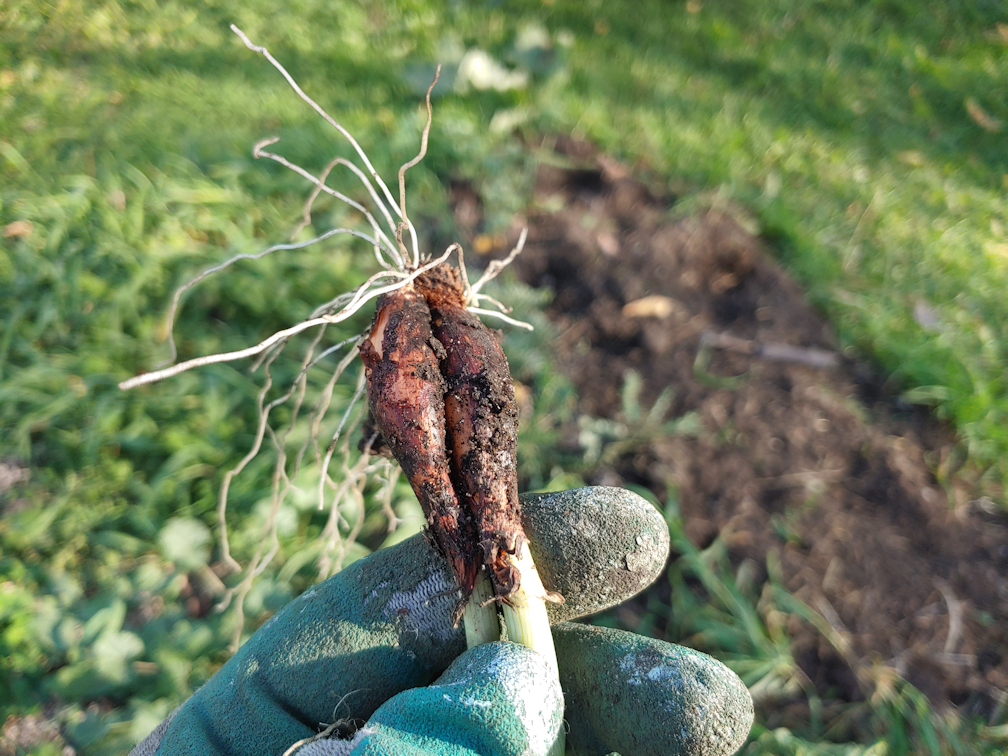
These are the mint rhizomes I found while clearing and resizing the bed! Even the rhizomes smells strongly of mint.

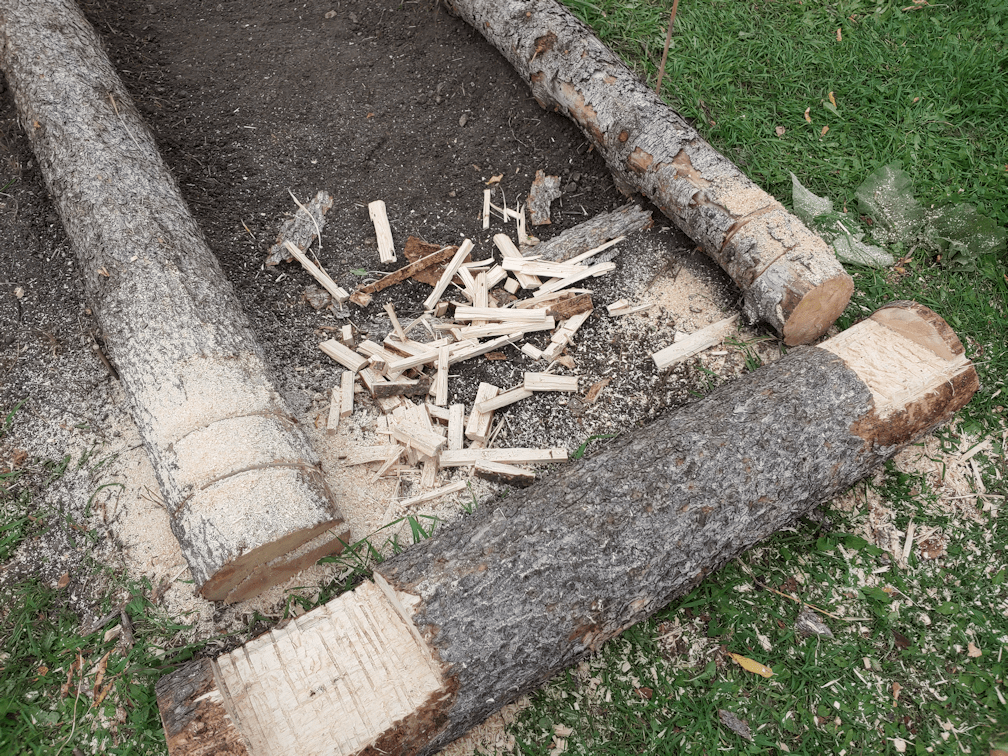
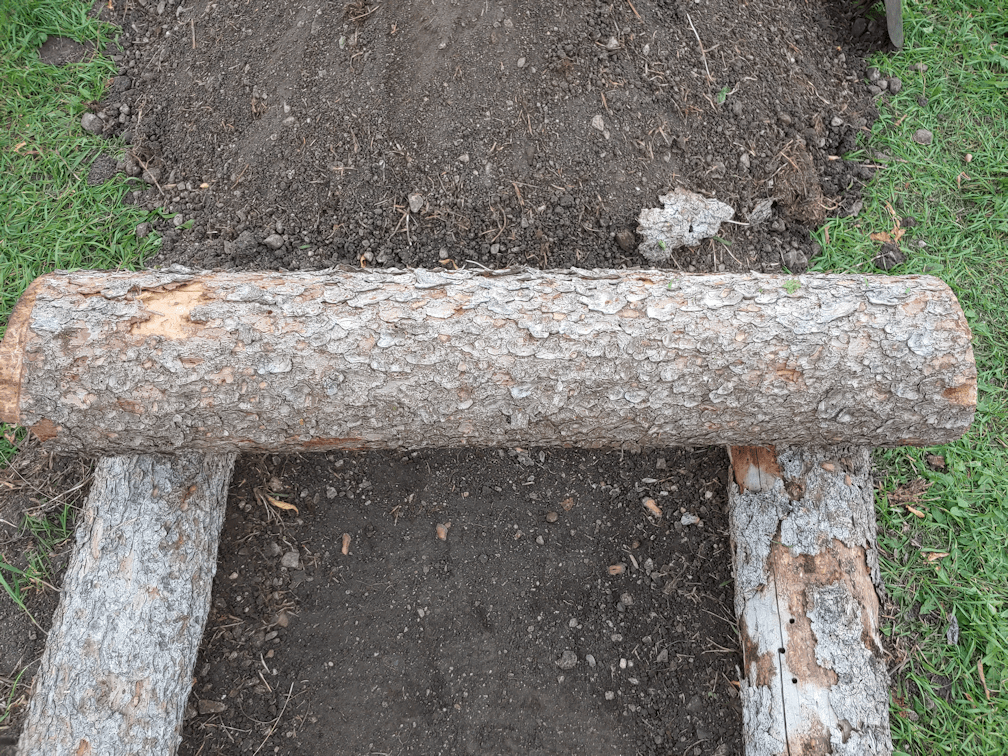
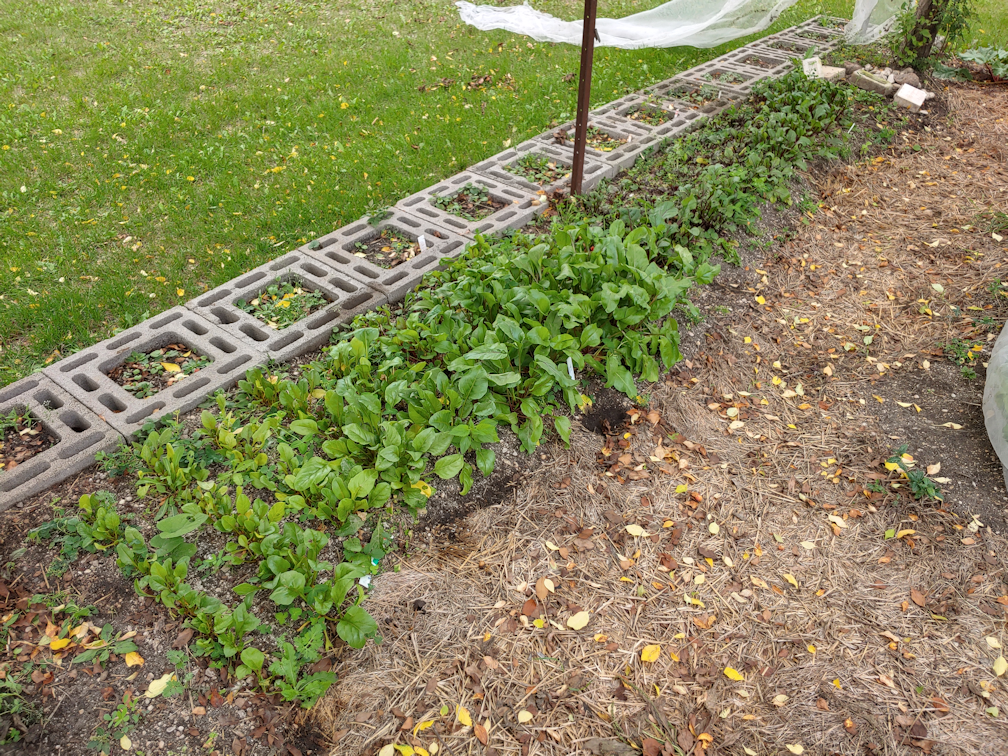
I then moved on to the L shaped bed we planted beets in. This one end in the foreground was particularly bad for weeds, but the rest was much easier to clear out.

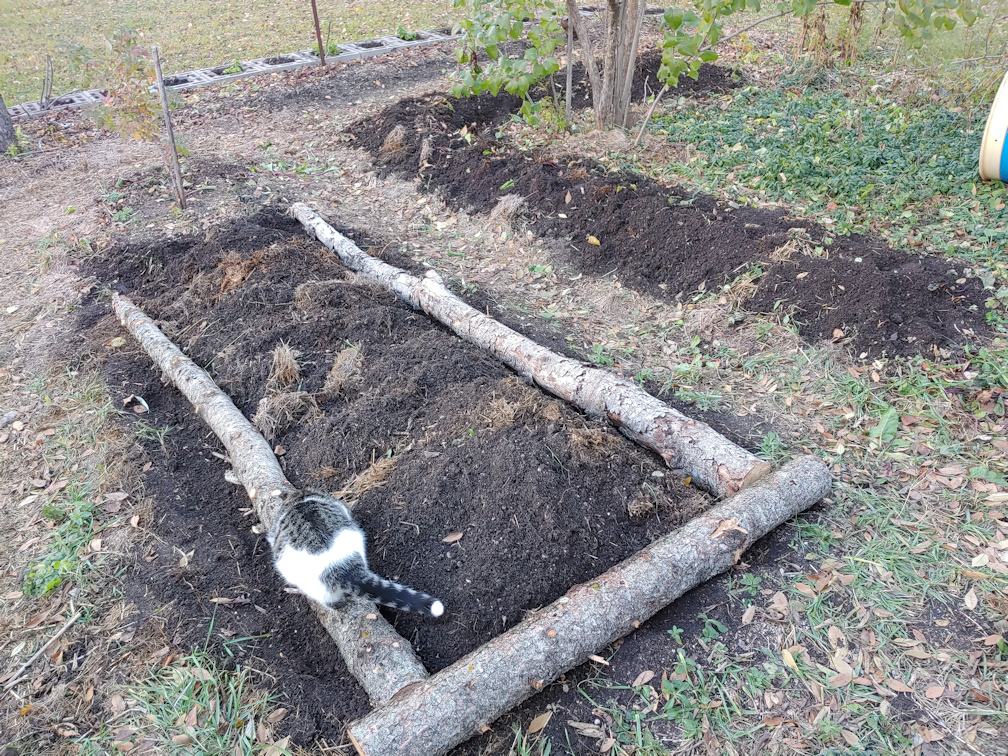
My older daughter was able to come out and give me a hand part way through. She brought the logs over to frame the resized bed. The log at the end was originally cut as an end piece for the high raised bed, but the measurement got goofed, and it was more like 3 1/2 feet long, instead of 4 ft. So it’s perfect for here! The other two logs were from the remaining tops of dead spruce trees we’d used in the high raised bed. They are too thin and wonky to use in a high raised bed, but they will work here for now. In time, this will get replaced with something more permanent, and higher.

Then my daughter helped me finish weeding the L shaped bed. Once that was done, a shallow trench was dug along the middle, and the beets that were too small to harvest got buried.

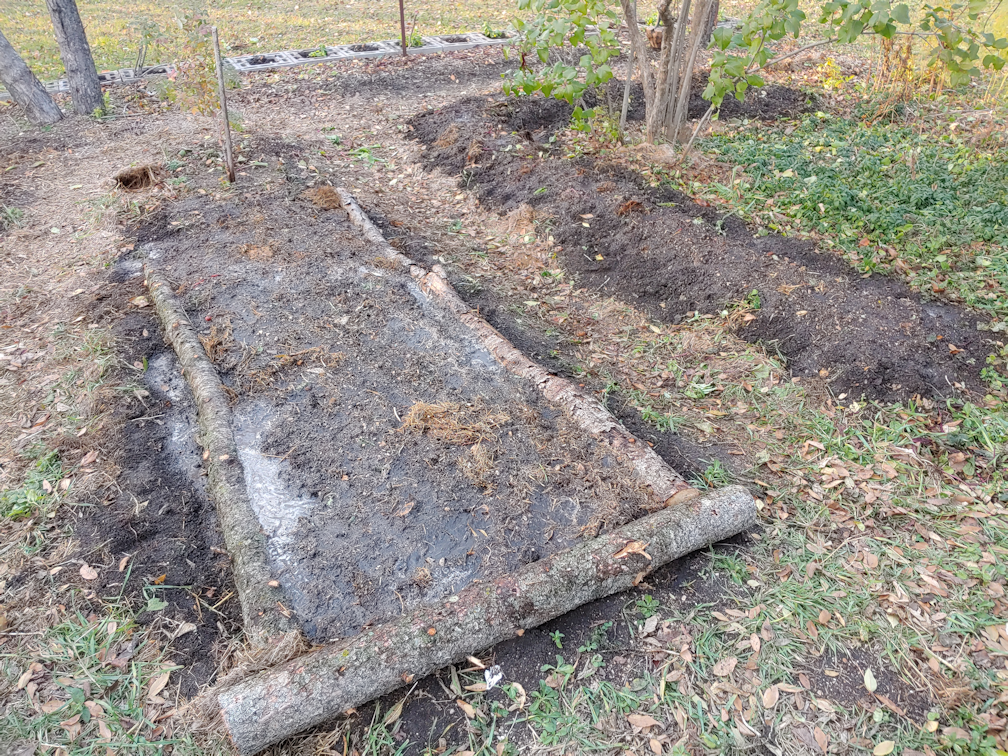
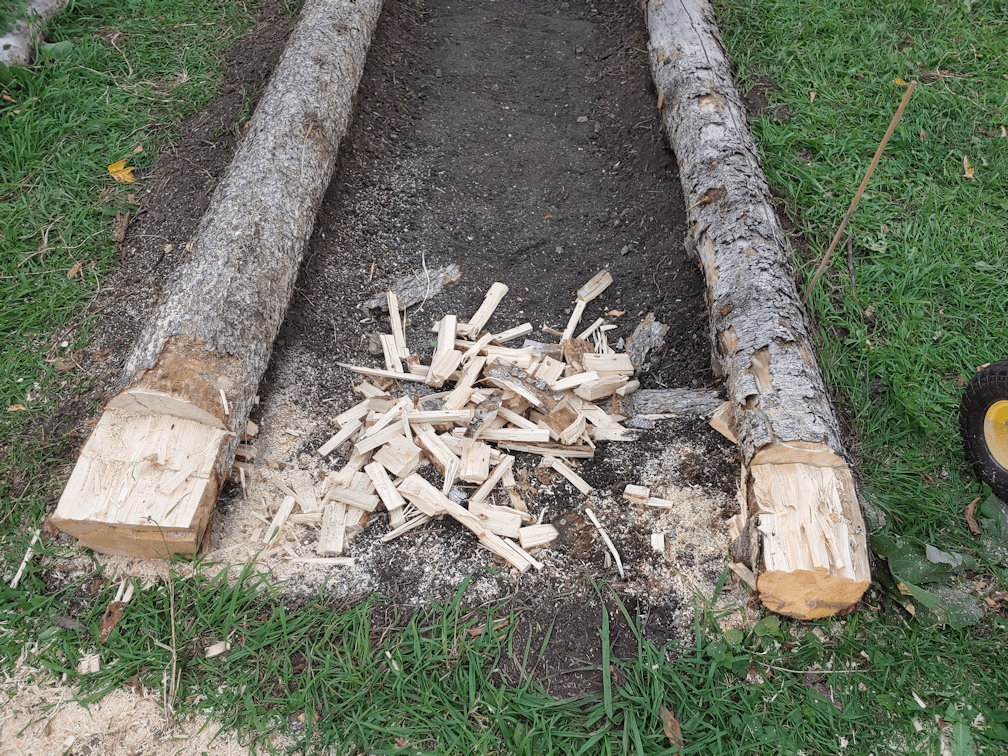
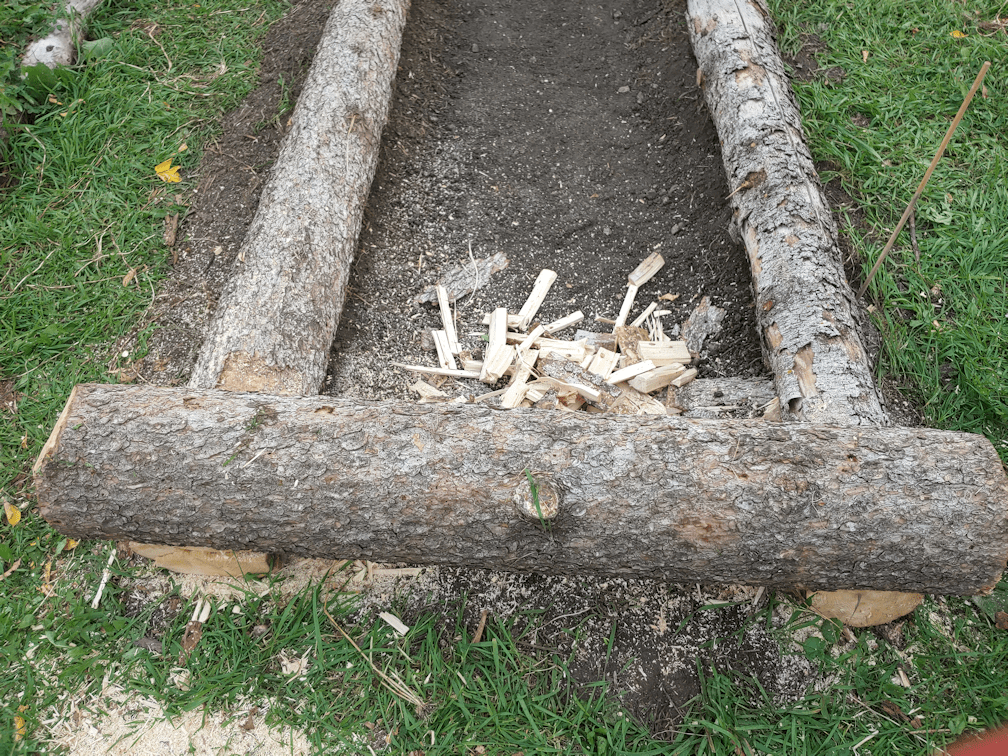
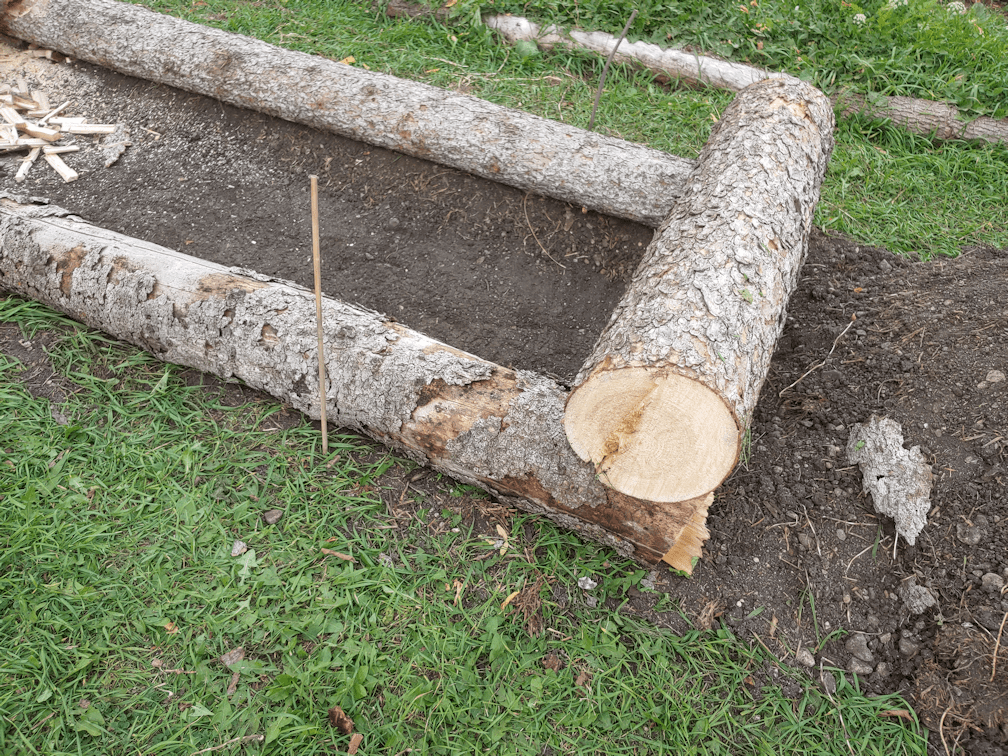
The final step was to even out the soil in the framed bed, then I used the hose to wash the soil against the logs and level it out more. As gaps were found under the logs by the water, I stuffed them with straw.

These beds are now ready for next year. There is just the bed along the retaining wall to clean up, and later the paths will get a new layer of straw to keep the weeds down.

By the time I was done, I was feeling much rejuvenated and refreshed.

The day in court was so much longer than expected. Because of the fairly long drive, plus the need to get some gas, I left before 8am. It was still dark when I left, and there was one redeeming factor during the drive. I got to see a gorgeous sunrise. We do live in a very beautiful area!

On the down side, by the time I got home, I’d burned off all the gas I’d been able to put into the tank! :-( I used my mother’s car, as it has not been driven much at all, lately. It does not have good mileage!

Anyhow.

I got there so early, I was the first person there, and the security guard didn’t even have the docket yet. We ended up chatting for a while, until the other security guard came with the docket. They both remember me by now! While we were talking the next person who showed up was our vandal. I almost didn’t recognize him at first, because of the mask (I wore my Mingle Mask, making me both recognizable and memorable, it turns out!). His lawyer was going to call in, so our vandal was on his own.

So we waited.

And waited.

Court started at 10, and they went through the docket.

We waited.

And waited.

And waited some more.

The security guard called our vandal over and told him he might want to talk to his lawyer about calling in, because he was next on the docket and I heard him say the lawyer was already on the phone, waiting, too!

An hour passed.

Two hours passed.

The second security guard, who was calling people in, came out and called for anyone who was there for the first time, but was not represented by a lawyer.

Someone else went in, and we waited.

Then someone else got called in, and we waited some more.

By the time we got called in, it was well past noon.

Our vandal was asked about his lawyer, and he explained that he had been on the phone for an hour already. The judge called into the mike, but the lawyer wasn’t there.

So they took the next files while waiting for the lawyer to call in again.

Several files later (they went by very quickly) and still no lawyer, so our vandal finally offered to text him, and they went on to the next file, with the understanding that it would be interrupted if the lawyer called in.

This one took longer, and then they moved on to another that was even longer. That one did get interrupted as the lawyer finally called in, with apologies.

The judge spoke to the lawyer for a while, then asked our vandal to clarify some things. I had agreed to suspend my application, if he agreed to seek psychiatric help. It turns out that his first referral was to the bigger city, but they are so backlogged, they are not accepting any out of town patients. His doctor then referred him to the smaller city we were in for court, but they are backlogged at least 3 or 4 months.

Given the way things are going, in my mind, it’ll be twice that, at least, but who knows?

So that left us in a quandary. The judge asked me how I wanted to proceed, and I told him that I understood the issues with backlogs, but until he is getting help, I don’t feel safe. He has already caused damage and been threatening towards me, which was acknowledged. I told them I felt that the only reason we have peace right now is likely because of my application, but it’s already been a year. The problem is, if it goes to trial, we won’t have a court date until…

A year from now.

All the previous cases that got rescheduled while we waited were going to November of next year, so I was not surprised by this.

Given how long it has taken, the lawyer suggested going to Case Management. The judge explained that this would be me, our vandal and his lawyer in a room, trying to work things out. I asked if I could have someone with me. The judge asked who, and I suggested my older brother, who owns the property. I had to explain that we are basically caretakers, and my older brother owns the property; the safety issue is about me, while the vandalism affects my brother. The judge agreed. So I won’t have to be alone and bullied by our vandal and his lawyer.

So, in the interest of speeding things up, the lawyer will have to show up in court a week from now, a date for case management will be worked out with the judge, and the lawyer will inform both of us.

By the time we left, it was nearly an hour, for what is normally a 10-15 minute session.

Near the end of it, our vandal tried to interject that there was a “bigger picture” involved and brought up his civil suit against me. He started to say how the property was transferred to my brother “behind his back”, that I’m keeping him from his possessions, and that I am using the courts against him. Which is a rich claim indeed, considering he is the one that caused damage and took so many things from this property, and he is the one who has filed vexatious litigation against me, in retaliation for applying for a restraining order. However, in his mind, he is the victim. He doesn’t even deny that he vandalized things. He just acts like it hasn’t happened, and my family and I are just persecuting him. He doesn’t deny that he’s taken things, either. He truly seems to believe he was entitled to it all. But then, he also believes he’s “maintained” this place for 30 years (my parents were still actively farming 30 years ago), my parents bought the property in 1952 (they weren’t even married yet), and they somehow managed to fun a fully functioning farm, without owning anything on it (he’s told me 90% of everything here belongs to him). It’s all part of why I want him to get psychiatric help.

The judge pretty much brushed his comments off as something to be dealt with in Case Management.

Given his mental state, I don’t expect anything to be accomplished by Case Management. But, at the very least, it will show the courts that we tried.

The year long delay for things to go to trial, though… good Lord! So much can happen within that year! Even then, ultimately it’s just a piece of paper. But it’s a tool that will, hopefully, get him help for his mental health, and maybe stop drinking (which hasn’t even come up, yet). The judge may even choose to have our vandals guns removed. Not that it would stop him from doing something like setting fire to the house.

*sigh*

The police recommended I apply for the restraining order back on 2018, when I first laid charges. It was already stressful enough to press charges – which got stayed, anyhow – and I didn’t want to go through it all. On the one hand, it feels like I shouldn’t have bothered now. On the other, I wish I’d done it back in 2018, before the world went crazy.

*sigh*

What’s done is done. I can’t stop now, or things will just get worse.

Meanwhile, we just keep on going, taking care of this place, and improving it any way we can.

And protect what’s left of it it from our vandal.

The Re-Farmer

2022 garden preparation: fixing up the tomato bed

Today, I took advantage of the lovely, warmer than forecast weather we are having, to clean up and redo the tomato bed.

Here is how it looked when I started. This is a new bed, built this spring, and I was very happy to see how deep and strong the roots on the tomato plants where, when I pulled them. I also saw the biggest, fattest worms I’ve seen this year!!

There were two goals to redoing this bed. One was to make sure the soil didn’t go through the chain link fence. When the bed was build, we laid cardboard down on the grass first, with the flaps up against the fence. That cardboard is pretty broken down now. We had to top up the soil part way through the year, and boards I’d scavenged from the barn were used to keep it from going through the fence. The other goal was to use the bricks to create a little retaining wall around the bed. When watering the tomatoes, no matter how gentle we tried to be, soil eroded into the path, exposing roots. Especially at the end by the vehicle gate, which got even more soil added to try and combat the erosion.

The first thing to do was move the soil away from the fence and pull up the boards. Then I went back along the fence with a hoe to make it as even as I could.

The boards were then put back, this time to fit in between the fence posts. Each section got one full length board, plus another cut to about 3/4 length. I snagged an extra board from the where the cucamelons were planted, on the other side of the people gate, to have enough.

The chain link fence is kind of wobbly, so I used the left over sections of board and placed them at the “seams” between each pair of boards, to support them from the weight of the soil.

Then, in a couple of sections, I also hammered pegs into the ground on the outside of the fence, for extra support.

That done, it was time to start working on the bricks.

First, I had a decision to make.

Should I make the bed two, or three, bricks wide?

I decided on two and a half!

This way, not only would the bed be a comfortable width, but there would be no corner to catch a foot on. Because I just know that I’d be doing that, constantly! :-D

Once that was decided, the soil was moved out of the way and the space where the bricks would go, leveled as well as I could with a hoe. Then the bricks were spread out along the length of the bed.

Would I have enough? It did look like it, but I wasn’t completely sure.

The next job was to use a garden claw to loosen the soil where the bricks would go, so I could push them down a bit. Not too far, though, because I didn’t want to lose any height.

By the time I reached the end, there was a gap of about two inches, so I just moved the bricks at the end to fill it!

Then is was time to level off the soil. This was also the time to pick out any remaining weeds and roots.

Then I went over it with a hose to wash the soil against the bricks and boards a bit more, and clean off any soil that got on top.

The final touch was to mulch the whole thing with leaf litter.

This bed is now ready for next year!

The tomatoes did so well here, we might use it for tomatoes again next year!

The boards and bricks around this bed are temporary. The wood will rot away, and there bricks are just sitting on the ground. At some point, we plan to get to the salvage place and see what sort of bricks and blocks we can find. Maybe even some paving stones. Once we have the materials, the path will be laid with bricks or paving stones, and the bed itself well get framed in a more permanent way. Until we are able to do that, though, this will be enough to keep the soil in this bed from washing away when we water it.

I was pretty much done when the girls finished their stuff inside, and came out to work on the last bed in the main garden area that needed to be cleaned up.

Since we have the straw bale now – and the chipper/shredder – I am thinking of running some straw through the shredder and using that to mulch the top of these beds over the winter.

Aside from that, these beds in the main garden area are now all done and ready for next year.

I’m pretty happy with how these are turning out!

The Re-Farmer

Today’s progress: high raised bed and half a carrot bed. Plus, a robocall with a difference!

One of the things about living our here is that phone calls are pretty rare things.

We like it that way.

Every now and then, we’ll get a robocall. Sometimes, from political parties, for conference call town hall meetings, or urgent messages telling us that we are about to be arrested by Canada Revenue for some reason or another, if we don’t call them immediately – and give them our personal information, of course. You know. The usual.

I was just preparing to write this post when we got a robocall with a difference. It was for our municipality, but from the RCMP. It was a warning that there was possibly an armed and dangerous suspect in our area! And by “our area”, they meant the two nearest cities, plus our region. Not municipality. Region. Which is huge.

The alert came with a name, but no description of the person. We did get a description and license plate of their truck, as if that means anything.

After the call, I settled back at my compute to continue with this post. I am happy to say I finally got some progress on the high raised bed that’s worth blogging about. Of course, I’m keeping a close eye on the weather. One of the handy things is that I have a little icon from The Weather Network in the corner of my task bar with the temperature on it and, when warranted, it flashes red with a white lightning bolt as a weather warning. We used to get those whenever there was a frost warning, but I have not seen that, even after last night’s heavy frost. It was flashing when I sat down, though, so I figured we were finally getting a frost warning.

Nope.

My weather app was giving a public safety alert, and it took me to the exact same message from the RCMP that I got from the robocall!

There is no other information about this guy, but they sure to want us to know he’s dangerous and might be in the area!

Or hours away from us, considering how large of an area they are including!

None of us are particularly concerned, but the warnings are appreciated.

Anyhow. To the topic at hand!

Progress on the high raised bed has been frustratingly slow. My tools are the baby chain saw, a hatchet (our other axes are too big for the job), a hammer and a chisel. Basically, I use the baby chain saw until both batteries are drained, with the other tools used to remove material in stages.

Today, I also worked on the carrot bed next to the high raised bed, which meant the first battery actually had time to charge, giving me a chance to get more done than usual.

Which means I FINALLY got the second log in place on one side of the bed.

That took ridiculously long to do! But, it’s now in place, and I’ve started on the other side.

I used the second log to mark where I needed to cut the notches on the side log and end logs. The logs at the end are the thickest, so I started removing material from there, first.

I think part of why I’m so frustrated is, I’ve got three chain saws. The gas powered one broke when I tried to start it, simply because the plastic shell was so old and brittle. The electric one I found was checked out, and they found nothing wrong with it and just sharpened the chain for me, but I discovered it leaked chain oil when I found it in a puddle after the first time I used it, which was for just a single cut before I switched to the baby chainsaw. The next time I used it, I found it would simply stop cutting after just a few seconds. I still have the little, electric, convertible pole chain saw with a 10 inch blade my husband got for me a couple of years ago. It would be enough to do the job, but something went wrong with it the first summer we got it. I checked it out again today, and it basically just screams when I try to make a cut, and the chain stops turning. I’ve got that in the van now, for the next time I go into town and can leave it at the small engine shop to see if they can fix it. I can’t even try using the reciprocating saw. It runs, but no longer shuts off. It needs to be unplugged to turn it off, and it even starts trying to run when it’s plugged back in, making and it quite unsafe to use.

If even one of those chainsaws worked, this thing would be done by now!

*sigh*

Ah, well. It is what it is. Hopefully, I will still be able to complete the high raised bed, and fill it, before the snow flies.

One of the things I found with the baby chainsaw is that, when it first seems to run out of juice, and the red light starts blinking on the battery meter, I can set it aside for a little bit and it will actually “recover” and run again for a while. That usually gives me time to chop or chisel away excess wood. I can usually do this a few times before the battery is finally completely dead. This also gave me time to pull carrots while waiting on the battery life.

I just dug up the Napoli carrots in half the bed. With the Kyoto Red mostly gone to seed, I figured they could wait.

Pulling them all from in between the weeds was certainly a challenge, even using a garden fork to loosen the soil and weeds!

After draining the second battery on the baby chainsaw, I had time to clean up the weeds, pulling out all the roots I could. If some leaves got left behind, I didn’t care, but my goodness, there were some REALLY deep roots I had to dig out!

Half the bed, all done! Hopefully, I’ve pulled out enough roots that it won’t get this bad again, next year! The time it took to do this was enough for a battery to charge, and get more done on the right raised bed.

The temperatures are supposed to stay the same as today for a couple more days, then start to warm up again, which should hopefully give more time to work on the high raised bed and, of course, finish cleaning up all the garden beds and ready them for next year, too.

The Re-Farmer

Our 2022 garden: high raised bed build, day 2

I did a fair bit of running around this morning, and was even able to get a quick visit in with my mother. We are hopefully now well stocked with cat kibble for the rest of the month. It’s also coming up on Thanksgiving here in Canada, which means cheap turkey season, so I got one for this weekend, and another for the freezer. :-)

Once back at home, I grabbed a quick lunch and the girls and I headed outside. While they worked on raking leaves for me – and running to and from the house for any tools I needed – I worked on the high raised bed.

The bottom got prepared a bit, first. I straightened out the edges and shoveled out some more soil, then used a thatching rake on the bottom. I eye-balled four feet across and raked up the edges where the logs would go. Then I got two nine foot lengths in. The first one was placed right where I wanted it to go (that’s the one on the right), then placed the two sticks against it. From the sticks, I measured four feet and placed two more sticks, then rolled the second log up against the second pair of sticks.

Once those were in place, I rolled an end piece against them and used their width to judge where to begin cutting. This end piece was the bottom of the trunk, so it had one very uneven end. It was measured and cut at more than four feet to compensate for that. That made it long enough to cut a notch out to fit the logs, rather than cutting right to the edge.

I used the baby chainsaw to cut the outer edges of the notch, then made a cut lengthwise. I then spent the next while using a hammer and chisel, sometimes a hatchet, to cut out excess wood, which you can see inside the bed. After most of the wood was chiselled out, I use the baby chainsaw to cut into the remaining excess wood, as you can see above.

Then I kept running it over the area to level it more. I wasn’t after perfection, here, and don’t have the tools to do a better job, so this was as good as it was going to get!

It didn’t take long for me to drain the battery on the baby chainsaw and have to switch to the second one

When I started working on the other end, I made plenty of cuts to make chiseling the excess out, easier!

I got it to this point with the chisel before going at it with the baby chainsaw to level it off some more.

Then I got a daughter to help me place it on the logs, so I could use it to mark were to cut wood out of the ends.

By the time I finished making cuts to depth, I drained the second battery. That’s okay. It was enough to get started, and since I was removing wood to the edge, it would be easier to take off the excess with a chisel than with the notches.

Right?

Ha! Of course not.

Both logs had knots in them. One of them had two.

Those were a real pain in the butt to work through with nothing but a chisel or a hatchet to cut through them!

On the plus side, working on this took enough time that the first battery was almost fully charged again, so I could use the baby chainsaw to finish off the area.

That done, the end piece could be set in place.

As you can see, there is quite a bit of a gap under the end piece. This is not a concern, as the bottom of the bed will be filled with logs. It will be an easy matter to find a piece that can be fit under that cross piece.

The good thing is, all those bits of wood I’m cutting out will not go to waste, as they will be buried with the old logs. We’ll have things decomposing at different rates, all of which will release their nutrients slowly over time while the wood will act like a sponge, reducing the need for watering.

By this time, we started to get a bit of rain, so I stopped for the day. The girls finished raking and headed in to make supper while I prepped to continue later.

I chose a second cross piece that was close in size to the one at the opposite end. As before, I will use the other logs to see where to make the cut outs. Hopefully, I’ll be able to continue on this tomorrow. It depends on whether or not my mother will need me to drive her around or not.

This would go a lot faster if I had a full sized chain saw. :-D Ah, well. We use the tools we have!

Meanwhile, I now have a nice pile of leaves to use when it’s time to start layering on top of the logs that will go on the bottom of the new raised bed! It’s been pretty windy, but hopefully they won’t blow away. ;-)

I’m glad we have found a way to make use of all those dead spruces we need to take down!

The Re-Farmer

Our 2022 garden: starting the first high raised bed

Our glorious weather isn’t going to stick around, and we’ve got garlic ordered, so I wanted to make sure we had at least one prepared bed for them.

This is the empty bed that had yellow onion and shallot sets in it. It was also supposed to have purple kohlrabi, but that never grew. We were planning to rotate our garlic to a different location that did not have alliums in it, but this bed is going to be so drastically changed, it shouldn’t matter.

Also, in the foreground, in the right hand corner, is a single onion that got missed! :-D

The first order of business was to move out the bits and pieces of logs framing the bed.

One of them had mushrooms attached! :-D

These are all the logs that were framing the bed. They will be buried at the bottom of the high raised bed. These are already starting to rot, which will be a good thing for our modified hügelkultur method of filling the bed.

Also, my spell check has hügelkultur in it!

This bed is so overgrown, you can hardly tell all those logs were removed!

Next began the tedious process of loosening the soil and pulling all the crab grass and weeds out by the roots and rhizomes.

Mostly crab grass.

When we built this bed in the spring, we extended what had been a shorter potato bed, using the Ruth Stout method, the previous year. Basically, potatoes were laid out on the ground and buried under straw mulch. After the potatoes were harvested, the straw was worked into the soil a bit. For the added portion, we just laid down more straw over the grass, as well as the previous year’s bed, then topped it with new garden soil.

There’s a reason we did it that way.

This is as deep as I could get the garden fork into the soil. About half the length of the tines. After that, I was hitting rocks. I’d shift the fork a few inches, and hit more rocks. Shift, hit rocks. Shift, hit rocks. It was insane!

Along with the onion that got missed, I found a shallot, too!

They got set aside on the chicken wire cover over the chard to cure. :-D

I pulled as many weeds by the roots as I could, but there’s no way I got all of them. The wheelbarrow is mostly crab grass, so this is not something that will go into our compost pile. I dumped it by the edge of the spruce grove, instead.

The high raised beds will be 9 feet long, and this bed is about 14-15 feet long. Originally, I wanted to keep them long like this, but we also want to be able to cover them, and at that length, the covers are very unwieldy. By going shorter, we can potentially add a second row of beds. I had to decide. Should we build the high raised bed at the south end, leaving room for a second row on the north, or start it at the north end, with a potential second row on the south side?

In the end, I decided to build the bed on the south end. It was the shade that decided it for me. If we were to make a second row of beds further south, they would be more shaded by the trees between the garden and the house. If we add a second row on the north side, they will be closer to the short row of trees my mother allowed to self seed among what had been her raspberry patch, but I want to get rid of those trees, as they are causing problems. If nothing else, they won’t be shading any new beds that are closer to them.

That decided, it was time to start digging!

I dragged over a couple of logs to use as a guide, then started removing the loose soil and piling it on the end that will not be part of the bed, pausing to remove more roots and rocks every now and then. I was happy to see how much the straw had broken down – and by how many worms I was finding!

This is it for the day!

I dug down only as far as the rocks, so it’s not very deep. Mostly, I just removed the straw and soil layer we made in the spring, and maybe a couple of inches lower.

The next step will be to level this off and straighten the edges for the logs. I cut the logs a bit longer than 9′ and 4′, to give room to trim the ends straight, but I may not even bother with that. As long as the beds themselves measure no more than 4′ wide on the outside, we’re good. I don’t care if there are bits that stick out a bit further at the corners.

I want to get this bed at least 2 logs high before I start putting the layer of logs on the bottom down. They’re smaller and lighter, but it’ll be easier to put them into place while the walls are a bit lower. The other layers can be added when the bed it as its full height. When it is 3 logs high, I’ll decided if it needs to be higher or not. Then it’s a matter of filling it with layers and getting it ready to plant garlic in. We might be able to plant all three varieties on one bed.

As much as I enjoy the work, it does help me realise how necessary having high raised beds will be. I don’t know how much longer I will be able to continue doing stuff like this. Weeding the bed was the most difficult and painful part. Thankfully, I was able to sit on the scooter for some of it, which helped, but this old body is breaking down. I can still do big stuff, like cutting and breaking down trees and carrying logs, but I’m loosing my fine motor skills on my hands. I drop things a lot more often, the joints are almost always stiff and sore, and that one finger just doesn’t seem to be getting any better. Then there is the back pain from bending over to weed. I can’t bend at the knees, since my knees are already shot. Strange that I’m losing my ability to do small, easy things faster than doing heavy manual labour!

I can still crochet, though, so that’s good. I whipped up a couple of hats recently, and plan to work on other small projects. The only problem has been choosing what yarn I can work with. My hands are so rough right now, some types of yarn catch on my fingers while I work! LOL Working with my stash of metallic yarns is out of the question, as well as anything the least bit fuzzy. :-D

Hopefully, I will be able to continue working on this raised bed tomorrow, after I’ve headed out to do some errands. We hit 27C/81F today, but tomorrow should be a bit cooler, and we’re expected to get rain – possibly even a thunderstorm – over the next couple of days. Looking at the long term forecast, we’ve got another nice, warm week before things start to cool down, and overnight temperatures may result in frost. It’s not until the end of October that we’re looking at the possibility of snow. Of course, looking that far ahead, things are very likely to change, so we shall see what really happens! Until then, I’ll be taking advantage of the mild weather and doing as much work outside as I can!

The Re-Farmer

Our 2021 garden: the last beet bed

Yesterday, I finally was able to tend to the last of the beet beds.

You can see why there was no hurry.

This beet bed got quite a bit of critter damage before we were able to cover it with the netting, and never really recovered. I think I lot of that has to do with the ornamental apple trees shading it too much.

This bed has four varieties of beets, planted in blocks. One variety does seem to be recovering a bit better. Those are the chioggia, if I remember correctly.

Just for the sake of comparison, this is the L shaped beet bed right next to the little one (after being weeded). These were planted on the same day, with the last seeds of all the varieties mixed together. In this bed, the critters did get at the end in the photo a bit, and it recovered a lot more, even though it has more shade than the rest of the L shaped bed. It still gets a lot more sun than the one along the retaining wall!

This is after weeding and loosening the soil a bit. The soil is really compacted for some reason (it got fresh new garden soil, just like the other beds). Very few of the beets seem to be developing their roots.

After planting the L shaped bed with the mixed seeds, I still had some left, so I scattered them in the sapce on the very left of the photo, which is pretty much right at the trunk of one of the ornamental apples. This spot never got covered. Not only did it get eaten by critters, but cats and kittens like to roll on it. Amazingly, there are still tiny little beets trying to recover in there!

Before putting the netting back, I did add pairs of sticks to hold the net above the greens a bit. Hopefully, it will dissuade kittens from jumping on it! :-D

This netting had been originally used to create a wall on the outside of the blocks to keep deer away from the lettuce that was planted there – only to have the groundhogs eat them all. To hang the net, part of it was torn so it could be placed around a tree trunk for support. That’s the tear you see at the end in the photo. The long side of the inside is pegged down snug. The long side along the retaining wall got shoved between the soil and the blocks. Though I could roll lengths of wood into the ends and weight it down with bricks, there is nothing I can do about the tear right now. I think it should be fine.

It doesn’t look like we’re going to get many beet roots out of here at all this year, but who knows? As long as the weather stays mild overnight, they will be left to grow as big as they can before we harvest them. Plus, we can still eat the greens. :-)

The Re-Farmer

Our 2021 garden: fixing the beet bed, and last things

One of the things we’ve done to protect some of our garden beds from the groundhogs and deer was to use mosquito netting as row covers. The edges were weighed down with whatever was handy; rocks, bricks, pieces of wood… that sort of thing.

The beet bed near where the garlic had been planted has been recovering very well. So well that the greens were tall enough to pull the netting out from under the weights that were holding it in place, in spots.

More specifically, out from under this board and the rock that was weighing it down. A grog took advantage of the gap and had a bit of a snack.

There wasn’t a lot of damage. The netting still did its job.

I took advantage of the situation to do some weeding and pick the onions that had been planted around the beets as a deterrent.

The down side of adding the netting was that the onions were rather squished, as they were planted so close to the edges of the bed. A few ended up on the compost pile, but there were still a few good enough to harvest! These last onions joined the others that are curing under the canopy tent right now.

I picked the beets that had the most of their greens eaten, plus a few more while I was weeding, which left me with some greens to harvest as well.

They got to join the corn I’d picked earlier.

This is pretty much the last of the Dorinny corn. There are still a few little cobs out there. I figure I’ll just leave those, and when we clean up the beds in the fall, we might have some seeds to save for next year, perhaps.

I just wanted to share how the first Mongolian Giant sunflower to start blooming is progressing, too. :-D

Back to the beets!

They are looking a lot better for a bit of clean up! There are some pretty big ones forming in there, too. It should be interesting to see what we get when it’s time to harvest the entire bed.

Then the netting was returned. I made good use of the bag of tent pegs I found in the garage, and pegged the sides down snug along the length, but close in to the beets, so that there would still be slack over the bed, with room for the beets to continue to fill out. I rolled boards into the excess netting at the ends and tucked them close under the leaves as well, so there would be no gabs in the corners for critters to get through.

The beets in the big L shaped bed in the old kitchen garden are starting to lift their floating row cover as well. I spotted a small gap where the rocks weighing the edge down had rolled off, and there are a few nibbled on greens at the very edge. There are heavier weights on either side of the gap, so a critter the size of a ground hog isn’t getting any farther. Tomorrow, I plan to uncover the bed, give it a thorough weeding, pick some more beets, then peg the netting down like this one, so it is more secure.

The beets planted against the retaining wall in the old kitchen garden don’t have this problem. They have not really recovered from when they got eaten. I think it has more to do with low light levels. That area is more shaded by the ornamental apple trees than the rest of the old kitchen garden. I’ll be uncovering them to at least weed them, and get a better look at how they are doing in the process.

As for what was picked today, the corn was added to the summer squash and teeny tomatoes the girls had picked earlier, and roasted in foil with some olive oil, granulated garlic, salt and pepper. The beets got roasted in another foil, with some chive blossom oil, salt and pepper. That way, I could roast both at the same time, in the same pan, without the beets turning the other vegetables all purple! :-D It turned out very well!

The Re-Farmer

Our 2021 garden: soil protection

We are quite pleased with the new garden beds at the chain link fence. They are working out very much as we intended, and the chain link is providing support for the plants, just as planned.

There is just one real problem.

Erosion.

While scavenging for wood I could use to make raised bed boxes for where the garlic was harvested, I noticed some other old wood in the barn. Today, I decided to grab a few boards and use them to help keep the soil where it belongs.

This is where the cucamelons and some gourds are planted. The ground slopes a bit here, so the bottom of the chain link fence has more of a gap under it. When we lay cardboard down first, we put flaps up against the chain link, but once the soil was added and things were being watered, the cardboard slid under the fence and the soil started to erode away.

It had been intended to place more of the chimney blocks along this section, to use them as planters like the ones we’re using as a retaining wall in the old kitchen garden. We still haven’t taken the last of those blocks out of the old basement (hauling those up the stairs and through the house is going to be difficult enough on its own, never mind no top of having to keep the cats out of that basement). We still intend to do it, though, and once they are in place, this will no longer be a problem. All that’s needed right now is to keep the soil from washing away under the fence, and taking the plants with it.

So for here, I just used a hoe to move enough soil to level things, then pushed boards under the bottom of the chain link from the outside. After that, I just tried to return some of the soil through the bottom of the fence, to hold the boards against the chain link. Otherwise, they would just lean inwards.

The boards were placed as far as the chicken wire critter barrier at the far end, making for a bit of overlap. It only needs to last until the end of the growing season, so as long as the boards keep the soil where it belongs, it’s doing its job.

More boards where then slid between the tomato plants and the chain link fence, though I did need to go back to the barn for another board. Erosion was not as much of a problem, here. There is much less of a gap between the bottom of the fence and the ground, so the cardboard flaps are still holding the soil in place. However, I wanted to add more soil under the tomatoes, and I didn’t want to be losing that.

Once the boards were in place, I was able to add quite a bit of soil, without having to worry about it sliding through the fence.

In time, this bed will get some sort of frame as well. What it will be made of will depend on what materials we end up acquiring. I’m leaning towards brick, partly because we are looking to use paving stones or something similar on the paths along both new beds.

The boards are just a stop gap measure for this season. Like most of the other wood I’m finding in the sheds and barn, it was reclaimed from somewhere, and has various levels of damage. They’re solid enough to do the job for the rest of the season, though, and I’m glad to have it!

The Re-Farmer

Morning finds

My morning rounds were a bit shorter than expected. Though we are still supposed to get a hot on – not as hot as yesterday, thankfully – we are also getting predictions of a thunderstorm and possible rain. It’s even overcast right now, so I didn’t even put the shade cloths over the fall plantings this morning.

The first “find” I had this morning was one of adorableness!

We still have separate food bowls for the kittens (except for Junk Pile’s, because we don’t really know where their home is), and I was on my way to top up the one for Butterscotch’s kittens, when I found this little cutie, just chillin’. She didn’t even run away as I went by with the kibble, then paused to take her picture. :-) Broccoli seems to be the most willing to put up with us humans, though she still won’t let us touch her.

The new hanging bird feeder was found in pieces this morning! I’m guessing the raccoons got to it during the night. Nothing else has the hands to turn the canister and unlock it from it’s base.

The big birdfeeder was also completely empty. The foam covered wire I’d used to reduce how much it wobbles on its post were all at the bottom of the post, with the foam torn up. Since I pruned away the branches the raccoons were using to reach the feeder, it looks like they scrambled up the post itself, taking out the padding in the process. I’m going to have to find something else to pad the top of that post, and steady the feeder.

Then there was this…

One of the new support hoops covering the carrot bed was pushed over, and the carrot greens beneath were looking a bit squashed.

I’m glad I had those tent pegs, as well as the weights, along the edges of the netting!

I was a bit concerned about how well the one hoop would hold out. When I was setting it up, I could hear the wooden dowels supporting it, making cracking noises and I bent the pipe onto them. It would have been better to use metal rods of some kind, but we don’t have any. The dowels are about 18″ long, and they were embedded into the ground by at least a foot, but the flags they were on have been out in the elements for the past year, so it’s no surprise that the wood was brittle enough to crack under the stress of holding the PVC pipe. I was able to straighten it up again, without having to take everything apart. We’ll see how it holds.

I actually think this was done by cats. Possibly even kittens. They like to roll around in the garden, and I’ve had to chase them off of, or out of, the mesh before. The opportunity to roll around on the mesh and on plants, at the same time, would have been too much for some of our kitties to resist!

Aside from being a bit flattened, though, the carrots are fine. Another reason I think it was the cats. If it were a woodchuck, they would have gotten through pretty easily, if they wanted to!

I’m happy to say that Potato Beetle is still with us! He seems to have simply moved back home, as if he were never gone for almost 6 months! The only down side is, he’s aggressive to the other cats. I realize they’re establishing their pecking order, but it looks like he’s already driven off Nutmeg, who was very much a beta cat. Creamsicle Baby is also showing submissiveness to Potato Beetle, but that doesn’t seem to be stopping him. He’s even going after the mamas. Normally, the males don’t go after the females like that. He’s even growled at Butterscotch; his own mother!

I’m hoping things will settle down as they get used to each other again.

The Re-Farmer

Row cover modification

While in the city for our monthly shop, I picked up four short, slightly flexible, lengths of PVC pipe. Today, I finally made use of them.

Since we covered various beds with the mosquito netting as floating row covers, they have not been eaten by critters. In the old kitchen garden, that means our carrots are actually recovering. The bed they are in is wider than the nearby beet beds, though, so they don’t have as much slack in the netting. What I’m still not sure is kohlrabi or not is getting pretty big, and the leaves are being bent over. Even the carrot tops were showing yellow, where they touched the fabric along the edges, where it’s weighed down with rocks and whatever else we could find.

I got the pipe to hold the netting up, but was stuck on what to use to hold the pipe in place that could handle the tension caused by curving the pipe. We’d done something like this with the hula hoops, but those are a lot thinner than the PVC pipe.

Normally, I would have used something strong and inflexible, like steel rods or rebar. I went looking around in the garage for something, without luck.

What I did find, though, was a bag full of cheap tent pegs.

That would be useful!

I also found one of the small flags we had at the fence line near the gate. The flags are getting quite torn up and need to be replaced, but I haven’t found the same time of flag this year. The doweling the flag is attached to fits perfectly in the pipe. All the flags still on the fence are torn up by the wind and needed to come down, as did the strings of Christmas lights we had running along the fence. The strings of lights need to be replaced. So I headed out to take down the lights and the flags, then used the wooden doweling from the flags as supports for the pipe.

Metal would have been preferred; I couple of them cracked while I was bending the lengths of pipe to fit over them. Still, they are holding! And the pipe is strong enough to stay in place.

The mosquito netting just barely fits across the bed, but those tent pegs I found were put to good use, taking the edges down. Wood and rocks that were used to weight down the edges before we put back, so help hold down any gaps between the beds.

I’m really happy with how this turned out. It a lot more solid than our first experiment with this. And now my carrots have room to grow!

The Re-Farmer