Well, I got some of the transplants in this morning! I’m just taking a break for hydration and sustenance, before I get back at it.
The first priority of the morning was to fill the remaining “instant raised bed” I got from The Dollar Tree that had a split seam, so my daughter sewed it up for me.
The one with the sweet potato slips in it got some straw on the bottom to act as a sponge, and to hold up the sides while I added soil, then stove pellets to create the sawdust mulch. For the eggplant, I had grass clippings, so some was added to the bottom, then it was filled almost to the top with sifted garden soil, with more grass clippings to mulch the top. Then the two eggplants were transplanted. It should be interesting to see how these do, compared to the ones that were transplanted earlier, in one of the low raised beds.
The next job was to reclaim the squash hill the Crespo squash was in last year. The old straw mulch was pulled back, the soil broken up and weeds pulled up. I ended up using our makeshift soil sifter on quite a bit of the soil, to get out more of the weed roots. After I sifted enough to fill the wheelbarrow, I broke up the soil in the hill some more, pulled out as many roots as I could, then returned the sifted soil. After re-burying the watering container (to fill with water for deep root watering, rather than spraying the entire hill), the hill got mulched with grass clippings, then straw. Once that was all ready, the two giant pumpkins were finally transplanted. If the critters don’t eat it first, these should get quite large and spread out quite a distance.
Then it was time to start planting into the holes my daughter had already dug. I did use the space to loosen the soil a bit more (it’s so incredibly hard!) and ended up pulling out quite a few rocks. The smaller ones got tossed into the trees. The larger ones, I set aside. We might actually find a use for them.
After loosening the soil, the holes were filled with water, then they got a couple of spade full’s of sifted garden soil. We still have some left of the dump truck load we had dropped off here, but it is so full of roots now, most of my time was spent sifting it out. At least the pile is close to where we are currently working!
The first thing that went in were the two Kakai hulless pumpkins. Once in place, they each got a light spade full of soil places around them. Then they got another watering.
Along the same row went the three Crespo squash.
For all of these, any flower buds got removed. Hopefully, they will now expend their energy towards establishing their roots and growing, rather than making flowers.
With the squash hill and the eggplant planter done, the rest of the transplanting should go faster. Except for all the soil sifting! Once everything is in place, the whole area will get a layer of straw mulch. I had intended to use the weed trimmer, first, but the sheer amount of time that will take is a bit much. All the grass and weeds would eventually make their way through the straw, but I hope that the plants will be big enough for the leaves to start acting like a mulch.
Well, I’m done eating lunch. Time to use more bug spray and get back at it before the hottest part of the day! We’re almost there now. On the plus side, we’re expecting overnight showers, so that will be quite nice for the transplants. :-)
During the winter, we tried a winter sowing experiment. We sowed seeds in 4 different styles of containers to see which would do better come springtime.
The answer is…
… none of them.
Not a single thing has germinated.
I think they froze. Our extended winter was probably a bit too much for them. People in some of my zone 3 gardening groups have had good success with their winter sowing, so I know the technique works. It just didn’t work for us, this year!
Will be try again next year?
Maybe. We’ll decide in the fall, I think.
When bringing the transplants in last night, I took the time to go through them all, organize them and get labels ready for today.
This morning, while taking them back outside, I gave them another once over, trying to figure out how I wanted to get them in. This is what we’ve got left to transplant.
This year, we have 3 surviving Crespo squash – and one of them was thinned out from another pot. These guys REALLY want to go into flower!
We did all right with the Styrian hulless pumpkins, with 4 surviving transplants.
The Lady Godiva hulless pumpkins did even better. There are 5 pots in there, but some of them have two or three plants – seeds started germinating later, after we started hardening off the plants!
The Kakai hulless pumpkin did not fare as well. There are only 2 of those.
The Baby Pam pumpkin did amazing. We’ve got 6 of them – a 100% germination rate! These are last year’s seeds, and last year, none of them germinated!
In the other bin are the two Little Finger eggplants I found among the squash and pumpkins, plus the two giant pumpkins started from free seeds given out at the grocery store near my mother’s place. We won’t be doing any of the pruning or special care to grow a competition sized pumpkin, but it should still be interesting to see how big they do get!
Here we have 3 pots each of winter squash, but some of the pots have 2 or 3 seedlings in them! We’ll decide what to do with them, as we are ready to transplant. I don’t like to “waste” strong, healthy seedlings, so they might all get transplanted. We shall see.
We’ve got 2 Apple gourds, for sure – these were from a second start, due to the Great Cat Crush. There are two others that are either more Apple gourds, or Ozark nest egg gourds. The writing faded on the labels.
We have quite a lot of ground cherries, and still have no idea where we are going to plant them!
Here are the last of the seedlings that were started at 4 weeks before last frost date. There are 4 green zucchini (the yellow zucchini and the Magda have already been planted), and 8 of the G-star patty pans, which we got through a happy mistake. The Teddy squash are from last year’s seeds, and these ones grow in a bush habit, rather than vining.
Then there are the three pots that have Yakteen gourds planted in them, but only one pot has seedlings – and a new one germinating again! That was one of the pots that got re-planted, because none germinated. The other round pot that has a label stuck in it was also replanted, but nothing has germinated. The middle round pot had Kakai pumpkins sown in it, which did not germinate, so I used the same pot for more Yakteen gourd seeds. Nothing. Very strange!
When it’s time to plant these, we’ll be trying to work them in groups or clusters, placing like away from like, as much as possible. At the same time, we want the summer squash to be easily accessible, which means not letting them get crowded by the sprawling winter squash! We’ll see how many we can fit into the area my daughter dug a grid of holes into.
It’s a littler over a weeks since our last average frost date, so hopefully, it’s not too late to be transplanting these. As you can tell by the yellowing leaves, they really need to be out of those pots and into the ground!
This year, we decided to use the squash tunnel for vining beans.
But first, it needed some work.
We were able to weed and prep this side of the tunnel in the fall. Can you tell?
What a huge difference in the soil. When we first set up the squash tunnel, using a post hole digger to make holes for the support posts, it was incredibly hard. For the rows to plant in, we layered straw, then fresh garden soil – we’d long run out of carboard, and even shredded paper, if I remember correctly. Then the top was mulched with straw after the squash, gourds and melons were transplanted.
As you can see in the photo, the garden fork can now did deep into the soil, and I could push my hands into it to pull out the weed roots.
And tree roots. A remarkable amount of fine, thin tree roots.
The only things causing problems while using the garden fork was hitting rocks or larger tree roots!
So. Many. Rocks! Deep enough that I didn’t try to dig them out, though. I just pulled out the small rocks nearer the surface.
In the picture, you can see some orange twine. I found 3 places where the screws had snapped, and the cross pieces were basically being held in place by the wire mesh. I just lashed them back to the support poles. We might get one more year out of this tunnel before we build a permanent one, closer to the house, so I’m not too worried about it.
It was very hot work. Though my weather app said it was 19C/66F, with a RealFeel of 21C/70F, this is what the tunnel thermometer read.
Yeah, that’s reading about 33C/91F out there.
I’m sure the heat loving melons, eggplants and peppers were just loving it.
Me? Not so much!
Along with beans, the two Canteen gourds were transplanted. These were growing so fast, they had been potted up three times, and we needed to add support poles because they were trying to climb anything they could reach, including the tomato plants they were sharing a bin with! They were outgrowing their pots again, and really needed something sturdy to climb!
In the row on the left of the photo, I planted Blue Grey Speckled Tepary beans. These are a vining bean for drying, not fresh eating. They are also drought and heat tolerant, so perfect for this spot! The space was just enough for the amount of beans in the package, too. I supposed it’s possible there were more, but the cats tried to eat the package, scattering beans all over the floor. I think we found all of them, but some may have been missed.
On the right in the photo, I planted Red Noodle beans. These beans can grow up to 20 inches long! The packet was supposed to have 25 seeds, but I counted 33, which didn’t fill the row. We still have 2 other varieties of pole beans, but there are too many in the bags to fit in the remaining space, and I didn’t want to plant just a few. One of them has something like 200 seeds in it, so we aren’t going to be planting all of them!
I think, instead, we’ll plant some climbing gourds in the remaining space. We have some Tennessee Dancing gourds that would fit. Or some luffa. I think we have some that survived. We’ll decide after we get the remaining two trellises ready.
I’m glad we got at least two types of vining/pole beans in. It’s quite late in the season to be direct sowing beans here, but they are short season varieties, so it should be fine.
It’s been a very long, hot day today, and we got a lot done in the garden!
My first priority was to get the melons transplanted, as they were getting too crowded in their toilet paper tube pots and starting to yellow and weaken. We had 100% germination on all but the watermelon, but one seedling had already simply withered away.
The only place we really had for these was in the deep straw mulched beds that have potatoes planted in them. The potatoes are in the north side of the beds, with one having slightly less room than the other.
I had 4 varieties of melons with just 4 seedling each, so they went into the bed that was slightly smaller.
The Zucca melon, which is actually a gourd and can grow extremely large, is planted on the far right in this photo. For the longest time, we had only one seedling of the Zucca. A second one germinated late, and I was happy with that. Then, less than a week ago, the law two germinated! As they grow, we can train the plants out into the open area beside the bed, where we hope they will shade the grass and weeds. I’ll be going over the area with the weed trimmer, working to cut things as close to the ground as possible, which will help, too.
The other three varieties are from grocery store melons. One, on the far left, is Crenshaw melon. The other two, I lost the names off. Both are cantaloupe type melons. On the label for the jar of seeds, I’d made note that one of the (right of centre) had a nice crisp texture. The other (left of centre) has only 3 seedlings. There’s a prepared space to plant something, if we want.
To plant these, I dug my way through the straw to the carboard, which was still nice and damp. After cutting through the cardboard, I dug out a small hole and loosened the soil, then drilled down into the holes with the hose on the jet setting. Each hole then got a spade full of sifted garden soil (and any worms that hitched a ride) before the melons were finally planted. The seedlings aren’t particularly large, and in the deep mulch, they practically disappear!
This bed is slightly larger. I started 8 Halona melons and 8 Kaho watermelons from seed, so I prepped two rows of four, just like the other bed, with more space in between for a path.
The watermelons were much like the Zucca… some germinated early, some just recently. Of the 8 seeds, there were 5 seedlings, but I went ahead and planted all 8, just in case the remaining seeds still germinated.
Getting these in took quite a while, though I think most of the time was spent sifting the weed roots out of the garden soil. It took two wheelbarrow loads of sifted soil to fill all the holes, with a bit left over.
I was returning the wheelbarrow to the pile of soil for my daughter to use when planting the last of the trees, when I had a bit of of a surprise. There was a car in the driveway, and a woman had just climbed the gate to get in. !!! She turned out to be with the electric company to do a regular maintenance check on our meter. They do it about once every year or two. The startling part was, from a distance, she looked just like my sister! :-D
I’m quite happy to have gotten the melons in. I don’t know that they’ll all survive – at least one might not make it, as it had so few roots, it fell out of its pot as I tired to remove them from the small bin they were in. Before heading in for lunch, I watered all the other transplants, and so far, nothing looks like they are suffering transplant shock.
After that, I took a break from the heat (!!!) before moving on to the next project, which I will write about in my next post. :-)
It’s shortly before 8pm as I start this, and it’s all I can do not to just go to bed right now!
My day started a bit earlier, as I wanted to get my morning rounds taken care of before making some calls, then heading to the city. My husband and I now have medical appointments for the end of the week. We are both way overdue. Especially my husband.
Once that was done, I headed to the city, stopping to get gas at the town my mother lives in, first. Too early for their fried chicken to be available, so breakfast was a bag of beef jerky. :-D Usually, I just get $20 or $30 in gas, but decided to fill. At 197.9/L $20 wasn’t going to get me much. It cost almost $55 for about a quarter tank.
Then I got to the city and the first gas stations I saw were at 207.9/L
That’s USD$6.24/US gallon.
As I got further into the city, I saw stations that were still at 196.9/L but it likely is just a matter of time before all the stations jump up in price.
It’s insane.
I’m sure glad I filled my tank earlier!
Today was our day to do the rest of our monthly stocking up, and I went to The Wholesale Club again for this trip. Ended up spending just over $400 there, and the only things that could be considered splurges were super long metal tongs, and a super long wooden spoon, for cooking over the firepit. Oh, and more 500ml, wide mouth canning jars for the stash. :-D
There were a couple of things they didn’t have in types and sizes that I wanted, so I went to a nearby Walmart. My splurges there were a heavy duty garden hose, and a fan for my window, to replace the box fan that broke last year. The garden hose was actually a bit cheaper than the medium duty garden hose I was looking at. Normally I’d say, you get what you pay for, but the last time I paid a more premium price for a heavy duty hose, it suddenly burst apart at the tap, the first summer we used it. We’ll see how well this one lasts.
Between the drive and the shopping, the whole thing took about 4-5 hours, but I got pretty much everything on my list – including the highest SPF sunscreen I could find, an more bug spray! After this, we’ll only need to pick up fresh stuff locally, as needed.
I’m glad I remembered to stop at the post office on the way home. Several packages were in, including a birthday gift for my younger daughter. We also finally got the credit from our previous internet provider, which we should have gotten back in February. Since I was there, I also picked up another bag of wood shavings to use as mulch.
Once at home and the girls unloaded the van and put everything away, I headed back outside. We hit more than 20C/68F today, and I wanted to make sure all the transplants – both the ones still in pots, and the ones in the gardens – got a good misting. Happily, there is no sign of transplant shock in anything we transplanted. In fact, one tomato plant that got all droopy right after being planted, has already perked up.
My younger daughter was able to get the Wonderberry transplanted.
We decided to put them around the stone cross. I’ve read that these are good at self seeding, so they can be treated as perennials, and we thought this might be a nice place for them. They are so full of flowers and berries! I would certainly prefer these spreading around the area, instead of those green leafed plants that are taking over everything. They do have pretty flowers but, wow, do they ever invade! Almost every area we’ve managed to clean up among the trees is now covered with these!
Unfortunately, my daughter didn’t get much more done outdoors after this. She was driven inside by the clouds of mosquitoes. I had bug spray on, and it barely kept them at bay. I ended up mowing the main garden area, instead of working on more transplanting or bed prep as I’d intended, because the tall, damp grass is just a haven for mosquitoes. Huge clouds of them would rise up as we walked through! They’re just nasty.
Before I started mowing, my daughter helped me move the row covers we made last year. From the droppings left behind, the deer walked all over them during the winter. They are completely falling apart. When we can, we’ll take them apart and salvage what we can to reuse in other ways in the garden.
I didn’t get all of what needed to be mowed – some areas are still too wet – but the main garden area, and the spaces between beds and trellises we used last year, are now mowed. I also set up the old, patched up rain barrel and filled it with water (which I could now reach without having to steal a length of hose from the front tap, thanks to the new hose I got today) while I mowed, so we can use it to water the silver buffalo berry and sea buckthorn with ambient temperature water. Plus I could reach to use the hose to water the peas.
Once a bare minimum of mowing was done, I went ahead and did some more transplanting.
We had 5 surviving Little Finger eggplants, and they just fit into the middle of the half-bed that had space. They are encircled by spinach and onions. Now that the eggplants are in, we can finish setting up the hoops – they just need cross pieces joining them in the middles – so we can cover them with net. I don’t know of the critters would eat eggplant, but I’d rather not give them the opportunity to find out!
There were 7 surviving Purple Beauty bell peppers. Most were from the second seed start. Only two survived the Great Cat Crush. :-D Once they were in, there was still some space in the middle of this bed. Just enough for the last two Cup of Moldova that didn’t fit in the bed that has just tomatoes in it.
This bed is encircled with onions on the outside, while the inside has turnips on one side, spinach on the other. The turnips – all three varieties – germinated a couple days ago, and today I could just see little spinach coming up, too.
With the peppers now planted, we’ll add twine to the supports, and then will be able to put net around the bed.
Tomorrow, we’re going to need to put a priority on transplanting the melons. They are starting to suffer in their too-small toilet tube pots. So they will go into the deep mulch space left over, after the potatoes were planted. I was going to plant the summer squash in there, though to be honest, between the two beds, we might have room for both. Well. Not all the summer squash. We do have a lot of patty pans!
We’re expected to get as warm tomorrow as we did today, so I think an early bed and early rise will be in order again. I want to get more work done in the garden, while it is still cool.
After I pain killer up and slather my dried up hands with lotion! I am in such pain right now. It’s fine if I’m sitting down, except for the joints in my fingers making it hard to type, but every time I get up, I find my joints have completely stiffened up and I can barely walk.
While I spent most of my time with the kulli corn, my daughters took care of other things.
My younger daughter got the sea buckthorn planted. These saplings are quite a bit larger than the silver buffalo berry! This will eventually close the gap of the hedge along the north fence line, where the deer jump through. Hopefully, we have both male and female plants, and will have berries. We do plant to get more, over time, but it will probably be another year or two before we know for sure.
The only trees left to plant now are the Korean Pine.
My other daughter started on the tomatoes.
Along the chain link fence, she planted the dozen Chocolate Cherry tomatoes. That’s a variety I got specifically as a gift for her. :-)
Last year, tomatoes did REALLY well in this location. This year, we’ll see how they do in other locations!
The next tomatoes she and her sister transplanted here were the Cup of Moldova and Sophie’s Choice tomatoes.
The row on the left, and in the centre, are all Cup of Moldova, while the Sophie’s Choice are the row on the right.
There are still two Cup of Moldova waiting to be transplanted, but they ran out of space.
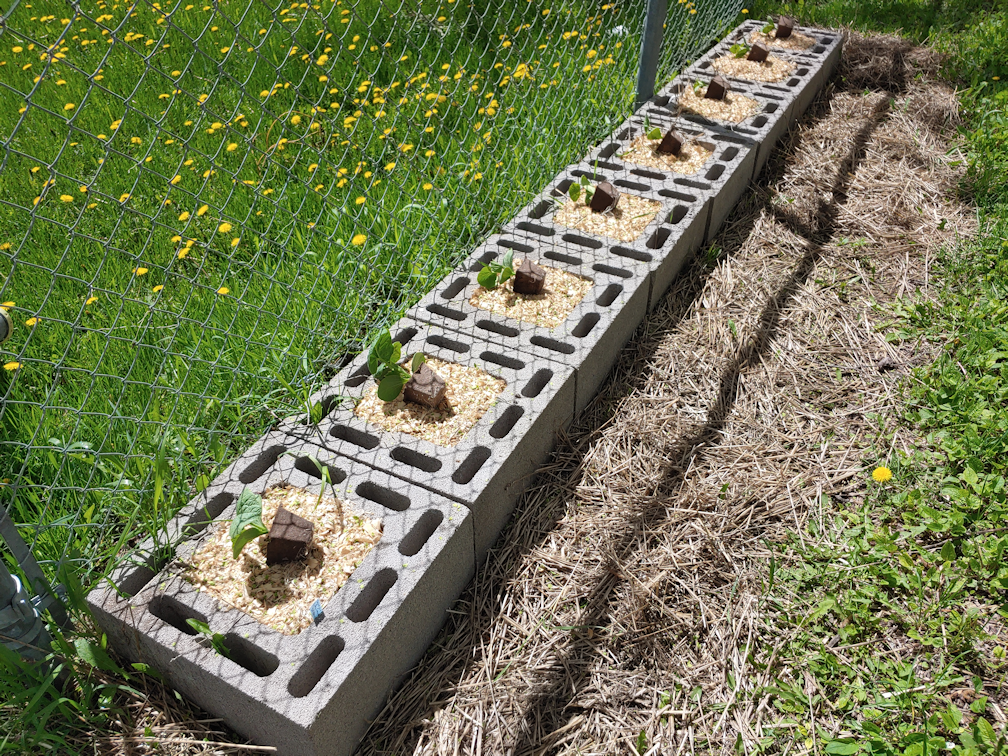
While they worked on that, I transplanted into the blocks we finished adding along the chain link fence this spring.
The Red Kuri/Little Gem squash went into these. I hope they do well here. Last year, we had only 2 plants, but they produced quite a lot of squash. Unfortunately, with the drought, the squash developed so late, we only really got 3 that were mature enough to be edible. The girls and I found them delicious (my husband is finding that he’s not a fan of winter squash), and we look forward to having enough to store for the winter.
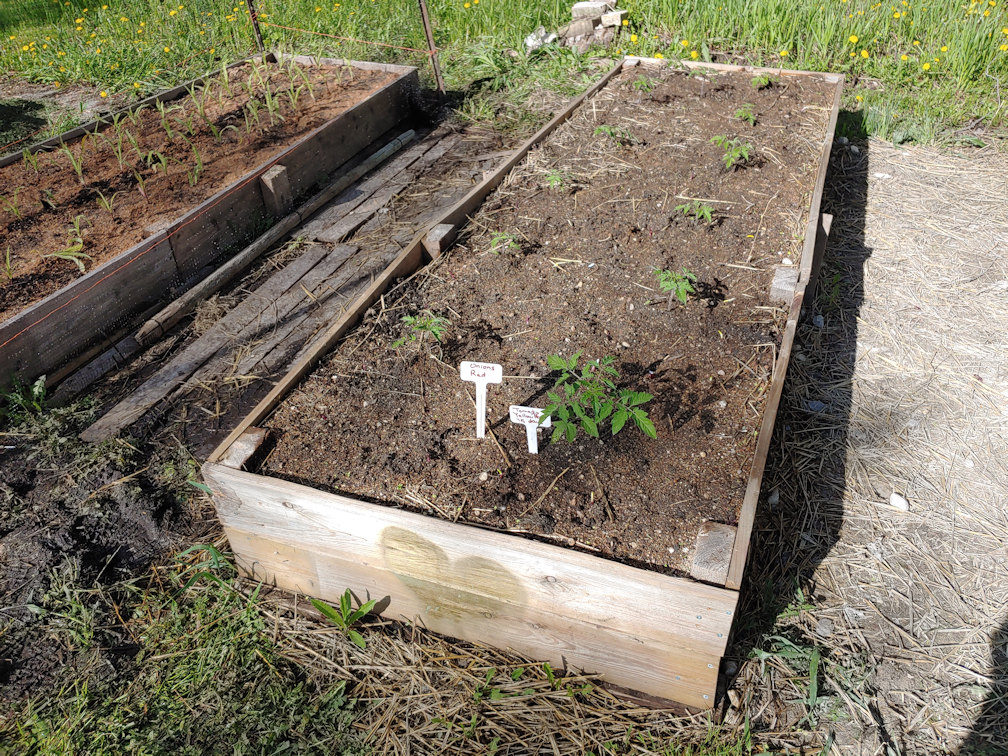
While one daughter worked on the bed of tomatoes in the main garden area, adding more support posts and winding bale twine back and forth to help support the tomatoes as they grow, my other daughter and I made use of the newly available bed next to the kulli corn.
There was a total of 13 Yellow Pear tomatoes to transplant. Once they were in, we got the box of red onion sets and planted them all along the outside of the bed in a single row, then fit the rest into the middle, in 2 rows.
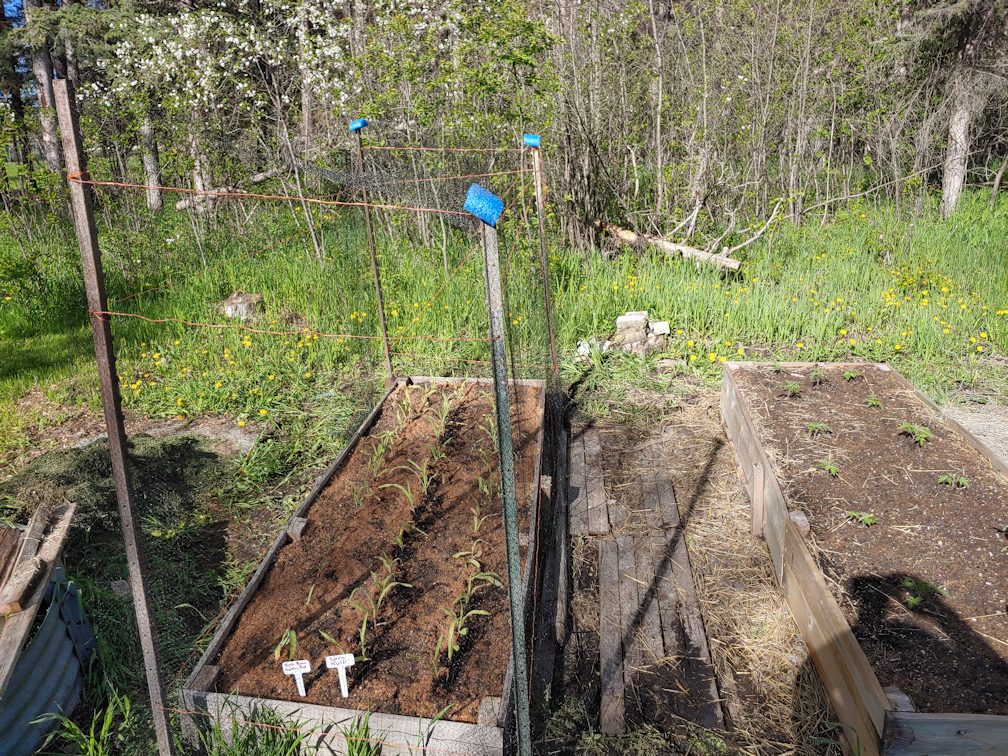
The last thing we needed to do before heading inside was putting netting on the kulli corn and the Red Kuri squash. Those were the only two things that were most at risk of betting eaten overnight!
The net is hard to see. I used pipes hammered into the ground to hold the net away from the squash. The blue bits of pool noodle shoved into the tops of the pipes are there to protect the net, as there are some sharper edges on some of the pipes. Last year, we had chicken wire at an angle over cucamelons and gourds, and the vines kept wanting to attach to the chick wire, instead of the chain link. There’s no way the net could hold the weight of squash climbing it, so I wanted to keep it away from the plants as they start growing large enough to reach the fence and start climbing. On the inside, the edge of the net is held in place with ground staples. The excess net went over the fence, and my daughter rolled it up and zip tied it down. We still want to be able to access and tend the plants as needed, which will mostly be done from the inside.
The last thing the girls did was lace up the ends, so keep the critters out. A determined critter could still tear through the net, but hopefully, they won’t want to be bothered.
In the background, you can see some wire “fencing” has been added to the outside of where the Chocolate Cherry tomatoes were planted. It will get netting as well, but the only thing in there that is in danger of critters are the carrots, and they aren’t even germinating yet, so there it no hurry, there.
We have a lot more to transplant, but work needs to be done to prepare for them, first. The supports for A frame trellises need to be added, and beds need to be weeded. The rows we used for the bush beans last year, as well as the straw mulched mounds we grew summer squash in, are completely hidden by the crab grass that has taken them over. The squash tunnel, which will be a pole bean tunnel this year, needs minimal work at least, and the summer squash can be planted in the deep mulch near the potatoes. After we’ve transplanted the squash, gourds, melons and cucumbers, and planted the pole beans, we’ll have a better idea of where we can plant the yellow corn, and the popcorn. We have more bush beans and peas we can interplant with the two types of corn, too.
We also have another variety of baking poppies and dill to plant, but I think we’ll have to skip those for this year. I know where we will plant the Wonderberry, but have still not figured out where to plant the ground cherries. All of these will be treated as perennials, as they will reseed themselves year after year, so they need permanent locations.
We’ll figure it out.
As for tomorrow, I’m finally going to make our second stocking up trip to the city. It’s unlikely I’ll be able to do any work in the garden, but we shall see. It’s hard for me to stay out of the garden, now that the weather has finally turned nice, and we can catch up! :-D
It feels so good to finally get things into the ground!
Yes! Finally! Major transplanting was started today. :-)
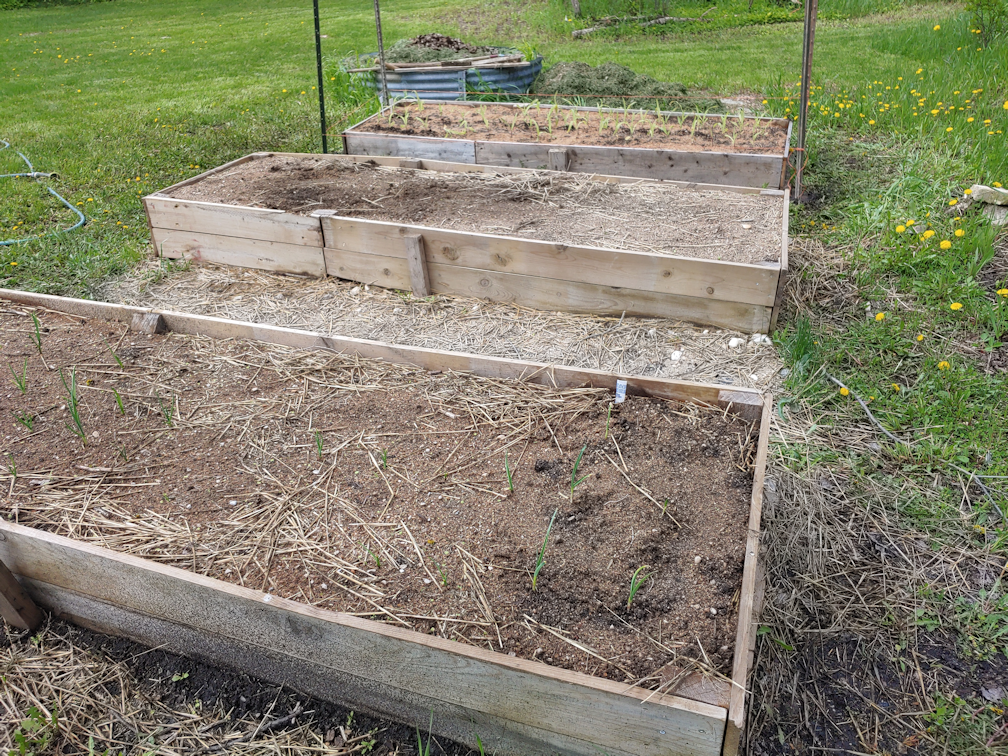
The first thing I needed to finish was topping up the low raised bed they were going into.
Since the snow melted away, we’ve been adding our kitchen compost in the trench, which already had some straw in it, and I even tossed in the soil from various pots we had, from house plants that died, to seed starts from last year that didn’t germinate. The last layer before adding the soil was some fresh grass clippings.
This is the first time this pile of garden soil has been uncovered since last year.
So. Many. Thistles!
And those roots go all the way though the pile.
Which meant I had to bring the makeshift soil sifter into service, so get as many of the roots as possible out. It was long and tedious, but at least it was made a bit easier by scavenging a couple of scrap boards out of a pile to support the steel mesh, rather than the found branches I was using before. Sifting the soil had to be a gentle process, because there were SO many worms.
I kept the worms for the new bed. :-D
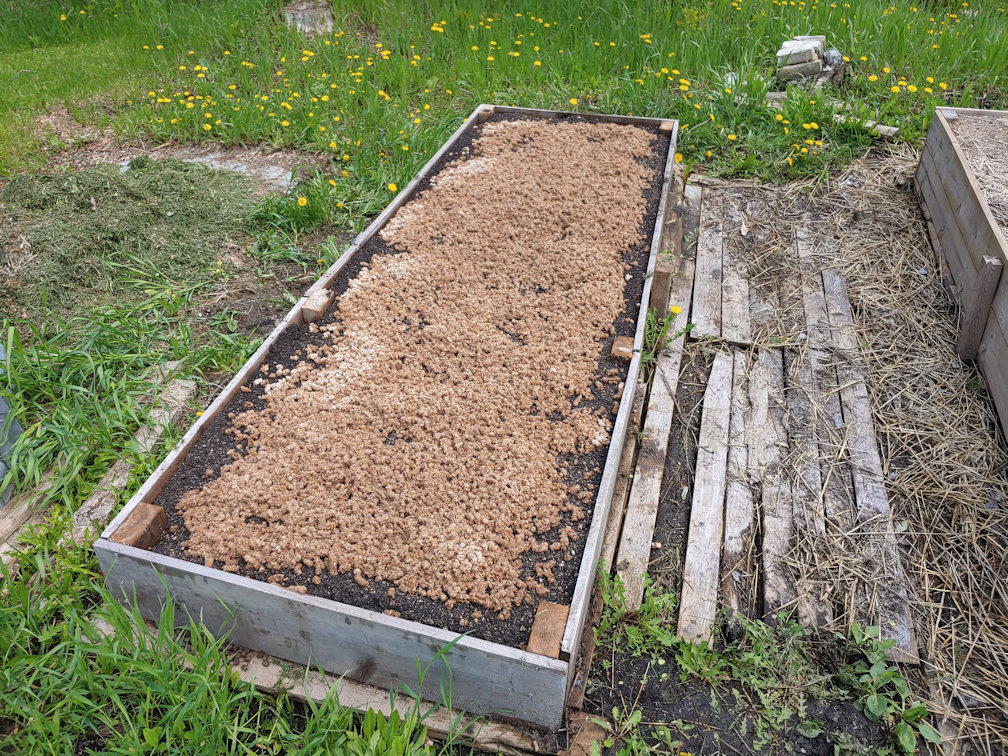
After the soil was added, stove pellets were scattered across the top and hydrated so act as a thin mulch. It won’t stop any weeds, but it will help keep the soil surface from compacting. After several soakings, the sawdust was spread evenly with the back of a fan rake.
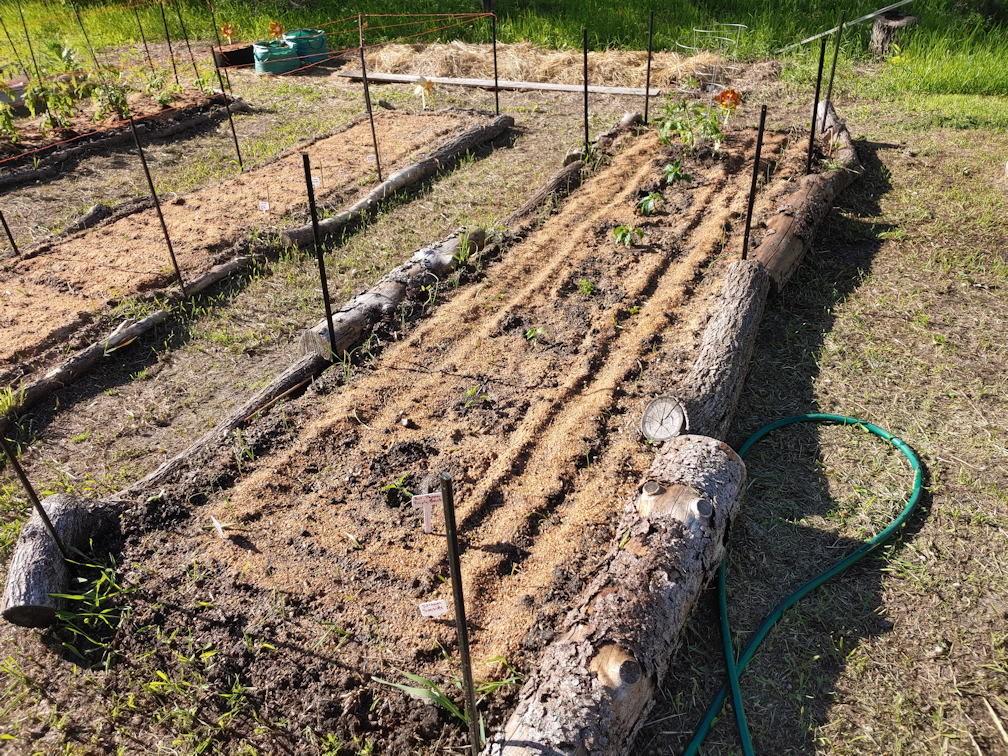
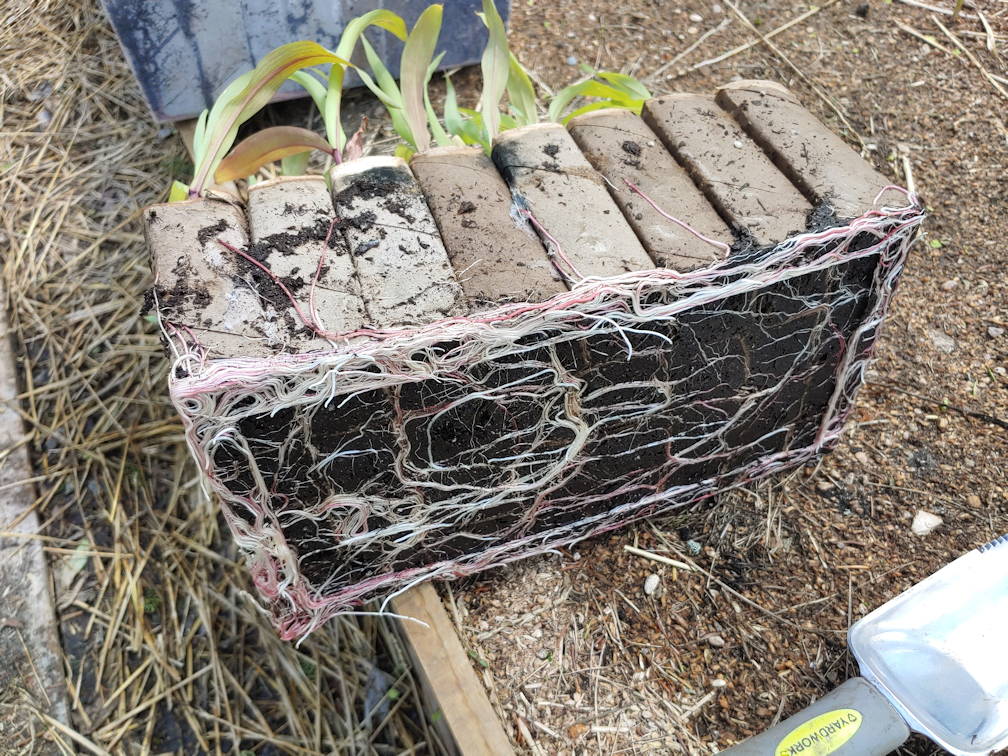
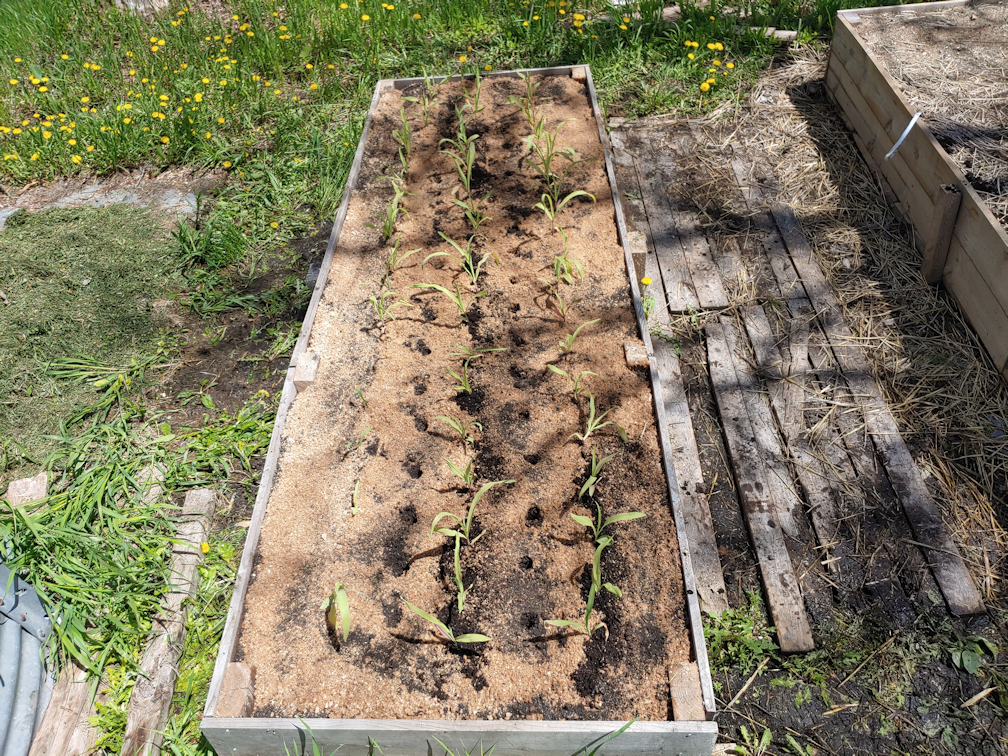
It took a couple of hours, but I could finally transplant the kulli corn!
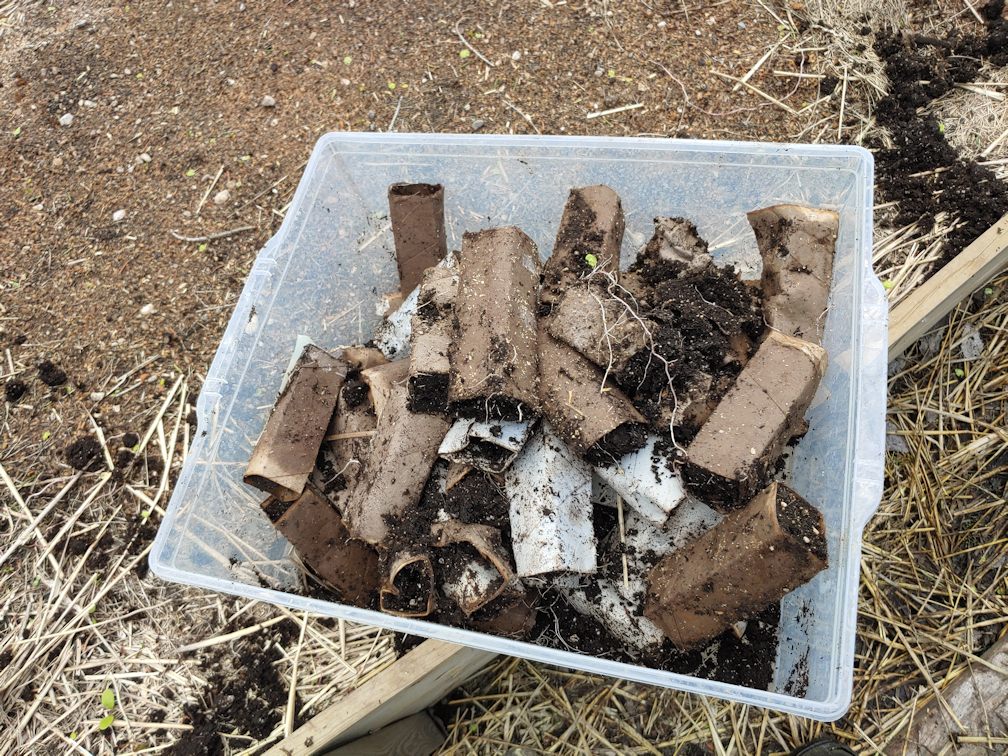
They had a major root system going! It made it difficult to get them out of the bins, then pull apart the tubes. The toilet paper really wanted to come apart!
With the larger bin, it was even more difficult to get them out, and the whole thing ended up falling out and apart. I think only one corn plant actually got broken, though. We’ll see if it makes it.
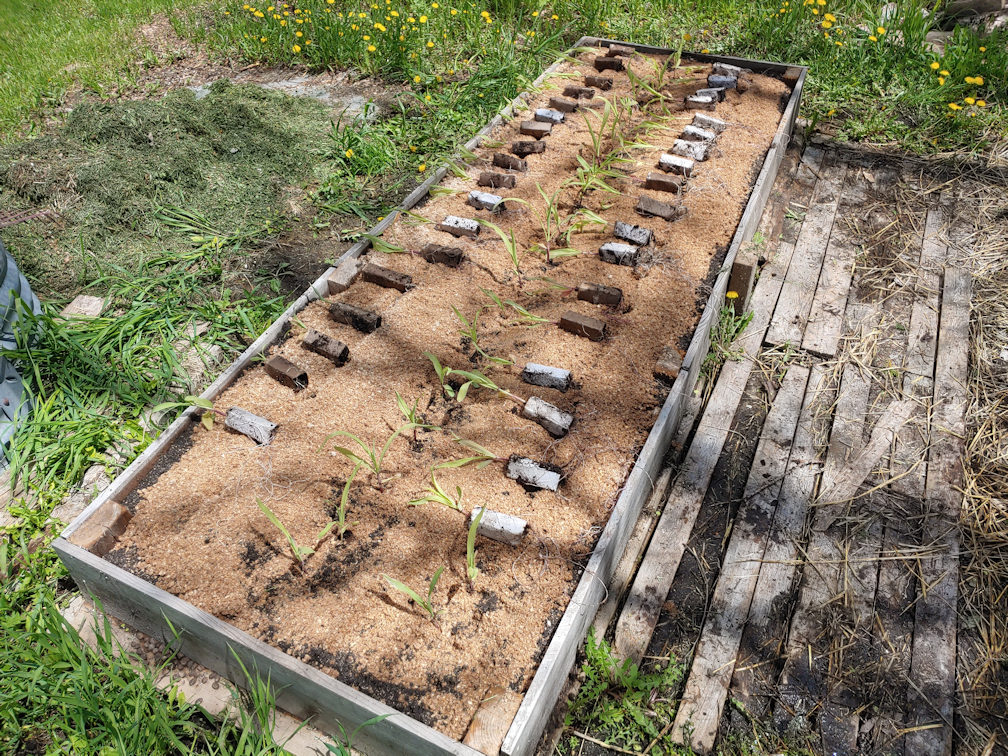
I counted the seedlings, then marked three rows of 20 evenly spaced spots for the corn. The actual total was 58, including some smaller ones that may or may not make it. We ordered 100 seeds, and there were extras, so we’re looking at roughly 50% germination rate. Which I don’t mind. We would have had trouble finding space for more. They are quite closely planted, as it is. Which should be good for improving pollination.
Of the remaining rolls, I broke apart the cardboard and rifled through it. No sign of the remaining seeds that did not germinate. The carboard went into the compost pile, while the remaining soil was used to top dress any seedlings that looked like they could use it.
I had also grabbed a bag of bush beans from last year, picking the one that looked like it had fewer seeds. That was the yellow “Golden Rod” variety. We still have some green bush beans left, too.
I counted the bean seeds and there was 38 – which was perfect! I could plant two rows of 19 beans, in between the corn.
As they are “old” seeds, I don’t expect 100% germination. This bed is very densely planted, but they should be complimentary.
The corn, however, needed to be protected. The question was, how?
I made a trip to the barn and dug out the T posts I spotted in one corner, a while back. There turned out to be 6 of them, all different lengths. :-/
I had to dig holes to be able to set them, using a garden trowel, since a spade would have been just too big. Within inches, I was hitting water, then rocks and gravel. After placing the posts and trying to push the soil back against them, there was literally water, shooting out from the ground, as I stomped on the soil!
We have no post pounder, so I found a heavy hammer to try and drive them deeper. Especially the longest one, but I think that one ended up hitting a rock. Being the short person that I am, for the taller once, I had to stand on the corners of the bed to reach. Even with a board across the corner to stand on, I was wobbling all over the place! LOL
Once they were in, I strung some twine around to further support the net, once it was added. That was a job that had to wait for when the girls were available.
In the two garlic beds, the nearer one had only 6 remaining garlic coming up – and one of those was barely there. I could find no sign of the few others that had emerged, as well.
I decided to transplant those 6 garlic into the other bed. That one has a lot more garlic trying to grow, but there was still plenty of space at one end to transplant the remaining 6 of the other variety.
The left a bed available for planting into, which we did end up doing.
The main challenge was, how do we cover the bed with netting, yet still be able to access the plants, easily, for weeding and eventual harvesting of yellow beans.
Piece of pool noodles were added to the tops of the posts, so they wouldn’t tear apart the net. When the one on the tallest post fell off, I left it. If it tears, it’ll only go down to the twine, and will actually line up better with the rest.
When I brought the T posts out of the barn, I also grabbed a stack of narrow pipes. I have no idea what they were for, or why they were stored there, but I figured the might make good supports. The short ends of the net are wrapped around those pipes and zip tied into place. For the long sides, we zip tied narrow fence posts we found… somewhere, to weigh down the netting. Any gaps were further secured with ground staples. If we want to tend the bed, we can remove the ground staples and lift the poles to get under the netting.
Hopefully, that will work out.
The corn can potentially grow to 8 ft tall, which is higher than the netting, but if they do get that tall, we’ll deal with it, then.
That was my big job for today, but it wasn’t the only one we got accomplished! I’ll write about that, in my next post. :-)
It had been my intention to work on clearing out that last low raised bed in the main garden area, at the very least, but once I got outside I changed my mind. There was less standing water in the yard, and the grass was getting out of control, so I decided to try mowing.
We have a large yard.
I was also using the collection bag to save those wonderful grass clippings to use as mulch. It doesn’t hold much, so there was a lot of stopping and starting to empty the bag.
After several hours, pretty much the entire inner yard was done. There was just one place that still had so much water that, even with the mower set higher than usual, it was just too deep. I even opened up the gate in the fence near the fire pit and mowed into the outer yard. I like keeping a lane in the grass to the back gate mowed, as an extension of the driveway. There’s too much water do to it in the usual areas, but I was able to clear a lane from the fire pit area, to where the lane would be. If we absolutely had to use the back gate, we would be able to drive through the inner yard to access it. We certainly wouldn’t be able to get through, the usual way!
Another of the goals will be to trim away some small trees taking over a corner, then mowing the areas where we will be planting the Korean Pine.
But not today!
Did I mention we have a large yard? :-D
The rest of the main garden area should get a once over with the mower, before going over it again with the weed trimmer, as close to the ground as possible, but I was just too exhausted to work on that today.
The ornamental apple trees are starting to bloom. So are the sour cherry trees, and all the lilacs are developing buds. Finally! That shows me that things have finally really warmed up, hopefully enough. I don’t know that we ever got frost last night, but the sweet potato slips are fine. I’m leaving the covers on them for one more night, though. Tonight is supposed to be the last cooler night, though I’ve noticed the forecasted overnight low has changed to quite a bit warmer than before.
Tomorrow, we start transplanting everything. The sun room is turning into quite the jungle!
We’ve had a very high germination rate this year – a huge improvement from last year! Even the Yakteen gourds, which I restarted, have a few seedlings. Some things had seeds germinate weeks apart, but they still made it. We even have a second tulip tree sprouting! We’d pretty much lost all expectation of any more tulip trees, or any paw paws, germinating, so that was quite a nice surprise.
Another nice surprise is that all the turnips have started sprouting already! My goodness, that was fast.
Today, the girls finished transplanting the silver buffalo berry, and prepped to plant the sea buckthorn tomorrow. After that, it’s just the Korean Pine for this year’s food forest additions.
My priority tomorrow will be to get the newest low raised bed next to the compost pile topped up and ready for planting. The Kulli corn will be going in there, and I want to get that done as quickly as possible. They really need to be transplanted soon. If we start them indoors again, I won’t do the toilet tube pots. It worked well enough, and it certainly saved space, but the seedlings quickly needed more room to thrive. Even if they were in just the red Solo cups, they would have fared well longer. Once the corn is transplanted, we’ll have to make sure to put a net around it right away, so they don’t get eaten!
The girls will start transplanting tomatoes along the chain link fence in the south yard. We have more tomatoes than will fit there, though, so others will be planted in the low raised bed that I finished prepping yesterday. There are so many, we might have to the last one that still needs to be weeded, too.
It’s going to be a flurry of transplanting over the next few days. The sun room is going to look so empty when we are done! :-D We will also be direct sowing the pole beans at the squash tunnel, along with the 2 canteen gourds that are trying to claim their way out of their pots right now. Then there are the two types of corn to direct sow, and I honestly don’t know where we’ll be planting those. We’re really behind in preparing beds, but once those trees came in, they became the priority. Mowing and using the weed trimmer is also going to higher on the priority list, since the winter squash is going to be planted throughout the old garden area, not in prepared beds. Basically, we’re going to dig holes, add some garden soil and the transplants, and mulch around them. The grass is so tall right now, though, we couldn’t possibly get that done until it’s cleared.
Yay! A day without rain! We finally got to get some serious work done outside!
I had a few goals for the day, but before I could even start on any of them, I had to get the weed trimmer out. The grass is getting out of control, but it’s still too wet to mow in most places. In the main garden area, the ground is so rough, it’s just easier to use the weed trimmer.
Easier on the lawn mower, that is. Not on me! Particularly since I was trying to trim as close to the ground as possible, as well as under the logs framing the beds. It’s pretty much all crab grass, with some dandelions thrown in for good measure, so it’s all going to come back, but at least it’ll take a bit longer, this way. :-/
Once that was done, I decided on where I would put the purchased grow bags we are testing out this year. I picked up a couple at Canadian Tire, mostly because they were on clearance. My original plan was to try growing some sweet potatoes in one of them, then have the remaining slips planted in the ground. The bed I was going to use for that now has the white strawberries in it, so I figured they could all go into the grow bags.
I decided to place them near the small potato bed, where they will get full sun, and be sheltered from the winds at least somewhat. I did put some straw in the bottom of the bags. The straw will act as a sort of sponge to hold moisture, but it also held the sides of the bags up, making it easier to add the soil.
The truck load of garden soil by the main garden is mostly used up, but so far it has been enough for what we need. The problem is that, after a year, it’s so full of roots, it’s actually hard to stab the spade into it!
We really need a soil sifter. I don’t have the materials to make one right now, so I rigged one up.
This steel mesh is what we use on the burn barrel as a spark catcher. I used it to sift soil last year. A couple of sticks to support it over the wheelbarrow, and it worked all right. Some roots still got through, but at least the big stuff was kept out.
It took a couple of loads to fill the bags. They’re not that large, but even with the straw on the bottom, they hold quite a bit of soil. I decided not to fill them to the top. I figure, once sweet potatoes start to form, they’re going to need some space. I’ve never grown them before, so we’ll find out!
Also, you can see that one of the handles has already torn off on one side!
These bags are probably too small for sweet potatoes, but this is a bit of an experiment, anyhow, so we’ll see.
For these, I decided to use the stove pellets as mulch. In the above photo, the one on the right had its first watering, and you can see they’re already starting to swell and soften.
After wetting them both down, I left the pellets to absorb the water and moved on to our other experiment.
I got a pair of these at The Dollar Tree to test out. The fabric they’re made of is a thick felt.
Hmmm… Did I mention I got these at The Dollar Tree?
You get what you pay for! The first one I opened, and it had a hole in it!
Some of the stitching looks like it simply came undone, but the opening was about a third of the circumference!
The other one was fine, though, so I gave the first one to my daughter. She’s been doing a lot of sewing, so she’s got all the supplies on hand and was able to stitch it up for me.
While she worked on that, I filled the second one. As with the others, I added straw to the bottom, using it to help hold up the sides. In between loads of soil to fill it, I watered the pellets in the first bags a couple more times, before smoothing out the sawdust, then repeated the process on the smaller fabric bed.
It looks so small compared to the other two!
The sweet potato slips I ordered was a 5 pack, and I decided to plant 2 in one of the green bags, then 3 in the black felt bed. I wanted to see if the black fabric, which would absorb more heat, would be better. We did get a short season, cooler climate variety, but they are still a heat loving plant.
Well, would you look at that!
We have extras!
After breaking up the bundle of slips (there was still ice in the packing medium!), the green bags got two each, while the shorter but wider black fabric bed got three.
Sweet potato slips, I’ve learned, are the only other plant that share a trait with tomatoes, in that you can bury them up to their leaves, and new roots will grow out of the buried stems.
I’m sure these bags will be too small, but with how sweet potato vines grow, I think I will let them spread onto the ground. Where the vines touch the ground, they can root themselves, and grow more sweet potatoes. So we might get some growing in multiple places. :-)
Once those were in, I got to work on one of the low raised beds that needed to be weeded (again) and prepped for planting.
It was actually a bit worse than the remaining bed that needs to be weeded. I got as many of the rhizomes and dandelion tap rooms out that I could. I know I didn’t get all of them, but at least I got most.
We’re running low on the canopy tent pieces I’m using for supports. This bed got only 6 of them. The other beds got 8. There are 4 left of these longer ones. After that, there are only some really short pieces. Short enough that I’m not sure where we can use them in the garden at all!
By the time I got this bed done, I really needed a break, so I popped inside for lunch … er… lupper? and a rest.
When I sat at my computer, one of the first things I saw was a flashing red alert on my task bar’s weather app icon.
It was a frost advisory.
*sigh*
Pretty much everything else we’ve got going right now is frost tolerant. These sweet potato slips, however… yes, they’re supposed to be a cool climate variety, but they just got planted!
I decided to play it safe.
We hang on to more of our water bottles, rather than putting them in recycling, and this is one reason why! They can be used as cloche over smaller plants.
Such a hot day, and we’re supposed to get frost. Ugh.
Okay… “hot” is relevant. It was only 16C/61F out there! It certainly felt hotter while working outside. I got a wicked sunburn on the back of my neck. My daughters chastised me for not wearing sunscreen, while one of them applied some aloe vera gel on the burn for me. :-D We do have sunscreen. Somewhere. I just forgot sunscreen existed, and didn’t even think that I might get sunburned!
Tonight, we’re supposed to dip to 2C/35F. Tomorrow’s high is expected to be much the same as today, while the overnight low is supposed to be 4C/39F. After that, our overnight lows are supposed to continue to slowly increase over the next couple of weeks.
Which means that we have one more night before we can start transplanting our warm weather crops. Even then, though, we will start with the ones that are most likely to handle colder overnight temperatures. There is still lots of work that needs to be done, including a repair on the squash tunnel – one of the screws holding a bottom cross piece snapped. Likely because of the winds we’ve been having.
There is still so much to do! The extended cold and the rains have really set things back.
Once everything is in, though, I expect we’ll have quite a good growing season. I look forward to not having to water all the garden beds, twice a day, almost every day, like we had to last year.
Between the weather and the critters, though, nothing is ever a sure thing!
Since planting trees and bushes are more long term than our usual gardening, I decided to start a food forest category.
Including for things that were already here before we moved in, like these Saskatoons. It’s so nice to see them blooming again – though you can very clearly see how high the deer ate the twigs and branches! Hopefully, we’ll have berries this year. Thankfully, these are very flexible, so we should be able to bend them down to harvest them.
We are, however getting a frost advisory tonight. !!! Well, our June 2 last frost date is just an average, after all. It’s supposed to dip to just barely freezing, so most things should be all right.
Including…
The 20 out of 30 silver buffalo berry my daughter was able to transplant today!
She does not take progress pictures, though, so I just got a picture at the end of the day.
Even with the holes already dug, it was a huge job. The soil that was removed was so full of roots, rocks, weeds and gravel, she was using garden soil from the remains of the pile we got last year – which is clear across the garden area. After sitting there for a year, it’s full of roots, too, which she picked out as best she could.
She started at the north end of the double rows, next to the highbush cranberry, as the ground is slightly higher there, and the holes were mud rather than filled with pools of water. It didn’t take long before she was having to deal with standing water, though.
Towards the end, I was able to help her out, adding the mulch and watering it just enough to keep it from blowing away. By the end of it, my poor daughter was so knackered, she could barely lift the shovel on its own, never mind with soil in it!
So the remaining 10 silver buffalo berry (I just realized, I’ve been calling them bison berry, because we don’t have buffalo; we have bison. The label says buffalo) will be planted tomorrow. Holes still need to be dug for the sea buckthorn, but there’s just 5 of those. Then there’s the Korean pine, which is going to be planted in the outer yard.
While she did that, I worked on the main garden area and got some decent progress done, too – but that will be my next post.