Okay, so working on that pipe is not going to happen today. Pain levels are on the upswing and I know if I try to work on it now, I’ll mess myself up for days.
So, instead, I worked on garden stuff!
The tomato seeds were all showing radicals, with some even starting to show seed leaves. It was time to get them into the seed starting mix.
The first image has the Black Beauty on the left, Spoon tomatoes on the right. Those Spoon tomatoes were really doing well! It’s hard to see, but all the Black Beauty seeds had radicals showing.
The next image has the Sub Arctic Plenty on the right. As a short season variety, it’s no surprise that they germinated so quickly. On the left are the Chocolate Cherry. I was a bit surprised that these were the slowest to germinate. I would have expected the Black Beauty to take the longest, considering they have the longest growing season needed.
I had to moisten more seed starter mix for this job, and I made sure to use hot water for that. By the time the cells were filled and the seeds were being transferred out of their trays, the damp mix was still warm. Warmer than the damp paper towels the seeds were on. Now they’re in the tray along with the Turkish Orange eggplant (there’s 6 visible seedlings there), the luffa (all three have finally emerged) and sweet bell pepper mix (no sign of any of those, yet). The bottom of the tray got warm water, too – I wanted to make sure those square peat pots had plenty of moisture to absorb, so they don’t try out the seed starting mix.
That done, I went through my next batch of seeds and decided to go for it with the melons. The White Scallop seeds were set aside for now, as they can wait until May to be done. I got the containers all prepped and labeled ahead of time, and even got some markers labeled for when it’s time to put them into seed starting mix.
For the watermelon, I used my older Cream of Saskatchewan and Kaho seeds. The Sarah’s Choice melon seeds are also older, but the Green Flesh Honeydew packet is new seeds.
Then there are the Zucca melons. Which are the giants. These seeds, which I made a point of scarifying by scraping their edges with a utility knife, are also older seeds, so I made a point of choosing the plumpest, most solid feeling seeds. Which could have been any of them, really. They were in quite good shape. I started 4 seeds. These are the ones that started out so well last year, only to be decimated by slugs, so any transplants we get out of these are going to require extra protection.
Four seeds each was what I was shooting for; we over did it with melons last year, and I want to cut back. With the Cream of Saskatchewan, there were only 5 seeds left in the pack, so I set them all out. With the Kaho watermelon, there were only 3 seeds left in the pack, so I guess that balances things out!
They all got covered with dampened paper towel, and are now set up on top of the aquarium light fixture. At this stage, they don’t really need light, but they do need warmth. I didn’t want to set up the other heat mat yet, and the light fixture is ever so slightly warm. Not as warm as a heat mat, but warm enough. Once they germinate and get transferred into trays, they’ll get a heat mat. It should be interesting to see how many germinate. Especially with the older seeds.
After this, the next things we might start indoors are some herbs and a few back-up White Scallop squash. Those can be started towards the end of April or beginning of May. I’m hoping we’ll be able to start using the portable greenhouse at around the same time. It really depends on those overnight temperatures inside the greenhouse, as we have no way to heat it. We won’t have the option to use the sun room this year, as the space is pretty much all set up for the cats now!
Ah, well. We’ll figure it out.
It felt good to be able to do some garden related stuff on such a dreary day.
In the first image of the slideshow above, you can see a very distinct bend in the packaging!
Thankfully, in the next two images, you can see that the bulbs were well protected. The angled packaging the bulbs were taped into is very solid. In fact, I will be keeping it, as it will probably come in handy for something!
In the next photo, you can see the bulbs next to the fixture laying upside down on the table.
Not that there is a cover over the bulbs.
That was my first problem.
When we got the fixture, years ago, and assembled it, we were never able to get that cover completely on, so about a quarter inch of it was sticking past the end of the fixture, which you can see in the next photo.
Not a lot to grab on to, but it shouldn’t have needed any at all.
After removing the legs at that end, I fought with that thing for at least half an hour. I ran a utility knife blade between the cover and the tracks. I used WD40. I even found an angled tool that I used to try and lever it from the far end. Nothing worked.
I figured if I had some pliers or something to grip the bit sticking out, that might help. After looking around the basement, I found our old pair of vice grips.
Perfect!
I just needed to close the jaws more and…
…
…close the jaws…
…
…turn the adjustment screw to close the jaws…
(apply WD40 liberally)
Just turn that adjustment screw…
Nothing. It would not move.
Well, I’ve got a handy vice at the table. I’ll just get the vice to hold the adjustment screw and I should be able to spin the vice grips to tighten and loosen the jaws.
Yes. I put vice grips into a vice.
I made that vice as tight as I could. Tight enough that it was actually starting to damage the grip texture on the adjustment screw. I still ended up spinning the screw in the vice instead of the screw itself moving.
Okay, that wasn’t going to happen.
Well, if I found something thick enough, I could put that with the bit of cover sticking out and grip both. It just needed to be at least thick enough for the vice grips to close onto it. Maybe some wadded up paper towel.
Nope.
I tried a piece of leftover wood that almost worked. It was thick enough, but too wide for the vice grips to reach the bit of cover I was trying to grab.
More searching around the basement.
I ended up finding a small scrap of wood in the garbage can I have just for wood, sawdust and other burnables. It was uneven on one side, but that didn’t matter as much. I was finally able to grip the edge of the cover and pull on it.
It took several tries, getting it to move, little by little, before it finally came loose, and I could pull it out without the vice grips.
Once it was clear, I wiped it down along the edges, partly to get the excess WD40 off, but also to wipe off whatever was making it stick. There really wasn’t anything, so I used a utility knife in the track it slid into, to scrap what anything that might have been in there. There were two spots, one on each side, that seems to have something stuck in the track. One spot seemed to be plastic; when we got the fixture, the cover had a protective layer of plastic on it, and not all of it seems to have come off. The spot on the other side might have had some plastic in it, too, but there may also have been some mineral build up from when this was set above the big aquarium. The hinges on the glass covered broke, which is why we got a fixture with legs at each end, in the first place. The other one sat right on top of the glass covers.
So, that was finally off and the tracks cleared up.
I did not put it back on again.
Okay! The bulbs are uncovered. I just needed to rotate the bulbs to removed them.
Just… rotate those bulbs.
Rotate.
Is there a trick to this?
They simply would not rotate, and there was very little room to work with.
Looking closely at the connectors, I could see some black plastic that appeared to be some sort of lock? But how would I move those so the bulbs could be rotated?
I never did find out.
While fiddling with them at one end, I ended up breaking off one half of the black plastic.
At which point, I was able to rotate the bulb. The other end rotated fine; the black plastic rotated with the bulb. Which didn’t happen at the end I was working on.
Okay, that’s out, time to try the second one.
Once again, it would NOT rotate – until half the black plastic piece broke off!
After that, it rotated just fine.
*sigh*
No matter. I could now install the new bulbs. They fit just fine, and even rotated fairly easily into position.
*sigh*
Then I plugged it in to test it out.
I even remembered to flip the fixture onto its side, so I wouldn’t blind myself.
It worked!!! Yay!
It only took me almost an hour to do something that should only have taken a few minutes!
That finally done, I got it set up. I decided to take the other fixture out completely, and that’s now stored under the work table. The light with the new bulbs was set up, with bricks removed to make it lower. The shelve section I’d brought out earlier was set up over the whole thing. The tray with the winter squash was moved off the heat mat and is now under the shop light. That allowed me to remove one of the heat mats and center the tray with the eggplant, peppers, luffa and pre-germinating tomato seeds onto the other heat mat.
You can sort of see the new set up in the last photo. Instagram wouldn’t show the whole image, so the new light fixture looks like another surface over the seed pots.
This light fixture does put off some heat. When we were still allowing the cats in the living room while we had seeds started, we would sometimes see Fenrir, in particular, sitting on the light fixture, keeping warm. It isn’t much, but that will provide at least a bit of warmth to the winter squash tray above.
I had the heater running the entire time I was working on this, and it didn’t seem to make much difference to the room at all.
So that turned out to be a much bigger job than expected, but we now have more light for the seedlings.
If it weren’t for the temperature down there, the basement would actually be an excellent place to set up a plant room. Ah, well. We make do with what we can!
Meanwhile, I peaked at the tomato seeds, and I think I could actually see radical emerging on a couple of them! I’ll check again tonight, before I shut the lights down. If I really was seeing radicals, that would sure have been fast – they were set out to germinate only yesterday!
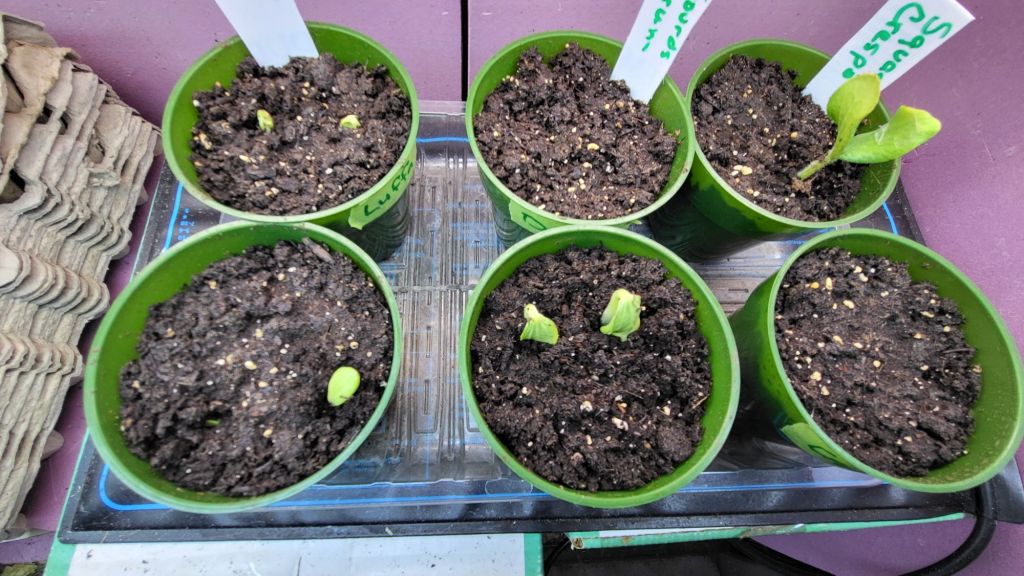
The first seedling to break soil surface was a drum gourd – one of the two in the middle pot – but then a Crespo Squash, on the right, burst through and exploded out of the soil. It seems like every time I look at the pots, there’s more visible growth.
What I’m really happy about is that not one of the seedlings emerged with the outer shell of the seed stuck on the leaves. Last year, there was more than a few times that I had to very carefully remove the shell, because the seed leaves were being killed off. As careful as I was, sometimes pieces of the leaves would break off, because the shells were so tightly encasing them.
I really like this pre-germinating technique!
The heat mat will need to be unplugged very soon. I won’t move them off right away, as I need to arrange space. I won’t need it until I start more seeds.
This weekend will be 7 weeks before our last average frost date. I will go through some of my seeds to see what I want to start first. The seeds we have left are pretty much all supposed to be started 3-4 weeks before last frost, but if I started all the ones I want to, I’ll run out of space in no time at all – and I will have way too many things that need to be transplanted, all at once. So I plan to stagger them.
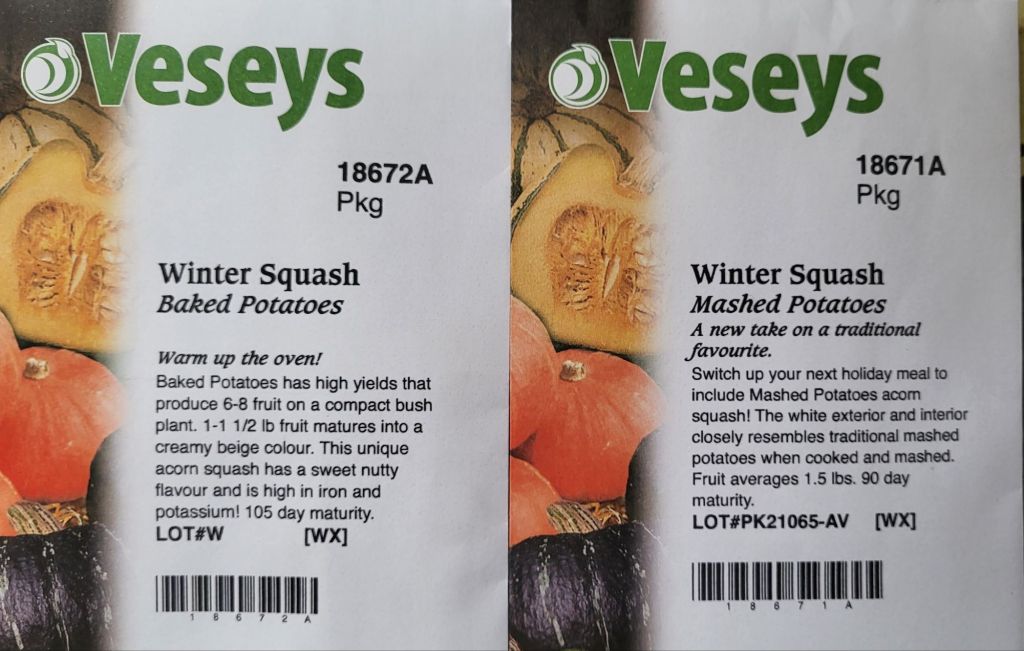
I might even start some of these.
Baked Potato SquashMashed Potato squash
I had to go to town today and finally picked up the mail. There were probably in and waiting for a while. Since we have so many varieties of winter squash seeds, we will probably start just a couple of seeds of each. At this point, we’re still after trying out different types to see what we like the most, and will then probably drop it down to one or two varieties.
Who am I kidding. We’ll probably be constantly trying new ones! Just maybe not quite so many different types, all at the same time.
That’s one thing about having the luxury of space like we do. We can spare some to try growing new things we don’t even know if we’ll like, yet.
Okay, so I’m really a week early for this, but I decided to start more seeds, anyhow!
It was also an excuse to finally get my video making software up and running on the new computer. That was far more complicated than it should have been, but once it was all set up, everything went well.
Plus, PBC makes a cameo appearance.
This time, I started the three varieties of short season bell peppers left over from last year; Early Sunsation, Dragonfly and Early Summer. When it comes time to transplanting them outdoors, we need to try a completely different location. Definitely well away from those trees along the north side of the low raised garden beds! Hopefully, by starting them indoors this early, as well as planting them in a better location, we will actually get ripe peppers to try. With the peppers we started last month, this will make for 6 varieties, only one of which was able to ripen outdoors last year. None of the seeds are new.
I ended up starting 4 varieties of tomatoes. We were intending to only plant a couple varieties, originally; one paste tomato variety and one cherry tomato variety for fresh eating. Then we got some free seeds I wanted to try, too. When going through the tomato seeds we had, I decided to grow the Chocolate Cherry tomatoes again. I used the new seed starting trays for the tomatoes, which have only 12 cells, so I’m going for more variety over quantity of plants. I know the cherry tomatoes should be prolific (if they do well this year), but the free Forme de Coeur we got are also supposed to be quite prolific. I planted only 2 seeds per cell. If we end up with only a few plants of each variety, all together should be adequate to our needs. If we do end up with a high germination rate, I’ll might thin by transplanting, but we’ll see when the time comes.
The San Marzano tomatoes went into my remaining new style of tray I got this year, with the larger, deeper cells. There weren’t a lot of seeds in the package, though, and I used them all up. I filled the cells only half way for now, and will top them up as the seedlings get bigger. With this, if we do have a high enough germination rate that they’ll need thinning, I will definitely thin by transplanting. As it is, I only had enough seeds to plant a pair of seeds in two rows, and the last row got only one seed each. It’s entirely possible that thinning won’t even be an issue.
Last of all, I started some Butterfly Flower, which is an orange variety of milkweed. That one had plenty of seeds, so I might also try direct sowing in the spring, too. I had a small tray with Jiffy Pellets left over from last year, so I used that. The seeds are pretty big, compared to all the others I started today, and each pellet got only one seed each. That’s still a dozen seeds, so not bad. Since these are perennials, we will need to be selective on where we transplant these.
Starting these seeds meant a bit of rearranging needed to happen. The seeds starting in the Red Solo cups were still in the big aquarium greenhouse, and that was going to be needed for the large tray of tomatoes.
Zero oregano seeds germinated, so I took those cups out completely. With the Purple Beauty bell peppers, one cup had all 4 seeds germinate, while the other had none, so I transplanted two of them into the empty cup. The German Winter Thyme doesn’t seem to be growing much bigger. I’m not sure what to make of that. The bin with these went into the mini greenhouse in front of the window. The two trays with the LED grow lights on them went into the mini greenhouse as well, and are now plugged into their USB cables. For now, I can still use the remaining three lights to supplement the tray with the eggplants and hot peppers.
The trays with the tomatoes and peppers are set up above the heat vent. Hopefully, that will be enough, because we’ve only got one heat mat, and that’s now being used with the San Marzano tomatoes. The milkweed is in the big aquarium greenhouse, too, but off on the side. These shouldn’t need the extra heat, anyhow, but the warmth from the lights themselves should be adequate for them.
Now I’m really going to be getting antsy. We are at 11 weeks before last frost and with these seeds started, the seeds I have left don’t need to be started until 2-4 weeks before our last frost date. Unless I decide to start some gourds, but even they all are recommended for starting at 2-4 weeks. That means having to wait until the start of May, at the earliest!
Well, before then, I’m sure some things will need to be potted up or something, so I should still be able to get my gardening fix! 😂😂
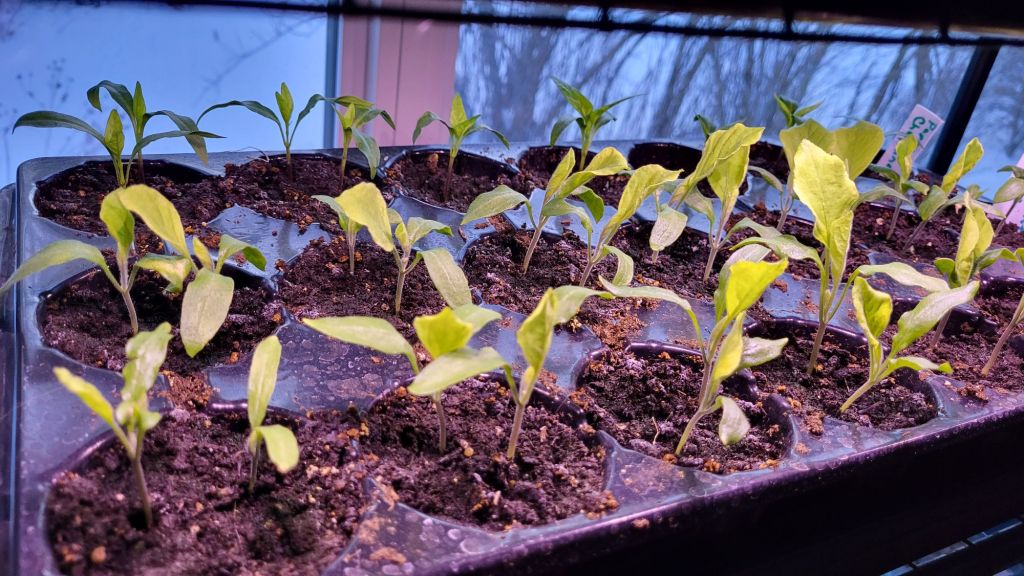
I took this picture after turning on the LED grow lights, but before turning on the bright shop lights. The LED lights are only along one edge of the shelf above, and I had them over the peppers for a while, but I’ve since rotated the tray, so the eggplants can be under the grow lights for a while.
It’s getting to be time to thin out those eggplants, and a couple more peppers. Thinning out is always so hard for me. I keep wanting to thin by transplanting, since I don’t want to “waste” any seedlings. The thing is, we don’t need that many! We could probably do fine with maybe 3 or 4 of each plant, including the peppers. We certainly don’t have enough space for all of them!
In the big aquarium greenhouse, all three cups with the Sweet Chocolate peppers now have seedlings in them, though it’ll be a while before they’re at the stage that they need to be thinned. With the Purple Beauty peppers, the one cup now has 4 seeds germinating; one cup had 4 seeds planted in it, the other had 3 seeds – the last of our Purple Beauty seeds. The second cup has nothing germinating it, so for that variety, when it comes time to thin them, I will thin by transplanting. I’d like to have at least two surviving plants and, right now, there are four seedlings, so we’ll see how that works out. For now, I’m leaving them in the aquarium, but I’ve moved the red onions out and under the lights at the window. We’re not going to have many of those to transplant, compared to the yellow onions and the shallots.
I spent some time looking for replacement bulbs for one of our tank light fixtures. The one with a burnt out bulb holds 2 bulbs that are T5HO. Looking at the various hardware store website, I can find the bulbs, but at sizes ranging form 12 to 18 inches. We need 48 inch bulbs. The one place that had them, they were sold out.
I did, however, find replacement bulbs on the Veseys website. These are the bulbs they use in their grow light set ups. The price for a pair of fluorescent bulbs is quite affordable. They also have LED alternative bulbs that fit the same fixtures, which last much longer and use less power, but are more than triple the price. I’ll be sticking with the fluorescents!
I checked the other light fixture we have over the tank, and it uses a single T8 bulb. That bulb is still fine, but it’ll be a good idea to get some spares of that one, too.
In the next couple of weeks, we’ll need to start our next batches of seeds. Time to go over them and make some decisions.
Speaking of seeds, I’m considering making another seed order. I’d had an order with my T&T Seeds shopping cart when my computer died. By the time I logged back on to place an order it was, of course, no longer there. My daughter had requested a couple of squash to try and I remembered one of them. Talking to my daughter later, she asked about the second one I’d completely forgotten about. When looking for replacement bulbs on the Veseys site, I couldn’t resist looking at seeds, and realized they also have the type of squash my daughter was interested in. In fact, there are two similar ones. So now I’m thinking of getting those, too.
We already have SO many squash seeds right now, though, including a winter squash surprise mix. We don’t need more seeds!
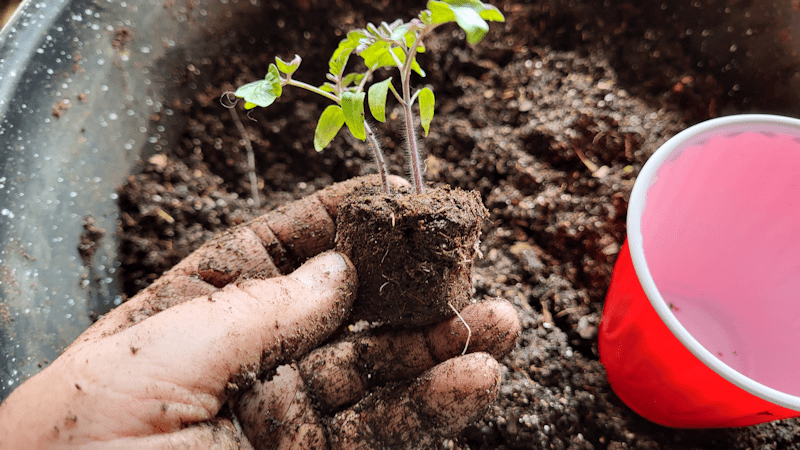
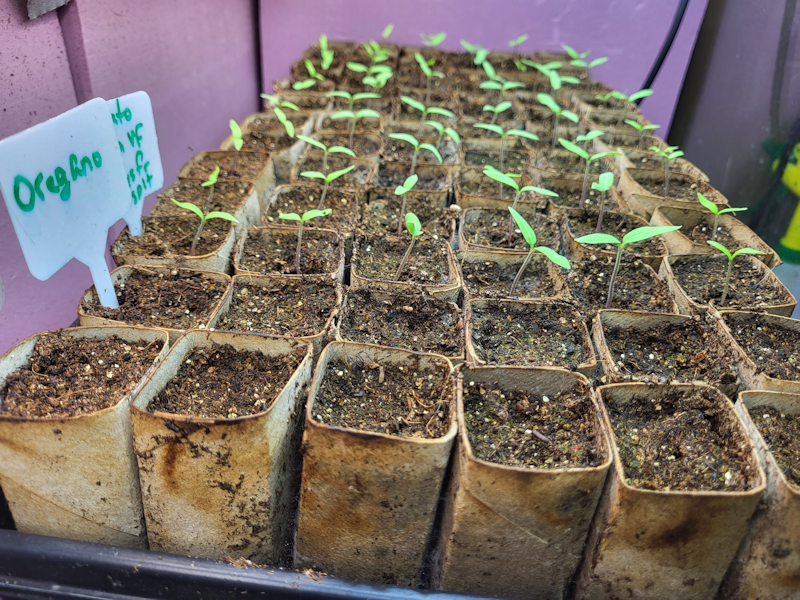
I was able to pick up more potting soil after helping my mother with errands yesterday, which means that today I got to finish potting up our tomato seedlings.
I actually was able to “pot up” the Black Beauty and Indigo Blue Chocolate tomatoes by topping the cups up with soil, first. Then I potted up the last 18 Roma VF tomatoes, which used up my last two plastic bins. I had to move things around, and move the onions right out, to fit everything. The taller seedlings hat to go either to the top of the mini greenhouse frame, or to the shelf, where the onions were. The rest are still short enough to fit in the mini greenhouse frame, though I’ve run out of space in there.
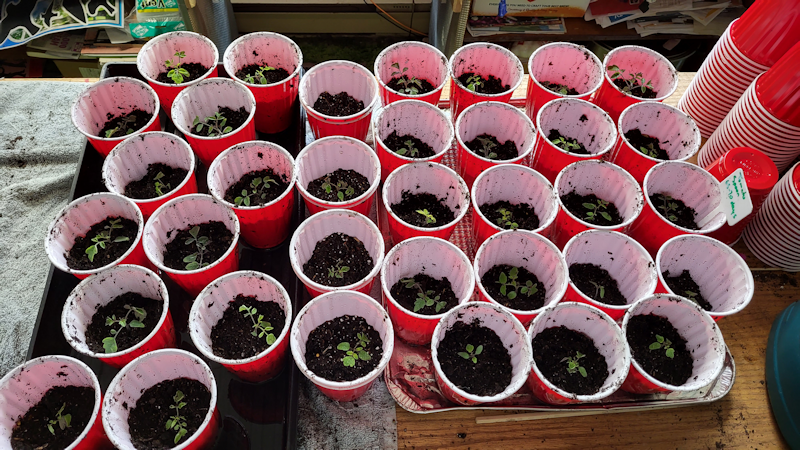
Next was the Spoon tomatoes.
I planted two seeds per pellet, and I made sure to do the ones that had pairs of seedlings first – though one of them had three! For each one, I removed the outer covering on the Jiffy pellets, then separated the seedlings. They’re still quite small, so the cups got filled only about half way.
I noticed the outer covering on the Jiffy Pellets is different this year. It’s more paper like. I remember it being more net-like, before. Those didn’t really break down, and I would find them in the garden while cleaning up at the end of the year. I’m guessing that has sometime to do with the change. With one pair of seedlings, a tomato had actually grown through the outer covering. As I was trying to gently remove it, I ended up breaking the tomato stem clean through! It’s a tomato, though, so I went ahead and planted the tomato top, anyhow. Changes are pretty good it’ll send out new roots and survive.
These are all 35 Spoon tomatoes (I’d mistakenly counted 36, before). I was able to fit 19 onto an oven liner tray, which will allow for bottom watering. The tray the Roma tomatoes had been in, which now had only the spearmint and oregano in it, could fit another dozen. That left only 4 that needed to be double cupped. I’ve run out of both trays and bins.
Those done, I did some more rearranging and removed off the watering can and extra cups, which allowed me to bring the onions back closer to the light. With all those, plus the bin with the Zucca melon and African Drum gourds in it, this surface is now completely full. I don’t even have my work space anymore! The light isn’t as good during the day on here but, early in the morning, it does actually get direct sunlight for a few hours.
The peppers in the large aquarium greenhouse still have new seeds germinating, so I won’t be potting those up for a while. Not that I have the space for it anymore!
I will need to monitor the overnight temperatures in the sun room over the next while. We’re supposed to warm up, but the overnight temperatures are still dipping below freezing. If the sun room can manage to stay at 6C/43F or warmer during the night, I should be able to at least move the onions over. They are about the only thing we’ve started indoors that can handle cooler temperatures. I’d love to be able to move the biggest plants out, which is mostly the gourds and Zucca melon, but they are the most cold sensitive plants we’ve got right now. Daytime temperatures in the sun room have been reaching as high as 20C/68F, which would be great as long as it didn’t drop too far. The times I’ve checked it through the bathroom window at night, I’ve seen the thermometer at around 10C/50F, which would be acceptable, I think. Plus, we’d be closing the doors overnight to keep the yard cats out of the plants, which means it would stay warmer overnight, too.
The cats are not going to be happy, losing their favourite bed on the swing bench, and private dining areas! I’ll be happy to not have skunks and racoons going in there anymore!
All in good time, though. It’s still only April, and a lot of these can’t get transplanted until the middle of June!
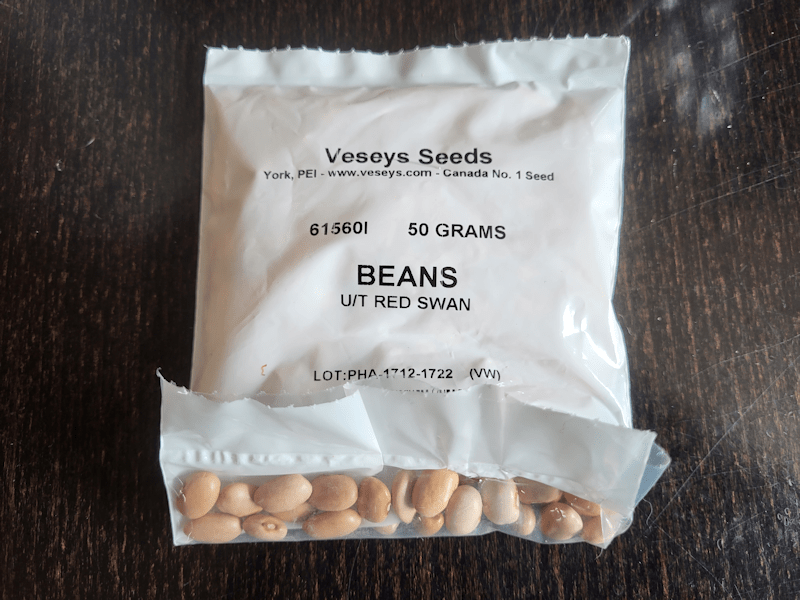
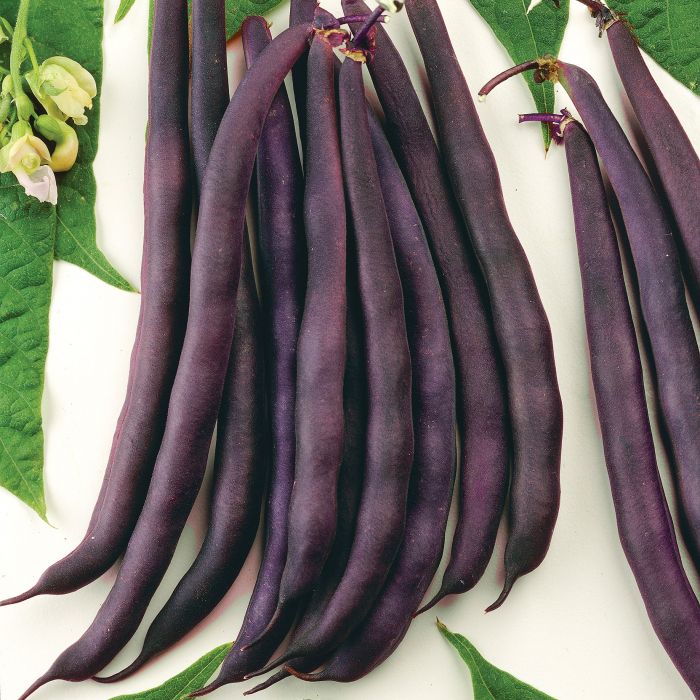
Our last packet of seeds that were backordered from Veseys finally came on. Or, I should say, I finally picked them up. I’m pretty sure they arrived last week. We just weren’t able to get out while the post office was open.
Wow! I just looked them up at Veseys, and boy am I glad I ordered them so early! The price has really gone up since then! This is the description for them.
Stringless and unique. Red Swan is a great fresh or cooking bean that is stringless! Bred by crossing a pinto and bush bean, Red swan blew our trial staff away with its yields and ornamental presence. Pods emerge red and mature to rose-purple at 5-6″ long. Red swan kept producing late into the season for multiple harvests and pods hold onto their flavour well at every size. Matures in 60 days.
We have had good results with purple things – beans, lettuces, carrots – so I hope these “red” beans will also do well. Plus, it’s a dual purpose bean. I should remember to plant half of them for a dry storage bean, and the other half for picking fresh.
Meanwhile, here is how some of our seedlings are doing.
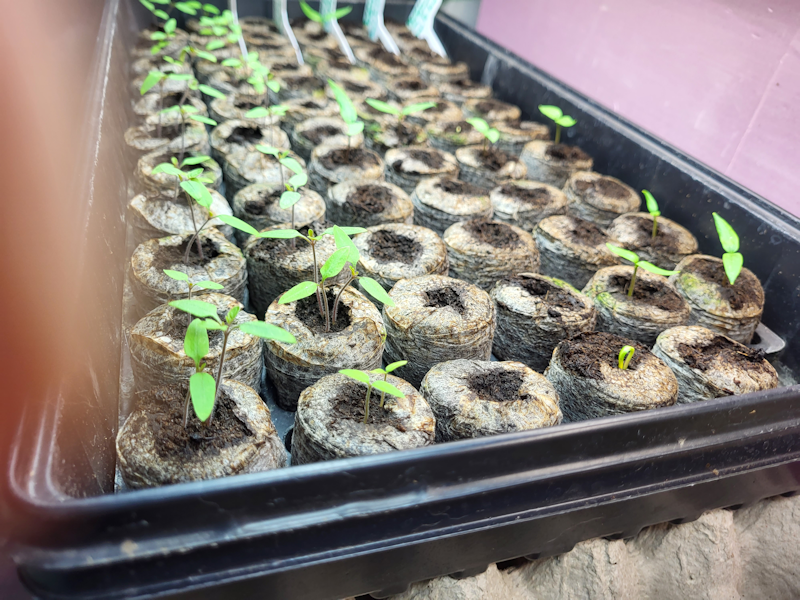
The trays in the big aquarium greenhouse are doing well. The germination rate for the Roma VF tomatoes is really high! So if the germination rate for the Spoon tomatoes, and some of those seeds were 2 years old! Still no herbs, but at least there are more peppers starting to show up. I’ve read that peppers can take up to 21 days to germinate, so I hope we will have more showing up. Especially with the cayenne. There’s still only one of those.
Ugh. My phone focused on the wrong place! Ah, well.
I am just amazed by that one zucca melon on the right! Not only by how tall it’s getting, but that its stem it so strong and holding itself upright, with no support! Last year, they never got this big, even after transplanting. They have such a huge fruit, it’s interesting to see that this is a climbing vine. I’ve had to make sure the tendrils don’t wrap around anything.
There are still just the two of them, though, and just two African Drum gourds, even though I did plant more seeds. We did bring a heater into the living room, but can only use it when someone is around to supervise, so while we’re able to get the room warmer, it may still not be enough to warm up the growing medium. The Crespo squash are looking good, though, with one still in its original pot, and the three that were thinned by dividing.
As for the rest, still no Classic eggplant, and none of the reseeded Little Finger eggplant or luffa have terminated. There are more tiny strawberries emerging, and I think it’s about time to pot up the Indigo Blue Chocolate tomatoes.
I might have to change up how the lights are over the seedlings. This area gets some good sunlight in the mornings, but the more trays are in the mini greenhouse frame, the less light there is for the lower trays. I have to find some way for the lights to reach the lower trays a bit better. They seem to be doing okay so far, though. I’ve been switching them around and rotating them every couple of days or so, but as we take more trays out of the aquarium greenhouses, I won’t have the room do to that for long. We’ll also have to find more surface area for trays; the potted up tomatoes are going to take up a fair bit of space!
While bringing the plants indoors, my daughter remembered to shake the blooming Wonderberry plants against each other, to give them a chance to pollinate. I still don’t know of they’re self pollinating our not, but we’re doing it just in case. Then my daughter commented that it seems to be working. We have berries.
What????
It turns out all three of the plants are starting to form berries!
Of course, my camera didn’t want to focus on the ones I was trying to get a picture of. After the photo was uploaded, I noticed more I hadn’t seen.
The instructions I found for these said to start them indoors very early, which we did. Now it’s looking like they were started way too early! I have no idea how they will handle being transplanted outdoors, which still won’t happen for at least a week and a half.
They are looking strong and healthy in their pots. Though we did pot them up into larger pots that can be directly buried into the ground, they’ve gotten quite large, and now those pots look so small!
There’s not much we can do about that for now. We’ll just have to see how they do.
While uploading the picture of the berries, I realized I’d forgotten another picture I took of something I FINALLY managed to get done, while tending the burn barrel. I cut away the trees that were growing around, under and through the old Farm Hand tractor sitting in the outer yard. My brother thinks it can be fixed up, so I wanted to make sure it doesn’t end up like so many other old and abandoned antique equipment lying around.
I was able to get most of it cleared with a pair of loppers, including one surprisingly large maple that was growing through the engine compartment. There was one large maple in the back that I had to come back with the mini-chainsaw to cut away. This one was not only larger than all the others, it had formed around part of the tractor.
The dents in the trunk piece are from growing around the bottom corner of the hydraulic fluid tank, and the hose attached to it.
Maple suckers will grow back, but it will be easier to keep clear, now that the big ones are out.
It’s a shame no one’s been able to keep this old crank-start tractor up. It’s been sitting so long, you can see lichen growing on the tank! There’s lichen growing all over it. As you can see, the hoses are degrading, too, and it’s all rusted. The front end loader attachment is so covered with moss and grasses, I can’t even tell which attachment is on it.
I’m glad I managed to at least get this job done. It’s been on my to-do list for three years!
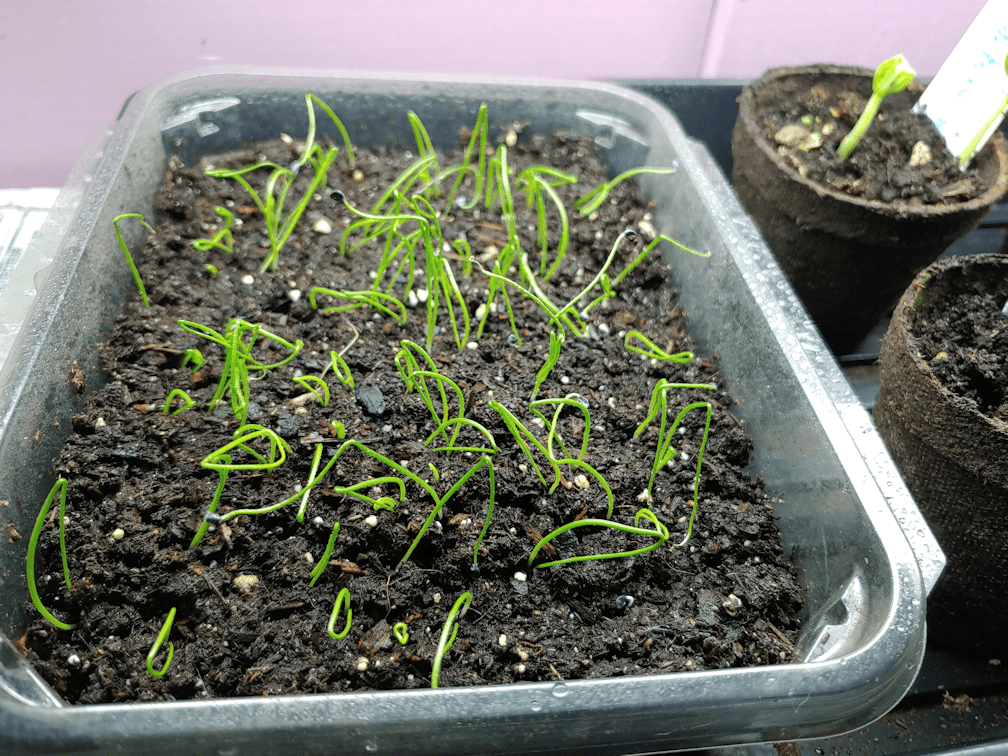
Switching up the seedling trays was definitely helpful for the newly germinated gourds!
It’s amazing how much growth can be seen, sometime in just a few hours! These still had their tips mostly in the soil when I checked them last night. The two Canteen gourds on the right were able to lift out of the soil without any issues, but the two on the left still had their seed covers stuck on the leaves. One slid off fairly easily, but I ended up tearing the leaf tips off to get the other one off. It just did not want to let go, and the whole thing wanted to come up by the roots when I tried to remove it!
We still have just that one little Wonderberry seedling in the back.
The shallots are happier in the aquarium greenhouse, too, and area starting to grow straight up again, instead of leaning towards the living room window, while in the mini-greenhouse.
I’m still a little concerned about some of the seedlings in the mini-greenhouse. Some are doing better than others, but it’s not an ideal set up for them. They need better light and more fresh air, but we can’t give them that and keep the cats out at the same time. :-( Hopefully, they’ll last long enough that we can transfer them to the sun room, even if it means setting up the heat bulb again. But then, we’ll have outside cats to deal with, too! :-( Gotta get the heated water bowl that’s still working outside, so we can close the doors again.