Getting cozy (crochet talk)

One of my favourite crafts to do is to crochet. I am even a teacher, certified with the Crochet Guild of America, and quite enjoyed doing classes, back in the day.

These days, I don’t crochet very much, partly because my hands have become so rough, most yarns catch on my fingers, even pulling the loop off my hook at times. I don’t like the idea of working with high end, $30 skeins of yarn, only to have my hands catch on the strands and tear them apart. And no; working with gloves on is not an option!

Also, hand lotion does butkiss.

One kind of yarn that doesn’t do that is cotton. So when my daughter came to me with a request for a basket cozy for her teas, it was the perfect project for some nice, sturdy cotton!

With a special appearance from Ginger!

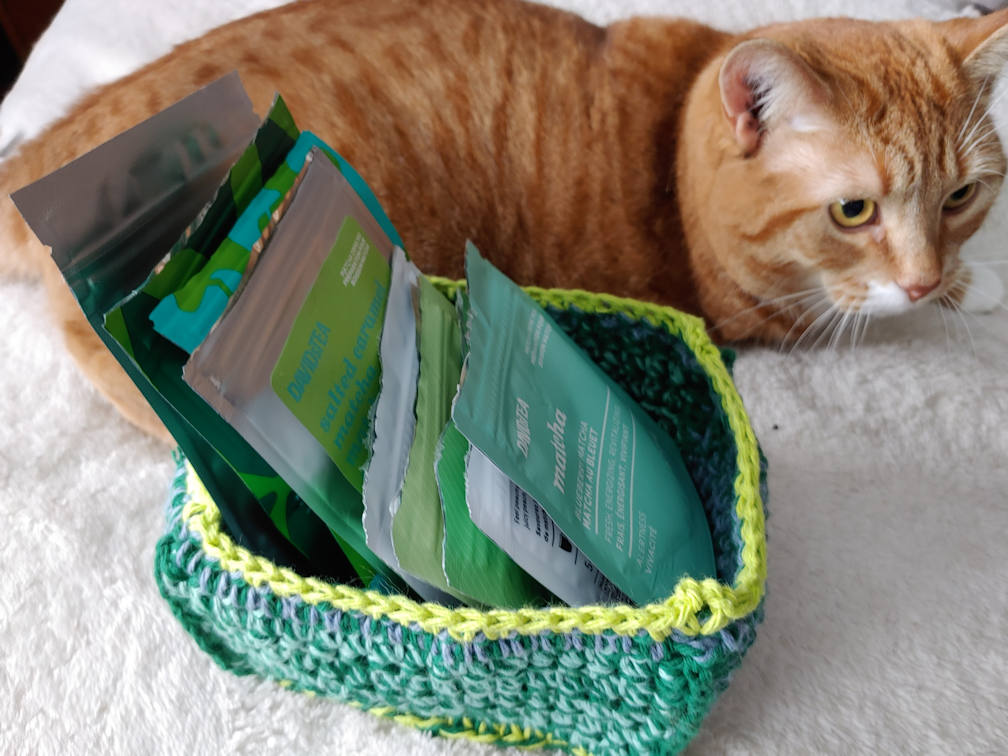
For her birthday, we got her a set for making matcha, so of course she had to get a nice selection of matcha blends to use it with. Taking advantage of a sale at David’s Tea, she was able to get a whole bunch of mixes, plus some straight up matcha. I didn’t realize the basket was for just her matcha teas, and used what colours I had. They just happened to suit the intended contents!

This was done with two strands on the hook, with the main colour a darker green, because I had enough of that yarn for the entire project. The other colours I had were in much smaller amounts.

To make this box, I started by making a flat rectangle for the base, a couple of rows smaller than the size I wanted, in single crochet. Then the base got a round of single crochet on all sides, which brought it to the desired finished size. Then, a loose round of slip stitch was worked into that last round. The slip stitches formed the base the sides were worked from. Each side was worked individually. I did the long sides, first, using a mint green I had just barely enough of, then switched to a sort of periwinkle blue for the short sides. I used just the main colour, in a single strand, to stitch the corners together with a modified single crochet. Then I went back to the blue and green combination to go all around the top to tidy it up. Finally, I used a single strand of bright green and a smaller hook, to tighten up that top, so it won’t flop around as much. To keep the corners from becoming rounded, I just added a little picot that doubled as decoration.

As the sides were worked from the slip stitched loops on the base, that left open loops facing outwards. Switching back to the larger hook and using the bright green with the main grain, I did one last round of single crochet into those loops, to make the base a bit more stable, and balance out that bright green at the top.

My daughter was very happy with it!

It was so much fun, today I made another tea cozy. This time, for one of my tea cups.

I think these were actually sold as soup cups. It’s about twice the size of your basic coffee mug.

Normally, when I make cup cozies, I make them with a strap that goes through the handle and buttons into place on the other side. It not only holds the cozy in place, but it protects your fingers from coming in contact with a scalding hot cup. Which is a big deal for people with nerve damage in their hands that prevents them from feeling heat!

That design works great with regular mugs, but with a cup that’s short and fat (like me!), they would slide off on the side opposite the handle.

So for this one, I made an over-the-handle loop. I started with a round, flat base that was just barely the same size as the bottom of the cup, then worked a couple of rounds without increasing, to start building up the sides. After that, I worked in rows, leaving a 5 stitch gap for the handle. I had very little of this yarn, and Nosencrantz had gotten to the purple, chewing through in several places, so I used the little bits for the stripes. Between the two colours, I managed to finish it. :-D

After finishing with the last two rows in blue, I joined the purple at the handle gap, working down from the right hand side, then around to the top of the other side. This closed up the handle gap from a 5 stitch opening to a 3 stitch opening. After making a little 3 chain loop at the corner, I then slip stitched into the last row of blue, all the way around, with the last slip stitch worked into the first stitch in purple. Next, I made a chain 3 to close the gap, slip stitching into the 3 chain loop at the opposite corner, then finishing off the yarn.

The slip stitches keep the top edge from being too stretchy, and the loop stretched over the handle pulls it all in. There is no way this cozy is going to slide off the other side!

I’m using it right now and, in retrospect, I would change one thing. I would make it one row shorter. That would require making the handle loop a chain or two longer to reach over the handle, without too much strain on the strands. When drinking from the cup, the cozy is juuuust tall enough that it gets in the way of my lips a bit.

We have three more cups like this (alas, our fourth one broke). I think I have enough cotton yarn to tweak it a bit and make a couple more. :-)

I really love doing structural crochet. I also love making useful, rather than decorative, things. I’m glad I can still work with cotton, because it’s perfect for both.

The Re-Farmer

This year’s Christmas decorations

Every year, I used to make new decorations for our Christmas tree, and to share with family. We had a multi-year hiatus for a number of reasons, including moving here, but I’ve started the tradition up again.

Each year, I try to do something different, hopefully learn a new skill, and use materials at hand. This year, I started with…

… cans.

Specifically, the cans from Costco’s canned chicken. I liked their size.

My daughter was kind enough to spray paint them gold for me, which took several days and several layers. Paint doesn’t like to cure when it’s cold, and she ended up having to do it in the old basement – forgetting that the furnace is there. :-D The paint didn’t want to adhere to the metal very well, but once it set, it was good.

Those were turned into…

… these.

Most of the materials used were from a dollar store. I tried to find really tiny Christmas trees but ended up getting some floral wire made to look like sprigs. I cut and twisted some together to make little trees, two of which are behind the little church. The ribbon, birds, gifts, bells, glitter paper, wooden stars and fake snow were also from the dollar store. I already had metallic card stock that I used to create platforms, as well as the other wooden pieces. A family member gifted me with a storage box fill of little wooden pieces, years ago, and I finally got to use some!

I did some wood burning on the starts and the church. My daughter painted the church and the books. I just love how the books look!

You can see in the flash picture that she used metallic gold on the books. She also used some metallic paint for details on the church. When I tried to find things small enough for the wreath behind the gifts, she dug around and find some teeny, tiny “gem” shapes she had saved from somewhere. I ended up using several different types of adhesives I happened to have, to hold everything in place. As long as they did the job and dried clear, I wasn’t too fussy!

These are too large to hang on our little Christmas tree, but they will be perfect to add to the lights and garlands we have running across the dining room cabinets at the ceiling.

With having to wait for paint to cure and some adhesives to dry, this took a lot longer than I originally expected. The most difficult part was cutting holes into the metal, then threading cord through for the hangers. I couldn’t be sure where to place the holes until after the insides were done. The church steeple was particularly awkward! Craft tweezers came in very handy! The bells needed their own hole, and I had to figure out how to hang those, and ended up using a piece of the tree-sprig floral wire, then using an extra wide ribbon to edge it, to make sure the part that’s on top was well secured.

I’m quite happy with the finished result!

The Re-Farmer

Wood carving: completing the set

Having made an olive server, using my new gouge, I thought it would be good to use some of the remaining wood to make a spreader and olive fork.

After cutting a length off, the first thing I did was split the wood down the middle.

Here, you can clearly see the rotted out core that I had to work around with the olive server.

The utensils I wanted to make would be well away from that core, though, so this was okay. I split off some excess wood from the opposite sides, then debarked the remains.

In sketching out the spreader and fork, I decided not to include the knot at one end. It may have added visual interest, but I just didn’t want to fight with it.

Once rough sketches were made, I rough cut away excess wood. A band saw would make the job easier, but I don’t have one that works, so I made do with a little Japanese pull saw that I got last summer, and a coping saw. The coping saw has been a problem, as it won’t lock at the handle end anymore, so it tries to rotate while I’m using it!

For the spreader, I added another rough sketch on what would become the top. I wanted a slightly wider bit at the start of the spreader blade as a sort of stopper, more for visual interest than anything else. I wasn’t too worried about matching the sketch closely, since it would depend more on how much I had to cut away from the core of the wood.

Next up was using carving blades to do more shaping and trim away excess wood at the core, to take out that rotten strip.

Then I broke out the Dremel.

After trying out different tips, I ended up just using the sanding tips. They are a course grit and did a good job of taking off the excess wood, grinding away the remaining saw cuts, and shaping it more.

Then it was back to the carving knives for more delicate clean up and shaping, then sanding.

Ready for oiling!

That knot in the blade was why I switched to the Dremel. I like how it looks in there, but my goodness, it was brutal to work around!

Next, the olive fork.

For this, I just went straight to the Dremel and used the sanding tips to rough shape it.

I then used carving knives to clean it up and work on the tines end to narrow it down even more. Once it reached the point where I would otherwise have started sanding, I made the tines.

My Dremel set includes tips for carving and engraving, and I used one of them to drill a hole where I wanted the tines to join. Then I used a cutting wheel down the length of it.

There was a knot right in the middle. The Dremel cutter did NOT like going through that knot!! :-D

After that, it was back to doing more detailed shaping until it was ready to sand.

Doing those tines was a real pain in the butt!

It actually worked out much better than I thought it would, though.

For both the spreader and the olive fork, I worked my way through increasingly fine grits of sandpaper, finishing with 220 grit. Because that’s the finest grit sandpaper I have.

There they are, ready for oiling!

You can see the edges of the knot that was cut through to make the tines much more clearly, after oiling!

The slightly wider bit on the spreader turned out to be a perfect thumb rest!

When sanding the blade of the spreader, I actually had to be a careful not to make it too sharp. It’s meant for spreading, not cutting! It’s remarkable how sharp a wooden blade can get.

A closer look at the tines of the olive fork.

Then I wiped off all the sanding dust that got onto the oiled surface! :-D

They fit! I had not actually planned this, but it makes sense, since they’re from the same piece of wood, but I’m really happy to discover they fit so perfectly inside the olive server.

I am quite pleased with these. Not only with how they turned out, but how quickly they worked up, too.

Now to think about what to make next! :-)

The Re-Farmer

Well, it’s up and done!

The Christmas tree is decorated as much as it’s going to be, and the base is covered.

Theoretically, the cats can still get inside the planter stand near the floor, but now that the stand it stabilized, it should be okay if they do. The tree skirt will hopefully be too “in the way” for them to want to jump up the stand anymore. Hopefully, they won’t try to climb it, instead!

Tonight will be the big test. While we are all in bed, will the cats leave it alone?

We shall see!

The Re-Farmer