The yellow celery (Golden Boy celery) had outgrown their tray. They needed potting up.
The question was, how to do that without damaging their roots?
That’s the down side of scatter sowing such tiny seeds. Especially when the germination rate was so high!
I decided the best way to do it was to set them into a seed snail roll.
As with the onions, I wanted to use potting soil rather than a soilless seed starting mix. That meant, more sifting. Which had its own challenge. Wearing a dust mask again was out of the question. I just can’t wear a mask anymore, and trying to last time was really awful. Yet not having some sort of protection was also out of the question because of how much dust sifting the dry potting soil would raise up.
My solution turned out to be pretty simple. The clear plastic garbage bag I use to protect my work surface is large enough to cover the entire bucket, and have enough slack that I could grip the handles of the colander I am using as a sifter and shake it. Yes, small amounts of dust did come out from below, but this was at floor level and it wasn’t an issue.
Before I started, I emptied the old, cracked tray I was using to collect the big pieces. This is what I got.
The depth of the soil barely reached my second knuckles. Meanwhile, just look at all those pieces that got sifted out! Totally insane. This bag was purchased last year, and I’ve heard that a lot of people were having the same issue. A few sticks is pretty normal, but nothing to this extent. It wasn’t even just one brand, either. Hopefully, the companies have gotten better at making sure their raw material is properly composted before bagging it up and sending it out!
The first picture is the “before” shot. You can see how dense they are. The tray is bottom watered, and roots are showing out the opening. Roots that would be quite entangled. How to get the seedlings out and apart, then transplanted, gently?
In the second picture, you can see what I decided to do. I had a tray (a thoroughly cleaned and repurposed meat tray that we’ve had for a few years now) that was wider and flat. I carefully moved the whole clump over into the tray, then very gently started to loosen the seed starting mix to untangle and free up the roots a bit.
Then I got some hot water and thoroughly moistened the sifted soil. The seed starting mix the seedlings was in was really quite cold. Not good! I wanted to transplant them into soil that was at least a bit on the warm side.
I had prepared a strip of packing material – this time, using a clear repair tape I happen to have, instead of painters tape, to join three sections to make one long strip. I started out by laying a thin layer of soil over about 3/4 of the strip, as I wasn’t sure just how much of it I would need to use. Then it was time to VERY carefully and gently pull apart and set out the seedlings.
I was able to get all of them in, and did add more soil to the roll to fit them all.
The remaining seed starting mix got added to the bucket of sifted soil. I added more hot water and mixed it all up before adding another layer of soil to the roll; just enough to cover the roots.
Before rolling it, I added strips of masking tape to the end, so it just needed to be lifted into place, with the tape already handy to close up the roll.
With the two layers of soil in there, the result was a pretty thick roll. I could use the plastic underneath to hold the soil in at the bottom, but there wasn’t much that could be done at the top, and soil was falling out. Once it was taped closed and the roll set upright, I found a few seedlings had fallen out with the soil. I found some gaps and carefully set them back in. I then used some of the soil that fell out to fill in the top of the roll and support some of the seedlings that seemed to need it more.
Now, it’s back in the tray under the shop light. Both trays were empty of water, so I added warm water to the trays to maintain bottom watering.
While I was doing all this, I had the heater going. It’s aimed under the shelf I have the trays on. The thermometer is kept at the far end, and the temperature was only about 13C/55F. Holding my hand under the shelf, though, I could feel it was a lot warmer just under the trays. So I set up the thermometer next to the tray with the snail roll, which is at the far end from where the heater is.
The first picture shows the “potted up” celery back in their tray. After setting up and leaving the thermometer for a while, I got a reading, which you can see in the next photo above.
It’s just barely touching 25C/77F! This is great, as cold is the big issue here. The ambient temperature really should be about 20-24C/68-75F
Since the heat is under the trays, that will warm up any water that is in them which, in turn, will warm up the soil and seed starter mixes. Not by a lot, but enough to hopefully keep the chill off the roots. Plus, it will be better for the fresh pepper and eggplant seeds I sowed to hopefully replace the ones eaten by a mouse or whatever it was.
The hygrometer reading is low, though. Ideally, it should be between 50% and 60% – even 70% for some plants. Hopefully, the bottom watering and occasional misting helps counter the ambient humidity at least a bit.
The celery seedlings now have a nice deep roll to spread their roots into, so they should be good in there for a while.
Hopefully, they will survive this! I seem to remember that I used the entire packet of seeds for this, so there’s no trying again if they don’t make it.
The first thing I noticed when I started it this morning was that the clock’s time was wrong. I’d reset it yesterday. Which means, we lost power to the console during the night, and it came back.
As my daughter and I were starting the drive, we were talking about what’s been going on with the truck, and how weird it was for the tire warning message and light to not be there anymore.
Then, just shy of the highway, less than 2 miles from home, both the light and the message came on.
*sigh*
We had left earlier than usual to meet someone from the rescue to get our top loading cat carrier back, but also to stop in the town my mother is in (again). We picked up a couple of energy drinks and sandwiches for breakfast, then went to the feed store to pick up the lysine. They were still closed, though, so we kept on going to where we were arranged to meet up. We had plenty of time to eat our sandwiches and just sit and talk.
Once we had the carrier again (they even cleaned it!), it was off to the city and Costco.
I could not believe how full the parking lot was, for a Wednesday morning! It was really busy in the store, but the bigger surprise was as we left. There was a huge line to the customer service desk, running all the way to the main doors outside. I don’t usually see that kind of line except after Christmas.
Still, we got what we needed to get here; anything left on our list will be done on our next Walmart run.
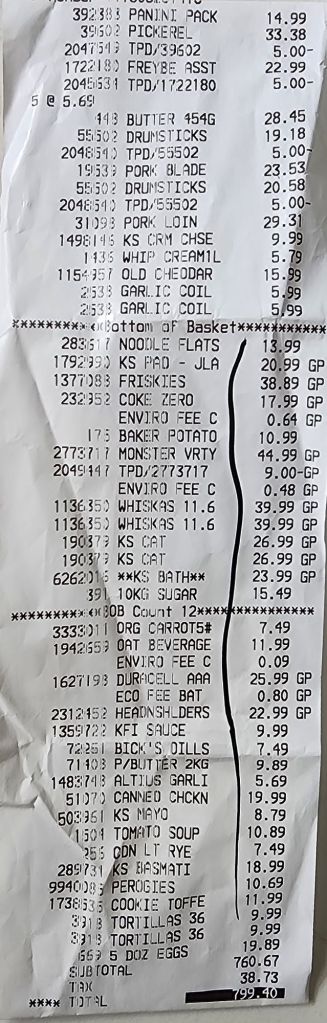
There is is. $760.67, before taxes. After the cart was re-loaded, we had to stop and my daughter reorganized things. Because of the crowds and line to the Customer Service desk, we had to do it outside. As our stuff was being scanned, a guy showed up to load the cart and he basically just threw everything onto the flat cart with no attempt to be secure or even logical about it. My daughter and I are both very keen on packing and stacking things well, so it was hard to watch! 😄
This picture was taken before my daughter was done reorganizing so no, those eggs did not stay balanced on top of the pierogi at the end of the cart!! 😄
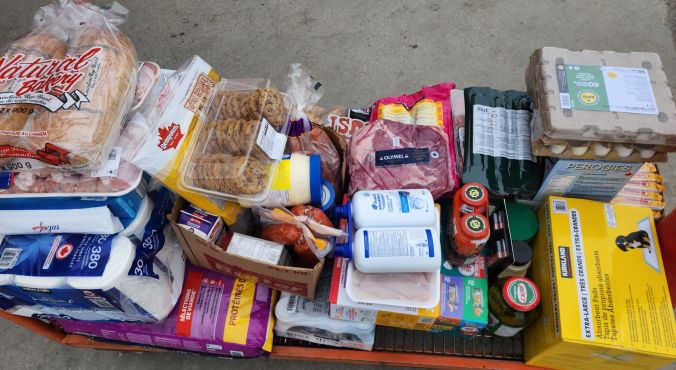
This is what we got today.
We did get cat supplies, though with the generous donation, we should only need maybe one more 40 pound bag of kibble before the end of the month for the outside cats. We didn’t need any for the inside cats, so the two 9kg and two 11.6kg bags are all for the outside cats. I think the price on the 11.6 kg bags went up. Either that, or they were on sale that last time I remember getting them.
We also got a case of canned cat food and a case of XL puppy pads. We now have enough canned cat foot that we won’t need to pick up more for the rest of the month. Usually, I get a couple smaller cases at Walmart to have enough for the month.
For non-food items, we got our toilet paper, AAA batteries, and some more Head and Shoulders that gets used as an anti-fungal body wash.
For beverages, we got a case of Coke Zero and a case of Monster. The Monster variety pack had replaced one of the flavours from before, and it’s to one I like but haven’t been seeing in stores much at all lately, so I’m happy. It was also on sale, so that was bonus. There is also a 3 pack of oat milk for the girls.
In dairy, we got a 4 pack of cream cheese, a carton of whipping cream, a block of Old Cheddar cheese, plus 5 pounds of butter.
For meat and other protein, there is a double flat of 60 eggs, a panini pack of sandwich meats, some pickerel fillets for the girls, two big packs of drumsticks that were $5 off at checkout, a pork blade, a pork loin, and a variety pack of dry sausages that was on sale. I also got two garlic coils, as the price was almost half what they are, locally. Oh, and some canned chicken. The price on that seems to be staying under $20 for six cans of late.
There is also a bag of carrots – organic, but they were on sale, and we didn’t see any non-organic ones anywhere, a 20 pound bag of Russet potatoes, frozen perogies, a case of ramen noodles, a bag of basmati rice, a case of tomato soup, large jars of mayo, peanut butter, and pickles. There is a two pack of butter chicken sauce, a shaker of powdered garlic (which, oddly, had more product for a lower price than the granulated garlic I usually get), and a large bag of granulated sugar.
For bread products, I got a 2 pack of rye bread and we got two packs of tortilla wraps. Finally, as a treat, my daughter selected from toffee and chocolate chip cookies.
Note that we did NOT get any beef. We haven’t been able to afford beef at Costco for a while, now. Lately, I’ve been picking up the odd package on sale, locally. The last couple of times I was in town because of the truck, I got some stew meat and some ground beef with sale prices much better than Costco these days.
Once the truck was loaded up, we filled the gas tank. Costco gas was at $1.239/L instead of $1.359/L everywhere else! It cost $51.69 to fill the tank.
On the way home, we stopped at the feed store and picked up the lysine. It came in adorable little 1kg buckets from a different brand this time. The price went up, so the two of them cost $67.20 after taxes. The containers I got before had been $20 each. Still better than buying it elsewhere.
When I saw the buckets, I commented on them, and that I would probably be keeping them to reuse. The woman behind the counter completely agreed with me – you can’t have too many buckets!
She also asked me if I was still wanting to get chicks.
I said yes, absolutely.
She asked if I was after a specific breed or anything like that, and I said I just want laying hens. She named several breeds, and I was fine with any of them. Then she asked about the date I’d want them, snowing the hatchery’s schedule on their white board.
There was no way we’d be ready for them in April! I told her, we need to be able to assemble the chicken coop first, which means, no snow on the ground. (Yes, I know; they’ll be in a brooder for weeks, first, but I still want to have the coop assembled and ready, before we get them.) So she put me down for the latest date they had, which is May 27. She has two other people who are interested in getting a smaller number of chicks than the 24 chick minimum the hatchery sells them for. I told her that, with our coop, we can have a maximum of 10 chickens, so we can go under, but not more than 10. So she will talk to the other two people and see what can be worked out to split an order of chicks between us, as well as splitting the shipping costs. With three people, we’ll be paying $15 each for shipping instead of $45.
Hopefully, we’ll be able to work something out with the other two people and get it all arranged and ordered. I’m flexible on the delivery date, too, as long as it’s not in April! She said, all three of us have said we are flexible on things, so this should work out quite well.
My daughter had been waiting in the truck all this time, so once we were back on the road, I updated her about the chicks discussion.
I think she is actually starting to look forward to having chickens! My daughters had been very reticent about it. Especially her sister. They have online friends who keep chickens, and my older daughter had commented about chickens getting sick, and we wouldn’t be able to take them to a vet.
Well, no, but we would be getting what we need to treat them ourselves! The feed stores carry medications and supplements for chickens, as well as feed. There’s lots of info out there on treating chickens.
Then we got to talking about where to set up the coop.
Ideally, I’d like to have it where we can easily see it, which would be in the south yards. Most of it isn’t level, and some significant portions of it floods in the spring, so that likely won’t work. I mentioned I was thinking of having it sheltered in the maple grove, or even where we currently have a pile of maple logs from the trees cleared away from the roof. The ground under that log pile is quite level, and I can see it out my bedroom window. Inside the maple grove would be more sheltered and there are fairly level spots there.
My daughter suggested we set it up against the retaining wall blocks at the end of the old kitchen garden. I had considered that area, but it would have to be at the northernmost end, as the south end is next to an area that gets deeply flooded in the spring. It’s not as sheltered from the wind, but it does get more light than if it were in the maple grove.
The other thing to consider is being able to secure the coop from being blown over in high winds. We’ve previously talked about getting panels that we can set around the mesh sides on windy days. The roosts are under the floors of the nesting boxes, rather than inside. There are three nesting boxes, with access from outside, at each end of the coop. When we assemble it, I want to find a way to attach a couple of roosts in the space in front of the nesting boxes, so they can roost for the night indoors, and not be exposed to the wind.
Ultimately, though, where we set up the coop will be temporary. I still plan to have some sort of polytunnel or greenhouse of some sort over garden beds in the main garden area. The coop and chickens would spend the winter inside that. So while we will need to secure it to make sure it doesn’t get blown over in high winds, we still need to keep it mobile.
I quite enjoyed talking it out with my daughter!
Anyhow.
Once at home, I had to drive up to the house to unload. I had some concerns on whether or not I’d cleared away enough snow before my body gave out. Especially the area I pull into behind the garage, so I can back up to the house. Sure enough, while in 2 wheel drive, I got stuck. I switched to 4 wheel drive and was able to back up. It was hard to tell, but I think that shuddering had started up again, while I was reversing in 4 wheel drive. The distance was so short, though, I really couldn’t say for sure. I just made sure to switch back to 2 wheel drive as soon as I was stopped, so I wouldn’t forget later.
Then it was the assembly line to unload the truck into the house. Last of all, my daughter and I took the kibble bags into the old kitchen. The whole time, we were constantly needing to make sure Sir Robin didn’t get into the house! He so wants to be inside!
Once the last of it was done, I left my older daughter to put things away while I grabbed some hot water and did the outside cats early. My younger daughter took over doing the kibble while I topped up the water bowls. Once all the cats were distracted, I was able to drive the truck out of the yard. I only had to scoot two of them away, first!
So there was have it. Finally. Our Costco stock up trip is done!
We will still need to do the Walmart and Canadian Tire trips, but that’s not as urgent, and there isn’t a lot we need to get there.
What I do need to do is visit my mother! I am planning to do that tomorrow afternoon, so I’ll be calling her tonight to let her know. My sister should have been able to visit her today. Maybe. During the drive home, we hit some pretty crazy blowing snow conditions, but it did clear up before we got home. As I write this, we are at our predicted high of -13C/7F, but the wind chill is -28C/-18F
Oh, my! Not only are we warming up over the next few days but, as I write this, we’ve got a high of 6C/43F forecasted for Sunday! 6C!!!! Wouldn’t THAT be nice!!
So, tomorrow (Thursday), I visit my mother. The day after, I have my doctor’s appointment. Saturday, I want to make a trip to the dump. Just a regular garbage and recycling run, though; my mother’s old mattress and box spring, and the broken office chairs, will have to wait for another day. Monday, my daughter has a doctor’s appointment. After that we don’t have anything scheduled until my dentist appointment near the end of the month, but March is also a birthday month for my older daughter. For her special birthday dinner, she usually chooses Pizza Hut pizzas. So at least one more trip there (no one delivers where we live. 😄)
Well, our mechanic has said, we need to drive the truck often. Mechanically, it’s running fine, with the possible exception of the shuddering in 4 wheel drive that comes and goes. I can just keep it in 2 wheel drive until absolutely necessary. They’ve checked and re-checked, and they can’t find anything wrong that could be causing it. The weird electrical thing has only affected the console and radio. The dashboard display has not been affected.
It’s still hell on my nerves, though.
The main thing is, we have transportation again, AND we finally got our first stock up shopping trip done – a week later than usual!
I’m glad I didn’t decide to just wait until the post office reopened in the afternoon. I forgot today is Wednesday. The store the post office is in closes at noon, every Wednesday, for inventory.
I was expecting the chicken coop to come in several large boxes, but there was only one small box. Only one package slip in my mail box. No coop. There was no “attempted delivery” this morning at all.
Hmmm.
Something to look up when I got home, and after I checked out my new stuff.
Two new heat mats, two 4 light clamp lamps and one 5 light tripod pedestal lamp, with full spectrum lighting.
This gave me a chance to do a few things all at once.
Right now, my work table is covered with a gain self-healing cutting mat my darling husband got for me some time ago. Unfortunately, the heat mats make it warp. So I cut some pieces of half inch rigid insulation to size, to go under the heat mats.
The heat mat with the germinated plants in it got a piece of carboard between the mat and the tray as a buffer. Normally, I would stop using a heat mat as soon as the seeds germinated, but it’s so chilly in the basement, that’s not really an option. Especially since I will no longer use a light fixture that puts off a small amount of heat. The buffer will keep the seed starting mix warm, but not too warm.
The large celled tray now has a new heat mat under it. I’ve filled the last empty cells with seeds that were set to pre-germinate, even though they were not germinated yet. Then, just in case, I added a couple of fresh seeds into each cell. I did actually see a single Caspar eggplant starting to break through the surface, but nothing in any of the other cells. It’s entirely possible the seed starting mix, not being on a heat mate, but getting some heat from above, was too cold.
I also added new luffa seeds to the three Red Solo cups where nothing has shown yet, including the one where I couldn’t find the pre-germinated seed at all.
The new lights have a controller with several settings. There are five brightness settings – I put them at the highest. They can also adjust from red, blue or white light, or all three. I have it on all three. It can also be set to shut itself off after 6, 12 or 16 hours. I set it to 12 hours. Each lamp also came with an adapter, so they can be plugged in as usual, or can have USB. I have a power bar hanging above that has a couple of USB slots in it, so I decided to use that.
The only problem is that these are clamp lamps, and cannot stand on their own. Which means I had to move the tray set up to the front of the table for the lights to reach. Only at the front of the able is the surface narrow enough for the clamps. This worktable has a sheet of plywood on top of a narrower table top. The ends are too thick for the clamps.
With a full tray of cells, plus a second tray that’s only partially full, I set things up so that the full tray has five lights over it, and the other has only three.
I’ve still left the shop light above on. That light is manual, so I’ll need to shut it off and on, but that’s okay.
I am looking to pick up more seed starting mix when we are out and about tomorrow then, either on Friday or the weekend, I’ll start more seeds. Specifically, I’ll be starting herbs.
The tall light fixture will be set up in the living room. The onions in their seed snail rolls are getting plenty of light, with the shop light lowered to their level, but the other plants around them could really use better light! That room gets the morning light, and that’s it. It’s pretty dim, the rest of the day. We don’t have a lot of plants anymore, after repotting and donating most of them to the large animal rescue that took Poirot’s orphan kittens last summer. That, at least, will make it easier to give them proper lighting with this new lamp.
The lights themselves were very reasonably priced. The smaller lamps were under $25 each. It was actually cheaper for me to buy as a quantity of two separately, than to buy a single 2pk, which is weird. The larger lamp was under $40, regular price, and I got that one on a 10% off sale.
That done, I went looking to see what happened with that coop delivery.
Now, when placing the order, I was really surprised that would be delivered by Canada Post. When checking the tracking for the two packages I was expecting, they were the same. They even went through the same delivery depots at the same time, though the lights were ordered several days before the coop was.
Any time an order arrived, the trackers say “delivery attempted”. Of course, no delivery is attempted at all. The packages are just left at the post office for us to pick up with the regular mail.
Today, however, the coop’s tracking now said “undeliverable” and “location unknown”.
It also said, Fed Ex.
*sigh*
If I’d known is was going to be Fed Ex, I would have used our physical address. They have actually found us and delivered to us before.
I tried using the “contact shipper” link on Amazon, which took me to a page with a list of delivery companies.
None of them, Fed Ex.
So I went to their website and eventually found a customer service number to call.
After going through the robot sentinel, I actually got to talk to a real human being! Not only that, but he was awesome!
I gave him our physical address, including both the name and the numerical designation for our road. He put me on hold to work on it, then had to come back to ask more confirming questions. I told him, our address doesn’t exist on Google maps. He did, however, find a road with the numerical designation – but under the name of our municipality, not our little hamlet. So I had to explain that that section of road ends at a crossroad, then restarts a short distance off before continuing for several miles. It’s those several miles that are the empty void in the map, and we are in the void. In the end, he was able to take directions and instructions on how to get to us, and how to find our driveway – with the warning that if they miss our driveway, they’re not going to find the next one to turn around in for another mile. I also told him about the sign we have, with our physical address on it, and arrows pointing the way, at the turn off. Because we’ve had this problem before!
We had a lot of laughs while working this out.
I asked if they would be delivering tomorrow, and he said it was very likely. So I told him, I’ll be out for most of the day, though there will be someone home. I let him know we would leave the gate open, and the garage, and the package can be delivered into the garage. I don’t know how many boxes this is going to go into, but it’s warm enough that I don’t mind not parking the truck all the way into the garage, so make room for the boxes.
We will need to figure out where to assemble the coop. It needs to be relatively close to the house, on level ground, and in an area that doesn’t get flooded out in spring melt. Wherever we decide to set it up, we’ll probably have to level the ground. We really don’t have level ground anywhere!
On the plus side, this is a relatively small coop. It would be easy to move, if we ever need to. It could even get set up in the main garden area, where we can let the chickens help prepare the soil for us, where more raised beds are going to be built. The coops is just under 4′ wide, and just over 6′ long. The raised beds we will be building in the main garden area will all be 4′ x 18′. It could be set up where a new bed is planned and either moved 6′ every few weeks, or an extended run could be built to cover the 18′. I’ve got enough chicken wire for that. I’d just need to find the materials to frame it out. The coop design I got has the eggs boxes and roosts above and an open run below, with wire mesh walls. It would be easy to make a door to access an extended run. The only hitch is that access to the nesting boxes are at the ends, so a run on the end would make it harder to reach.
Hmmm… Things to think about.
We’ll have snow on the ground for quite a while yet, though, so there’s plenty of time to figure it out.
First up, this is my first order from West Coast Seeds, a Canadian seed source that comes highly recommended. I used the Gardening in Canada affiliate link, so Ashley gets a cut. I gain so much from her videos, it’s my little bit to support her.
The other reason I wanted to order from here is because of my current seed starts. When I turned the light on over the trays in the basement, I decided to check on my luffa. Of the four pre-germinated seed, only one has emerged and it still just as seed leaved.
Yes, I dug around to check the others.
With the first one, I started off gently moving the seed starting mix aside, but there was nothing. In the end, I was digging around aggressively, and there was no sign of a seed. Which means it rotted away. The remaining two seeds, I did find when I initially, very gently, most the seed starting mix aside, stopping as soon as I touched a seed. There is no side of growth, though.
It may be that, even on the heat mat, the basement – and, therefore, the seed starting mix – it just too cold.
These seeds were ones I got from MI Gardener and have a days to maturity of 120. Thanks to Gardening in Canada, I learned that West Coast Seeds has a variety of luffa that needs only 55 days to maturity! I could actually direct sow those and get luffa!
Of course, I can’t just order a single pack of seeds, so I went looking.
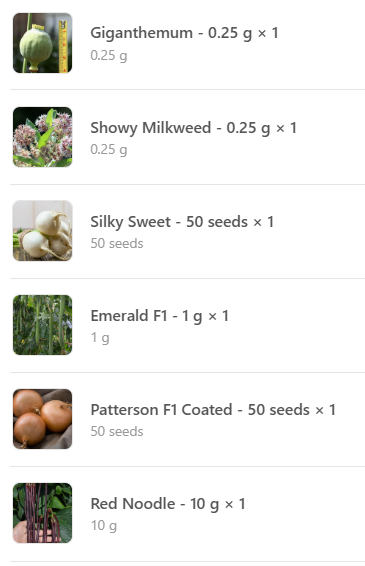
This is what I ended up getting.
From the top (all links will open in a new tab):
Giganthemum: This is something that Ashley from Gardening in Canada had in her recent seed haul video. Yes, I already have bread seed poppies. This variety, however, is supposed to get seed heads as large as a baseball! It has edible seeds, which is the main reason for ordering them. I have a space selected to grow bread seed poppies as a perennial, where I will allow them to re-seed themselves. What I will probably do is find another such location, in another part of the yard, and grow both varieties.
Showy Milkweed: this is the main variety of milkweed for Monarch butterfly conservation efforts. I’ve got an orange variety of milkweed that I have not been successful with. Hopefully, we’ll be able to get this variety established as part of our efforts to attract more pollinators.
Silky Sweet turnip: I already have some white turnips winter sown. I chose this variety because it just sounded like it would be really tasty. It matures in only 35 days and is a cool weather crop, so this can be succession sown throughout the spring, and again in the late summer/fall, if we want.
Emerald F1: This is the luffa gourd that matures in only 55 days! It’s listed as a dual purpose gourd, as the immature gourds can be eaten, but I think that’s true of all luffa varieties. We might try eating some, but that I want are those sponges!
Patterson F1 onion: Okay, yes, I have my own saved onion seed, plus red bunching onions and red bulb onions started. My saved seed is a mix of red and yellow bulb onions. I chose these because I wanted to be sure of yellow onions, and they are described as being exceptional storage onions. Unless I start them as soon as they arrive, though, these will be for next year.
Red Noodle bean: I couldn’t help it. I just really, really want to successfully grow the red noodle bean at least once! When I tried to grow them last year, I had an amazing germination rate, the seedlings exploded into growth, got to about 6-8 inches tall, and then stopped. They never got any bigger, and I don’t know why. I can make guesses, considering the horrible growing conditions we had last year, but they are still just guesses. I have quite a variety of bean seeds, both bush beans and pole beans, as well as varieties for drying, so we will have lots of choices, once the soil warms up enough for direct sowing.
There we have it. My first West Coast Seeds order.
Oh, my goodness! I just checked my Amazon tracking. My chicken coop and my lights and seed mats have arrived!
If I leave right now, I can get there before the post office closes for 2 1/2 hours over lunch.
The outside cats are certainly running around a lot more, now that things are warming up! It’s going to get quiet pleasant for the rest of February, according to the long range forecast, though the local weather group I follow is monitoring a weather system that might push a Colorado Low into our area.
I never got a call from the hospital yesterday, so I called them before going to bed. I’m glad I did, because my mother called me this morning!
She is still in the hospital, all packed and ready for her transfer. She told me she asked the staff about when she was leaving, and that they told her they didn’t know how she would be transported. Which is strange, since they told me from the start that they are arranging her transport.
The doctor at the hospital was never able to connect with the doctor and the temporary care unit, and that’s why she didn’t get transported yesterday. I explained that to her, and assured her that the hospital would be arranging the transportation. Likely with a HandiVan, rather than an ambulance. My mother didn’t even know where she was going, other than it would be in the smaller, nearer city. I told her, she would be in the old hospital, now converted to temporary long term care, but that we still didn’t know where in the building she would be. She was satisfied with that. She sounded like she was really looking forward to the transfer!
Late this morning, I headed out to the feed store in the town my mother no longer has an apartment in. 😄 We’re heading into the middle of February already (how did that happen so quickly???), and we still had kibble, so I only got three 40 pound bags. I also ordered some lysine, which should be in on Monday. Or Tuesday. Monday is a statutory holiday (it has different names in different provinces) and I think they will be closed.
Since I ordered that chicken coop – which got shipped yesterday already! – I stopped to ask some questions about chickens. The two people that were there at the time got quite enthused in answering them! I’ll need to set up a brooder (I already have the heat lamp, currently being used in the sun room for the cats). They gave me a booklet from the hatchery they get their chicks from that has all the information needed. I know we still have feeders and whatnot in the old log building my parents used as a chicken coop when I was a kid, but I’m not about to go digging those out. They’ve been there for probably 30 or more years by now. I honestly can’t remember when my parents stopped keeping chickens.
I asked them which breed they would recommend for someone just starting out and looking for layers. They both very enthusiastically recommended Browns. They were really impressed with the number and size of the eggs this breed lays, plus they are known to be quiet, friendly and clean.
The chicken coop that’s on its way is big enough for only 10 chickens, which is a bit of a problem. The hatchery’s minimum order is 24 chicks. There is, however, someone else that’s looking for only a few chicks, so they took my name down alongside theirs. If they can find one more person, they can split a shipment, and the shipping costs, after the chicks arrive. It costs a bit more for sexed chicks, but with only 10, I don’t want to have any roosters in there. By the time everything is added together, it should cost me about $75 for 10 chicks. Meanwhile, I can slowly start picking up the other supplies I will need, like feeders and waterers. I can get pine shavings locally.
Over time, as we build bigger coops, we’ll look at getting meat birds, too. If we’re looking to fill the freezer for a year, we’d be looking at at least 100 meat hens, so that would require a much bigger coop! Or multiple smaller ones. It’s a shame the building my parents used can’t be used. We might still be able to fix it up at some point – it’s still in good enough shape for that, at least – but that is very much a long term project.
Once I was done there, I topped up the gas tank ($1.279/L *sigh*), then went to the grocery store. I was mostly looking to get more rye bread, but found a few more things, of course – including some tri-tip beef that was on sale. Beef has become something where local prices tend to be better than Costco prices. At least when the sales are on. Still high, but at least affordable enough to grab the odd package now and then.
I also got sucked in, as soon as I walked in the door.
There was a seed display. The first I’ve seen this year!
Of course, I had to look, and yes, I did get seeds.
The first are some double marigolds. These are something I want to scatter plant all over the various garden beds, wherever there is space. They can be started indoors 4-6 weeks before last frost, so around the middle of April or beginning of May. Marigolds are easy to collect seed from, so I should hopefully be able to collect some for next year.
I also got some yellow zucchini, because I just can’t have too many summer squash! These can be started 3-4 weeks before last frost, so in the beginning of May.
Both can actually be direct sown, too, so I might try a bit of both. It depends on how much room I find myself with.
I seriously had to resist buying more!
So we are set for the next while. I don’t need to head out anywhere again until it’s time to take the truck in to get the differential leak fixed – a 2 hour job. I had intended to visit my mother while the work was being done, but she shouldn’t be there anymore. Depending on when they can start working on the truck, once it’s done, I will likely to head to the city my mother will be in, to hit a Walmart and a Canadian Tire, both of which are quite close to the old hospital building she is being transferred to.
I’m actually surprised I haven’t gotten a call from the hospital yet. That means she hasn’t been transferred yet. I would have hoped the doctors had connected by now!
Ah, well. We shall see. The main thing is, she is safe and care for, either way.
Now… time to start pouring through that hatchery booklet I picked up today!
The Re-Farmer
Addendum: Oh! I just hit publish when a message from my brother came in. The hospital just called him. My mother is transferred, safe and sound!
I did get messages back from the garage about the truck, but nothing about coming in. I’m not sure the problem is the sensor, after finding some oil on the ground in the garage yesterday. It was a while before I went out to move it today, so that I could check the oil levels, and see if there were any new oil stains under it.
There was. Just a couple of drops.
*sigh*
Oil levels were fine. I’m going to have to take a chance, though, and at least make a trip to the nearest Walmart. We’ve used the last of our canned cat food today, and the dry kibble is starting to get low, too.
It was a nice enough day that, after checking on the truck, I stayed out to clear some of the paths that got filled with drifted snow, after two days of high winds. Happily, the plows have gone by, so the roads will be clear. Things are supposed to keep warming up over the next few days, which is going to be quite a relief.
Of course, that makes me think of gardening!
The peppers and eggplant seeds that are set to pre-germinate aren’t showing any radicals yet, nor to I expect them to, this soon. Next on the list was things like tomatoes and herbs, but after watching the above video, I will just be doing the herbs, first. I sorted seeds I’ll be starting by how many weeks before last frost the packages recommend starting them. In theory, I could start the tomatoes in April.
I just really, really want to start more seeds! 😄
I realized it’s been a while since I updated about the onions. All four snail rolls now have seedlings.
They’re tall enough now that I raised the light a bit today. Should they get big enough to need “potting up”, they can be unrolled, more seed starting mix added, then rolled back up again. I made sure to leave enough excess length of the packing foam to accommodate extra width.
Just a little green growth to sooth the gardening soul, as winter drags on!
Normally, today would be my day to go into the city for our first stock up trip for February. With the truck having issues and an appointment to get it checked tomorrow morning, today was a home day, instead.
Which turned out to be a good thing.
I didn’t think I’d pushed myself yesterday, but the pain started hitting last night, and this morning I could barely walk. I managed to feed and water the outside cats, grab a quick breakfast, pain killered up and went back to bed for a couple of hours.
Thankfully, that seemed to help a lot.
Which meant I was up to setting things up in the basement to start more seeds.
That included testing out the heat mats. I’d bought a new one last year, because the old one stopped working, but I tested it again anyhow. For a while, I thought I’d need to buy another heat mat, but the new one did eventually warm up quite nicely. The basement is always between 13-16C/55-61F, though it does feel warmer after we removed the cat barrier in the “window” between the two basements, now that we don’t allow the cats down there anymore. I set up just one of the lights, choosing the one that actually warms up a bit when it’s on.
Then it was time to get the set of seeds to start this early. I decided against starting thyme. I’ll see if the varieties we planted last year survived the winter under their thick mulch and blanket of insulating snow. If they didn’t, I will buy transplants, instead.
I also decided against trying the Sweetie Snack Mix peppers again, and will start more of the other two varieties, instead.
There’s the luffa, of course. I probably could have started those at the same time as the onions. There are sprouts in all four onion seed rolls now.
Then there’s the Caspar eggplant, a new variety I’m trying this year. The Golden Boy celery is the first time I’ll be trying to grow celery. The Sweet Chocolate peppers are a variety the girls suggested. They grew well when we had them before. When it comes to flavour, they really don’t find much difference between any of the varieties we’ve tried. The California Wonder Bell pepper is a new variety for us that I chose specifically because they are described as being thick walled.
I decided to pre-germinate the peppers, eggplant and luffa, as the seeds are larger and will be easier to move and plant, once the radicals appear. I could also use a damp wooden chopstick to pick up the pepper and eggplant seeds.
With the peppers, I was thinking a total of 9 plants. When it came to pre-germinating the seeds, though, I ended up going for 9 seeds each – though the California Wonder got an extra when one of the seeds I grabbed looked like it was damaged. We’ll see how many actually germinate.
I also started just 9 seeds of the eggplant. I’m hoping to get 4-6 transplants out of those.
I was seriously tempted to pre-germinate more than 4 luffa. Even with pre-germinating, they do struggle to survive. We’ll see how many germinate – and how many survive until transplant time. Last year, I started with four, three pregerminated, one didn’t survive being planted, and of the remaining two, only one really grew much at all.
When it came to dampening the paper towels for this, I made sure to use warm water, too.
As for the celery, the seeds are so tiny, I decided not to pre-germinate them. Instead, I repurposed a clamshell from strawberries. The holes on the bottom are fairly large, so I set a paper towel on the bottom to keep the medium from washing out the bottom. Normally, I pre-moisten the starting mix in a large bowl I have for that purpose, but for such a small amount, I filled the container with dry mix, then used the warm water to thoroughly soak it, first, making sure there were no dry spots. Then I pressed it down to get rid of any excess water, and ensure there were not air gaps.
I have a little seed dispenser that I used to scatter the seed lightly over the surface. With seeds that small, the hard part is keeping them from being too densely sown. Also because they are so small, I didn’t top them with more seed starting mix. Instead, I added a layer of vermiculite. That got a thorough spray with warm water.
All of these fit into a seed starting drain tray and are now set on the heat mat, under the light. The light has “legs” that fit on the ends of the aquarium we originally got it for, so it only needed a couple of the fire bricks I’ve been using as supports. The other light we have rested directly on the aquarium frame, so if we need to bring that one out, it’ll need twice as many bricks to get the same height. The handy thing is, as things grow taller, we can just add more bricks to raise the lights by an inch per brick.
For the peppers and eggplant, I’ve got some deep cell trays I can plant them into. The less potting up, the better.
In the beginning of February, I will be starting tomatoes. I will probably pre-germinate, then use the Red Solo cups for those. I’m still torn between starting three, or all four, of the new varieties I got.
Oh, who am I kidding. I’ll be starting all four.
It would also be the time to start herbs, such as tarragon and savory.
Hopefully, this will work out. Aside from the luffa, these varieties have a relatively short days to maturity on them. It’s not just frost free days we need to think about though, but soil temperature. Last year, we had such warm days in May, but the overnight temperatures were so low, we still couldn’t transplant our seedlings until well into June.
Hopefully, this year will be a much better growing year, without the drought, heat waves and smoke!
All righty. Time to get my thoughts organized about how things went this year, and what I want to do next year.
When this post gets published, I’ll actually be at my mother’s place, doing some housekeeping for her and getting her apartment the way she wants it for Christmas. We’re already getting weather warnings for this weekend. Today’s high (Thursday) was -11C/12F. Wind chills at around -22C/-8F. Tomorrow (Friday, when this will be published) and Saturday, our highs are supposed to be -21C/-6F, but we are getting warning of wind chills dropping things to -40C/-40F. !!!!!
Then it’s supposed to start warming up again, up to a high of -5C/23F on Tuesday, before dropping again. There are no longer any predicted highs above freezing around Christmas, but we’re still expecting major swings in temperature.
I’m so glad the winter sown beds got that extra layer or straw.
Speaking of which, here are my final thoughts on how our 2025 garden did.
Winter Sowing
This was the big experiment this year. If it didn’t work, we would have had a very different gardening year, that’s for sure! The other part of the experiment was broadcasting mixes of seeds, some of them years old, which gave me the chance to restock with fresh seed, later on.
Two of the mixes were complete failures, but for very different reasons. The summer squash just never came up. If anything did sprout, they got rolled over by cats. Which is what killed off the “tall and climbing things” bed, and the winter sown flowers. I did see things start to sprout, but they didn’t survive long.
The root vegetables mix in two beds did really well, though one almost got chocked out by the insanely productive Jabousek lettuce seeds that were added. I’m even happier with the greens mix, having finally been able to grow kohlrabi, and those Swiss Chard were an excellent cut and come again crop.
In the end, if it weren’t for the winter sown beds that survived, we would have had a much less productive year! This is a major game changer for me, and I expect to keep doing this from now on. Not only did we get much earlier growth, but it saved me a lot of work in the spring.
The biggest problems
Cats.
I thought it would be the elm seeds, and they were definitely a problem in the expected places, too, but the yard cats were particularly destructive this year.
What I won’t do again, and what I’m doing instead
Definitely not broadcasting mixes. That did give me a good idea of what could be successfully winter sown in our climate zone, though. Particularly with the drought, heat and smoke we got this year. This time, the winter sowing was much more planned out. The beds also got more thoroughly mulched before the hard frosts hit.
With that in mind, we’ve planted carrots, peas, spinach, chard, kohl rabi, cabbage, beets, and Hedou Tiny bok choi. Plus, of course, garlic. There were also lots of little onions found while cleaning up the old kitchen garden that got transplanted. Those might bulb, or go to seed. Either one works for me.
I will also have to make sure to put cat proof protective covers on pretty much everything.
I was also happy with having radish pods instead of radish bulbs. There is a variety grown specifically for their pods that I might pick up at some point but, for now, we quite enjoyed the proliferation of pods to snack on and do quick pickles with. You get a LOT more food from a single radish by eating the pods, too. Definitely for winter sowing, though, as I’ve read they taste a lot stronger when they are direct sown in the spring.
Transplants
This was a really hard year for all our transplants. The heat, drought and smoke likely played a big part in that, but in some beds, it looks like tree roots invading the beds also played a part. We got very little out of our transplants. The ones we started indoors that did best were the Chocolate Cherry and Spoon tomatoes, even as stunted as they were. The worst were probably the melons. The pepper and eggplant plants did rather well, but to so much for blooming and productivity. The purchased herb transplants, on the other hand, did great in their tiny raised bed!
The biggest problems
The transplants were something we could protect from cats rather well. In the end, it was probably a combination of drought conditions and those tree roots. Not a lot that was in our zone of control that we could have done anything about.
What I won’t do again, and what I’m doing instead.
I won’t winter sow onions again. Instead, I will be starting them indoors for transplanting. I had hoped they would at least grow enough to use the greens and deter deer, but most of them simply got choked out.
We will, of course, still be starting seeds indoors to transplant in the spring, but we need to set up a seed starting area and the aquarium greenhouses in the basement. If for no other reason than we need to clear space in the cat free zone, AKA the living room. Now that cats aren’t allowed in the new basement anymore, I can open up the “window” between the basements, near the furnaces. That should help more warm air from the old basement to flow into the new basement and equalize things. There is the “doorway” (a vaguely door shaped hole cut into the wall when the new basement was built) but no real air flow between the two basements.
As for what we can do instead, for better success with our transplants… I honestly don’t know. There isn’t much I can do about heat waves. There are limits to watering during a drought, and not just due to the lower water table. Our well pump still needs to be replaced, if we dare risk the foot valve, so the more the hose is used, the more wear and tear on the pump. In the end, it comes down to the weather, really.
As for the tree roots, we need to cut that row of self-seeded trees down completely, and ensure no suckers start coming up at the stumps. My mother was adamant about not cutting those trees down, even though I see signs that someone tried to at some point. Probably my late brother tried to get rid of them. I recall my mother laughing about how angry he would get because she would stick trees all over the place, making it hard for him to take care of things.
Now my oldest brother owns the property, though, and he is very much in agreement with getting rid of them. He had issues with where and how my parents chose to plant trees, too, and we’re both now dealing with the consequences.
Other than clearing those trees out, the only other thing we can really do is more raised beds. The higher, the better but, for now, even low raised beds help. Once the trees are cut down, I’m even thinking of putting a long, higher raised bed over where they are, to make sure they get good and dead. That would also reclaim the garden space lost to my mother allowing those trees to grow after she transplanted out the raspberries that were there.
As for the purchased herb transplants, those did quite well. I certainly won’t turn my nose up at buying transplants to supplement anything we start indoors.
Yes, I will still be trying luffa again! 😄
Spring Direct Sowing
These where the most affected by this year’s climate conditions of all. It was pretty brutal.
We direct sowed pole beans, bush beans, corn, carrots, peas and more summer squash. I’ll add potatoes to this list as well. I think the potatoes did the best, even though they never reached the blooming stage. The summer squash and two types of beans were the worst.
The biggest problems.
There’s only so much I can blame on the drought. We haven’t had much luck direct sowing summer squash in the past, either. Granted, last year it was slugs that were the big problem, and this year, we had lots of frogs taking care of those for us!
In the end, though, I think most of our issues were the same as with the transplants. Too much heat, drought conditions (even with watering twice a day) and so much smoke. Plus, tree roots.
What I won’t do again, and what I’m doing instead
I will have to find space for them, but summer squash will be started indoors again, for transplanting instead of direct sowing.
Beans and corn; there really isn’t anything I can do differently with those.
The peas did surprisingly well, but we need to ramp up our deer protection.
The carrots need less tree roots competing for space. Those have been winter sown in the trellis bed. If I plant more in the spring, I need to be strategic on where, to avoid those roots.
The chard I direct sowed were a complete fail. I have more varieties to direct sow in the spring, and those will go in earlier. I suspect it was partly too hot when they were planted, and the soil too compacted by watering.
Soil compaction is an issue. We need to add more organic matter to our soil. Preferably something like peat moss (Canadian peat moss is ethically harvested) that will also increase the acidity.
That might be another issue for everything. Our soil is so alkaline, and most things do better in slightly acidic soil. I’ve been amending with Sulphur, but it’s really hard to increase soil acidity. Especially with dark grey zone soil like ours, that leaches everything so quickly.
More high raised beds will allow us to control for that more, but this is the sort of thing that takes years to amend, even the slightest.
Food forest and perennials
Happily, we got quite a boost with our food forest this spring, adding a plum, another variety of eating apple more suited to our climate zone, new cross pollinating varieties of haskap and gooseberry. I remember we had gooseberry here when I was a kid and so loved eating them when they were really really sour! I look forward to eating them again.
The biggest problems
Deer. Drought. The insane number of rocks I find when digging holes to plant in.
What I won’t do again, and what I’ll do instead.
I won’t underestimate how determined deer can be, nor assume they won’t like something! I got spoiled by them ignoring the silver buffalo berry and sea buckthorn, though they did go after that one highbush cranberry, over and over again, last year.
In the spring, I’ll be making more wire mesh cages for the fruit and nut trees. The berry bushes seem to be okay.
I really need to find a place to transplant those grapes to.
Now that I’ve got the new strawberry and asparagus bed, I’m thinking of slowly turning that section over to perennials. Not next year, though. I have other plans for there, first.
Final thoughts
There were a lot of things out of our control this year, and some things I am just not sure what went wrong. Like with the red noodle beans.
With so many changes to our garden this past year, and not being able to reclaim spaces we’d planted in, in previous years, it really isn’t a typical year at all. We did have some surprise successes (peas, crocus) and big disappointments (no melons and almost no squash at all!).
At least I can call it a learning experience.
Here is the last garden tour video I did, where you can see the beds that are already winter sown.
Planning ahead to our 2026 Garden
Obviously, some of that is already in and done, with the winter sowing. We’ve got quite a head start to next year’s garden already.
Doing that meant I got a lot of seeds in advance. I took advantage of some big sales and replenished my stock from MI Gardener.
Here is what I got.
No, we aren’t planting all of that!
But we will be planting both old and new seeds.
My daughters and I went though my seed inventory to make some decisions on what we’ll be planting next year, outside of what I’ve already winter sown.
I just went into the basement, where my seed bins are stored, to get my lists and diagrams. Since I was there anyhow, I went ahead and uncovered the window between the two basements. I’d covered it with a piece of rigid insulation and had poked holes in it to allow for some air flow, but it clearly wasn’t enough. Once that was down, there was a literal wind of warmer air coming in from the old basement! Wow!
So that will make a difference. I’ll have to keep an eye on the thermometer I’ve got over my seed bin. The new basement tends to stay between 10-13C/50-55F, all year. I don’t have a thermometer in the old basement, but it’s often warmer than the main floor!
I didn’t write a list the varieties we intend to plant yet, but have the seed packets set aside. We intend to grow fewer plants of more varieties in some things. The varieties will be listed in future posts, but this is what we’ve decided to grow this year.
To start indoors
Winter squash and gourds. The gourds are my “fun” thing to grow. Summer Squash. Melons. Cucumbers Onions – bulb and bunching Eggplant – hopefully, a variety my daughter is not allergic to! Tomatoes Peppers Celery Herbs Flowers
So… yeah, I’m going to need to make space!
That doesn’t leave much for us to direct sow in the spring!
Spring Direct Sowing
Corn – short season and not to short season Beans – pole and bush. If I have room, beans for drying Potatoes Flowers
Succession sowing
Peas Chard Spinach Carrots
One thing I will have for 2026 is more room to plant in. There is one bed in the old kitchen garden that took forever to re-work, but it is now ready for planting, and included supports to hold hoops or whatever I end up using to hold covers and protect the bed from critters.
The bed that was winter sown with tall and climbing things was a major issue and a complete fail. I did have mesh netting to protect from the seeds, but it couldn’t protect from playful kittens. I’ve been gathering the materials and will rework that bed, yet again. It will be taller, narrower by a few inches, and like the reworked bed in the old kitchen garden, it will have supports I can attached hoops or wire or whatever I need to cover and protect the bed from elm seeds and critters.
The plan so far.
Which, I’m sure, will change a few times before the garden is completely in!
Let’s start with the old kitchen garden, which is mostly winter sown. There is the short side of the L shaped wattle weave bed that is open. I intend to plant herbs there, including fennel, though we want that more as a vegetable than an herb.
The newly finished rectangular bed could have root vegetables planted in it, so I was thinking of more carrots. However, it might be a better place to plant summer squash in.
The open retaining wall blocks are now all filled with transplanted alpine or whatever they are strawberries. Those will be for perennials, since nothing else seems to want to grow in them.
I did the same with the retaining wall blocks by the chain link fence. Hopefully, they will survive the winter. It’s hard to say, being planted in concrete blocks, but all the chimney block planters did get mulched for winter insulation.
Once the longer bed at the other section of chain link fence is redone, I am thinking winter squash and/or gourds would be good to put there. They can be covered until they’re too big for cats to get into, can climb the fence, and are too spikey for deer to eat.
In the East yard, two out of three rectangular beds are winter sown. In the third one, I’m thinking a couple of varieties of tomatoes can go in there.
There is a 4′ square bed in this section, which will get white eggplants transplanted into it.
In the main garden area, one of the beds is sown with Daikon radish on one side, turnips on the other. Down the middle, I plan to direct sow pole beans.
The high raised bed will get bush beans.
In the trellis bed, the winter sown peas didn’t fill the entire row, so we will transplant cucumbers in the last couple of feet.
Of the three remaining 18′ beds in the main garden area, one will have peppers, celery and tomatoes. The other will get squash and/or melons. The third bed will get potatoes.
The area near where the new asparagus and strawberry bed is, is still covered with black plastic, which has mostly killed off the grass and weeds that took over what used to be a squash patch before. I plan to pull that back and use that area to plant two varieties of corn that mature at very different rates, so there should be no issue with cross pollination.
Further out is the area where the Albion Everbearing strawberries were. I plan to sow bread seed poppies in that location, as part of the plan to slowly convert that whole section to perennials, or self seeding annuals that can be treated as perennials.
What you’re not seeing in there is flowers or onions.
The onions will get interplanted all over the place. The bulb onions are saved seed, but the bunching onions are new, so those I’ll try to keep in one spot. Perhaps interplanted with the herbs in the old kitchen garden or something.
The space at the end of the high raised bed will have flowers again – hopefully including those self seeded asters – but I also intend to have both transplanted and direct sown flowers scattered all over, interplanted wherever I find the space.
Somewhere in there, I want to direct sow some of the saved Hopi Black Dye seeds.
If all goes well, I’ll have at least one additional trellis bed done, and we can finish our first trellis tunnel, though maybe not in time for spring planting. If my brother is able to get one of his tractors going and we start dragging dead spruces out of the spruce grove – maybe even cut more of the dead ones down – I will have the logs needed to continue building pairs of trellis beds and, if all works out, pairs of beds that will become polytunnels. Once the second bed for the first trellis tunnel is done, though, framing the existing low raised beds are priority. Those will be only one log high for now, while the trellis beds will be started at two logs high. I’ve got only so many dead spruces to work with, so building the beds up higher will be left after we’ve got all the beds framed out that need it. Over time, I’d like for at least half of the raised beds to be increased to match the high raised bed – 4 logs high. I’m finding that the perfect height for reach, and for my back. I do want to leave some beds lower for things that grow tall, like corn or pole beans. The trellis tunnel beds may eventually be increased to 3 logs high, but we’ll see.
Then there are the perennials and trees.
I’ve placed an order for some Manchurian Walnut, which is one of the few nut trees out there that are hardy enough to grow here – it’s actually hardy to zone 2b, which is what we are in Canadian. I could only afford to get one, rather than any of their bundles. It will be planted in the outer year. In the same order, I was able to get a bundle of five Bleu Basket Willow. Those will be planted beyond the outer yard, where they will eventually be coppiced and used to grow stems for everything from, yes, weaving baskets, to wattle weaving and even willow furniture, if we want. Over time, I plan to get two other varieties of basket willows that are different colours.
We might have to buy replacement Korean Pine, too. We shall see.
We’re also looking at other types of hardy fruit trees to get as the budget allows, such as pears, or varieties of cherry that actually grow and produce in our climate zone.
All in good time.
All done!
Well, there we have it.
In the end, 2025 was a really rough year for gardening. Yes, we were able to harvest and the winter sown beds made a huge difference, but nothing really reached its full potential, including the winter sown beds, as well as the surviving ones did. So many people in our region struggled with their gardens.
I know a lot of people have been going on about “survival gardens” or sharing those idiotic memes about how, if we all grew gardens instead of lawns, no one would starve. Hogwash. Obviously, I’m all for growing as much of your own food as possible, however you can manage is, and to be as self sufficient as possible. I absolutely encourage people to do that, every chance I get. Especially in these unstable times. But the hype and expectations I’m seeing out there are not helping. Years like this show exactly how little control we actually have when it comes to growing our own food. There are bad growing seasons like this, but even if you have an excellent growing season and your garden is doing great, one storm could wipe it all out. Or it could be destroyed by animals, insects or disease.
As the old saying goes, hope for the best, plan for the worst. There will always be things happening we have no control over, other than how we respond to it.
Okay, so we’ve gone over the winter sowing, then the very disappointing transplanting. How, we get into the direct sowing.
For direct sowing, we did summer squash, pumpkin, pole beans, bush beans, carrots, peas, corn, sunflowers and, to fill in space after losses, Fordhook Giant Swiss Chard. We also planted potatoes and, for a second try, flowers (which I covered a bit in my last post).
Sunflowers, Pumpkin, Corn, Beans and Chard
The pole beans we planted were the Red Noodle beans, in the same bed as the Hopi Black Dye sunflowers. This bed also had seed onions from last year, plus the oodles of tiny self seeded onions I found and transplanted in between the seed onions while preparing the bed.
The Red Noodle Beans germinated and started growing really quickly. I’d planted them along the trellis side of what will eventually be a trellis tunnel. They came up so fast, I rushed to put trellis netting up, even though the structure had only the vertical supports up.
I could have saved the effort. That initial growth spurt was it. They never got any bigger that what you can see in the above slide show. I had a few spare bean seeds left and ended up planting them in gaps between some sugar snap peas. Those stagnated just as much, in a completely different bed.
*sigh*
The Hopi Black Dye sunflowers, however, were a pleasant surprise. It took a long time, but they did finally germinate. They, too, stagnated and took a long time before they started blooming. Some had a single head, while other developed seed heads at almost every leaf junction.
In the same bed as the Red Noodle Beans and sunflowers, I planted the free pumpkin seeds that are given away at the grocery store in my mother’s town. This year, their packets (they limit one per person) had five seeds in it. Last year, they packets had three seeds.
There was no variety name given, but the town encourages people to grow the seeds and enter their pumpkins in their pumpkin fest, from which they later save seeds to give out for free the next year.
I planted them in protective collars, in between the self seeded onions and tomatoes I found in the bed.
The pumpkins where the last thing I direct sowed this year. All of them germinated, and the plants were all some of the healthiest squash we got. They actually came up faster than the sunflowers. When one of them started to develop a pumpkin, I trained that vine up the trellis netting – by then, it was obvious no beans would be climbing it.
These vines were very resilient. Even after they seemed to be completely killed off by frost, but we still had warmer days after, they started to grew new leaves and even started to try and bud!
At least we got one pumpkin out of it, with five plants. Last year, we had three plants, and got five pumpkins.
We got three. One of them got eaten by a deer. It recovered, though.
Despite this, those three little plants actually did start producing! We got a remarkable amount of beans from then, considering how spindly they were!
That did leave me with a lot of open space, and I was out of bean seeds, so I tried planting Swiss Chard.
All I can say about those is, they germinated. Quite a few of them, actually. None of which grew beyond their seed leaves.
*sigh*
I hadn’t planned on it, but I also planted some yellow Custard beans. These were from old seeds that I had, and they went in between rows of corn and between tomatoes.
The bush beans were included in these beds partly for their nitrogen fixing qualities. Corn is a heavy nitrogen feeder.
I planted Orchard Baby corn, which is a short season variety. I got three rows of corn with two rows of beans in between them. The tomatoes got a few beans planted down the middle of the bed, plus one went into a gap between tomato varieties.
I had extra corn seeds, so those got planted around the Arikara squash, nearby.
Most of the beans didn’t germinate at all. Only two or three made it. I wasn’t surprised by that, as these seeds were a few years old, so I replanted them. Eventually, pretty much all of the beans did germinate, as did the corn in that bed.
The corn with the Arikara squash, however, did much better! They germinated faster, grew faster and produced cobs faster.
As for the yellow Custard beans, they did eventually start to bloom and we even had beans to harvest, but the plants never grew even close to their full size or production. The ones planted among the tomatoes had a 100% germination rate, though one got dug up by a cat later on. They, too, struggled to grow, bloom and produce. We did, however, get yellow beans to harvest, later in the season.
Summer Squash and Potatoes
With the winter sown summer squash bed a complete fail, plus the small section of winter sown root vegetable mix by the garlic rolled on by cats, we had some open space to work with.
The winter sown summer squash bed became our potato bed.
While cleaned up the bed and digging a trench for the potatoes, I did find a couple of squash seeds but, overall, they seemed to have completely disappeared.
The potatoes we’d bought earlier and started chitting in the basement all failed. They started to grow shoots while in the basement, but I think it was too cold in there for them to do well. Once inside the portable greenhouse, however, they didn’t go any better – and then they got knocked over when the wind almost blew away the greenhouse, knocked over by cats and basically cooked in the heat of the greenhouse.
I got more seed potatoes. Those were chitted in the greenhouse, and did not get cooked.
With the cats seeing all freshly turned soil as an invitation, we made sure to put netting over the potatoes, right from the start. Over time, they got mulched, then mulched again.
I had to hand pollinate them, as the male and female flowers bloomed out of sink.
Only one white scallop squash survived, and that was set back even more than the zucchini. In the end, we got only one scallop squash to harvest.
It was very disappointing, but at least we got something, before the frosts killed them.
Peas and Carrots
The peas were among the first things we planted, and we had two varieties. Sugar Snap peas and Super Sugar Snap peas. We also had two varieties of carrots. The Uzbek Golden carrots were also in our winter sown mixes, plus we tried Atomic Red carrots this year.
The peas were already germinating when the carrots were planted. I’d already set boards out, which protected the carrots until they germinated, and then were used to keep the soil from eroding while watering, as this bed has no walls.
The peas were probably the best we’ve ever grown, even though they did not reach their full potential with the heat, drought and smoke.
There weren’t a lot of pods to harvest, but I could at least snack on them while doing my morning rounds – until the deer got at them.
*sigh*
The carrots were both successful and not successful. There was good germination, and we eventually did a fair bit of thinning by harvesting. Few got very big, though. At the end of the season, when it was time to harvest everything and prep the bed for next year, there were quite a lot of carrots.
Little carrots.
But will, we had something! In fact, once we concluded that we like the Super Sugar Snap peas more than the Sugar Snap peas, I was able to leave pods on select plants specifically for seed saving.
Flowers
I already covered this quite a bit in my last post, but we did direct sow flowers this year. The winter sown bed got destroyed, so we started over.
In the second photo of the above photo, you can see that cats were not the only problem we had, trying to protect the winter sown flowers. The wind completely destroyed the cover we put over them.
I found more Dwarf Jewel nasturtiums to try again. I also found some mixed Cosmos seeds, and decided to plant the memorial Crego Mixed Colors aster seeds I had.
My mother used to grow Cosmos, so I knew they could grew here. We also have wild asters growing, but not domestic ones, so I wasn’t sure on those. Nasturtiums are completely new.
The bed got protective netting as soon as it was planted.
They took so very long to germinate. The asters, longest of all.
The nasturtiums bloomed and we were able to collect seeds, but they were much smaller than they should have been. The Cosmos eventually got big and bushy, but by the time the started to bloom, it was late in the season and they were killed off by frost long before they could go to seed.
The asters were what I wanted to go to see the most, as they are in memory of an old friend. Thankfully, the Cosmos protected them from frost, and I did manage to collect seed.
Final thoughts.
This was a very rough year in the garden. It made me so very glad we had the winter sown beds! Much of what we planted, however, is stuff we will continue to plant. One really bad year is not going to stop that. Locations and varieties may change, but the staples will always be there.
Beans: as disappointing as this year was, beans are a staple crop and we will be growing them again; both pole and bush beans, to extend the season. By the time bush beans are no longer producing as much, the pole beans are ready for harvesting.
At least, that’s how it normally works.
I really want to grow red noodle beans again. They are supposed to do well in our climate zone. There’s only so much I can blame on the drought and heat, or even the smoke. Maybe not next year, though. I also want to grow beans for drying, but that will depend on space.
Corn: These were also disappointing this year, but I do plan to grow more next year. I’ve got way too many varieties of corn seeds, but I have more Yukon Chief, which is a super short season variety we’ve grown before, that I will be planting next year. I’m also going to be growing a sweet corn that matures later, so they can actually be planted close together and cross pollination should not be an issue. Corn is a heavy feeder and you don’t get a lot for the space they take up, but I just really like corn!
Sunflowers: I’ve got the saved seed from this year, and I’ll be trying those, next year. Each year we do that, the variety will get more acclimated to our area. At some point, we might even have enough to use the Hopi Black Dye sunflowers as a dye! At some point, I want to try the giant varieties again (like the Mongolian Giant we winter sowed, but everything in that bed failed), but probably not next year.
Chard: I’ve already got a new variety of those winter sown with our garlic. I might try others, both old and new varieties, with direct sowing early in the spring, but I’m quite blown away by how the ones I did direct sow never got past the seed leaf stage. Not sure what to make of that.
Pumpkin: we have a new variety of pumpkin seeds to try next year, which I will probably start indoors first. It’s the seeds we get locally that do amazing when direct sown, so I’ll likely get more of those next spring, too.
Summer Squash: Once again, we have new varieties to try. I might start them indoors again, too. Direct sowing just doesn’t seem to work well. I know my mother used to direct sow zucchini when she gardened here, but that was a long time ago, and the soil and growing conditions have changed quite a bit.
Peas: we already have some dwarf peas winter sown in the kitchen garden. I’ve got another new variety waiting to be planted in the spring, plus we have our saved Super Sugar Snap peas to plant next year. I’ve just got to figure out how to protect them from the deer!
Carrots: I’ve already got a rainbow mix of carrots, winter sown. Hopefully, they will do better, size wise, than this year’s did. I still have other varieties of carrot seeds, including saved Uzbek Golden carrot, which we quite like. I’ll probably direct sow some in the spring. It will, once again, depend on space available.
Potatoes: I’m still surprised by the potatoes that never bloomed. Of course, potatoes are a staple crop, so we’ll be planting them again. In digging them up to harvest them, and to clean up the bed in the fall, I found a LOT of tree roots had grown into the bed, which may have contributed to the problem.
We’ve got to do something about those trees!
For now, the amount of potatoes we grow is nowhere near enough to last us through a winter, but we’re still looking to find varieties that both grow well here, and that we like. In the future, as we reclaim lost garden spaces and continue to expand, the goal is to plant many more potatoes to store in the root cellar.
Flowers: Of course, I’ll be planting the saved memorial aster seeds, plus some dropped seed might come up on their own. We have new Cosmos varieties, Bachelor’s button, saved nasturtiums, and other flower seeds to plant. It’s more about deciding where to plant them, as some were specifically chosen so that they can self seed and be treated as perennials. Over time, we plan on having areas filled with wild flowers all over, to both attract pollinators and deter deer.
Well, if you’ve managed to slog your way through all that, congratulations! And thank you for taking the time! If you have any thoughts or feedback, please feel free to leave a comment.
While I tried to include quite a few images with this, since I’m posting images almost exclusively on Instagram (I’ve used up almost all the storage space that comes with my WP plan), it’s a bit messed up. So, if you want to get a better look at things, here are the garden tour videos I did in June and July.
I sounded so hopeful in June.
Not so much by the end of July!
Ah, well. It is what it is!
In my next post, I’ll be analyzing our perennial and food forest stuff, and then one last post in the series with an overall analysis, and what we’re planning on for next year.
We’ve got a lot of work ahead of us, that’s for sure!
In my last post, I talked about the winter sowing we did. A definite head start, with a short growing season like ours. Still, things needed to be started indoors, too.
We “lost” a lot of beds that would have been available for transplanting to winter sowing, which limited how much we could start indoors. We also had some re-arrangements in the house that meant I could no longer use the living room, and the aquarium greenhouses, to start seeds indoors.
I had to use our basement.
Not the old basement, which is actually pretty warm. The “new” basement, which has more space, but is pretty darn chilly!
Here are a series of videos I made of our seed starting sessions, beginning with the things that needed the most time.
For winter squash, we went with four types. Baked Potato, Mashed Potato, Sunshine and Arikara – all new varieties for us. The Arikara squash are a rare variety, so I particularly wanted to grow them for seed.
Next on the list where peppers.
This year, we went with a Sweetie Snack Mix with orange, red and yellow mini bell peppers for my family to snack on. We’re still in the “let’s find a variety we really like” stage, and trying new things.
Pre-germinating seeds has been another game changer for us. We’ve had years were we’ve planted and replanted things several times before getting germination. This way, only seeds that have already germinated get planted, for a much higher success rate.
This year, we also got a portable greenhouse, so we could start taking the transplants outdoors earlier – mostly because of space issues – and to make it easier to harden them off when the time came.
In the following video, it first shows the kitchen garden winter sown bed getting its own little greenhouse cover, and then the assembled portable greenhouse.
By the end of it, you could already see we were having issues, as the cover started to tear, even as we were putting it on!
The next seeds to pre-germinate were tomatoes.
This year, after going over our seeds with my daughters, we went with four varieties. The Black Beauty and Chocolate Cherry, we’ve grown successfully before, and the family enjoys them. New was the Sub Arctic Plenty. These are a super short season variety that we could technically start outdoors, since they are supposed to mature in less than two months, but they got started indoors, too. Last of all were the Spoon tomatoes. Those were mostly for me, as they’re the only tomato I can eat fresh without gagging (I’ve since learned this is a reaction to one of the chemicals in tomatoes, much like with people who find cilantro tastes likes soap). The seeds have gotten very expensive, so I want to grow these specifically for seed saving, too.
Something I somehow did not get pictures of were the melons I started. I started pre-germinating those at the same time I potted up the pre-germinated tomato seeds.
I used up some older seeds and started Kaho and Cream of Saskatchewan melon. I also started older Sarah’s Choice melon and new Green Flesh Honeydew seeds. Last of all, I started some older Zucca melon seeds as well.
The Zucca melon and the Kaho watermelons didn’t make it. None germinated. The others did, though, and I was able to pot them up.
Starting seeds indoors in the cold and dark basement was a real challenge. A challenge made more difficult, as one of my aquarium lights, which are grow lights, since they were for aquarium plants, too, needed replacement bulbs. They need a size that I simply could not find locally, so I had to order them online. I was able to get them from Veseys, which also had them at a very reasonable price.
Still, with heat mats, lights and even a heater, we were able to manage it.
It took a while for some of them, but the pre-germinated winter squash seeds all made it. In fact, most of the seeds did really well. It took quite a long time for the eggplant and peppers to germinate – those were direct sown rather than pre-germinated. The colder temperatures did seem to set them back a fair bit.
I was more than happy to be able to get them out of the basement and into the portable greenhouse as soon as possible!
We were still having cold nights, though. I had a thermometer in there for a while and, in the morning, it was just as cold in the greenhouse as outside. To try and combat this, I dug out an old, black garbage can – one of many we’ve been finding around the property! – and set it up to be a heat sink – covered to make sure no critters fell in! The idea being that water inside the black container would absorb heat during the day, then slowly release it during the night.
I can’t really say it worked that well. Partly because it turned out to have a leak and, after several days, it would need to be refilled.
During the day, it got insanely hot in the greenhouse and, other than tying the door flap open, there’s no way to release the heat.
Yeah, the heat was off the scale on the thermometer in there! It got so hot that, on many days, I had to move the trays and bins of transplants outside and into the shade, so they wouldn’t cook.
Like the chitted potatoes, but that will be covered in another analysis post.
In the picture with the transplants, you can see that I did buy some this year. I decided not to start any herbs indoors – I just didn’t have the space for them, and my results have been hit and miss over the years. In the picture, I got on each of lemon thyme, English thyme, oregano, Greek oregano, lemon balm and basil. Later on, I also picked up two transplants of sage.
Even with the structure being secured at each corner, we had one wind storm that was bad enough to knock it half over!
The old garden hose was draped over the top of the greenhouse to reduce flapping in the wind, which was an issue well before this particular wind storm knocked it over. I later set the bags of manure strategically on shelves to add more weight and keep it from being blown over again.
Eventually, they were being taken outside of the greenhouse to harden off, not just to keep them from being cooked. They recovered very well.
The one thing that wasn’t doing well was the luffa. Of the four seeds, three pre-germinated but only two survived to be transplanted into pots to live in the greenhouse for the summer.
As you can see in the slide show above, one of those surviving luffa was super tiny.
The stove pellets are something I like to add as a gentle mulch. When wet, the pellets expand into sawdust and are less likely to squish or smother young seedlings. They also hold moisture quite well. I find they’re also good to mulch in hard to reach areas. I can reach under leaves or between plants and drop a handful of pellets where it would be more difficult to use grass clippings, leaves or straw.
In the end, I found myself with what were probably the best transplants yet. It was looking to be a great start for transplants this year! Aside from the sad luffa, they were all strong and healthy plants, by the time they were ready to go into the garden.
This first slideshow is of three types of winter squash that were planted in one bed. I set protective collars around them to help with the still-coldish nights, but also to protect them from rolling cats, slugs and other critters.
I later set up a soaker hose but, in the end, I found it easier to use the protective collars to water them. Protective collars went around all the transplants except the peppers and eggplant.
With the drought conditions we had this year, I found that the collars really helped. I could water into a collar until it was full, then move on to the next one. By the time I finished watering from one end of the bed to the other, the first collars were drained of their water, and I would do it again. Most of the summer, I would water a bed in this way three times, twice a day. By the third pass, the water would finally be draining slightly slower. It was more efficient to water this way, than to water empty, mulch covered soil around the plants.
The Arikara squash had three survivors, and they went into their own little bed in the East yard.
Last year, in this bed, I had finally successfully grown Crespo squash. The vines got so huge, they even spread into the cherry tree suckers nearby and started climbing them! The bed got amended as much as I could, and I had confident expectations that another variety of squash would do well here again.
The three squash were transplanted with a cover of mosquito netting to keep the cats out. The netting was a bit too small, though, and didn’t cover it very well. Still, it was enough to protect the bed until things were big enough. I didn’t want it covered for too long, so the squash could be pollinated by insects. Later on, I would direct sow corn among them.
Melons and Spoon Tomatoes
Last year, we had brought the logs to frame a low raised bed, but didn’t get a chance to finish it. I was able to do that this spring, and that’s the bed that got the melons and Spoon tomatoes.
I found some metal posts at the dollar store and first used those to create a trellis for the melons. In past years, they turned out to be far to heavy for the plastic netting I’d used, so I figured something stronger was in order!
In planting the Spoon tomatoes, I put a pair of bamboo stakes in each protective collar. Later, I added cross pieces to make a trellis to secure the Spoon tomatoes to, as I knew they could get quite tall and leggy.
I also direct sowed beans beside the tomatoes, and will talk about those in another post.
More Tomatoes
The other three varieties of tomatoes all went into one of the East yard garden beds.
In the first picture, you can see just how much growth there was with the winter sown bed in the background. That greenery is almost all lettuce!
You can also see that the Chinese elm seeds have started to drop.
The attempt at solarizing didn’t work. It did warm up the soil, though, and the weeds were much easier to pull at that size.
In the end, I had 9 Sub Acrtic Plenty, 5 chocolate cherry and 4 Black Beauty tomatoes to transplant.
I added a large, plastic coated metal plant stake into each protective collar, then wove in bamboo stakes to great a strong trellis. I knew the chocolate cherry could get quite tall. When we grew Black Beauty before, they didn’t get as tall, but were so heavy with tomatoes, I had to add more structural support to their trellis, because they were pulling it over! I wanted to make sure these had a good, strong frame to hold their weight.
Sweetie Snack Mix peppers and Turkish Orange eggplant
Next, the peppers and eggplant went into the wattle weave bed in the old kitchen garden.
The Sweetie Snack Mix peppers all fit into the short side of the L shaped bed. The Turkish Orange eggplant were planted around the tiny fruited strawberry plants that were already starting to bloom!
In cleaning one of the beds, I found some sort of flower. I decided to transplant it in this bed, too. Later, I added a second, different, flower of some type I found. Once they bloom, maybe next year, we’ll know what they are!
The peppers and eggplant all got wire tomato cages for support. Those came in handy, later, for other reasons!
This tiny bed had been prepped in the fall, but was pretty over grown already. You can see the walking onions outside the bed are doing really well already, too!
The cats also like to sit on top of the mesh, so before anything else, I added supports to it, then added a bamboo stake that was given to us, weaving it through the top. It was meant to keep the top from sagging under the weight of cats, but has turned out to be a fantastic handle.
This little bed is the perfect size for a few herbs. It even had room for a couple more.
Spur of the moment, I got some discounted sage and tucked them in as well.
So, everything went in and was looking good, though things were getting pretty late by the end of it. We had plenty of hot days in May, but the nights were too cold for the transplants, and the soil didn’t get much chance to warm up. I recall we even got a frost well past our old average last frost date. The last of our garden didn’t get in until the end of June.
It did not bode well for how the summer would go.
How things grew
Drought.
Heat waves.
Smoke.
A triple whammy that affected everything. I’m amazed we got anything at all.
Winter Squash
The winter squash was hit particularly hard, and not just by weather and smoke.
Those strong, healthy winter squash in the main garden area started blooming very quickly, even while still small. Just male flowers, but that’s not unusual.
All the winter squash in that bed were hit with these tiny insects. Thrips, I was told they are. They were really bad. In the end, they were dealt with using a spray bottle with dish detergent in it, after washing most of them off with a hose.
None of the winter squash did well. After the first flowers appeared, they just stagnated. It was ages before they started blooming again. Plants that should have gotten big enough to completely fill and cover their beds barely covered their protective collars.
It took even more time before any female flowers showed up, and I made sure to hand pollinate as many as I could find. Usually, I had to open up a spent male flower to be able to do it, though sometimes, not even that was to be had.
By then, it was so late in the season, we started having to worry about cold nights. Not quite frost, yet, but cold enough to set them back. I really wanted to give what few squash had finally started to develop, the best chance they could. Thankfully, we did have a long and mild fall, but not mild enough for the squash.
After a pretty severe frost, I finally decided to open it up and see what survived.
None of the Sunshine squash made it, but we did have some Baked Potato and Mashed Potato squash to harvest, including one decently large Baked Potato squash. That one was pretty close to the size they are supposed to be. We had something to harvest to try out, at least.
They, too, stalled and stagnated. The corn that was planted with them, however, did better than the corn in the larger bed, so we could rule out soil issues. The above photo was taken after I’d salvaged the trellis from the melons to make a fence to keep critters from eating the corn before we could.
As with the other winter squash, the Arikara squash seemed to do well, then stalled, then started to grow again, then stalled.
When it got late enough to harvest the corn and pull the stalks, they had started to grow again, so I left the fencing.
In the above picture, you can see frost damage on the leaves – and flowers! There were even female flowers developing!
It was too late by then, but they continued to surprise me by starting to show new leaves and buds even after the entire plants looked like they had been killed off by frost.
I took these pictures of progress on covering the paths with wood chips, but you can see the melon and Spoon tomato bed in both images.
The melons just… didn’t. Some tried to bloom, but the vines seemed to die back a bit, possibly from transplant shock, and then that was it. They never got better, even if a few did try to bloom.
The melons were a total loss.
The Spoon tomatoes, however, were a surprise.
The first surprise is that they stayed short and bushy. Every time I’ve grown them in the past, they got quite tall for such a small plant, and needed support. That’s why I made the bamboo stake trellis for them that I did. The absolutely stagnated, like everything else.
And yet, they were incredibly productive! I couldn’t believe how many tiny tomatoes we got off of these! Granted, they are so small that it takes about 50 or more to equal one small slicer tomato, but it was enough.
Yes, I did collect some just for seeds.
We also lost a lot of tiny tomatoes into the bed while picking them. When the frosts were coming, my daughters pulled them all, then all three of us sat together, picking off only the reddest tomatoes to keep, and the rest went onto the compost heap. Of the next couple of weeks, even with the frosts, I saw all those tiny green tomatoes turning red!
Not only will we probably have self seeded Spoon tomatoes in that bed, but in the compost pile, too!
More tomatoes
Then there were the other tomatoes.
*sigh*
One of the things I had to do was put netting around the bed.
The Black Beauty tomatoes were already something that takes a long time to ripen, but when we grew them before, they got large and bushy and were loaded with tomatoes. This time, we had hardly any show up.
The Chocolate Cherry did better, but still nothing close to when we grew them before.
The Sub Arctic Plenty barely grew at all. They did produce a few tomatoes, though.
In the above first picture, there’s the last of the ripe Spoon tomatoes, along with the unripe tomatoes, that we brought in for our last real harvest. This included dry radish seed pods and Super Sugar Snap peas for seed saving.
Sweetie Snack Mix peppers and Turkish Orange eggplant
Then there were the peppers.
The plants actually did pretty well, though they didn’t get as large and bushy as they should have. One thing I did that I believe helped was prune the ornamental crab apple tree of branches overhanging that bed – discovering a whole bunch of hidden dead branches in the process. It took a very long time, but they did start producing, and we even harvested a couple of mostly ripe peppers off the plants.
When the cold nights and frosts threatened, the wire tomato cages allowed us to cover them with old bed sheets we repurposed for the garden.
The pepper plants handled the cold surprisingly well, though. As with the tomatoes, most of these got harvested while still green, and brought in to ripen indoors before the hard frosts hit.
The Turkish Orange eggplant also stagnated and took a long time to start producing fruit, so it was very late in the season before we started seeing orange among the green.
It was so late in the season, I was collecting carrot seeds, too!
As with the peppers, the last of them were harvested green and brought in to ripen indoors. The plants themselves were not at all cold hardy. Yet, they surprised me. Even after I cut their stems at soil level to more easily harvest the unripe eggplant, I later found that they were sending up new growth!
Over time, as they ripened, we were able to use the peppers and even had enough to dehydrate a small bag’s worth.
As for the eggplant, we tried them out and they were okay tasting. Not particularly tasty, compared to other varieties, but that could have been because of the difficult growing year. One of my daughters, however, found that after eating them, with the skins on, her lips went numb. She’s never had this reaction to eggplant before. There’s something in this variety that she’s allergic to!
In the first picture, you can see the herb bed in the background, still green and producing, after several frosts, while the other beds are being winter sown. Everything except the basil, which got killed off with the first light frost. It was fantastic being able to pop into the garden and harvest a few herbs, any time we needed.
We were still harvesting as needed until it finally was time to mulch the bed for the winter. Even then, I mulched around the plants first, and we kept using them, before fully mulching them before the snow hit. The thyme, oregano, lemon balm and sage are all herbs that, in milder climates, are perennials. With proper mulching, these might actually survive the winter.
For a time, it did seem that they were stagnating, too, but there was a different solution for that. They weren’t getting enough light. We’d pruned the ornamental crab apple tree at that corner before, but much of it was grown back. After cutting way a major branch, the herbs, and even the winter sown kitchen greens bed, suddenly were getting so much more light!
I’m glad I bought the transplants, though, rather than trying to start them myself indoors. I don’t think I would have had as much success, otherwise.
Now we have one last transplant to talk about.
The luffa.
*sigh*
As with everything else, they stagnated. One grew a fair bit more – enough to actually climb up the greenhouse structure, and even bloom.
The other one also, eventually, started to grow, but these were both failures. They’ve grown better for us, out in the open garden beds, than in the greenhouse!
Final Thoughts
Starting seeds in the basement: we have no choice on this one. In fact, we are currently working on making space and figuring out how to bring the aquarium greenhouses into the basement, so we have have better control over temperature and light. The problem is, the big tank and the shelf it’s on are quite large, and we aren’t sure how we can get it around the bottom of the stairs without breaking anything! Also, one of my heat mats died, so we’ll need to get another.
Pre-germination: no change there. We will continue to pre-germinate as many seeds as possible
The portable greenhouse: I really loved having this, but we have a major issue. By the end of the season, the winds basically tore it apart. Plus, we’ve had a couple of cats jump up onto the roof, adding more holes. The cover is completely toast. The frame it still good, though, so we will probably look into getting better quality greenhouse cover material and basically make a new cover for it. Currently, it’s covered with a large heavy duty tarp and being used as another winter shelter for the cats. With no door flap, because that is gone.
Winter Squash: we will always be growing winter squash of some kind. This year’s failure had to do with things out of our control. I’d like to try this year’s varieties again, but another time. We’ve got other varieties to try in 2026 already. I’m still looking to grow the rare Arikara squash for their seeds, too.
Melons: same as with the squash. Growing conditions just killed them off this year. We have new melon seeds and new varieties, so we will be growing melons again.
Tomatoes: My daughters have suggested not to grow Spoon tomatoes again. Too many tiny tomatoes to pick. 😁 We have new varieties to try, including another tiny variety 😄, so next year we will likely have another three or four varieties again. Just not a lot of each.
Peppers: my daughters suggested that we just grow the Sweet Chocolate peppers we grew a couple of years ago, as they were enjoyed. I did pick up a different variety noted for having thick walls, so we might be doing two varieties of pepper next year.
Eggplant: with a daughter that has a reaction when eating the Turkish Orange eggplant, we won’t be growing those again. I did, however, get a white variety to try next year.
Herbs: total win, here. We plant to have many more herbs in the old kitchen garden, and we do have seeds to start indoors, but buying transplants is always a good option, too. Plus, with this particular little bed, we might even have our first perennial herbs – if the heavy mulch helps them survive the winter!
Luffa: Yes, I will be trying luffa again! I am determined to grow sponges. We’ve come so close in the past!
What we could really use is a polytunnel or a more permanent greenhouse.
All in good time!
As for this year’s transplants, they started out strong once they got out of the basement. It just was such a difficult year. We had modest successes, at least, but nothing that would feed us for any length of time! As my SIL once said, of their own garden: if we relied on our garden to feed us, we’d starve! One of our goals, however, is to grow and store enough produce for 4 adults from harvest to harvest. We can’t afford years like this too many times!
We were not the only ones that has such a bad gardening year, of course. Lots of people on my gardening groups really struggled.
Hopefully, next year will be better.
We will, however, be learning a lot from this year, to help make that happen!