The sign is up!

Have I mentioned I have an awesome brother?

Absolutely the best!

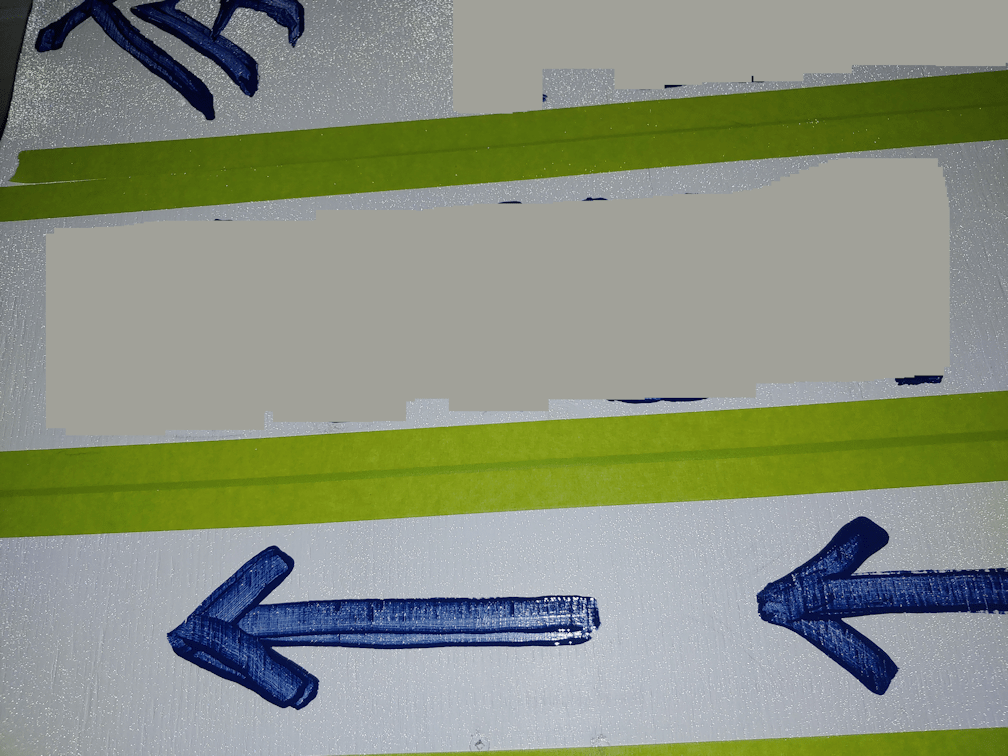
He came over this morning, his truck loaded for bear, to install the sign I made to replace the one that was stolen. And, wow, did he ever go all out!

Once we decided where to put the sign, he used the little legs on the back of it to mark how far apart to set the posts, in the ground.

He started working from the outside of the fence, clearing away some brush growing at the fence line, using the soil auger bit on his drill to make post holes, then using the metal bar to widen the holes. He hit rocks, of course, but was able to either break right through them, or move them. He did have to cut away a section of spruce root, though.

While he worked on the outside of the fence, I worked on the inside.

The area was pretty overgrown, and I worked on cleaning it up so we could access things. This also gave us a chance to take a good look at the corner post, which turned out to be quite solid. It’s just tilting. You can even see how one of the support boards has broken from the pressure!

He ended up setting the 8′ fence posts slightly more than 2′ deep. He brought his post pounder and a level, and had to do a bit of back and forth-ing between them, to get them level at the top.

While he worked on that, I continued clearing undergrowth.

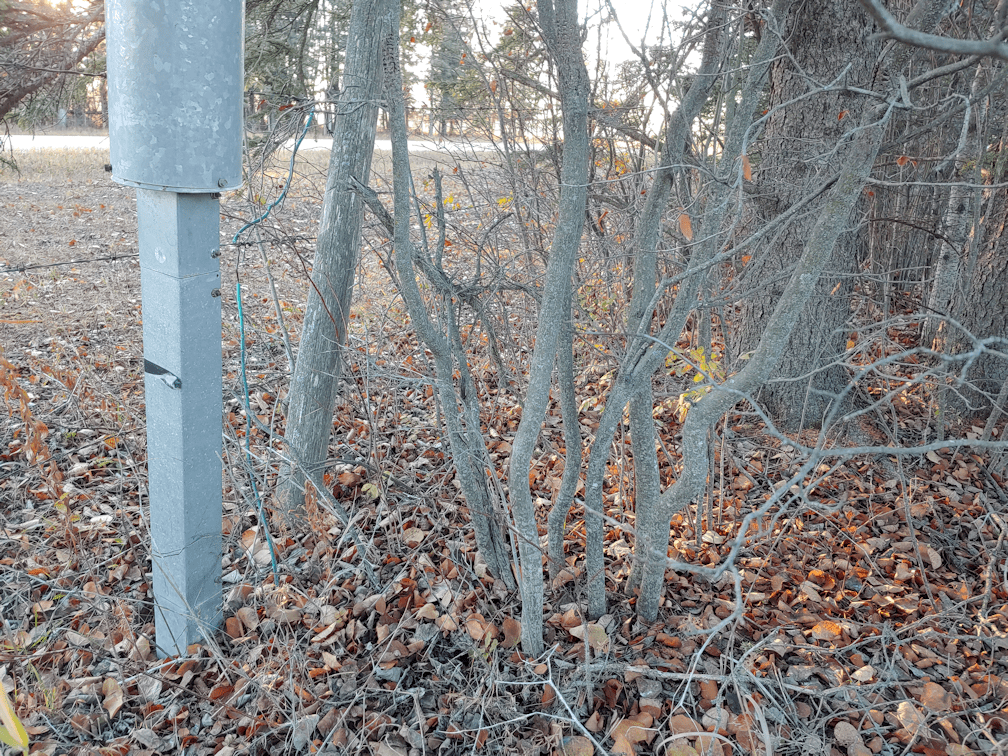
I continued clearing into this area, wanting to have access to the telephone company’s post. My brother confirmed that the green wire is a ground wire.

When planning for tree planting, we need to make sure not to plant over the buried phone wire. In our brother’s property across the road, there is an open alley through the trees. I had figured we just needed to line up with that and we’d be good. However, this post it not at all lined up with the alley.

My brother remembers when the phone lines were buried, and was able to tell me why. My father had asked them to move where they were laying the wire down in the quarter section across the road, so as not to take down the large, mature spruces they would have gone right through. They agreed. Once they crossed to the home quarter, they shifted back to being closer to the north property line. There is another one of these posts near our second gate, right at the north fence line, and my brother says the line was laid from this post to the other.

Which means it continues to shift diagonally, northward, along the way.

It also means the lone chokecherry tree that was allowed to grow in the open grass along the lilac hedge, it directly over the buried phone lines.

*sigh*

I am so thankful that my brother is able to tell me this stuff. He’s the only living person left who knows it! This will help us in working out where to plant trees and bushes.

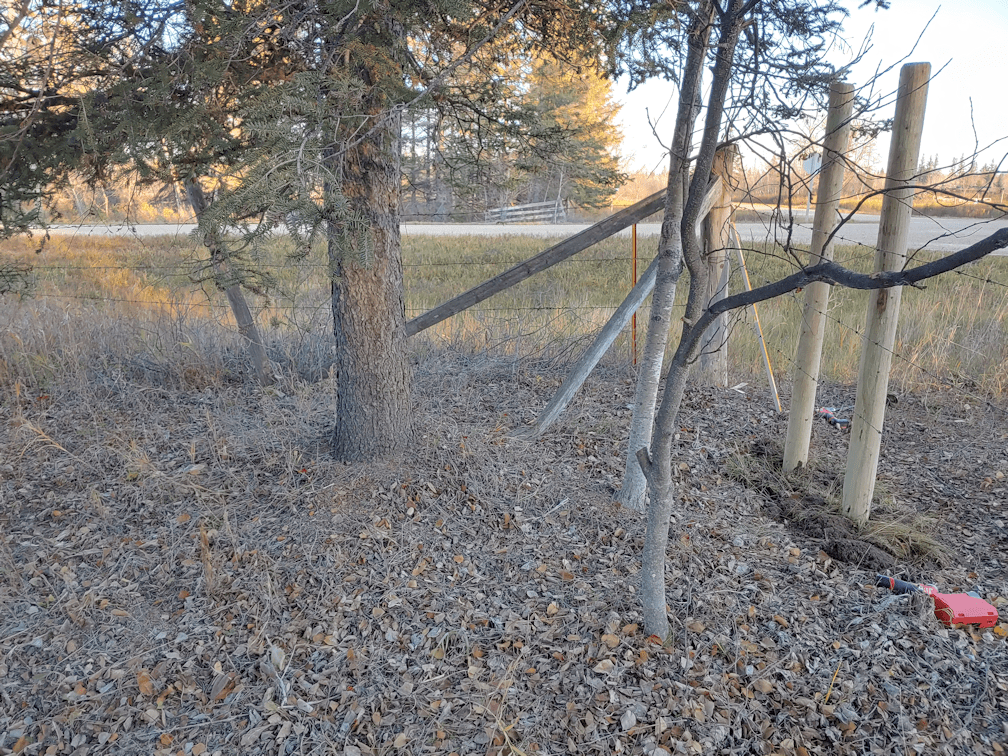
Here is the corner, all cleared of underbrush. Even the trees that were left to grow got a bit of a necessary trim.

Gosh, it look so much better!

As for the posts, my brother took soil from the ditch to put around the posts. In the process, he cleared the ditch a bit, so that any water in there would not be as obstructed.

We then used his pounder to pack down the soil, with him doing the outside while I did the inside.

What an awesome tool!!! I want one!

I also want one of those steel bars (there was one here, but it got disappeared before we moved here) and a post pounder. :-)

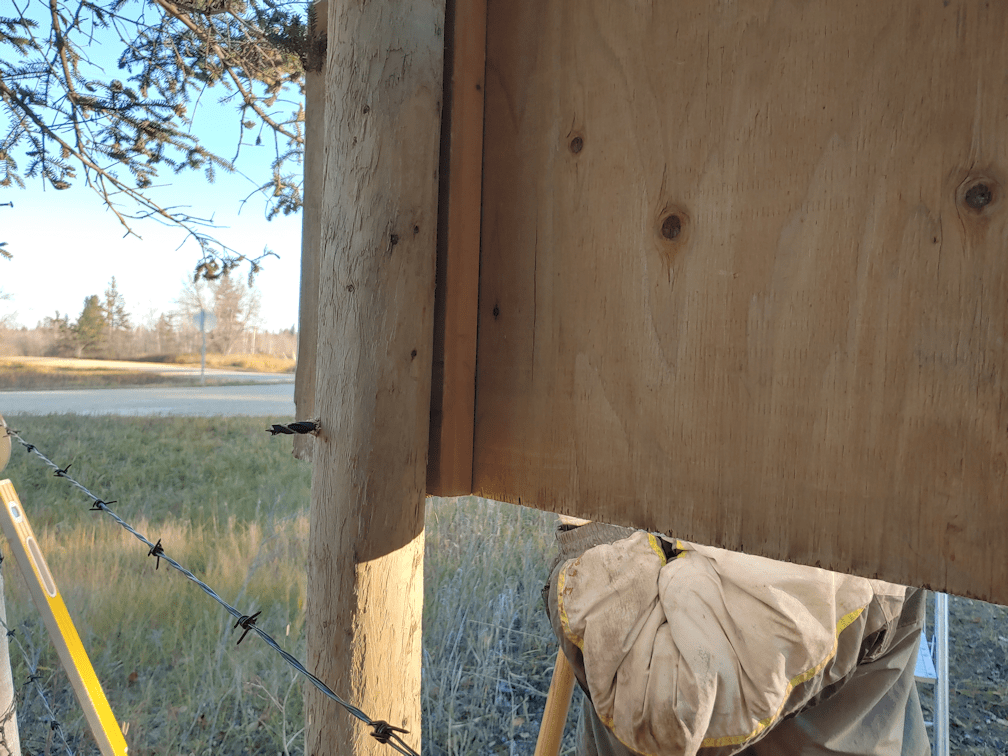
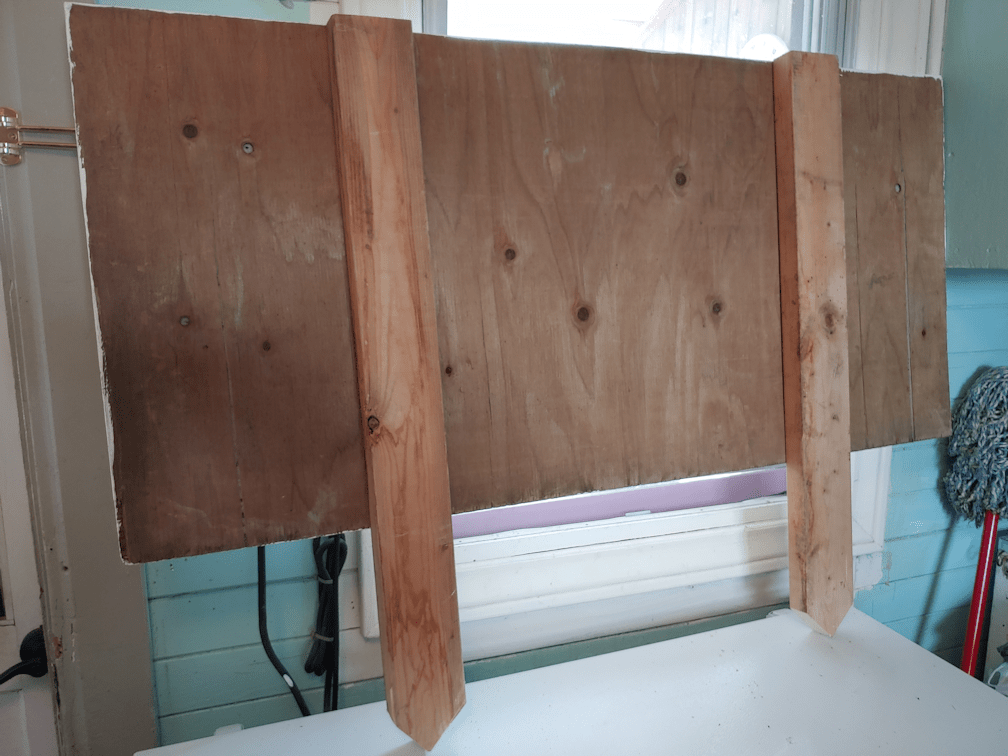
Then it was time to attach the sign. The legs were trimmed off, but the wood attached to the back was left. Between us, we worked out exactly where it would sit, so that the the remains of the legs on the back lined up with the roundest part of the post. While I held it in place from the inside, he marked the based and drilled a couple of screws at the line, to support the weight of the sign. Then he screwed the sign to the posts at the top, using deck screws, right where he would later add the carriage bolts. Once it was secure, and I didn’t need to hold it up anymore, he drilled pilot holes at the bottom, then enlarged them to the size needed for the bolts.

A perfect fit!

After helping put the washers and nuts on the bolts, I continued cleaning up the undergrowth while he finished attaching the sign.

This is the “after” by the telephone company’s post. I didn’t want to clear out all the small trees, as we do want what little privacy they can give us. Several dead branches from the pair of spruce trees got trimmed off, too.
It’s remarkable how big the pile gets, and how quickly!

Then, while I hauled the branch pile away, adding it to the one that’s out by the spruce grove, my brother added some final touches to the back of the sign.

A board was added for extra strength and stability.

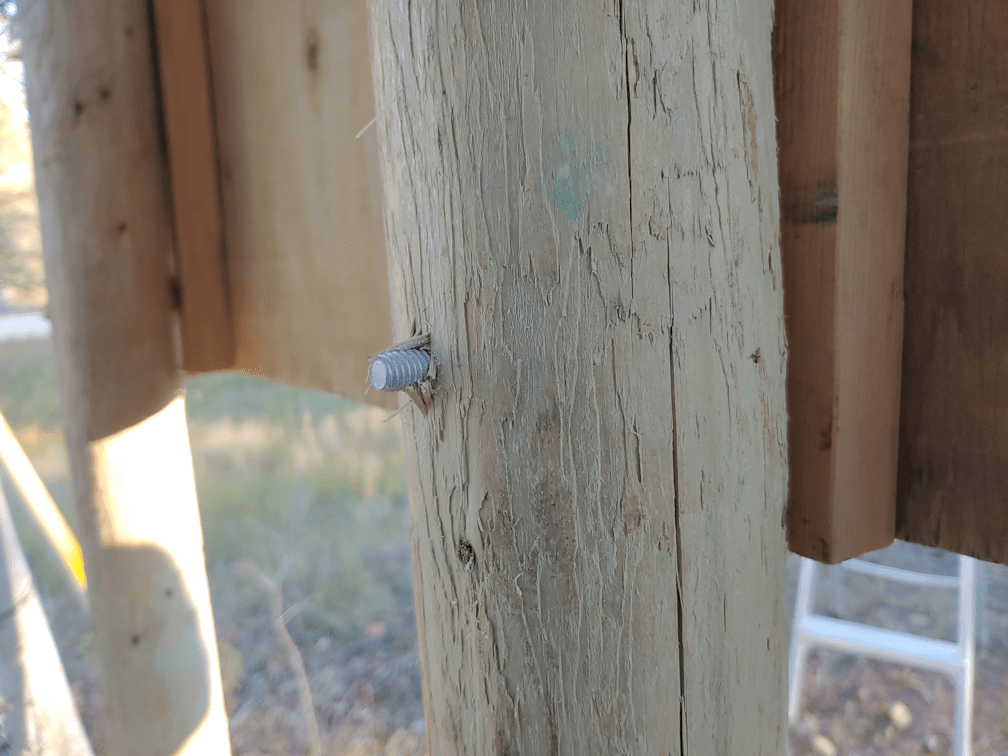
We’re just assuming our vandal is going to try and do something to it, so he also added extra locking washers to the back of the carriage bolts, and other things. They cannot be taken off now!

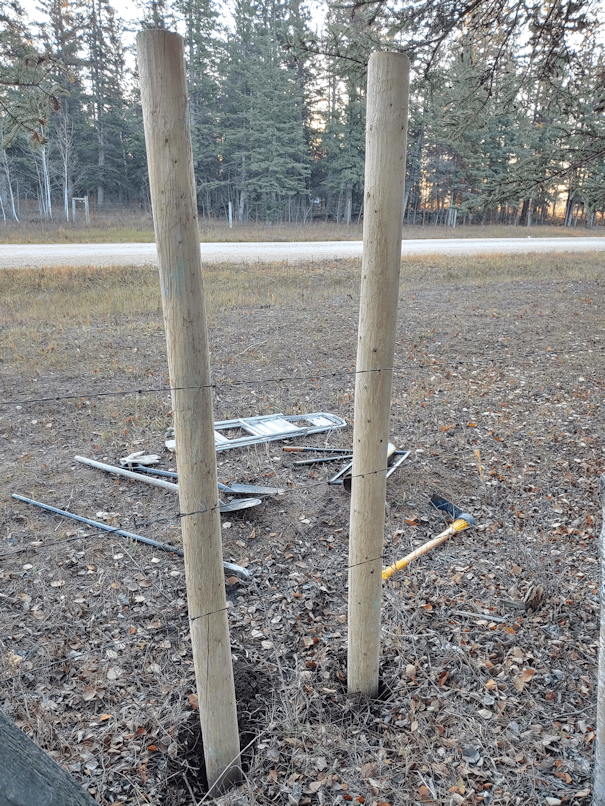
He also attached the barbed wire to the post and…

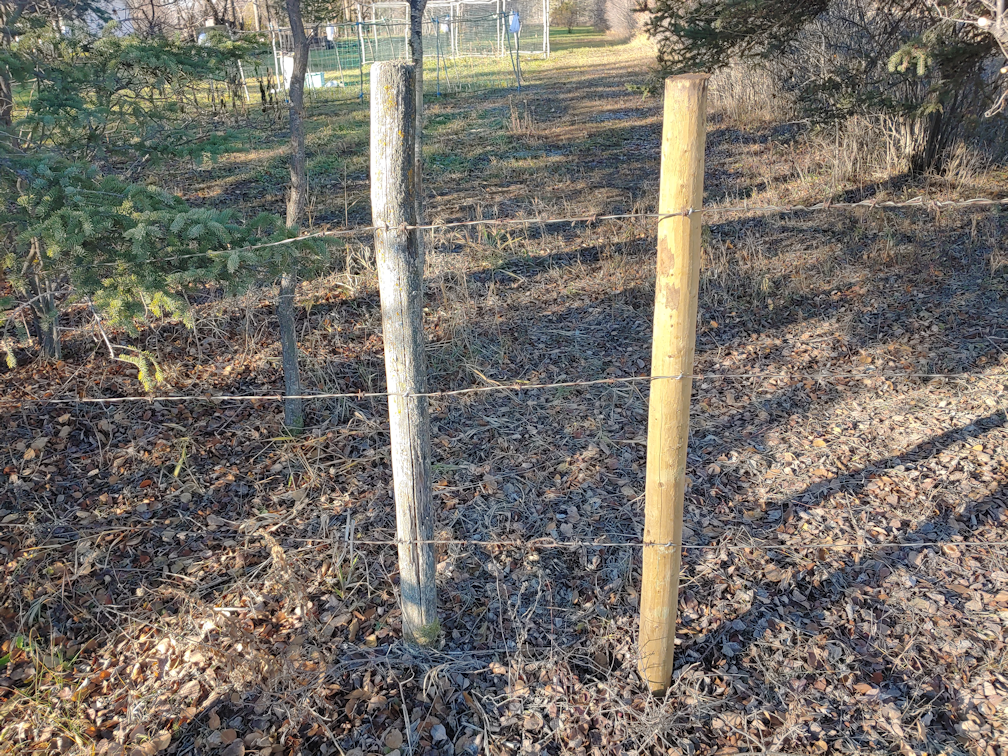
… in what seemed like the space of a heartbeat, installed a new fence post. The old one beside it is free floating; completely detached from the ground.

He even added a second one.

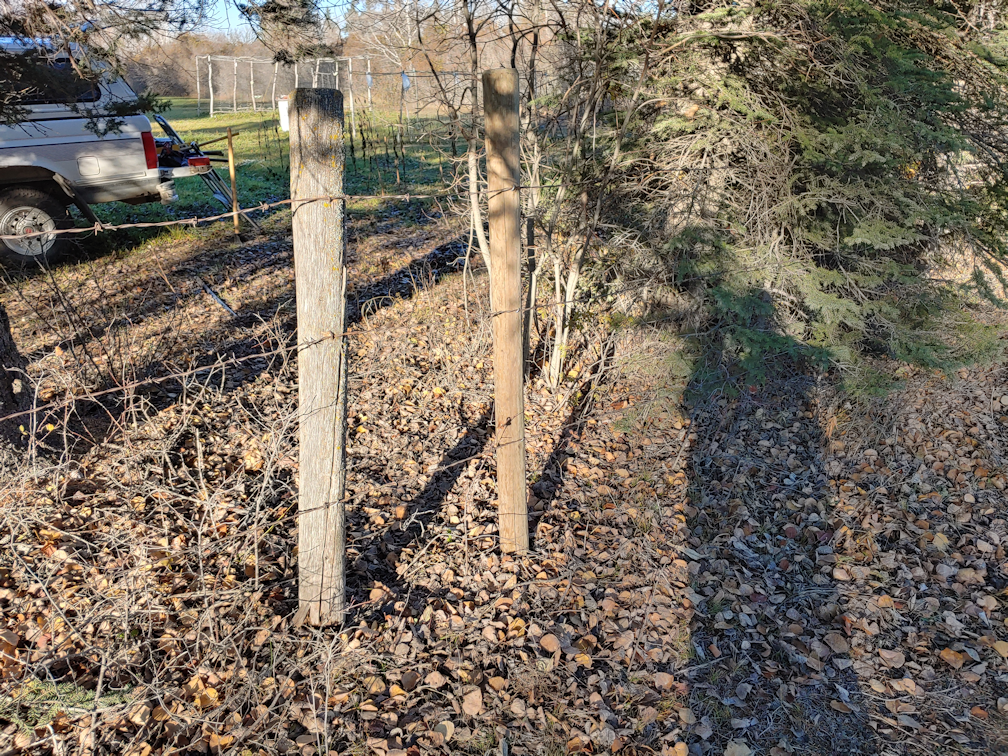
In this spot, the fence was so unsupported, my brother was able to lay the barbed wire on the ground, so it would be easy for us to cross the fence. After we were done and he was straightening things up, he installed another post. This time, I was able to provide the post, from the collection of fence posts I’ve been finding as we clean up. Just a couple of new posts, with the old posts keeping the barbed wire properly spaced, the fence is surprisingly more secured, and the wire was taught enough to actually make it difficult to slip between them as we crossed in and out!

Speaking of secure…

For some reason, there was an old post lying loose on the ground, not attached to anything. So we used that to add support to the corner post. My brother brought out a post maul – yet another of his many tools that he brought, just in case! – and was even able to straighten the corner post, just a little bit. Then he added some screws to the support post we added, as well as the one that was already there, to secure them even more. The last thing that was done, was installing the mounting hardware for the newer security camera. It took a while to find a good place for it. I wanted to make sure it covered the area in front of the sign, but also not face the main road. There is enough traffic around there that we’d ended up draining batteries like crazy, from the motion sensor being triggered so often. The mounting hardware also allowed me to adjust the camera even more, to make sure it was aimed exactly where I wanted. Of course, it also has to be set up so it can be reached easily, to switch the memory card and change the batteries.

If our vandal does decide to do something to the sign, we’ll have it on file. The camera isn’t exactly hidden, and may act as a deterrent, too. Unless our vandal is drunk again, at which point, he wouldn’t care if he was being recorded. I’m just hoping that if he does decide to do something to the sign, he’ll see the camera and stop.

Since the sign has our name an address on it, obviously I’m not going to post a picture of it here, but my brother is very happy with how it looks, and I’m very happy to have it up, so much sooner than I expected!

In all, it took us about 3 hours in total, to install the sign, a couple extra fence post, the trail cam, and clean up. Then my brother headed straight home, because he had so much to do at his place this afternoon, too!

Have I mentioned I have the best brother?

It deserves repeating.

Later on, when it’s dark out, I want to go back out and take a photo of the sign with flash, to see how the reflective paint shows up behind the lettering. I know my brother will want to see how it looks, too!

I am so happy this is done and – as a bonus – that corner got cleaned up. It looks so much better. We’re not cleaning up the rest of the fence line until we have planted the berry bushes we intend as a privacy screen.

It’s starting to look really nice out in that corner!

The Re-Farmer

Sign progress

This morning, I finally started on the lettering for the new sign I’m making, to replace the one that was stolen.

My brother had mentioned what I was doing while visiting my mother and winterizing her new air conditioner (and he even found the right size screws to replace the ones that were missing from the seat of her walker). Yesterday, she called and asked me about the sign my brother said I had ordered. Of course, my brother told her I was making it, but somehow, she decided as was… paying someone else to make it? I’m not sure. I’d even told her I planned to make one, when I told her the one with my dad’s name on it had disappeared, but I guess she forgot. As we spoke, I mentioned that I wasn’t in a hurry to finish it, since I wasn’t sure what I would do to put it up. I don’t want to dig post holes, and the fence posts are all falling down, but we do need something permanent that can’t be stolen. I also mentioned that we would probably need to put a camera on it, too, and we don’t have a spare right now.

Well, I found myself chatting with my SIL later on, and it turns out my brother wants to come out here with his post pounder and put in a couple of fence posts before the ground freezes! He even offered to pick up a couple of 7′ fence posts, and the sign could be screwed on later.

At which point, this morning I decided I may as well get the lettering finished. I used painter’s tape to divide the sign into sections, then a pencil to draw in the letters and numbers as a guide, then added the first, base layer of the blue paint.

I removed the identifying features, but here is how it looked, with and without flash.

There was a bit too much light in the room, but you can still see the sparkle from the reflective paint in the photo where flash was used.

I picked up a set of really cheap craft brushes to use for this. After this first layer of paint is dry, I’ll do a second coat with the same size paint brush I used for the first coat, and then will use smaller brushes to tidy up the edges, the serifs, and maybe add a few decorative flourishes to the uppercase letters. Once that’s done, I’ll be able to see if it needs a third coat.

I’m debating whether or not to outline in a contrasting colour. I have paint markers in silver and gold that can leave fine lines, and should be able to withstand being outside. That might be too much, though. I just hope the letters will be easy to read from the road. I find myself thinking they may be too small, but then I remember that the old sign’s letters were much smaller, and it could be read from the road, so this should be fine.

I think it will look really nice, once it’s installed!

The Re-Farmer

Reflective

I remembered to go out in the dark and take a flash picture of the sign I’m working on. Looking at it on my phone, I didn’t think I got very good coverage. It wasn’t until I uploaded the photos onto my desktop that I could see how funny it was.

On the sign itself, you can see spots that are reflecting more than the rest. They were the same in each of the photos, which I took at different angles, which tells me that yes, it’s the covering, and not, say, the LED flash on my phone.

It’s what I see around the sign that is funny. All those white looking spots around the sign? Even on the grass? That’s the reflective paint! It’s everywhere! :-D It was a bit windy when I was spraying it. I expected a bit on the wall of the cat’s house, and a smattering on the posts below, but I did not expect to see that much on the grass or on the ends of the sledge the cat’s house is resting on!

So… if it’s calm enough tomorrow, I’ll give it another coat, then check it again! :-D

At least I know the stuff works!

The Re-Farmer

Sign progress, and checking the water levels

One of the tasks I got a bit of progress on yesterday, was the sign I am making to replace the one with my late father’s name on it, that identified this farm.

Before adding the second coat of paint, I cut a scrap piece of 2×4 from the wood we found in one of the sheds and brought to the basement a while back, and made “legs”. They are short, but they are something I can work with when we are finally able to put the sign up. Mostly, I wanted them screwed in place before the second coat of white paint was added. That way, I could brush over the screws to make them less visible, while making sure not to fill in the holes for the screwdriver, so they can be taken out easily, if necessary.

They also did a better job of keeping the sign above the top of the freezer while I painted, than what I was using before. :-D

There is one problem with working in the old kitchen, though.

The wasps are somehow getting in from the hive in the crawl space.

So far, they are staying at the north window, trying to get outside; the south window faces into the sun room, and the west window is covered with foil, so there is actually more light from the north. Plus, the old kitchen is not heated in any way and is always a few degrees colder than the rest of the house, so the wasps were pretty groggy. Still, when I first came in to start working on the sign, I did have to move a wasp off that had landed on it, while the paint was still a bit wet. If it had been warmer and the wasp less groggy, it probably could have flown off on its own. As it is, when I gently brushed it loose, it just fell to the floor, where I could no longer see it.

They won’t last long, as wasps die off over the winter, but it does mean my husband has to be careful going into there, since he is allergic to stings.

With the second coat of white paint done yesterday, the next step on the sign for today will be to take it outside and use the reflective spray paint on it. I’ll have to read the label on the can again, to see if it should have more than one coat or not.

I can do this part outside, as we are not expected to have rain again for a while. With how much we got recently, this morning I decided to check out the old gravel pit that the renter got dug deeper, so see how it was. Along the way, I checked a pond, and there was no standing water at all, though the bottom has a lot of green growth at least.

The old gravel pit is wonderfully full of water! This is the most it has had all year. Thankfully, there is a lot of clay to keep it there, too.

The hill created when the pit was deepened has been noticeably affected by the rain, as well, and I could see where actual rivulets had formed, washing things away.

This is the bottom of one of the rivulets, where you can see a deer had made its way through the clay and silt. All around the bottom of the hill, there are now patches of clay and silt like this, but this is the only one that had tracks in it. :-)

I’m really glad the renter was able to get this pit dug deeper. Even with all the rain we’ve been having, the water table has not recovered yet, so this is the only water around for wildlife. Of the dugouts in the area that I can see from the roads, only one, about two miles away, has any water in it, and it was also dug deeper this year, too.

Well, things have warmed up nicely – it’s currently 15C/59F right now! – and it’s time to get outside and get some manual labour done! :-)

The Re-Farmer

Bee rescue, and new sign started

Yesterday, looking at the weather radar, I had expected that we would catch the edge of a weather system that was being pushed up from the southeast. Which is what usually happens.

Instead, the system ended up going right over us, and we had heavy rain all day and most of the night. We are expected to continue to get rain today and tomorrow, and remain cool until the day after.

I didn’t think the bee on the sunflower would survive that long.

We have a mini greenhouse in the sun room, so I lay the cover of a seed starter kit upside down on the top shelf, and had a sieve ready to use as a cover, then went to cut the sunflower off and bring the bee over. It had actually moved a bit since I last looked at it, which was encouraging. We had set up a light fixture on the top of the mini greenhouse with a full spectrum, incandescent light bulb in it, to keep our seedlings warm. The sun room wasn’t much warmer than outside, so I turned the light on to add a bit of warmth, making sure the fixture was tilted away, so it was more indirect.

The bee is hidden by the petals on the sunflower, in the above picture.

If the bee were sluggish and staying on the sunflower only because of the temperature, I expected to see it become active fairly soon. If that wasn’t the reason it was still on the sunflower, I expected to find a dead bee.

Since it’s too wet to work on outside projects, I set up in the old kitchen to start an inside project. Since the sign with my late father’s name on it got disappeared from the corner of the property, I decided we needed a new one, as it had been a landmark we could use to give directions to our place. Yesterday, I went rifling through the barn and found a scrap of half inch plywood that was in decent shape, brought it over and gave it a cleaning. Today, it was dry and ready for painting.

We still had some white paint from when we fixed the door into the sun room and repainted the frame as well, and there is enough to do at least two coats.

It’s just a bit bigger than the top of our freezer! :-)

The first coat is done, and tomorrow I will give it a second coat. I will also look for wood that I can attach to the back to make posts that can be driven into the ground. The sign that disappeared had been attached to the corner post of the fence, but all those old fence posts along there are falling and need to be replaced, so I want to mount the sign independently from the fence.

After the paint is dry, but before the lettering is painted on, I plan to give the whole thing a spray with some reflective paint I picked up a while back. This way, the background should highlight the lettering when hit by headlights as people turn the corner towards our driveway.

We’ve been talking about coming up with a name for the farm, just for fun. It has always been really important to my parents that the farm stay in the family name, which is why it went to my older brother, who has sons and now grandsons, to carry on the name. So out of respect for my late father, I have decided to simply use our family name on the sign, however I will also include our driveway marker number, with the municipal road name, which is also our family name, and an arrow towards our driveway. The road sign with our family name on it that disappeared when the stop sign it was mounted on was broken, never got replaced, so having that road name on the sign will be helpful for our neighbours, too. Which means I will have two lines of lettering, plus an arrow, on this sign when it’s done.

I think we might also need to set up another camera on it, just in case. I have no proof that our vandal stole the old sign, but if we put up a new one, with our family name on it, I suspect it will infuriate him, and our restraining order against him is still going through the court system.

After I finished with the first coat of paint, I checked on the bee, and was happy to find it crawling actively around the sunflower. I’m very glad we had it covered!

We tucked the entire sunflower into a plant pot (our houseplants are still outside), where it would be more protected, both from the weather and from curious kitties. Happily, it immediately began crawling around even more. Hopefully, it will be able to make its way back to its hive, wherever that may be. Most local bees are more solitary, and have hives underground, so there is no way to know where it came from. At least now it has a chance, and we need all the pollinators we can get!

As much as I appreciate the rain we are having, I’m looking forward to when it clears so I can get back to work outside. I got a transaction notification from my bank, showing that Veseys has charged us for the garlic we ordered. That means they will be shipped soon. Possibly even today or tomorrow. I’ll get an email notification when they do. They will need to be planted soon after they arrive. That means we are running out of time to prepare a bed for the garlic. If the weather prevents me from finishing the high raised bed we are working on, then I will top up the low raised beds we made where the garlic was planted last year. With the new dimensions, we might even be able to plant all three varieties in one bed. It’s typically advised to rotate alliums into different beds every year, but in building the low raised beds, the soil has been amended a lot, and they will be topped up with fresh soil, so it should be just fine. We shall see what we have time for.

Meanwhile, we’ve got a couple of days to work on indoor projects, instead. Like the bread baking I can hear my daughter working on as I write this! :-)

The Re-Farmer