It took quite a few trips and a fair bit of rearranging, but all the transplants that were in the living room are now in the sun room!
There is a down side to not being able to close the outer door for the sun room. To keep the cats out, that means closing the inner door. The outer door has a screen window.
We reached a high of 21C/70F today, but the sun room reached 27C/81F! And the only air circulation is the ceiling fan. We are keeping the inner door into the old kitchen open. The outer door has a screen window, and with the old kitchen staying so much cooler, it should help at least a little bit. While it will help keep the sun room temperature down a bit, it will also warm up the old kitchen, so it’s a trade off.
Hmmm. I just remembered. I think we have a spare hook and eye closure somewhere. If I can find that, we can latch the outer sun room door from the inside. That would help. We’d still have to close the inner door for the night, so we don’t lose too much heat, but that’s okay.
Meanwhile…
I got the second light hung up and plugged into the first one. We are pretty much out of trays and bins to hold all the transplants, and I’m not finding more like the ones we have. We do still have a couple more of the black plastic trays, but they’re not very strong, and some of them have started to crack. I’ve been doubling them up, anyhow, just for the extra strength, and that way I can also use the cracked ones without leaking water everywhere.
There’s still a bit of room on the shelf! Those peppers had been in the big aquarium greenhouse and will need potting up, but I think they’ll enjoy being here for a while, first. They, at least, will really like the heat in here! I’m hoping the oregano and spearmint will do better here, too. They are not doing as well as the oregano and second variety of thyme we planted more recently are. I think the sad little luffa will like it better in this heat, too. In fact, depending on how things go, we might even try growing it in a pot in the sun room, instead of outside, this year.
We are expected to cool down a bit over the next few days, with Sunday being the coolest at 10C/50F. Tomorrow is supposed to reach 15C/59F, so it should be a good day to continue working in the old kitchen garden and finish that last bed. I’ll start hydrating my trays with the Jiffy pellets, so they’ll be ready for starting seeds the next day.
The priority for tomorrow, though, will be to go to the post office and pick up those raspberries that are in! We’ll want to plant those as soon as possible.
I had a bit of time this morning to prepare before working on the old kitchen garden. My plan had been to use the four foot length of logs left over from when the branch piles were chipped to build up the walls of garden bed, end to end, held in place by stakes. As I was doing other stuff around the spruce grove yesterday, I realized a tree top from a dead tree we’d cut down was still stuck in the cherry trees we need to get rid of (they are non-productive, and invasive), and it was nice, long and straight.
So this morning I worked on getting that out, then went through the spruce grove to see if there were other dead trees that were already on the ground I could make use of. That was then I spotted something red among the dead grasses.
This was about 40 yards away from where it had been hanging. No wonder I couldn’t find it back then! I guess it really was the racoons that stole it away.
The cannister was still intact, but the rest was broken into many pieces, which got cleaned up.
I did manage to find more useable trees that I dragged closer to the old kitchen garden, and then I headed out to see my mother. I left early because I wanted to go to the pharmacy first, then grabbed some fried chicken and wedges for lunch. My mother has told me not to, in the past, because she decided the chicken was making her sick, but she had no complaints at all when I showed up with it! The other choices weren’t open today, or opening later, so there wasn’t much choice.
So we had lunch, then she gave me a list of the few things she needed at the grocery store and I picked those up for her. While visiting longer after that, I discovered our vandal has been swinging by her place again, and had left more phone messages. I listened to those and recorded them with my phone. I’m concerned, because our restraining order is expiring about now. I’d hoped to not need to file to renew it. I still sometimes see him on the security cameras, just going by. He hasn’t been doing things like coming up to the gate and messing with it, or giving the finger down the driveway, nor has he done things like follow me home and yell at us from the road – but once the restraining order is expired, there’s nothing to prevent him from starting that up again. From his messages, he’s clearly still obsessed with us living here on the farm, and still portrays himself as a victim, and me as trying to put him in jail and destroy his life. Truth is, I don’t even think about him until he shows up on the camera files, or starts bothering my mom again.
Frustrating.
Anyhow.
After finishing up my visit with my mother, I went to the hardware store. I found some things to use to keep the frames I want to build from bowing out, and also to pull in the walls of the raised beds. The long sides are made with board that are 6′ pieces and 3′, joined by attaching them to pieces of 2×4. What I didn’t expect was for the 2×4 to start splitting lengthwise! So all three beds are bowing out, some more than others, at the joins. If I can get those pulled in and straight again, the frames I want to build will sit properly on top.
For the frames, I wanted to get 1″x2″x10′ boards, but when I got there, they only went up to 8′ long. Since these will be moved around a lot, I did not want to be cobbling the long sides together to make 9′. The next option was 1″x4″x12′ I’d intended to get a dozen of the 1″x2″, but went with 10 of the larger size. After taxes, it came out to just over $80, which was more than I’d wanted to spend! But, I needed the lumber.
So I got the lumber, then drove into the yard to have it loaded into the car.
Slight problem with not using the van right now.
If I’d been able to get the 10′ size, it would have worked, but at 12′ long… well…
I folded down the front passenger seat, so they could be slide right up to the windshield, but they were still sticking out the back. They gave me a flag, but didn’t have any ties. I had to go back inside and buy a couple. The car happens to have metal loops on the sides so I could attach the longer one across the boards to secure them, but I still had to secure the hatch. The shorter tie was still too long. I went back in to try and find shorter one, but there was nothing. The hatch had a small hole I could put the hook into and that’s all there was to secure it there, so it’s not like I could use rope or something. I ended up pushing the end of the tie through the loop in the middle that the hatch locks into, shortening it a bit, and that was the best I could do.
I drove home doing only 80km/h all the way (speed limit on the highway is 100km/h), with one arm over the boards! I did pull over at one point to adjust them higher into the front of the car, and even used the flag to tie around the ends of the boards (in the photo, it runs under one board, to keep it from sliding off), just to secure them a little bit more.
The ties I got are going to stay in the car, and I’ll probably get some cord or rope to include in our emergency kit, too! That’s the red and black bag to the right of the lumber in the photo.
As I was driving home, I was thinking about how these 4″ boards would be just too wide for the frames I want to build, when it finally occurred to me that I could just cut them in half, length wise!
Which means, I could have gotten away with buying only 6 of them, instead of 10.
Ah, well. It’s not like the extra will go to waste!
So that’s the plan with these. After I’m done with the old kitchen garden, and the girls have finished with the sun room, I’ll drag the table saw out of the sun room and use it to cut a few of the boards in half, length wise, to start with and then build the first frame. I think I’ll make the first one over the spinach bed. I don’t like the floating row cover sitting right on top of the soil. As light as it is, it just seems like it’ll weigh down the seedlings when they germinate. That will be my prototype, so if I need to make any changes in the plans I have in mind, I’ll do that when making a cover to replace the hoops and plastic over the carrots.
But that will have to wait.
I’m not sure if I’ll be working on the old kitchen garden tonight, anymore. It’s supposed to be warm out there – we’re at 11C/52F but the winds are still high. It’s not just about being chilly. Even with a hat on and wearing the hood on my jacket, I still got ear aches from the wind.
We shall see.
I’m hoping to be able to set up for another time lapse video of the process. I have a GorillaPod to hold the phone I’m using to record video, but it’s a smaller one, which limits what I can attach it to. There are several options, though, so it shouldn’t be too hard to figure out.
I’ll decide whether I’ll start on it tonight or tomorrow, when I do my evening rounds and see what the conditions are like.
Now that I’ve got the lumber, though, I’m really itching to build those frames!
Okay, so I was supposed to take it easy today, so that I wouldn’t be too sore for manual labour tomorrow.
But I kept going outside because, aside from the wind (I’m so tired of the wind!), it was gorgeous out. Unfortunately, the wind limits some of what I could do.
No limits on feeding the kitties, though!
Not-Junk Pile kept watching me closely, but would not let me near her. From what little I could see as she moved around, it does look like she is probably nursing. I haven’t the slightest clue where her litter might be.
One of the things I ended up doing was tending the bed we’ll be planting peas into, a bit.
I just pulled the mulch back from the fence line to expose the soil to the warmth of the sun. There are a fair number of weeds and grass coming up. If I let them get bigger, they’ll be easier to pull up.
I also watered the beds we planted, as well as where the girls sowed the alternative lawn mix in the maple grove. That included pulling back the plastic on the hoops over the carrots to water them. I couldn’t see any carrots germinated, but I am seeing some weeds we missed, pushing their way through. I won’t try to pull those until the carrots have established themselves, so I don’t accidentally pull of carrot seedlings.
Since I had the plastic off anyhow, I improved the hoops set up. I’ve got a pair of bamboo stakes across the tops, and added two more pairs on the sides, just a few inches above the soil, to make sure the plastic doesn’t end up on top of the carrots planted closest to the walls. Then I zig zagged twine from the bottoms of the hoops, to the bamboo stakes at the top. I was noticing the wind was pushing the sides of the plastic inwards more than I liked, so that should help prevent that a bit. By the time it was done and the plastic put back, it didn’t really look any different, so I didn’t bother taking photos.
That was in the afternoon. In the early evening, after feeding the cats, I decided to extend my evening rounds in the outer yard. I went into the warehouse to look again at what’s in there, besides the many bags and boxes of my parents’ belongings and furniture. There’s what appears to be a folding table that we could make use of, but we’d have to move quite a few things to access it. Not as much as what we’d need to access what looks like good lumber and plywood in another corner.
I also went looking under the warehouse. Quite a bit of stuff had been shoved under there. Boards and beams of various sizes. Old drawers. Electrical wire. Lead pipes, some with taps still attached. Some is potentially useful, but others are looking like they’re breaking down, even though they are well sheltered under there.
I also made sure to check the area around our septic outflow. We’re going to have to do some clean up around it, as branches from nearby trees have been falling around it. There is a low spot nearby that, when I was a kid, had a pond in it most years. Since moving here, it had water during last spring’s flooding, but was otherwise bone dry. Right now, it’s full of water – and frogs, from the cacophony I was hearing!
While back there, I was looking around the back of the collapsed log building and noticed something half buried in the tall grass. I ended up pulling out a metal fence post. There were a couple of wooden fence posts under there, too, one of which was still quite useable, so I dragged both of those over to where I have two other metal fence posts leaning against the back of the garage. The one I found is covered in rust, but still solid – and the same length as the other two! Seven feet, I think.
I spent some time looking at stuff in the barn, too. It seems like every time I go in there, I see something “new” that I hadn’t noticed before. One of the things I wanted to look at were the “spare” windows that I’m hoping we can use to replace the windows in the sun room that have lost their inside pane, and the one where the inside pane is cracked. Looking at the larger windows, though, I realized we won’t be able to use them for the sun room. Taking a closer look at them, I realized they are much bigger!
There are a lot of old windows all over the place. Many have broken glass, but many more are still intact. I went into the shed near the barn; the one with the tarp on the roof. There are so many more old windows in there, some of which we could probably find uses for, as we build various sheds and shelters. There are also a lot of doors of various types, styles and ages. I took a closer look at some of them, and they turned out to be closet doors. One pair are a type that are made to slide on tracks. The other is a pair of folding doors, like we are already using as a table top for our transplants. What we used to hold the transplants to harden them off and keep them safe from cats last year are not available. If we can find solid supports that are tall enough, these closet doors would probably give us enough space to set out all the transplants for hardening off!
On the way back to the inner yard, I decided to start moving some things along the side of the garage, where we’re looking to have a shed offered to use placed and used as a chicken coop. There were some odds and ends, some boards on the ground, one of which was so rotted, it had grass growing through it in places, and a length of steel pipe buried in the tall grass. There’s also a small maple that was growing in the space between the boards, and a small red osier dogwood, that we’ll need to get rid of. But first, I grabbed a rake and did more clean up.
I’ll have to come back with the loppers to cut away the maple and dogwood. You can’t really see the dogwood in the photo. It just sort of disappears in the grass by the garage wall. I was finding bits and pieces of the branch pile that used to be here as well. We’ll have to come back with the wagon or wheel barrow to haul away the pile of dead grass and branches for burning – which will have to wait until the wind dies down!
Now that everything is clear, we’ll have to bring a ladder over and clean the eavestroughs on the garage. They haven’t been done since we moved here. On this side, it was because of the branch pile in the way. On the other side, it’s just a lot harder to get to, with so many trees growing near the garage.
Then we’ll have to bring over the old tire rims I’ve decided to use to put under the shed, and level things off at the front of this area, in line with the front of the garage, as best we can. It needs to far enough forward to not shade the garden beds on the other side of the chain link fence. Then I need to contact the guy who offered the shed to use and work out when he can bring it over. Once it’s in place and gets the repairs it needs, and set up as a coop, we should be able to use those metal fence posts we’ve found for the chicken run we’ll need.
I’m looking forward to getting at it, so we can finally have chickens!!!
So that’s what I ended up doing today. I didn’t push myself, and so far, I don’t feel the need to take more painkillers, which is a good sign!
We’ll see how well that last, overnight! I don’t know how much outside work I’ll be able to get done tomorrow, though. I’ve asked the girls to work on cleaning up and de-catting the sun room, so we can start moving transplants into there. I’ll be heading to my mother’s in the afternoon, then hit the hardware store on the way home to pick up the lumber I need to make proper frames for the garden beds. The one thing I haven’t figure out for them yet is what to use across the middles, to keep them from bowing outwards. I don’t want to use wood, or anything larger like that, as I don’t want it to end up being in the way of any plants. I’ve been looking at threaded rods but, at the lengths I need, they are way too expensive. So I was thinking of a steel cable of some kind. I’ll have to look around and see what they have – and how much it costs! – to figure it out.
I have been having major issues with Nosencrantz in particular, trying to get at the north window in my room. My craft table is under half of the window, and that end of the table has my tea station and phone base/answering machine, among other things. They keep trying to get to the top of a set of shelves I have to hold supplies. The selves are repurposed wire shoe racks, so they can’t handle having cats jumping on and climbing them.
In trying to keep the cats out of my craft stuff, I’ve basically rendered my craft table useless, filling it with stuff to discourage them from jumping on it. Most cats have learned to stay off, but Nosencrantz won’t. She keeps digging into things, clambering over the stuff I’ve put on the table to block her, and basically driving me rather bonkers.
The thing is, I have no problem with them having access to the window. There just isn’t any way for them to get to it, without knocking things about or even collapsing my shelves of craft supplies.
Today, after repeatedly having to chase Nosencrantz off my craft table, I just got tired of it, went into the basement and scrounged together supplies to make her a shelf at the window, that will also protect my stuff on the table.
This is the result!
At some point, I’ll probably sand it some more, maybe paint it, and make a more padded cushion for the top, but for now, it does the job! The other cats are oblivious to it, but Nosencrantz has tentatively gone onto the table, which I’ve cleared enough for her to get to it. She has yet to jump onto it herself. Instead, she’s tried to get into a container behind my phone! I’ve figure out what she was after and have tucked them into a tin, so hopefully, she’ll stop doing that and just use the shelf to sit and watch things outside the window!
Okay, so I made this video a while ago, but had all sorts of problems exporting the finished video into a file format that I could upload to YouTube that worked. After trying for days and having it fail, suddenly it worked. Nothing had changed on my computer, and there was no software update. Just, one day no-worky, another day, yes-worky.
Frustrating!
No matter!
Normally, I would have done a long, photo heavy post on making this, but I don’t have the media storage space, so I’m trying to make more videos. I’d found a video on how to make a Tuscan beef stew that looked really good, but I didn’t have the exact ingredients.
So I made it with what I had on hand.
Here is not-quite Tuscan style beef stew, made with mead.
Let me know what you think, and if you have any suggestions to improve things!
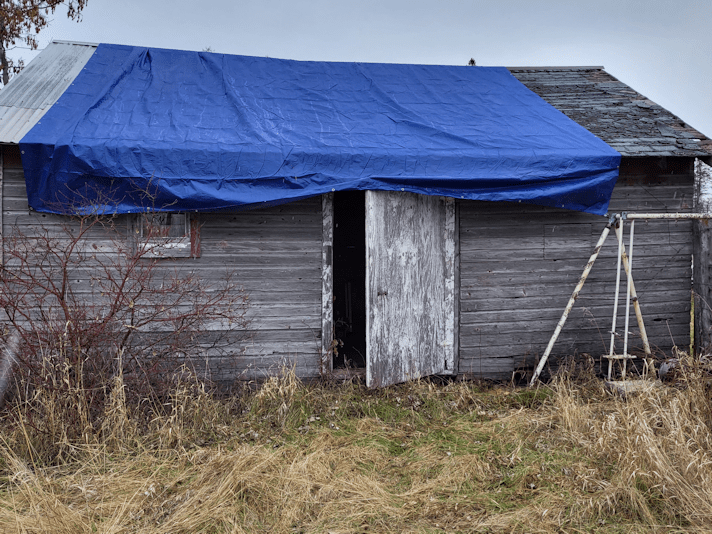
Well, it took the three of us a couple of hours, but we finally did it. We got the tarp over the hole in the shed roof.
One thing I can say about that shed, now that we’re done.
It’s not going to last much longer!
Anyhow.
The first thing to do, of course, was to open up the tarp.
This is what 20′ x 30′ looks like. It’s being held up at the back by tall grass.
The kittens really, really loved this tarp!
Now, I’ll say right from the start, this tarp should have been oriented the other way. We could have covered the entire roof with it. That, however, was not an option for us. There was simply no way we could do that, reach the edges and be able to fasten it down, safely.
The trick was, how to get one end of the tarp over the roof. I decided to make use of the remaining PEX pipe I bought to use as netting support in the garden, so make one end more or less rigid. There was just over 20′ of it left, too, so that worked out.
I was going to Zip tie the pipe to one end, but I couldn’t find my package of smaller sizes, and I wasn’t about to waste the long ones I had on this. I did, however, find an unopened roll of garden twist ties. I’d bought 2 of them a couple of years ago, and never used the second one.
The PEX was in a roll, so it took some doing to straighten it out as much as I could. With the temperature barely above freezing, I was trying to warm it with my hands and much as I could, to make it more flexible.
It still wanted to roll up again, especially at the ends, but it worked well enough.
Then next step was to tie twine to grommets near the corners. I’m glad I got those rolls of bale twine! Very handy. I used my arms to roughly measure out about 35 feet of twine, then tied them on.
Next, I needed weights. Something that I could tie to the twine and throw over the roof – keeping in mind that I’m not very good at throwing things! I poked around in the barn for a while and found these.
Perfect!
By this time, one of my daughters joined me. It took a few tries, but we got them over the roof.
Mostly.
With one of them, I was able to grab it with a garden tool, but the other one had to be pulled back and thrown again. 😁
Before we could haul the tarp over, though, we also had to prune some trees away. They need to be cut away from the shed completely, because of the damage they’re causing. I didn’t cut the dogwood, though. Unlike the maples, its not going to develop a large trunk or branches that will tear the shed apart.
By this time, my other daughter was able to join us. It took a LOT to wrestle the tarp over. There were so many things it could get caught on. On the side with the shingles, there were plenty of nail heads sticking out, and not just from where the shingles had blown away. It was even catching on the metal cap at the top. We had to use the extended pole pruner, at maximum length, to get under the tarp and lift it over whatever it was getting caught on – while also trying not to tear holes in the tarp! Of course, the PEX kept trying to roll up again, too, which certainly didn’t help any.
By the time we got it over, it was shifted so far to one side, the hole was completely uncovered, so we then had to fight with it some more, maneuvering it to where it needed to be using twine tied to the grommets. Then, once it was where it needed to be to cover the hole, the hole thing needed to be adjusted so that the roof was covered, the tarp could be tied down, and the door could still be opened.
At this end, it’s tied down at only two places, and I made sure to test to see if the door could still be opened. At some point, we’ll have to pick up some Bungee cords and hooks so that we can fasten it down better, while also being able to unhook them any time we need to open the door.
Also, that old children’s swing? You can just see a line from one of the legs to a fence post at the corner of the shed. For some reason, the swing is tied to that post with barbed wire.
Fastening the tarp in that corner was particularly dangerous, and not just because of that barbed wire. There is all sorts of stuff buried under there, hidden in the tall grass, and even sunk into the ground. Oh, and rolls of more barbed wire, rusting away.
Still not as dangerous as the other side.
Pulling enough of the tarp over so that the door could be opened, meant we could easily reach to fasten it to the wall.
AFTER turning under the sharp corners of some of the metal roof pieces, so they wouldn’t cut the tarp! We ended up rolling an old tire over for my daughter to stand on, so she could reach the edges with pliers.
Aside from the junk snowmobiles and the antique boiler/steamer thing (now that’s something that we should cover, too!) in the way, this area had bits and pieces of snowmobiles the cows scattered, my daughter found glass from the window that broke a few years back – I thought I’d found all the pieces when I fixed that! – rotten pieces of wood hidden in the tall grass, and boulders sticking out of the ground.
There are SO many large rocks sticking out of the ground out here.
With the pipe running along the back of the tarp at the grommets, we could get away with hammering only a few nails in, instead of one at every grommet. Which is good, because the wood of this wall is getting so rotted, it was hard to find spots where we actually could hammer nails in.
Yeah. This shed has definitely not got a lot of years left.
I suspect the nails won’t hold long. I’ll have find other ways to secure it and go back. The main thing, though, is that it’s now in place, and just in time. Ice pellets were starting to fall while I was still setting up the tarp. By the time we were done, it was a mixture of snow and rain. It seems to be snowing right now – at least, I can see some snow accumulated on the ground and the driveway, on the security camera live feed, but we’re also still supposed to be getting rain.
I’m glad we managed to get it done. How long it’ll last, with the winds we get, who knows, but there’s not much we can do about that right now. 😕
I went and borrowed my husband’s phone to take a picture. It’s my old phone, but of course he’s set it up to how he wants it – which turns out to include fingerprint scan to unlock it. I really hate that function. I find they don’t scan fingerprints well, and the last thing I’d want is to get locked out of my own phone because the thing can’t recognize my fingerprint. It could well be because my hands are so rough, it messes up my fingerprints. Either way, it looks like I won’t be borrowing his phone when I got into the city after all. It’s changed so much, I had to get him to tell me where the camera icon was! He does love his funky themes and designs. 😁
Anyhow…
Here it is!
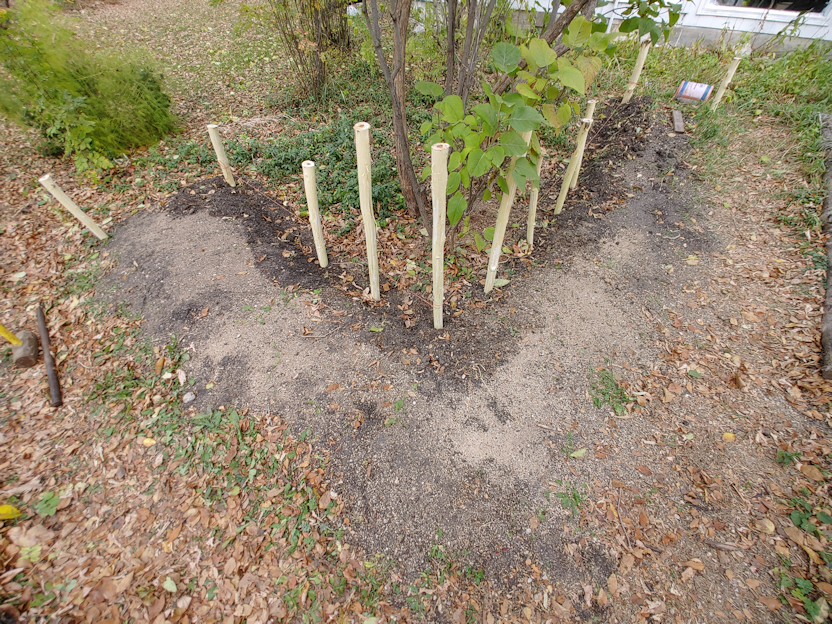
I had enough long poles that I could do the back without having to overlap any. The only problem came when it was time to do just the taller posts. It wasn’t too bad when I was weaving around seven of them, but when it came to just the three at the turn, it was more difficult. I had the shorter pieces for it, but three poles just isn’t really enough to hold the wattles in place, though for some of them, I could push the more flexible tips into the previous wattles to lock them down.
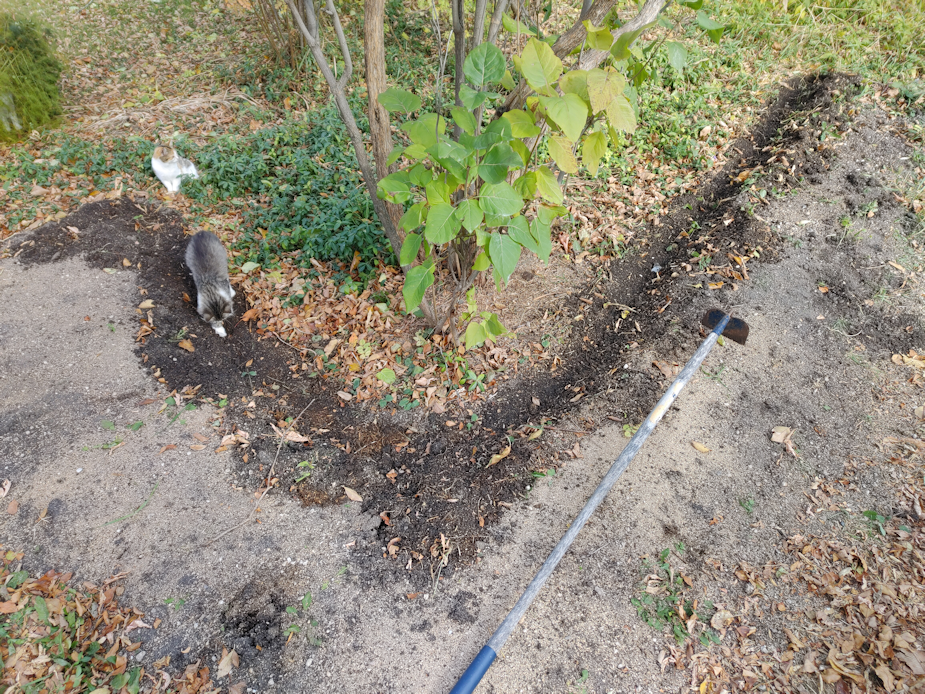
There was lots left over when the inside of the L shape was done, and I wanted to use them while they were still green and flexible, so I went ahead and did the outside. The first thing that needed to be done was to hoe the soil out of the path and back into the bed, while also clearing and leveling where I estimated the uprights would go. Once that was done, I measured two feet from that long pole right in the corner, marking three places; the left and right are lined up with the back walls, while the center one is in the middle.
Knowing I would be working with much thicker poles, I spaced the uprights further apart along the sides, compared to the previous ones. That left me with four extra prepared posts. After using the pencil point bar and a sledge hammer to make holes for the posts, then sledge hammering the posts in place, I could see I wouldn’t be able to use the uprights at the ends, so I added another post at each end, just inside the posts supporting the end wattles.
When it came time to weave the wattles in, I used the longest poles first, with the thickest parts at the ends, so that the more flexible tops would go around the curve. Some of the posts were long enough to actually bend all the way around the curve! When I put in the second side, I was able to wrap the ends around the wattle in the first side. I was able to do this for the first several layers before I found myself having to weave a shorter third pole around the curve. Unfortunately, a few of the poles just couldn’t go around the curve without breaking.
With the more flexible ends going around the curve, this meant the ends built up higher, faster. Which I’m okay with. For the last few pieces, they weren’t long enough to go around the curve at all.
I will need more material to build up the curve, but I also want to build that corner higher, too. So what I need to look for now is a lot of thinner and flexible, pieces. If I can find enough of them, I might be able to not only build up the corner and the curve, but wrap a nice edging along the top, all the way around.
Finding appropriate materials to do this was surprisingly difficult, but I’m really happy with how it’s turning out. By the time this is finished, though, we probably won’t be able to accumulate enough materials to do it again anytime soon, except perhaps for some very small beds.
Once the walls are done, we can add amendments and more soil to this bed to build it up, and it will be MUCH easier on the back to work in it.
At some point, I’m going to have to borrow my husband’s phone or something, just to have handy to take some progress pictures!
And kitty pictures.
I counted 26 this morning. !! And I didn’t see Rosencrantz until much later, nor did I see Rolando Moon, who seems to have moved on again.
My new phone is expected to arrive on the 28th, which is the day I’m taking my mother’s car in to get the tire fixed. The shipping notice originally said the 27th, which I would have preferred, since that meant I could have the phone set up and ready before going in for our first city shopping trip for next month. I’ll definitely borrow my husband’s phone for that trip, at least.
Once I was done my morning rounds, I grabbed the loppers and went into the south side of the spruce grow. We haven’t done any clean up in there for quite some time. Much of that area was under water this spring, anyhow.
This area has been mostly taken over by poplars, and that was what I was after. As we clean out the spruce grove, one of the things I want to do is cut back a lot of the poplars and plant more spruces. I want it to stay a spruce grove, not turn into a poplar grow. Spruces are better for cutting the wind and snow year round.
What I was looking for were tall, straight poplars small enough to cut with the loppers. At that thickness, they should still be flexible enough to bend as I weave them around the uprights. If it’s too thick to cut with the loppers, it’s too thick for the wattle weaving.
While I was doing that, I found myself working around the apple trees we’ve been uncovering out there. I asked my mother about them, and these were trees she’s planted herself, mostly from seed. My mother still has a hard time understanding that you don’t get the same type of apples from seeds at the tree they came from (as far as I know, there is only one type of apple that grows true from seed). We have no idea what kind of apples these can produce. The area is so overgrown, the much shorter apple trees barely had enough sunlight to start blooming. I was even cutting poplars that were growing through the branches of an apple tree!
Since I was there anyhow, I went ahead and pruned several of the apple trees, cutting away dead branches, and opening them up to more light. With the number of poplars I cut away from around them, that will be a help, too. We will need to come back with other tools to cut away the ones that were too big for the loppers to cut through, as well as other bushes I can’t identify at this point. I was happy to spot little spruces trying to grow through the tall grass and fallen trees and branches, which also need to be cleared away. I was also very thrilled to find a single Tamarack tree. There were three others planted closer to the house, in between some spruces, that are way too crowded together. I’m hoping to save them, but that might require cutting down the spruces next to them, and I don’t want to do that if I don’t have to. This Tamarack, however, as all on its own and would not have been deliberately planted there. I really like Tamarack, and would like to eventually plant more of them.
Anyhow.
I kept finding more of these apple trees, but I couldn’t get at most of them. Of the ones that I was able to prune, though, I’m hoping they will finally get enough light to bloom and produce. I did see some flowers on one of them for the first time last spring, but no apples developed.
I am quite happy with how many small, straight poplar I was able to get at and harvest. Once I was done, it took several trips to drag the piles of them I’d made, over to where the burn barrel is. The branch pile may be chipped, but I’m already adding more to the remains that need to be burned! The next while was spent trimming all the branches and twigs off, adding those to the burn pile, then sorting the remaining poles more or less by length. Then they all got dragged over to the old kitchen garden.
I should actually have enough to finish wattle weaving the inside of the L shaped bed, and even start on the outside of it. What I think I will do for the outside is not have a 90 degree corner, like there is around the double lilac, but to have a curve, instead. I haven’t quite decided yet, but if I think having a curve would actually make things easier, and more even.
By the time the poles were dragged over to the old kitchen garden, I had to go inside to warm up! I don’t know what the temperature was outside at the time, but the thermometer in the sun room was at only about 3C/37F. Which is what our high of the day is supposed to be. It’s almost 2pm as I write this, and we finally reached that temperature outside. Tomorrow’s high is expected to be only 4C/40F, but after that, we’re supposed to have three days with highs of 13C/55F.
I have to get back at work with the poles I cut this morning, though, while they are still at their most pliable. It’s definitely going to be chilly work!
Today’s high was supposed to be 19C/66F. I don’t know if we reached it, but with the blustery winds, it never felt that warm. I’ve been keeping a close eye on the weather, and my app on my desktop includes historical data for each day, including 30 year record highs and lows for various data. I noticed that today had a record high for snow of 14cm/5.5in in 2019. In fact, we set record highs for snow on the 10th, 11th and 12th, all in 2019. We were just coming to the end of our second year here, so I went looking at my blog posts for those dates.
Ah, yes. I remember that blizzard!
The amazing thing is that, just days later, all that snow was gone, and while we were still cleaning up storm damage, everything was back to green and sunny!
Depending on which app I look at, however, we might be getting a mix of snow and rain starting tomorrow night, and by Friday afternoon, we’re expected to get between 3-6cm (roughly 1-2 inches) of snow.
That meant my focus was preparing to build up walls around the L shaped bed in the old kitchen garden.
I went through the maple pieces I’d cut yesterday and started cutting them to size, cutting points on them, and debarking some of them.
I had lots of furry help. So much help, one of the kitties got plumb tuckered out!
From the longest, straightest pieces of maple, I cut three into 4 foot lengths. Then I went through some of the strongest pieces to cut four 3 foot lengths, then four 2 1/2 foot lengths. After that, I just cut as many 2 1/2 foot lengths from the thinner straight pieces as I could get out of them.
I used a hatchet to cut the points on all of them. That was probably the most unpleasant part of the job. Not so much for the thinner pieces, but for all the thicker ones. I’m ambidextrous for most things, left handed when it comes to fine motor control, but for some things, I am completely right handed.
Using a hatchet is one of those things, and my right hand has been in terrible shape lately. I had difficulty gripping the hatchet, and had to stop frequently to give my hand a break.
The draw knife was awesome for debarking the wood. It’s still quite green and came off easily. I don’t have a way to secure the pieces I’m working on well, so there were quite a few times when I was pushing instead of drawing the blade – and it works just as well that was, too. For some of the thinner pieces, though, it was easier to just use a knife to debark them.
Also, no, that is not rust on the blade of the draw knife. It’s stained with tree sap.
The stack of the thinnest pieces did not get debarked. It would have taken forever and, at their sizes, it would have been awkward. The pieces that will be taking the most stress, however, have been debarked.
That all took a few hours.
Then it was time to get to the garden bed. I pulled the lettuce I’d left to go to seed (it looks like we’ll get seed from just one of them) and got ready to prep the bed. Without walls, soil was falling into the path and the inside of the L shape, and I don’t like wasting good soil!
I used a hoe to draw some of that soil back into the bed, and level off the edge, where the uprights will be going.
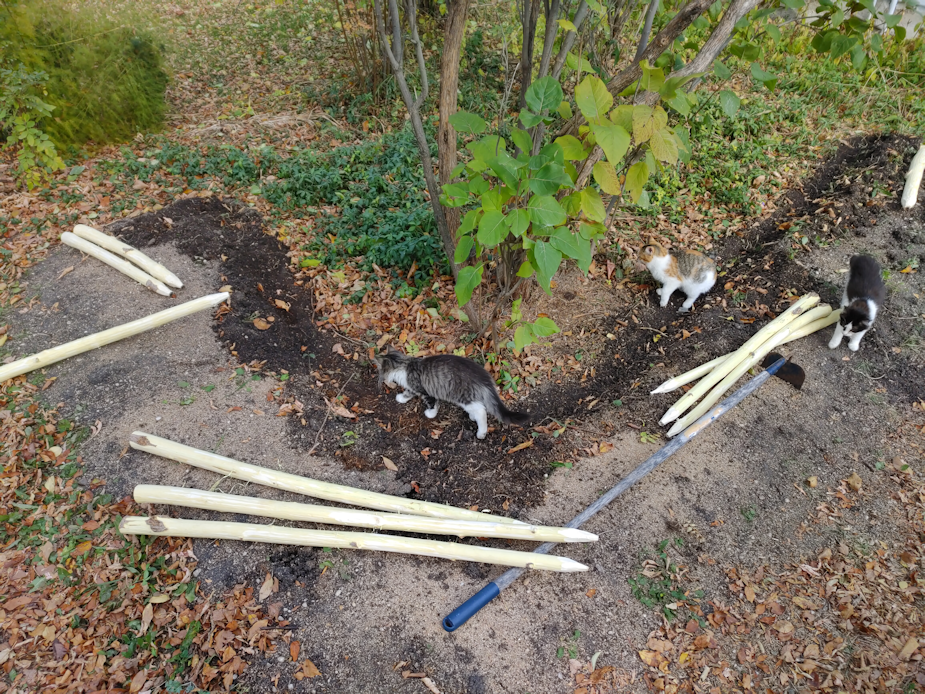
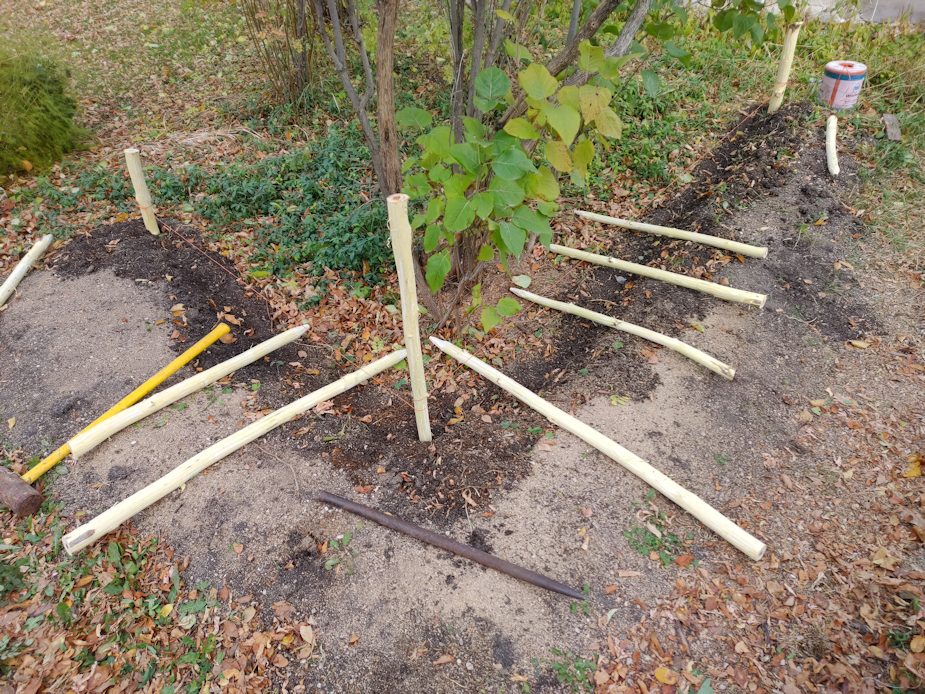
The three longest pieces will form a triangle at the inside of the bend. When we start weaving branches through the posts, these will be taking the most stress. Working out from there, one 3 ft piece will go along the short end, and three down the long end. If I have enough materials to do it, I plan to build up the wall higher at these posts, as much to wall around the lilac as to create a wall for the bed.
The four 2 1/2 ft pieces are for the corners at the ends of the bed.
To install the posts, I used the pencil point bar and hammered it into the ground.
Unfortunately, that old hammer doesn’t have the right handle on it, and the head fell off again. I had to switch to a sledge hammer.
I really didn’t want to switch to the sledge hammer.
Ah, well. It worked better. I’m just going to be in a world of hurt, tonight!
I started by placing three posts in, then tied twine between them as guides for the rest of the posts. Then I laid out the spacing for the remaining two 4 ft posts, and the four 3 ft posts.
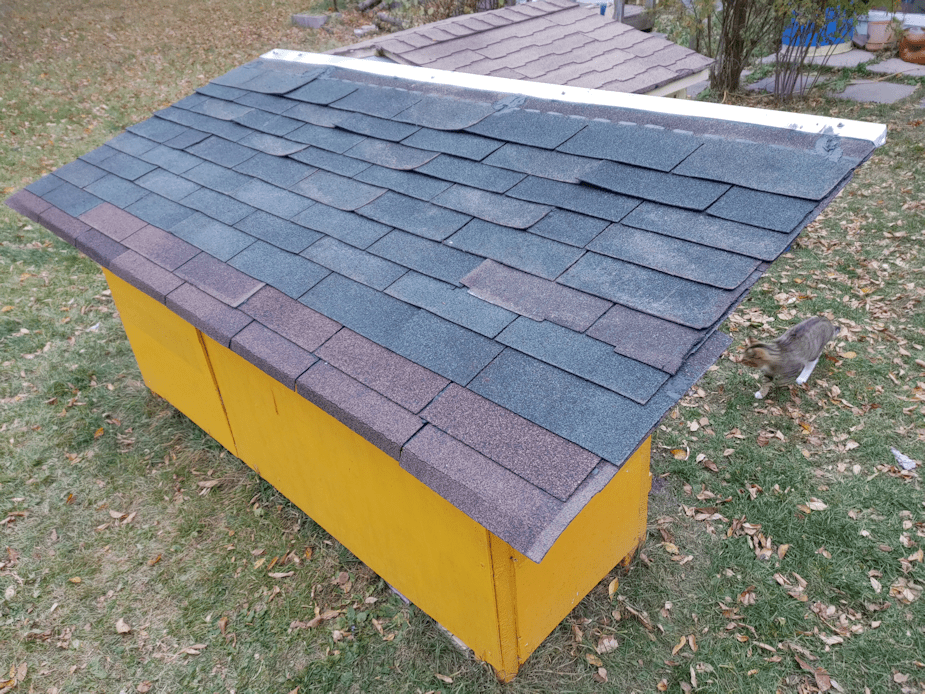
At this point my daughter, who had been working on putting salvaged shingles on the kibble house, ran out of roofing tar. I’d only picked up a small can for patch jobs, never expecting to need more.
So I left my daughter to continue pounding in the posts while I went into town to pick up more tar, and a few other things while I was there. When I came back, I found my daughter lying on a tarp on the ground surrounded by kittens. She is having much more success at socializing than I am!
She had even pounded the other two corner posts at the ends of the L shape.
The weather was starting to get worse, so I quickly filled in the gaps with the smaller 2 1/2 ft posts.
The long end of the L shape will be only 2 feet wide, so the end posts needed just one more added in between them, plus three more along the north side. The short end of the L shape needed only 2 more to fill the gap. Since this end can be accessed from three sides, we’re okay with it being wider than 2 feet, so the end posts there got two more in between. The rest of the posts will be for the outside of the L shape.
From the looks of it, I’m going to need to find more pieces to be able to finish the outside of the bed, but I’m not concerned about that right now. It’s the inside of the L shape that I need to get done first.
By this time, however, dark clouds were rolling in and it was starting to look like rain, so I left the job at this point and focused on cleaning up and putting away anything that might blow away. My daughter, meanwhile, finished the roof of the kibble house.
The green shingles are almost 50 years old and are in pretty rough shape. The brown ones are better, but they’re almost 30 years old.
The water bowl house roof is thinner plywood, so we’ll be using pieces of metal roofing that we’ve been scavenging for various things since we’ve moved here. If we used shingles, the nails we have would go right through by nearly half an inch, and that would be a problem! I dragged a piece of metal roofing out from the barn that we can cut in half and lay side by side to cover the roof of the water bowl house, but I also spotted a stack of corner pieces. I brought one over, and helped my daughter put it on the edge of the shingles on the kibble house. I found a bin of metal roofing screws in the warehouse, so I grabbed a bunch for when the water bowl house is done, and my daughter used a few of those to install the metal cap on the edge of the roof, using the screw holes that were already in the metal – after making sure to put some tar under each hole, first.
Almost everything about the kibble and water bowl houses has been done using scavenged bits and pieces we’ve found around the property, and a lot of it is pretty old and starting to rot. We don’t expect these to last long, but using paint and even decades old shingles will help them last longer. At some point, it’ll be nice to be able to build versions using new materials, all well measured and cut and leveled, etc. But this will do for now.
Once this was done, I set up a longer extension cord I found that was in good shape, and was able to plug in the cat’s house. We lifted the roof and put in the high density rubber mats I’d dragged out of the barn, which will help insulate the floor. There’s a thick scrap yarn crocheted blanket that is laid out on top of the mats, too. We will not be using straw this year. As much care as we have taken with the terrarium heater bulb, I would much rather not have straw in there! The heat bulb is working fine, with the heat shield still in place, and the timer is set to light sensor, so it will turn on when it gets dark, then off again when it gets light. The smoke detector was tested, too, and it’s working fine.
Once the water bowl house is done and set up where it will go, we’ll be able to plug in the heated water bowl through the cat’s house entry, too.
Tonight, the cats will have a warm and cozy place to stay if they start feeling too chilly. I especially hope the tiniest kittens will start using it!
As for me, I’ve pain killered up and hope I’ll be able to continue in the old kitchen garden tomorrow. For the weaving, I plan to cut the willow branches and use them right away, while they are still very green and flexible.
I really hope this works out. Otherwise, that’s a lot of work for nothing! Well. Not for nothing. Now that those posts are in, even if wattle weaving doesn’t work, I could still use them to hold whatever we find to use instead. It’s all fly-by-the-seat-of-our-pants work, anyhow!
Today did not work out at all as planned. My daughters and I were originally going to take my mother to a marsh in the area to see the migrating birds – something my mother tries to do every fall. Unfortunately, my daughters weren’t feeling well, so we’ll be rescheduling that. We only have today and tomorrow for good weather, though, so I was going to go over to deliver some thanksgiving dinner to her and, if she felt up to it, maybe head to the marsh anyhow. Before heading over, I pulled my mother’s car out of the garage to do a bit of fall clean up – and discovered a flat tire! I pumped it up, then used our van. I couldn’t see anything that could cause a flat, and when I came home, the tire was still holding air, so I don’t know what’s going on there. I’m just glad I decided to clean out the car first, which requires moving the car out of the garage. Where her car is parked is so tight, I might not have seen it before leaving, if I hadn’t. I’ve left it out so we can check the tire any time we’re outside.
So there was no going anywhere with my mother, since it’s difficult for her to get in an out of our van. Instead, we had thanksgiving dinner together with the food that I brought. I am happy to say that she actually tried and enjoyed the peanut soup (after having an angry outburst over the fact that I brought soup at all), and even the roasted vegetables – though she did do a double take when she spotted a sunchoke, asking me what it was. When I told her, she started lecturing me about how I shouldn’t be growing “strange” things – after she had already eaten it! 😄
Overall, it was a good dinner, and I’m glad we were able to do it, in spite of some of the very strange attacks she came up with during conversation. 😄
It also meant that I was able to get home with the conditions still good enough to get some work done outside – though it did get very windy!
I need to build a wall along the “inside” of the L shaped bed in the old kitchen garden. Given what materials we have on hand, I was thinking of doing a wattle weave. I had intended to use lengths of maple suckers that I need to clear out of the maple grove, but after looking more closely at them, none of them were suitable for weaving, nor did they seem adequate for supports.
While bringing kibble to the tray in front of the pump shack, I took a closer look at some maple growing next to it. There was a maple that had been cut down, and suckers have been growing out of the stump for some years, to the point that they were getting into the power line running into the pump shack.
Lots of nice, straight and strong suckers, that would make good upright supports.
So that’s what I worked on today.
At some point, we should come back to the stump with a chain saw and try and clear it away even more. Maple stumps will send up suckers from the stump of a dead tree for ages, if something isn’t done to make sure it’s completely killed off. From what I could see, this maple has been cut down at least twice over the years, and been trimmed of suckers a number of times, too.
You can see where the power line attaches to the outside of the pump shack and runs in. That dangling board used to be attached to the side of the shack somehow. Something needs to be done about that, since it’s supposed to be supporting the line, not hanging off of it! Some of the suckers I cut away had branches tangled up in there. I’m very glad to have them clear of the shack!
I saved the straightest pieces. Hopefully, they will be easy to debark I wouldn’t want them to root themselves and start growing.
There was a lot of material that could not be used, too.
At first I put the cleaned up branches on the pyre stacked over the burnable garbage that’s too much for the burn barrel. On a calm day, we’ll have ourselves a bonfire! I ended up putting the last of the branches on the mostly composted bits that are left over from the branch pile that got chipped, just because there was getting to be too much on the bonfire pile.
I like being able to get more than one job done at once. I got to do some necessary clean up by the pump shack and it’s power line, and at the same time acquire materials to use for a garden bed or two!
As for the branches needed to weave around the uprights, I should be able to prune away suitable pieces of willow branches from the trees in the yard. Trees that have already been trimmed professionally to clear branches from the power line to the house, and that we need to keep trimmed. Willow is very enthusiastic about growing new branches after being pruned, and it’s been a couple of years. I’m just not sure we’ll have enough to do the wattle weaving I have in mind, but there are other willows in other areas in and around the yard that could probably use a good pruning, too!
I’m looking forward to trying to figure it all out, tomorrow. The temperatures are supposed to drop after tomorrow, but we’re also still expecting rain rather than snow, so it shouldn’t be too bad to get work done outside.
Now, if the wind would just die down, that would be great!