This afternoon, I headed into the roots cellar and grabbed the last of our yellow onions that we had hanging down there. These are the Norstar we grew from seed. We finished the ones we grew from sets a while ago.
And these are the last of the Red Karmen onions we grew. There’s one more, hidden from view.
All the onions we grew and harvested back in August have lasted us more than half way through January. Adjusting for the time then needed to cure, that’s about 5 1/2 months.
Not too bad, considering they didn’t get very big. We did try to be a bit frugal with them, though.
They also stored really well in the root cellar. We had the fewest shallots (what are not in the photos above), and they were gone in less than two months, so we never found out how well they stored. ;-D
We will be growing a lot more onions this year, all from seed. The goal is to not have to buy onions from a store at all, anymore.
I am just itching to start the onions indoors, but I have decided to wait until the middle of February to start them, at about 15 weeks before last frost. The only other thing we would start that early are the luffa gourds.
I’m actually sad that we’ll have to start buying onions again. The ones we grew were so much better! I don’t know what varieties the stores carry. They usually have labels like “yellow” or “medium cooking onion”. LOL They’re good, but the varieties we grew were tastier. That’s the main benefit, in my view, about growing onions from seed. Buying sets is easier, but there are a lot more varieties to choose from with seeds.
This morning, I decided to go through our onions and harvest the ones I was sure were done for the season. Here are the first ones I picked.
These are the yellow onions we planted from sets that I picked up at Canadian Tire, and planted in the same bed as the shallots. This is about a quarter, maybe a third, of what was in the bed. There were also a few that I pulled and left behind, as they had no roots and were starting to rot.
These ones are mostly pretty small, as they died off too early, I think.
There were enough of them that space on the drying screen was an issue, but they had enough stems left for braiding, so now they are hung up to cure under the canopy.
Then I went back to check the other onion bed.
Very few of these were ready to pick. On the left are the surviving yellow onions we grew from seed, and they are looking the best of all the onions. The ones on the right are the red onion sets we ordered from Veseys.
These have been left outside to dry for a while, but they will be for immediate use in the kitchen! :-)
I’ve been looking up how to tell if onions are ready to pick and finding conflicting information. Some say they are ready after their tops have fallen over, which I think is way too early. Others says after the dry outer skin has developed. Still others say once the youngest leaves – the ones in the very middle of the stalks – are dry, they are ready to pick. That one seems too late!
So the ones I picked were ones that had died off the most, and I could be sure they would not be growing any bigger. I’m also on the lookout for those with roots that have died off, and pull up easily. Those tend to already be going soft, and often have what looks like mold growing in them. From what I’ve read, that’s a sign of fungal infection, so they need to be taken right out.
It should be interesting to see the differences in flavour. I probably won’t be able to tell the difference, and the medications my husband is on has changed his ability to taste things, but the girls should be able to taste differences. I’ll have to trust them to tell me which varieties are worth growing again! :-D
After the issues we had with cats destroying so many of the onions we started indoors, I’m just happy to have any onions at all right now! :-D
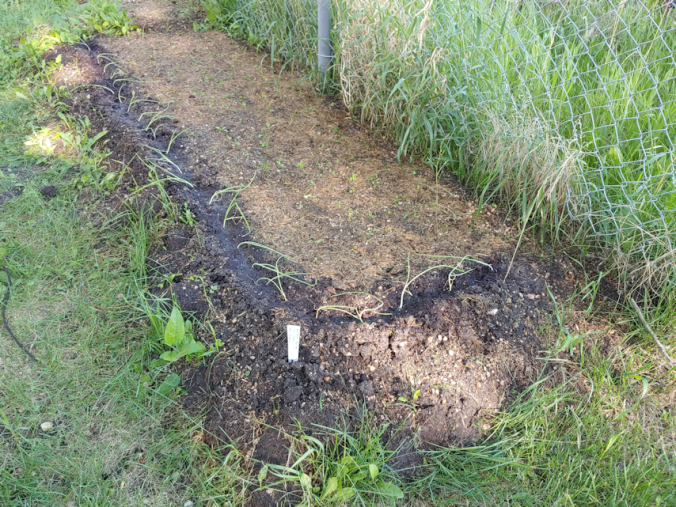
Today, I built what should be the last garden bed for the year. This one is for the climbers.
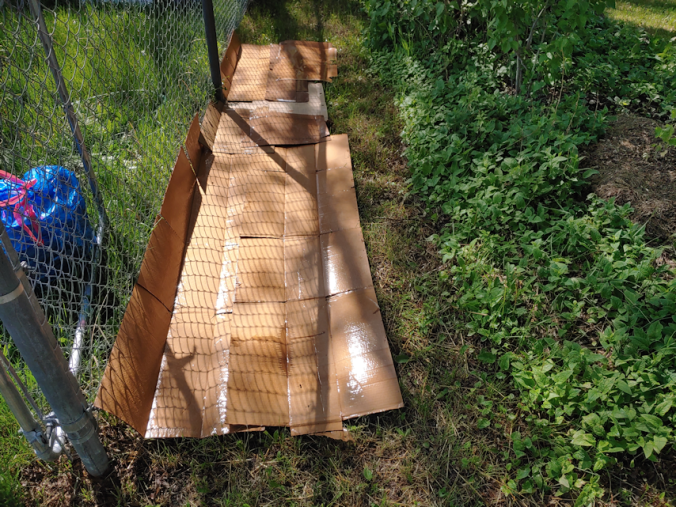
Here is what the space looked like when I started.
The original plan was to use the remaining chimney blocks, like the one in the photo, as planters along the chain link fence, but they remain in the basement until we can figure some thing out, and it is not a priority.
We’ve been saving up our cardboard, and had just enough to create a barrier layer, which got a thorough soaking.
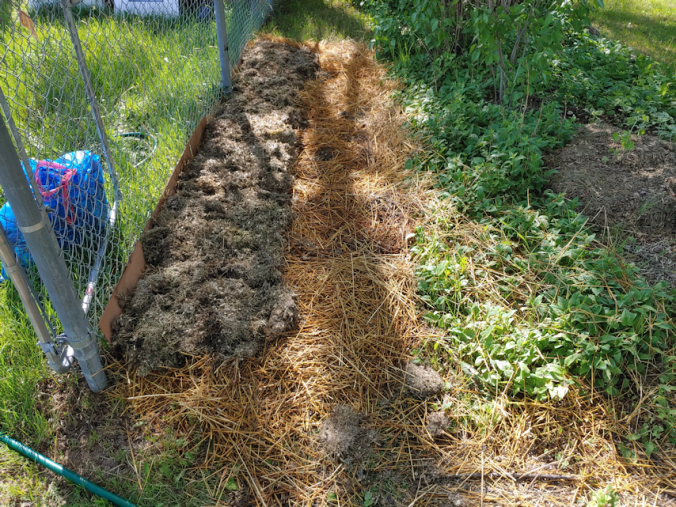
The next layer was the straw, which is also the mulch to cover the path between the new bed and the flower bed beside it. I was able to get some of the straw at the bottom of the bale that has had time to start breaking down, too, which was great! This layer, like all the layers, got a thorough soaking – after I beat it flat with the back of a fan rake.
Then, because we had some, I emptied our kitchen compost along the fence line, which got tromped on before a soak.
There wasn’t much. We don’t get a chance to accumulate much for the compost pile. It tends to get used right away!
We still have grass clippings, so a thick layer of it got laid down.
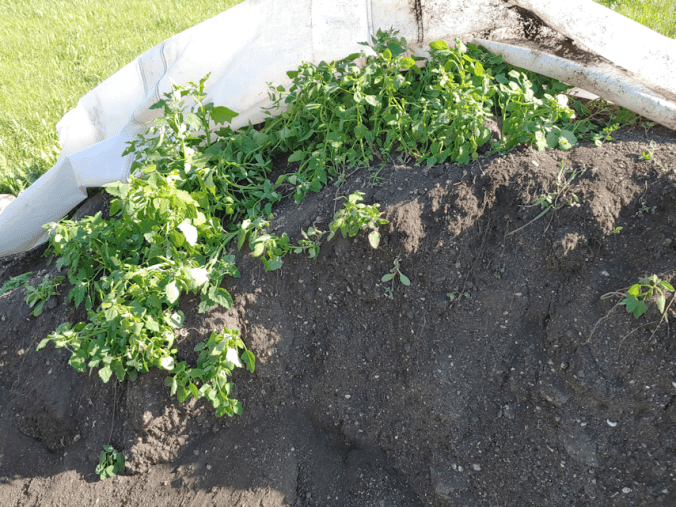
We’ve been keeping our compost-safe paper for shredding, and I had a bag full to add for another layer. After giving it a soaking, my daughter tromped it down for me, while I went to get a load of soil. This was from the nearby tarp covered pile in the outer yard. When I pulled back the tarp, I just had to call the girls over to take a look!
The white tarp allowed enough light through for the weeds to start growing, and grow they did!! They were huge!
These are mostly lambsquarter, which are supposed to be edible and very healthy. Better than spinach!!! At least that’s what the breathless Pinterest images that have started to show up in my feed are all exclaiming. Maybe some day we’ll try them, but for now, they are growing in places we want other things to be growing (or, in the case of our soil pile, nothing to be growing!), so we’re pulling them. Still, it was something else to see how big they got under that tarp! It actually is encouraging, since we plan to build polytunnels and high raised beds in the outer yard, eventually.
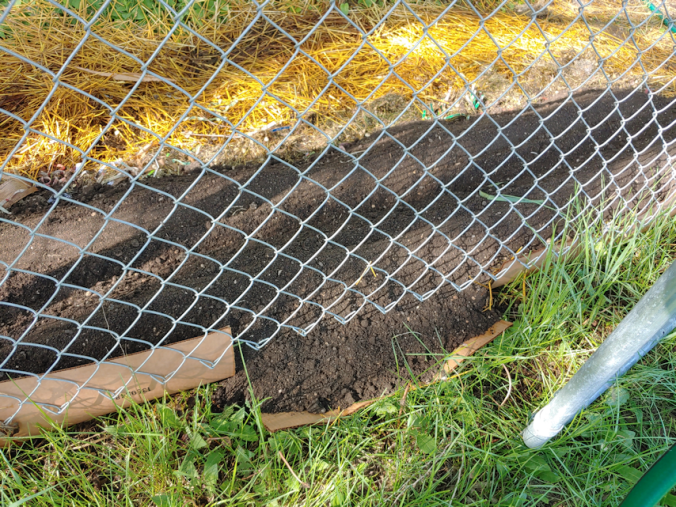
Finally, a thick layer of garden soil was added to the new bed, with a trench down the middle to hold water. My daughter did catch me before I made the new bed too wide. With the one we made for the tomatoes, we’re finding it a bit hard to reach, even though we ended up narrowing it down when we added more soil for the transplants. We’ve noticed the same issue with the beds of spinach, carrots and onions. They’re only about 3-4′ wide, but they are low beds right now, and we’re short. It’s hard to reach the middle while bending down so far; our balance goes off kilter. Especially for my daughters who, unlike me, have not had their generous proportions surgically reduced. That really affects center of balance! It would not be an issue with the tall raised beds we plan to build, but we need to remember that, for low beds, they need to be narrower. Especially if we can reach from only one side, like these along the fence.
One thing that was an unexpected issue is that the chain link fence on this side is higher above the ground at the bottom than on the other side of the gate.
Which means that the damp cardboard flaps against the fence couldn’t quite hold the soil in some places! Which is fine. We’ll work around it.
After filling the trench in the soil with water to soak it, I brought over the cucamelons that have sprouted (most did not, but that’s okay; we planted way more than needed!), as well as the gourds. The bucket and plant pot have the cucamelon tubers in peat that I dug up from last year, to see if they would grow this year. Time to dump them out and find out if they survived!
They did not.
Aside from a few wispy root clumps and what may have been the dried outer skin of a tuber, I found nothing. They had completely decomposed.
Well, that just left me with some peat I could make use of.
So I widened the trench I’d made before, added some peat to it, and watered it again.
Then it was time to do the transplanting.
The cucamelons were all in their own Jiffy pellets, so they were easy to space out. I planted even the tiny ones. If they make it, great. If not, at least they had a fighting chance! Our cucamelons from last year were quite prolific, even in less than ideal conditions. This location gets much more light, so I expect them to do even better, here. If all grows well, this fence will be completely covered with climbing vines!
Of the gourds, the pot that had 2 Ozark Nest Egg seedlings had sprouted a third! I’d forgotten I’d planted 3 seeds in the cups. The pot that first sprouted still had only one, plus there is the one Thai Edible Bottle gourd. These are in Jiffy pots, so the ones with just one seedling in them got planted whole. The one that had three in them, I gently broke it open along one side and sort of unrolled the contents to separate the seedlings. One of them just sprouted today, so it’s unlikely to survive, but who knows? It might do even better than the others. :-) I believe in you, little sproot!
That done, I had some more transplanting to do. I’d put the last of our Norstar onion seeds into a Solo cup, and they not only sprouted, but are starting to form bulbs!
The girls and I had talked about where to put them, and the border of the asparagus bed seemed the best place.
The onions are shallow growers, and there’s plenty of space between them and where the asparagus are, so this should be fine. At this stage, I doubt they will reach full maturity, but they will help deter critters and insects. There were more seedlings than would fit here, so I added the last of them in front of the Mosaic Mix tomatoes. There had been some bunching onions transplanted there before, but they were the tiniest, wimpiest ones that we probably shouldn’t have bothered with, and only 3 were still alive. Which is fine. There are more bunching onions in front of the Spoon tomatoes. We’ll see how these ones do!
That’s pretty much it for the transplanting. We should probably plant the one Hopi Black Dye sunflower that finally sprouted. Since there’s just the one, I’m thinking of planting it somewhere else, like in the old kitchen garden. The pink celery will go into a pot that we can move in and out of the sun room, as needed, but they are way too tiny to do anything with, yet.
Which means that tomorrow, it’s back to the other garden beds. The pea trellises need to be finished, the squash tunnel needs to be worked on, and the summer squash needs a garden soil top up, before getting mulched with straw. Somewhere in there, I need to actually mow around the main garden beds. It’s getting pretty out of control around there! For the old garden area, I’m seriously considering using the weed trimmer, instead. It’ll take longer, but I won’t have to worry about hitting rocks or lumps of soil with the lawnmower. Also, of course, weeding. Especially in the corn and sunflower blocks. All the stuff that barely grew there before have had the most moisture and inadvertent tending since… ever, and they’re really liking it! :-D
The main thing is that, aside from the pink celery and that one sunflower, we’re done the transplanting! Anything else that didn’t germinate by now, isn’t going to. We won’t be tending those pots anymore.
Aaaannnndd….
It was getting late, so I paused and took the pink celery seedlings indoors, then went ahead and transplanted the one Hopi Black Dye sunflower in the old kitchen garden, in the bed we planted the poppies in. So that’s done now, too!
Today was the day to start planting our onions. I wanted to get the transplants out, to make room for the squash in the sun room, and get the onion sets in.
The plan was to have onions on either side of the kale that has already been direst sown, in the bed on one side, then plant the rest of the onions in the bed at the opposite end, with kohlrabi in the middle (those don’t get planted for another week). Deer don’t like onions, so we’re hoping that between those, and the flashy windmills, they will stay away from the things they do like, such as the spinach.
This is one of the beds we made last year, that we simply topped up with new garden soil. I realized that the soil was starting to wash away on the sides, so I brought over more logs to act as walls.
Thankfully, these logs have been sitting out for 2 years, so they’re quite dry and light.
I didn’t have any short enough to use as end caps, though. We’ll have to take care of that later.
Once the logs were in place, I brought over more soil to fill in the sides, so I’d have room to plant into, without anything collapsing down into the logs.
My younger daughter joined me when I was just finishing up the first bed, so she continued to bring soil to add to the sides of all the beds, while I brought more logs to shore up the other bed from last year, that didn’t have any yet.
We’d used up the smaller logs when we first starting building the new beds, so the more logs I brought over, the bigger they were getting! Which is good, I suppose, since these are deeper beds than the new ones.
My daughter continued adding soil to the beds while I started transplanting the Nostar onions we started from seeds. There were three very different sizes! The ones that were in peat pellets ended up being the largest ones, while the ones in the K-cups had started out larger, but did not retain moisture as well, until I moved them onto their own tray, where they could be watered thoroughly without drowning the onions in the pellets. Then there were the ones that were started some weeks later. There are still some seedlings in the cups they were sown in; I only took the biggest ones to finish off the row.
On the other side of the kale, my daughter and I planted a three row grid of the Red Karmen onion sets that arrived in the mail yesterday.
By this time, we were done for the day!!
This bed is where the rest of the onions and the shallots will be planted, with the kohlrabi to go in the middle. The bed to the left is the one that’s half-planted with carrots. A second variety will go in the other half as soon as possible.
Oh, I almost forgot. When I was doing my rounds this morning, I took another look at some of the old corrals and other things around the barn and outer yard, hoping to find something we could salvage and build raised beds out of. There was nothing! Everything out there is just too rotted out. There’s possibly usable material that was stacked in an old shed, but the shed has collapsed on top of it, so we’d have to remove an awful lot of stuff, just to see one way or the other. It’s such a mess, just getting into there to move stuff has a high risk of injury. It’s unfortunate, but there’s pretty much nothing to salvage at all, never mind to build accessible raised beds with. Ah, well. It was worth a look!
After putting things away, my daughter stayed out to tend other things while I transferred the squash to the sun room and set up the lights as best I could. They are long aquarium lights, so I can only set them up vertically along the shelf. It will be good when we can invest in some grow lights, that we can hand over each shelf. At least the sun room does get a lot of natural light through much of the day.
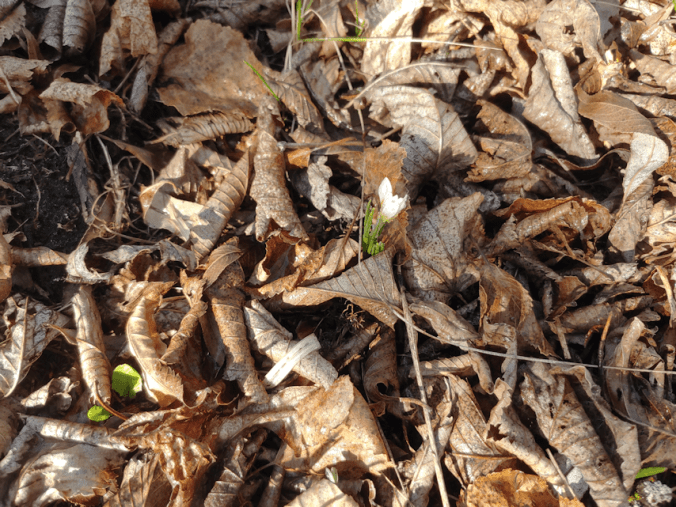
While I was working on that, my daughter made an exciting discovery.
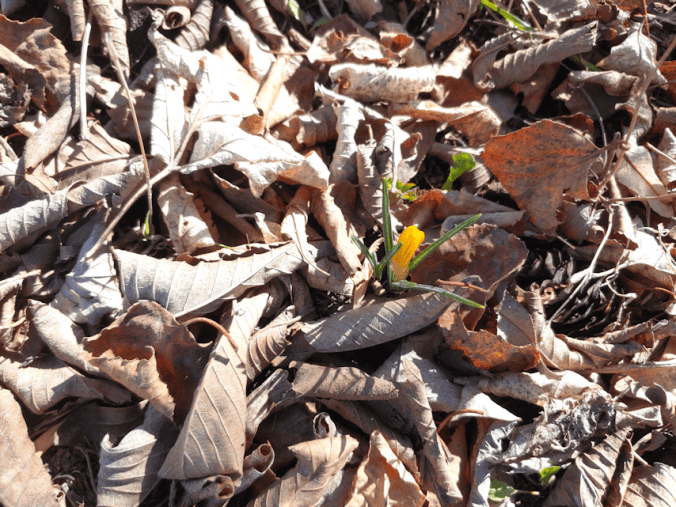
The crocuses have started to bloom!
They are so tiny!!!
I wasn’t able to get a photo of the third type, which are purple and white.
I will have to make sure to check these tomorrow morning, so see how much they open!
My daughters are just thrilled to see them. I don’t think either of them expected them to survive February’s Polar Vortex, having been planted just this past fall. So they are really excited right now!