Our 2024 Garden: all sorts of things

I decided not to continue with prepping the garden bed I started working on yesterday. That area was in full sun, it was hot, and the mosquitoes were out in full force. So, other than helping my daughter drag out the first of the 18′ logs she prepped (she also cut two 4′ pieces for the ends, and they are now waiting to be debarked and have any branch bits cut flat), I stayed inside.

Instead, I went to be unusually early for me – at about 8pm – and actually fell asleep and everything! I was awake by 5am. Usually, I do my morning rounds, have breakfast, then head back out to do the more laborious stuff. This time, I made sure to eat first, then just stayed out after doing my rounds, so work on the garden bed.

I got distracted.

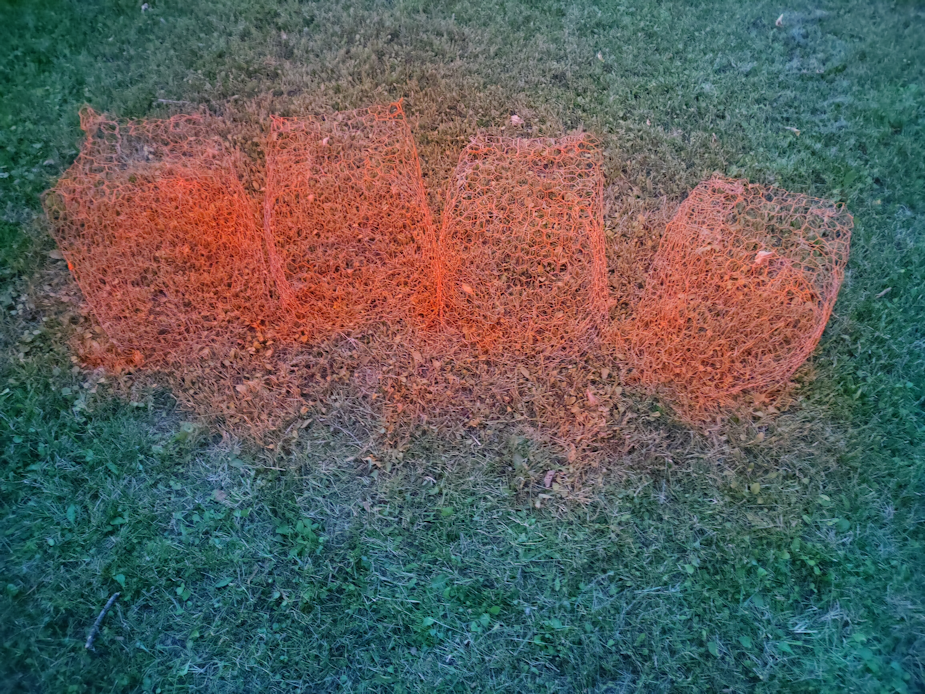
The first distraction was remembering to put netting over the chimney block planters at the chain link fence.

Syndol helped.

I had a roll of netting just long enough to cover the length of these blocks. It was actually longer than needed, but this piece has a tear near one end that was “sewn” together with twine. I made sure that end was the excess netting wrapped around the far end of the blocks

So that area is now protected from getting smothered by the elm seeds.

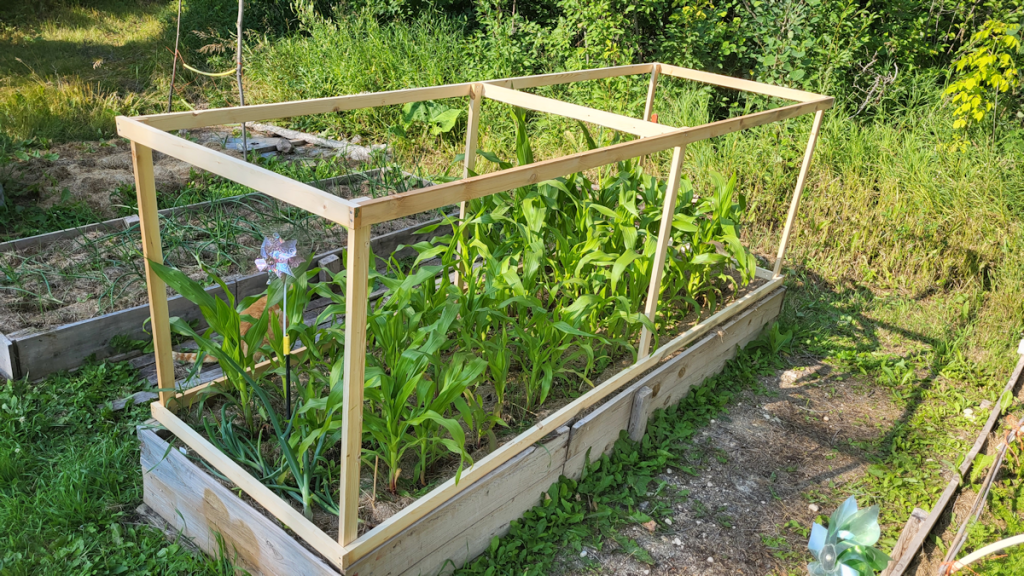
Of course, I checked the other beds, then gathered my tools to continue working on the low raised bed.

I had the loppers with me, to cut away the roots I knew I would find.

Since I had them anyway…

… I went into the edge of the spruce grove and started clearing things away from the Saskatoon bushes. There’s a lot of chokecherries crowding them – one bunch was so entwined, I accidentally cut away some Saskatoon branches along with the chokecherry! There were quite a lot of dead, broken branches to clear away. Those were broken by the deer standing up on their hind legs to reach the berries, and pulling the branches down. There was an elm growing right from the based of some Saskatoons. I cut most of it away, but will have to come back with a saw to get the rest of it.

That was just the big stuff. The next thing to do will be to clear away the false spirea.

Again.

I had this whole area cleared of the spirea, a few years ago! It’s all completely filled in again. That stuff is so hard to get rid of, and so invasive!

That will be for another time. Getting those chokecherries out was the main thing. The Saskatoons will no longer be competing with them for water and nutrients, and they will get more sunlight, too. These Saskatoons are the healthiest ones we’ve found. There are others, out by the garage, but every year, as the berries start to form, they start to get what looks like some sort of fungus. So we want to be keeping these ones by the house well cared for and healthy.

That done, it was time to finally get back to that bed!

The first part of the job went well enough. I cleared the weeds out of the second half of the bed, and started piling the soil up onto the half I cleared yesterday, shifting the edge of the bed in the process.

I had help.

That cat needs a name.

Trouble started at the end nearest the trees, where I was breaking new ground to the 18′ mark. I already knew there were roots under there, but I kept finding more! The finer roots are one thing, but those larger ones – even the smallest of them – are much more difficult to get out. After shoveling the soil away as best I could, I took a hose to them. Partly to make them easier to see, partly to wash the grit off the roots so I could more easily cut them with the loppers and not damage the cutting edge.

I didn’t get all of them out, but I did make sure to cut them at the tree side of the roots, pull them up and dig them out as far as was reasonable, then cut them out. Anything left should die off.

I hope.

Once those were out, I started putting some of the soil back into the hole and leveling off the side where a log will be placed. Then I started digging out past the existing bed, along the 18′ line to corner marking the new 4′ width of the bed, breaking new ground.

Where I found more roots, besides the one that I was hitting when putting the marker back up.

These ones continued through to what will be the path between beds, so I cut them away to that point.

At which point, it was time for a hydration break!

One of the things I remembered to do once inside was to turn the aquarium greenhouse lights back on. Since I was there anyhow, I decided to check on the pumpkin seeds I’d scarified and set to pre-germinate.

They are already germinating! It’s only been about a day. Maybe a day and a half, since they were set up!

I’ve left them for now and will probably pot them up this evening.

That was so, so fast!

Well, it’s past 11 now. I should grab lunch, then head back outside.

This bed is a lot more work than I expected it to be, mostly because of those frickin’ roots!

The Re-Farmer

First cover done!

This afternoon, my daughter and I were able to get the first raised bed cover done! The frame, at least. We worked on the one intended to go over the popcorn first, as it was the most involved.

Here is the finished product!

It is now ready to support whatever cover material we choose for it. The question is whether or not I will be attaching something to it permanently, or if I want to attach something in such a way that we can take it off and attach something different, later.

Considering that this bed will need protection from deer and racoons, something permanent would be most logical. I have enough chicken wire to wrap around the sides, at least, but racoons will tear right through that. I might have to pick up some 1/2 inch hardware cloth. Until then, however, we could probably still put the chicken wire around it temporarily.

As you can see, the cover doesn’t fit exactly over the raised bed. That was expected. The bed itself has become wonky over time. Not only have the sides been bowing out, but some of the boards are warping. One warped board you can see in the photo has bent outwards enough, it actually snapped one of the screws that was holding it to the 2×4 join.

We will have to find a way to lock the cover onto the walls of the bed, too, or it could simply get knocked right off by a determined critter.

I’m pleased with how it turned out. The frame itself is lightweight, but sturdy. It can be carried by one person, though having two people is preferable, if only to lessen the chance of the frame being twisted or dragged.

We cut extra pieces when prepping the boards, and there are enough to make 3 more frames. I will be away tomorrow afternoon with my mother, but my daughter might be able to get it done while I’m out. They will be much easier, since it’s just the basic rectangle, exactly the same as the bottom part of the frame in the photo above. The only difference is that I plan to add eye hooks to the middles inside the long sides and use cord to keep it from bowing out. I’m still debating whether they will need corner braces. That will partly depend on how they hold up to having the fence wire attached permanently to them. I would rather add them after the fence wire is attached, anyhow. It will be easier to add braces with the wire in place, then add the wire with the braces in place. Since I have to go to the hardware store, anyhow, I will try to remember to look at metal corner braces as a possible alternative.

Little by little, it’s getting done!

The Re-Farmer

Our 2023 garden: spinach and alternative lawn mix

My daughters were out early, taking care of some planting for me, so here are some “after” pictures. 😊

The first area they worked on were the bald patches in the maple grove.

These are where the branch pile we got chipped last summer had been sitting for about four years. The first thing they did was use the thatching rake to break up and loosen the soil, then raked it smooth. For the patch in the foreground, they made sure not to get too close to where we’ll be digging a trench to replace the water line from the house to the garden tap. I ordered two packets of alternative lawn mix, which they sowed and watered and tamped down. From the website:

This mix contains annuals and perennials of daisies, poppies, sweet alyssum, soapwort, nemophila, viola, thyme, chamomile, clover and fine fescue. 

Hopefully, they will not only fill in the bald patches, but will also naturally spread themselves in the maple grove, and maybe choke out the bell flowers that have been so invasive here!

In the time it took me to finish feeding the outside cats and switching out the trail cam memory cards, not only had they finished this area, but they finished planting the spinach, too!

The only thing left to do by the time I came out was to add the floating row cover. I bought a couple of these from a dollar store to try out. I’m not sure we’ll get more. It seems very fragile. At some point, I should buy a whole lot of tulle fabric. For the spinach, however, it’s more about keeping the critters from eating them than for insects. I just hope the cats will stay off of it. Otherwise, we’ll have to add hoops. I’m still shooting to build proper covers for these beds soon, but I don’t know when I’ll be able to pick up the lumber I need, so this will do until then!

The next cool weather crop I need to get in is at least one variety of bread seed poppies. I keep forgetting about them! I’ve decided to clean the vine off the chain link fence and put them in the bed we unsuccessfully tried to grow white strawberries in, last year. That can be the permanent spot for one variety. The other cool weather crop we can get in this early are peas, which will be planted along the chain link fence where we had tomatoes last year.

After that, things will need to wait until closer to our last frost date, so we’ll have time to prepare and finish more beds.

It feels so good to be able to get stuff into the ground!

Oh, and I got my first shipping confirmation from Veseys, for the smaller order that got processed a couple of days ago. It is our 3 pack of raspberries!

Royalty raspberries; image belongs to Veseys.

The expected delivery date is May 8, but I wouldn’t be surprised if they arrived earlier. I look forward to getting shipping notices for the apple, mulberry and potatoes!

The Re-Farmer

Wimpy!

One of the things we had to do because the cats were so determined to dig up the soil in our house plants – especially Cabbages! – was cobble together barricades around each individual plant or pot. For smaller plants, we used the plastic containers from cheese balls and pork rinds we found at Costco. Containers I meant to save to use to protect plants in the garden. I’d cut them into strips to put around the inside edge of the pots and, when that wasn’t enough, to loop over the plants. That worked for things like the aloe vera, but one pot with a jade tree in it was just too big. I ended up using some 1/4 hardware cloth I had – again, something I bought to use for something else entirely – to make a wall around the entire pot. It took 2 pieces to go all the way around. This pot is a square with an inner pot that can be removed. The outer pot has a reservoir for bottom watering, and we had to jam the hardware cloth between the two. It was the only way to keep the cats from simply pulling it out. That still wasn’t enough, and we had to make a “roof” over it, too. I only had 1 inch hardware cloth left, but it was enough. Sometimes, we’d find Cabbages sitting on top of it, looking out the window!

Now that the living room is barricaded and can be used as a plant room, most of our house plants have been moved over. The one hanging in the kitchen can stay, since the cats have been leaving it alone up there. A couple of larger pots, however, needed a second person to open and close the door in the barrier and keep the cats out.

Yesterday, that finally got done.

One large aloe vera handled the transfer well. After removing the plastic strips around it, it was a bit floppy, because some of its leaves were forced to grow into curves by its protective force field.

The jade tree in the big pot had outgrown its cage a while ago. Branches were starting to grow through the larger holes of the “roof”, so that had already been removed. My daughter was a sweetheart and was able to manhandle the pot into the living room for me – the thing barely fits on the largest shelf of the plant stand we’ve been using for them! Once it was in place, I wrestled with the hardware cloth to get it off.

As soon as it came off, everything fell over!

There were three main stems in the pot and, with the cage around the pot holding them up, they didn’t have the strength to hold their own weight! On top of that, the branches were twisted around, some around each other, in various directions.

It took some doing, but…

I got it supported.

I had some thick doweling left from my outdoor kitchen model. They’re short, but strong enough that I could put them around the thickest stem and use super long twist ties to support it at the base. I was even able to support a smaller stem to those as well. The third stem got its own support.

That still left floppy tops, though. After scrounging around, I found a couple long cherry wood stems in the basement we’d saved with the intention of eventually carving something out of them. One of those is now shoved into the middle of the pot, and I was able to weave some paracord around various branches and stems and get them lifted up and supported.

The top broke off one of the smaller stems, along with a whole lot of leaves. After cleaning up all the broken leaves, I planted the broken top. Jade trees are remarkable in their ability to propagate. If I wanted to, I could have started up a new plant out every single one of those fallen leaves. I think the broken stem has a good chance of survival.

It will take a while, but eventually the stems will gain strength and be able to support themselves. Still, it’s interesting to see how the cage that was there to protect the plant also weakened it so much.

There’s a life lesson in there.

Meanwhile, now that these last two big plants are moved away from the dining room window, it suddenly seems to much bigger and brighter in there! 😄

The Re-Farmer

Making tree cages

Since transplanting the Korean Pine in the outer yard – and promptly losing one that got dug up by a critter – I’ve been wanting to find a more secure way to protect them, but also to make them more visible. With the possibility of cows being allowed into the outer yard, that become more of a priority.

This is what I put together while doing my evening rounds.

I used chicken wire salvaged from the garden row covers we made last year. We’ve got some square buckets, and I used one to work out where to cut the wire. After the cut wire was made into a ring, I used the bucket as a sort of form to square off one end, then fold the edge inwards to make a sort of top with an opening in the middle.

We’ve got some high visibility paint that I use to mark rocks in the yard, so I can see them through the tall grass when mowing. Just the thing to make the chicken wire visible – on its own, it pretty much disappears against the grass!

They will dry overnight, and in the morning the girls will place them around the Korean pine. Along with the one that got dug up by a critter, another on just up and died for some reason, so we are down to 4 of the 6 we planted. I’d like to not loose any more of them, if possible! Hopefully, these cages will help protect them from critters, at least. Tomorrow morning, the girls will take them out and put them over the saplings, in place of the plastic cloche they used this morning, when the calves got into the outer yard. Some ground staples to hold them in place and, hopefully, they should work out.

The Re-Farmer