So we had a couple of issues with the new camera, but they’re only partly related to the camera itself.
My routine with the trail cams is to switch memory cards every morning (weather willing). The first time I switched out the micro disc on this camera, I wasn’t able to see the screen inside very well, which distracted me from something important. It wasn’t until I switched cards again the next day, and tried to view the second day’s recordings on the desktop, that I realized I had not formatted the card before using it. When I first set up the trail cam, I formatted the card right in the camera, but with the screen not working when I changed to the new card, I completely forgot, and hadn’t thought to do it on the desktop earlier.
Then we got hit with a blizzard and temperatures plummeted, which meant I did not get out to switch memory cards on the cameras for 2 days.
Yesterday, Christmas day, we actually hit -1C/30.2F!
That gave me the chance to get out, shovel paths to the cameras and switch out the memory cards.
The card on the new camera had nothing on it.
It was completely blank. Just like the screen inside, when I switched it to set up mode, turned it off, turned it back on.
The other camera had recordings on it, but only for 1 day, really. I got to see our angel driving past our driveway in his tractor, slowing down… then backing up and opening the door to look down our driveway… then pulling into our driveway and getting out to climb our gate to come to our door. What a pleasure to then watch as he later cleared our driveway! I was very impressed by his ability to maneuver that beast of a front end loader in reverse. That boy knows how to handle that machine! :-D
With the other camera, as the batteries drain, it shows up during night shots. White lines begin to appear, streaking across the frame, becoming more severe as the batteries drain more. It does not affect daytime shots, since the camera doesn’t use extra battery juice to power the infrared flash. In this older camera, there were a couple of night files, then nothing until the morning I switched cards. Which tells me we had nothing going by to trigger either camera for a day.
I ended up bringing the CamPark T40 inside, opening it up and turning it on and off, every now and then, as it warmed up. After a while, the screen inside did try to flicker to life, only to immediately go dark again. Once, it finally flickered on long enough that I could see the battery indicator.
It had only 1 bar!
I decided to put in fresh – room temperature! – batteries.
The camera worked just fine.
After having to reset the time and date again, I set it up outside again. I just checked the files this morning, and it worked beautifully. It even caught a deer that walked under it; it had to have just jumped the fence behind the camera, then used the path I’d shoveled to walk to the driveway. With the other cameras, it would never have been caught. The other camera did not catch the deer at all, even though it walked across the driveway. The motion sensor range on this camera is so much broader! This is a huge bonus.
As for the other batteries, because they were new, chances are they are fine now that they’re thawed out. I don’t have a battery tester, though, so we’ll find out when we try to use them in other things.
With the other cameras, the batteries are dropped in from the bottom, 4 wide and 2 deep. This camera has all 8 batteries in one flat row. It seems that this makes them much more susceptible to the cold!
As winter progresses, we will see how much of a problem this will be. I think, as soon as we can afford to, I’ll invest in a solar charged battery pack for it, and we shall see how those handle the cold.
As this point, I am glad we still have one of the old cameras going, as it kept recording in the cold, even as the new camera’s batteries froze and failed.
Right now, that is the main thing that makes me hesitate about getting another CamPark T40. At least for winter use.
I was quite looking forward to seeing how the new camera worked after it’s first night. We got a few centimeters of snow last night, and it was blowing quite a bit – I had 400 images of snow from the garage camera in my email this morning, and I’d already deleted about 300 before going to bed! So I did have some concerns that I’d have hundreds of stills and video of snow.
I did see one potential problem before even opening it. The camera is water tight, but snow accumulated on the top. Even brushing it off, it does mean moisture can potentially get into the camera when it’s opened. That is one benefit the old cameras, with their bottom latch, had over the side swing design.
I brought along a small, disposable bowl as a safety catcher for the micro SD card. I’m glad I had it! I was able to prep the new card from it’s little case, so I could quickly and easily switch cards, and have it waiting in the bowl. The card in the camera was easy enough to get out – it just needs to be pushed in and it will unlatch, as is typical. I then let it fall into the bowl rather than try and pull it out with my fingers. There is not a lot of space for fingers to grab the card. I do like the micro SD, but this is another thing that I would consider as better with the older cameras, because I am switching cards out daily.
As I suspected, putting the new card in is going to be an issue. It needs to be pushed in far enough to latch, but getting it to that point is not as easy. Just using a thumb for finger isn’t good enough. It has to be pressed in with a fingernail. Awkward to do while holding a bowl, and the camera itself wiggles. Until it catches, the memory card is pretty loose, and it would be way too easy for it to fall out – and it that little thing falls into the snow, the chances of finding it are very low! It would be much better if the slot were on the side, instead of the bottom.
Once it was in, I tried to check the preview screen, as it was just black. It doesn’t “wake up” when the memory card is taken out, like the old camera’s did. I put it on set-up and the screen came live, but it didn’t even show the little start-up image. The screen was basically white, with a greyish bar across. I hit the menu button, and I could see text trying to show up in the grey area, but nothing readable. I figure the screen was not handling the cold very well.
Which did not bode well.
Once I started uploading files to the computer, however, I was encouraged. It’s set to take 3 still images, then a 10 second video, which means 4 files for every time the motion sensor gets triggered. There were a lot more files than just me fiddling with the set up.
I have it set to maximum quality for both stills and video, and I must say, I was really impressed! Here is the second of the three still shots it took of my brother’s dog, coming to visit.
The files are so large, I reduced this image to 25% of original, just to keep the file size down!
It was rather jarring to see such high quality images of my own face as I fiddled with the camera position. It turns out I make some rather strange expressions while concentrating… :-D
With the old camera, the gate barely fit in the frame, so this wide angle is awesome. More importantly, the motion sensor has a wider range, too. It caught one of the cats going by at the far end of the gate. With the old camera, it wouldn’t have even been in frame, never mind picked up by the motion sensor!
Also, I love the information bar across the bottom. It even includes temperature! Which was funny to watch as I went through the files. It started at 14C, still warm from the house. By the last file, it was at -17C!
It’s also much more readable. The old camera included time, date, file number and moon phase icon, all crammed into the bottom right of the image.
The processing speed on this is much faster. With the old cameras, when set to video, there is a delay between when the motion sensor is triggered and when it starts recording video. For, say, a vehicle driving by at normal speeds, that would leave me with either the very tail end of the vehicle, or nothing but a cloud of dust or snow, settling on the road. When set to still shots, it’s faster, but not by much.
This thing is fast enough that it can get the burst of 3 stills at the beginning, and the vehicle is still picked up in the short video. And not just the tail end, either. I’m very impressed.
As for night shots, it also seems to be smart enough to know not to turn on for snow! The other trail cam had a couple of videos triggered by snow. The new camera had none at all. There was one series of files taken when it was dark enough for the infrared flash, triggered by a vehicle, and that was the closest thing to night shots we got.
I am really happy with this camera so far! We shall see how it handles the upcoming weather, though. A storm is predicted to hit us tomorrow, and by Wednesday, we’re supposed to get 30-45cm (11 – 17 inches) of snow! January and February are our coldest months, so that’s when it’s really going to be tested.
At this point, however, my husband and I are already talking about getting more of these. They are inexpensive, and it would be really good to have cameras in other areas of concern.
I have been really looking forward to this new trail camera!
This brand is not available in any of our local stores. The ones I’ve seen are pretty much the same design, if not the brand, of what we already had. I was perfectly willing to go with the same brand to replace the old camera which, after 2 years of constant use, has become finicky. I’ll talk about the features that convinced me to choose this camera, but ultimately, there were two things that really convinced me to get this one. The first was watching the video review, and the reviewer commented on how little battery power it uses. That is a big one, since I have found our current cameras – especially the older one – just suck through batteries. Especially in colder temperatures.
The other thing was the price. This camera uses micro SD, so I had to buy those (I got three 32 gig micro SD cards, though I only needed two), but the total still came out to just under CDN$90. The cameras we have now, which were bought for us by my wonderful brother, cost far more. He was able to get them on sale, as they are older models, so that helped, but if I were to get a new model of what we have now, we’d be paying anywhere from $150-$250 in the stores.
For us, we are using the trail cams as security cameras, so that is what we kept in mind when it came to the features that were most useful.
Let’s take a look at what’s in the box.
Along with the camera itself, there is a USB cable that allows you to hook it right up to your computer. There is the hardware to set up a permanent mount, or an alternate strap. For now, we will be using the strap, though the mount would be much more convenient. The camera will be mounted on a fence post, and we plant to take that fence out at some point. Once that’s done, we’ll have access to trees that will be much better to mount it on. It might be a couple of years before we get to that point, though!
There was also an instruction manual. I just hadn’t found it yet, when I took the picture! :-D
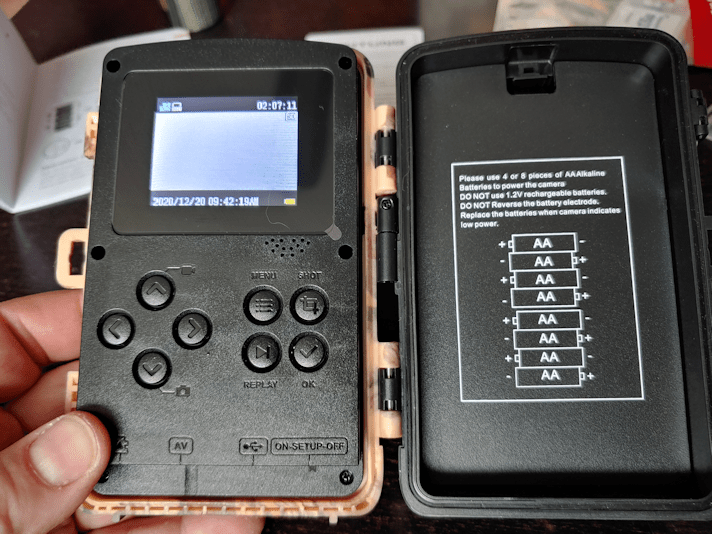
Here is one of the design features I like. It opens like a book. The side latches are easy to open and close, and you can even attach a very small lock, if needed. The seal is waterproof, which is essential for this design. Our other cameras open from the bottom and, while it is very quick to change out the memory cards, it becomes an issue when the batteries need to be changed.
With this design, the batteries can be changed without having to take the camera down. With our old cameras, the batteries are changed from below. Once the cover is popped open, they fall right out, but you can’t get fresh ones in without moving it.
The batteries were more trouble to put in than I expected, though. The springs seem a bit delicate, and move quite a lot. Hopefully, that will not be an issue. I won’t find out if it is, until it’s time to change them.
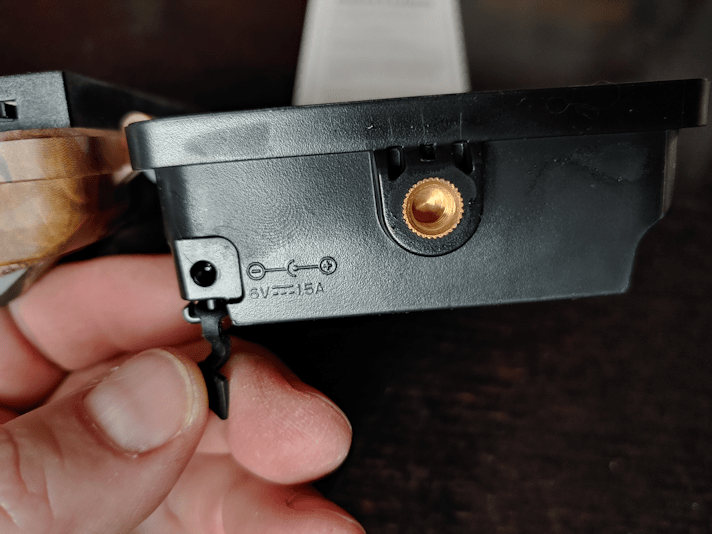
At the base under the batter case is the 1/4″ tripod thread for the mount. The DC connection is something I’m quite thrilled to see. If this camera works out, we might want to invest in a solar panel kit, which would plug in here, and not have to change batteries at all!
At the based of the cover half, there is the slot for the micro SD card. That was surprisingly hard to get in until it clicked in place. Switching memory cards is something I see as a potential problem. It is so tiny, and if I drop it, finding it again it going to be a challenge!! I will have to get into the habit of carrying something I can hold under the camera to catch anything that slips out of my clumsy fingers! :-)
There is an AV jack, the USB cable port, and the power switch.
The older cameras have small digital display for set up, but this one has a small screen and a mini computer, really. You can preview files, as well as use the camera as a manual camera.
The settings are another area with additional features that are important for our needs. Both our older cameras can do still shots or video. This one can do that, plus be set to do a burst of up to 3 still, then take a short video. I have it set to take 3 stills, then video. The length of video is also more flexible. Our older camera took videos at 30 seconds long , the newer one could go down to 15 seconds. We could set them for longer, but not shorter. Which is okay, except that when the motion sensor gets triggered by a car going by too fast for the camera to actually catch, we’re left with videos of dust or snow settling to the ground.
It’s the delay between shots that is going to make a huge difference. In the other cameras, the shortest delay is 15 seconds. A lot can happen in 15 seconds. Particularly when you’re recording someone vandalizing a gate. :-( The best I was able to set them at was 15 seconds of video (or 30, on the older camera), followed by a delay of 15 seconds. Even when doing stills, there’s that 15 second gap between shots.
This camera’s delay can be set as short as 5 seconds!
I now have it set to take 3 stills, followed by 10 seconds of video, with a 5 second delay.
There are a lot of other setting options as well. Photo and video qualities have quite a large range (I have those set to best quality for now). Motion sensor sensitivity can be adjusted for high, low and medium. I’ve left it at medium.
Oh, and while going through the settings, there is the most annoying beeping sound.
That can be shut off!
It can even be set to take time lapse photos, or to take recordings within a set time only, as well as being able to record audio. It can also be password protected.
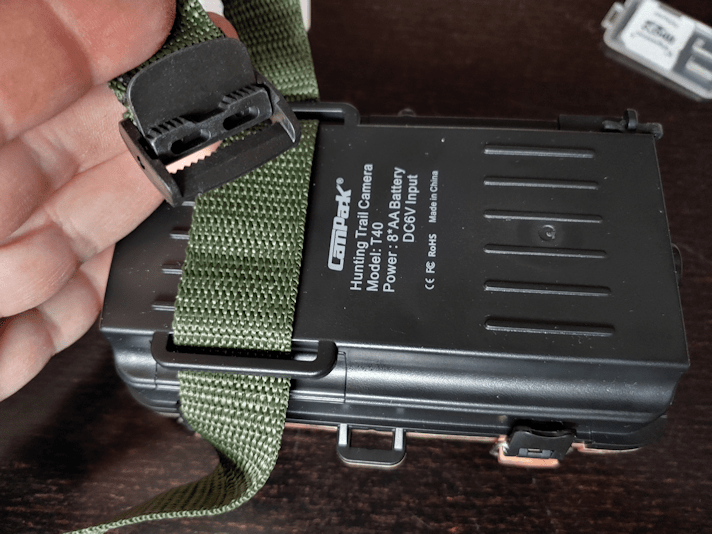
Once I got the settings to where I wanted, it was time to attach the strap.
It has a simple locking buckle to hold it in place. The newer of our other cameras has a strap as well, and the locking buckle on that is of higher quality than this one. I don’t expect to be undoing it often, so that should not be an issue.
Finally, it was time to set it up.
Here is the old camera on the left. If you look at the bottom, right corner of the camera, you can see the latch to open the bottom. When the memory card is removed, the display screen turns on automatically, while the control buttons are protected inside.
This older camera came with a pair of elastic cords to attach it. It used to be on a tree, which was just small enough for the cords to wrap around. I like how easy the elastic cords are, for taking it on and off, but they limit what it can be attached to. On this fence post, they had to be wrapped extra around the post an to get it snug. The straps are more flexible as far as the size of what you can wrap it around, but it’s more of a pain to get in place. So there’s a trade off, there.
The camouflage pattern on the new camera is… not very camo. :-D
One of the other features on this camera is the “setup” mode. The power switch has “on”, “set up” and “off” positions. When it set up mode, lights flash when the motion sensor is triggered, so I could walk back and forth at the gate, and see exactly when and, more importantly, where I was triggering the sensor. Once it was set, I could open it up again and switch it from “set up” to “on.”
This camera has a wide angle lens (the camera it is replacing does not, but the newer one does) and the motion senor is also wide angle. This is important to me. With having two cameras on the gate, I was able to see just how much one camera or the other was missing, simply because the motion sensors weren’t being triggered in time. I think this one is going to be a solution to that problem.
After using the set up function to position the camera, I set it to the “on” position and left it. Tomorrow, we shall see what we got!
Besides me walking around and fussing with the camera. ;-)
The down side is, once it’s been set to “on”, there is nothing to tell me if the camera is actually working. With the older cameras, after switching the cards, I would make a point of triggering the motion sensor, so make sure they were working. I could tell, because there is a small red light, just to the left of the motion sensor in the photo, that would blink. A few blinks for a still short, or continued blinking for the duration of a video. They also made a quiet shutter-type noise. This camera is completely silent. It’s also too bright for the infrared flash to turn on, so I don’t even have that to go by.
Since there is nothing to tell me it’s doing anything, a part of me can’t help but think it’s not actually on.
With having to use a wheelbarrow to haul things from the basement to the barn, one of the things I really wanted to do this pay period was pick up a utility wagon of some kind.
Yesterday, at Costco, I found one. Today, I got to break it in!
Ideally, I would have picked up one of the types with rigid metal mesh sides and bottom, with removable sides. They cost about $250, though, which was not in the budget this month. Instead, I picked up a folding version with fabric lining, which has almost the same dimensions as the metal version I was looking at.
While I ran into town to run errands, the girls assembled it and left it waiting for me in the garage, so I could test it out.
It folds up to a nice, compact size, and it quite light.
It isn’t visible in this photo, but there is a loop in the middle of the wagon to pull on to fold it up again. On the handle, near the frame, is a lever that lets you adjust the handle length. In the first photo, you can see a red button on one side of the handle. That is the release button to unlock the handle for use.
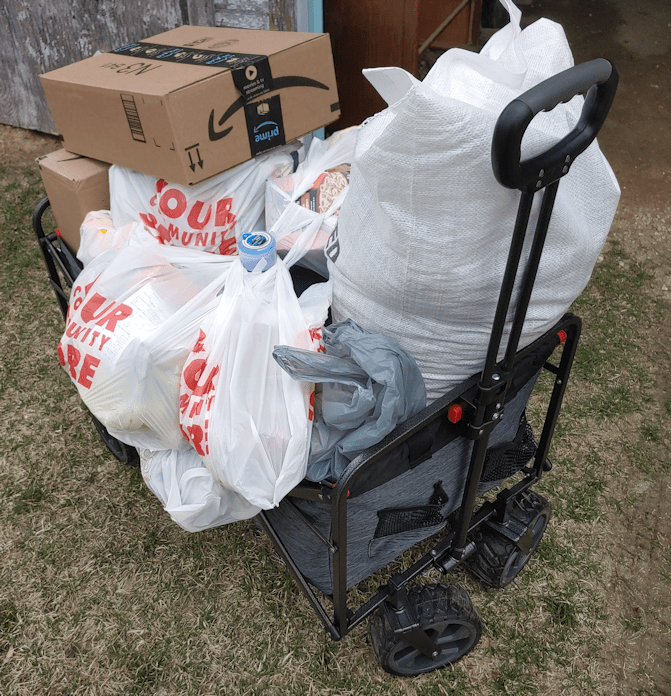
I picked up a lot of larger, heavier things while running errands. One of the reasons I chose this specific wagon is because it’s rated to 300 pounds. Normally, I would have had to drive into the yard and unload at the house. Instead…
… I got almost everything in the wagon!
I did have to use the neck of one of the two 18L water bottles to hang bags off of, and had one last bag I needed to carry, but I was able to get everything from the van to the house in one trip. This included a 20kg (44 pounds) bag of bird seed and, along with the big water bottles, a couple of gallons of distilled water for my husband’s CPAP humidifier, and a 12 pk of cola, on top of everything else.
It did a great job of rolling all that over the rough ground to the yard; only the one Amazon box ended up falling off part way through.
This would have made hauling all that stuff to the barn SO much easier! We’re going to get a lot of use out of this.
Because it is fabric sided, though, we plan to cut a board to fit on the bottom. One of the things we expect to use it for is to roll 5 gallon buckets of water around the garden, once we start transplanting things. Having a “floor” will be a help with that.
Oh, and the Amazon box that fell of had this in it.
Yay!!!
It will be some weeks before we need to use the soil auger, but I’ll be putting one of those soil testers in the garden bed we’re working on as soon as I can!
It has been a very productive day today – and it’s only half over. Much better than trying to get things done in the city, yesterday!! And no snarky people. Not one.
One of the things I picked up today was a bottle of white wine. Historical Italian Cooking released another video recently, and I am really looking forward to trying it!
After bringing my mother home from the hospital yesterday (I called her this morning and she is doing well today, and did not have any episodes during the night), I’d gone to the hardware store in her town to pick up the paint we needed to finish the replacement door for the sun room.
I also got myself a new toy.
Since I am cutting so many slices from the lilac wood, and plan to do more with maple and cherry that I’ve set aside. I even have a couple more branches of lilac waiting outside, so I decided it was worth the splurge. With the kittens in the basement, I’m not as comfortable using loud power tools. I have hand saws that are done the job, but when I saw this saw – and its affordable price – I went for it.
This is a fine toothed, fine bladed pull saw. I hoped that it would cut more smoothly than the saws I was already using, so of course I had to test it out.
On the left are the round slices I’d cut using a regular carpenter saw, which is what I had that worked the best at the time. To the right are slices I cut using the new saw, in the miter box at 45 degrees. None of these have been sanded.
It’s hard to see, but the cut edges with the new saw are smoother than the other ones. They also didn’t leave that jagged edge that sometimes happens at the very end of a cut. The larger saw also left occasional black marks that need to be sanded away. So, right off the top, the new saw will save me on sand paper. I also splurged on sheets of sand paper in grits starting at 50, up to 220. The slices I cut with the old saw needed that 50 grit, but the new slices don’t need to be started with such coarse sandpaper.
There were a couple of other benefits I noticed. The sawing itself is quieter, which means less noise to disturb the babies nearby. It cuts faster, and with less vibration, so things are not being shaken off the shelf on the work table quite as much. :-D
The blade is so much thinner, there is less loss of wood as sawdust, and it’s easier to cut thinner pieces. However, this also means the blade bends more easily. Since it’s shorter than the other saw, I had to take greater care while sawing in the miter box, as the blade would sometimes bend and hit the inside of the miter box rather than go through the slot. After a while, because the piece of wood I was working on was wonky in shape, I started to use the miter box just to start a cut, then take it out and hold it in my hand to finish the cut. After a while, I didn’t even do that, and just eyeballed the angle and started it without a guide. I don’t know that I would have been able to do that with the other saw. Previously, I’d used the vice to hold the wood, but this branch had too many bends in it for the vice to be able to grip it.
As before, I use the last 3 1/2 inches of the branch to make lengthwise cuts in the miter box, and found an unexpected problem. Cutting the wood lengthwise resulted in sawdust clogging the teeth very quickly. I kept having to pull the blade out, remove the sawdust in the teeth, then make a few more passes before I had to do it again. So while cross cutting went faster than when using the other saw, cutting lengthwise took longer.
Of the branch I brought downstairs, I’ve now cut the two thickest sections into pieces. There are more smaller branches I’d taken off to work on later. I’m still thinking of what to make with the pieces I’ve already cut, but the smaller pieces will be of a size and weight suitable for earrings, so I know I will be making at least a few of those.
My new toy will make it much faster and smoother to cut the pieces to size. I hadn’t planned on getting a new saw, just for this project, but now that I have, I’m already glad I did. Definitely worth it.