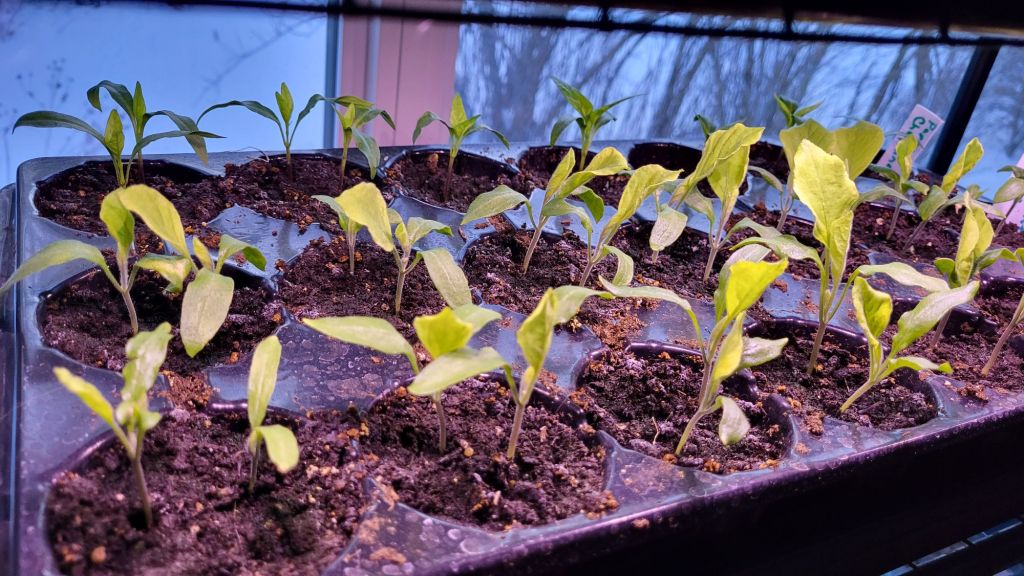
I took this picture after turning on the LED grow lights, but before turning on the bright shop lights. The LED lights are only along one edge of the shelf above, and I had them over the peppers for a while, but I’ve since rotated the tray, so the eggplants can be under the grow lights for a while.
It’s getting to be time to thin out those eggplants, and a couple more peppers. Thinning out is always so hard for me. I keep wanting to thin by transplanting, since I don’t want to “waste” any seedlings. The thing is, we don’t need that many! We could probably do fine with maybe 3 or 4 of each plant, including the peppers. We certainly don’t have enough space for all of them!
In the big aquarium greenhouse, all three cups with the Sweet Chocolate peppers now have seedlings in them, though it’ll be a while before they’re at the stage that they need to be thinned. With the Purple Beauty peppers, the one cup now has 4 seeds germinating; one cup had 4 seeds planted in it, the other had 3 seeds – the last of our Purple Beauty seeds. The second cup has nothing germinating it, so for that variety, when it comes time to thin them, I will thin by transplanting. I’d like to have at least two surviving plants and, right now, there are four seedlings, so we’ll see how that works out. For now, I’m leaving them in the aquarium, but I’ve moved the red onions out and under the lights at the window. We’re not going to have many of those to transplant, compared to the yellow onions and the shallots.
I spent some time looking for replacement bulbs for one of our tank light fixtures. The one with a burnt out bulb holds 2 bulbs that are T5HO. Looking at the various hardware store website, I can find the bulbs, but at sizes ranging form 12 to 18 inches. We need 48 inch bulbs. The one place that had them, they were sold out.
I did, however, find replacement bulbs on the Veseys website. These are the bulbs they use in their grow light set ups. The price for a pair of fluorescent bulbs is quite affordable. They also have LED alternative bulbs that fit the same fixtures, which last much longer and use less power, but are more than triple the price. I’ll be sticking with the fluorescents!
I checked the other light fixture we have over the tank, and it uses a single T8 bulb. That bulb is still fine, but it’ll be a good idea to get some spares of that one, too.
In the next couple of weeks, we’ll need to start our next batches of seeds. Time to go over them and make some decisions.
Speaking of seeds, I’m considering making another seed order. I’d had an order with my T&T Seeds shopping cart when my computer died. By the time I logged back on to place an order it was, of course, no longer there. My daughter had requested a couple of squash to try and I remembered one of them. Talking to my daughter later, she asked about the second one I’d completely forgotten about. When looking for replacement bulbs on the Veseys site, I couldn’t resist looking at seeds, and realized they also have the type of squash my daughter was interested in. In fact, there are two similar ones. So now I’m thinking of getting those, too.
We already have SO many squash seeds right now, though, including a winter squash surprise mix. We don’t need more seeds!
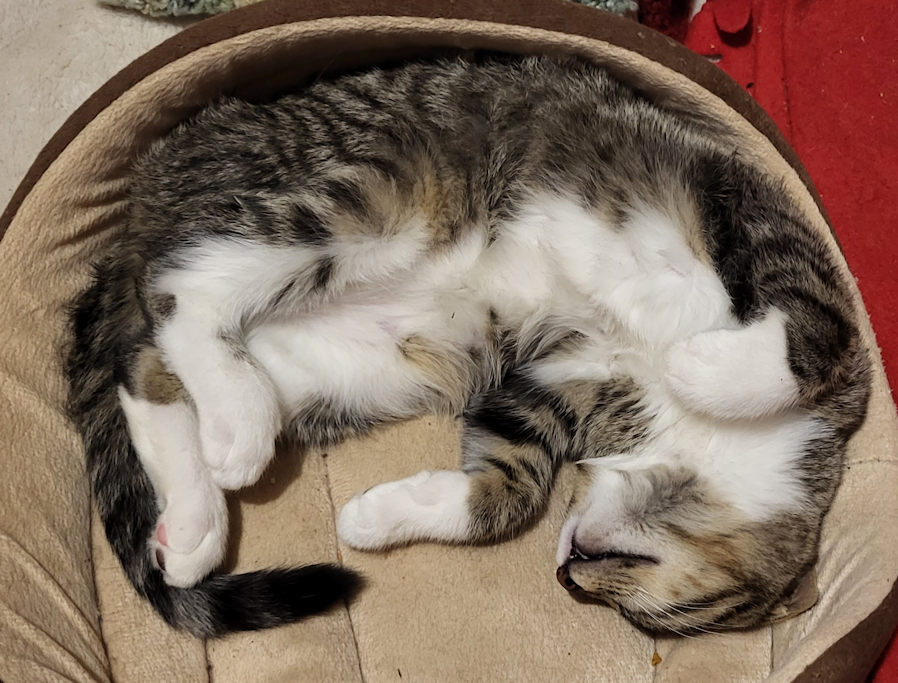
I’ve been able to sneak a touch while she was eating on the cat house roof maybe twice before. She’d panic and run off.
Today, she was at the water bowl in the sunroom as I came in from outside, her back to me. I started to pet her back, and she just kept drinking! A couple of other friendlier cats started to push in on either side of her, wanting pets, too, so she started looking around. That’s when she finally looked behind her and saw me, still petting her back.
She moved away immediately, but not in a panic, and not in a run. She just went under my husband’s walker and watched me.
So I started petting other cats, and saw the fluffy tortie was in reach, so I picked her up. Her response was to immediately start purring! She still wanted down, but she enjoyed some cuddles, first.
I even got to pet Sad Face (AKA: Shop Towel) for a bit.
I’m just so excited to finally pet Brussel. It’s only taken a couple of years! She’s been hanging out in the sun room a lot more, too.
Now, if only her short haired sister, Sprout, would start coming to the sun room, too. I’ve stopped putting food under the shrine, so she at least had to come to the kibble house to eat.
It occurred to me that these guys are coming up on 6 months old. The Cat Lady was looking into getting 5 slots for the cheap spay and neuter day, including Toni, Ghosty and a couple of outdoor males, but I just asked if her if we could get the 5 oldest kittens done, instead. She still wants to get Toni done, too, so she’ll see if she can get 6 slots. She might be moving next month, though, and things are really hectic for her and her family right now (and their 27 or so cats!!), so she’ll get back to me on that one. I told her I’m less concerned about Toni than I am about having 5 kittens old enough for their first heat (well… three female kittens going into heat with intact males around!). Ghosty, depending on how things go with the move, would not be coming back, as she’s found a home for her.
Speaking of large numbers of cats, I did a head count outside this morning. Including Shop Towel/Sad Face, I counted 38.
As much as we’d like to reduce that population, we really need to reduce the indoor population first. It’s just not healthy for them, mentally or physically. The Cat Lady, once they move to their new home, will be able to convert a heated shed into a place just for cats. That’s something I wouldn’t mind finding a way to do. Too bad we can’t use the storage house for that! We need more sheds, anyhow. The ones we have are either fallen apart, falling apart, or jammed full of junk. Or, in the case of the warehouse that used to be my late brother’s workshop, filled with my parents’ stuff my mother insists we keep. Not that we’d use that for cats. We need a workshop more!
Ah, well. All in good time.
With the temperatures dropping below freezing consistently over night from now on, I pulled the bed of Red of Florence onions, yesterday.
There was enough to half fill the wheel barrow, plus there were a few too small to bother keeping.
Their necks are still too “fleshy”, so we won’t be able to cure them like we did with the other onions we harvested already. We’d had a night and morning of consistent rain, so these were also pretty damp. We have the hardware cloth “door” we made to keep the cats out of the old basement when we keep the door open in the summer. It does double duty for laying out vegetables. I was able to set it up in the old kitchen and laid the onions out to dry a bit. From there, we will need to process them; some for freezing, some for dehydrating. This is on top of the onions we’ve been able to cure and braid for casual use. We got a very decent haul of onions this year, but only the yellow onions, plus these ones. Oh, and the shallots. We also had the Red Wethersfield onions, but not one of them survived transplanting! I’ve no idea what happened to them, but I want to try that variety again before we conclude that they just won’t grow here.
The high for today, and the next couple of days, is expected to be 3C/37F. After that, the highs will be lower, and reach just above or below freezing. So far, the overnight lows are not expected to drop very far, and remain just a few degrees below freezing, but we will no longer be seeing overnight lows above freezing from here on. It’s still not too bad, though. Nothing severe or extreme. Also, we don’t have the snow that other parts of the country got yesterday, including the city we lived in before moving out here!
There was a thin layer of ice on the outside cats’ water bowls. It’s starting to be time to bring warm water out for them when we feed them. It’s time to put the hoses away and cover the taps, anyhow. The electrical in the cat house needs to be plugged in and tested, so we can plug in the huge heated water bowl in the water bowl shelter, plus the terrarium heat bulb inside, with its timer set to turn it on at dusk. I’ve already set up the smaller water bowl in the sun room and plugged it in.
Still lots to be done, but as long as we get the essentials taken care of, the rest can wait until spring, if necessary.
We have reached a lovely 16C/61F today, with wonderful sunshine. You know what that means!
Time to get work done outside!
Today, I focused on using the last of the soil in the kiddie pool the melons were grown in and soil from the grow bags, to top up our first trellis bed. The potato bags were already emptied and the soil all in a pile, so that was nice and quick to transfer over. Between that and the soil from the kiddie pool, more than half the trellis bed was covered.
Then I started on the grow bags the bell peppers were in.
I think I discovered why the peppers never thrived in those.
I had two shallow “raised beds” from the dollar store, plus two deeper, higher quality bags. As soon as I started trying to break up the soil with the spade, I found it to be remarkably solid and hard to cut through. That bag in the photo was the last of these fabric grow bags. It flipped inside out as I tried to empty the soil, and was still stuck.
Those are tree roots.
It turns out those horrible elms from the self seeded row of trees my mother allowed to grow not only release millions of seeds every spring, their roots will actually grow up into the grow bags and smother whatever else is growing there! The only bags where this was not a problem were the potatoes. Those had a thick layer of straw on their bottoms. I did see a few roots here and there, but nothing in the soil layer like this. These fabric grow bags had some grass clippings added to their bottoms. Those were completely decomposed. I didn’t do the feed bags the hot peppers were in until later. Those had straw on their bottoms, too, but not as deep a layer as the potatoes.
So most of my time ended up being spent trying to break up the soil enough that I could finally shake it from the roots, before it could be dumped into the trellis bed. The four bags the bell peppers were in were just enough to finish topping up the trellis bed.
That left five feed bags; four that had the hot peppers and onions in them, and one that had just onions. I left those and shifted to the high raised bed. The grass clipping mulch was moved and the bed was weeded – leaving two little onions to keep growing.
It’s really amazing, how deep dandelion tap roots can grow!
I found what looked like a couple of mouse tunnels in two of the corners. Grass clippings were used to fill in gaps in the corners, and all along the edges, as well as to chink some gaps on the logs that I found. I also debarked it a fair bit. That’s to keep insects and moisture from the logs, so they’ll last longer.
Once that was all cleaned up, I leveled the soil, pushing some of it up against the grass clippings around the edges. Once that was done, I went back to the remaining grow bags and de-rooted them. All five ended up in the high raised bed.
Last of all, the soil was topped with a light sprinkling of grass clippings before both beds got a thorough soaking. I want the water to soak through all the layers, but don’t want to compact the soil layer, and the grass clippings will help with that at least a little bit.
The beds have now been put to bed for the winter!
When adding soil to the trellis bed, I could see it bouncing! I did stomp on them, but the layers of grass clippings, leaves, kitchen compostables, straw, wood chips and bark, all still have quite a bit of space in them. By spring, I expect the whole thing to have sunk and settled at least 4 inches. The main thing, though, is that it is ready for planting in the spring, even if it takes longer to build the trellis part of the trellis beds!
Now for my happy Butterscotch news!
She’s back indoors!
I’d gone out to feed the cats a bit early, yesterday evening. Butterscotch came around and I got to pet her and cuddle her. She still wouldn’t go near the other cats, and if they came close, she would leave, even from the food I’d put near the storage house for her. Shop Towel in particular was interested in that.
After trying – and failing – to bring her to the kibble house to eat, I tried a different tactic. I’d seen a kitten running around around the front of the house, so I left a pile of kibble on the concrete steps for it. Butterscotch let me pick her up again, and I walked around the back of the house, avoiding all the cats, to bring her to the lone pile of kibble.
I almost got there, too.
It just happened that the girls decided to come outside, and as soon as the doors started rattling, Butterscotch got spooked, and I couldn’t hang onto her anymore. Once the girls realized what happened, they worked with me to encourage Butterscotch to come to them at the steps, and got her eating.
My younger daughter stayed with her while her sister and I played interference with the other cats. Several of them suddenly decided they needed to check out what she was doing at the steps!
Including Shop Towel.
Shop Towel has become an enigma. He’s been hanging around and eating with the other cats, and they are mostly okay with that. Driver and Judgement have not been targeted by him, nor have any of the other males. Mind you, he’s clearly the father of most of the adult males, but I don’t know how much of a difference that would make.
The problem starts when he seed Butterscotch and Nosencrantz.
He hasn’t really targeted Nozencrantz, but he has in the past, and she’s clearly nervous around him. When he goes for the food, she leaves. At least she’s not running up a tree anymore, but it means she doesn’t eat. This morning, I left kibble on the red bench for her, just so she could have something!
Butterscotch, however, has his attention, and he wants to chase her.
Between him, and her not wanting to go near any of the other cats, this was a problem. If only we could get her inside, but she wouldn’t let us take her close to the house!
Well, we found a way.
It started with my younger daughter going over to Shop Towel as he was milling around the storage house. She squatted down (oh, to have functional knees like hers!), held her hand out – and he came right over! She was able to pet him as he purred and rubbed against her legs! We were all pretty stunned by this.
That gave us an opportunity.
The cat carrier was in the sun room, in hopes we’d be able to catch one of the adult females for spaying and adoption. While my younger daughter kept Shop Towel distracted, I got the carrier and her sister and I managed to get Butterscotch in.
She was not happy about that.
The carrier also allowed me to get her past all the indoor cats and bring her into my room.
She was not happy with the kittens. She snarls at them, and spent the night hiding under my printer table. She still came out for pets and cuddled, though, and she was very happy to have wet cat food!
The kittens are curious, but we let the big ones in and out, so she’s not overwhelmed by them. The three tiny ones are still too small to let out.
After I finished up in the garden, had a shower and came into my room, I was able to persuade her to come out for pets, and even go up onto my bed for cuddles. The kittens still in the room were all asleep, so there was no snarling involved.
As I write this, she is still on my bed, curled up and having a nap!
I feel much better having her inside. She probably would have been fine outside, but that whole thing with her not being able to get food because she wouldn’t come closer to the house or other cats was a concern. Plus, she’s one of the originals that my late father cared for. Grandma deserves a warm and comfortable retirement!
I really hope this works out for her.
Once we get some of those kittens to the clinic for spays then adoption next month, I’m hoping we can convince Nosencrantz to come back in, too. I miss her nightly cuddles!
Okay, so I did finally make it outside yesterday to do some work. I may have been mentally drained with all the BS going on with our vandal, but not going out was actually making me feel worse. It was later than I normally would have gone out, but the weather was still good, and there was still enough light.
For a while, anyhow.
My first task was to fill the wheelbarrow with material to add to the bed. The compostable bag of kitchen scraps went in, along with the Spoon tomato and pepper plants from the old kitchen garden, and all the squash and pepper plants from the main garden bed. I also pulled up the potato plants from the grow bags, which meant the Purple Peruvian fingerling potatoes would need to be harvested.
All that material went on top of the straw layer, followed by a layer of leaves and finally a sprinkling of grass clippings.
The grass clippings were more to keep the leaves down for when I tromped all over it, after this picture was taken. Then the whole thing got a thorough soaking. After that, I emptied my last half bag of manure over the grass clippings.
My plan had been to empty the soil out of the kiddie pool the melons were growing in, then use it to collect the soil from the potato bags while harvesting those. I got one load in the wheelbarrow, but the soil in there was very damp, sticky and heavy, and I was starting to lose the light. So I just emptied the one load into the bed, then shifted gears.
One thing about spreading even that small amount of soil onto one end of the bed: those layers REALLY start to sink under the weight! The bed looks over full in the photo, but those layers will probably settle to only half the bed, by the time the soil is added.
The feed bags used to grow the potatoes in are good for only one year’s use. They were all starting to tear apart as I tipped them over and dumped them out. The straw from the top and bottom of each bag could be easily set aside, leaving just the soil to sift through and pile up before moving on to the next bag. I got a decent amount of potatoes out of it. More than either of the other two varieties, and they were decently large for a fingerling potato, too. It was so dark by then, it was getting hard to find the dark purple potatoes in black soil in fading light! I will not be at all surprised if I find ones that got missed, when the soil is transferred over to the new bed. I did try to get a picture of the harvest, but it was a sucky flash picture, so I won’t inflict that on you. 😄
Today has turned out to be a less pleasant day, weather wise, so I’m extra glad I got as much done yesterday as I did. This morning, as I was finishing my rounds, I harvested some Uzbek Golden carrots to go with a roast I was wanting to do today. A nice big hunk of beef roasted with all three types of potatoes that we have, a whole bunch of our smaller yellow onions, and the golden carrots. Those were so big and juicy that, as I was cutting off the tops and tails, several of them would suddenly make a popping noise, and split from end to end!
I checked on the roast before I started this, and it was done – and the house smells delicious!
I was so excited when the phone rang, and I saw the plumber’s name on the call display.
Then confused, when there was nothing but dead air.
It took several calls like this, until I finally made sure my cell phone was on Wi-Fi calling (it keeps turning that off of me!) and got through to him that way. He’d tried calling another number in our area, with the same prefix, and had trouble there, so it seems like it’s a regional problem.
The important thing is, he was able to come over shortly after calling, and get the new tank installed.
Here, you can see his handy little pump draining the tank. We had turned off the breaker but never drained it or shut the water off, so that if we happened to turn on the hot water tap out of habit, it would still work. We just wouldn’t have hot water.
Looking inside, he thought that maybe the bottom element had burned out and said it could possibly be fixed, but I saw no point in that. This tank has already lasted two years longer than expected!
The weird thing was this.
This is where the electrical wires are tucked in, after the tank is hooked up. The plumber could not understand how water got in here!
After switching the tanks and starting to fill the new one, we talked about our well pump. It turned on while the tank was being filled, of course, but was having a hard time filling the pressure tank fast enough, so it started to make that grinding noise that worries me so much. I told him, we have a new pump ready and waiting, but with the possibility of the foot valve breaking, no plumber has been willing to change switching it out, because we’d end up with no water. He agreed with that assessment! I asked if he happened to know of any companies that serviced hand pumps, but he couldn’t say for sure. It’s entirely possible, we can change out the well pump and not have any problem at all, but when I said I didn’t want to risk it until we got the hand pump checked out and working again (if all it needs it new leathers), he thought that was a good idea. If we find ourselves with a worse case scenario, we at least can haul water to the house! Part of the problem is that the pipes in our well are a size that isn’t used anymore, so if the foot valve goes, we’d have to either find the old size somewhere or, if there are none to be had, get a new well drilled.
While the tank was filling, he was careful about using the valve to slow down the flow of water, giving the well pump a chance to catch up.
It takes quite a while to fill a 40 gallon tank!
Once it was full, he got me to turn on a hot water tap – which we have right in the basement, where the laundry used to be – to get the air out of the pipes and the water flowing. Once that was done, we could turn the breaker back on.
It takes a while for 40 gallons of water to heat up!
But heat up it did, and we now have hot water again! He recommended to check it a few times to make sure nothing is leaking, which I’ve done. Hopefully, this tank will last longer but, just in case, I’m hoping that we can pick up a “spare” tank, because we won’t be able to replace a warranty tank with a warranty tank again!
The whole thing ended up costing just under $235, after taxes. Thankfully, my daughter had already provided funds for most of that. Otherwise, I would have had to go into funds set aside for a down payment towards a new vehicle! We’re good, though, and I am very grateful!
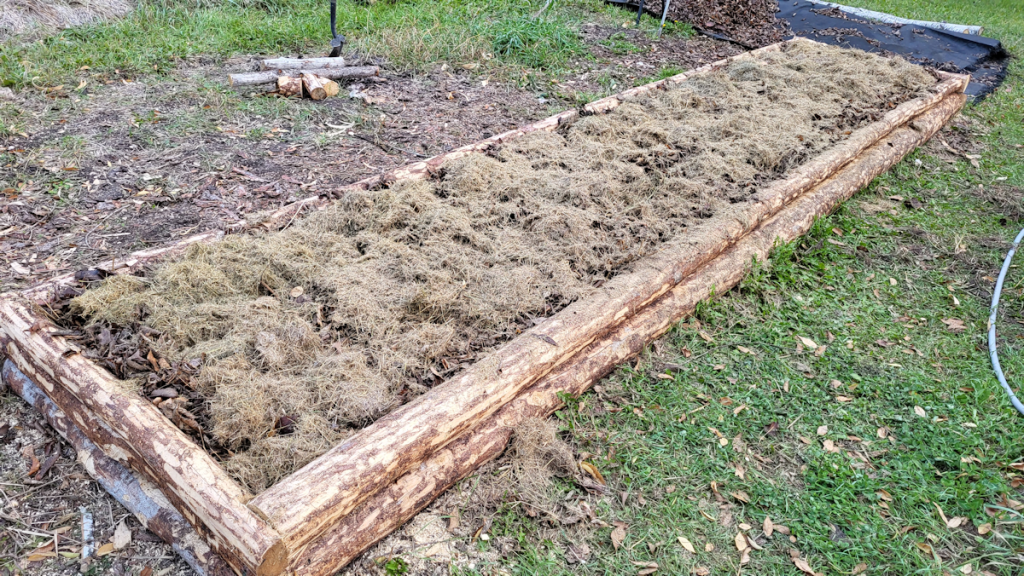
It turned out to be a gorgeous day today – we reached 12C/54F this afternoon, which was several degrees warmer than forecast. I took advantage of it – and of having the cardboard from the box the new hot water tank was in – and started filling the trellis bed.
The cardboard almost completely covered the bottom of the bed, leaving gaps small enough that I’m not too concerned about it. After laying out, stamping down and hosing down the cardboard, I added the bark shavings from the poplar poles that will make up the trellis supports, followed by a wheel barrow load of wood chips. That got tromped down and soaked before the next layer was added – tomato, bean and melon plans pulled up from the garden. Finally, I added straw that had been laid out on this area when it was a Ruth Stout style garden bed. Another tromping and a soak, and I stopped for a while. These layers are just enough to cover the bottom logs, but they will settle down once the soil is added. I started adding scraps of wood into gaps as chinking, from the inside, so the straw could be used to hold it in place. There are more gaps that need to be chinked before more layers are added. It will get kitchen compost added, as well as leaves and grass clippings, before soil is finally added to the top. I’ll be using the soil from the melon bed and the grow bags, but those still need to be cleared.
With that in mind, I harvested the last of the onions in this area. There were just a few yellow onions left in the high raised bed, plus the Red of Florence onions sharing grow bags with the peppers. Last night’s frost was too much for the peppers, but some of the larger unripe ones were salvageable. I harvested the last of the peppers in the wattle weave bed, too, along with the two little eggplant that could be picked. We’re at 8C/46F right now, and supposed to drop to 6C/43F overnight, but there’s really nothing left to cover and try to protect anymore.
I’m happy with the progress on the trellis bed. Hopefully, I’ll be able to get that bed filled and set for the winter, and still be able to harvest more logs for the second bed. I’ll worry about the trellis supports later. That part can wait until next year, if need be.
I’m going to pay for today, tomorrow! It’s a good thing it’s Thanksgiving, so I’ll have a break to recover.
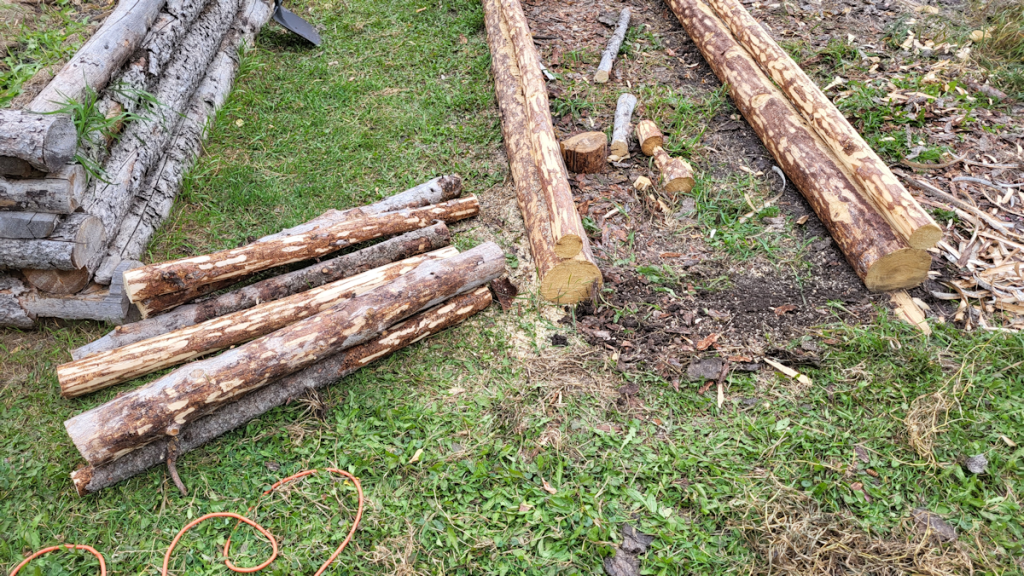
My goal was to get the felled tree that was stuck for so long, cleared and cut to size and, hopefully, start clearing access to the other tree my brother cut down for me that is almost completely hidden by the underbrush.
The first task was to clear away a small spruce tree I had to cut to allow the felled tree to drop. It was such a perfectly straight little tree, I ended up debranching in and setting it aside for future use. There were a couple of other dead trees plus underbrush to clear before I could reach the broken tree top that was laying across the trunk. The tree it was from had lost its top at some point, so a pair of branches grew upwards to create a double top. The whole thing was too big and heavy to bother taking out completely. Instead, I cleared away some of the branches, then cut it away from either side of the trunk I was after, giving myself enough space to work. I was able to use the mini-chainsaw for this, so once it was clear, I kept cutting away branches from the trunk I now had access to, until the battery died. I was already on my second battery, and the first one hadn’t had time to recharge yet, so I switched to the loppers. This part of the tree extended outside the north “wall” of the spruce grove, and I was able to use the loppers to clear all the way to the end.
The next step was clearing access to the bottom of the trunk. Between a machete and the loppers – our weed trimmer isn’t heavy duty enough for what was grown back since we were last able to work in this area – I was able to make a path. There was still the top of a dead tree I’d harvested before, laying on the undergrowth, that I dragged out. It’s straight enough, we might be able to use parts of it. Then I had to clear the trunk itself, which not only meant clearing underbrush around and branches on the trunk I was after, but even some low hanging dead branches from the spruces the trunk was wedged in between.
Once everything was finally clear, I measured off and marked 10′ from the base of the trunk, then the next 18′. The 18′ length will be for the next trellis bed. There’s still at least another 18′ of trunk left, but the closer we get to the top, the less straight the trunk is, and the more full of branch stubs it is. It will likely still be used; just not for the side walls of the next trellis bed.
Once everything was accessible and de-branched, I was finally able to cut the 10′ length.
Then I had to drag it out.
Good grief, that log was heavy!
As I’ve done with most of the logs, I dragged it out by a rope tied to one end. Getting it out of the spruce grove was quite a challenge. I even tried wrapping a plastic bag around the far end to help it slide better across the ground, but this time, it made no difference. I ended up taking it off again, as it seemed to actually make things worse.
Once it was out of the spruce grove, I left it and went into the barn. I found some scrap pieces of wood that were used as spacers between some old salvaged lumber we’ve been scavenging for various projects. The pile used to be a log bigger, before we got here, so there were quite a few of these scrap bits.
I decided to store the 10′ lengths beside the garage and lay the pieces on the ground to keep the log from direct contact with the soil. Then it was back to the log!
It wasn’t long before I gave up trying to drag it. It was not at all co-operative! I ended up simply rolling it the rest of the way.
Here it is!
The very first 10′ length of what will be the vertical supports for the roof of our future outdoor kitchen.
Only 9 more to go.
I wonder how much that thing weighs? I just tried looking at some log weight calculators, but they either require information I don’t have (oven dried weight and bark??), or they don’t have black spruce in their species list. I’ve tried a couple of species of spruce, but they don’t grow here. I also tried tamarack, which does grow here, but I think tamarack is a denser wood. The results ranged from just over 140 pounds to over 200 pounds. That’s a huge range! Plus, this tree has been dead for a very long time, so it’s very dry. If I had to guess, after looking at the calculators, I’d put it at maybe 150-170 pounds. Which isn’t really a lot. I’m definitely not as strong as I used to be! 😥
The other felled tree that I need to access looks like another big one. I have no idea how tall that one is, but I’m hoping I’ll get another 10′ length, and 18′ length again.
Anyhow.
Once the 10′ length was cleared, I went back and measured out the 18′ again, then started cutting it. With the top of the tree still hovering above ground, I was expecting its weight to drop at the top, which would have made for an easy cut.
Of course, it didn’t go easy.
Instead of the top dropping, the entire trunk slid down a couple of inches, pinching the chain saw’s bar. The chain was still free and could spin, but the bar couldn’t move any further to finish the cut. It could only just rotate in place. In the end, I had to take the bar off the chainsaw. I was then able to get the bar out, but the chain was still stuck. I had to find something large enough and strong enough to lift the log – a steel pipe my brother had found and used when the tree first got stuck on him! – high enough to open the cut enough that my daughter to pull the chain free.
At which point, I was done for the day! It was starting to get dark, anyhow.
So I almost got the tree cut to size!
I’m not actually sure how I’m going to get the rest of it out, though. The top of the tree, once free, will be easy to drag clear. This 18′ section, though, is right in between three other trees. They’re dead, too, and slated to be cut down, but they don’t have clear paths to fall. There are other dead trees that need to be cleared out, first.
I never imagined that one dead tree would be so difficult to harvest! It’ll get easier as we clear away more of the dead trees, but these first few just don’t have a lot of space around them. There’s still more than a dozen more dead spruces to cut down, and some of them are quite a bit bigger. These ones that my brother cut down for me were specifically chosen because they were smaller and more suitable for the trellis beds!
So… yeah. I’m pretty tired now! 😄 I also forgot to take painkillers before I started this. I’ve taken some since then, but by the end of it, it was getting hard to move! My daughter had to take over removing the sheets we’re using to cover the peppers from the clothes line, because I was having such a hard time of it – then did to covering of peppers for me, too!
And now it’s almost midnight, already! Where did the time go? Time to try and get some sleep. Tomorrow, we feast!
Taking a break for some food. Here are just a couple of pictures of what I managed to get done so far, today.
The first trellis bed is done. Had to mess around to get the ends of the sides the same height as the three end cap logs. Finally, just in case, I sprayed the holes each rod and rebar with clear sealant I got for the eavestroughs. The hollow rods in the middle end cap log I put in today had to be inserted at an angle, which would allow rain to drain right into the holes in the logs. The sealant isn’t made for something like this, but it’s what I had, and I think it should help. The bed is now ready to be filled.
I finally got the stump chair near the chain link fence built. Then, after adding another coat of paint to the sun room door, I painted the seat as well. Both will need one more coat.
While the day is still nice and the light holds, I’m going to tackle the felled trees in the spruce grove next.
It’s been a wet and dreary day today. It started raining off and on last night, and has continued throughout the day. I was just getting the kibble ready for the outside cats when it started raining again! No surprise that many of the cats preferred to eat in the sun room. 😁
The squash we harvested was still on the table outside, so I brought it all in. I laid the winter squash out on the freezer in the old kitchen, but there wasn’t room for most of the squash from the compost pile. Those, at least, I could find room for in the sun room.
I left fairly early to get my daughter, since I wanted to make a couple of stops along the way, including a gas station, where I made sure to pick up an air freshener for the car! Having the garbage in the car from Thursday evening to Saturday morning was not a good thing. We can’t even leave windows open to air it out, since either critters or insects would get inside. The last thing we need is for a racoon to decide to get in and tear the inside apart, searching for the source of the smell.
I also wanted to stop at a Walmart long the way to pick up one more bag of kibble, as our supply was not going to make it to our first big shopping trip.
We have not been feeding the cats more than usual with the outside cats, and with the inside cats, we’ve been controlling their feeding a bit more. Instead of having dry cat food available throughout the day, and giving them wet cat food in the evenings, they are getting two feeding times with dry kibble, with a small feeding in between. At least we’re not running out of wet cat food, as I’d been buying extra for the kittens.
This is the first month I’ve really tried to keep track of how much kibble we’re buying. Usually, we’d buy 8 bags during the big shops, then just buy more near the end of the month a few times. This month, however, I got twelve 9kg bags of kibble from Costco. We thought that would be enough. This is, however, the second 10kg bag I’ve had to get.
That’s 14 bags, totalling 128kg of kibble for the month. Which is 282lbs.
With the Costco and Walmart prices, plus tax, that’s about $300 on just dry kibble, this month alone. Then there’s the canned cat food, plus the litter pellets. The litter pellets are cheap and the 40lb bags last a long time, so I’d say about $20 a month, on average. The canned cat food, between the large case we get at Costco, and the slightly smaller cases we get at Walmart, is about another $90
So we’re looking at $410 (US$304.18 at today’s exchange rate) we’re spending on the cats this month. On those months where we had to buy kibble in the middle of the month, wherever we could, it would probably be more expensive.
That would make one heck of a car payment.
Now, part of that can be blamed on inflation. The price of kibble has increased by almost 6% in the past couple of years. And that’s just going by Costco and Walmart prices. Other stores have seen steeper increases. Especially outside of the city.
It’s ridiculous, but the alternative would basically be to start putting cats down. With the outside cats, someone from the municipality would send someone over to shoot them.
I suppose we could just stop providing food for the outside cats, and they’d eventually go away, but considering how starved some of the cats look after they’ve disappeared for the summer, I don’t think there are a lot of options out there for them. More likely, the coyotes would get them. So… no. Not going to let that happen. Even if it means sometimes feeding skunks, racoons and blue jays in the process.
So, we keep feeding them, and looking for people willing to adopt. Thanks to the Cat Lady, we have actually managed to adopt out quite a few, though six of them are still with the Cat Lady, four of them permanently!
Ah, well. It is what it is!
Meanwhile…
When I got to my brother’s, I thought they’d be really tired and I would just be saying hello and good bye, but they were up for an actual visit. It was so wonderful to see them! We got caught up on how things went while they were gone, particularly with my mother. As we were leaving, I mentioned coming back to see their photos from the trip. My SIL told me she’s considering putting them together into a movie, like I used to do, years ago. Digital cameras were just starting to become affordable, and when we moved out of province, we started to basically document everything. Then, about once a year, I’d put them together into a DVD for my parents. Moving making software for home was also just starting to be affordable, but these were still little more than slide shows. Still, I had fun adding music and making captions, and sorting things into chapters. The idea was that these would be easy for my parents to see on the TV.
I did that for several years. Then I found out my parents never watched any of them. So I stopped.
Making DVDs, that is. I never stopped documenting things. It had become a habit by then, along with journaling. A habit that came in very handy when life suddenly got very complicated, and I found myself having to make witness statements, police reports and affidavits.
So glad to be away from all that now. Dealing with our vandal is small potatoes in comparison! It also made his attempts to intimidate me pretty comical, but that’s a whole other topic! 😂
But I digress!
I hope she does put something together. I’d love to see it!
After my daughter and I left, we made a couple of stops along the way, including to pick up the pizza order her sister made after we let her know we were leaving my brother’s. That was sweet of her to treat us!
We’ve had more take out this month than we’ve had in years!
My daughter enjoyed her time taking care of my brother’s place for them, but she was glad to be home.
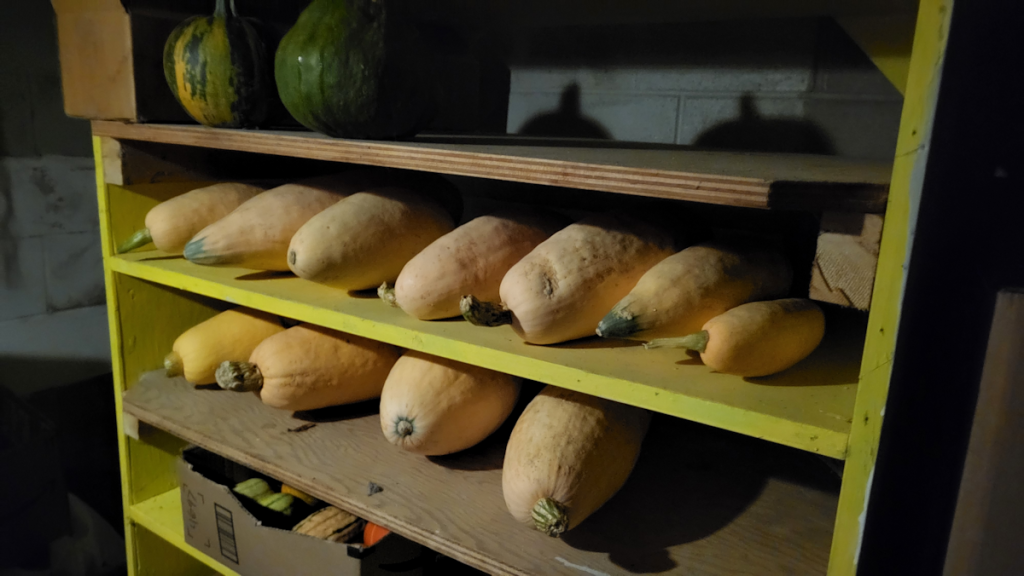
Once at home, and before we settled in to eat, my older daughter and I were able to deal with the winter squash I’d left on top of the freezer. The first challenge was just to get through the old kitchen door, without any cats getting through. Then it was just getting them into the new part basement, where the root cellar is. Then it took the two of us to get them into the root cellar, but keep the cats out.
But we got it done!
The two round, green pumpkins at the top are from the compost heap squash. All the smallest winter squash fit into a carboard box. The rest are the candy roasters and Pink Banana.
The root cellar is not a very good one, to be honest. We had considered turning it into a cheese cave at one point, so I set up a thermometer and a hydrometer in there, and kept track of the temperature and humidity for a year. Both fluctuate too much to make a good cheese cave – or a good root cellar! Still, my parents used this as a root cellar for many years. It works well enough!
Not that any of these squash can be left there for long. With the frost killing off the plants before the squash could fully mature, they won’t last as long, so they’ll need to be eaten fairly quickly. We are most eager to try the big ones!
The main thing, however, will be to make sure we don’t forget about them. I avoid going into either basement – or even the upstairs – because my knees and stairs are sworn enemies. We go into the root cellar even less often. It’s where we store our Christmas decorations away from the cats! Heck, we still have a couple of cases of mead down there that we keep forgetting exists.
But it’s done, and the winter squash is put up for the season.
We’re still processing tomatoes, too. We have whole tomatoes in the freezer, plus I’ve got a couple more trays dehydrating in the oven right now, and there are still more under the old market tent, slowly ripening. We’ve just been bringing in the ripe ones every few days or so. Thankfully, those are out of the rain, and no critters seem interested in them at all!
I was just yawning and thinking how it’s so late and time to go to bed, but I’m seeing it’s not even 8:30pm yet. It’s full dark out there, and feels so much later! Especially after being such and overcast and dreary day to begin with.
I might try going to bed early for a change.
Ha! Who am I kidding? I’ll probably get started on something, then suddenly realize it’s 2am again. Because I’m silly that way!
Finally! I was able to bring over my tools and equipment, which I just keep in the utility wagon now, over to the garden and get a bit more done on the first trellis bed.
The first step was to cut the two logs set aside into 4′ long pieces. I know for sure I’ll need two per end, but these logs are thinner than the ones in the side walls, so I cut extra just in case.
Before putting one of the end pieces down, I loosened up the soil where it would be lying and tried to level it off a bit, since there was a dip near the middle of the space. Because I want these beds to be 4′ wide on the outside, after laying down the first end piece and matching it to the outer edge on one side, I shifted the other side a bit to line up with the other end.
Steel toes boots are create for kicking logs and not breaking my toes!
I started with the thickest 4′ log for the base log on this end. Using the side wall logs to mark where I needed to cut, I removed wood from the ends to fit over the side wall logs.
What a pain.
For this job, I used the mini-chain saw, a hatchet and hammer to remove the bulk of the excess wood, and even the electric chain saw to remove the excess wood.
A pain, to be sure, but much faster and easier than when I started building the high raised bed and had only hand tools!
Once I was satisfied with how the end piece fit, it was time to secure it. A couple of years ago, I’d bought some plastic coated metal rods to use as supports in the garden. The rods were hollow, and they quickly bent and broke in our rocky soil. I’ve been using the broken pieces to secure things like hoops for garden beds, but I also used some to secure the corners of the tiny raised bed in the old kitchen garden.
I decided to use them to secure the end pieces on the trellis bed, much like I already used rebar to secure the side walls. I drilled matching holes through the end pieces into the side walls, then hammered the metal rods in place.
Then I went through the other 4′ lengths to find one that fit the best on top of the first log and repeated the process. This time, though, I was having to fit them over two very different sizes of log, so that required some extra angled cuts, as well as flattening the length of both logs a bit, so they’d fit against each other better. There’s still quite a gap in between them in one place, but that can be chinked later. Last of all, they were secured with more metal rods, though the top log was thin enough that I could break one of the rods in half and use the shorter pieces.
And here it is! The first finished end cap, viewed from inside the bed.
This all took quite a while to do, so once it was done, I stopped for the day. I’ve got too many other things that need to be worked on.
I’m quite happy with how it’s working out so far.
Since the vertical posts will be added to the outsides of the bed, not down the middle as I’d planned to do originally, I will fill the bed once the other end cap is done. That way the layers of material will have at least a bit more time to break down under the top layer of soil it will get. I may even decide to get more logs to build the next bed, first. We need beds to plant in next year, more than we need the trellis part of it. The trellis posts can even be added after planting, if necessary. The priority is to have more planting space. This year’s garden is so much smaller than I had planned on, simply because I ran out of prepared spaces to plant in. I don’t want to have that situation again, next year!
So, once this bed is built and filled, it’ll be time to cut logs to size from the two downs trees we have ready right now and drag them over. These trunks are so thick, the bottom 10′ will be set aside to be used as supports for the outdoor kitchen we will be building. Using such thick logs in the trellis beds would be a real waste of material.
The first day of fall is tomorrow, and time to get work done before things get too cold is running short!