Prepare and repair

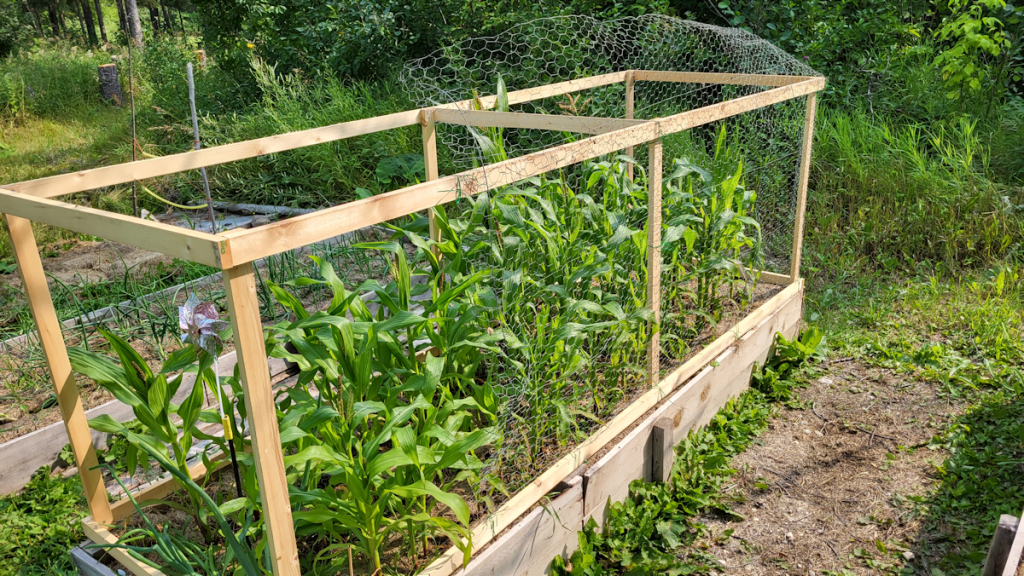
Yesterday evening, I was able to work on one of the three raised beds in the south east yard, where we grew popcorn this year. Aside from weeding and preparing the soil for next year, I wanted to see if I could do something about the bowed out sides.

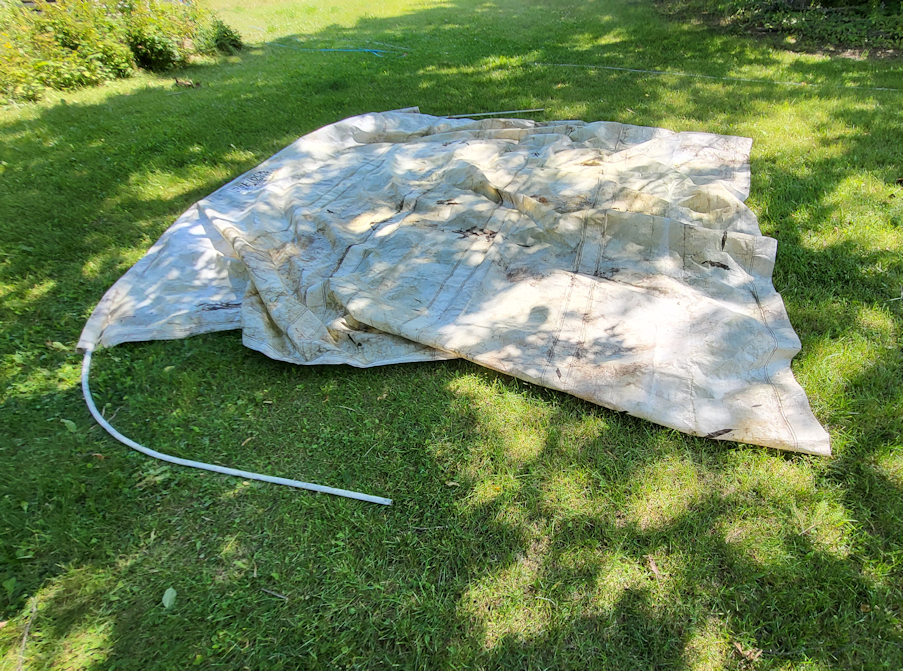
In the first picture of the slide show above, you can see I had a line across, already. That was enough to keep it from bowing out more, but not to pull it in. For that, I needed to move the soil more than I had, when I put the line in, in the spring.

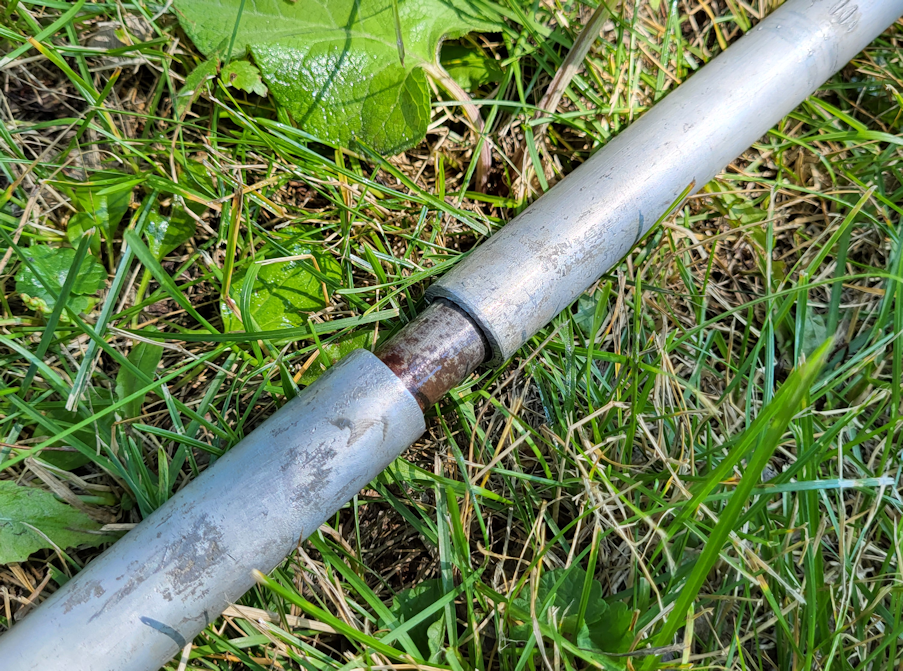
The first thing to do was dig through the entire bed, removing all the weed roots I could. Once that was done, I shovelled soil away from the side walls, then redid the line. The original line actually broke while I was working with it, so I brought the roll of mason’s line and did it again. This time, instead of just doubling the line, I took used enough to fold it three times, making for 8 strands. After opening up the metal thing I can’t remember the name of, I put the lines on and pulled the sides in. One side was worse than the other (on the left, in the photos), so I focused on that one more.

Slight problem, though.

This is built out of scrap wood I found in the barn. One of the corners was already deteriorating more and, when I pulled the side in, I think I snapped the screws in the top board!

The corner is still holding, though. I’ll add more screws later.

Once the line was secured, I also tightened the metal thing (why can’t I remember what it’s called?? 😂), using a nail for leverage. That pulled the sides in a little more, too. I didn’t want to pull it in too much, though, because things would start breaking.

The next step was to level the soil again. By that time, I was losing light, too. To get a good idea of how well the sides had been straightened, I took the cover off the carrot bed, which isn’t needed there, and popped it over the prepared bed.

I had to come back today to get a picture, though, because the one I took last night did not turn out in the low light!

All these beds, and all the covers, are 9′ x 3′ (technically, 9′ 1″, counting the width of the end pieces). Which means the covers should fit exactly over the bed frames.

Well… it almost does!

The side walls now match the sides of the cover, but the corners, not so much! The corners on the bed have shifted. The one that broke is actually lower than the others, too! No surprise, considering there was so much flooding in the paths last year. However, it’s all close enough that it doesn’t matter much.

So this bed is now ready for next year’s garden!

Now, if we can just get to the others, and finish the trellis beds, before things start to freeze. Today is supposed to be the last rainy day for a while, so I should be able to break out the power tools and extension cords again. Current forecast also calls for lows of 1C/34F, 2C/36F, 1C/34F, then -1C/30F, over the next few days. Which means that, tomorrow, we need to either bring in the last of the stuff outside that isn’t frost hardy, or cover them for the night. Tonight, at least, is only supposed to go down to 6C/43F. We’re also supposed to get more heavy rains. Right now, it’s a damp and chill 12C/54F.

I’m glad we got the septic tank done yesterday, that’s for sure!

Lots of work to do out there, and time is running out. It all comes down to the weather.

The Re-Farmer

Beaten by the heat

I managed to get a few things done before the heat finally drove me indoors. I had my lunch and a break in the blessedly air conditioned living room, then went back out again.

Alas, I was defeated, but not just by the heat.

As I write this, my computer tells me it’s 29C/84F out there. This is what the sun room thermometer shows.

Yeah, that reads 36C/97F. That’s with shade and the ceiling fan going. It felt cooler to go into the sun room than being outside.

Before it got too hot, though, the first thing I managed to do was complete our third raised bed cover. Here is how it looks, over our carrots.

I have to admit, it’s the best looking cover I’ve made so far! Appearances aside, there things I would both do, and not do, again.

The first is, I won’t use that plastic hardware cloth again. Aside from the “rigid” plastic being not rigid at all and needing support, the plastic mesh is thick enough to actually cast shade. Which would be great for a day like today over, say, a bed of lettuce or something. However, we don’t have lettuce growing in full sun right now and, as you can see, those carrots don’t need any more shade! However, it will protect them significantly. For more complete protection, I would close off the ends, too.

The second is, those hoops I took off the high raised bed worked MUCH better than the ones I tried using before. These were cut to length from a roll of PEX pipe, and I would definitely use more of this in the future. Once the hoops were secured and holding the plastic mesh taught, the excess was cut off, which was easy to do with just pruning shears. The pruning shears also turned out to be the best tool to cut the steal strapping I used to secure the mesh and the hoops to the wood. An added bonus with having the hoops is that, if this cover were used over a larger bed or directly on the soil, the ends of the hoops could be put over stakes to secure them.

The next thing I decided to do was see if I could assemble the parts and pieces for the carport thingy we found in the barn. The metal pieces had been stored in the hay loft, but the cover piece(s) were in the main area of the barn.

I didn’t realize what they were and used one of them to cover the pile of garden soil by the barn, which is why it’s so dirty in the photo. It wasn’t until I saw that the metal supports had no horizontals that I realized what the pockets in the “tarps” I found were for. Once I figured it out, I took it off the garden soil pile and tried to clean it, but it’s still pretty stained.

Each of the supports is in three pieces. Two side pieces that are hollow aluminum tubes, and one top piece that is the same material, with steel inserts at the ends to join with the side pieces. I tested it out with one set of supports, first, scrubbing the rust off the steel and wrestling the pieces together, then sliding it through a channel in the cover.

As expected, the support was far longer than the cover is wide, which would make for open sides. Which I am good with, but it does make me wonder if that’s how it’s supposed to be, or if the second cover is supposed to be used at the same time. That doesn’t make sense to me, since it would have an open “seam” at the top, from end to end. I’ve never seen this thing assembled, so I’m just guessing.

The test done, I brought the other pieces over. I plan to set it up above the tree stump bench by the main garden area, so I can paint it and not worry about it being rained on. There will be room enough to bring the folding table over for painting, too.

All the pieces got scrubbed down, removing rust and dust (at least I hope it was dust). To assemble it, I worked most of a side piece into one of the channels in the cover, then attached a top piece.

What a pain that turned out to be.

After more scrubbing, liberal use of WD40 and, in some cases, flipping the top piece to use the other end, I got them together.

Maybe not perfectly snug in places, but close enough.

After that, the pieces were long enough to push the rest of the way through the channels in the cover, and still have a couple of feet sticking out to add the other side pieces.

After much fighting, I got them together.

Excpet for one.

I fought with this long enough that I had to get out of the heat and take a break before going back out and fighting with it some more, but I just can’t get it any farther than this. I’ve scrubbed both the top piece insert and inside the side piece tube. I scraped around, and there is nothing blocking it. I even found a tire iron that fit in the tube and tried using it to scrape and possibly widen the opening. I checked to see if the side piece had been flattened in any way, and it was not.

It simply will. Not. Go all the way in.

I finally had to go in to get out of the heat for the rest of the afternoon, and will likely try again later. It’s possible that, as the day cools, the metal will shrink enough for the pieces to finally slide together.

Part of the frustration is that, aside from the straight section where the pieces join, the tupes have bends in them, so I can’t even hammer them together from the other side!

Oh, and one more thing. There are six sets of supports.

I got 10 short lengths of coated rebar to hammer in the ground to secure the supports. I’m short two! Dangit! While I was at the store, I considered getting two more, just in case, but figured I already had two extra. For some reason, I thought there were only 4 supports for the canopy, maybe 5.

Ah, well. As long as the ends are secured, it shouldn’t matter if a set in the middle is not.

It’s starting to cool down outside. I’m going to go feed the outside cats and do my evening rounds, then fight with it again.

The Re-Farmer

Things that got done today

It was hot, muggy and gross out there, but stuff still needed to be done!

My daughter and I finally got to picking the sour cherries from the tree next to the house.

We picked as many as we could reach using the little household stepladder. The ground is too uneven to safely use the bigger A frame ladder, even with a spotter. Which is okay. We can leave the rest for the birds! We almost filled the colander we were using to gather them. Then my daughter used one of the window screens we found in a shed that have been so handy to lay them out. She gave them a good washing and picked over them to get rid of any damaged or bird eaten ones that got missed. I think we still had about 5 pounds of cherries when she was done. I’m thinking we might make a syrup out of them, but will look up different ideas to try, first.

We’ll have other fruit to harvest, too.

There are SO many grape clusters! I’m still amazed. The most we’ve ever since since moving here. It will be some time before they’re ripe, though. The chokecherry tree by the compost ring and low raised beds will be ready to harvest soon. Actually, there are two of them, very close together. There’s a larger, healthier looking chokecherry tree by the main garden area, but with the tall trees beside it, it doesn’t get anywhere near as much sun as the one by the low raised beds. The berries on there are still mostly green, and there are far fewer of them. These trees are still pretty spindly, as they were quite choked out until we cleaned up around them, but they are just covered with berry clusters, weighing down the branches.

While checking the grape vines, I was on the lookout for more of those caterpillars, but accidentally knocked a big brown one onto the ground!

I tried to pick it up to put it back, but it kept flipping, uncurling and curling. It was remarkably strong! In my attempts to use leaves and twigs to move it, it flipped itself onto the step, which made it very convenient to take photos! I did finally get it on a grape leaf and back onto the vine.

Then I went to get one of the vines out of the spirea, where I found the green spotted caterpillar. So pretty! I was able to untangle the vine without disturbing it.

While I had the timer going for the sprinklers in the garden, I finally finished attaching the fence wire to the raised bed cover frame.

What a pain in the butt that was!

While setting up to work on it, I noticed that a screw in one corner – top right in the first photo – had snapped, allowing the pieces to rotate slightly. Not good!

Propping the frame up with boards helped steady it, but it was a real pain to attach that fence wire. Plus, Gooby decided that rolling around on the ground and sticking his head or feet right were I was hammering was a good idea.

It was not a good idea.

He was very determined, though!

I did finally get the fence wire attached. Between the snapped screw in one corner, and the likelihood of the U nails simply popping out while the frame is being moved, I decided adding extra boards to sandwich the fence wire was a necessity. I cut spare pieces to length, but by then I had worked my way through the sprinkler and soaker hoses, and needed to do the rest of the watering directly. My daughter was a sweetheart and attached the new lengths to the frame for me. That definitely made the whole thing stronger.

The lengths of fence wire for this was 5′, which made for a rather tall arc. This would be perfect for things like the bush beans on the high raised bed. For the next one, though, I’ll use 4′ lengths.

What I will not use, though, is that fence wire again! The twisted wire at every join is just too thick, making attaching it to the wood less secure. I still want to have something structurally sturdy, though, as it has to support any mesh, plastic or netting that is laid over it. Either that or I will need to add hoops to support the material. Hardware cloth or chicken wire would not be enough on their own.

With this one, I plan to cover it with the black netting we have, closing up the ends in the process. That will make sure no cats will get into the beds and lay down on our vegetables!

The buggers.

Meanwhile, the garden got a good watering. We hit 28C/82F today, as we did yesterday, but did not get any of the scattered rain showers that were predicted. Tomorrow, at least, will be a slightly more pleasant 23C/73F but it’s supposed to reach that temperature by noon and stay there until 7pm. To top it all off, we’ve got air quality advisories from all the wildfires. It was definitely on the hazy side, today! Just moderate air quality advisories for our area. Others are listed as extreme, so we don’t have much to complain about, that’s for sure.

I gave up trying to go to bed early today – at least not as early as the last couple of nights. Still debating whether I should try sleeping on the couch to reduce the interruptions by kittens.

Speaking of kittens, Question has absolutely glommed onto me today! She’s constantly climbing up me, whether I’m standing or sitting. While bending over to pick up the adult cat food bowls, I suddenly had a kitten hanging off my butt. Question had been on the bed behind me and went for it. When I stood up, she climbed her way up to my shoulders and stayed there! After feeding them, I sat down to work on the computer with my own supper. Even though she ate her own food enthusiastically, she was determined to eat mine, too! She was not happy that I would not let her! When we were done giving Leyendecker his medications, I settled at the computer again, only to have her climb up me again, to nap on my chest. As I write this, I’m leaning way back in my chair as she sits on my belly. I think she’s nodding off! None of the other kittens behave like this. Mind you, while her sister has been improving in health, Question is still really gooby, and doesn’t have as much energy as the other kittens.

What a handful the litter bugger is, though. Literally. She’s just a tiny little handful. They all are! Not for long, though. They sure are growing fast!

Well, I need to make up my mind on where I plan to sleep tonight.

If I sleep tonight.

The Re-Farmer

Morning activities, and a change in plans

We’re supposed to get quite hot for the next while, so I tried going to be very early. Usually, I don’t go to bed until 2 am or so. Especially this time of year, when it’s still light out for so long. So “early” usually means “before midnight” for me. Instead, I tried to be in bed by about 8, hoping to be up and about outside by 5.

It didn’t work.

Some people can fall asleep soon after lying down. My husband has always been able to do that. I’ve never been one of these! I think I did finally fall asleep before midnight, but didn’t wake up any earlier.

Also, I need to start being very careful rolling over at night, because I’m starting to wake up with kittens chewing on my toes!

Anyhow.

The first order of business outside was to feed the cats. One of the first cats to show up was Octomom! I think the girls had called her Slick, but she’s around so infrequently, the name didn’t stick.

She is such a beauty! She didn’t like me being around, though, and kept moving away as I set kibble out in different places.

Last of all, I put kibble in the bowl in the garage for her. It was not only empty, but I could see in the box nest, that she had been digging around for any remaining kibble that might have been left behind in there.

Since the mama was at the kibble house, I took advantage of it. I grabbed one of the blankets, then went over to the barrel the kittens are in. After removing the “cover” (a sheet of aluminum weighed down with a brick), I took out the rotted pieces of the barrel top that had fallen inside, then lay down the blanket on one half of the bottom – which, I could not see, is just dirt. The barrel is upside down. The pieces I had taken out used to be the “floor” of the barrel. Now, it’s open at both ends.

After moving all the kittens onto the blanket, I went and got the other one and tucked it into the other half. Then I found some clean pieces of wood in the garage. They used to be part of the packaging for the wood chipper, if I remember correctly. They are longer, and I put them at angles above the kittens. This gives the mama something to land on when she jumps in, and an area to perch on above her kittens, when she needs a baby break.

By the time I was putting the cover back on, the mama was returning, and she was not happy to see me! She hovered around, growling at me, until I moved away. I watched as she climbed up to the rim of the barrel and looked down, but she did not go in yet. Instead, she perched on the edge and glared at me! The last I saw, she had moved onto the other barrel and continued to watch as I continued my morning rounds. I’ve been out that way a couple of times, since, and once I saw her in the grass. Later on, I’ll have to check again, when I’m sure the mama isn’t around.

As I headed back to the sun room, I spotted this.

It’s SuperAdam!

I don’t think any of those kittens are her own, and there are kittens from at least 3, possibly 4, litters that she is nursing!

One of the things I checked this morning was the raspberries, of course.

Those purple raspberries we transplanted this spring are doing amazing! The one in the photo is the largest of the three. We have been able to pick a whole 5 ripe raspberries from the three bushes.

The other image is of the raspberries I picked from the ones in the main garden area. My mother had transplanted them in the area long before we moved out here. Now that the crab apple tree that was there has died and was cut down, the raspberry bushes at that end, and around the old compost pile, are doing much better! The ones at the other end, closer to the chokecherry tree, are not doing as well.

Also, I don’t know if you’re seeing the bowl of raspberries okay, but after I uploaded the images to Instagram, that picture now looks like it’s got a semitransparent black overlay on it. Instagram seems to have issues with multiple images uploaded at once.

One of the other things I worked on this morning was an experiment.

I took the remains of some chicken wire and added it to the box frame. It’s just held in place with wire twists. I had a lot less chicken wire than I thought; not even enough to cover one side.

We do have enough of the black netting we got last year to cover it completely, which we might use as a temporary cover. I definitely want to use hardware cloth attached semi-permanently to the sides. I will probably put some on the top, too, but not permanently. The thing it, once the sides are covered, the only way to tend the bed would be to remove the box cover completely. That would be a 2 person job, to avoid damaging the corn.

Hmm… I was just thinking, as I look at that picture. Right now, I’ve got the excess wire over the top. The hardware cloth also comes in 4′ widths. I could have excess mesh on the bottom, covering the sides of the raised bed. That would ensure critters won’t be able to slip under the bottom of the box cover. It would also serve to keep the whole thing from getting knocked off the bed by a determined critter.

Something to think about.

By the time this was done, it was getting too hot and humid to stay outside, and it wasn’t even 10am yet!

We have a change in plans for today, anyhow.

We got a call from the vet clinic about Leyendecker’s appointment tomorrow. Looks like they got a cancellation or something, because they were asking if we could come in today, instead! So he now has a 4:30 appointment today.

Hopefully, it will not be something serious, but after his last vet visits, I have my doubts. 😟

Ah, well. It will be what it will be.

The Re-Farmer

A bit more progress

When heading out earlier, I carefully checked on the babies, and they seemed very comfortable in their new nest!

I’ve seen the mama around, but not in the sun room. While she was willing to put up with me when I put the evening kibble out, once she’d eaten, she kept her distance. I was concerned when I started hearing the kittens from the sun room, but she was going in the other direction, so I made a wide circle around her to use the main doors, in hopes she would go towards the sun room to get away from me but, instead, she went up the sidewalk to the gate. So I went inside to not disturb her, and hope that she hears her kittens and tends to them. Earlier, I even made sure to leave little piles of kibble around where the nest is, to treat her when she does.

This is what I started working on while outside.

What a flippin’ pain to attach the fence wire to the frame! I was using U nails (aka: staples) to attach them, but they were the biggest problem. They were poorly cut, and the ends were often jagged instead of pointed. There was really nothing we could do about that, either. I also had to hammer most of them to be more closed, so that they wouldn’t splay while being hammered into the wood.

I tacked a section of fence wire to the ends first, the added the third section to the middle, so that it overlapped the end pieces evenly. Once that was tacked in place, I went back and added a U nail over every joint in the wire, with my daughter holding the frame steady and passing me the best U nails out of the bag that she could find. I would not be at all surprised if the U nails simply popped right out.

I was very frustrated with them.

Ideally, I would strength the whole thing by sandwiching the fence wire between another piece of wood, but the horizontal and vertical pieces of fence wire are joined by one being wrapped several times over the other, making each join triple the thickness of the wire on its own. It would still work, but there would be a larger gap between the boards than I would want. It would certainly make the corners more stable, though. Hmm… We do still have a couple of 12′ pieces that were cut wonky. Maybe I could experiment and try it with just one frame.

By the time I was hammering the last of the U nails in, it was starting to rain again, so we left the other half for another time.

Once inside, I was going to start supper, but the girls took that over and are working on it as I write this. We did decide that there really wasn’t enough of the potatoes I picked earlier for the four of us – we do like our potatoes! – so I went out and harvested some of the Red Thumb potatoes, too.

That colour is amazing! These are red all the way through, too.

After passing them on to my daughters to prepare, I went back out and harvested some fresh dill leaves from the self seeded dill we have along the edge of the old kitchen garden, to go with the new potatoes. When the old kitchen garden is set up to be more of an herb garden, we plan to include a variety of dill that is grown more for its leaves than for the seed heads, since that’s how we use it the most. We have another variety that is more for pickling, and we plan to sow those somewhere further away, where we don’t mind them self seeding and can treat them as a perennial.

I’m really looking forward to trying these potato varieties!

The Re-Farmer

Cold progress

Well, today has turned out to be a pretty miserable day, weather wise. It’s 9C/48F right now – as warm as we’re going to get today – but the “feels like” is at 6C/44F. After the heat we’ve had in the last while, this is sweater weather. A few weeks ago, it would have been t-shirt weather! 😄

There was some wind, but the direction changed, so I felt I could bring the transplants out for a few hours. They need to get used to the chill, too, before getting in the ground.

I had intended to take down some trees to use to build our trellis tunnel, and was planning to haul out the electric chainsaw and an extension cord. We do have a power outlet on the fence along the road that I could hook up to. There was, however, a constant threat of rain. The trees I singled out are not very large, but straight and tall. I could take them down with hand saws, but I really wasn’t up to that.

So, I worked to solve a problem, instead.

This one.

This is the bed the shallots were transplanted into.

Which the cats promptly started to lie on.

I put the largest of the old window screens we use for things like curing onions, etc. in the fall to cover it. It’s not quite bit enough, and I kept having to put it at more of an angle because, of course, the cats still went on top of it. Sometimes, I’d find one corner pressed down inside the bed. No damage to the shallots, but that’s just been luck, so far.

So this bed needs protection from the cats, with a decent amount of height to it. I rifled through some material we used to make covers for the long, low raised beds in the main garden area for wood. Those frames had started to break apart over the winter, but I was able to take them apart, and some of the wood was still useable. I brought over three lengths, which you can see in the background of the photo.

This bed is 4′ x 2′ in size, and the boards I brought over were 8′ long, so I was able to cut one in half for the sides of a frame, choosing the board with the least damage. From a second board, I was able to cut the end pieces, which are 2′, minus the thickness of two boards. Nothing is exact, so after marking 2′, I used the edges of the boards to mark of the actual length needed.

This would have been a good day to use the miter saw I got at the garage sale awhile back, but I would have had to bring it outside to use it, and I didn’t want to risk it getting rained on.

I took progress photos and will probably make a video of the process when it’s done, but I had to stop before it was finished. This is what it looks like, now.

The chicken wire and hula hoop pieces were salvaged from the old frames. You can also see that I used small pieces of wood to reinforce the corners, using 3″ long pieces of wood. I had planned to just nail them in place, but didn’t have good nails for it (I’ve never seen the tip of a nail bend like that before… 😲), so I had to use screws for those, too. I did break out the drill to make pilot holes. Thankfully, the rain held off while I was using it.

Gooby really wanted attention while I was working. Not good when using cutting implements or power tools!

To finish it off, I need to add chicken wire to the ends, plus add a support across the top – because you just know that a cat will try to climb or jump on it! I’m still debating whether I want to add a third hoop in the middle. For such a small frame I normally wouldn’t bother, but with the cats… it might just be worth it.

I had to stop because it finally started to rain too much to stay out in it. I had already brought the transplants back into the sun room.

What I’ve done here is basically a miniature version of what I want to build for the box beds the carrots and spinach are planted in, so in a way, this is a test run. Doing the ends is going to be a finicky, to work around the curves. Chicken wire is nice and flexible, at least.

So for now, the shallots are still not really protected, since the cats can just walk right through the open ends, but with the weather the way it is right now, I think they’re more likely to be hiding out in various warm shelters. This is the coldest it’s been outside since they were kicked out of the sun room, so we could use it as a greenhouse.

I don’t know how long this cover will last, but I used the least damaged wood and made sure to reinforce the frame at the corners. Given the small size, it has a pretty good chance of lasting a few years, I think.

The one last thing I’ll need to figure out is the best way to secure it to the frame. I don’t need to latch it or anything like that. I just need to make sure it doesn’t get pushed off. I had considered making the frame sized to fit inside the logs, but with their uneven surfaces and dimensions, I decided against that. Plus, having contact with the soil will make the wood rot faster, and it’s old and weathered enough as it is. I might take advantage of those corner braces and make “legs” that extend down the outside of the bed, so that if something does push against it, it won’t move more than a little bit.

But that can wait until later. For now, it really needs those ends closed off!

The Re-Farmer