I definitely want to start with the good news, before getting into the gardening stuff.
As I was putting things away in the sun room, I saw a cat in the cat cage jump out and meow a greeting. Nothing unusual about that, except that this cat had something around its neck that was flapping.
We had put collars on the cats that got fixed, to make them faster to identify, but I also made sure they were reflective collars, so they would be less likely to get hit by a car or something. Most of the cats lost their collars long ago. Judgement had lost one or two already, but he still had a ratty yellow collar still on him.
I took it off and threw it away!
Now I’m hoping to see Syndol back, too! It’s not unusual for cats to disappear for the summer, then come back for the winters, but sometimes they don’t come back at all. So this was a nice surprise for the day.
My priority for today was to finish what I started in the old kitchen garden. The rectangular bed in particular needed a bit more work. I was able to pull more weeds and roots I could no longer see when I stopped last night. I also found the gap under one log was quite a bit larger than the hole the cats had made, so I found more sticks to push in front of it. The gap extended all the way to the corner, though, so I used the scrap board I’d been using when hammering stakes into the ground to lay across the opening on the inside, then added a few more sticks to hold it in place.
Then I could use the rake to level all the soil again.
The section of the wattle weave bed I’d prepped yesterday needed some clean up again. I kept having to chase cats out of the garden beds because they kept wanting to use the nice, soft, fluffy soil as a litter box!
After levelling the soil in the rectangular bed, I marked out four rows with stakes and twine. This required repeated removal of kittens. In the second picture, you can see what I planted and transplanted. In the row north of centre, I planted the mixed beets, so they wouldn’t overshadow the Hedou Tiny bok choi I sowed on in the row south of centre. The bok choi can get quite tall, after it has bolted and gone to seed, but for harvesting, they should only be about 2 or 3 inches tall. I do plan to leave one or two to go to seed to collect at the end of the season.
In the outside rows, I transplanted a whole bunch of the onions I’d been finding. On one side, I transplanted the ones that were clearly bulb onions. On the other, I transplanted the ones that look like they might be white bunching onions, except I’ve never tried to grow white bunching onions before.
In the next picture, you can see where I planted one packet of dwarf peas. I got two packets, but this is a very short row, so I only needed the one. The peas went in the back of the bed (north side). I’d already transplanted some onions at the end and at the front near the corner before. Today, I took the two garlic bulbs I’d found, broke up the cloves, and planted them in line with the onions. They filled the entire remaining front space.
Once everything was in, it all got mulched with leaves. Then I mulched around the herbs in the tiny bed as well. I didn’t cover them, as we’re still using them as needed. Before the hard freeze hits, I’ll cover them completely with a leaf mulch, and we’ll see how they survive the winter!
I also moved the raised bed cover over the rectangular bed for the winter.
I didn’t take final pictures, though, as I decided to take garden tour video, instead. I’ll be going through them and putting together a garden tour video. If I’m satisfied with what I took. Otherwise, I might take new recordings tomorrow, before I head into the city for the Costco shop. We’ll see.
At this point, the only bed I was considering winter sowing into is the small bed off to the side where the Albion Everbearing strawberries had been last year. It still needs to be cleaned up, and I plan to sow bread seed poppies there. That can wait until spring, though, if necessary.
As it stands now, other than mulching the transplanted strawberries and little things like that, the garden can be done for the year. The winter sowing is in, and anything left can wait until spring if I can’t get to it in the next while. We’re getting a bit of rain right now, and the next couple of days are supposed to be dry and cooler, but Sunday and Monday are supposed to get warm again, with plenty of sun, so there’s still the possibility of getting ahead of things for next year.
So, to recap, we have winter sown for next year:
Purple savoy cabbage White and Purple Vienna Kohlrabi Daikon Radish White Egg turnip Rainbow Mix carrots Spring Blush peas American spinach Yellow Swiss Chard Garlic Hedou Tiny bok choi Assorted Mix beets Tom Thumb Dwarf peas
Then transplanted miscellaneous onions and garlic that were found during bed prep. Plus seed onions.
Last year, I scattered seed mixes and they did surprisingly well. This year, I’m hoping the more orderly plantings will survive the winter and give us a nice head start in the garden next year!
It’s just past 5:30pm as I write this, and it’s all I can do to keep my eyes open. I am SO tired! Please forgive any odd sentence structure or typos, because I’m sure I’m going to miss many when I got over things before hitting publish!
The cats had me up at about 5am this morning. I got up and fed them – the morning feeding includes kicking all the cats out of my bedroom except Butterscotch and Freya. After the dry kibble is dispensed, I pour some cat milk into a small bowl for our elederly Freya (Butterscotch gets the rest of the little carton), and then I sit beside her on my bed, holding the bowl for her while she eats until she is done. This saves her from having to jump down from the bed to eat, and she can stay all curled up in whatever cat bed she’s in.
Yeah. I’m a suck for the cats.
After a while, I let the other cats back in, then tried going to bed for a couple more hours. I swear, the cats know exactly when I fall asleep for real, and that’s when they start getting into things they shouldn’t, and start making loud noises. Or just going crazy. Tissue got the zoomies this morning. So what sleep I did manage to get was highly interrupted. I can’t even keep the door closed, because then they start scratching at it and that keeps waking me up.
The temperature had dropped to 2C/36F at 5am. By about 8am, it had warmed up to a whole 8C/46F. Which was about when I started heading out. First, the kitties got fed, and I got a daughter to help out. Not with the feeding, though. With kitten catching! Kale and Sir Robin the Brave are incredibly fast about getting into the old kitchen, and haven’t learned to stay away from moving feet, or closing doors! After luring the adult cats away with kibble, I closed the inner door into the sun room and my daughter started handing me bowls of wet cat food to set out for the littles, plus one with both wet and dry cat food for Poirot at her cat carrier nest. Another bowl with part kibble and part wet cat food went into the cat house for Caramel and her babies.
Then I continued my rounds, leaving the sun room closed up, even though all three mamas were out. The white and grey mama has been seen nursing the creche babies more often, now that her third baby is in the sun room again.
Poirot’s grublings are getting more mobile, so I set up a a bit of a shield for them.
I’ve been saving cardboard for the garden in the old kitchen, and there just happened to be a couple of pieces of cardboard that was used as spacers inside a box that were just perfect for this. In the second picture, you can see how they’re set up to cover the gap between the shelf and the wall, and cat carrier and the wall. This should be enough of they accidentally squirm out of the carrier. As they get more mobile, we might just move the carrier to the floor, so they can go in and out as they wish.
Once done with tending the colony, the first thing I do it switch out the memory cards. As I go out to the sign cam, past where the food forest is being built up. That corner gets very sun baked and dry in the summer, but these guys don’t seem to mind at all!
They are absolutely everywhere. It’s impossible to not walk on them, but they don’t seem the least bit bothered by that. I don’t know what they are, but if I had to guess, I’d say they are some type of pansy? Whatever they are, they are pretty indestructible!
The next thing was to check on the garden beds. Especially the one where I just planted peas, yesterday. I thought they were fine until I got to the northernmost end, where I saw the cats had been digging. *sigh* Hopefully, they didn’t actually dig up any seeds, but I really couldn’t tell. I was trying to figure out some way to cover things when I remembered I still have grass clippings saved to use as mulch. There isn’t a lot left, but enough to do the job!
The soil got a gentle watering, first. After the grass was laid down, that got watered down, too. Partly so it wouldn’t blow away too easily.
The plastic covered beds all got watered, too. With the sprouting seedlings, it’s hard to tell which are what I planted and which are weeks. Some that I suspected to be weeds were starting to show their true leaves, and I was correct: they are maple seedlings. So I pulled as many of those as I could, along with identifiable stuff like dandelions – so long as pulling them wouldn’t disturb any other sprouts.
The low raised bed that no longer has plastic on it got watered. I’d tried blocking off one end of the cover and hoped that would be enough protection until I could do the other end. This morning, I discovered, I was wrong.
*sigh*
After repairing the digging damage as best I could, I got creative. This is all temporary.
In the first picture, you can see I just stuck some boards across the opening. The stick holding them in place is secured at the top through the mesh, so those could only go so high, so I used what I could find to add verticals on the inside. Hopefully, the cats won’t try to jump through the gaps.
In the next picture, you can see the twine I wove through the mesh to close up the end. Again, temporary, but this should hold for a while.
After the watering and weeding was done, I headed inside for breakfast, before going back out and continuing what I hoped to get finished today.
It was almost exactly 10am and I just sat down with my food when the phone rang.
It was my mother.
No one showed up to do her med assist this morning.
I should have gotten a call, but I got nothing. My mother had tried calling the case coordinator, but it’s Saturday; her office is closed.
So I told her, I would quickly finish eating, then head out to give her her medications. She wanted me to dispense her other two meds for the day, too, in case her med assist didn’t show up for those times, either, but I refused. Got quite a mocking for following the rules. So what will you do? she asked me. Come out two more times?
I said, yes! I will!
I told her, there’s a reason your medications are in your lock box. You were messing with your medications, forgetting if you took them, etc. Oh, I wasn’t that bad, she said. Yes, you were, Mom. That’s why you have a lock box! She actually seemed to stop and think about that!
One of the things I did was write up a note and leave it in their notebook, stating that I had dispensed that morning’s medications and at what time.
I also told her that, since I was out anyhow, I would make a trip to the nearest Walmart to do a bit of shopping. I had planned to do it later in the weeks, but I could do it now. The Walmart carries 2L plastic milk jugs, which she finds easier to handle, so I told her I was thinking of getting a plastic jug for her. I did just get her a carton, but…
She does still have milk, but it turns out she had dropped the carton while trying to open it and spilled some. So more milk, in a better container, was a big yes from her!
I ended up leaving with a small shopping list and some cash. One of the things she was running low of was the topical pain killer she’s been using on her knees. She’s now using it on her back, too, so she’s going through it faster. I had already been thinking of checking that out, too, as I figured it would be a better price.
Since it was well past 11am by the time I was going to head out, I offered to make a lunch for her, but she said she had leftovers from yesterday’s Meals on Wheels, so she was fine. Once I knew she was settled, I headed out.
My first stop was actually a Dollarama that shares a parking lot with the Walmart. There were a few small things that I wanted to pick up and, of course, I went through the garden supply section. I ended up picking up four 4′ metal posts. Not T posts, but the same idea. They have hooks in the metal to hold trellis netting. They would have been perfect for what I was doing yesterday – and easier to set into the soil! We will be trellising pole beans and more peas, though, so new posts will not go amiss. I probably should have gotten more, but I should be able to get some more next month, if I need to.
After I was done at the Dollarama, it was across the parking lot to Walmart.
I got a few things that were not on my list. 😄
One thing that was on my list was more wet cat food. Since we are giving wet cat food to the kittens, we’re going through it faster. Normally, at Walmart, I pick up cases of 32. Looking at the new prices for the individual cans, though, I realized it would actually be cheaper to buy them loose, than by case lot! I ended up using some of their cardboard flats and got 48 cans of paté for the inside cats (paté works better when making cat soup) and 24 cans of chunks in gravy for the kittens.
They had sales on canned food for humans, too, and I got a flat of 24 cans of tomato soup for the pantry, too.
I also went through the garden centre. I picked up some replacement Yukon potatoes, since I’m sure the ones I’ve been chitting are no longer viable. Their herbs and vegetables were out, so I went hunting and found a few herbs. I got English Thyme, Golden thyme, two containers of oregano, lemon balm and basil. These will go into the tiny raised bed in the old kitchen garden, which has a cat proof cover already.
As for my mother’s list, the topical painkiller she uses was there – and cost $11 less than at her local pharmacy! That’s a huge difference!
The store was very busy, so it took a while for me to get everything I was looking for (and then some), and I was really tired and hungry by the end of it. I had some frozen stuff in my cart, so I stopped to get some take out that I could eat while driving, then headed out, making sure to update my family and let them know I was on my way to my mother’s, then home.
Which is when things went sideways.
Literally.
The last part of my route to my mother’s is a provincial trunk road, from one highway to another, that leads to my mother’s town. This is an east/west route.
The wind was coming from the south.
As I was driving towards an area of wide open fields, I saw the entire horizon was covered with what looked like black smoke. Once clear of some trees, I could see it swirling over the fields – but no flames.
It was dust.
Basically, the topsoil from the south side of the road was being blown to the north side of the road.
As I was being buffeted by the wind, driving through it.
Which is when I heard and felt something behind me and looked in my mirror just in time to see the cover over the box of our truck blow off, into the ditch and keep on going!
I pulled over, but by the time I did, there was no sign of the cover. I’m sure it was still being blown across that field for some time!
I had stuff in the box of the truck, and it was already getting scattered across the box. I gathered it all together and crammed it mostly into the back of the cab, making sure nothing went to the front that could get mixed up with my mother’s stuff.
I made sure that there was no way those metal posts would be able to slide and hit a window!
Once everything was put away, I continued to my mother’s place. Wow, what a difference in how the truck felt while driving! The wind swirling into the box of the truck was very noticeable.
When I was done at my mother’s, I was able to get for damage, which you can see in the second image in the slideshow above. There was enough flex on the box when the cover was torn off that it cracked the tail light cover.
But I didn’t get a chance to see that until later.
As soon as I entered her apartment, my mother, who was lying in bed, started saying, Oh, I’m so glad you’re here! I’m so glad to see you! while getting up to sit on the side of her bed.
I’m doing poorly, she tells me. Maybe I should go to the hospital. What do you think?
I certainly did not voice what I was actually thinking. My mother has cried wolf so many times, and uses having us take her to the hospital as a way of getting attention.
I asked her questions about what was going on. She was pretty vague about it; as if she expected me to already know. She told me she took one of the new pills (the T3s), but it didn’t seem to make a difference.
I told her, these pills aren’t magic. They are just stronger painkillers. As she kept on basically about what her expectations were (take pill: pain ends utterly and completely), I told her that her prescription for these is just a couple a day, morning and evening, as needed. I’m on the same pills, same dosage per tablet, and I can take up to 9 of them in total, per day. So it really depends on the individual.
She was pretty shocked that I could take so many per day, when she had a limit of two per day.
As I was putting things away, she lay back down in bed and suggested that maybe using the topical painkiller would help (confirming, finally, exactly what it was that was causing her problems this time). So that’s what we tried. She asked me to do, not only her hips (the pain is mostly just on one side), but her entire back as well. As I was doing that for her, she said to add lots, so I did it second time. As I was putting away the tube, she started saying she could feel a difference, already!
Hopefully, that will be enough.
My brother and I are planning to be there tomorrow for Mother’s Day, so we’ll be able to check on her more thoroughly, then.
Meanwhile, whenever I had a few moments, I kept my family and my siblings updated on things. I told my mother that I had frozen things in my vehicle and had to get them home, so I was soon back on the road. A daughter was sweet enough to have the gate open for me when I got in.
After everything was unloaded, and the new transplants and bags of seed potatoes secure in the portable greenhouse, it was time to feed the outside cats. I had another daughter on kitten duty, too! Other than doing a quick check to make sure none of the raised bed covers were blown away, I was more than happy to finally settle in at home.
So much for my garden and planting plans for the day! As I write this, we have continued to get warmer. It’s past 7pm now, and the temperature has risen to 24C/75F, though with the wind, it does feel a bit cooler. Not much, though! One of the local weather groups I follow on Facebook has been posting information and the coming heat way, with significant heat warnings to come.
We’re supposedly getting rain right now, though the current systems are skirting right past us. Later this evening, we’re supposed to be getting real rain. One of the things that the weather nerds that run the group noted is what appears to be pyrocumulous clouds forming in some areas! These are thunderstorm clouds that are created by heat; you might typically see them form over volcanoes, but can also form over forest fires, if the conditions are right. Scary stuff!
Tonight, the coolest temperatures are supposed to be at around 5 and 6am, at 14C/57F, and then start heating right up. The heat wave is supposed to hit us the hardest on Monday and Tuesday, but still be very hot on Wednesday and Thursday.
On Friday, the temperature is supposed to drop right down, with overnight lows of 0C/32F, and a mix of rain and snow. Saturday is supposed to be only slightly warmer.
Spring weather is so chaotic.
Well, if we can work around the hottest parts of the day, I should still be able to get at least some of those walnut seeds planted, get more areas prepped in the garden and, if all goes well, even do more direct sowing done. Chances are, though, that very little will get done until after the heat wave passes, and we’re back into cooler temperatures. At which point, we’ll be needing to protect some things from frost! For now, we’ve been able to leave our transplants in the portable greenhouse day and night, but we’ll have to bring them inside on those coldest nights.
As for me, it’s time to pain killer up and get to bed. If the cats are going to be waking me up at 5am anyhow, I may as well take advantage of it and get work done outside, before it gets too hot! I just have to work out what time I’ll be meeting up with my brother at my mother’s place tomorrow.
The first image is under the cover of the low raised bed in the East yard. This one has a root vegetable mix of seeds, plus 1 type of lettuce and onion seeds. There are a lot of sprouts in there! I’m guessing mostly radish and beets. I’m not seeing signs of carrots or onions sprouting, but it’s really hard to tell at this point.
This bed was getting the most difficult to tend to with the high winds, so when I took the cover off to water it, I spent a lot of time securing the plastic after the cover was put back on. The plastic on all the beds is meant to be there only until the plants establish themselves and don’t need as much warmth or protection. It will likely be replaced with netting later in the season. So securing the plastic involves a lot of rolling and carefully tucking under the frame. With this one, that also meant completely redoing how it was weighted down on top. Hopefully, it will hold. We’re expecting high winds again, in a few days.
There wasn’t much to see in the high raised bed or the ground level bed with mixed flowers in it. There are sprouts, but not very many. The main thing is, they are no longer being dried out by the wind, nor dug into by the cats!
The next picture is of the old kitchen bed. There is quite a bit of spinach coming up in there, and I can even see tiny onion sprouts. The cluster of larger leaves visible came up very early and I thought it had to be a missed onion from last year, but now I can see that these are most definitely garlic. We had garlic planted in here, two years ago! I did try to pull things that were most obviously weeds – crab grass and dandelions – but only if I could do so without disturbing any seedlings, so there wasn’t a lot I could pull.
The other winter sown beds got watered as well. I think the summer squash bed, and the end of the garlic bed, are lost causes. The only things coming up in the summer squash bed is clearly not summer squash, and the few feet of the garlic bed shows nothing at all. I don’t think they made it!
There are more sprouts coming up in the mesh covered bed at the chain link fence, though still just the one pea shoot. This is the bed that has Dalvay shelling peas, a few King Tut purple, Royal Burgundy bush beans, Hopi Black Dye and Mongolian Giant sunflowers, a few black Montano Morado corn seeds, plus onion seeds. So there should be more pea seeds showing, as peas prefer to germinate in cooler soil. That suggests to me, most of the peas did not survive the winter. As for the sprouts I am seeing, about all I can say right now is that none of them are corn.
Unfortunately, while covering the bed with netting will protect it from the Chinese Elm seeds that are forming right now, the net only partially protects from the cats. There are a few smaller cats that are absolutely determined to get under the netting. Then, when I go to get them out, instead of leaving through the open space next to them that they got in on (the netting slides on the wire hoops), they run down the length of the bed, bashing themselves against the netting every now and then, in a panic. Or, like this morning, they simply climb on top of the netting and play on it! This set up wasn’t designed to actually hold that kind of weight, so quite a few of the wire hoops are now bent out of shape. It is really frustrating.
This bed is still made with temporary materials. Along the path side and ends is loose bricks. The chain link fence there are old boards to keep the soil from spilling through. When we finally have the materials to make it more permanent, we will need to keep protection in mind. It’s not enough to just cover it with netting to keep the elm seeds from smothering the bed, stop the cats from using it as a litter box, or keep the deer from eating whatever is grown there. We need the cover set up to be able to hold the weight of cats – we just can’t keep them from going right on top of any of the covers!
The cover that we have over the old kitchen garden bed is the one that was made using fence wire. When it was done, I swore I never wanted to work with that again! It’s so thick, I had to double up the frame on the sides to secure it in between, then double up the ends, just to keep it from falling apart. However, while it was on the high raised bed, I found it worked out really well, in that I could reach through the wire to tend to the bed, without having to remove it. The openings are not all the same size, though. It’s meant to be installed with the narrower openings at ground level to keep small critters out, while the larger openings at the top are all that’s needed to keep mid sized critters out. Which means there are spaces where I cannot fit my hands through, but I can still reach around from other openings.
The wire is also strong enough that no support hoops were needed. Not only can it hold itself up, but when the plastic was placed over it and the cats started jumping on it, it held their weight, too!
The cover that’s on the winter sown bed in the East yard is almost there. The hoops are strong enough to hold weight; especially now that I’ve secured them permanently, and they no longer slide through the pieces of metal strapping I used to hold them in place. I originally thought it would be useful to be able to remove the hoops at some point, but that potential convenience caused more problems than solved any. They do, however, still bend inwards, slightly. Particularly the ones at the ends.
The hoops are supporting a plastic mesh that is stiffer than netting, but more flexible and easier to work with than hardware cloth. As you can see in that first photo, it’s wide enough that it creates more shade, so this is a cover that would be idea to use for things like lettuces, which like more shade. The plastic mesh does sag when the cats jump on it. My plan is to add horizontal supports in between the hoops. These would keep the hoops at the ends from being pulled inwards, plus keep the plastic mesh from sagging downwards. I am hoping it will only need horizontal supports across the very top, but it might need more halfway up each side, too.
Once the plastic sheet is no longer needed, I will have to put something across the open ends, to keep the cats out. I have some black plastic mesh that should work out well, once I figure out how to secure it!
I don’t want to be spending too much time or effort on these covers, though. These were my first experimental raised bed covers. Now that I know how these have been working out, I plan to build new ones using better and stronger materials, taking into account what we have found works, or doesn’t work, with these ones. These ones still have a few years in them, though, and we will keep building more raised beds, so we will need more covers as time goes by.
Meanwhile, as I was watering the bed at the chain link fence, I took a good look at the haskap bushes.
*sigh*
I have one “Mr. Haskap” and two “Mrs. Haskap” bushes – cross pollinating varieties. With haskap, you need two varieties for cross pollination. The “Mrs. Haskap” is the Borealis variety. I can’t remember what the “Mr. Haskap” is, but that one still has its label, so I can check later.
The first image is the “male” haskap. It’s leafing out beautifully and, in the second picture, you can see it even has flower buds forming!
The next two photos are the “female” haskaps.
The larger one was bought at the same time as the Mr. Haskap and, at one point, I was sure that one had died. It has barely any leaves opening on it. The smaller one is still really small, even though it’s only one year behind the other two. At least it has more leaves, but still, they are way behind their pollinator variety! This is why, after all these years, we’ve never had more than a small handful of berries. They simply aren’t blooming at the same time long enough for proper pollination.
The varieties I have coming later in the month are Aurora (the pollinator) and Boreal Blizzard. These will be planted out in the food forest area, near where the apple and gooseberry just got planted. The Opal plum should be shipped at the same time as the haskap, and it will be planted in that area, too.
Hopefully, this will work out better than what we’ve got now, and we’ll finally have berries to eat! Two bushes should be enough to meet our needs; they are supposed to be quite productive. We’ve got three, and have barely had enough to taste.
At least we know we like them!
So that is how things were in the garden this morning. With today being a calm day, I hope to get back out there soon, and get some work done!
While winding down for the night, I’ve been watching some videos, including this new one from MI Gardener; a resource I have recommended before.
This is an interesting video, since I fairly regularly see these concrete blocks being recommended to make raised beds. He lists the reasons he believes they should not be used.
I found it really interesting, and wanted to talk about some of them.
One of the first things he brought up was the weight. The ones he uses in the video are 8″x8″x16″ This is the size of most of the blocks we’ve been finding all over the place, though I think I’ve found some that are 10″x8″x16″
He also adds that they are cheap, and says they cost about $2 each.
So, of course, I had to look it up!
It turns out, one of these concrete blocks weighs about 30-35 pounds. The ones he’s using has flat ends. Some have shaped ends, and from what I found on the Canadian Home Depot page, they weight 42 pounds (19kg). The 10″ ones weigh 45 pounds (20.4kg).
I’d never really thought about how much they weighed. I found them heavy to carry around, but not that bad, really.
As for being cheap, interestingly, the 8″ ones are listed as just under $5 each – and are more expensive than the 10″ ones, which are just over $4 each. The last time I looked at their prices, at an actual store, not online, was a few years ago, and one 8″ block was priced at over $8 each, which shocked me. This was before inflation went nuts, too. Very odd.
This got me wondering, since we are using concrete chimney blocks as planters. So I had to look those up, too. I found plenty of links, but not one of them included a price. The closest I could find was an old image with a price on it, but the link was no longer active. Other than that, I found some on FB Marketplace were someone lists a whole bunch of things, not just chimney blocks, with a $4 each price listed. I don’t think that price was the same for all the wide variety of items listed, so I still don’t know how much they sell for here.
The chimney blocks we have are the standard square size of 16.75″x16.75″x7.62″
That measurement is so odd, I thought it would make more sense in metric, but not really. That works out to 42.5cmx42.5cmx19.35cm
What caught my attention was the weight.
Each one of those chimney blocks weighs 68 pounds (30.8kg)
So… I was lugging almost 70 pound blocks around the yard when I built the retaining wall and the chain link fence planters.
Okay, so weight was one of his reasons not to use them, but the other was height. They’re only 8″ high (slightly higher than our chimney blocks), making only 8″ of growing space.
I found that curious. His sample concrete block raised bed is on top of soil. Granted, it looks like the area was just leveled and has been driven over, so it might be compacted, but it’s still open soil, not a concrete pad or something. Any plants could send it’s roots lower. We have maybe 8″ of top soil – 10″ in a really good spot – before we hit gravel, clay and rocks. An 8″ high bed gives us about 16″ of growing space. We have been using modified hügelkultur, so the first couple of years would have sticks and branches at the bottom, so we don’t plant root vegetables in them right away.
I would find 8″ too low for accessibility reasons, and when I see people doing raised beds with concrete blocks, they are often two, three or even four blocks high. He talks about adding a second level, and demonstrates how easily the block spins around, since the base row is not perfectly level. He mentioned that people have suggested rebar to hold them in place.
I agree with him on the rebar. It seems almost counterproductive.
I’d just use concrete glue. AKA construction adhesive. It’s really cheap, one tube goes a long way, and can be applied using a caulking gun. Granted, that makes it permanent, but most raised beds don’t get moved around once they’re built, anyhow.
He makes a point about breakage being a problem, but not in the way he talks about. Where we are, we have temperature extremes. Pretty much all the concrete blocks we’ve been finding have been outdoors. Most of the chimney blocks we’ve used were stored outdoors since my parents bought this farm in 1964. Yeah, they have dings and chips, but they are still sound. The only blocks we’ve had actually crack and split where the two we put into the fire pit to hold old oven racks over the coals to cook on. It was exposure to high heat that lead to them cracking, not outdoor temperature fluctuations.
He mentioned that concrete is very porous, and that the edges of beds would need extra watering. True enough, though with our chimney blocks, there isn’t any centre space that would hold water longer than the edges. We still watered them as often as the other beds. We just have them more water. It’s been a few winters now for the retaining wall blocks long the old kitchen garden, and not one of them has cracked due to water absorption and the fresh thaw cycle. I’m not saying it can’t or won’t happen. Just that is hasn’t happened to us.
He then mentions that concrete absorbs a lot of heat. More so than even metal raised beds.
That may indeed be a problem in a lot of places.
Where we are, that’s a selling point! Even in the heat of our summers, it just makes them better for heat loving plants that might normally not grow well here.
There is another element to using concrete blocks he doesn’t mention, and that is the effect on soil pH. I’d read before that concrete can help lower the pH, which would be great for our alkaline soil.
As I was looking it up just now, though, I found one article that said concrete can lower the pH, but that was it. Other articles, however, said that concrete will increase the pH.
Which is the last thing we need!
Given the smallish growing space inside our chimney block planters, it wouldn’t take much to affect the pH in the soil there. Granted, I did amend the soil with sulphur this past year, as well as with peat, but with our pH already at 8 or higher, it’s going to take a long time to adjust the pH even slightly lower. Getting it to be slightly acidic, which most of the things we want to grow do better in, will take years. Looking up what vegetables grow well in alkaline soil, the list is pretty long, but most of them have an upper limit of 7.5. If we can get our soil at least down to that, it would be good, but it is harder to lower the pH than it is to increase it.
Well, the mint I transplanted into some of the retaining wall blocks seems to be handling the high pH quite well, as are the chives. Our biggest issue, however, is roots growing in from below. With the blocks at the chain link fence, it’s the nearby elms that took over the soil in the blocks. In the retaining wall, it’s some sort of invasive flower we haven’t been able to get rid of. It’s almost killing off the mint, in some blocks!
So when it comes down to it, whether using concrete blocks for raised beds is a good idea or not really depends on a lot of things. Stuff he saw as negatives, are positives for us, or non-issues.
Would I use concrete blocks for a raised bed?
Probably not.
We’ve got all those dead spruce trees that need to be cut down that can be used. For other raised beds, I’m liking the wattle weave idea and want to build more, though it’s surprisingly hard to gather enough suitable branches to use for the weaving. If we did happen to have enough concrete blocks to make raised beds, there are other things I’d much prefer to use them for.
When it comes to gardening, it is such an individual thing. We all just have to figure out what will work for our own gardens in our own regional area and microclimate, and use what materials we have access to.
Hearing what works or doesn’t work for others and why can still be a huge help. Which is why I like videos like this one. Not only did I find what he had to say very interesting, it got me checking things out and looking things up to learn more.
And now I know how much those chimney blocks weigh, too!
I headed out to do some weeding and prep in the main garden area. Just to get the beds ready for planting, and for adding more permanent walls around the low raised beds.
Of course, things turned out to be more than I expected, so I decided to set up the tripod for a future video. Here is a preview.
The plan is to have the beds in uniform sizes in this area, to match the trellis tunnel beds that will also be added. We don’t have a lot of time left to prep before things need to get into the ground, so we need to shift focus to getting these existing beds ready.
Part of the problem with the existing beds is that they are bordered by shorter chunks of logs, just laying on the ground. They don’t do a very good job of keeping the soil in place, and some of them get knocked out of position more easily. Plus, the crab grass rhizomes just grow right under them.
What we’re working towards is beds that are 4′ wide from the outside, with 4′ paths in between. They will also all be 18′ long, so each bed could fit a pair of the 9′ x 3′ covers we’ve been making (taking into account the width of the logs, the growing space will be closer to 3′.
Using the high raised bed as the starting point, I marked out the 4′ distances for the paths and the beds.
You’ll notice that the markers don’t line up with the existing beds. We never measured anything when we laid those down. To get the sizes and distances we are after, they will all need to be shifted over. Some more than others.
The photo above, however, was taken before I realized my mistake when I first started measuring them out.
My brain was thinking about using those covers on them.
The 9′ x 3′ covers. The ones made to fit over 9′ x 3′ beds built out of 1″ x 6″ boards, so they fit exactly right.
I had marked the rows at 4′, but the beds at 3′.
Thankfully, I caught my mistake early enough and reset them all 4′ apart.
At the far end, I only marked out the two beds closest to the high raised bed. Which required digging out some rocks, so I could push the markers into the ground. Since the high raised bed is shorter, I used the end of the first trellis bed as my guide. It doesn’t have to be exact. Just within an inch or so.
I got most of the bed with the Red Wethersfield onions in it done – I was originally going to just weed that one, but when I saw how much things needed to be shifted, I decided to transplant the onions and get it done right from the start. I paused for a break when I was working at the far end – the one closest to that row of trees – when I started breaking new ground, and hitting larger roots and more rocks.
So I paused to take a break, transplanting the onions I pulled out, into the first trellis bed.
Then it started raining.
So I too a longer break!
My daughter, meanwhile, has headed out to process logs for the beds. If we get them framed just one log deep this year, that will do. We can add more logs to make them higher after that, but we really need to get them ready for planting. Something that it taking far longer than it should!
I won’t be able to work in it tomorrow, since I’ll be helping my mother with shopping, so I’ll head back out in between the rain to keep at it. It’s not supposed to start raining hard until 7pm, so I should get at least a couple more hours in.
But first… food. It’s 2pm as I write this, and I forgot to have lunch!
It’s been a while since we could get to the bed with the carrots in it. Previously, we had no issues harvesting them, and the bed did have a nice thick layer of mulch.
One of the first things I did was detach the arched cover from the box cover in the centre, and switch it to the bed on the left. This way, we could put the cover on the carrot bed onto the box frame, making it much easier to attach the plastic.
The painter’s cover sheets I got are 12’x8′. My daughter and I folded them in half to make them 12’x4′. Once we had the plastic over the arched cover, she went to start removing the mulch for me while I attached the plastic to the frame. This is temporary, so I just stapled it down. The staples didn’t want to go in all the way, though, so I had to go around and hammer them in.
I can see wind is going to be a problem with the plastic.
As for the carrots, I had a bin all ready to collect the last of them, but it was not to be. Not only was the soil frozen solid, so was a lot of the mulch! My daughter got off as much as she could, then we put the cover, now with plastic over it, back on the bed.
We then took the other arched cover and set it back on the box cover. The mesh on this one is temporary. The chicken wire I used is too bendy and easily misshapen, so it will be replaced with stronger welded wire or something, later on. For now, though, it’s enough to hold some plastic. It went faster this time, as I went around stapling the plastic down, and my daughter followed with a hammer, tacking the staples down so the were actually holding the plastic in place. Very frustrating.
The second arched cover’s wire is a bit smaller than the first one we did, so there was more excess plastic to tuck under at the ends, and a bit more on the sides. This one went onto the bed next to the compost ring, which still has quite a bit of snow on it. It also did not get weeded or reworked as thoroughly as the one in the middle, before things got too cold.
So now we have two beds with plastic “greenhouse” covers on them. We’ll need to check on the carrot bed regularly over the next few days. As the ice in the mulch thaws, we’ll remove more of it, until the soil itself can finally start thawing out – and we can finally harvest those carrots!
Note for future reference. If we use this method to store carrots again, we need to either use a lot more mulch, or have it covered in plastic like this – or both!
It’s 10C/50F right now, making for a gorgeous day to work outside.
This is what it was like, a year ago today!
We were having to dig ourselves out and were still expecting a blizzard.
It’s not at all unusual to have at least one last blizzard in April. We aren’t expecting anything but warm days and mostly sunny skies for the rest of April, this year. In fact, if the long range forecast is at all accurate (ha!), May will be chillier than April.
Gosh is feels good to be able to work outside right now! Yes, I know, we need more snow, and we’re expected to have drought again this summer, but I will enjoy what I can, when I can!
For us, building our raised beds is a matter of using what materials we can get without having to buy anything. We’re scrounging and salvaging whatever we can.
If, however, you are in a position to actually purchase raised beds, there are a lot of options, kits and companies out there to choose from.
Gardening in Canada covers some of the things to think about – and a few things I didn’t think about at all, since they’re pretty irrelevant to our situation. This video is well worth a watch.
After we’ve built more of our raised beds, I think I might do a video about them. Everyone has their own very individual situations to consider. Perhaps it might be useful to people if I go through my thought processes as to why we made the choices we did, and apply that process to their own situation.
The Red Thumb fingerling potatoes had to get into the ground, so they went into the beds that were ready.
I have no doubt I was crowding them a bit too much, but these are fingerling potatoes, so I hope that will make a difference. I still couldn’t fit them all in the bed along the retaining wall. The last of them went into the short end of the L shaped bed, where you can see the straw mulch. I was able to add straw mulch to the rectangular bed with the Irish Cobbler potatoes in it, too.
The extra height added to the bed along the retaining wall came in handy. I did work in some of the composted sheep’s manure first. The bed was already starting to compact! The height of the soil is almost as high as the retaining wall (it is settling a bit, still). The logs are high enough to hold the straw mulch in place.
Unfortunately, the cats seem to think that straw is there, just for them! Especially Gooby.
It started raining by the time I was ready to add the straw, but I gave all the straw a thorough watering, anyhow. They’ll get more deep watering, even with the rain. I’ve noticed that, if the straw doesn’t get saturated first, the top will get wet, but the bottom stays dry, so the moisture never quite gets to the ground. I want to get these beds soaked down through all the layers. Once that’s done, the beds will hold the moisture for quite a long time before they will need watering again.
The whole point of our wanting to use grow bags this year was because we have such a problem with slugs. I’m hoping that, by planting these in raised beds, it will be less of a problem. I suppose we could leave out some beer traps for the slugs, but I have no doubt the cats would be getting into them! I’d rather encourage garter snakes or toads and frogs.
Meanwhile, we’re also seeing peas starting to break ground. Just barely visible! We’ve got carrots sprouting, too, but they are very small and it doesn’t look like we have a high germination rate. They really should have had the plastic right on the ground until they germinated, instead of on hoops, but the hoops were as much to keep the cats off as to keep the moisture in. Hopefully, the heat inside didn’t kill off too many seeds. We do still have 2 other varieties of carrots to sow, so we should be able to make up for any losses.
We’re getting air quality warnings right now. There is a cold front moving in, so the temperatures will drop quite a bit, tomorrow (though not low enough for frost), and with it will come smoke from the many fires in Alberta. Rain is desperately needed, though with so many of the fires being started by people, more than rain is going to be needed to get these under control!
Along with rain today, we’ve also got a fair bit of wind. Nothing exceptional, but too much to take the transplants out. We have no way to protect them from the wind on the various surfaces we use to lay them out. So they remain in the sunroom, which isn’t much warmer than outside right now, with the fan and the lights, for today.
I’m glad I got the potatoes in right away. Rainy, grey weather like this always makes me incredibly sleepy. If I’d delayed it, I probably would not have been able to get it done. As it is, I think I’m going to have to lie down for a bit. I can barely keep my eyes open, as I write this!
So… all three varieties of potatoes are planted. Which means I can finally turn my attention to taking down the trees we’ll be needing to build the trellis tunnel. That should have been done, long ago!
It was a chilly day for it, but we got quite a bit done cleaning up in the garden today.
My focus was on finishing with the abandoned carrot bed that was half done yesterday.
This is how it was left lat night. The second half had the Kyoto Red carrots planted, and after the groundhogs got at them, most had gone to seed when they grew back among the weeds.
Yet we still managed to have some carrots of an edible size!
There were a lot more twisted ones than with the Napoli carrots. This bed had been built on top of one of the potato beds we’d planted the year before, then basically doubled the length. The half the Kyoto Red were on was on top of non-amended ground, and you could see in some of the longer carrots, where they had hit rocks or harder soil, and twisted their way around. Even using the garden fork to loosen the soil and pull up the carrots was harder than the first half.
What a difference with the carrots that had gone to see!
It doesn’t look like we’ll be collecting any; if there are any mature seeds on some of these, I can’t tell.
Once I pulled as much as I could, I started working on cleaning out the weeds and roots. One of my daughter came out after I started that part, and she started working on the sweet corn blocks.
She stacked those next the high raised bed, as I’ll be using some of them in the layers of material used to fill it.
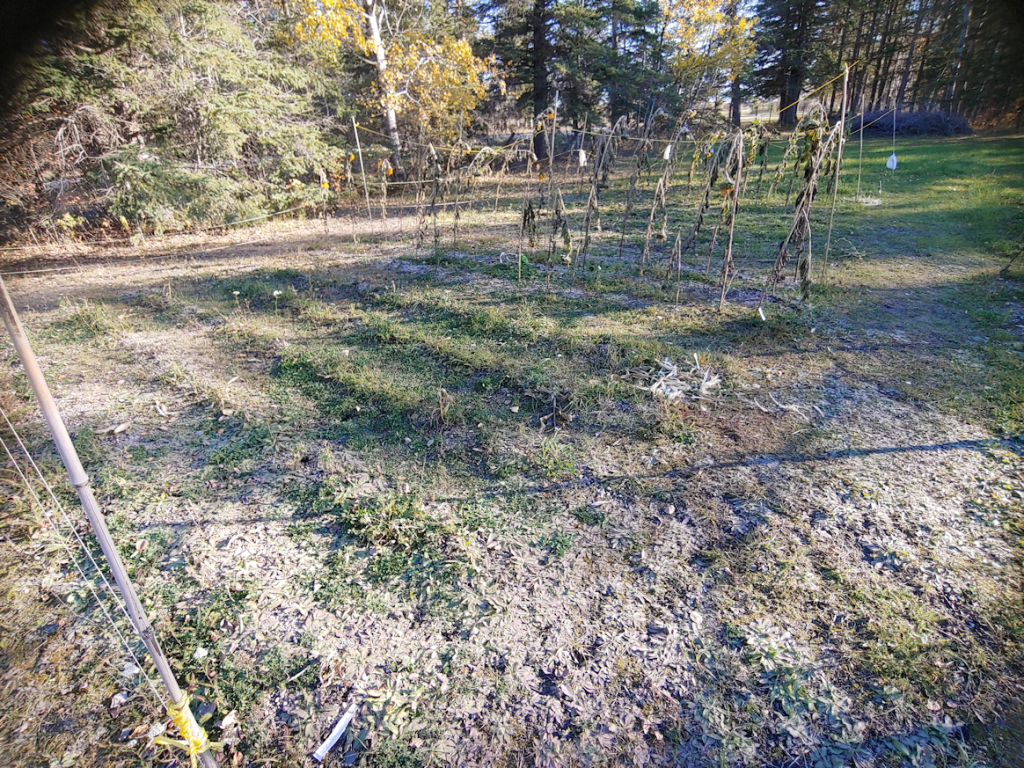
The sunflowers were left for now, but all three blocks of sweet corn were cleared.
She also pulled the summer squash and beans. These beds will be used again next year, so I got her to leave the plants there for now. The beds still need to be weeded and prepped for next year, and I might be able to make use of the plants to improve the soil more.
My daughter also moved the sprinkler hoses, but they were pretty cold and brittle, so they’ve been laid out in the sun for now. It’s supposed to start warming up over the next while, so I’ll wait for a nice warm day before rolling them up for storage.
By the time she got all that done, I was just finishing cleaning the carrot bed. Thankfully, none of the other beds will need as much work to clean them, and will go a lot faster!
My daughter did the final leveling and raking of the bed while I got the tools to continue working on the high raised bed.
I’m finally starting to get a bit of a method down. Between that and the narrower logs, I’m getting the notches cut faster. The logs on the ends are so huge, if I were making this bed only two logs high, I could leave the ends as they are now! As it is, when I add the end pieces for the next level, the narrower side logs means I should only need to cut notches on the cross pieces.
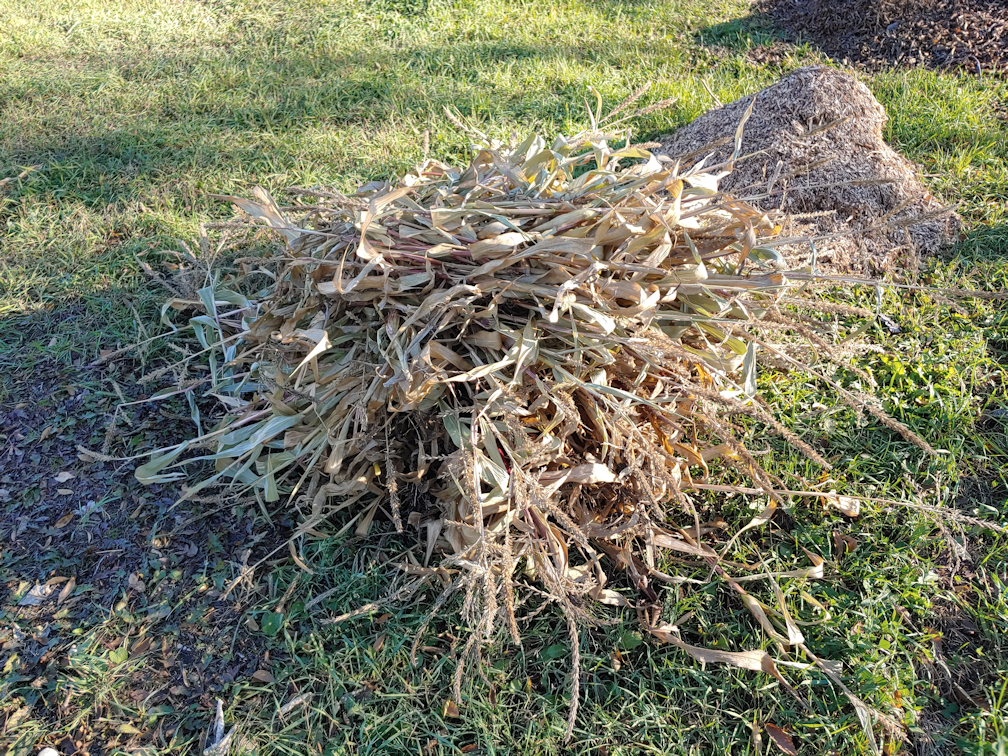
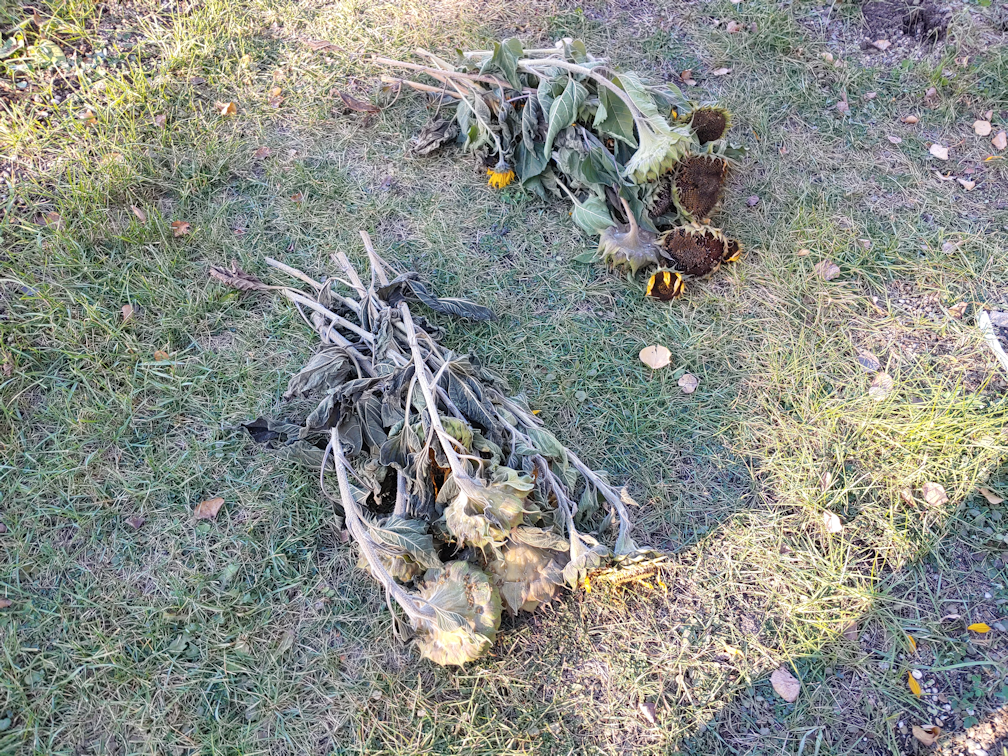
When I got to the point where the second battery on my baby chainsaw needed to sit for a bit before I could squeeze in a few more cuts, I took the time to cut some of the sunflowers. Checking them this morning, I was seeing a lot more losses to birds, so I figured we should get them inside while we still had seeds. :-D
One pile has the Mongolian Giants and the other has the Hopi Black Dye. I don’t know that all the seed heads I collected will give us finished seeds, but we shall see. I cut the stalks pretty long, which meant some of them included the little baby sunflowers that were branching out, too. Those will, for sure, not have any mature seeds on them, but that’s okay.
At this point, we would be hanging them someplace warm and dry. The best place right now is the sun room, and we have no way to hang anything in there just yet, so I made do.
They should still get good circulation around them on these shelves as they dry. I am very curious as to what we will get out of them!
There is a lot more clean up to do, but thankfully we are expected to continue to get mild weather. So much so, that I am still holding off in broadcasting the wildflower seeds for a while longer. Doing this in the fall will only work if there is no chance of germination, so I would rather wait a bit longer. I think one more week will do it, just to be on the safe side.
I did a fair bit of running around this morning, and was even able to get a quick visit in with my mother. We are hopefully now well stocked with cat kibble for the rest of the month. It’s also coming up on Thanksgiving here in Canada, which means cheap turkey season, so I got one for this weekend, and another for the freezer. :-)
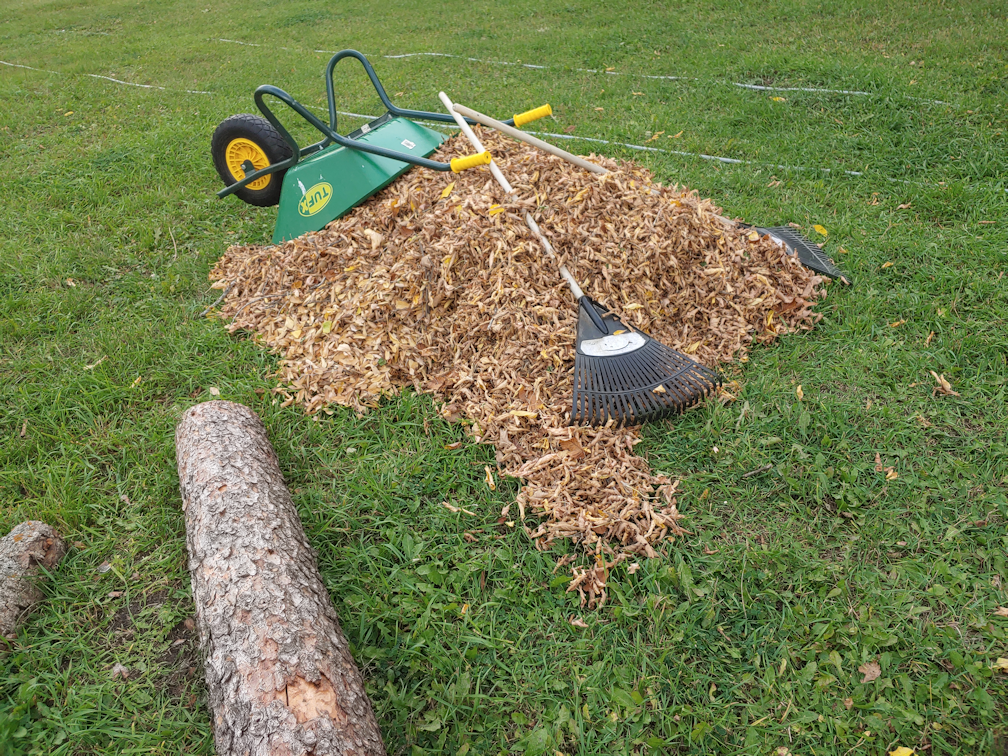
Once back at home, I grabbed a quick lunch and the girls and I headed outside. While they worked on raking leaves for me – and running to and from the house for any tools I needed – I worked on the high raised bed.
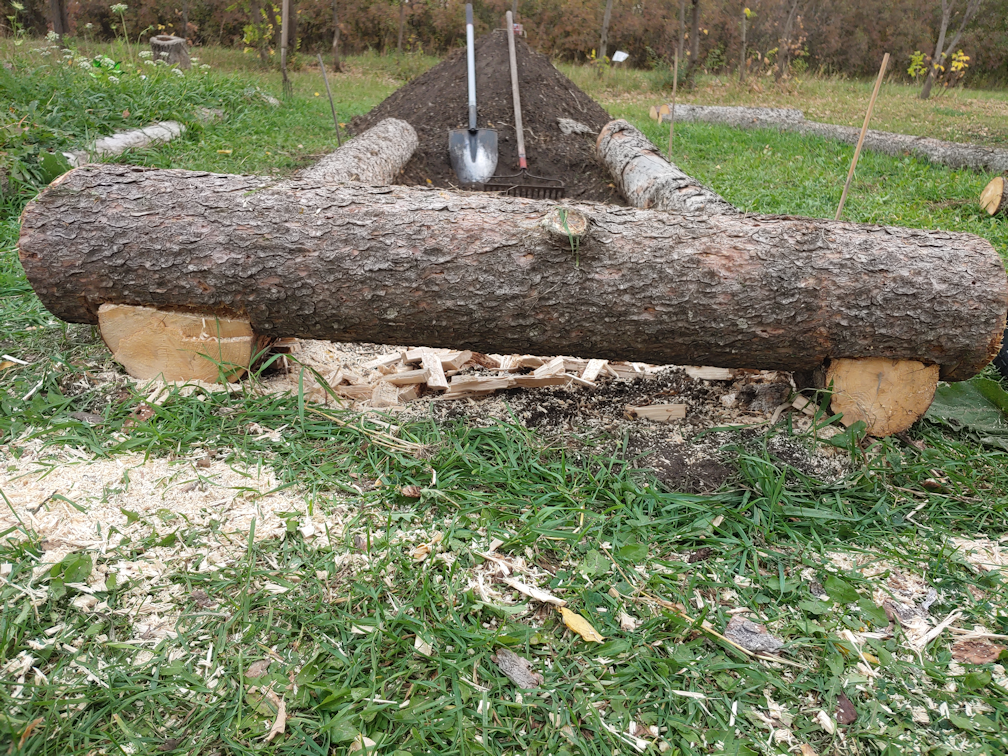
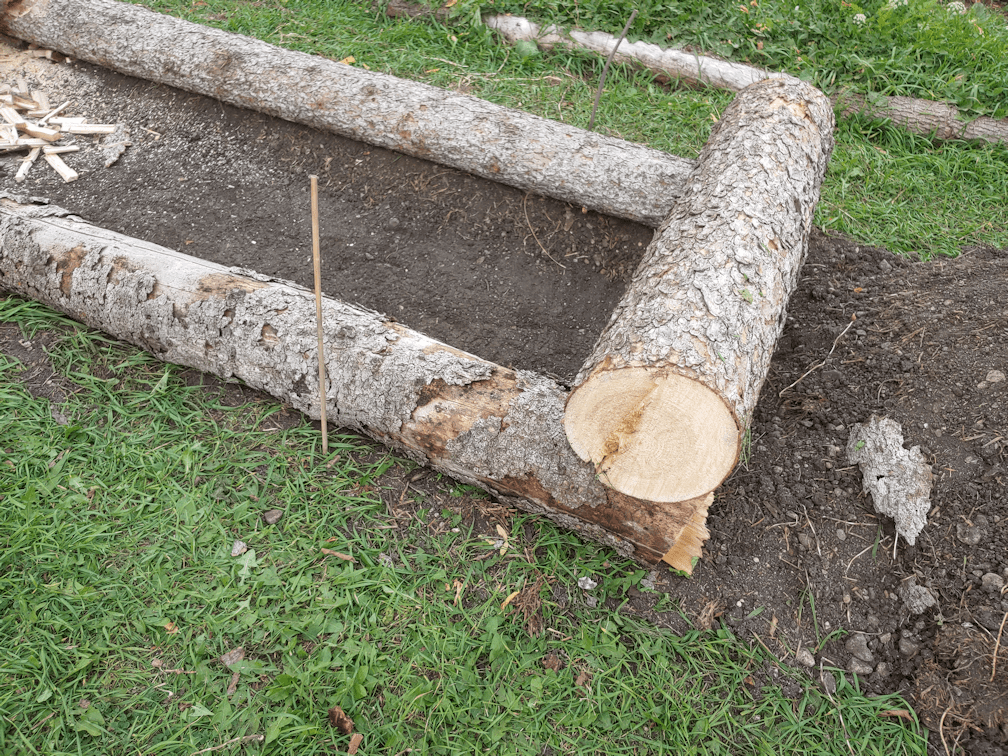
The bottom got prepared a bit, first. I straightened out the edges and shoveled out some more soil, then used a thatching rake on the bottom. I eye-balled four feet across and raked up the edges where the logs would go. Then I got two nine foot lengths in. The first one was placed right where I wanted it to go (that’s the one on the right), then placed the two sticks against it. From the sticks, I measured four feet and placed two more sticks, then rolled the second log up against the second pair of sticks.
Once those were in place, I rolled an end piece against them and used their width to judge where to begin cutting. This end piece was the bottom of the trunk, so it had one very uneven end. It was measured and cut at more than four feet to compensate for that. That made it long enough to cut a notch out to fit the logs, rather than cutting right to the edge.
I used the baby chainsaw to cut the outer edges of the notch, then made a cut lengthwise. I then spent the next while using a hammer and chisel, sometimes a hatchet, to cut out excess wood, which you can see inside the bed. After most of the wood was chiselled out, I use the baby chainsaw to cut into the remaining excess wood, as you can see above.
Then I kept running it over the area to level it more. I wasn’t after perfection, here, and don’t have the tools to do a better job, so this was as good as it was going to get!
It didn’t take long for me to drain the battery on the baby chainsaw and have to switch to the second one
When I started working on the other end, I made plenty of cuts to make chiseling the excess out, easier!
I got it to this point with the chisel before going at it with the baby chainsaw to level it off some more.
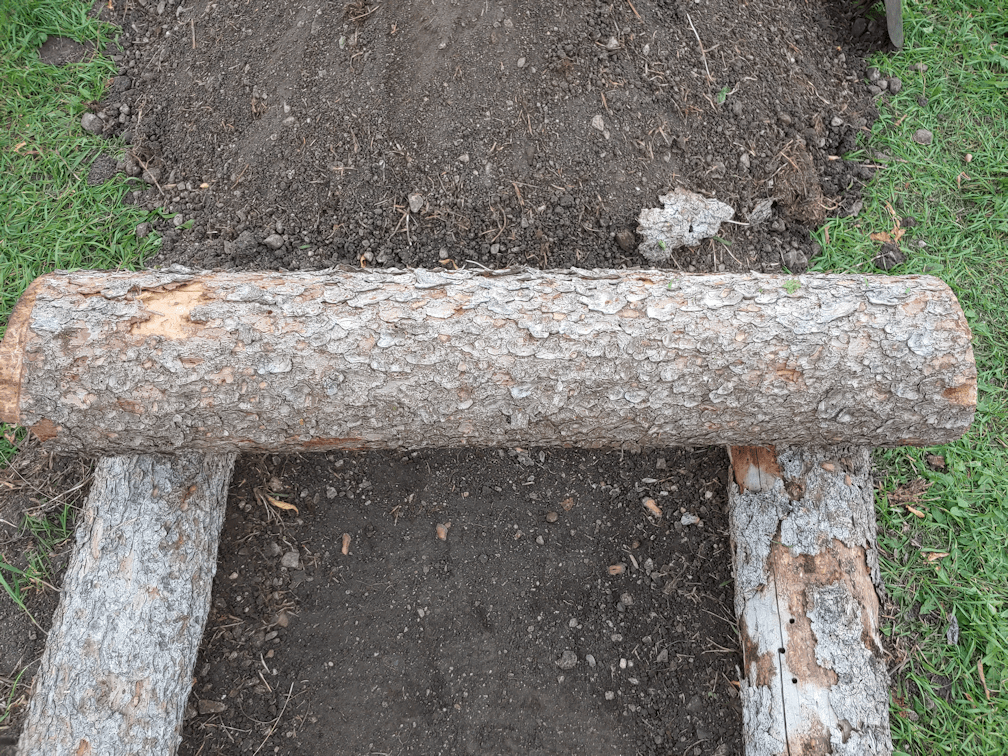
Then I got a daughter to help me place it on the logs, so I could use it to mark were to cut wood out of the ends.
By the time I finished making cuts to depth, I drained the second battery. That’s okay. It was enough to get started, and since I was removing wood to the edge, it would be easier to take off the excess with a chisel than with the notches.
Right?
Ha! Of course not.
Both logs had knots in them. One of them had two.
Those were a real pain in the butt to work through with nothing but a chisel or a hatchet to cut through them!
On the plus side, working on this took enough time that the first battery was almost fully charged again, so I could use the baby chainsaw to finish off the area.
That done, the end piece could be set in place.
As you can see, there is quite a bit of a gap under the end piece. This is not a concern, as the bottom of the bed will be filled with logs. It will be an easy matter to find a piece that can be fit under that cross piece.
The good thing is, all those bits of wood I’m cutting out will not go to waste, as they will be buried with the old logs. We’ll have things decomposing at different rates, all of which will release their nutrients slowly over time while the wood will act like a sponge, reducing the need for watering.
By this time, we started to get a bit of rain, so I stopped for the day. The girls finished raking and headed in to make supper while I prepped to continue later.
I chose a second cross piece that was close in size to the one at the opposite end. As before, I will use the other logs to see where to make the cut outs. Hopefully, I’ll be able to continue on this tomorrow. It depends on whether or not my mother will need me to drive her around or not.
This would go a lot faster if I had a full sized chain saw. :-D Ah, well. We use the tools we have!
Meanwhile, I now have a nice pile of leaves to use when it’s time to start layering on top of the logs that will go on the bottom of the new raised bed! It’s been pretty windy, but hopefully they won’t blow away. ;-)
I’m glad we have found a way to make use of all those dead spruces we need to take down!