Babcia’s Bread experiment, part 2; the beginning

Photo heavy post ahead. :-)

Okay, here it is! My very first attempt at slowly recreating my grandmother’s bread, with her use of “old dough” yeast that she kept stored in flour in between baking day. (Part 1: the story)

The first goal is to create the bread dough yeast starter, and for that, I need to make a yeast bread.

Here are the ingredients.

Water, yeast, salt and flour.

That’s it!

I used Kosher salt, as I figured that was more like what my grandmother had available to her.

For a 2 loaf recipe, I used 2 cups water, 2 tsp salt, about 2 tsp yeast, and between 5 and 6 cups of flour.

The yeast is my “cheat”. Back in the spring, when everyone started panic buying, yeast was among those things that became hard to find. One of our local grocery stores now not only stocks lots of the usual big name brand or two, but a wide variety of brands and types of yeast. When I spotted a “sourdough” yeast, I grabbed a packet, just to try it.

Since some of the dough from this batch will become the “mother” of future batched, I thought it was appropriate to use it.

The ingredients list is interesting. Both wheat and rye is used.

If you’re wondering about the sorbitan monpstearate, this is what I found:

“Sorbitan monostearate (abbreviation SMS), or Span 60, is an emulsifier esterified from sorbitol and stearic acid with the European food additive number E491. This ingredient is mostly used in baking yeast by improving the activity of instant dry yeast when the yeast is rehydrated before use. “

Speaking of rehydrating…

For the 2 cups of water, I boiled it first, because I have doubts about our well water. We really need to get the water tested, but a full test is really expensive, so… boiling it is.

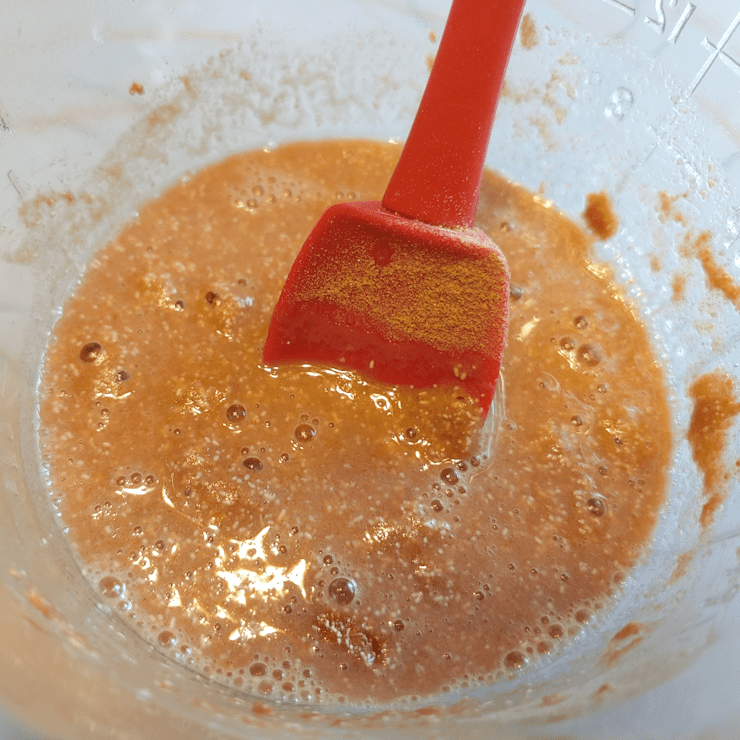
I measured out half a cup of water into another measuring cup to rehydrate the yeast. I could have done it in the full 2 cups, but the half cup cooled down to a safer temperature for the yeast faster.

The inclusion of rye in this really changes the colour!

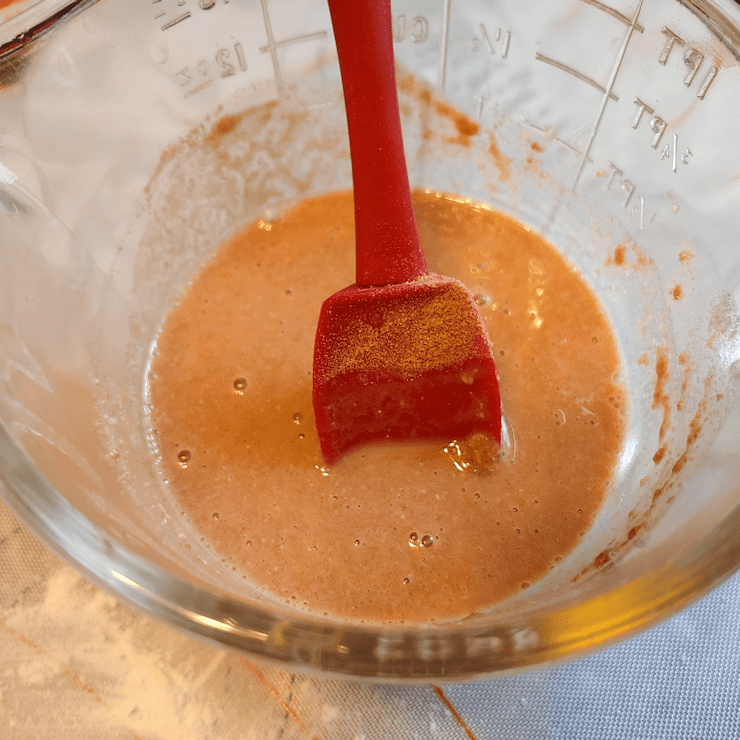
I let it proof for 5 minutes. I don’t know if I should have proofed it longer – I have recipes that call for anything from 5 to 15 minutes. It’s bubbled up, though, so I decided to go ahead.

While it was proofing, I mixed the salt into about 2-3 cups of flour. Without a wood bread bowl, I decided not to use a plastic one, and tried “dump your liquids into a well in the flour” method.

That looks…

Unpleasant.

The next while was spent with very messy, sticky hands, incorporating the rest of the flour and water in.

Thankfully, my daughter came down to give me a hand, adding the flour and water as I kneaded it in.

Once it was all mixed in, I kneaded the dough for about 15 minutes.

I may have used too much flour. I’ll have to keep that in mind for next time.

I did notice a difference in texture from my usual bread. Although I kneaded the dough until it felt smooth and satiny, it never looked smooth.

In fact, the longer I kneaded, the rougher it began to appear!

So I went by feel rather than appearances when it came time to set it aside for a first rising.

It went into an oiled plastic bowl, turning to coat all sides with oil. After covering the bowl with a tea towel, it went into a warm oven to rise.

Earlier in the day, I had prepped a baking stone and was curing it with oil in the oven. The oven was off but still warm; prefect for proofing the dough.

Once it was in the oven and rising, I set a timer to check it in an hour while my daughter started a batch of French bread. Checking it at an hour, I decided it needed more time, by my daughter’s bread was rising by the, too. So I took the bowl out and put my daughter’s dough in the warm warm oven, and set my timer for another hour.

This is the dough, after 2 hours.

After turning the dough out to prepare the loaves, I had to make sure to do that most important part.

Collect a dough egg! :-D

This humble little lump of dough is what it’s all about.

Into our flour canister it went!

I almost forget to get a picture before burying it!

My other daughter labeled the container for me.

She is a hoot! :-D

The ball of dough will now dry out until the next time we bake this bread.

After dividing the dough, I decided to form it into round loaves.

By this time, my daughter’s loaves were in the oven.

Where she forgot to take out my curing baking stone.

So they got to have their second rise on a normal baking pa, instead.

In kneading and shaping the dough, once again, the dough got rougher rather than smoother! You can really tell in the one of the left.

I then left them to rise, checking them after about half an hour.

My daughter’s French bread was done well before my second rising was done!

The ended up needing another hour of rising time.

The baking stone had cooled down quite a bit by then, but was warm enough that I transferred the loaves over, and I think that residual warmth helped them rise even more. The above photo was taken just before they went into a 400F oven.

All done!

I am not sure how long they took to back. I set my timer for half and hour, then kept peaking and resetting the time for another 5 minutes, over and over. I think it took about an hour to bake.

I was quite impressed with how much the loaves rose in the process!

The next part was the hardest.

Waiting for the loaves to cool down!

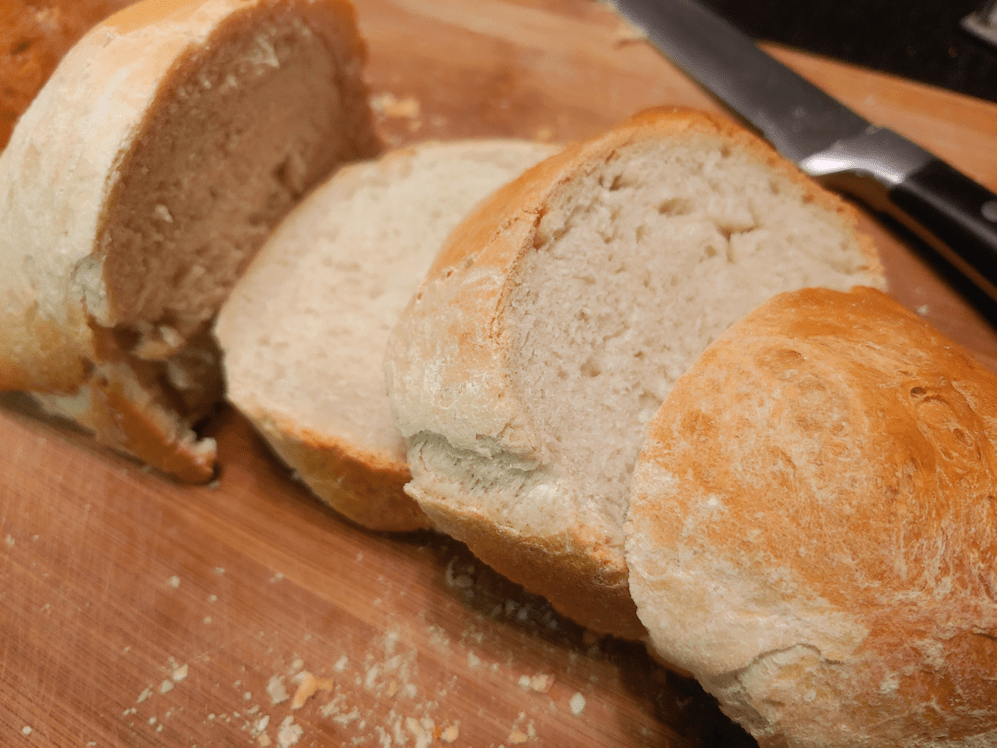
For all that the loaves rose so much in the oven, they still felt surprisingly dense. I was also a bit surprised by how fine a crumb there was.

I taste tested one piece plain, one with ordinary butter, and one with a garlic herb butter.

I’m having a hard time describing the flavour. It was certainly tastey, but I think I was picking up the rye flavour in the “sourdough” yeast. It did have a “sourdough” tang, but one that is quite different from any sourdough we’ve made ourselves.

The sponge was soft, yet toothsome. The crust was crusty enough to be a good chew, but not so crusty as to cut up the mouth (something I have issues with, when it comes to most “crusty” breads).

The plain slice was tasty, but the buttered slices definitely were better. With no fat in the bread itself, the butter really brought out the flavours that were more muted in the unbuttered slice.

All in all, this very plain, very basic bread was a success.

It is, however, just the first step in the process. It’s purpose was to provide us with some dough to reserve for the next batch. Every batch of bread we make using the bread egg now sitting in the flour canister will be another step closer to recreating my Babcia’s bread.

While my grandmother did her bread baking once a week, we will probably make our first batch using the bread egg in 3 or 4 days.

I am really curious to see how it will look when we fish it out of the flour, and how the overnight soak will turn out! For a first time use, I don’t expect the flavour will be much different, but who knows? I’ve never done this before! :-D

The Re-Farmer

Babcia’s Bread Experiment, part 1: the story

I may have mentioned in past posts, about my mother’s memories of bread baking in pre-WWII Poland. I was fascinated by what she could tell me. With no commercial yeast available, I had thought my Babcia (grandmother) had used a sort of sourdough. I know my father remembers this; a portion of the bread dough would be set aside to continue to ferment, and be used in the next batch of bread.

My grandmother did something different. She allowed her old dough to dry.

We lost our own sourdough starter, the Sourceror this past summer. It almost made it to 2 years, but we had a real problem with fruit flies this year. Somehow, they managed to get into the container and contaminated it.

Having a big bubbling bowl on the counter has been a bit of a problem for other reasons, so the more I heard about how my Babcia saved her dough, the more I wanted to try it.

My mother’s memories go back to the late 1930’s, early 1940’s. Then WWII happened and they eventually ended up in Canada, where commercial yeast was available. After questioning her about it, this is what I’ve been able to piece together.

Babcia would bake bread once a week. She would set aside some of the dough, adding in the scrapings from the wooden dough bowl, form it into a ball, then burying the ball in the flour. The night before she would be baking bread again, she would take out the dried ball of dough, break it up into pieces, and soak it in water overnight. In would get all bubbly, and that would be her yeast for her bread baking, with the cycle continuing each time.

My basic bread recipe includes things like oil, sugar, eggs, milk… all things that I just couldn’t see handling sitting in a bag of flour for a week without going off. On questioning my mother, I learned Babcia used none of these things. It simply wasn’t available. Her bread was flour, water, a bit of salt, and the reconstituted old dough. That’s it.

The flour would have been flour they milled themselves (at least they did until the Nazi’s caught them using an illicit hand mill and destroyed it), using grain they grew themselves. My mother says corn flour was also sometimes used, which they also would have grown themselves. The ingredients may have been few, but my mother remembers it as being the best bread; especially when corn flour was added. She remembers it was light and fluffy, too.

My mother was too young at the time to remember a lot of details, though, so I did some research. I know that bread can be as basic as flour and water, but if salt is used, would that be a problem? I know that sugar feeds yeast, while salt retards it. How would having salt in the dough affect the old dough yeast cake? Also, how much dough was set aside? My mother remembers a “ball”, but as young as she was, her sense of how large that was would be distorted.

In my research, I found quite a bit about “old dough” bread baking. This gave me a lot of the information I was looking for. For some types of old dough baking, dough is set aside before the salt was added, while others were taken out after. Both work. As for how much was taken out, I eventually found a general “about the size of an egg” description.

What I didn’t find was anyone who used old dough that was stored in flour. Nor did I find any that stored the dough for weekly baking. Most described setting the old dough aside in the fridge for 2 or 3 days, at most. In some forums I found, people described using it in their daily baking. Not a single person described using their old dough the way my mother remembers her mother did it. They all used wet dough. None used reconstituted dry dough.

I have decided, instead of getting a sourdough going again (for now), I will try and recreate my Babcia’s bread.

Of course, some things I will simply not be able to recreate; at least not now. We’ll be using plain old AP flour. I won’t be adding corn flour right away. I don’t have a big wooden dough bowl like my Babcia would have had (with a wooden dough bowl, yeast would have gotten into the wood itself, adding its own layer of flavours). I also don’t have a wood burning masonry stove (something similar to this, with a sleeping area on top) like my grandmother would have been baking in.

I found some proportions for ingredients for 2 loaves that I will start with, and I will probably experiment with making some a couple of times a week before I start adjusting quantities for larger batches.

One of the main differences in this experimental process is that I don’t have a yeast “mother.” My mother has no memory of where her mother got hers from. It was always just there. She may well have gotten her first old dough from the family members she was living with (my great grandparents having already gone to Canada to start a homestead, only to not be able to send for their children as they had planned, because of WWI). However, as they saw the warning signs leading to WWII, they abandoned their farm in Eastern Poland, taking nothing but the clothes on their backs and a goat they could milk for food, to settle in Western Poland. At that point, my grandmother likely got another old dough ball from one of their new neighbours.

It’s amazing how much history is intertwined in something so ordinary as how my grandmother leavened her bread!

So this is what I will be doing in my experiment that will possibly span years.

Today, I have started a first batch of plain bread; it’s rising as I write this, and I will post about it separately when it’s done.

I will be using a commercial “sourdough” yeast I happened to find, in this first batch.

After the dough is risen and before I shape it into loaves, I will break off some of the dough and store it in a container of flour, then bake the rest of the dough as usual.

In a few days, I’ll reconstitute what should be a mostly dried ball of dough overnight, make another 2 loaf batch, then continue repeating the process.

What should happen: the flavour of the bread should change and develop over time, just as with a sourdough.

What might happen: I’ll have sucky bread that doesn’t rise properly? The dough ball will start molding? The yeast will die off and I’ll have to start over? I have no idea.

For the first few months, at least, I will stick to the same basic mix of flour, water, salt and the old dough for yeast. Eventually, I will try adding corn flour. If I do decide to modify the recipe in other ways, it will be by doing things like kneading in herbs or shredded cheese or whatever, after the dough ball has been removed. I won’t be adding things to the base recipe, like sugar, milk, oil or eggs.

After I’ve done a few batches, and assuming this works, I plan to give some to my mother to taste. Hopefully, she will remember enough to be able to tell me if I’ve succeeded or not! :-D

The Re-Farmer

Garden plans for 2021

Yes, it’s only the middle of November, but the girls and I are already planning for next year’s gardening.

We learned a lot in our first year of gardening here, and will be using that information as we expand our food growing.

We have several goals and things we keep in mind when deciding what to order. First is keeping in line with our long term goal to be as self sufficient as possible. The other is to take advantage of being able to grow our own food by growing things we either can’t normally buy in the grocery store (either due to lack of availability, or poor quality in stores), or because they tend to be more expensive, or “treat” items, that we typically can’t justify spending our limited budget on. Both of these goals also allows us to go a bit wild in what we grow! :-)

With that in mind, I’ve already placed and order with Rare Heirlooom Seeds. It’s a small order; some of the things I would have bought were out of stock while, with others, we will go through the wish list to pick and choose. Here is what I’ve got ordered right now.

Giant Rattle Breadseed Poppy. I was really excited to see this new item! These are very much like the poppies I remember my mother growing, when I was a kid. I used to love eating the seeds right out of the dried poppy pods. She grew enough to make the filling for poppy seed rolls, which uses a LOT of seeds! Poppy seeds are something I love, but buy very rarely. If we have our own, I would certainly be using them every chance I get!

Longue Rouge Sang Carrot. I’ll be honest. I selected these just for the colours.

Kyoto Red Carrot. This is one I ended up choosing based on comments other customers left behind. It’s described as a “winter carrot”, which obviously isn’t a thing in our climate. Several people had complained about not being able to grow it well in their warmer zones. Then someone in a zone 3 – the same as us! – said they grew it as a summer carrot and it thrived. Awesome!

Strawberry Spinach. This is something I’ve actually tried to grow before, in containers on our balcony, years ago. We had limited success, largely due to weather conditions. What little we got, I liked, so I want to try them again. Both the leaves and the berries are edible, so that’s bonus, too!

Dorinny Sweet corn. I hemmed and hawed quite a bit about growing corn yet, but I decided to just go for it. This variety is from a Canadian hybrid, so it should be quite hardy to our growing zone.

Montana Morado Corn. This one falls into the “go wild” category! I chose it partly because it is a cold hardy variety, but mostly because of the amazing colour. It is also a variety that can be milled into flour; something we have included in our mid term plans. We just have to acquire a hand mill. Once we do, we will be looking into planting grains as well as corn, specifically for milling.

Other things we plan to get from this site are giant sunflowers, plus a variety of sunflowers that can also be used to make a purple-grey dye.

We’ve also got a substantial wishlist going at Veseys, which is where we got almost everything we planted last year. Those will be ordered later in the season, as their new catalogs include promo codes for discounts. With how much we plan to order, we’re going to need a discount!

This past year, one of the things we really loved about having the garden, was being able to pick and eat our own produce, daily.

As great as it was to have fresh produce all summer, there wasn’t much left over for the winter. This time, we will focus more on things we can process (the pickled summer squash was a huge hit for our family), as well as things that can be kept in the root cellar for long periods.

So for sure, we will be re-ordering the summer squash mix, with an extra packet of sunburst squash again, to go with the carrots and cucamelons (I have cucamelon tubers from this past summer, but will likely get more seeds, too).

We plan to get a variety of winter squash, with a focus on those that store well. Winter squash is something I almost never buy in stores. This will include small eating pumpkins (rather than the more popular carving pumpkins).

This time, we know to use 3 or 4 inch pots to start our seeds indoors, and to start them earlier. Maybe even get a warming mat. Some of our seeds took forever to germinate (especially the birdhouse gourds!), while others germinated fine, but outgrew their Jiffy pellets before the weather allowed for transplanting.

With potatoes, we decided to get the same amount of Yukon Gem potatoes as before (6 pounds of seed potatoes), but also get other varieties. If all goes to plan, we’ll be planting 4 varieties, including two that are noted as being good for winter storage. For these, we’re thinking of using grow bags or pots, to try and keep out the grublins that chewed holes in our potatoes.

We might get more varieties of corn, as well. We will be getting a collection of peas in 3 varieties. Peas right out of the pod are the best! A 3 variety collection of bush beans is also on the list. I love fresh beans, but in stores, they are among those things that always look a bit iffy. Eventually, we will get beans for drying, but not quite yet.

If we can figure out how to protect them from the deer, we will be getting the same collection of beets as we did before, too. A spinach collection (three varieties, each maturing one after the other) is also on the list.

We will be getting at least one more variety of carrots. We will very likely pick up a 3 variety pack of raspberry canes, too. These produce in their second years, so they will be for 2022’s garden. We’ve also been looking and onion and shallot varieties, focusing on those best for storage.

We’re looking at starting to get more trees and bushes, too. There are blueberry varieties that are suitable for our climate. Of course, we want more haskap berries. What I thought were gooseberries here turned out to be currants, so gooseberry bushes would be good to get, too. We’re also looking at mulberry, apple, plum and pear trees. All of these take at least a couple of years before they start producing, so the sooner we start planting them, the better. We will likely get fruit and nut tress from Hardy Fruit Tree Nursery. It’s one of the few places I’ve found that has cold hardy food trees suitable for our zone.

There is an extra purpose to all this planning ahead so early. We had plans we weren’t able to follow through on for last summer’s garden, in regards to trellises and other supports. Once we know what we are going to plant, and figure out where, we can use the winter months to accumulate any materials we need to buy (like cattle panels, rebar or rebar grid, tie wire and other fasteners, etc.). Most of what we want to build, we can use materials salvaged from around the property, but there will always be a few things we’ll have to buy.

With that in mind, I now have a tighter goal for cleaning up the spruce grove – something that is already behind “schedule” of our original timeline by a couple of years! We have a lot of tall, springy poplars that I want to clear out, and they will be used to build upright trellises, A frames, arbors, and more. We’re also looking to build squash tunnels. The beds we have where we planted squash last year looks like they will be permanent gardening areas, so I would like to start building up raised beds there. The walls for these can double as supports for any arches we add. Plus, I’m going to see if I can start taking down more of the dead spruces that are further from the house and garage (the ones closer will be taken down by professionals!). The wood might be usable for various projects. However, as we clear out the dead wood and open up the ground to sunlight, this will give us space were we can plant fruit trees that require extra protection from the elements.

We’ll have a lot of work ahead of us!

I’m looking forward to it. :-)

The Re-Farmer

Recommended: Kris Harbour Natural Building

Welcome to my “Recommended” series of posts. These will be weekly – for now – posts about resources and sites I have found over the past while that I found so excellent, I want to share them with you, my dear readers. 🙂 Whether or not I continue to post these, and how often they are posted, will depend on feedback. Please feel free to comment below, and if you have a favorite resource of your own, do share, and I will review them for possible future posts.

I hope you find these recommendations as useful and enjoyable as I have!

Okay, so I totally forgot to make a Recommended post last week! I also forgot yesterday was Wednesday. :-D My apologies!

Today’s post, however, is the last one I’ve got in my queue! If you have a resource site or video channel you would like to see a Recommended post for, please let me know in the comments with a link, and I’ll check it out.

In today’s post, I present to you a guy who is going all out with off grid self sufficiency! Kris Harbour Natural Building.

This channel has been around since 2015, and wow! He’s got so much going on here! This is someone who left behind life in London to live off a plot of the land in Wales, and has accomplished some pretty amazing things in the process!

I first found the YouTube channel while doing searches for ideas on what to do with the wood from the trees we had cut away from the roof and power lines. With the sizes of some of the pieces, I had started to think of carving wooden bowls. I was specifically looking for videos on how to do it without power tools. I found this.

At about 2 minutes in, you can see him start to mark out an oval shape using a string. That’s actually where I got the idea on how to mark out the curved, overlapping rows we planted the sunflowers in. I thought it was an ingenious way to mark out a smooth curve.

Then I discovered he lives in a cordwood round house. You can see a tour of it, here, as well as some typical morning chores!

Yes, he’s got running hot and cold water, electricity (wind, hydro and solar!) and internet.

He’s also got a playlist of 41 videos, showing how it was built.

Literally from the ground up.

He’s also built an earth bag workshop.

There are 52 videos in total, spanning 2 years, documenting the build for that!

Want to know how to build a hydroelectric system? He’s got you covered.

Solar shower?

You bet.

How about musical instruments?

Wanna see how to build a harp?

Maybe you’re more into the fibre arts. How about a battery powered carding machine?

Do you live near the ocean? Feeling hungry? How about some coastal foraging?

How about making cider and apple juice?

Build a primitive lime kiln?

Refurbish antique chisels?

Hatching chicks?

Gardening?

It’s all there.

Granted, most of the videos are about the big stuff; the building projects, water, electricity, and infrastructure. As those get done and he works towards increased self sufficiency, the scope of the videos will naturally change. I really appreciate that he’s making all these videos, so anyone can follow along with what he is doing, and perhaps adapt things for their own uses.

I highly recommend checking out his videos, and subscribing to the channel. It’s awesome!

Thank you for checking out my Recommended series of posts. I hope you enjoyed these resources as much as I have! While I will no longer be posting weekly, I will still be keeping an eye out for great resources to recommend in the future, and do feel free to pass on your own favorites in the comments!

The Re-Farmer

Recommended: Self Sufficient Me

Welcome to my “Recommended” series of posts. These will be weekly – for now – posts about resources and sites I have found over the past while that I found so excellent, I want to share them with you, my dear readers. 🙂 Whether or not I continue to post these, and how often they are posted, will depend on feedback. Please feel free to comment below, and if you have a favorite resource of your own, do share, and I will review them for possible future posts.

I hope you find these recommendations as useful and enjoyable as I have!

As we continue to clean up, repair and improve things here on the family farm, we do have an ultimate goal to be as self sufficient as we can. Our health and mobility requirements mean we’ll probably never be completely “off the grid”, but there is still a lot we can do.

Growing up here, we were basically subsistence farmers. We grew, raised, preserved, butchered much of our own food, and for our animals, grew most of their feed, too. When it came to gardening, there was a time when the garden was close to an acre in size. This was your typical garden of everything planted in long rows, far enough apart to run a tiller in between. In my mind, gardening meant growing food. Flower gardening was just an aside, and not something I understood as “real” gardening, for may years. Even now, when I think “gardening”, my mind always goes to growing food.

As productive as my mother’s garden was, however, it is not how I want to garden, for many reasons. Everything from the rocky soil where the garden used to be, to mobility and accessibility, leads me to wanting to do raised bed gardening.

The following resource is very much the sort of thing I have in mind. Self Sufficient Me (Website YouTube) is an Australian site, so obviously, there is a lot that won’t apply to us in central Canada! We’re not going to be growing papayas anytime soon. :-D However, this resource has lots of information that can be used pretty much anywhere. Along with their website and YouTube channel, they are on other social media, which you can find linked here. They also have a second YouTube channel here.

It was through the videos that I discovered this resource. I haven’t been able to go back through all 8 years of them, but I’m slowly working on it. ;-)

The videos include some very basic stuff, perfect for beginning gardeners.

This next video really caught my attention, as hugelkultur is sort of the method we will be using when we build our raised beds. We might not use such large stumps and logs, but will likely have lots of big branches!

I especially appreciate that he talks about what didn’t work about the raised bed, as well as showing how the soil looks after 4 years.

Also, I love his tools!!!

Of course, he covers building raised beds as well.

He’s got all my prerequisites: height, strength, easy and cheap! :-D

Don’t have the space to do raised beds? He’s got you covered there, too.

He also goes beyond growing vegetables, and has videos on raising animals, too.

He readily admits that he is no carpenter, and that’s one of the things I love about it. He’s big on going ahead and building things, without worrying about being perfect.

We don’t have to worry about snakes where we are – the snakes we have would be more in danger from the chickens than the other way around – but definitely predators are an issue.

Chickens are not the only critters he raises, and you will find videos about raising quails and ducks, as well as videos reviewing products – the good and the bad! – about pest control, composting, watering, and so much more. I definitely recommend going through the many videos available. I’m sure you will find plenty to inspire you!

The Re-Farmer

Recommended: Urban Farmer Curtis Stone

Welcome to my “Recommended” series of posts. These will be weekly – for now – posts about resources I have found over the past while that I found so excellent, I want to share them with you, my dear readers. 🙂 Whether or not I continue to post these, and how often they are posted, will depend on feedback. Please feel free to comment below, and if you have a favorite resource of your own, do share, and I will review them for possible future posts.

I hope you find these recommendations as useful and enjoyable as I have!

Last week, I recommended a resource that would be very useful for anyone interested in homesteading, geared towards rural living.

This one is for you city folk who are also interested in growing things, either for your own use, or as a way to make an income; BC based Urban Farmer Curtis Stone.

Curtis Stone is the owner of Green City Acres, a commercial urban farm, so this is someone who actually is making a living as a city farmer. Being in Kelowna, BC, this is also someone who manages to do it in our Canadian climate, with all its extremes of heat and cold. They also offer online courses, workshops and have a newsletter available.

There are also podcasts and lives shows. I’ll be honest, though, I haven’t been able to watch these longer videos – some going to 2 hours – simply because of limited data available on our internet.

There is a lot of practical information from growing food, to growing a business.

There are videos about farm software, using hedgerows, using solar, building greenhouses, growing mushrooms, and even videos about the issues farmers and land owners in Canada have to deal with, in regards to our laws and regulations (we’ve got some pretty insane ones here in Canada).

With the sudden shortages and rations that have happened because of the Wuhan virus lockdowns, a lot of people are looking at ways to grow their own food. With that in mind, Curtis Stone has made videos to address these concerns directly, and has also started up a new farm project, to see how much food people can grow themselves quickly, on a small parcel of land, that will be very interesting to follow along.

So if you’re someone living in an urban environment, and would still like to find ways to grow food, Urban Farmer is the resource I would recommend.

The Re-Farmer