Our 2022 – 2023? garden: preparing the garlic bed

Well, the soil sifter I made really got a work out today! I’m actually quite impressed. It got beaten and battered, and that janky thing withstood the abuse and did the job.

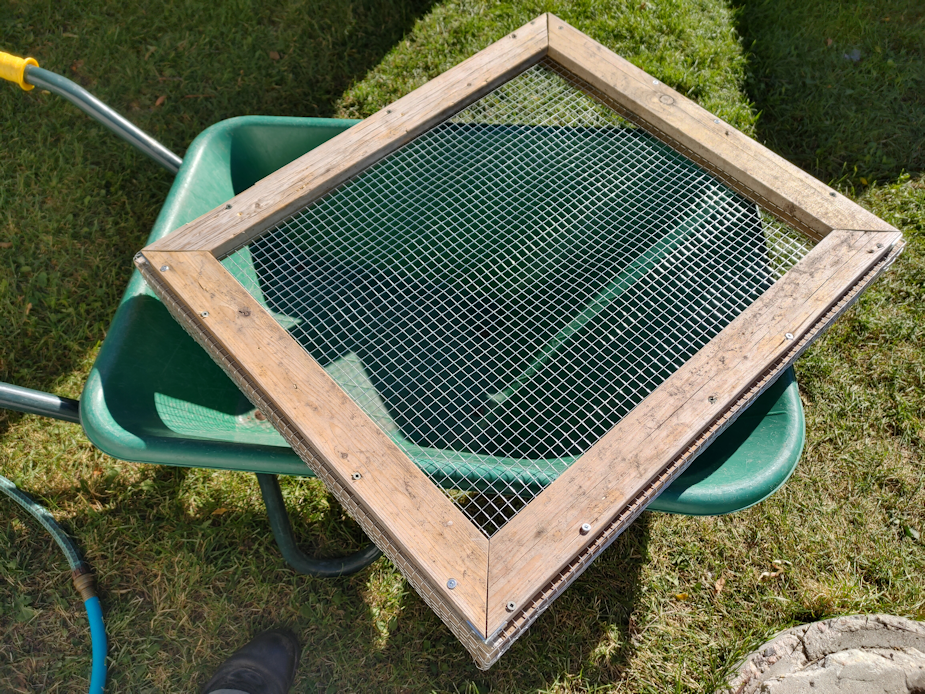
The half inch mesh works out well. The soil was very full of worms, and most of them fell through the mesh quite easily. Any pebbles small enough to go through will not be a problem. In fact, they will help with drainage. Unfortunately, it’s also large enough that roots can fall through, too, so I still did most of the picking of roots by hand, tossing them on the path to be trampled on, pushing through the soil until I reached a point where I could just shake the rest through. What got left behind were the larger rocks and weeks, and small clumps of soil. I didn’t want to break those up too much, as it would have hurt too many worms.

I laid out the black landscape-type fabric/tarp we’ve got to put the sifted soil on until I’m ready to put it back into the bed.

It took many loads as I worked my way down. You can see the crab grass rhizomes I pulled out on the grass. You can’t see all the other roots and weeds that also got pulled out.

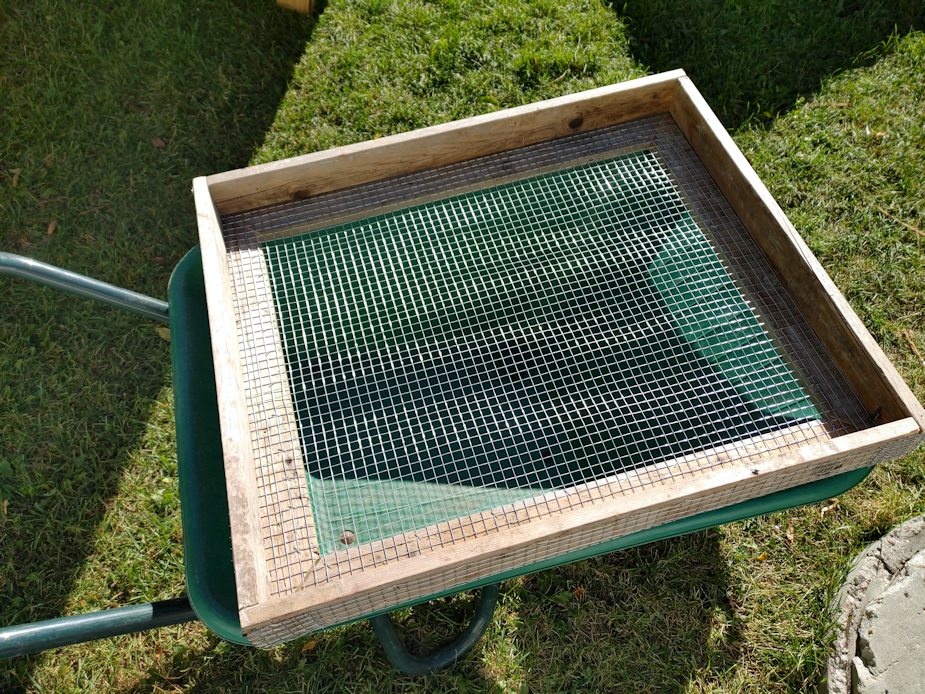
Using the wheelbarrow and soil sifter really helped a lot. I have a long handled garden claw that I used to break the soil up in the sifter, pulling up the longer roots, and using the back of it to help push the soil through the sifter. It was a real back saver! Plus, when I stopped to work with my hands, I could brace the garden claw on the ground, or even into a corner of the sifter, to lean on as I worked. The logs around the garden bed allowed me to raise one leg, relieving even more pressure from my back. Without all those little things to help out, I would not have been able to finish the soil sifting today!

This is where I stopped, after several hours.

Oh, wow. I just looked at the time stamps between the first progress photo I took, and the last one. I was working on this for four hours. !!

Basically, I removed the top four inches or so of soil. After that, I was scraping the shovel over rocks.

There are still a lot of rhizomes along the edges, but the run under the log border, and I wasn’t up to moving those out to get rid of them.

The sifted soil is now so light and fluffy, it looks like there’s so much more than what could fit into the space in the bed!

What got left behind in the sifter got dumped among the nearby trees. Plenty of rocks, clumps of soil, worms, and the occasional sticks, rusted nails and even bits of glass!

I am so glad this is done.

Tomorrow, I plan to add a layer of wood chips into the bottom of the bed, top it with the summer squash vines I’ll be pulling from the next bed over, and then the soil will be returned, ready for garlic planting and mulch. I hope to get that all finished tomorrow, because the day after, I am expecting to go into the city for a much needed stocking up trip to the city.

While I was writing this, I got a call from my brother. He had just made the trip out to my mother’s to get the battery from the motorized chair he got for her (which she refuses to use) that isn’t holding a charge for some reason. She just let him know that they’re coming to spray her apartment for bedbugs again, the day after tomorrow. She hadn’t mentioned a thing to me when I called her last, even though she’d told me about some other stuff, even though I’d really stressed with her to let us know right away if she got another letter of notification that they’d be coming in to spray her place again, so that we would have time to help her prepare. She started talking to him about staying in the lobby, even though she has to stay away from her apartment for 12 hours after spraying.

*sigh*

My brother took a picture of the letter she got and will send it to me. Hopefully soon, because I’d like to read it before I call her. It looks like I will be helping her book a room at the motel again, as she doesn’t want to stay at my sister’s overnight. Too many stairs in her house. Which means I’ll be using her car to go into the city, which means not a Costco trip.

At this point, I don’t even know if they are spraying her place because they’re actually finding bed bugs, or because they’ve just decided to keep spraying the same apartments every month. The guy did leave a trap, but no one comes to check it.

What a pain.

Oh, and I just found out our vandal had called my mother again – at the beginning of the month! It was her birthday, so he used that as an excuse to call her, then start harassing her about the farm again until she finally hung up on him. I had hoped, after losing his court case against me, he’d finally give up, but apparently not. She never said a thing to any of us until now. So frustrating!

Well, we’ll figure it out. For now, I’m just going to focus on getting that bed done and planting garlic for next year!

The Re-Farmer

Small builds, and green tomatoes

It has been absolutely gorgeous outside today. As I write this, we are at 14C/56F. Just perfect to be outside for many hours!

I was planning to build a soil sifter today, but after fussing with the trail cams this morning, I decided I needed to build a new stand for one of them, first. The gate cam had stopped working again, even though I’d just changed the batteries. The day before, there were only 3 files recorded before it stopped working. The gate is more of a security priority, so I took the new solar powered camera from by the sign and set it up on the stand at the gate. Which was not as good of a set up, but it would do.

I brought the camera that had been at the gate inside and tested the batteries. They had gone down a lot, for being used only for a day, but they were still well into the green. After checking the camera itself out for a bit, I decided to take a scouring pad to the battery contacts in the flip-down cover. Water had gotten into it at some point, and there was rust, but I had given them a scrubbing before, and things were quite dry. Still, it was really the only thing that was available to do. Sure enough, it worked!

I wanted to leave the solar powered camera at the gate, so I took the now working camera to the sign. I could screw it onto the mounting plate, but it’s a very different design. Instead of screwing into the bottom, it screws into the back. With the other camera, I could swivel it into an angle that covered the front of the sign and, because it’s a wide angle camera, it also included the road and intersection. Not being able to swivel this camera meant that it was basically facing the sign, on edge.

I figured my best bet was to use the old flag stand the camera was mounted on at the gate, and bring it to the corner by the sign. That would actually work better than having it mounted on one of the supports holding up the tipping corner fence post. Which meant making something for the new camera, that I could attach the mounting plate to, for the gate.

After scrounging in the barn for some scrap wood (I spotted a couple of Rosencrantz’ kittens just outside the barn!), this is what I made.

The solar panel makes the camera very top heavy. When it was mounted by the sign, there were many files motion triggered not by someone or something going by, but by the wind making the camera wobble on its mount. I made this stand taller, and attached the mounting plate low enough that I can use the strap that also came with it, to secure it more firmly and ensure no wobbles will trigger the motion sensor.

I moved the camera to the other side of the driveway, so that the solar panel will get maximum exposure to sunlight. With the wide angle lens, it also needs to be closer to the gate than the other camera. Once I find the sweet spot for coverage, I am thinking of pegging the legs to the ground, for extra stability. It would be better to have something like a sandbag, though, since I’d have to move it when mowing in the area.

Once that was done, I could start on the soil sifter.

I measured our wheelbarrow and cut pieces for a 2’6″ x 2’4″ sifter. The straight pieces would form a box, and the angled pieces would make a frame.

At this point, the only thing holding the frame together are the metal right angle brackets on the corners. The frame would be secured to the box, with the hardware cloth sandwiched in between.

The roof of the water bowl house made an excellent surface to unroll the 1/2 inch hardware cloth, then use the box to measure out where to cut the wire. Once cut to size, I tacked the mesh to the box with a few staples, just to hold it in place while adding the frame.

There is, a problem with using salvaged wood for everything.

I should have made the frame pieces about an inch longer. I didn’t compensate for the slightly extra width the box got from how I attached them at the corners. However, the wood is warped and uneven, which meant there was no way I could match the frame to the box, even if I’d made the frame part bigger. In several places, I had to put the screws in at an angle to catch the edge of the box. I had been using a drill to make pilot holes, only to break the bit part way through, and I didn’t have another in that size. The wood is old and very dry, so it was easy to put the screws in without a pilot hold but, as you can see, the wood started to split in a couple of places. Some of the wood was already splitting on its own.

Once the frame and box were secured to each other, I folded the excess mesh onto the sides, cutting at the corners so that a piece could fold around the corner to be secured.

The mesh was secured with a LOT of staples around the outside of the box, and more staples were added to secure the mesh to the frame on the inside. These won’t hold well, though. We need a heavier duty staple gun for projects like this.

Once done and set up on the wheel barrow, I could really see how warped some of the wood it. It can’t lay flat. Which is okay. I am not expecting this to last very long, but if I can get a year or two out of it, that’ll be enough. I am planning on using it while cleaning up and preparing garden beds for next year, to sift out rocks and roots. I want to use it on the wood chips, too. The smaller chips can be used as mulch right away, while any larger pieces can be set aside until we can bring the wood chipper out and use the shredder chute to chop the bigger pieces finer.

While I was working on that, one of the things the girls worked on was picking through and sorting all the tomatoes we picked. They found more slugs inside some tomatoes! The ripest tomatoes were set aside to use right away, while the greener ones were to be laid out on screens.

The problem was finding a place the screens could be laid out that the cats won’t get at.

We ended up using the sun room.

The onions were still laid out to cure on the wire mesh door we use for this, so we prepped them by trimming the roots, brushing off the dried dirt, and thinning the greens, before and my daughter braided them. It made for one very heavy braid! Once those were out of the way, we set screens up over the mesh door, and many of the tomatoes would fall straight through the mesh.

In the foreground are the chocolate cherry tomatoes. Then there’s all the yellow pear tomatoes, with the few remaining Sophie’s Choice tucked in with them. At the far end are the Cup of Moldova tomatoes.

They can stay in the sun room to ripen, though we will also be looking up recipes for using green tomatoes, too. There are plenty of ripe ones to start on first, though. Now that these ones are laid out on the screens, they can sit for a while before we have to get at them.

And the kittens can still use the swing bench, below. In fact, there was a kitten sleeping under the tomatoes when I took the picture! Unlike the inside cats, they have no interest at all in what’s on top of the screens. They just want soft, warm places to lie down and sleep!

The Re-Farmer