With the chillier temperatures, it’s really not a good time to be painting outdoors, so I made a point of starting right after doing my morning rounds. This way, it could have the whole day to cure, and I could decide on whether I wanted to do a second coat or not.
The top is cut so terribly crooked! LOL This is the piece I cut using a hand saw, after two failed attempts with the power tools we have available.
Though the house was painted the summer before we moved in, it looks like the inside of the door frame only got one coat, so I went ahead and painted that, too.
The extension cord to the cat shelter was staying, but I managed to keep it away from the paint. This corner on the left is where we’ve had to add the most material to make up for the shifting of the frame.
It’s really amazing how much a coat of paint makes even the worst patch jobs look better! :-D
Well, that didn’t take long! :-D
I had to leave the doors into the sun room open, of course, and later in the day we found white foot prints on the concrete inside! :-D
I’m rather happy with how the paint was feeling by the end of the day. We will be able to drop the cord down and actually close the door for the night. I’ve decided to go ahead and give it a second coat tomorrow morning, which means that the day after tomorrow, we can hang the door back up again.
It will be so good to finally have this job done!!!
After painting this morning, I headed to the post office to pick up our bulbs, which are now planted – but those will get their own posts! :-)
The first order of business was to test out my new tool on the sun room door frame.
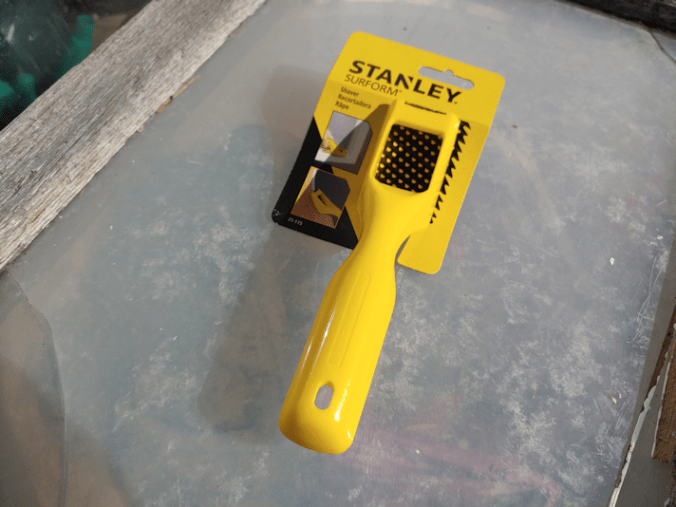
I had gone into town to look at mini planers, but while perusing my options, I chose this tool, instead.
It’s a shaver. The shaving plate looks rather like a bada$$ Parmesan cheese grater. I figured the many cutting blades would make short work of the areas I needed to work on.
I was right. (For a change! LOL)
Using the blue paint marks from the door to show me exactly where I needed to shave off the wood – was well as smoothing my messy, messy cut somewhat – I did both the side of the door frame and the threshold.
What a fantastic little tool! The door can now close without catching anywhere on the frame or the threshold!
Then, because it worked so well, I did the threshold for the inner door, too. It now closes better, too.
The door is not quite done, yet. I’ve decided I need to take it off again, and move the hinges in about half an inch. Right now, when the door is closed, there is a lot of stress at the hinges, and I can actually see where parts of the door are starting to pull apart. This is a temporary fix with a salvaged door, but I’d like it to at least last the winter!
When we first set up the replacement door and attached it to the frame, we lined the hinges up on the door itself with the old door, then rehung it in the same recesses in the frame that the old door’s hinges were in.
With all the other problems that had to be dealt with, we still used the same spots, even after I filled the recesses with wood. Now that the door can actually close, I can see that the hinges are too far out, which basically forces the door to bend in order to close.
As I was thinking about this, and remembering the old door we were replacing, I am realizing what likely happened. When the sun room was built (which happened while we were living in another province), it likely had a different door. When that door was replaced with the door that was here when we moved in, the same recesses in the frame were used for the hinges. Remembering the problems we had to close that door before it finally fell apart, I am guessing that the house had already shifted and the frame was no longer straight, plus the door itself didn’t set the same way as the previous door, but whomever hung it didn’t bother doing anything to compensate for that. Over the years, my parents just put up with it. Meanwhile, the house would have continued to shift which would have made it worse, until it was in the condition it was in when we moved here.
If my guess is right, we hung this door up in the same location as the previous door, which was hung in the same location as the original door.
What I am now thinking of doing is taking the door off again, painting the frame, then hanging it back up with the hinges further in, rather than where the old door was hung.
Given the overnight temperatures, though, I will need to wait for a sunny, warmer day so the paint will have as much time to cure as possible before it starts dropping below freezing. Unfortunately, the long range forecasts are showing a steep drop in temperatures over the next few days, though it is supposed to flatten off after that.
For now, though, we have a working door!
The next job on the list was setting up the newly painted bird feeder stand.
I decided to set it like a fence post, in the same spot as before. The new metal support we have the suet cage hanging from was set aside, and self-seeded flowers and bird seed plants cleared away. Much of it was already empty, though. I don’t know what cats were fighting in there, but they flattened everything around the bases of the bird bath and feeder!
I half considered trying out one of the old post hole diggers we found, but as I dug, I immediately started hitting rocks, so I’m glad I didn’t! The soil is a lot deeper here than in other areas; I just started to hit sandy soil when I stopped. Very different from the soil further away from the house.
The larger rocks I dug out went back in, to help support the post.
Finally, the soil was returned and stamped down. It will now be left for a few days to settle before I hang anything on the hook.
If you look closely at the suet feeder in the back, you can see a chickadee on it!
Chickadees were not my only audience!
The suet feeder was returned, with the hook facing the bird bath. I deliberately placed the other hook facing away from the bird bath, to reduce the number of seeds that end up in it. That’s not as much of a concern with a suet feeder, though my daughter pointed out that it’s a lot closer to something the cats use to drink out of! So it will likely be moved further away.
The chickadees were quick to return, and are already using the support bars from under the platform feeder as perches! This might actually be a better use for them than to add another platform later.
The hook is on the north side of the post, but the post itself is leaning slightly to the south. This was not intentional, but rather than straightening it, I decided to leave it. It should compensate a bit for any pull from the weight of a full bird feeder. That would be more of an issue with those surprisingly fierce winds from the south that kept blowing the whole thing over until we stopped hanging a feeder on it.
I’m rather pleased with how it looks. Plus, it’s set deep enough in the ground that I should be able to hang a feeder on it without needing to stand on something. Previously, I could tip the whole thing over to reach but, obviously, that is no longer an option!
The real test will be how it holds up the next time we have a storm, while a feeder is hanging off of it!
The replacement door to the sun room is back up again!
Of course, things went wonky in the process. At this point, I expect nothing else!
I don’t know if you can tell, but we ended up adding yet another piece of wood under the bottom hinge. The gap there was still massive. And yet, none was needed at the middle hinge!
Of course, the door didn’t quite fit, even after all this. We still needed to force the door over the threshold. We’d had to do that with the old door, to a certain extent. It wasn’t as noticeable, and I think that was partly because the door was already starting to fall apart before we moved here.
Using the blue paint scraped off the door as a guide, I used whatever tools I could dig up to smooth out the side piece. I tried one of the planes we found in the basement. It was a bit big for the space, but it would have worked, except the plate was loose, which is when I discovered the frame holding it was cracked.
We didn’t find it that way. The cats had knocked it off the shelf I’d put it on.
*sigh*
I carved out a recess for the latch plate and deepened the hole for the latch itself until it could finally catch and stay caught. I also began chiselling, carving and rasping away at the outer edge of the threshold until the door could close without being forced.
Well. It still kinda needs to be forced. There is still an issue with the hinges. Understandably, there is a lot of stress on them. I’m trying to think of what I can do to fix that, and not a whole lot comes to mind that is feasible.
I suspect this door won’t last very long, but it’s the best we can do right now, and at least there’s a working door!
I still need to work on smoothing out the frame some more before we paint it. I have been eyeballing some tiny little planers at the hardware store that would be perfect for the job. I might just have to spring for one.
You know, when the outer door on the sun room finally broke, we thought replacing it would just be a simple matter of switching out one door for another that we salvaged from a shed.
How wrong we were!
There were a lot of things we discovered along the way that complicated things. For those who are new to this blog (welcome! Happy to see you here! :-) ), you can catch up on the saga here, here, here and here. Then life happened, and the whole thing stopped until yesterday.
Today, I am finally seeing a light at the end of the tunnel!
The first thing I did was smooth out the rough bits of the cut pieces a bit, then nail the side piece in place. I didn’t bother taking a picture at that point, because it really just looked the same as when we checked the final fit yesterday.
I had trimmed away some ragged bits of old caulking that were still attached to both frame and wall, but that bit of a gap that you can see was still there.
Once the side piece was nailed in, it was time to take off the door and work on the hinge side.
When cutting the side piece yesterday, I first cut it to the line I’d measured and marked with a chalk line, only to discover that when we put the piece in place, needed more cut off. That I was left with two long, narrow pieces came in very handy.
I used sections from the skinny end of the first piece I cut off to fill in the hinge recesses.
Since the weight of the door will be on this side, I used some wood glue on the second piece that was cut off…
… then nailed it in place, with extra nails on either side of where the hinges will be screwed into place.
Before taking the door off its hinges, I’d marked exactly where I would need to put the latch plate on the other side.
While giving the glue some time to set, I used a chisel to start gouging out a recess for the latch.
While I had been working on this, we got a call from the appliance repair guy about our washing machine, and he arrived while I was gouging, so I paused to be with him for that.
It was just last week that our new washing machine simply stopped working. No response when pushing the power button. Of course, pretty much every time we walked past it, we’d reach over and push the button. Nothing happened.
When the repair guy first called after being contacted by LG for the warranty work, and I described what was (and was not) happening, he ordered 2 parts that could possibly be the problem. They came in very quickly – in conversation, he mentioned that some of his customers using other brands have been waiting for 5-6 weeks, and he still doesn’t have their parts! With LG, the parts come in pretty much the next day.
He, of course, did the same thing we did; pushed the power button. LOL He tested the power to the outlet, and it was fine. As we were chatting, he mentioned that he has only recently started working with LG products; the company had been trying to get him to do warranty work for them for some time, and he finally agreed. I’m glad he did, because he’s the only person in the area that does! Still, he said he’s not as familiar with LG products as other brands.
After popping off the cover for the electronics at the back, he took the screws off one of the first part he was going to replace, for the power. The other one would have been the display panel. Then to check something out, he plugged it in.
It made noise.
I think we both had matching stunned faces.
He hit the power button.
It turned on.
I asked him what he did. He’d done nothing!
He checked the wires, to see if any where loose, but everything was fine.
He was at a complete loss as to why is suddenly started working.
He was also at a loss as to how to proceed. If he left it and sent the parts back, he’d half to re-order them if it stopped working again. The fact that it stopped working once, for no reason he could find, means that it could easily happen again. In the end, he decided to leave the parts with me, bill the warranty work, then if – when? – it happened again, we could call him directly, and he’d put in the new parts. Not knowing why it happened in the first place, as well as what happened for it to start working again, made is difficult for him to just walk away from the job. It just seems like there’s a very good chance it will happen again.
After he left, we started a small load of laundry, just to test it! So far, it’s still working fine.
What a mystery!
Ah, technology. I love my tech, but it does break down a lot more than the old school stuff! :-D
After that, I went back to working on the door.
While the door was hung, I had to lift it over the threshold to be able to close it. There was a large gap at the bottom hinge, but not the top hinge. In fact, the top corner of the door was hitting the frame. So while I did not need to add material all the way to the top of the frame, I decided to fill the hinge recess at the top, as well. With no hinge recesses, there should be enough of a gap at the top for the door to no longer be touching the frame at that corner.
Once the hinge side was built up, I put the top piece back. I then applied caulk to the outside of the frame pieces.
It’s amazing how just adding that white caulk over the gap made the whole thing look so much better!
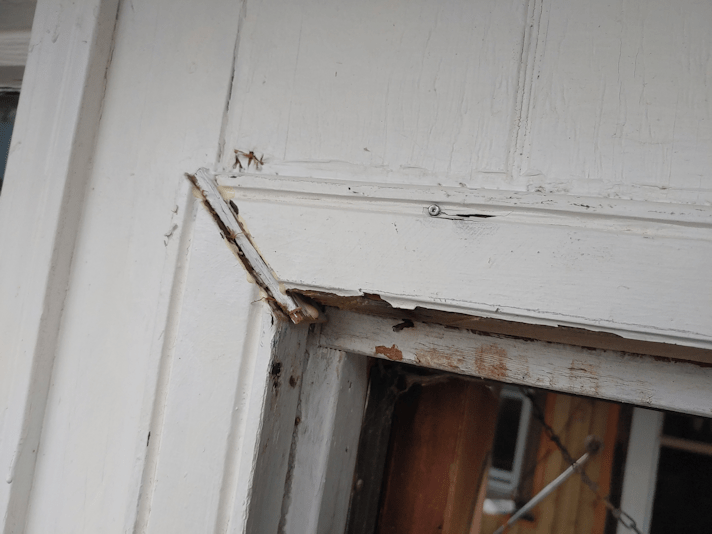
The top was a different issue. Particularly in the middle, where there was a substantial section of wood missing! I’m guessing there was some rot that got cleaned out, before it was painted the summer before we moved in.
Little bits and pieces from the remaining piece cut off the side frame got used to fill in the gap, then I caulked the rest.
I lined the angle cut with the other side of the frame, but the shifting meant that left a large gap on the hinge side. Another piece of wood and some wood glue got pressed into duty to fill the space.
For now, everything is being left for the glue to and caulk to dry and cure for a while. The next step will be to hang the door again, and attach the latch plate. I picked up a quart of white exterior paint, and the whole frame will be painted.
Then, once everything is back up, the chain for the door, to keep it from blowing open too far, will be attached to the top of the frame. Once that is secure, I plan to move the shelf we’ve got behind the door, to the other side. I want to wait until the door is completely done because, right now, that shelf ensures the door doesn’t get blown open and breaking a window or something. I doubt the door can even open that far, but I didn’t want to take any chances!
So I figure, I’ll snag a daughter this evening to help hang the door, then – weather willing – the painting can happen tomorrow afternoon/evening.
Unless we discover something else has gone wrong, once the door is hung back up. The way this project has been going, that wouldn’t surprise me at all! :-D
This morning, after doing my rounds and feeding the felines, I headed into town to run a few errands. This included stopping at the post office in our little hamlet. Which is also a liquor store.
I bought a whole lot of wine.
Or, should I say, my daughter did, since she paid for it. :-D
We don’t actually want the wine, but it came in 3L jugs. We need to rack our hard apple cider, and I’ve been hesitating because we only have gallon jugs (4L) to rack into. With using unfiltered, raw apple juice, there is going to be a LOT left behind when we siphon off the liquid, and 4L jugs would have left a lot more headroom than there should be.
The 3L wine bottles will be perfect carboys.
We will just have to drink a lot of wine over the next couple of days! :-D
I hope it’s actually good wine. I’m not a wine drinker to begin with, so chances are pretty high I won’t like it. :-D
I was happy to see the waterproof cord protectors came in in the mail, so that’s another step closer to winterizing the cat house.
Once in town, I made a point of stopping at a local business that had been getting threats, including death threats, for putting up a humorous sign saying “face diapers” were not required to enter. I’d talked to one of the owners online, and wanted to stop in in person to show them some support. We had an excellent chat. It turned out the owner has a health condition and cannot wear a mask. Even though there is no mask mandate, some of the local businesses are refusing to allow anyone in without a mask, even if it means discriminating against people on the basis of health, so he wanted people to know everyone was welcome in his business, with or without a mask. It was good to hear that, for all the threats and efforts to cancel his business out completely, he’s now busier than ever! It’s a printing business, and he gave me a bunch of business card sized notices of exemption, citing the relevant portion of the mandates (for those municipalities the province put mandates on) and phone numbers.
One of them will be going on my mother’s door, and I’ll be giving her one to carry with her, too.
After visiting the shop, I went to the other hardware store in town, hoping they might have something I could use to cut the piece of door frame for the sun room. Even just clamps, so I could use the reciprocating saw.
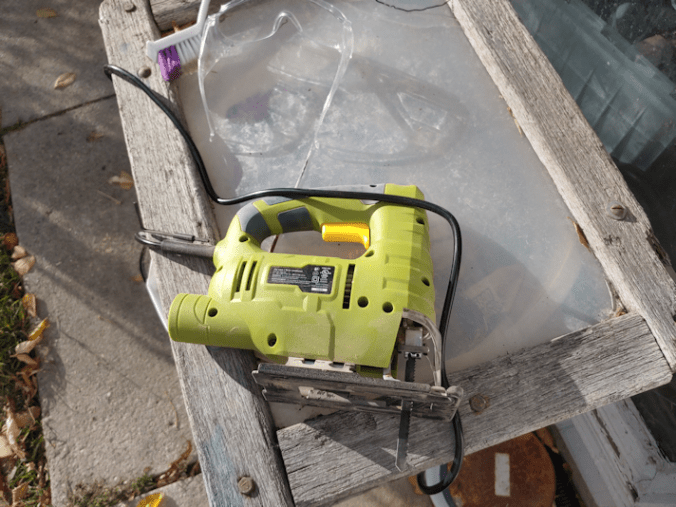
I ended up leaving with an inexpensive jigsaw.
My new toy got a major workout today! It even went through hidden nails.
But before I started that, I ended up spending some time on the computer, emailing with my siblings about the situation with my mother. Then I called her and asked for the name and number for the social worker she deals with. These are the people she talks to when there are problems where she lives. She didn’t want to give me the number, saying she didn’t want to make trouble with the caretakers. She had found a note under her door saying that I should be wearing a mask in the building, but it was not signed or anything. She’s pretty sure who left it. We talked about how she should not be wearing a mask, and she again said she didn’t want to make trouble, and just takes it off her face when she needs to breathe. !!!! I convinced her to give me the information, and promised to be nice to them. :-D
It turns out that the number was for a senior’s office, and while they often do things where my mother lives (until they got canceled by the pandemic restrictions), they don’t actually have any say in what goes on there. That falls under a provincial department.
When I called them, identifying myself and my relationship to my mother, then told them what happened, they immediately came to the same conclusion as my mother about who left the note. At one point, I was talking to two people on speakerphone, and they seemed so incredibly happy that I was calling on behalf of my mother. It turns out they have been trying for years to get this caretaking couple fired, due to their horrific and abusive behaviour towards the seniors in the buildings they work in – not just the one my mother is in! – but they have the residents so intimidated, no one is willing to write a formal complaint to the provincial department that manages the building. It turns out this couple has especially targeted my mother, who stands up to them the most. The ladies I spoke to vehemently agreed that my mother should not be wearing a mask, but she has told them she’s afraid of what would happen – meaning how the caretakers would react – if she didn’t. !!! They have already threatened to get my mother evicted, and it turns out they’ve threatened the job of one of the social workers, too!
In the end, I got a name and number for the person they’ve been working with at the provincial level, and they were thrilled that I was willing to call with a complaint (because even if they witness something, they are not allowed to say anything themselves), asking me to let them know how it works out.
When I called the number, though, it went straight to voice mail, so I left a message saying I wanted to talk about elder abuse towards my mother. I will try again tomorrow.
Once I did as much as I could with that, I headed outside and started to set up to use my new toy.
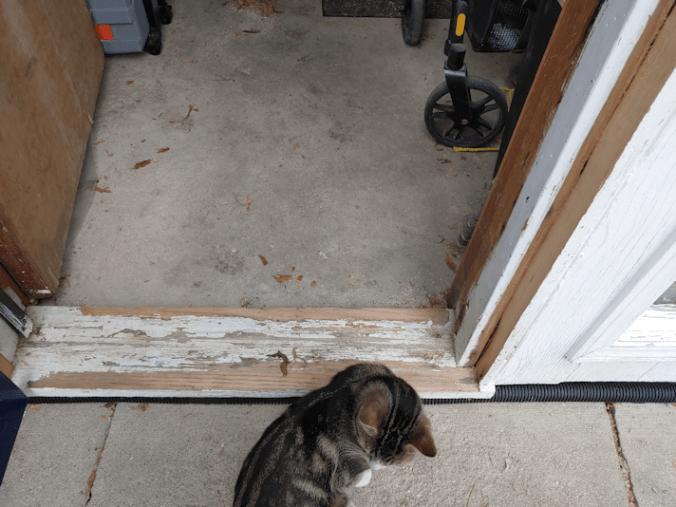
I was being watched!
Sibling snuggles!
So adorable!
Of course, once I started making too much noise, they ran off.
With my daughter’s help, I was able to cut the marked area off the piece of frame. Then we set it in place and…
… made a new mark to cut it again.
Finally! We can close the door with the frame piece.
I had considered screwing the pieces in place, but in the end, decided we’ll just nail them.
The crazy thing is, with all the buckets, jars, tins and plastic margarine containers full of nails all over the place, we have absolutely no nails that we can use to put the frame pieces in!
We’ve got lots of roofing nails, though. :-D
So tomorrow, I will make another trip into town.
Once the frame pieces are back, we will remove the door and use the pieces I cut off the frame on one side, to add to the frame on the other side, so that the door will hang straight, even if the sun room itself is now shifted.
It is all a horrible, messy looking patch job, but until we are in a position to replace the entire door frame, it’s the best we can do for now.
I’m glad I found that little jig saw. It still had a hard time cutting this surprisingly hard wood. That is also managed to cut through some hidden nails, barely slowing down, is bonus.
I will have to make a point of stocking up on spare blades. I foresee using this baby a lot, in the future!
Once we did as much as we could with the door, I had a chance to paint the other side of the support post for the old platform bird feeder. I’ve already picked up a new hanging feeder to put on its hook, ready and waiting. For now, I will not be trying to put on a new platform, and will just leave the little support pieces for that, where they are.
If all goes well, we should be able to set it up by the end of this week. I’ll just have to pick up some more bird seed. :-)
Before I start on how things went with the clean up, I have another update. I just got off the phone with Canada Cartage – the company shipping our new washing machine.
They didn’t receive it at this end, so they will call us with a new delivery date when they have it.
I might still call the guy at Home Depot tomorrow morning, to see if he can pull a few strings. We’ve opted not to go into town to use the laundromat, and have instead been washing the necessities in the bathtub.
Oddly, my clothes have never been cleaner or softer. Ever. And all I’m going is leaving them to soak in hot water and detergent, then swishing them around a bit before rinsing them.
Weird!
I am happy to say that we have got the old kitchen done, and everything that needed to go back, has been brought in.
I’ll start with the old kitchen.
There wasn’t much left to take out of there. Most of it was behind the wood burning cook stove.
Which, interestingly enough, also hid another outlet.
No wonder insurance companies are such sticklers about wood burning stoves and furnaces!
That basin may well be older than I am.
I left it there.
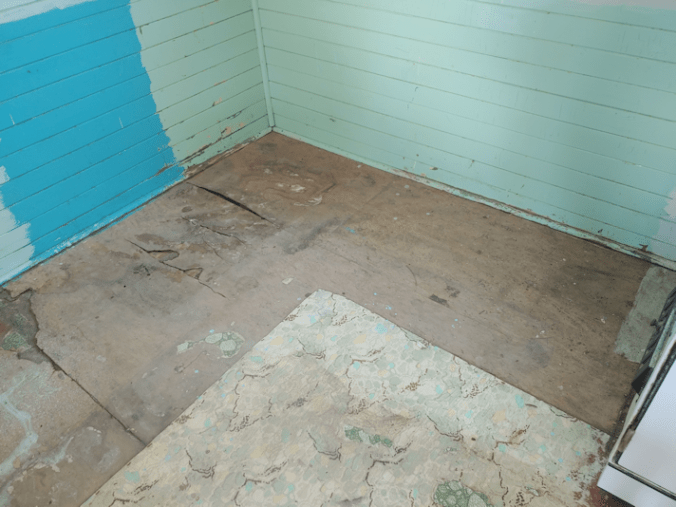
Once everything was out, including the floor mats (which were carefully picked up so that I could pour out the crud over a large garbage can!) and random nails and whatnot were swept up, I took stock of the floor.
This corner is the worst.
And there’s nothing we can do about it, right now.
I am guessing the previous freezer my parents used to have here cause this damage when it finally died.
The best I could do at this point was take the little shop vac to the area.
I vacuumed the window of what may well have been decades of dead bugs, too. I even vacuumed parts of the stove a bit.
A container of nails and… dirt? had fallen in here. I got most of them, but we have found so many random containers of rusty nails, I just swept up and threw away the rest.
I just had to remind myself of what was in this cupboard.
We will deal with this another time!
The weather outside was getting really, really windy, so the girls and I pushed to get everything inside. We will likely change things around later, but for now, it’s all in!
We considered moving the freezer back into the other corner and putting the couch where the freezer is. In the end, I just pulled it closer to the door, to make more space for the shelves we put back where they were before. They are extremely sturdy shelves, and are great to stand on when we need to access the breakers.
I decided to put the rocking chair in the old kitchen, too. More because of how I wanted to arrange the sun room.
A small shelf that was in the sun room is now tucked behind the stove. At some point, we can put a small lamp in there, so a person can sit on the couch and read, and have somewhere to put down a drink or something. There was even still room for a small garbage can.
The prie-dieu that I still have plans to refinish, fits perfectly in the nook on the other side of the stove. As do the folding camp chairs, some window screens, and even my dad’s old wheelchair tucks partway in.
So that’s done for now! I’ll be finding somewhere else for the giant enameled container that is handy. My mother used that for everything from washing and soaking cucumbers to make pickles, to making bread dough. We’ve made use of it ourselves, already. Finding a container that large – with a lid, too – is not so easy, anymore, so we’re not about to put it away in storage. (We put even more stuff into the storage house today, too. :-( )
When it came to the sun room, the focus was on anything tool and gardening related.
This is where that plastic couch used to be.
The yellow shelf in the corner used to be in the old kitchen. Previously, we had a dresser under the shelf across the window as my “tool box”. The wood at the bottom of the drawers ended up warping so badly, it took quite some finagling to get it open. So, out the dresser went and we grabbed that shelf from the old kitchen to replace it.
It was full of jars, and a plastic bucket of nails and screws that was so old, the plastic disintegrated when I tried to pick it up.
We’d put the shelf under the window, on bricks, in case water got in (it did), but this time, we decided against putting any shelf against that window. Partly because the shelf has a metal top that will be a great work surface. Partly because the inner pane of the double pane window is badly cracked. At some point, we’re going to have to take the pieces out, so no one gets hurt.
The bins used for cat kibble and bird seed now have their own spots, out of the way. Before, they were just on the couch. No way the skunks can get those lids open in there! :-)
Not that that will be an issue anymore, but I’ll cover that later.
The small garbage can is there told hold our wiener roasting sticks, and other fire pit supplies.
Here is the other side.
The swing bench is close to where it was before, and the cube shelf went back to it’s previous spot. We now have a tall box to hold the long and weird stuff, in the corner, and the table saw is easily accessible.
I’ll probably shift some things around later, but this will do for now.
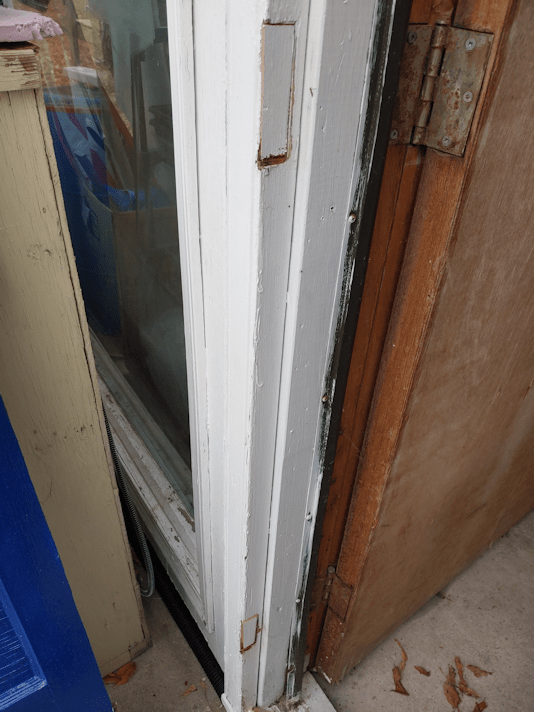
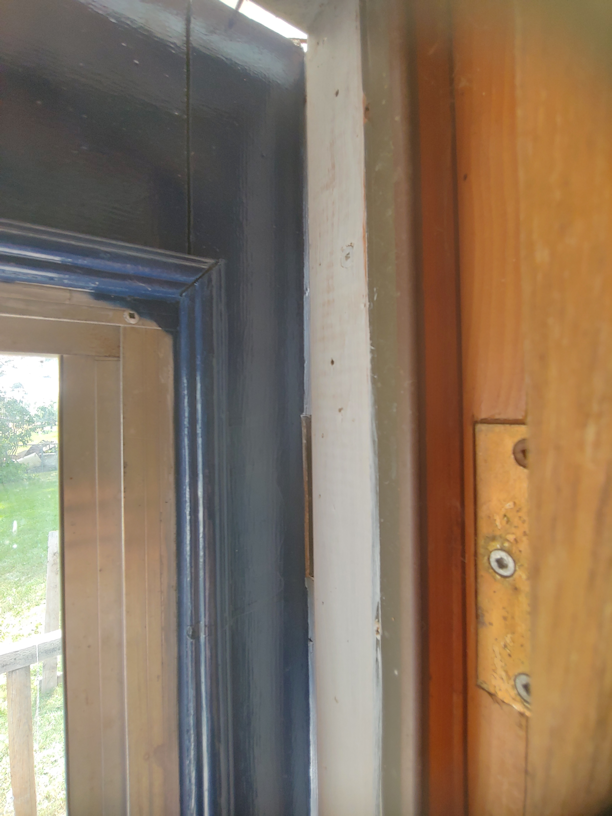
Then there is the door…
I can lift the replacement door to close it, but when I do, this is what the hinge is like at the bottom. It has only 1 screw, and it’s not all the way in, which is a good thing. I wouldn’t be able to close the door, otherwise.
At the top…
The top corner of the door is actually flush with the door frame.
I remember fighting with the old door to get it closed, and having to lift it. While I did check the bottom of the door frame, for some reason I never thought to look at the hinges. At least, not that I can remember.
Basically, that means that this has always been a problem. Right from when the old door was first hung.
Much of the sun room is salvaged materials, including all the windows and both doors. So I guess they just made do and lived with it. No one thought to fix the problem.
No wonder the previous door started to fall apart.
I’m going to have to jerry rig it myself.
*sigh*
Once that is done, then I’ll double check how much I need to trim the 2 pieces of door frame that we took off. For now, though, the door stays closed because it’s stuck at the bottom corner, where I have to lift it over the door jam. With the outside door closed, the inside door will now stay closed (it blows open easily, otherwise).
We can now keep the sun room closed. The cats can shelter in the old dog house my brother provided us, and no more skunks coming in!
Which means no more animal damage, urine or feces to deal with.
We can actually start using the sun room… as a sun room again! :-D
Today, I finally started on a job that should have been done at the start of spring! Between the rain and the heat wave, and various appliance catastrophes, we just never got to it.
It’s still 24C (75F) out there as I write this, so it was still uncomfortably hot for the work, but it’s much more bearable than what we had last month!
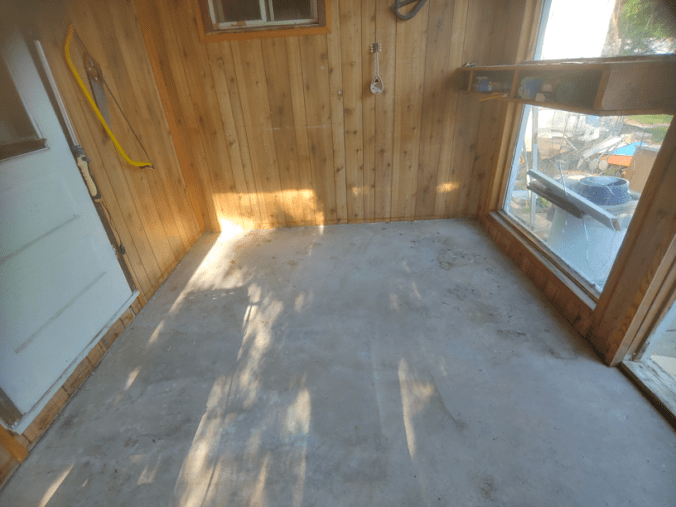
My goal today was to empty out the sun room, so I could sweep up the concrete floor.
Here is what it looked like once I emptied it (except for the table saw; I’ll move that when I’m ready to use it).
This is after 2 winters of the sun room being used by the yard cats as a shelter, and 1 summer as a kitten maternity ward.
Also, visiting skunks. Most of the poop on the floor under where the plastic couch was sitting is skunk poop, which is distinctively black in colour.
Here is how it looks now.
It was a pretty gross job, but still nowhere near as bad as it was when we first cleaned it out.
Washing the floor will wait until we are done with a whole bunch of other stuff, first.
The cushions from my late father’s swing bench – one of his favourite things was to lie on that for a nap in the sun room! – have been hosed off and are hanging to air out. I set up the kiddie pool we ended up using to mix soil and peat, and it now has some of the dirtier old blankets, pillows and cushions we’d given to the cats, soaking in it. Other items are draped and got hosed off, and the biggest blanket is waiting for its own soak, tomorrow.
I hosed down some of the furniture and shelves, too, and it will all stay in the yard overnight. Tomorrow, the girls will empty the old kitchen out, as much as possible. Once that’s done, I’ll do what I can about the floor in there (I doubt I’ll be able to wash it), and the plastic couch will go into there instead of the sun room. The utility shelf currently in the old kitchen will go into the sun room.
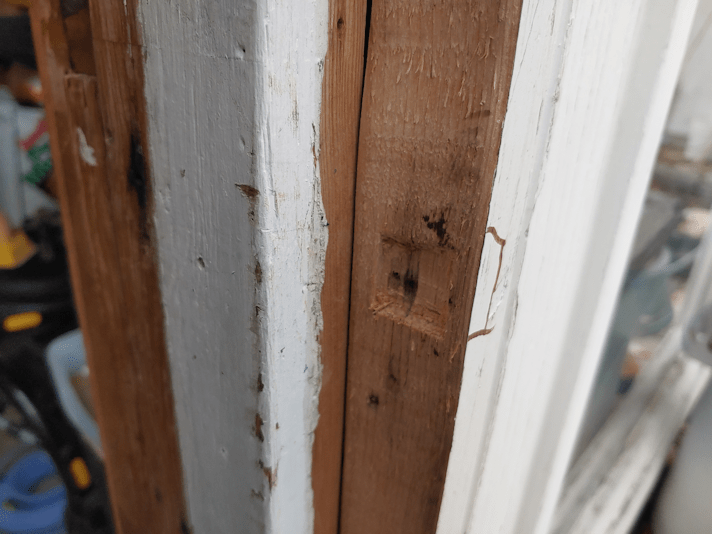
I’ve also finally taken off the parts of the door frame I need to trim narrower, so we can finally close the replacement door. Once they were off, however, I discovered something odd. In spite of being sized to the old door, carefully measured and trimmed, I still couldn’t close it once the frame pieces were off. It was hitting the bottom. I had to lift the door in order to close it.
I remember the old door did that, too.
Once I lifted it and closed it, I looked at the hinge side and discovered that the frame itself is wider on the bottom than on the top. !!! So the door is hanging at an angle, and that’s why it needs to be lifted to be closed. Which, of course, pulls the hinge away from the frame. From the looks of it, that’s been a problem for a very long time!
Well, I’ll just have to figure out how to fill the gap, then rehang the door.
Replacing the old broken door turned out to be a much more complicated job than any of us expected!
By the time we’re done, though, we should not only have the sun room reclaimed, and my husband will be able to use it again, but the old kitchen should be a usable space, too. Other than to just shove things in that we have no other place for, that is! LOL
I got a little reminder today, of why I need to start using the sun room as a greenhouse.
The cats have already knocked the mini-greenhouse over once, and despite our best efforts at making sure the bottom of the plastic is pushed under the frame, the cats are determined to get in. Especially Susan! They’ve even clawed a hole in the plastic at one corner. As adorable as she was, taking a nap half in and half out, this is just not a good thing. :-(
The first order of business was to measure and cut the door down to size. We did remember to remove the hinges first, though. ;-)
I’m so excited. I got to use the chalk line we found in the basement to mark where I needed to cut! :-)
I also got to use the circular saw that was gifted to use last year. I’ve never actually used one before. With so many older brothers, I didn’t get to use a lot of the tools we had. Still, it’s pretty self explanatory.
I am, however, a lefty.
It wasn’t the straightest of cuts, but that’s okay!
When we put the hinges back on, we’ll make sure to line them up with the existing spaces on the door frame.
Speaking of which…
The door knobs on the replacement door turned out to be about half an inch off from the old door. So, while the girls scrubbed and cleaned the door, I removed the plate from the door frame, then measured off where it needed to be moved to. After a bit of hunting, I found a chisel and prepped the new location for the plate.
I won’t put the plate back on until the door is installed, in case I have to make any adjustments.
I also moved my seedling trays into the sun room.
The sun room has been reaching more than 20C (68F) during the day. It’s the night time temperature that concerns me a bit, which is why I also moved the mini-greenhouse in. The plastic cover will help keep heat in a bit, so the trays can be moved into there before it gets too chilly.
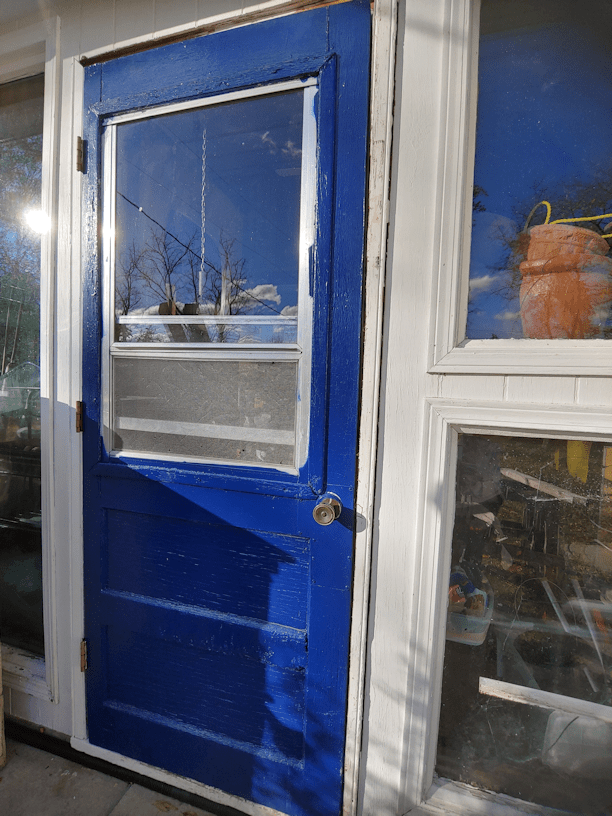
All clean! This is the outside of the door. It’s not in the best of shape, but it’s better than the old one, and will do just fine.
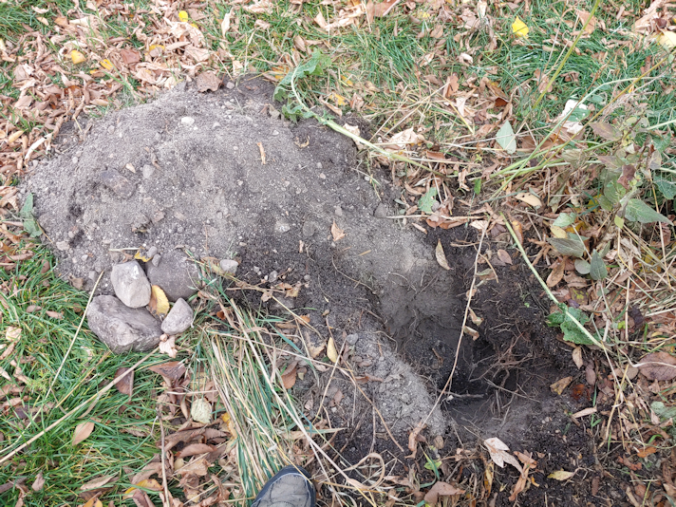
While it was drying, I decided to check out the future garden space where the old wood pile used to be. I figured I would use the potato fork and see how the soil is, where we covered it with black plastic.
The soil is amazing! The tines of the fork sank all the way into the soil. No ice in there at all, and it is so soft. It will be perfect for the beets and carrots we plan to plant there.
Except…
It’s also full of roots. You can see the dark pile to the side in the above photo; those are the cherry roots I’ve pulled up so far.
The area is just cris-crossed with cherry roots that we will need to dig out. I was also finding pieces of rotten pallet wood I’d missed last year, and some huge roots from the old spruce stumps nearby. We’ll need axes or saws to get those out.
Hopefully, the girls will be able to give me a hand and we’ll get this entire area free of roots tomorrow. Beets are supposed to be planted as soon as the soil can be worked, so as soon as we get it cleared, we can get those started. The ground is so soft that, when it comes time to plant, I’ll have to make sure to put boards between the rows to walk on, so I don’t sink. !!
That reminds me. I got a notice today that my soil tester and garden auger have been shipped and should arrive on Friday. The soil tester measures temperature, moisture and PH levels. The auger is a drill attachment, and we won’t need that until we’re ready to plant in the old garden area, probably in late May.
While I was working on this, my daughter came out with a respirator and a can of spray paint.
This is the same blue we used on the driveway gate. :-) It took an entire can to do two coats on this side.
Then, because it looked like it was going to rain, we made space in the sun room and brought the saw horses and door in to finish curing.
Tomorrow, we would normally head into the city for a big shop. Talking to the girls about it, we decided to wait a couple of days. Instead, I’ll go into town and pick up some more paint, so we can do the other side of the door.
Plus, takeout food. I am just dying for some takeout. :-D I have no idea where; the Chinese restaurant we normally go to is closed on Tuesdays, and the pizza place we order from doesn’t open until 4 pm.
There is, however, that fish and chips place that opened their summer time take-out window early, so they could stay open during the shut down. They’ve got the best pollock and fries I’ve ever tasted – and I don’t particularly like fish and chips in the first place! :-D
Oh, wow. I’m feeling hungry just thinking about it…
So tomorrow, we should be able to go the other side of the door, and get that garden area de-rooted.
Beep Beep came half out of her baby nest to have a bit of food while I was there, with the babies peacefully snoozing in a pile. I was even able to get a picture, despite her best efforts to use her butt to block my attempts. :-D
She was more co-operative later.
That is one happy, contented bunch of wormies!
Beep Beep looks ticked off at the flash. :-D
While I was outside, doing my rounds, Butterscotch and her boys followed me around.
Creamsicle really, really wanted up – and not just with me!
He does love climbing things!
Including my leg. :-D
Potato Beetle was more polite about it.
Just look at that face!
He has a terrible habit of running in front of us as we are walking, then flopping down on the ground, right in front of our feet. It can be very hard not to step on or trip over him! :-D
He likes to go up on the roof and watch the girls through the upstairs window. I’m told he even falls asleep with his forehead against the glass! :-D He is such an affectionate boy. :-)
Butterscotch not only let me pet her this morning, but even let me pick her up, if only briefly. This let me get a quick feel of her belly. The one teat that was very swollen yesterday is still swollen, but already getting softer. This is good, since her not suckling could potentially lead to mastitis.
Before heading outside this morning, I checked on the seeds I’d started earlier, and found there are some seedlings sprouted among the fennel, so I took the dome off the tray. They are already really leggy. I need to get them set up in the sun room soon. The main concern I have for there is how much the temperatures drop during the night. We can’t get a good sense of that with the doors propped open all the time, so I was going to close the outer door, leaving the inner door with its much smaller window, open. We could then keep an eye on the temperature through the bathroom window, throughout the day.
Unfortunately, the door can’t close.
Even when we first moved here, this door was difficult to close. I had to lift it and basically force it shut. Now, not even that works.
Not that it matters anymore. We need to replace the door.
A part of the door’s edge appears to have changed shape and just hits the frame. That’s the part that prevents the door from closing. If this had been the only issue, I could just use one of the planes we found in the basement and shave it down. However, as you can see in the photo, the door itself is coming apart at the bottom, and the window is no longer attached along one side. The caulking is old, brittle and has been breaking off all long that side.
Theoretically, I could take the door off its hinges and repair all of this, but it’s really not worth the effort. I’m pretty sure this is a standard sized door, and we should be able to switch it out with one of the doors we’ve found in a shed.
It’ll be worth a try, at least.
If that doesn’t work… we’ll have to figure something out, or I won’t be able to use the sun room as a greenhouse. I need to be able to protect the trays from the cats.
So that’s something I hope to get done this afternoon.
Before I show you the messy stuff, let me share with you some adorableness!
This morning, while doing my morning ablutions, I noticed Dave on the bath chair, eyeballing the towels. We have a small shelf with folded towels under some hanging towels. The hanging towels cover the top, and the cats like to go behind them to create a little cat cave as they nap on the towels. They do it so often, I now keep an old towel the top, just for them to use as a bed. I figured Dave wanted to get in there, so I moved a hanging towel to let him behind it.
It was already occupied!
I had no idea she was there, the entire time I was in the bathroom! :-D
Such a cutie. :-)
Now, on to the icky stuff.
During the evening cat routine, my daughter headed to the sun room to top up the food and water for the outside cats.
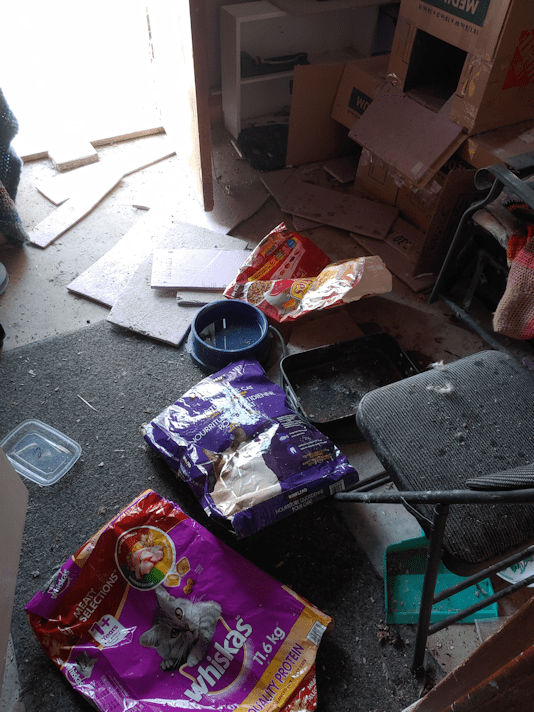
The sun room was a mess, with stuff scattered all over, part of the cat condo was collapsed and the bin holding the cat kibble was open.
Two skunks where in it, eating.
*sigh*
I had hoped it wasn’t them getting into the bin. They are likely why we are not seeing the cats using the sun room as often. When I do my morning rounds lately, the cats almost always come over from elsewhere.
My daughter splashed them with water to get them out. One left, but the other might have still been in there when she brought the bin into the old kitchen.
Since it was so late, the mess was left to be dealt with this morning.
When emptying the big bags into the kibble bin, I use one as a garbage bag for the others. It had been sitting beside the bin. I would also sometimes put a bit of kibble in the cat condo, to encourage the cats to use it. My guess is, the skunks has finished off all the food in the bowls, then dug through everything they could get at, to find stray bits of kibble, including pulling the crunched up bags out of the bag that was being used to hold them.
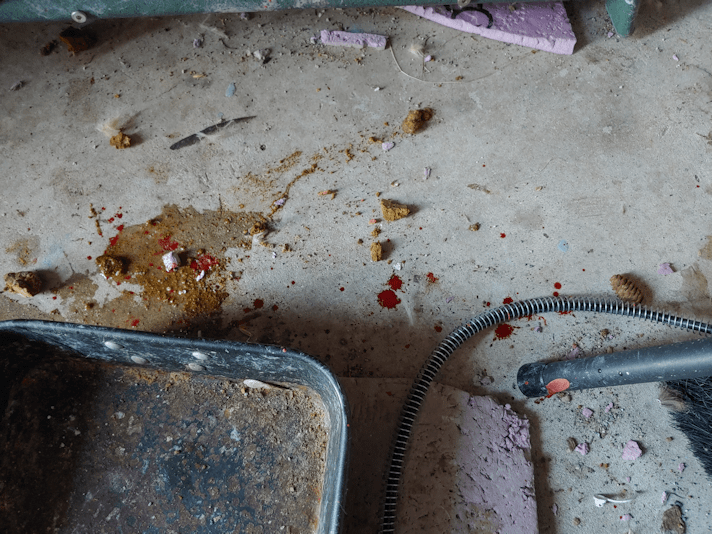
Spotting this as I picked things up was concerning.
Yeah. That’s frozen blood spatter.
While cleaning up, I heard a plaintive meow, but there was no sign of any cats. I eventually was able to lean far enough to look under the swing bench, where I saw a big orange lump loafed on an old blanket we’ve got under there.
It was Jim Boy.
When he came out, the poor thing seemed desperate for cuddles – and for food! I haven’t seen him in quite a while. He still looks like he’s in pretty rough shape, but better than the last time I saw him.
The more important thing was, no sign of injury. The blood did not come from him.
As I continued my rounds, I saw Creamsicle and Potato Beetle – both also looked fine. Butterscotch came from somewhere behind the house, looking uninjured and still very pregnant. I even saw Rosencrantz who, thankfully, does not look at all pregnant. Even Junk Pile cat showed up. I never saw Beep Beep, though. I also didn’t see Pump Shack cat, though I did see him later in the live feed for the security camera. None looked like they had any injuries, from what I could see.
Butterscotch even started to sort of follow me when I was doing the rest of my rounds. I heard her meowing in the spruce grove, but she never came close. On my way back to the house, I cut through the trees to see if I could convince her to let me at least pet her, but she wouldn’t let me come anywhere near her.
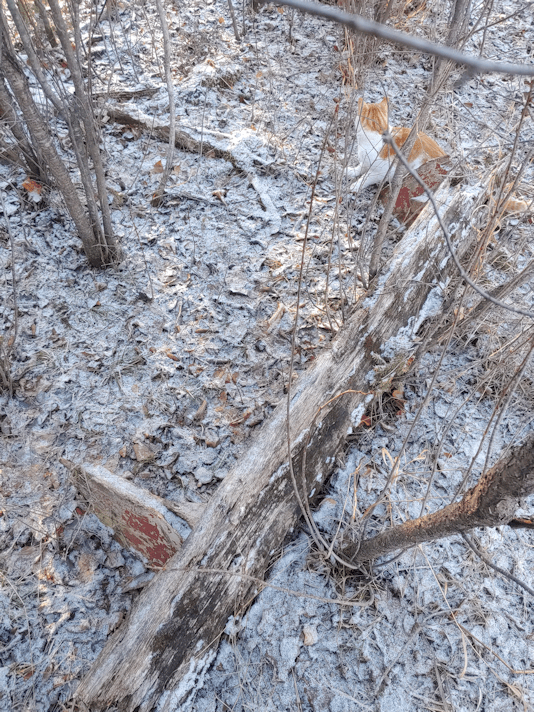
I did, however, find this.
Another old and rotting bench!
I may have seen the board before and thought it was an old, fallen tree, but once the leaves come in, it’s completely hidden and the area impassible. This is the first time I’ve been able to come close enough to see that it was a bench!
You can tell, by the trees growing around it, that it’s been there and fallen over for quite a long time.
As we clear things up, I do want to eventually put benches and seats among the trees. Seeing the remains of so many makeshift benches all over gives me an idea of what NOT to do. I might just go ahead and buy the heavy duty plastic benches or picnic tables that Costco carries every spring. If we do go with wood, we’ll need to take steps to protect it from the elements and the moisture of the ground.
All in good time.
As for the skunks, we’re going to have to stop topping up the food bowls in the sun room overnight. Once the weather finally turns to spring, all the food and water will be kept outside, so we can close the sun room doors again – especially after we’re able to empty it out and give it a thorough cleaning. I’m not actually too bothered about the skunks coming around, but they are greedy guts – cat kibble is bad for them to begin with – and seem to be driving the yard cats out of the very room we’ve taken great care to turn into a safe and warm sanctuary for them.
Yet another reason to finish cleaning up the basement and turning it into a maternity ward for Beep Beep and Butterscotch. I’d hoped to have had it finished by now, but my goodness, it is such a huge job!