First up, some good news in progress that made it worth being up way too late again.
At around midnight, I was contacted by someone from the new rescue. Some spaces are opening up, and she was wondering what friendly yard cats might be available to take in for fostering and adoption?
She had a few in mind from pictures I’d sent before, but requested more up to date photos and videos that she could show to potential fosters. My daughter and I did that while doing the morning cat feeding. Unfortunately, a couple of times when I thought I was taking video, it turned out it wasn’t recording. Instead, I had a second or two of video of our feet or whatever, taken at either end of what was supposed to be a video for the rescue! We have a whole bunch of adult males in particular that are so friendly, it’s almost impossible to get still shots of them, as they are all over each other, trying to get pets.
So I will have to try again later today. If all goes well, we might be able to have our tiny girls that are friendly, but still too small to spay (even though they are almost a year old) be taken in. Or Sir Robin. Sir Robin desperately wants to be an indoor cat! I haven’t even seen some of the adult feral females in a few days which, unfortunately, means they may well have just had kittens somewhere in their hidden places.
Tis the season.
Speaking of the season, here is how our seedlings are looking.
Two snail rolls have graduated to the upper level and are now under the shop light, giving them a few more inches of space that I couldn’t give them with the gooseneck light fixture they were under.
The Golden Boy celery is thriving since being “potted up” to the snail roll! That poor little luffa is getting its true leaves, but is looking pretty sickly. The summer savoury is looking very leggy and weak, but the tarragon – the very few there are – are looking stronger.
The second picture is of the eggplant and peppers tray. Those seedlings are looking very sad and weak, and there are so few surviving. I’ve already resown them, but I won’t try again. They are short season enough that I might try direct sowing, instead.
With how few there are, I’m seriously considering “potting them up” into a snail roll. I could easily fit them all into a single roll, with room to spare. I’m just not sure how well they’d handle being transplanted. It can’t be much worse than they are doing now.
In the first picture, you can see quite a few more of the hollyhocks now. There are still two or three seedlings disguised as vermiculite in there.
In the next picture, you can see a second Orange Currant tomato is up – plus there’s another elbowing its way up that I didn’t even see until I looked at the photo, later.
It’s the same in the next picture. I could see one Manitoba tomato had emerged, but looking closely in the photo, I can see the stem of another, pushing it’s way up.
Still no sign of anything in the Chocolate Stripes or Blueberry tomatoes, and still no Florence Fennel visible.
All in good time.
Tomorrow is the last business day of the month – payday – so we are expecting to do our Costco stock up trip in the city. I’ll see what they have for seed starting mix. I only got one bag and it’s pretty small. I might only get four seed snails out of it. I won’t be starting more seeds for a couple more weeks, but I will probably be starting more. Costco carries the big Pro Mix bags, which would last me for the rest of the seed starting season. I might have to sift it before using it. I haven’t heard people talking about needing to do that with their seed starting mixed this year at all, though, so it might not be an issue. I might need to get more potting soil, too. I still have some but, with so much material getting sifted out, I don’t have as much potting soil as it appears in the bag! Any time I pot something up, I would be using potting soil rather than seed starting mix.
We really need a better set up for starting seeds indoors.
While taking video of the peppers for the garden tour yesterday, I spotted what I thought was a tiny pepper beginning to form. It turned out to be the remains of a blossom. From what I could see, if it did develop into a pepper, it would be our first one.
Today, I went to take another look. After moving the dried remains of petals off, I did indeed find a teeny, tiny beginnings of a pepper.
An absolutely adorable little tree from, no bigger than the tip of my thumb.
I am so happy we have so many frogs this year. I wish they could make a bigger end on the mosquito population, though! Lots of frogs, but no dragonflies.
Gotta set up some bat houses at some point. Walking around this afternoon, the air was filled with the whining of mosquitoes. It’s absolutely insane, how many there are this year!!
Thankfully, I wasn’t needing to be out there for long. My daughter and I had our back to back medical appointments, after doing my mother’s med assist this morning, followed by a trip to the pharmacy, so we were away most of the day. Plus, it’s been raining off and on all day. Very happy for the rain, too! Not much to do in the garden right now, anyhow. Just see how much more the deer have eat, and stare perplexedly as all the things that just aren’t growing this year.
*sigh*
As my SIL once said about their own garden; if they had to live off of what they grew, they’d starve! They weren’t trying for any sort of self sufficiency. Just to supplement. We, on the other hand, are planning our garden out specifically to have a combination of fresh eating, freezing, canning and winter storage. Last year, we at least were able to freeze a few things. This year, I don’t think we’ll even have anything more than for fresh eating.
We do still have just under 50 days before first frost – a bit longer, if we go by the adjusted average, though I certainly won’t count on it. Who knows what might happen in that time! Maybe, things will actually start suddenly growing and producing and we’ll have a long and mild fall, with plenty to harvest at the end of the season.
This bed had already been prepped, then covered with plastic, except for one end, where there had been onions gone to seed. They did not survive another winter, though.
The plastic didn’t solarize the weeds to death, but at least it kept most of the elm seeds off! The challenge was to get the plastic off again, without dumping them all onto the soil.
For a bed that had already been weeded before the plastic was laid down, there were a LOT of weeds to clear out. As I worked around the bed, I suddenly realized that I was pulling out baby carrots! Last year, we had a couple of Uzbek Golden Carrots bolt and go to seed, so I left them to it, so I could collect the seeds in the fall. When I went to gather them, though, the seed heads were shriveled and messed up looking, and there were no seeds to collect.
Looks like one of them did have seeds, after all!
There was no way they could be transplanted or anything like that, so away they went.
Once the bed was clear of weeds and roots, I finished off our last bag of manure into it, and worked that into the soil.
Then it was time to figure out where the tomatoes would go.
I used the collars (I found an extra “stash” of the water bottles I make the collars from in the basement, so I had plenty for the tomatoes) to figure out the spacing. There were four Black Beauty, four Chocolate Cherry and nine Sub Arctic Plenty.
We’ve grown the Black Beauty and Chocolate Cherry before, so I know what to expect with those. They both get quite tall, while the Black Beauty became really heavy. They had trellis supports, and I ended up having to add supports to the supports, to keep the whole thing from tipping over in the wind!
With that in mind, I made sure that these were on the north side of the bed, so they wouldn’t shade out other plants. So I set out eight collars on that side, with a space in the middle.
If I remember correctly, the Sub Arctic Plenty are a bush type tomato, so I don’t expect them to get tall. I’m thinking they will be more like the Forme de Couer tomatoes we grew last year. Each tomato plant had a pair of bamboo stakes to support it, and I’d used twine around the plants to secure them. The plants got so heavy with tomatoes, the supports started falling over, and some of the bamboo stakes even broke from the weight.
With that in mind, I planted the Sub Arctic Plenty tomatoes along the south side of the bed, where they would get the most sunlight.
As with everything else, this bed was dry, dry, dry, so it got repeated waterings at every stage. I’d taken the cover off the other bed and every time I watered the tomato bed, I gave the other bed a gentle watering, too.
Once the tomatoes were in, it was time to give them support. For the verticals, I used 6′ plastic coated metal stakes. I’m glad I got more of these! Every collar got one of these tucked against one side. I used up all the stakes from last year, and used a couple of the new ones, to make one for every tomato plant.
Once those were in place, I used bamboo stakes to weave through the verticals. I did three horizontal rows on each side, and more can be added later, if need be. I then added some sticks to connect the two sides. There’s just a couple at the ends of one level, and a couple more further in, at another level. We may not need any more than that. We’ll see how things progress over time.
I did not have any clean grass clippings left for mulch, so I made use of the stove pellets we use for cat litter. I scattered them around, and even inside, the collars before giving the whole thing one final watering, to get the pellets to break up into sawdust.
I think it worked out rather well, and should be able to hold the weight of the tomatoes we can expect from these varieties,
Once this was done and cleaned up, and I took a break for lunch, it was time to work in the old kitchen garden. I decided it was time to remove the cover and netting from the greens bed, so the first thing to do was roll up the two sheets of netting, then take the cover off.
The kittens are going to miss their little mosquito netting hammocks!
The greens bed was really dry, so I spent time time watering it from the rain barrel – the rain we had was almost enough to refill it – and weeding. The spinach is bolting and we’ve decided to let them go to seed. I also found a second tiny bok choi that is staring to bloom.
That done, the herb bed got a watering, too, and then I did the pruning and clearing I mentioned in my earlier post, before I could even start on the wattle weave bed.
I decided that the Sweetie Snack Mix mini bell peppers would go in the short part of the L shaped bed, and the eggplant in the long section, among the strawberries.
The short side of the bed didn’t need a lot of weeding, and I was careful to work around the garlic that got missed and started growing this year. The old mulch got pushed up against the wattle weave sides, and the hard packed soil was broken up and fluffified. It was surprisingly hard packed. So I added some of the remaining rehydrated coconut coir over the area and worked that into the soil.
I laid the transplants out, in their cups, to figure out the bed way to space them. After that, it was the usual routine of wetting everything down, then again and again, in between every stage of transplanting. When the peppers were finally planted, I made sure to press down around each one, to create a shallow “bowl” to collect water and drain it towards the plant. Then each pepper plant got its own wire tomato cage to grow up into.
That done, it was time to work on the other side. It was a bit more challenging, working around the strawberries and onion survivors that are there. There was no sign of any of the chamomile self seeding, and the thyme that almost survived the winter was long dead, so that gave a bit of extra space. The mulch was moved aside, the compacted soil broken up, and the last of the coconut coir worked into the soil.
The transplants in their cups were laid out to figure out the spacing, along with the mystery flower. I decided to plant that at the very end of the bed, where it could stay permanently. If it survives! The flower did get a plastic collar, more to keep the cats from rolling on it.
Once the eggplant were in, each with their shallow “bowl” around them, they got their wire tomato cages set in place, and they were done!
Almost.
The mulch I’d moved aside was mostly old wood chips. I didn’t want to push that back. I did, however, have some leaf mulch that had been pulled off and set along the inside of the L shape, by the double lilac. It was old and dry, so I was able to crush handfuls of it, and shake it out over the transplants, to give the soil a light protection. More mulch can be added as the plants get bigger.
I forgot to take an “after” picture when I was done, so I went back out later, and got a picture of the entire finished bed, which is the last image in the above slide show.
That done, I went on to water the new trees in the fruit forest area, and the walnuts in the outer year. Still no sign of anything emerging where the seeds are planted, but the year old sapling is starting to get some bigger leaves on it.
I headed outside shortly after 7am to go my morning rounds and start on the garden. By the time I was done and heading back inside, it was past 8am. Taking into account stopping for breakfast and lunch, I got about 10 hours in the garden today!
Which is great, because all the transplants are IN!!!
Tomorrow, my main goal of the day is to get the third low raised bed near the compost rind cleaned up and planted with short season corn and yellow beans. After that, I want to work on the permanent trellis bed where I want to plant red noodle beans. That will make sure the trellis gets finished off, because they’re going to need something to climb!
Last of all, I will be clearing the bed at the chain like fence, salvage what I can find, replant with what I can manage, then cover it up again. Somehow. I like the netting that’s over it, but it really need something better than the wire to support it. I’m not even sure I can salvage the ones that cats have bent up!
I’ll figure it out.
Just another day or two, and the garden will be officially in!
Almost there!
On a completely different note, while I was working outside, my daughter let me know that the shop I took our push mower to had called and left a message. As expected they can’t find the part that’s needed. It’s simply not available, anywhere.
I was expecting this and had been thinking about it. I’d told them not to worry if they couldn’t find it; I’d just come pick it up. However, it would just end up as more junk here. So when I called them back and talked about it, I suggested they could keep the mower and use it for parts. If I ever buy a push mower again, it won’t be that brand, so it would be of no use to me. They, however, might be able to scavenge it if some other poor soul has the same brand of mower and needs a part that’s hard to find. They happily accepted the offer. Win, win!
Thankfully, my brother has provided us with mowers we can use! I was going to take my mother’s old mower in, but my brother thinks he can fix it himself, so we don’t even need to bring that in.
Oh, my goodness. It’s past midnight as I finish this! I need to get my butt into bed!
The first (rather crappy) image above is of our very first sweet pepper seedling! I was starting to wonder if they were going to make it or not.
The pre-germinated Spoon tomatoes (in the next image), however, are growing like gangbusters! Almost every cell has at least one seedling emerging. Of the four varieties, these ones have been growing the fastest, and I’m quite impressed with them.
While I was out today, I picked up a new dial type thermometer for the portable greenhouse. With the old one showing temperatures like 50C/122F, and I thought for sure there was something wrong with it, since it didn’t feel anywhere near that got while I was in the greenhouse.
It looks like I was wrong!
In the next photo, you can see old and new thermometers, next to each other. The new one is on the right, and had been in there for maybe 10 or 15 minutes.
This time, however, it did actually feel very hot in there. Not sure why it didn’t, last time!
The last image is of our chitting potatoes. When I’ve done this in the past, I’ve laid them out on cardboard egg trays, cut side down to dry off. Recently, I watched and MI Gardener video on chitting potatoes, and he was laying them down on wood shavings to absorb the moisture. With I think would work better than the egg cartons. So this time, I used some older drain trays from seed starting kits – they have cracks in them and can’t hold water anymore, so they won’t be used for seed starting anymore. I put a layer of the stove pellets we use for litter on the bottom. As they absorb moisture, the pellets will swell up and start breaking apart into sawdust. I am thinking that will do a very good job of absorbing moisture so the cut surfaces will try off and “heal” better.
In the past, I set the trays of chitting potatoes up on our chest freezer in the old kitchen, which gets in the way of actually using the freezer. They are supposed to be set in warmth and light, so I moved things around and set them under the light next to the seedling tray with the warming mat. I had to lay them crosswise to fit, so half the potatoes weren’t getting as much light. That was solved by shifting the winter squash tray on the shelf above, so now the shop like that shine through the openings in the shelf. That should work fine, and the trays can be rotated, if necessary.
I checked on the pre-germinating seeds while I was at it. Still no sign of radicals.
As for the potatoes, I honestly don’t know where I’ll be planting them this year. They can be planted before the last frost date, though. I am expecting to plant these in one of the main garden area beds, and it will just depend on which one I can get ready yet. We hit 15C/59F today, and tomorrow we’re supposed to reach 17C/63F. I’m rather hoping that the snow covering the beds in the main garden area will finally melt away! Maybe then, I can lay some plastic down over some beds to help them thaw out faster.
I’m itching to get started on a lot of clean up out there, but some areas are just too muddy, while others are still covered in snow! At the very least, though, I should be able to start removing mulch from the winter sown beds that no longer have snow on them. Somewhere along the lines, I’ll figure out where the potatoes will go!
I was happy to see an envelop from Vesey’s today. These were the part of a larger order I made that could be sent right away. It was just two packets of seeds, and one of them was flowers, but I did want to get the peppers started right away.
With a days-to-maturity of only 70-75 days from transplant, starting the Sweeties Snack Mix this late should be okay. This mix of small sized bell peppers are something I actually see regularly in the grocery store, sold in packages with red, orange and yellow peppers, just like what is supposed to be in this seed mix. I’ve even bought them a time or two, so I know the family enjoys eating them. Which is good, since these are the only peppers we’re growing this year. We still have both dried and frozen peppers from last year!
While I was handling the moistened seed starter mix, I could tell it was way too cold for the seeds. The thermometer I have set up on the work table reads a consistent 10C/50F – which may have felt warm while I was outside, felt cold while in the basement! The container I use to hold the pre-moistened seed starter mix, however, is enameled steel, and it was sitting on the concrete floor.
Oops.
I now have a different set up and it no longer rests on the concrete floor. Hopefully, that will make a difference for the next time I have to start seeds!
I brought down a little heater and set it up to warm things on my work table. Since I had to wait a while, I did some clean up in the root cellar. We didn’t get to the last of the winter squash in time, and a bunch had to be cleared away. I decided not to put them in the compost ring, though. Instead, I spread them out in different areas to see if they would seed themselves. It’s more likely that they will be eaten by critters, but if a few seeds survive, we might have “wild” squash plants growing.
Once those were out, I took the time to clean and sanitize the shelves before getting back to the seeds. The only things we have left in the root cellar right now are onions and garlic. We keep forgetting that they are there!
As for the peppers, because these are a mix, there’s no way to know how many of each colour of pepper we’ll get. Depending on the germination rate, I might thin by transplanting. They should be fine on the heat mat for now, but once things start germinating, I’ll have to find some way to keep things warmer in there, since I’m not about to leave a heater running unattended in the basement.
Ah, well. We’ll figure it out!
Meanwhile, we’ve started our earliest seeds for now. The net ones I start should be the tomatoes, and those won’t need to be started for at least a week. The seeds set to pre-germinate should be potted up, by then. Hopefully, the bulbs for the other light fixture will have arrived. Not only does that fixture have a built in timer, but it also puts off a bit of warmth. The one that’s down there now doesn’t seem to get very warm at all.
It should be interesting to see how things work out, in this year’s seed starting dungeon!
Okay, after going through their website more, I made some decisions and placed an order at Vesey’s. It was mostly for our future food forest, but I did order a couple of seed packets so I could take advantage of a promo code for free shipping.
As I was preparing to write this post, however, I got a phone call.
From home care.
Guess who has to go to my mother’s again this evening, to do her med assist?
Two nights in a row. Apparently, someone just called in sick.
My mom is going to be furious.
*sigh*
I will just have to deal with that, later.
Meanwhile, here is what I ordered today. (Links will open in new tabs)
These were the one thing we absolutely wanted to get this year. The Opal Plum tree. The description from the website:
Prunus spp. Opal stands alone as the hardiest European type Plum available on the market. It is vigorous, productive and self-fertile. Even in short summer seasons, the fruit will reliably ripen. The plums are round, red-purple with a golden flesh and have a complex and sweet flavour, fresh or dried. Hardy to zone 3. We ship 18″ trees
The key points were that it is self fertile, so we don’t have to plant it next to our dying wild-type plums, but can plant it in the section we’ve designated for a food forest. It’s hardy to our zone, so we don’t have to do like we did with our zone 4 Liberty apple, and tuck it into a sheltered area. (Hopefully, it survived the polar vortexes we got this winter!)
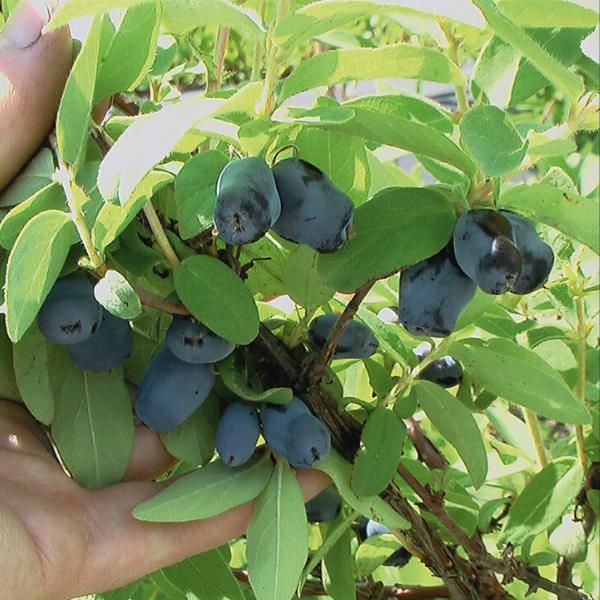
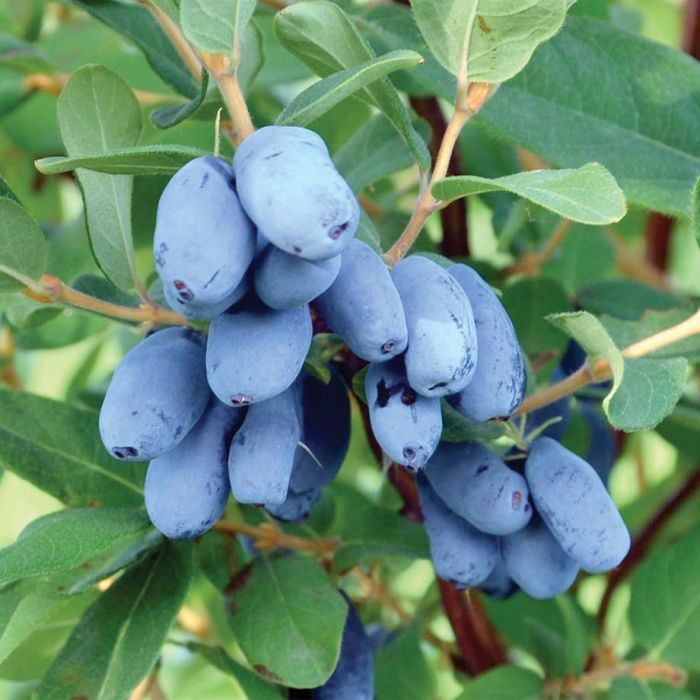
I decided to also order some more haskaps. We already have three, but they have not been doing well at all. While I should probably transplant them, I’ve decided to get a couple more that will be planted in the food forest area, this time.
The second is Boreal Blizzard, an early producing and largest fruit variety.
We currently have “Mr” and “Mrs” haskap varieties, where are sold as cross-pollinating varieties. The “Mr” is an Aurora, and seems to bloom too early to pollinate the “Mrs.” variety, so I am hoping that the early Boreal Blizzard variety will work out better.
If these haskap do well, that will confirm that the ones we have now are not producing because they are in a bad location. Which I am 99% sure of, but it really is a good location – for us!
To use the free shipping promo code, I needed to have at least one packet of seeds.
I had been looking at these last night, while planning my order, but they were listed as sold out. This morning, they were back in stock! So I snagged them.
This is the Sweetie Snack Mix of small sized peppers. They have a short growing season, too, so they should work out. I think my family might like them better than the larger bell peppers we’ve been trying so far.
Last of all, I got some flowers for the girls. 😄 The Jet Black Hollyhock. These are pollinator attracting biannuals and should be self seeding, so we will plan out where to sow them with that in mind!
There we have it. Another order in for our 2025 garden, and our food forest.
The grand total for this, after tax, came to $137.08, however we will only be billed for the seeds when they get shipped in the next day or two. The sapling and haskap plugs will be shipped closer to our last frost date of June 2, and we will be billed for those, then.
The flower seeds were not that expensive, but that packet of mini peppers cost $8.75, with only about 20 seeds in the pack. That’s almost 44¢ per seed!
Still cheaper than buying them at the grocery store, but what a huge leap in prices for vegetable seeds! During the illegal lockdowns, with people panic buying and prices going up and up and up, so many people decided to try growing their own food, a lot of seed suppliers were completely sold out. They are still recovering from that. I know some smaller Canadian seed growers had to back out of the consumer market completely and only sell commercially in bulk. Add to this, in the years since, more people are trying to grow their own food because the grocery prices have gotten so high. That increased demand puts a major stress on supplies, too. Which is why I’m seeing the cost of vegetable seeds skyrocketing, while the number of seeds in the packets are going down, but not with flower seeds. I haven’t been looking at herb seeds lately, so I don’t know how they are doing for pricing.
With this order in, the next thing we’ll need to decide on is what variety of potatoes we want to grow and where. Anything beyond that is just gravy.