Clean up: our “second bathroom”, inside and out

I’m a sucker for punishment.

The plan was to head over to the outhouse, quickly do a second coat of paint until we ran out, then get back to working on the bread baking.

Instead, I kept adding more things to do, and by the time I got inside, I had to get my daughter to continue the bread baking, as I was no longer physically able to do it. Which is what she is working on now, as I write this blog post!

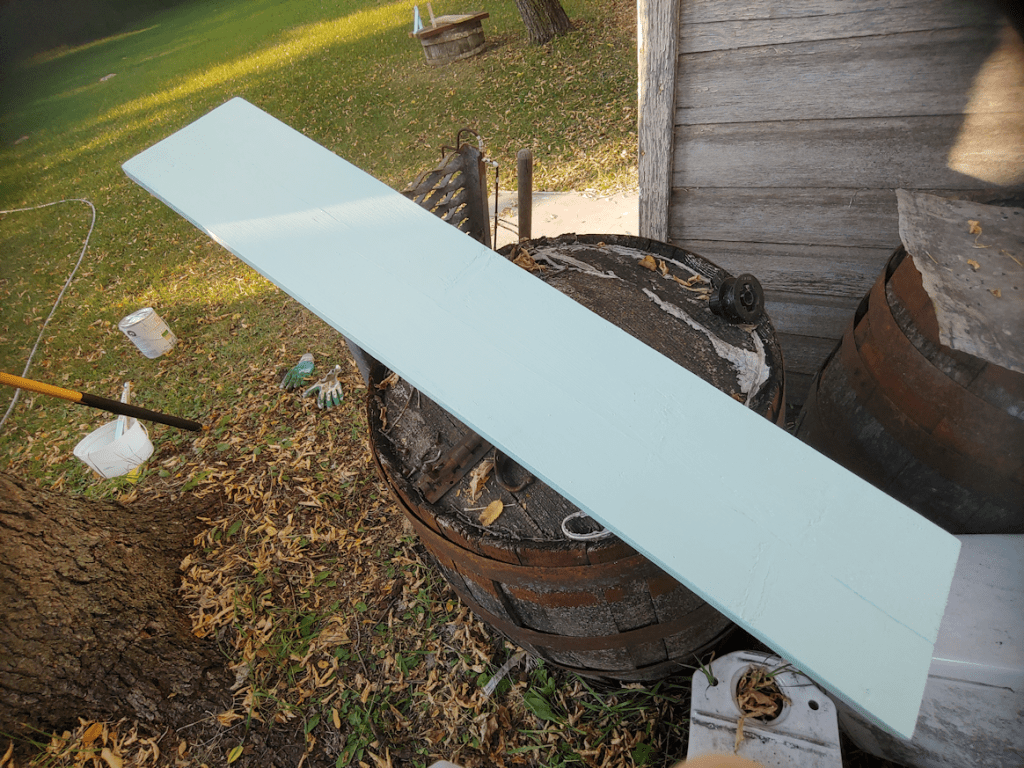
While looking for something else entirely, I found a pair of wooden shelf supports and instantly realized that they could be painted and used to put a shelf in the outhouse. So when I headed out to do the second coat of paint, I also poked around the barn and a shed to find a thin board wide enough for the supports. It was about six feet long, though, so I basically held it up to the outhouse door from the outside, and eyeballed where to cut it to fit along the back of the outhouse. It ended up being just over half the length of the board, so I figured if I was off with the longer one, I could still use the slightly shorter one.

It ended up being just a hair too wide to fit between the corner posts. A few swipes with a micro plan and some sand paper was enough to get it to fit perfectly!

That done, I sanded the rough edges, then scrubbed and hosed it down before setting it aside to dry. Then I added a second coat of paint, just to the seat box inside, before painting the shelf supports.

I’m thinking I might paint the rest of the board, too. If we get more shelf supports, we can add it onto one of the side walls.

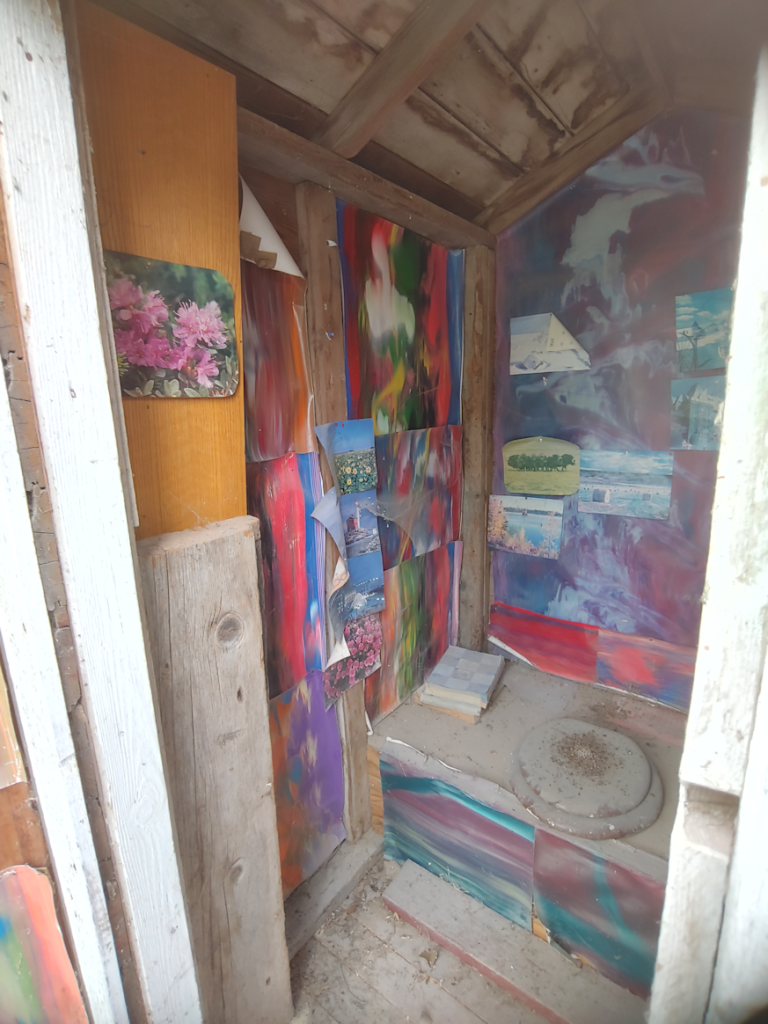
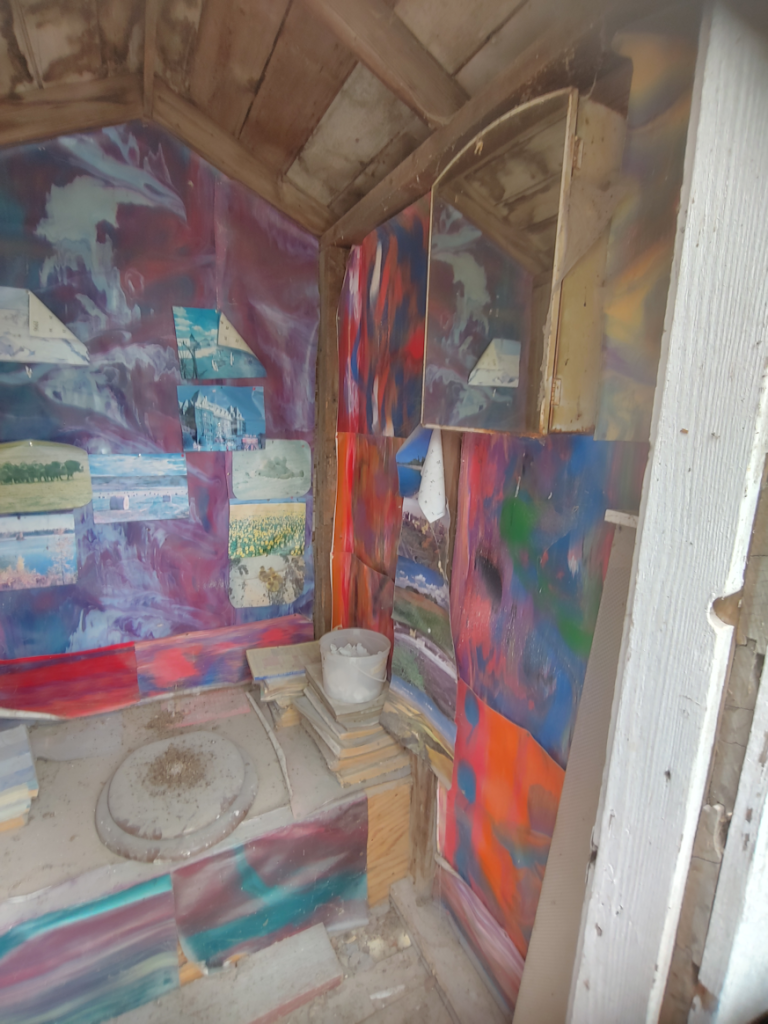
It took a while for the washed shelf board to dry, so I decided to give the mirrored shelf a scrub down, too, then once that was dry, I hung it back up inside the outhouse.

Rolando Moon decided she absolutely had to be on top of where I was putting the tools and screws! The violent beast went from demanding I pet her, to attacking the hand that was petting here, making me bleed! I did manage to get the screws with washers out from under her, though.

I just wanted the washers, though. There were just two, for the top screw holes, which are slightly wider than the bottom ones. I used new screws to hang the mirror back up. After washing the blood off the new screws and washer, from the wound Rolando Moon gave me!

Previously, it had been hung up right against the centre joist, but I chose to centre it between the corner and the joist, instead.

Then, I just had to do it…

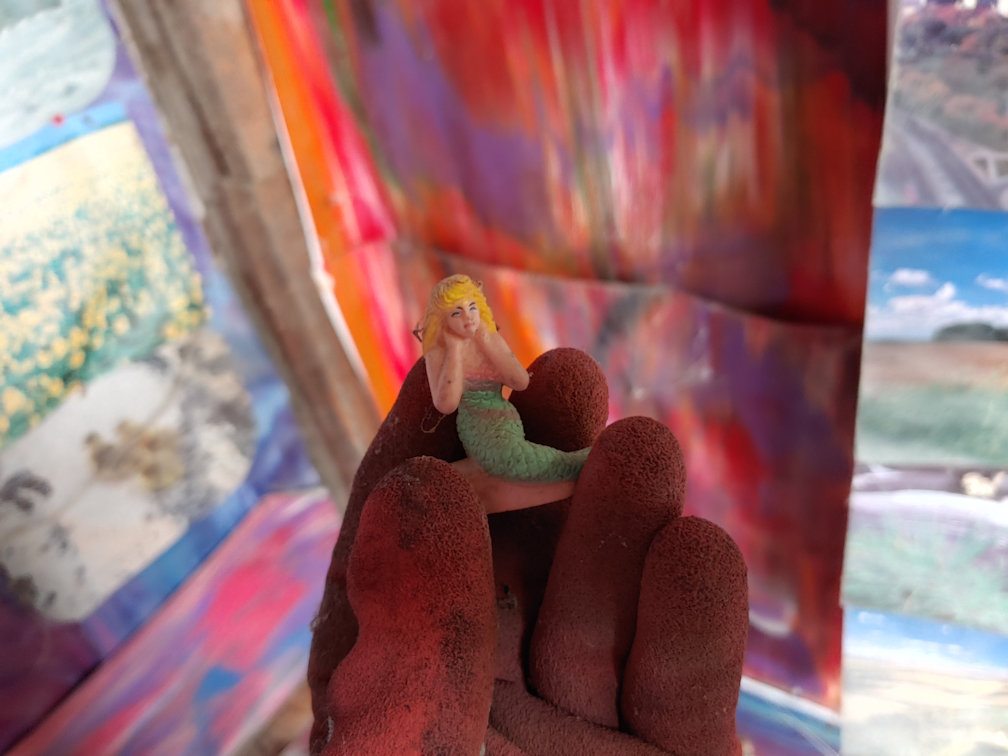
I just had to put the little mermaid I found while I first emptied and cleaned out the outhouse, inside the cabinet.

She lives here now.

😀

Once we’ve picked one up, the LED battery operated light switch will be mounted directly opposite the mirror.

By the time this was done, the shelf board was dry.

After removing Rolando Moon, I got the one side painted. Tomorrow, I will paint the other side. By then, I should be able to mount the shelf supports, using the boards on the wall to make sure they are level, then attach the shelf board once the paint is dry. Only then will I continue doing the second coat of paint inside, until the can is empty. If I end up not doing the ceiling, or the narrow parts around the door, that’s not going to be a problem. As long as the areas that are most likely to get scrubbed in the future get a second coat, it’s all good.

Since I could no longer work on the inside, I decided to work on the outside, and empty the pit of groundhog gravel.

The wire mesh on the back was held in place by being hooked onto two bent nails, that were nowhere near each other. You can see one at the top right. The other is barely visible, near the bottom left. It didn’t take much to remove the mesh.

There was a second, smaller piece of mesh, partly buried until a thick layer of grass and roots.

*sigh*

That took some doing to move out of the way.

I thought I would be able to remove the two bottom boards by taking off the smaller pieces on the side, then pulling them off. They where, however, thoroughly nailed in place, with old and rusted nails that were not about to come out. So, I instead dug out my jig saw and used it to cut a piece off the bottom.

As you can see, it’s solid gravel against it! I ended up having to cut a second piece off. I was then able to start shoveling the gravel out, and when I could no longer get the shovel far enough in before the 2×4 across the bottom stopped me, I used a garden hoe to move more gravel closer, then shoveled some more.

I never did reach the … compost… layer. I did hit a lot of rocks, though! I emptied it as best as I could, without removing the more recent… deposits.

Then it was time to cover the hole back up.

I put the two pieces of siding back, then screwed the bottom one to the 2×4 behind it. The next time we need to get under there, we can just remove the screws and the boards will easily pop out again.

I then folded the smaller piece of wire mesh to fit the opening. I found a scrap piece of board with screw holes already in it, so I used that to fasten the mesh in place. The wire is folded at the bottom and weighted down with rocks. Critters can still get in if they really wanted to, but this is temporary. When we get to painting the outside, we’ll make things more permanent, perhaps replacing the cut boards with a hinged flap that can be latched to keep the critters out. Who knows.

I have no idea why that other large piece of wire mesh was used to cover almost the entire back of the outhouse. It really served no purpose, since only the gap at the bottom needed to be covered. Even the smaller one on the bottom couldn’t keep the critters out.

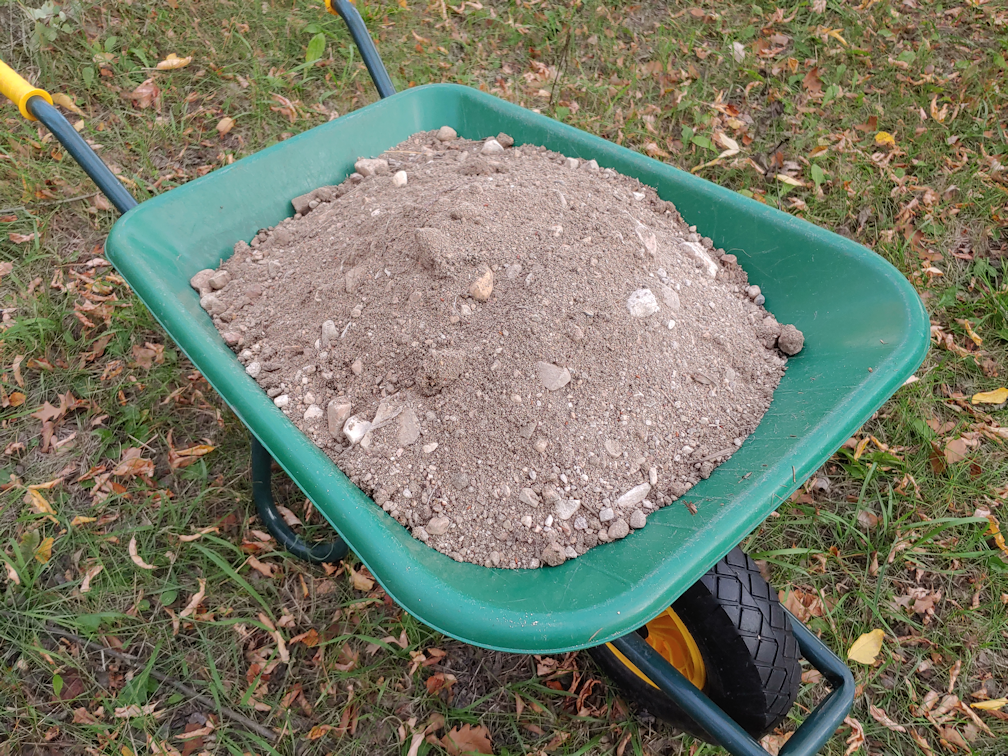
I was able to fill the wheelbarrow with clean groundhog gravel! If there was any chance the shovel full I pulled out wasn’t clean, it went onto the nearby cat litter compost pile, instead.

The clean gravel was put to good use.

It was enough to make a thin layer on top of the boards in the path between the new low raised bed boxes. The bigger rocks went up against one of the boxes, where there is a larger gap, then it all got spread out and hosed down, so that the finer particles would wash into the gaps between the boards below. It seems to be more clay than sand and gravel, though. We will still need to add more, but this is a good start.

And that was it for today!

Deciding to include a shelf added at least an extra day to finishing the inside, but I think it will be worth it. I’m more happy about getting the pit clean up over and done with for now!

The Re-Farmer

Clean up: our “second bathroom”, part two

Part one.

Okay, so the area in front of the outhouse is now safe to walk on.

What about the inside?

The very… colourful… inside.

I’d asked my mother about all the paper in there. She told me she put them there to make it pretty.

I… just don’t know what to say about that.

Like pretty much everything else around here, the outhouse was being used for storage.

The first thing I had to do, though, was check out the floor. Much to my surprise, it’s solid. I still plan to reinforce it, but there is nothing wrong with the floor boards.

Other than being really, really disgusting.

And that toilet seat…

*shudder*

This outhouse has actually been used a couple of times since we’ve moved here. Once or twice by my brother, who insisted on using it rather than going inside. Once by a poor guy who came out to service our internet that suddenly needed to go to the bathroom, but my daughter had just gone into the shower. He couldn’t wait for the bathroom to be available, and was actually willing to use this outhouse.

I still feel so bad about that. The poor guy!

The first order of business was to take everything out that was leaning in the corners.

Which included a folding closet door (minus one hinge), a length of copper pipe, a fluorescent light fixture, which I think still have bulbs in it, and several pieces of wood.

I might be able to use the bigger ones to reinforce the floor.

Oh, and more of that colourful paper that is all over the walls.

Then it was time to move the toilet paper.

Yes. I’m serious. That’s the toilet paper.

Well, not the rolled up paper with the tape on it. That was with the stuff stored in the corners.

When I was a kid, before we had an indoor bathroom, we used old catalogs, fliers, phone books, etc. as toilet paper. I didn’t think it was strange, since I knew nothing else. We didn’t buy toilet paper until we got an indoor bathroom, because this stuff couldn’t be flushed down the toilet.

While clearing things out, I emptied the medicine cabinet on the wall, too.

A 30 year old calendar page isn’t quite so strange when compared to a 46 year old Eaton’s Christmas catalog.

After moving the catalogs and whatnot away, I found this in the corner.

A pile of pine cones!

Also, my mother even covered the top of the toilet seat box with colourful paper!

When I saw the pine cones, my first through was that squirrels had got in and were starting to make a winter stash. Which was a surprise, since this outhouse is actually pretty animal proof. I don’t know where squirrels would have got in.

There was something I missed, however.

Do you see that tiny little something in the corner, a different colour from the pine cones?

When I started sweeping the cones away, I found this.

A mermaid!

I now think that perhaps my late brother’s kids may have played in here and left the pile of cones and mermaid behind, forgotten. If true, then this may have been here for more than 10 years. Probably quite a bit more! However it got here, when we are done with cleaning up and setting up the outhouse, this is going to get a place of honour for display! 😀 More “found object” art… 😉

Once everything was cleared out, it was time to take all the paper off the walls.

At that point, I was starting to really wish I could wear a mask. I tried to be careful not to kick up much dust, but there was no way to completely avoid it.

The outhouse might have been critter proof, but it was not moth proof! As I pulled sheets of paper off, I kept finding moths hiding behind them. Dozens of them.

They did not appreciate being woken up!

Moths were not the only surprise I found behind the paper.

I suspect this was the first attempt at “beautifying” the outhouse. This was right in the middle of the back wall, and would have been the first thing a person saw on opening the door. Then it got covered over with the colourful paper.

I … don’t know what to say. 😀

Yay!! It’s all done! All the paper is gone!

I was going to say, it already looks a lot better, but… no. It still looks disgusting.

Time to break out the big guns.

It’s power washing time!

I hosed down the entire inside, trying to get into every crevice. Which is not easy to do when trying to get the front, on either side of the doorway, while standing outside.

I sure as heck wasn’t going to be hosing it down while standing inside!!

That part took a while.

Okay, NOW I can say, it looks a lot better!

Also, that toilet seat is actually white. It’s been painted brown.

I… don’t know what to say.

Now that it’s have it’s initial cleaning done, I’m actually impressed with how sound this is. Ideally, we would jack it up higher and put it on blocks, rather than leave it on the beams that it’s on, but this is not meant to stay.

The next thing that needs to be done is to scrub the inside. That will be the time to get rid of all the bits of paper and packing tape stuck to the tacks and staples used to tack them to the walls. I forgot to hose down the inside of the medicine cabinet, but that’s okay. We will likely take that down for a while.

While the whole thing needs a paint job, the plan is to use a highly durable paint on the inside, that can handle scrubbing.

In a LIGHT colour! My daughter was suggesting a robin’s egg blue, but I’d be happy with anything that makes it brighter in there. Also, a new toilet seat. There’s nothing “wrong” with this one, except… ew.

I checked the pit, of course. It does need to be emptied. It’s also completely composted and level – being flooded out with melted snow for years did have a plus side. The cat litter compost is behind the outhouse, so it can be added to that. There are those that recommend using human waste as garden compost, but that is something we will never do. Who knows what medications a person might have been on when they left their “deposits”. While it is not urgent to empty the pit, it is definitely something I want to do before anyone actually uses it again.

Oh, we also have to do a bit of work on the door. It needs new hingles, as the current ones are sagging. It would probably be a good idea to calk around some areas, so no more moths will get in. Particularly around the screen covered opening at the top. I actually saw a moth squeezing through the wood around there!

The biggest job that needs to be done is the roof. The shingles have moss growing on them. Given the small size of the roof, however, I think we have options to modify. There are some scrap pieces of plywood in the barn that should be big enough. After removing the old shingles, I am thinking of adding some plywood that is longer than the current roof size, to make an overhang above the door. We also have lots of leftover pieces of metal roofing material that can be cut to size and used instead of using shingles.

The final touch I’d like to add is a solar powered light. I’ve been eyeballing some solar powered hanging light fixtures, thinking of the cordwood building we plan to make, and that can be used here just as well. That would be a huge improvement over using candles or flashlights, like we did when I was a child! 😀

If we do this right, this outhouse should not only last for years, but actually be pleasant to use.

The Re-Farmer