Catio done, crazy wind damage and an interesting find

Today was supposed to be a much warmer day. Technically, it was, but we also had high winds, so it sure didn’t feel much warmer!

The winds showed exactly why I needed to get the catio finished. The bottoms or the front panels I had to leave unsecured because it got too dark and too cold to continue were flapping in the wind.

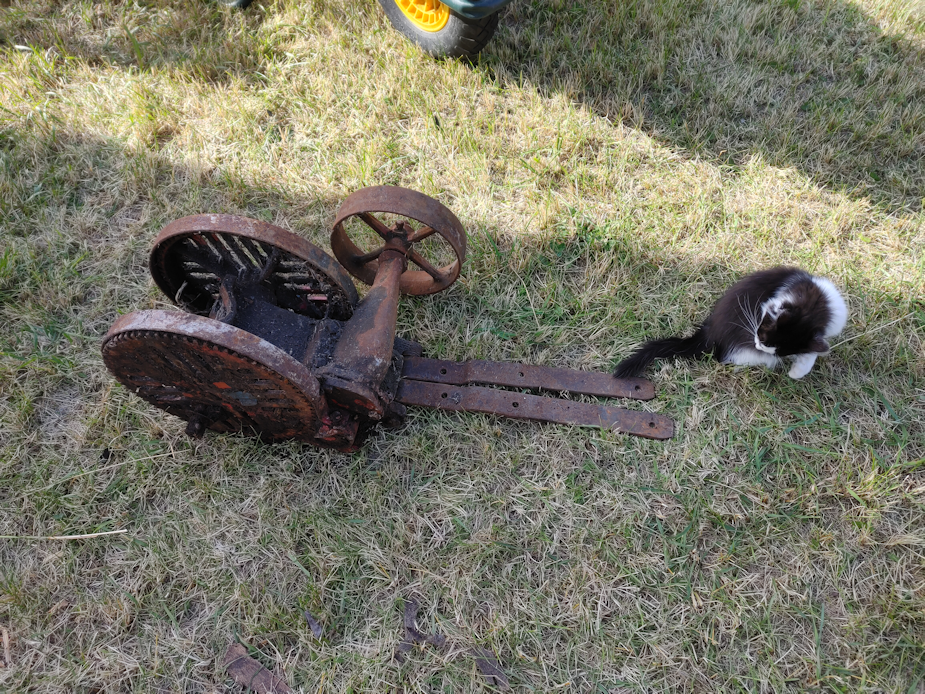
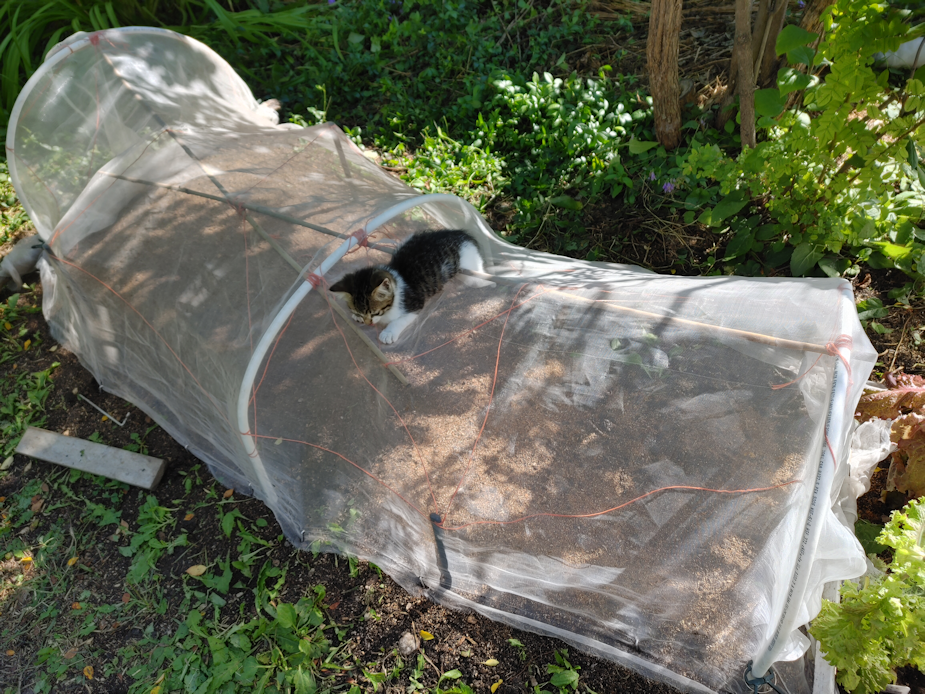
I had some very curious helpers!

If you click through above, there’s a short video of the kitten being adorable.

Working on the bottom of the catio had its challenges, but the biggest one turned out to be Kohl. She absolutely HAD to be right in there, trying to lick my fingers and giving me little nips if I didn’t pet her often enough.

Once it was done, I figured it would be easier to make a video to share.

The only problem was that the door was loose. Previously, I was able to tie it in the mostly closed position, so it wouldn’t get blown around in the wind. There is a brick to keep it from closing all the way, but it sometimes gets knocked over and I’ve found the door closed a couple of times, just since it got moved to this location. Since it’s not latched, a cat inside could push their way out, though it might take them a while to figure it out, and it would be harder for the smaller kittens. No cats would be able to get in to the food, water and shelter, though.

What I ended up finding was a small Bungee cord with hooks small enough to fit onto the wire mesh. I’ve got it looped around the handle. It’s stretchy enough that larger cats can push their way through the gap, but strong enough to keep the door from being blown around – plus securing the door like this helps keep the brick in place, too.

All in all, I’m very happy with how it has turned out. There are a few finishing touches I’d like to do, but they aren’t essential.

After I finished with the catio, I had intended to work in the garden, but it was just too windy. Instead, I worked on putting things away for the winter. The canopy tent was really being blown around, so that is not down and tucked into the garage for the winter. Then it was puttering round, doing things like getting the insulation set up around the based of the house, putting the hoses at the back away, etc.

While I was working, I heard some load noises from somewhere in the outer yard, so when I had the chance, I went looking around to see what had been blown over.

Yikes!

It turned out to be a wall!

This old log building has been slowly collapsing more and more for many years. It’s a shame it was allowed to happen. I remember playing in there when I was a kid, and it was in front of where the chain link fence is now.

With the wall down, I went closer to take a look at things. We’re definitely going to have to get that cleaned up as soon as possible. There are a lot of nails and sharp things sticking out.

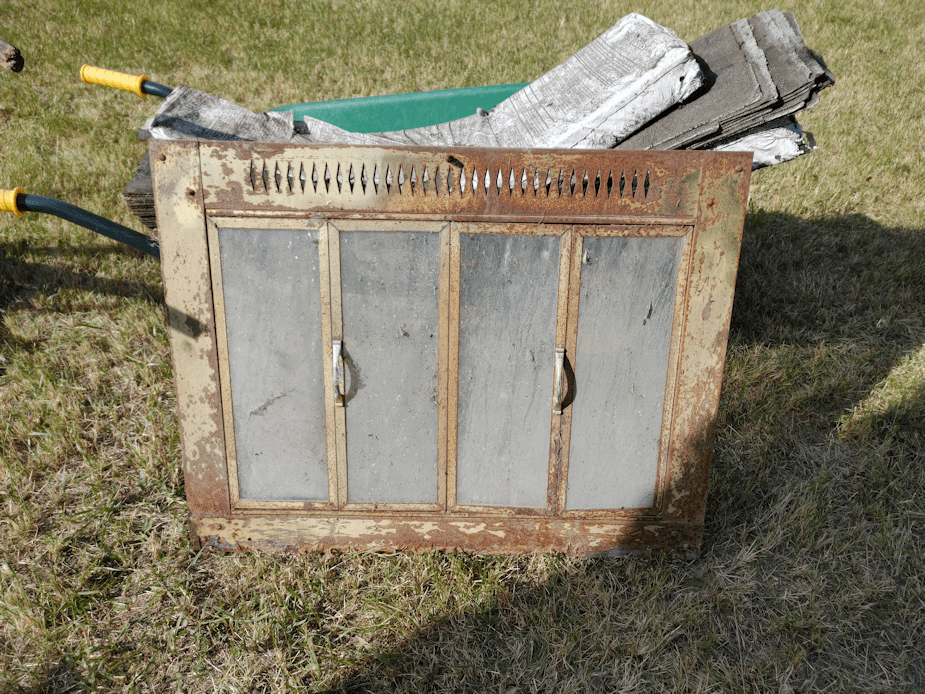
There is also an oil drum that is now visible, though not in the angle of the shot above. Something sitting on top caught my attention.

What that a fire brick?

There turned out to be two of them.

Yup. They are fire bricks. I had to remove moss growing on one of them.

After taking the picture, I looked up the name on the bricks.

It turns out they are vintage fire bricks! Claybank Brick Plant in Saskatchewan is designated as a national historic site! It operated from 1914 to 1989, with a brief closure in 1916, partly due to WWI.

The bricks are now in the garage.

There is so much stuff in there, including what appears to be salvageable small lumber and possibly a stack of plywood? I can just see the edges of them, with no indication of size, other than there being some smaller ones in the stack.

After inspecting the wind damage on the old log building, I went around the yard to see what other wind damage there might be. No new fallen trees, thankfully, but I did find some larger fallen branches. My mother’s angel by the gate is still upright, though! I’ve no doubt that, were it not secured to the concrete base under it, it would have fallen over with today’s winds.

While I was still outside, I got a call on my cell phone.

It was home care.

*sigh*

They don’t have anyone to cover my mother’s morning med assists, tomorrow. This was a time slot that actually had someone scheduled, not one of the “unfilled” slots. I went in to call my mother and left a message, then headed back outside to finish a few last things. When I got back in, I thought I saw a new message on the machine and listened to it. It was my mother talking about not getting her meds regularly, and that’s why her health is failing. I called her back but she was confused when I mentioned I’d heard her message. She hadn’t called me today! (She hadn’t seen my message to her, either.) It turned out I had listened to an old message.

Ah, well. I needed to talk to her, anyhow. She’s still upset about having the male home care workers from India. This time, she saw something on the news about a “new” gang from India that the police found. Nothing about where, but now she assumes that if the home care workers are from India, they must be gang members.

*sigh*

Anyhow.

I encouraged my mother to ask the home care workers for help more often, and she didn’t get angry with me about it, so that’s an improvement. Since I’ll be there tomorrow morning, I’ll be taking care of a few other things as well. Her current schedule was done before we had the meeting with the home care coordinator, so it doesn’t reflect extra time for this, but I noticed that she’s got 15 minutes for the morning, 5 minutes at supper, and 10 minutes for the bed time meds. If they’re going to be available to do things like make her a small meal, they’ll need to increase at least the scheduled time at supper.

With that in mind, I’d better get to bed before midnight for a change. :-/

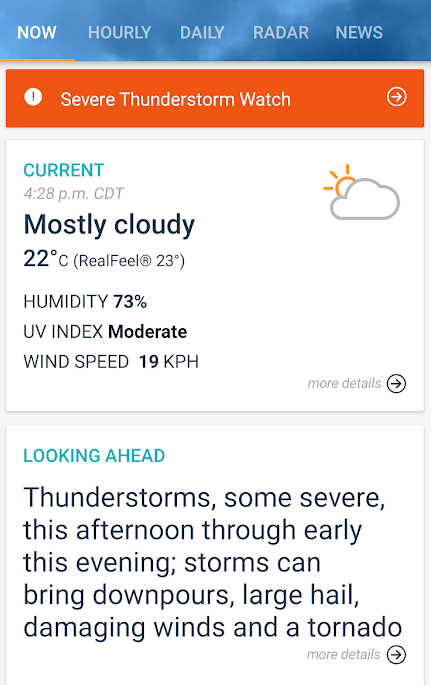
Tomorrow is supposed to be just as warm as today. I hope the winds won’t be back. If I’m going to get any winter sowing done, I need to rake up lots of leaves to mulch the beds right away. I wasn’t even going to try, today. It would just get blown away!

Well, crud. I just checked the forecast. Apparently, it’s going to be even windier, tomorrow!

At this rate, there might not be any leaves left in the yard to rake up for mulch!

*sigh*

The Re-Farmer

Getting some progress, though not as much as I’d hoped

Today turned out to be a gorgeous day. We reached a high of 22C/68F and, as I write this at almost 9pm, we are still at a lovely 14C/57F.

As usual, my day started with the feeding of the outside cats and my morning rounds.

I got an enthusiastic “thank you for a warm breakfast!” cuddle from Colin.

We were expecting my brother to come out today with their storage trailer; they had to hire a semi truck driver to haul it out for them. With that in mind, after I had my breakfast, I headed back outside to start re-bagging the aluminum and removing the mixed metal. Quite a few of the bags have been torn open by the cats; they can smell all the empty cat food cans in there.

After opening the gate for my brother, I set myself up by the garage, where the bags are stacked, with a folding camp chair, a crate for the mixed metal and the magnet keychain the salvage yard gave me.

And gloves.

Definitely gloves!

Then my phone started going of with messages from various people, including my SIL, keeping me up to date on their progress, so I would know when to expect them. It was a pleasant surprise that my SIL was able to come along this time.

With all the interruptions, though, I barely got through sorting half a bag before they arrived with the truck driver!

So, of course, I joined them and got some video to sent to them later on.

While my brother and the truck driver got the trailer lined up with where it needed to be, my SIL and I were staying a safe distance away. This put us near the old log building by the fire pit with the collapsed roof. Thinking about by brother’s suggestion to have the metal salvage company come out in the spring, instead of this fall, to give us time to add more to the salvage pile, I decided to take another look inside the log building to confirm my memory.

Yes, there were several old appliances in there, and even an old wringer washer. In fact there is quite a lot of metal in there.

Including…

… what that another grinding wheel sharpening stone? (I’d found another one, several years ago) Also…

… what was that I was seeing next to it?

Something that most definitely NOT be going for salvage!

What a find!

I can’t see well enough to know how this old grindstone was powered. The gears are all ceased, but that can probably be fixed.

If you click through to the next photo, you’ll see the grinding wheel still has its axel, unlike the one I’d found back in 2020. It’s a shame there’s no sign of the pedal powered frame it would have been on, though the pieces may well be buried in there.

I showed them to my SIL and told her, I’m thinking we have enough to have the salvage company come out this fall, then come back again next year. As far as I know, they won’t go into a collapsing shed like this to get stuff, so we’d have to pull out all the metal ourselves.

I forgot to talk to my brother about it, though, by the time the trailer was set and the driver left. They then needed to check inside to make sure nothing fell over or got damaged, so I left them to it and started going through the aluminum again.

They had to leave soon after checking the contents, but they will be back again next week, this time with a friend and a second trailer to haul things! They’re going to be running out of space to store things soon. 😄

After they left, I finished the bag of aluminum I was working on, then headed inside to help my daughter. Today was the day we could finally put up the tub surround!

That took way longer than either of us expected.

The problem was figuring out where exactly to cut the holes for the taps and faucet, then how to cut the holes themselves. We don’t have any hole cutting tools.

After much measuring and marking and measuring some more, my daughter marked out where the holes needed to be on the back of a panel. Then we headed outside and used incrementally larger drill bits to make the holes. My largest drill bit wasn’t going to make a large enough hole, of course, but I could still use it to enlarge the holes before we switched to using a utility knife – one of the alternative tools recommended in the instructions.

Eventually, we got them done and set it over the pipes to see how it fit.

For all her measuring, one of them didn’t.

The problem is, there is nothing level or plumb in our bathroom – neither the walls nor the tub!

We took turns carefully shaving off more and more of the opening over the hot water tap until we could finally get it on, and the panel was flat against the wall.

Which is when my daughter discovered her mistake.

Before we started measuring for the holes, the panels themselves had to be set against the walls, with their positions marked off, so that the corner pieces could properly cover the edges.

She measured and marked the back of the panel, as if it were the front. The whole thing was off by about half an inch.

But only at the top.

🫤

We’ll just have to figure it out.

Last of all, a notch had to be cut out at the top to fit under the shower. The previous tub surround fit under it, but these panels are ever so slightly taller.

They are also ever so slightly narrower. Which means that areas of old adhesive cannot be covered by the new panels.

We will also have a bit chunk of open wall open on one end.

We’ll have to figure out how to work around this.

Meanwhile, I had to move on to other things while my daughter got out the caulking gun to apply the adhesive. I was able to give her a hand as she was finishing with the second panel, then helped her with the third.

After being adhered to the walls as best could be done with how things are, they were taped in place and left to sit for about 20 minutes, before she could remove the protective film, then adhere the corner pieces.

So I headed back outside to work on the aluminum again.

I ended up out there for several house, coming inside only long enough to hydrate or use the bathroom!

Here is how things looked when my daughter finished adding the corner pieces.

It now needs to sit for 48 hours before they can be caulked with a silicone sealant.

Which is probably what we’ll have to use to cover the gap between the panel over the taps, and the corner piece.

Once the sealant has had a chance to fully cure, we will finally be able to put the new taps and faucet back on, and the tub and shower will be useable.

Though we still don’t have hot water.

I was supposed to call and see if we might still be able to get a warranty replacement, but never got to it. Meanwhile, the powered anode rod we ordered is ready for pick up, and I wasn’t even able to do that!

I did, however, get some decent progress on the aluminum.

In the first photo above, you can see the six bags of sorted aluminum. I had only two new clear bags left, so I have been finding ways to salvage bags that weren’t too badly damaged, and reusing them. With the mixed metal removed, and filling the bags as much as I could while still being able to tie them off, I was able to combine at least 8 bags into those six. I wasn’t really keeping track, but … hold on. Maybe I did…

If you click through to the next photo, you can see the rest of the bags that need to be sorted through, on the left. On the right, there’s one bag with mixed metal in it, had half a bag of aluminum (it got too dark to continue). I had to throw away three bags that were too torn up, one of them a smaller blue plastic recycling bag, but a couple of bags were double bagged, and I was able to salvage the outer bags. When putting things aside for the night, I stuffed three empty bags to reuse, into the crate. Not counting the two new bags… That makes 10 bags of that I’ve sorted through, for 6 1/2 bags of aluminum, and almost a full bag of mixed metal.

Tomorrow, I plant to keep at the sorting, then we’ll see how many we can fit into the truck. Unfortunately, we are now expecting to get rain between 8am and noon. If it’s raining, I’ll move the truck out so I can bring the bags into the garage to continue sorting. I don’t expect to be able to head to the salvage yard until the afternoon. After that, I’ll be heading to the nearest Walmart for more cat food. We are almost out!

While was writing this, the Cat Lady started messaging me. She has someone who is looking for two male feral cats – actual ferals – to adopt! That would require trapping. We’ve got a few that we can’t get close enough to see if they are male or female.

We should be able to catch 3 female kittens and one adult female without need of a trap, so she will see about booking us for spays next month.

I told her about my plans to go to the salvage yard with some aluminum tomorrow, then to the Walmart, near where we usually meet up. She had asked me to let her know when I’d be going there next, as she has some cat beds and a cat tree for us! When I told her I was needing to buy kibble, she told me she would get a couple of bags for us, and can meet me tomorrow afternoon. That is so awesome of her! Every little bit helps. That 40 pound bag I got just a little while ago is already almost gone, partly because I had to use it for the inside cats, too.

So that’s my plan for tomorrow, I guess!

Which means I’d better be getting myself to bed.

Until next time, then…

Have a wonderful day!

The Re-Farmer

This and that

I seem to still be in recovery mode today, even after taking yesterday as a day of rest. I tend to forget just how draining it can be after spending time with my mother, even when she’s having one of her better days!

It’s also working out to be a hotter day. We’ve got a high of 26C/79F for today and tomorrow and, depending on what app I’m looking at, we’ll be hitting either 29C/84 or 31C/88F by the end of the week.

I did get at least one thing accomplished – finally! I cut away the web of roots and got the water pipe out from where I’d tried patching it, to the tap.

It took more digging and cutting to find the bottom of the tap and cut it free!

The only thing holding it upright was the web of roots, and that length of conduit pipe.

The short sections of rigid pipe were filled with dirt and roots. A couple of them had to be blasted with water before I could get them off the water pipe.

I did find where water can been coming out, when I did the patches and tested the tap. Quite a split in the pipe!

How the ground pipe was joined to the tap pipe was not what I expected. I thought there might be some sort of threaded connector. The metal pipe is jammed into the water pipe – and it is still very water tight, and very secure! I’ll probably have to cut it off, if I bother to at all.

I would like to use the original tap again. Even parts of the original metal pipe, too, if I can. However, my intended replacement for all this is to use an ordinary, heavy duty garden hose that can be easily removed, as needed. The dirt and roots in the short sections of pipe reinforce my plan to have a long pipe, from house to tap, to protect the hose.

For now, however, I will not remove the rest of the pipe, to the house. There are going to be much larger roots to cut through, plus it runs through a higher traffic area that gets regularly mowed, so I don’t want to dig a trench until I’m ready to put in the new system. I’m very interested in seeing how that hose end that comes out of the ground is attached to the water pipe!

So, for this project I need to get a long enough heavy duty hose, enough pipe, with drainage holes, to fit together and reach from house to tap, angled fittings for the ends that will get a removeable seal around the hose to prevent water, dirt or critters from getting in, and appropriate pipes and fittings to attach the hose to the tap assembly. For the tap itself, I want to build a box for the vertical pipe with the tap mounted on the garden side. I liked the original post’s little roof over the tap and will probably expand on that, to double as a shelf or something. The box will have a door at the back to access the hose and pipes, with room enough to store a few things, like the cord that will be used to pull the hose through the underground pipes, should it ever need to be removed, repaired or replaced.

Once this is installed and complete, I plan to make a vegetable washing station under the tap, using salvaged materials I’ve found around the property.

Hopefully, by the time it’s done, it’ll be good enough to last another 50 years or so.

After I finished up with the tap and hose set up, I headed towards the house and checked out the old kitchen garden. I was finally able to get a photo of one of the developing luffa.

I’ve been able to spot three of these. Hopefully, they have been pollinated and will develop into mature luffa gourds before we get frost. These are so high up, there’s no possibility of hand pollinating!

Before heading back to the house, I had an adorable surprise.

Tiny, familiar kittens.

Octomom had brought them to the house!

I only saw 4 of them, including this one.

They still can’t move very fast, so I was able to catch this one and hold it for a little while. This one is completely black. I saw the other black one, and it appears to have a white patch on its chest. I also saw the brown and the grey tabbies. Where the other 4 are, I could not see. Eventually, Octomom came around for them, but only two followed her across the yard. The rest were still hiding under the storage house.

While I was outside, I started to get some messages from the Cat Lady. She was at the vet with the kittens, and the prognosis is not good. They would have died within the week, she was told. As it is, they have a cat virus (calci), herpes, low glucose, low oxygen, pneumonia, infected ears and sores in their throats. The kittens have been at the vet all day, and the bill is getting high. I feel so bad about this. We were only going to pass on the one kitten, so now it’s double the expense for her, and we have no way to help out.

Priority is going to be spaying and neutering, because a lot of this is exacerbated by the sheer number of kittens.

Oh, wow!! Something just happened while I was writing this!

Two Toes is letting Tin Whistle nurse!

I had been expecting the kittens to at least try to nurse on her, since Decimus leaves the room once she’s done with nursing, and batting them away when they want to nurse more. They had not been trying, though, nor did Two Toes, until just moments ago!

Two Toes is doing really well. She seems quite happy, loves head pets, and gave me kisses today!

Whatever fight she was in that left her with a broken leg, the fur on her face and head is full of scabs that are healing well.

The only down side is poor Snarly Marlee! She does NOT like the kittens. The girls try to bring her into the living room for a while, so she can get a break, while they are there.

Hopefully, it won’t be for much longer. It would be fantastic if we could adopt them all out!

The Re-Farmer

Some progress outside

I didn’t get back to the trench with anything to cut the roots, yet. I wanted to wash away as much of the soil as I could. First, to uncover the roots to better see them, but also to get a better look at the pipe itself.

I just don’t know what to make of this!

There are sections of the wider pipe, all along the main pipe (I agree with 53old; it looks like irrigation pipe). Once I get the roots cut away, I will take off one of the couplings I put on in my attempt to repair the pipe, and I should be able to take this length of the pipe out, all the way to the tap. Then I’ll be able to take a good look at what is under those wider sections of pipe.

The only thing is, I have yet to find the end of the pipe. I’ve been digging around at the bottom of the tap but keep hitting roots and rocks, and that end of the pipe is quite a bit lower than the rest of it. My brother will be here tomorrow morning, and I hope he’ll have time to see this!

I also managed to get the bed the garlic was harvested from almost completely ready for planting.

The first photo in the series is the “before” picture.

After clearing away the grass clipping mulch, you can see that there is a fair bit of weeding to do, mostly along the edge. That crab grass comes up from under the log border. I broke up the entire bed to weed it, and was finding plenty of rhizomes making their way into the middle! Then I added a bag of manure to work into the soil.

Because the edges are where the most trouble is for weeds, once the manure was worked in, I raked the soil away from the log edges and into the middle. Then I took some of the grass clipping mulch and packed a thick layer tight against the logs. They won’t be enough to choke out the weeds, but they will at least make it harder for them to get through. Plus, it’ll make sure we don’t accidentally plant too close to the edge.

Last of all, I raked the soil back towards the grass clippings and leveled it off a bit. There are a lot of hard clumps, though, so I’ll have to come back to it with the cultivator tool and break those up. Once that is done, it’ll be ready for planting.

What we’ll most likely do is plant in three blocks, square food gardening style, with the beets in the middle. The radishes are a fast crop, so having them near an end makes sense. The spinach is a cut and come again crop, so having them near and end also makes sense. While the beet greens can be eaten, we’ve don’t tend to eat them a lot, their roots will take the longest to reach a harvestable size. We will likely harvest them all at once at the end of the year, so they can stay in the harder to reach middle zone.

Once these beds get converted to high raised beds, reach won’t be as much of a problem. The lower the bed, the harder it is to reach the middle of it. If you’re short like me and thinking of growing in low raised beds, I would recommend not going more than 3 feet wide for that reason. Ours are 4 feet wide, which is great for a high bed, but gets pretty painful on a low one! Even the box beds, two of which are about a foot high, it’s still uncomfortable to reach into the middle and actually do anything of substance.

That’s where we’re at now! Once the bed prep is finished, we just have to choose which varieties we will be planting. 😊

The Re-Farmer

What the heck???

We had another beautiful, coolish day today. In the afternoon, I headed out to finish the last little bits of lawn I didn’t get done yesterday.

It was raining.

Not much, and it stopped and started frequently, but enough that the grass was too wet to mow, and I certainly wasn’t going to use anything with electricity.

So I worked on the sun room for a bit, cleaning out the corner the kittens like to hang out in, and moving things so I could finally access the shelf against that wall. I was also able to finally put those folding legs onto the piece of 3/4″ plywood I found in the pump shack. We now have a 6 foot by 2 foot table. This will come in very handy. Especially with the picnic table finally falling apart.

Next pay period, I need to include some outdoor paint in the budget.

Later on, I headed out to pick up our beef freezer packs that we ordered. By the time I got back and we had supper, it had been clear long enough that the grass was dry, so I headed back outside.

We took our van to the mechanic for him to check when he has a chance in between appointments, so we’re parking my mother’s car in the middle of the garage, where there’s lots of room. As I went to get the lawn mower out, I took advantage of the side her car is normally parked being empty. The garage has a dirt floor, and the cats have been using it as a litter all winter. We’ve had enough rain this spring, that the soil was damp until recently. It is now dry, so I grabbed a wheelbarrow and a rake and finally cleaned it all out. It looks – and smells! – much better in there now! Then I got the push mower out to finish up the mowing in front of the garage. One thing I can’t do with the riding more is mow right into the doorways, so that’s looking all nice and trim, now.

Speaking of trim, once that was done, I broke out the weed trimmer to continue doing the edges of the inner yard, and the outside of the chain link fence along the garden beds. I just went as far as the extension cord from the garage would let me, which gave me a chance to work on the edges of the sidewalk to the people gate in the chain link fence. It’s quite a mess, partly because we still have those horrid elm seeds along the edges. They have caked on along the edges, including where the blocks are uneven, and did not want to come off. Some did loosen enough that pieces came off when I swept away the grass clippings with a broom, but in the end, I had to use the stirrup hoe to get them loose.

The sidewalk is getting to be a bit of a mess. Parts of it have lurched out of position because of tree roots. Some are cracked, most likely because my family has been driving over with for decades, either driving up to the house, or when my late brother would use the Bobcat to clear snow away. That sort of thing. Some pieces have become uneven enough that I have to be careful when mowing, or the blade will hit concrete.

The lawn is also trying to encroach on parts of the sidewalk, so I worked my way down the edges with the stirrup hoe to try and cut back what the weed trimmer wasn’t able to clear away.

Then I got to the end of the sidewalk by the people gate.

In that area, there are a number of broken blocks set to make the sidewalk wider. We’ve tried to keep those clear, too, including clear of snow in the winter. I’d gone over it with the weed trimmer, but there’s a lot more growth into the cracks between the blocks there, so I ended up using the blade on the ice scraper to cut and clear away the grass, roots and soil.

I started to scape and clear the blocks and though I’d cleared it, so I got the hose to pressure wash debris off the sidewalk. I paid particular attention to the edges, to try and clear the soil away. When I got to the end with the broken pieces, I found I needed to do some more scraping and clearing, along with using the ice scraper to try and break up soil and roots, just to be able to move it aside.

Then I scraped and cleared some more…

… and more?

Hold on. Why am I hitting a brick???

I can’t believe I’m still finding those glazed bricks all over the place! But why here? There was another regular brick I found, but that one made sense, since it was filling in a cut out corner in the patio block.

I kept scraping, until it became clear that the last block actually extended under the chimney block planter at that end. So I cut away the soil and roots around the chimney block as best I could, then left it. I didn’t want to get too close to the chimney block and undermine it.

Then I started working on the other side.

I found another glazed brick and dug it out. That one was broken, but when I went back to clear some more, I found one more that was intact.

I also found more patio blocks.

Quite a bit more!

When the matted roots, grass and soil got to be more than 4 or 5 inches thick, I stopped for the night. Once again, there is a patio block under the end of the garden bed on that side, but this time, there might be more than a foot of patio block under the bed. Thankfully, the things we have growing in there have shallow roots.

There’s a block that extends towards the elm tree on that side, but it’s going to take a lot more effort – and better tools – to uncover it.

I wonder if my brother remembers those blocks being there, and how far they extend? Because these have been buried for decades! Over the past 30+ years, we moved back to this province a couple of times. Somewhere in between those moves, the chain link fence was installed, and those blocks were added, but I don’t remember ever seeing them extend that far. I can’t even remember if the sidewalk blocks where there before or after the fence was installed!

I plan to uncover as much as I can for now. Then we will decide it we need to remove the ones under the garden bed ends or not – after the growing year is done, of course!

You’d think, as we’re into our 6th summer here, we wouldn’t be finding mysteries like this anymore!

The Re-Farmer

Mystery solved

While at my mother’s, we went over the shopping list a bit before running her errands. One of the things she wanted to get was some basic, transparent tape. The kind you find in the office or school supply sections.

My mother being my mother, she started hemming and hawing, saying, Oh, I’ve got this other tape. Maybe I should use that first (bringing out a roll of heavy duty packing tape), or maybe I should use this tape up, but I’ve never been able to use it.

This is what she brought out.

Yeah. That’s a fabric tape. With a bright blue backing. She’s never used it, because she has never been able to take the backing off. When she moved off the farm, she took it for some reason, and had no idea where it came from or what it was for. Best guess was that my late brother, who worked in demolitions, might have brought it home as salvage from somewhere.

Curious, I look it over and found this on the inside.

It expired 19 years ago.

I’ve never seen a tape with an expiry date before.

I told her I’d take it home so I could look it up. I could have looked it up on my phone right there, but this way I could get it off her hands, so she wouldn’t have to think about it anymore. She has way too many things taking up space that she refuses to get rid of, and it seemed to distress her. I can’t even begin to think what she thought she would us it for when she took it.

So I brought it home (along with 2 ice cream buckets of vegetable peels for the compost pile, a stack of magazines we’ll never read that are only good for the burn pile, and a bunch of onions. At least the onions make sense. They are on the list of foods she’s not supposed to eat).

I think I figured out why it has an expiry date. It’s fire retardant! Or at least it used to be. This is one listing I found:

POLYKEN 294FR FLAME RETARDANT FIBERGLASS CLOTH TAPE

Polyken 294FR is a printed, linered, flame retardant glass cloth tape for aircraft cargo compartment seam sealing. Very lightweight. White fiberglass cloth printed with F.A.R. specifications. Highly conformable and easy to install. Very flexible accommodating angles and turns. Aggressive adhesive system. Removes easily without leaving residue. High tensile strength. Repositionable.

Applications: Cargo pit applications. Seam sealing (taping) and repair of cargo compartment liners for use on covering pins/rivets where high adhesion and flame resistance is critical. Aerospace industry. 

https://industrialtape.com/catalog/product/298-berry-plastics-polyken-294fr-flame-retardant-fiberglass-cloth-tape.html

Which means it’s likely something my brother who worked in aircraft maintenance brought home. He’s been retired from the industry for about 20 years, so even the dates make sense.

What blows my mind is that most of the links I followed said things like “ask for a quote” rather than listing a price. I found one with the blue backing like this roll, and the 3″ x 36 yards size was priced at over US$85. Another supplier’s same size roll was over Cdn$100. From the looks of the images I found, I’d say this is a little less than half a roll.

I wonder if the age has something to do with why the plastic backing won’t come off, too.

What a fascinating find!

The Re-Farmer

Looking for things, and finding some surprises

The girls want to shingle the roof of the water bowl shelter. The paint I got was pretty cheap, and it’s so thin and watery, it doesn’t really cover well. The roof of the shelter is already mostly painted white, and the yellow just can’t go over it well.

We’ve been using some leftover shingles like what is on our roof now for replacing shingles that have blown off. We still have an unopened package of those in a tiny shed by the barn. However we also had shingled in the shed where the roof collapsed under heavy snow this past spring. I’ve been wanting to start cleaning that up so we can salvage some of the wood. Hopefully, we can salvage enough to build a chicken coop. I decided to start cleaning up in there until I could get at the shingles, and a couple other things I want to preserve.

I worked my way to the corner, taking out a LOT of rotten boars, beams and shingles, and was able to get out the antique plow, and the gadget my late brother made to help him install transmissions.

That plow is remarkably heavy to carry! And awkward.

Not as awkward and heavy as this thing I found under it.

I have no clue what it is.

Then I found this surprise, under an old window and sheets of what I think is fibreglass.

What a remarkable window! And the glass is still intact!

It’s now stored in the garage with the van, where I think it will be safest. I would love to be able to clean this up and find a way to use it!

The wheelbarrow has all the shingles that were in there.

I recognise those shingles. They are the shingles from when the addition to the original log cabin part of the house. I spent many hours playing on the roof and remember the colours well.

That roof was installed in the mid 70’s.

They may not be useable. If not, I can go to the other shed, where there is an unopened package of the shingles that we have right now. That was installed in the mid to late 90’s.

Speaking of things that are older than expected…

I knew that shed was old, but I did not think it was “forged nails” old!

The wooden shingles were nailed in place with more modern nails, but the boards were nailed to the trusses with forged nails.

Hundreds of them.

They are all rusted out, with many all bent up or even broken, but I would like to save as many of these as I can.

Of the roof pieces I pulled out, there were only three lengths of wood that were potentially salvageable. The rest are incredibly rotted out. There’s still lots to clean up, but I’ve already got a substantial pile for burning – after I’ve salvaged as many of the forged nails as I can! It’s the walls that I expect to be able to salvage more, and it’s going to be a while before we can start tearing those down.

Whether or not there’s enough useable wood to build a chicken coop with it, I have no idea at this point -but I’m still hopeful!

The Re-Farmer

Morning kitties, and checking beyond the outer yard

It’s a good thing we normally keep kibble, water and a litter box in the sun room. When I closed the door last night, I made sure to check for kittens and saw none. This morning, I discovered I’d closed the three amigos up in there overnight!

I was able to get a picture with Rosencrantz’ tortie! It is the shiest of the bunch. I was able to pet the one at the pack a little bit, at least. Rosencrantz herself acts like she wants to be petted, will stretch out to sniff my fingers, bump her head against my hand – then try to bite and scratch me, too! She used to be much more friendly.

While doing my rounds, I kept hearing cows and calves, very loudly. The renter has rotated his cows out and took away the power source for the electric fence to use in the other quarter he’s renting, so if for some reason there are cows in this quarter, there is nothing to stop them from getting into the outer yard – and we’ve opened up the gates to the inner yard.

For all that I could hear them, I couldn’t see them. I decided to do a walkabout, though. I haven’t gone beyond the outer yard since last year, and I really wanted to see how the gravel pit was looking, after the renter hired someone to dig it deeper during the drought last year.

Wow. What a difference!

September 2022

I couldn’t even go to where I had tried to consistently take pictures last year, because it’s under water. You can see a whole bunch of ducks swimming around, too!

Just for comparison, this was last year.

August, 2021

That was the most water it had all of last year. The clay held what little rain we finally got.

September, 2022

Only the deepest part was dug deeper; it extends quite a bit in one direction, and forms a sort of marsh in the other. Last year, this part didn’t even really get muddy.

This is what it looks like in July of last year.

July, 2021

If you look in the trees, there’s one that is distinctively bent up. If you look in the photo I took this morning, you can find that tree, further away. The spot I stood in to take the picture in July of last year is underwater now, too.

I wish I’d thought to head out and see how high the water was when things were flooding in the spring!

I followed along the marshy bit to where it ends at a sort of roadway, with a pond on the other side.

It has water, too!

When I was a kid, I remember there being enough water in here to float makeshift rafts in, but it has filled in a fair bit over the years.

I was surprised to see this, not too far away.

This tree is still alive! The trunk is even more split open, with the middle rotted away, than when I first found this tree broken after high winds.

Since I was in the area, I decided to head towards the field, which the renter has prepared for next year already, so check on things. There’s an old junk pile there, too. All during my walkabout, as much as possible, I was picking up junk and scrap pieces of metal the cows had scattered around, and put them onto the nearby piles of junk.

I really look forwards to being able to get a scrap dealer to clear away some of this stuff!

I found more pieces of junk scattered about near the fields and cleaned them up a bit.

And found this.

It’s completely intact. Not even a chip, though it was full of dirt.

I brought it home and added it to the table of other found objects. 😁

My daughter came by as I was working on this post, and I showed her the photos I took this morning. She was happy to see the cup! She’s found it last year and had intended to bring it back, but her hands were too full of other things. It’s now sitting exactly where she’d wanted to put it, herself! 😊

I found another surprise in the area.

More water!

Normally, this area has water only during spring melt. There is a sort of “river” that heads off to the right in the photo, all the way to the road, where there is a large culvert, and continues north in someone else’s property. To the left, it goes into the field and joins up with the municipal drainage ditch. The group of trees in the middle become an island, but right now, we have another pond!

While chatting with the renter, I’d commented on how glad I was that they were able to get the gravel pit dug out. He mentioned that, in this quarter, getting enough water for the cows has always been difficult. Not this year, that’s for sure! And with how deep the pit was dug, and the heavy clay bottom, it should not be a problem again, even in dry years.

While heading back, I spent some time checking out the car graveyard, which has all sorts of old farm equipment as well. In the process, I think I found a solution to a problem.

One of the things I want to get built this fall is a chicken coop, so we can get chicks in the spring. We can’t get away with the basic chicken tractor that is so easy to find plans for all over. We need something suitable for our winters, so a lot more substantial. However, I still want to be able to move it to different locations, so that we can incorporate chickens into our garden plans. I’ve been doing some research and have seen mobile chicken coops that are more or less what I have in mind. Basically, they are build on a wagon chassis. I’ve looked around, and even second hand, those can be pretty expensive.

I think I’ve found one.

Among the junk is an old, wooden wagon of some kind. It’s got sheets of aluminum in it, and the wood walls are rotting away. It has all steel wheels and, as far as I can tell, the chassis is completely intact.

As soon as I have the opportunity, I want to go back out there with some tools, pull out the metal sheets, dismantle the rotting wood portions and see what’s there. Once clear, we should be able to just roll it home. We should be able to build a pretty decent sized chicken coop on it, if it’s intact enough!

It’s remarkable what we have been finding among the junk, that can be salvaged. It’s a shame so much of this stuff was left to rot away in the first place.

It would be really awesome if we can salvage this!

The Re-Farmer

Our 2022 garden: fixing kitten damage, and finding strange things

Don’t let this ball of adorableness fool you!

This is a ferocious and destructive little beast!

Yesterday, I fixed up the mesh covered beds with the fall spinach, making sure to peg down the sides of the netting so the kittens couldn’t get under.

This morning…

Well… they didn’t get under it.

*sigh*

When I came out, there were kittens sitting on the mesh, looking at me.

I took this photo after I’d taken out all the pegs. The mesh needed more support, but I don’t have any more of the metal stakes I used to slide the hoops over.

What I did still have were some pieces from the canopy tent a piece of tree had fallen on last year. Most of the pieces from the dismantled frame are being used around various garden beds, but there were two longer pieces that had snapped near their middles that were still around, leaving me with four lengths with one rough end.

So I stuck them in the spaces between the hoops, broken ends into the soil, thinking maybe I could lash or zip tie hoops to them. Which wouldn’t be very stable, but as I pushed the pieces into the soil, I remembered that they all have screw holes at the ends. I’ve been using those holes to threat twine through.

So that’s what I did. After lashing the bamboo poles back across the hoops, I began stringing twine through and across the metal pieces, the hoops and the poles.

With kittens rolling around, playing in the netting, rolling across the bed, and generally getting underfoot.

I could see that some spinach from the first sowing had started to germinate, and the seedlings are all flattened.

*sigh*

Well, at least the netting has enough support to keep it from collapsing.

For now.

As I was cleaning up and about to put things away, something odd in the path caught my eye.

This was just sitting in the dirt in the path.

It wasn’t there yesterday.

It is not ours. The girls and I don’t have anything like this. Which means it is probably something that was left among my parents’ stuff, though I don’t recall ever seeing it before. Where it came from and how it got into the path of the old kitchen garden is a mystery!

The Re-Farmer

Weather warnings and why is that there?

Today has not been as hot as yesterday, which is greatly appreciated. We are, however…

… still under a severe weather watch.

Looking at the weather radar, it looks like the storm systems will pass to the north and south of us. Mostly to the south. Right over where my brother lives. :-( As much as we are having issues with the wet, it’s merely an inconvenience, compared to how much the southern areas of our province have been walloped. If the radar is anything to go by (ha!), we might not even get rain tonight.

One can hope!

With the ground so saturated, I’ve been trying to regularly go into the old basement to sweep the water into the floor drain, or into the sump pump reservoir. Today, I decided I may as well take advantage of the situation and do some clean up. We now keep a broken hose (it’s missing the male coupling) down there on the regular, since it comes in so handy when clearing the pipe to the septic tank. I decided to use it to wash away any accumulated dust (muddy dust) and dirt in some areas. In particular, I wanted to try and get the space under the stairs. There is a shelf built under there, with less than a foot of clearance to the floor. I knew there was an old pump of some kind on the floor under there. Whenever I tried to sweep the water into the trough in the floor that leads to the sump pump, the water would be black.

While poking around under there, thinking I would push the old pump – possibly an old well pump, or a septic ejector pump – out from the other side, I discovered there was something stuck under the bottom step.

Also, I knocked over a class jar. Which turned out to be an old canning jar. The kind with the glass lids. It had its metal ring on it, but no glass lid. It was under there for so long, the metal ring is practically fused to the glass.

Then I found a couple more jars and bits of garbage. I got the old pump out, which turned out to be heavy enough I think at least parts of it are made of cast iron. I set it up so it wouldn’t be in water anymore, then found some sort of cast iron plate – a square with evenly spaced holes in it – that was under it.

The very old, very rusted paint can I found was unexpected. It was pretty full, too. Whether it’s paint or stain or something else that comes in that sort of can, I couldn’t tell.

After clearing the space and using the hose to wash things out a bit, it was time to figure out what was stuck under the bottom step.

It was a log.

It looks like a piece of birch. Firewood for the old furnace? My brother had bought a load of birch for my dad, as it burns slower and hotter than the wood he was using. It meant my dad didn’t have to load the furnace so often. Especially at night. That, however, was many years ago. My brother then got the electric furnace and set that up so that my father wouldn’t have to do those horrible stairs to load the furnace anymore at all, if he didn’t want to. It was set up so that, if the wood burning furnace died down, the electric would take over. Now, the wood burning furnace is unused and tied closed with wire, for insurance purposes. There hasn’t been firewood in that basement for years before we moved here.

In theory, it could have somehow ended up under there by accident, but considering the other stuff under there, plus where it is in relation to where the wood was kept, that is highly unlikely. I find myself wondering if perhaps it was shoved under there deliberately, to support the bottom step. If so, that means the step was breaking.

I left the log. Just in case!

I did get substantial areas of the basement hosed down, though, and they are looking much better. The other areas can’t be done, as things would need to be moved out of them, and that’s just not worth fighting with right now.

The water in the new part basement, however, is becoming a problem. I’m going to have to leave that job mostly for the girls, though. The end that has the most water accumulating on the floor also happened to be where most of the litter boxes are set up, and it’s becoming quite the mess. Things are starting to mold, too. Not good. Cleaning out that area is going to have to be done over several days, I think.

Hhhmmm. I’m watching the sky as I write this, and it’s getting dark out there. I used the hose outside to give all the bins we used to carry transplants in and out a wash, so I can lend them to my mother as she puts things away in preparation for her apartment to be treated for bed bugs. They’re spread out in the grass, drying. I think moving them into the sun room might be a good idea.

Just in case!

The Re-Farmer