Over the past while, I’ve been adding another coat of Plasi Dip to the ends of the picnic table legs. I stopped adding more coats yesterday, but have continued to spray the cracks in the rain barrel. Basically, I plan to empty that can on those. :-D
This is about 5 or 6 coats. I lost track of how many, exactly. When I took the picture, it had at least 24 hours to cure since the final coat. It looks like it will do the job just fine, and help extend the life of the picnic table.
Earlier today, a daughter and I flipped the picnic table right side up, then checked the surface. Sure enough, there was a bit of damage. Some paint had come off when the bird feeder had been put on top of it – both surfaces hadn’t quite cured yet, and the feeder stuck to the table.
While upside down, the table was on the chimney inserts I’d used to raise it off the ground while painting. There were a few scratches from those, as well as dirt. My daughter hosed it off and scrubbed where needed.
Tomorrow, the bits of damage will get touched up before we move it to somewhere near the fire pit.
For something that is too far gone to repair, this should last quite a bit longer now. As long and nothing actually breaks. :-D
I headed out last night to brush spider webs away from the garage security camera. The infrared flash was reflecting off a single strand of web, but it was enough to completely mess with what could be seen!
That and seeing a spider go by on it is a bit alarming. :-D
Which is why I happened to be out to notice the incredible number of stars that were visible.
Time to break out the Gorilla pod and see what I could capture with the camera on my phone!
Now, I will admit off the top that I have only the vaguest understanding of the manual settings on cameras. I’ve had them explained to me often enough. The problem is that when I try to adjust things, what I get is often the opposite of what I’m supposed to get.
Very frustrating.
So what I ended up doing with my phone’s camera is just adjusting settings and trying them out until I find something that works.
Then I don’t touch them again.
To get these pictures, I set up the Gorilla pod’s legs to hold the camera almost parallel to the ground, and a couple of inches above. I can then step back and use voice commands to take the actual photo.
The first pictures that worked were taken in the inner yard.
Aside from resizing the images to 50%, these photos are straight out of the camera.
The above is the first picture I took that worked.
Can you see the shooting star? Quite a few pictures had them. Most of which I missed seeing while the photo was being taken.
Though I made sure to set up in the shadows of trees, the yard light does actually affect the outcome, as you can really see in this next one.
The camera may have been in shadow, but the tops of these trees were partially lit up by the yard light, so they look SO much brighter!
I’m so happy with how the Milky Way shows!
For the next couple of photos, I’d moved into the outer yard to the mowed area in front of the storage building. This put the pump shack between me and the yard light.
No adjustments made to the settings, and the images are much, much darker, just from the yard light being blocked by a building.
So many more stars are visible with the long exposure, that it’s actually harder to make out constellations. In the above photo, you can just make out the handle of the Big Dipper, near the bottom.
In some of these photos, there were blades of grass visible in the frame. This one just has some seed heads waving around on one side.
After looking up and confirming when to start harvesting cucamelons, I went ahead and picked the largest ones.
The fruit doesn’t grow larger than 1 or 2 inches, and we read that if they are left too long, they get really seedy. Which makes sense.
Aren’t they adorable?
There was just enough for 2 each, so the girls and I tried them last night, while I left the last two in the little bowl on the table for my husband to try in the morning.
One of them disappeared.
Either we’re going to step on a cucamelon at some point, or a cat ate it. :-D
So… how did they taste?
Like cucumber, really. :-D The skin to flesh ratio is higher, so you do have more of that slightly bitter flavour of the skin, but just enough to make them distinct. They have a nice crunch, too.
From what we read, picking the fruit makes them more productive, and they will produce for a long time. I look forward to having more of them to gather, soon!
I think these are definitely keepers for future gardening. Apparently, in colder climates with shorter growing seasons like ours, you can even dig up the roots in the fall for spring transplanting, and have earlier production.
While making scalloped potatoes yesterday, I wanted to find a way to use the carrots from our garden I had picked that morning.
If they had been larger, I would have just sliced them thin and layered them with the potatoes, but these were on the small side.
So I got creative.
Here is how I ended up making the the scalloped potatoes.
For the cheese sauce, I used 1 medium onion, sliced thin, butter, flour, seasonings, whipping cream and cheese.
We already had old cheddar and grated Parmesan in the fridge. I also picked up a cheese that has recently showed up in local stores that is just awesome. BellaVitano Reserve. We’ve tried the three different varieties we have available, and I picked up Tennessee Whiskey this time. They have an Espresso one that it really good, too. I shredded this, plus the cheddar, and mixed it all together with some grated Parmesan. I used most of it in the sauce, saving some for later.
For the seasonings, I used mushroom salt, freshly ground pepper, garlic powder and paprika. For the liquid, I like to use whipping cream, but it can be made with milk or a lighter cream, though why anyone would want to, I don’t know. ;-)
To make the sauce, the onion first gets slowly cooked in about a tablespoon of butter until soft. Then, a couple more tablespoons of butter is added. When that’s melted and bubbling, the flour (about 2 tablespoons) is added and cooked, stirring constantly with a whisk, for maybe a minute. Then 2 cups of room temperature cream is added, little by little, with pauses to whisk it smooth. For the first while, the flour thickens the cream very quickly. After all the cream is added, the sauce is simmered, while constantly stirred with a whisk, until it is slightly thickened. Then the seasonings are mixed in. Finally, the heat is turned off, then the shredded cheese mixture is stirred in until melted. After tasting to see if the seasonings need adjusting, it is set aside.
For the rest of it, I had potatoes peeled and sliced thin and the carrots were peeled and shredded. I didn’t count how many potatoes I used. They were on the small side, so it was probably around a dozen. The shredded carrots made about 3 cups, loosely packed.
In a buttered baking dish, I put a layer of potato slices, topped it with 1/3rd of the shredded carrots, then added 1/4th of the onion and cheese sauce. This was repeated two more times, then the top layer was just potatoes and the last of the sauce.
It then went into a 350F oven for about 40 minutes.
Shortly before the time was up, I took a ring of Polish sausage and cut it into slices. The slices were then laid on the top of the potatoes.
I hadn’t originally planned to use the sausage, but I happened to have it, so why not? :-)
I did have some concerns at this point. We’re still getting used to the new stove, and haven’t used the oven much at all in this heat. When stabbing the potatoes with a fork before adding the sausage, they were still surprisingly hard. I had forgotten to cover it with foil at first, so that might be why.
I covered with foil at this point, but it really should have been added right from the start.
With the sausage on the top, I put them in for another 10 minutes. Most recipes for scalloped potatoes that I’ve seen say to bake for 40-50 minutes, and I was shooting for 50 minutes in total. After that, I added the rest of the cheese mixture on top.
Back in the oven it went, though without the foil. I didn’t want the cheese to stick to it. I then baked it until fork tender.
It ended up taking a lot longer to cook than I expected.
Also, handy hint. Put the pan on top of a baking sheet, in case the sauce bubbles over.
We’ll be testing out the oven’s self cleaning function, next…
:-D
When it was fork tender, I took it out and topped it with chopped parsley I’d picked from our garden that morning.
This was quite an experiment from how I usually make scalloped potatoes. They are usually just the potatoes and onion-cheese sauce, these days. I was very curious as to how the carrots worked.
They pretty much disappeared!
I used some of each type of carrot we have; white satin, rainbow (orange, pale yellow, and white), and deep purple. The purple carrots left colour on the potatoes, but with them being shredded, and such a long cooking time, they all pretty much disintegrated and disappeared into the sauce. I could taste a hint of their sweetness, but that was it.
I would definitely be up to including them again.
The addition of sausage… well, you can’t go wrong with adding kielbasa!
The cheese mixture worked really well, too. That Tennessee Whiskey cheese added to the flavour, but did not overpower.
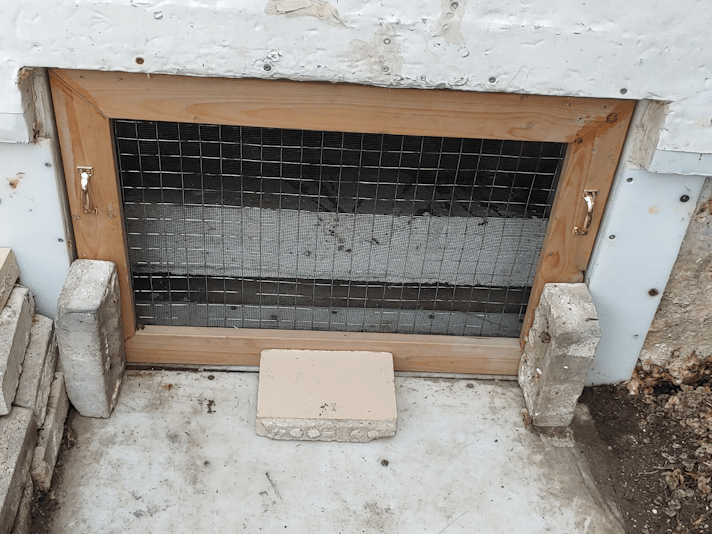
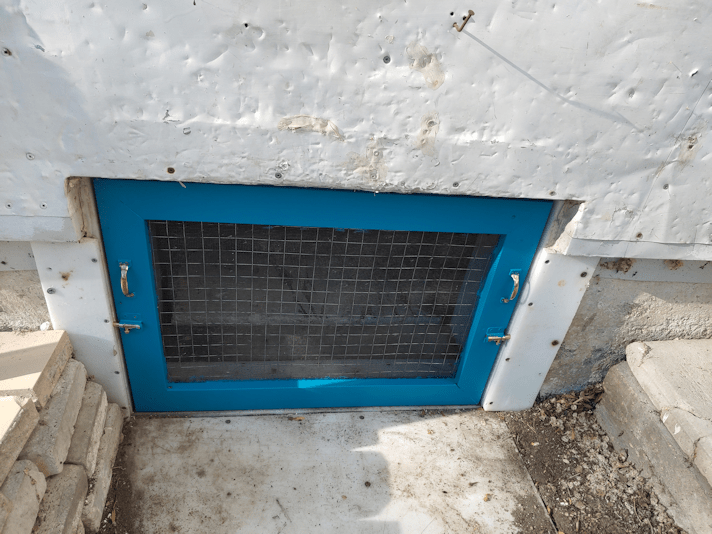
After several coats on of paint on the outside, and one on the inside, the screened window for the old basement is now fully cured and back where it belongs!
It’s one thing to have that bright blue on something that is in the yard. Quite another to have it on something that is part of the house! Even the blue replacement door is a dark blue, so not quite as jarring.
I think it looks rather nice against the white. :-)
Okay, before I show you what I found while picking chokecherries, I’ll share with you why I am so super excited about it.
When I was quite young, I spotted a caterpillar on the leaves of a crabapple tree. It was unlike any I had seen before. Not only that, but I found three more!
I don’t know how long I spent, examining them while they worked on spinning silk around them. Their green colour, almost exactly like the leaves they were on. The yellow stripe around the body, with the row of spots along it. The way it’s real head was tucked and hidden below with – most fascinating of all – “eyes” that made it look almost like a fish head, with a very distinctive line next to the “pupils”! With another stripe around the real head, it looked like a fish holding something in its mouth. :-D Then there was the fact that, if I poked one (gently, I must add), two little orange “horns” would emerge from its body.
I was absolutely thrilled by them.
So it was with great excitement that I went running to my mother and brought her over to see them. She seemed very interested in the one I showed her, and even asked me to show her the others as well. I enthusiastically obliged, pointing out each leaf that had one of these caterpillars.
Then, to my shock and dismay, my mother proceeded to bash at the leaves, sending the caterpillars flying. After making sure she got rid of all 4 of them, she left. I searched in the grass for them, hoping to put them back on the tree, but never found them.
As you can imagine, that was the last time I shared my excitement over a critter with my mother. In retrospect, my mother probably assumed it was something that would eat and harm the apple tree. She certainly never took the time to explain it to me.
For years, every summer, I would find myself searching among the leaves of the apple trees, hoping to see this caterpillar again. It took me even more years (in the years before internet! LOL), but I eventually was able to identify them as the caterpillars of Tiger Swallowtails. The butterflies are rather common out here, but finding the caterpillars, not so much!
You can probably imagine my childlike thrill and excitement when I finally saw one, today!
I’ve cropped the photos, but did not resize them, so you can click on them for full size.
With its little bed of silk on the chokecherry leaf, it almost looks like it is floating in mid air!
Doesn’t that look almost like a fish head? A bit like the local catfish.
In this photo, you can see just a little bit of the real head, tucked underneath.
This little guy is, of course, different from the ones I saw as a kid. It’s a darker green and more mottled looking. The spots along the yellow stripe around the body are harder to see. This one also has a spot of purple in the black “pupil” of the false eyes. It is still, however, the same kind of caterpillar, and I couldn’t be happier!
I did, of course, call the girls over to see it, too! I had told them the story about finding the caterpillars – and what my mom did to them – years ago, so it was fantastic to be able to share this with them.
I then took great care not to disturb it, while picking berries. Alas, I did not see any others, but I did look! :-)
Normally, I would not have done clean up on a Sunday, but the chokecherries needed to be picked, and we couldn’t get at the two trees with the ripest berries.
Which turned out to be 4 trees… :-D
Here are the ones behind the garden beds where the old wood pile used to be.
The arrows are pointing to the two chokecherry trees. They are close enough together that I had thought they were just one tree at first. All around them are dead cherry trees with live cherry saplings coming up the bottoms, along with other odds and sots that have come up since I cleared things away last year.
I started on this side because I figured taking out the dead cherry trees would be the more difficult job. Especially since we were getting spotty rain, so I wasn’t going to string out extension cords to use the electric reciprocating saw!
This is how it looked when I stopped.
The fallen spruce tree and poplars behind them kinda make it look like they’re not cleared, but there is plenty of space to walk around them now.
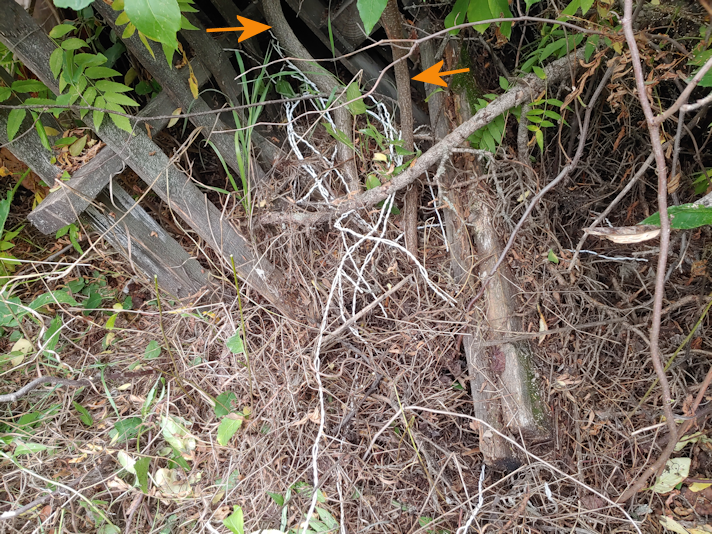
While the girls started picking berries, I moved on to the other side. This is how it looked before I started.
In the spring, I had cleared a path to the junk pile to access the wood stacked in it, and I’ve been trying to keep things clear around the Saskatoons. You can see those on either side of what’s left of the path, and the arrow is pointing to the chokecherry tree. Which is actually two trees next to each other.
Most of what’s here is spirea and thistles, with a bit of burdock, plus a few other things hidden by the spirea. I figured this side would be much easier to clear, since I could basically just yank them out of the ground.
I really should know better by now.
The spirea and thistles were, indeed, easy to pull up.
First, I’d forgotten about the fallen spruce tree in there, and how close it was to where I needed to go.
It’s been there for a long time, so I was pulling out bits and pieces that had broken off as it fell, as well as breaking off or pulling out rotten branches that were jutting out all over.
I’d uncovered the one stump that I already knew about, then found another, smaller one, beyond it.
As I worked my way closer, I found something else.
There’s a reason we call what started out as a pile of neatly stacked boards that used to be covered with a tarp, a “junk pile”.
So… that’s… wire? It looks like the wire from those little decorative fences you can get to put around garden beds.
Also, there’s an old pallet there.
Because, of course there is.
Don’t mind me. After clearing out the old wood pile and dragging away a couple dozen rotten pallets, I’m not much of a fan of those anymore! :-D I remember having to work my way around it, while searching for boards in the pile that weren’t too badly rotted.
As I worked my way closer, I found the chokecherry trees grew through the partially rolled up wire. Which gives an idea of how long it’s been hidden there!
That wire really does look like it’s from one of those little fences, undone. It even has cross pieces still wound into the twists.
At this point, I stopped!
It was clear enough to reach the trees, and most of the berries. So I started picking those, while the girls harvested carrots and little squashes. :-)
The piles of debris will wait until tomorrow to be hauled away!
This pile is almost all spirea and thistles, with a few smaller branches from the fallen spruce tree tossed in. I had to pull up some of the wildflowers, too. They’ve shown up all over the place this year, so there are plenty more around the yard.
This pile is mostly the cherry I cleared away from around the first chokecherry trees, plus the larger pieces of the dead spruce tree I was working around.
These are pieces I set aside to keep for future crafting or carving purposes.
As for the chokecherries, we picked about a gallon pail of them. The girls had picked from the tree by the squash beds, and the ones among the lilac hedge, too. Lots were left behind for the birds. We are finding more chokecherry trees deeper in the spruce grove, that are not ripe yet, so we will have more to pick, later on.
I’ve just come back from adding a second layer of Plasti Dip to the picnic table legs and rain barrel, before starting on cooking. Then I realized I completely forgot to share a couple of things in my gardening post!
This is one of them; a friend among the cucamelons!
When watering the garden beds, we have been seeing a LOT of little frogs all over – more than I’ve ever seen before – but we do not see these green little tree frogs often.
We need to fill in those openings along the outside of the chimney blocks we’re using as planters. The tree frog will get out easily enough, but I had one of the other frogs end up in one, and it couldn’t get out. I ended up putting a stick in the hole for it to climb.
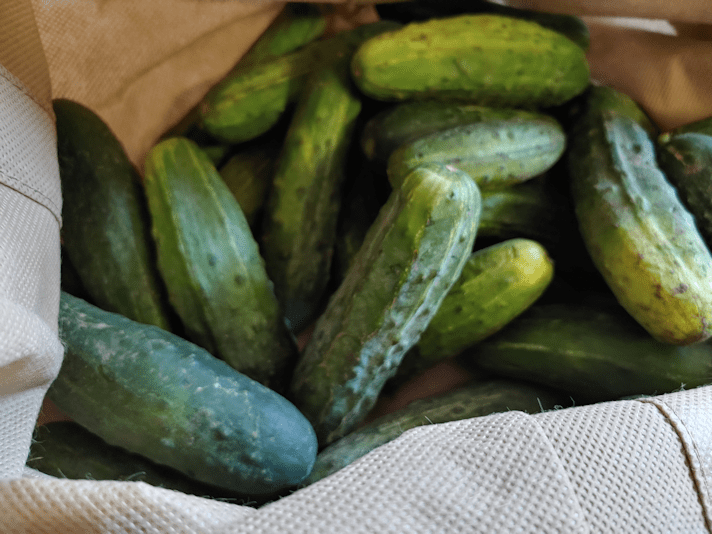
My mother also had a “gift” for me, yesterday.
A whole bunch of cucumbers! One of the local Hutterite colonies is quite involved with places like were my mother lives. Every year they host a dinner for widows and widowers, they regularly provide entertainment, and so on. Every now and then, they drop off produce in the lobby for anyone who wants! This time, it was a whole bunch of cucumbers. My mother took a lot (I really hope she didn’t take more than her fair share. :-( ) and gave me about half of what she had. I haven’t decided what to do with them, yet, but she plans to do quick pickles.
I’ve haven’t done pickles since I was a kid helping my mother! We might just make cucumber salads with them.
I realized I’ve neglected to take progress photos of some of our garden beds, so I got a few this morning.
Here are our two potato beds.
I was shooting blind, because my phone’s screen went completely black in the sunlight. Still, you can see the potatoes among the mulch, separated by a path of grass. Some have bloomed and the plants are starting to die back. We could probably harvest baby potatoes now, if we felt like digging under the layer of straw. I’ve never grown potatoes this way, so it should be interesting to see how they did.
This next photo is the second squash bed.
I just happened to catch a locust flying by in the picture!
We are currently inundated with grasshoppers and locusts right now. Hopefully, they won’t eat up too many of our vegetable plants.
This second bed is the one we planted the day after we were hit with one last frost. The sunburst squash are huge, with many flowers and many little squashes. The mixed summer squash has a couple of plants that are doing well. Interestingly, it seems that plants on the south end of the bed are struggling more than the ones at the north end, rather than any particular type of squash having a more difficult time.
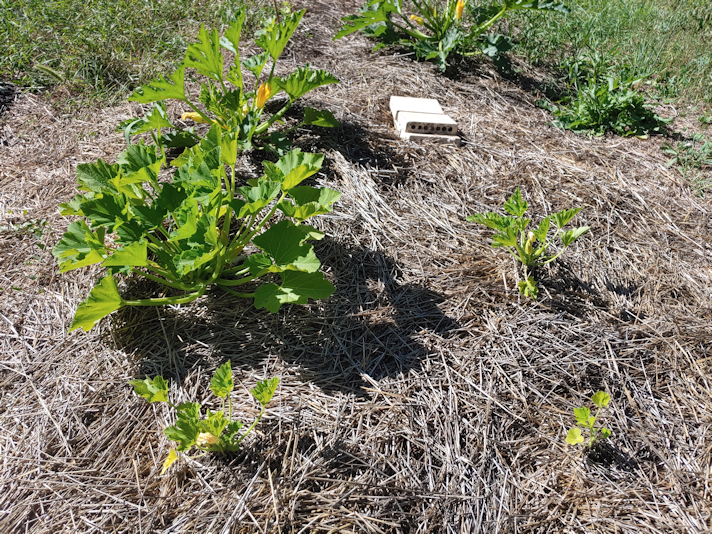
Here is the first bed that got planted.
These are the ones that got frost damaged, even though we had covered them for the night. Some died completely, but a surprising number have managed to survive – with some downright thriving!
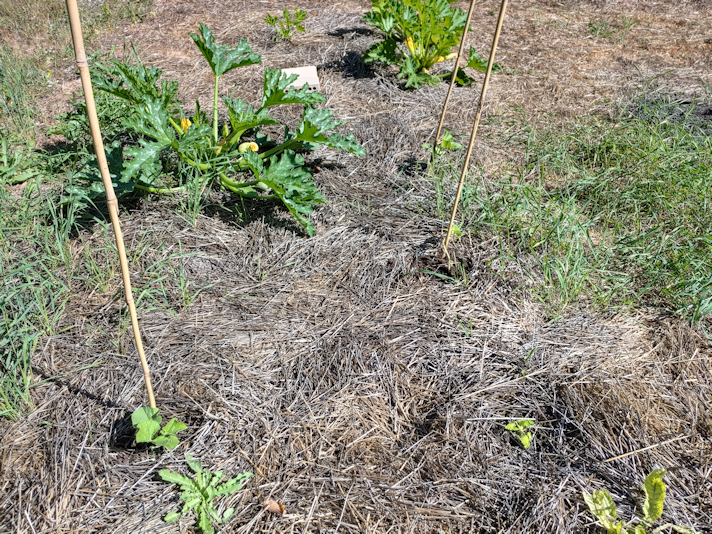
This picture is the same bed, from the other end.
The transplants had died at this end, so when some gourds in the seed tray actually germinated, I transplanted them here. Three of them are marked with bamboo poles. Much to my surprise, the one that got dug up by a skunk digging for grubs is surviving. Given how late they germinated and got transplanted, I’m not actually expecting much from them at all, but it will be interesting to see how much the manage to grow.
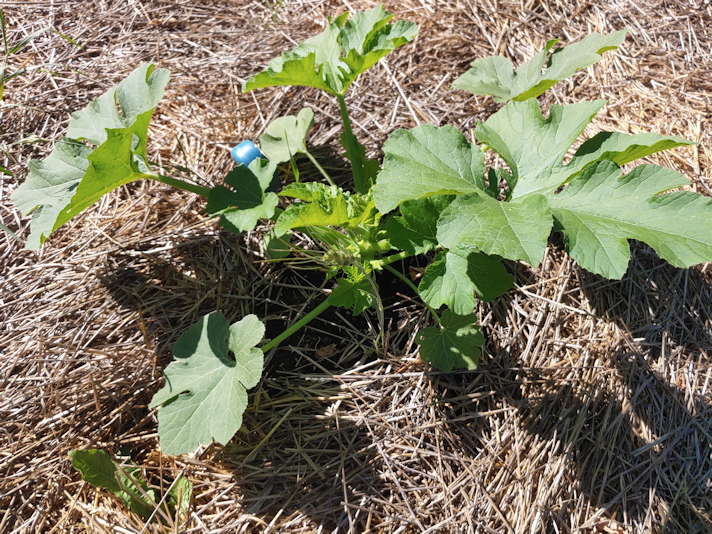
Then there are the pumpkins.
These were from seeds that were being given away for free at the grocery store near my mother. I had taken one (it even had a sign asking people to take only one), and then my mother gave me two more. Clearly, she didn’t read the sign, because she still had a pack she kept for herself and planted in her own little garden plot that she has this year!
The pumpkin in the above photo is the one from a pack that had 5 seeds in it (the others had 3 seeds). This is the only one of the 5 that germinated, and it came up much later than the ones that germinated in the other two mounds. One mound had 2 seeds germinate.
In spite of such late germination, this one is probably the biggest of the bunch.
It is also the Northernmost mound.
When we started planting here, I’d made a point of planting in the Northern 2/3rds of the area we had mulched. The south side of the area has a lot more shade from the spruces my parents had added to the north side of the maple grove. I didn’t even try planting at that end for that reason. The middle third of the area still gets a lot of sun, but the north third gets basically no shade at all, at any time of the day.
I think that might actually be why I’m seeing differences within the same beds of squash, and the pumpkin mounds.
Something to keep in mind for any future planting in here!
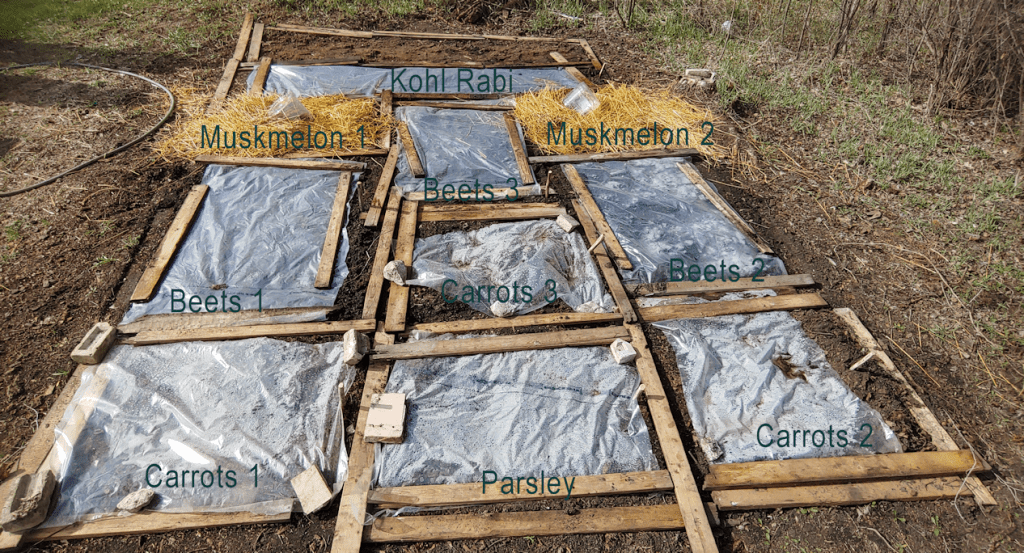
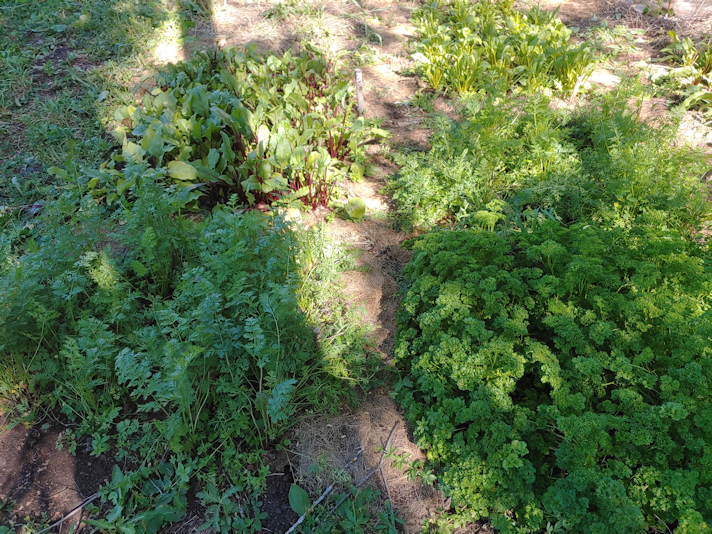
Then there are the beds we made where the old wood pile used to be.
The beets we got were a collection with Merlin (a dark red), Boldor (golden yellow), and Chioggia (alternating rings of purple and white)
In the foreground, you can see the parsley bed in both photos. It is doing very well. To the left of the parsley bed are the deep purple carrots, with white satin carrots on the right. The carrots could be doing better, but overall, they’re okay.
In the midground of the photos, there is a bed of rainbow carrots above the parsley bed, and beets on either side . Another bed of beets is in the background, beyond the rainbow carrots.
I don’t know how well you can tell in the photos, but there are not a lot of beet greens. The deer have really done a number on them. :-( We should still have some to harvest, though.
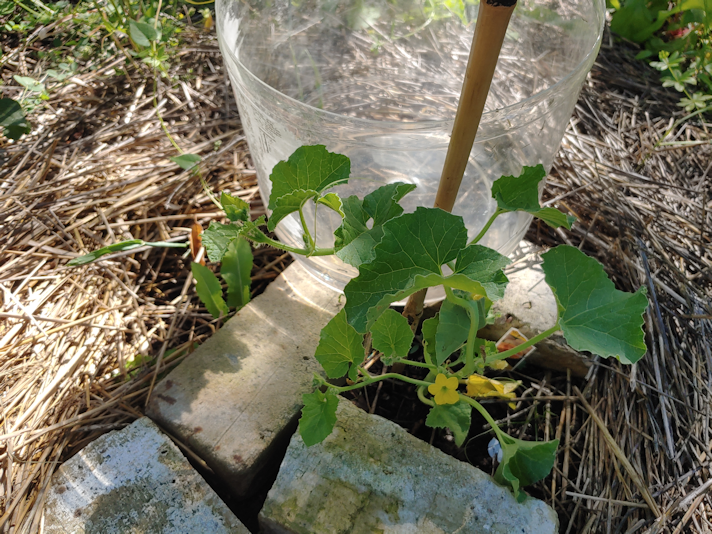
Of the two muskmelon we bought to transplant, one died. This is the survivor.
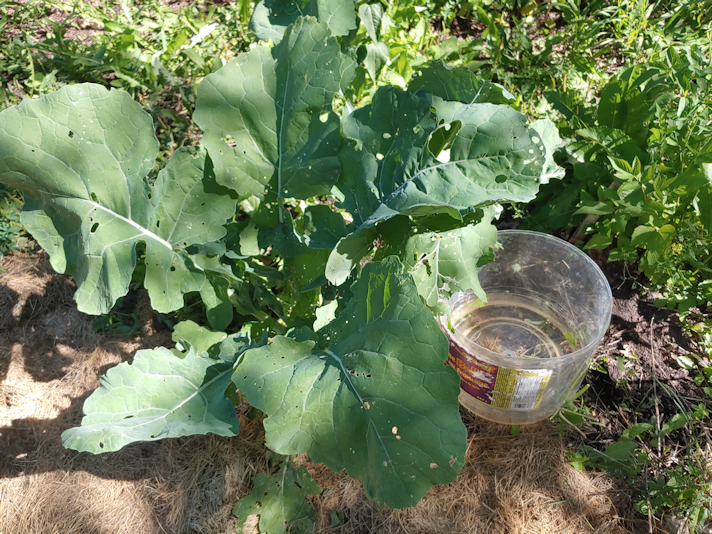
We planted a lot of kohl rabi, but this is all we have that came up and survived.
The large leaves that you are seeing are from 2 plants.
Yup. Out of all that we planted, only 2 survived.
Actually, there had been four.
It turns out that deer like kohl rabi, too. You can’t even see the second one that was nearby; it, too, was reduced to a spindly stem!
In case you are wondering about the plastic containers…
Those are what I used as cloches to cover the muskmelon overnight, to protect them from colder temperatures after transplanting. The containers used to hold Cheese Balls that we got at Costco. I just cut the tops off, then drilled holes around near the bases for air circulation.
I now have them set up near the surviving muskmelon and the kohl rabi. When watering the garden beds, I fill those with water. The water slowly drains out the holes I’d made for air circulation, giving a very thorough watering to the plants. The first time I’d tried this was with the muskmelon, which was pretty small and spindly. The next morning, it had grown noticeably bigger and stronger! So I put the second one by the struggling kohl rabi, and the difference the next day was just as dramatic.
Until the deer ate the two littlest ones.
This worked so well, I’m trying to think of ways to use other cloches we have, most made from 5 gallon water jugs I’d bought for the fish tank, to set up near some of the more struggling squashes.
This morning is the first time I’ve harvested some of the parsley, along with a few carrots. What I don’t use right away will be set up to dry. Which is what will happen with most of the parsley we planted, as we tend not to use fresh parsley all that much.
And now I’m going to stop struggling with our nasty internet connection, which really doesn’t like inserting photos right now, and start on the scalloped potatoes I have planned for supper. I think I’ll find a way to layer some carrots in with the potatoes, too! :-)