Nosencrantz let me skritch her ear this morning.
“Thank you for breakfast,” she says. :-)
The Re-Farmer
Nosencrantz let me skritch her ear this morning.
“Thank you for breakfast,” she says. :-)
The Re-Farmer
Well, that didn’t take much at all!
With the help of my younger daughter, we got the shut off valve installed on the hot water pipe.
Ha!
Just kidding.
My daughter did all the work. I took pictures and passed her things.
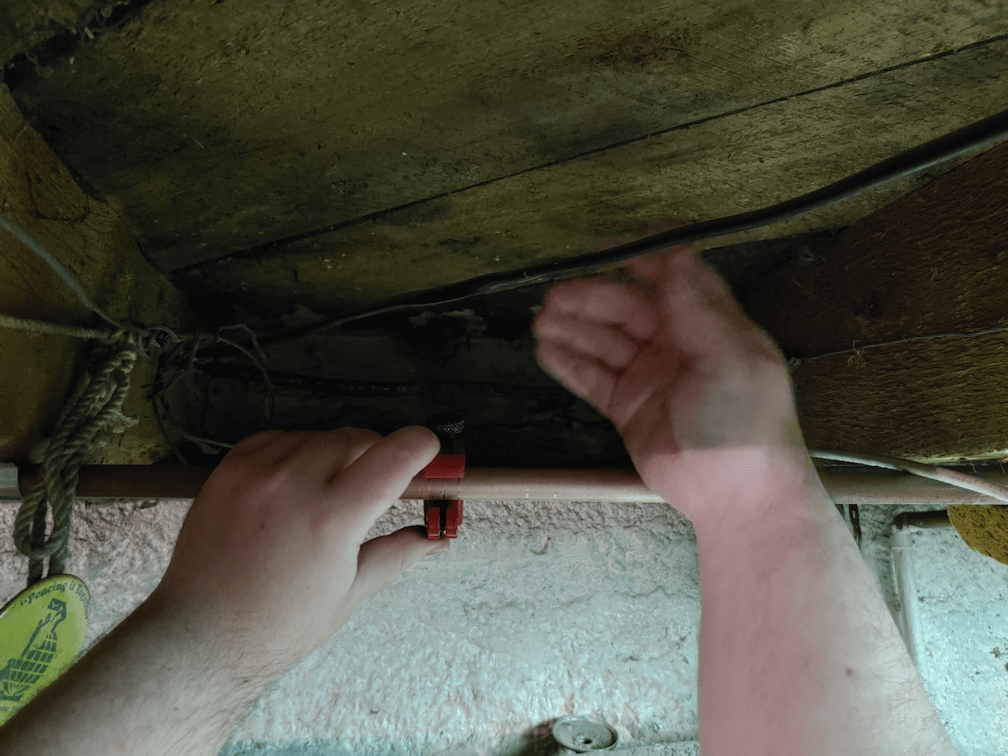
The first thing we needed to do was take off the “clamps” holding the pipe to the exposed floor joists above, on either side of where the pipes were in contact with each other and, I believe, the source of the vibrating noise that is so alarming. The “clamps”, however, were small strips of aluminum, hammered into place with finishing nails. We never did get the nails out. My daughter ended up ripping the aluminum off, instead. !!! While my daughter worked on that, I shut the water off to the hot water tank, then opened the tap to drain the pipe.
One of the things she noticed while trying to remove the aluminum strips is that the hot water pipe was actually bent upwards at this point. No wonder the crossed pipes were so jammed together.
Once there was a bit of flexibility in the pipe, it was easier to access and work on, too.
After deciding where to put the valve, the pipe got scrubbed clean, then the shut off valve was used to place marks on the pipe, so we could see where to cut it, and later see that the pipe ends were far enough inside the valve once installed. Thanks to needing to fix the kitchen sink a while back, we did have a nice little pipe cutter for the job. :-)

About two inches of pipe was removed, to make room for the valve.

The cut ends then got scrubbed and sanded, inside and out.
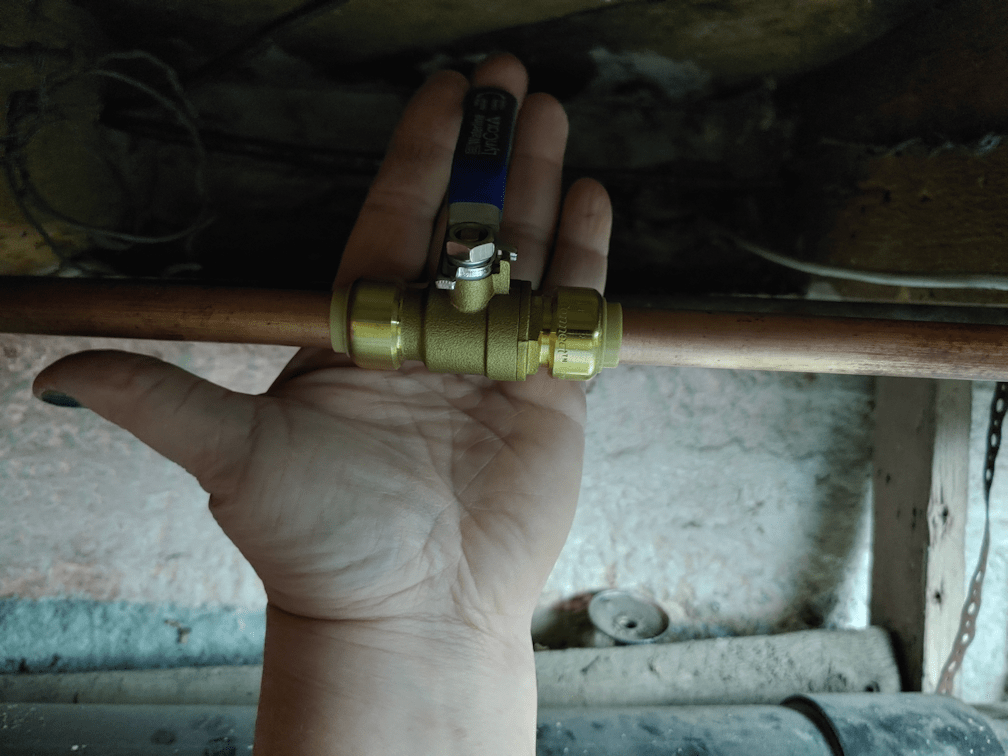
Then is was just a matter of sliding it in, and making sure the pipe was as far as it needed to go. The water to the tank was turned back on so we could test it for leaks, then the valve was shut off.
The whole thing took about 10 minutes.
With the valve in place, there is no water to leak at the tap, but if we need to use it for some reason before the tap can be replaced, we can just turn it on, use the tap, then shut it off again. Very handy.
Meanwhile, there is still the issue of the pipes.
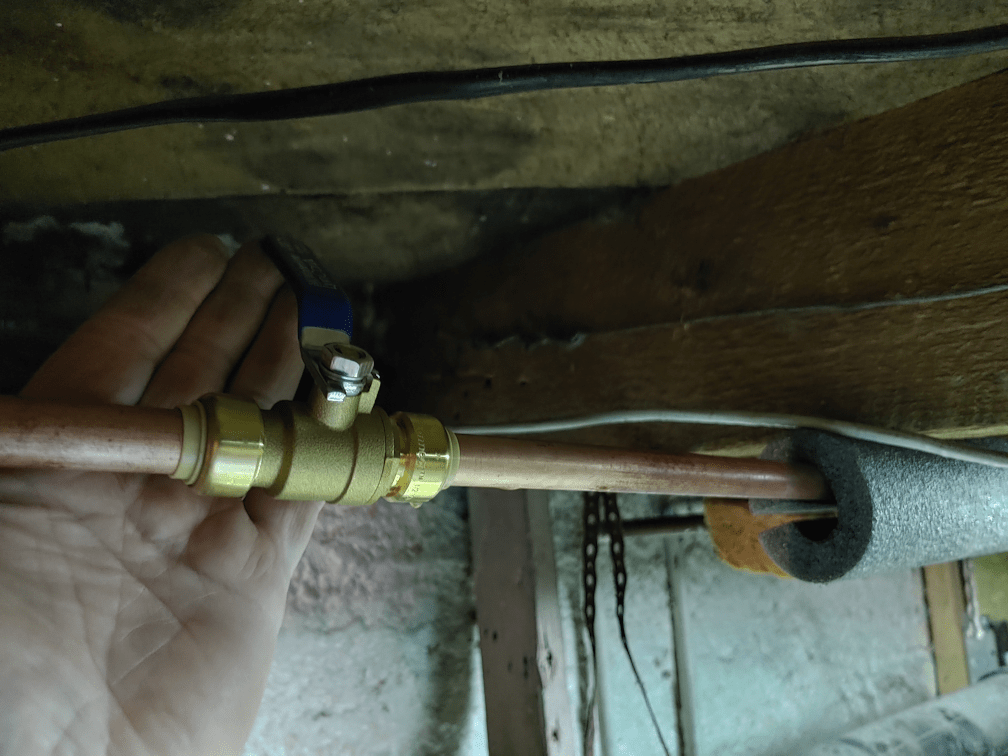
For some reason, we have short lengths of pipe foam in the basement. It’s meant for a width of pipe I don’t see around. I put a section on the pipe, under the floor joists the pipe had been clamped to. It was just long enough to go under both.

I didn’t have any foam that was thin enough, so I jammed an old sponge I’d been using before, in between the two pipes that had been in contact, to absorb vibrations. I’d tried to squeeze it in before, but there was no give at all. I could only get it part way under, so it didn’t really stop the noise, though it seemed to make it better.
Now I am just waiting for someone to use the enough water to trigger the well pump, and see if the noise is still there.
We didn’t add a shut off valve to the cold water pipe, yet. For that, we’d need to shut water off to the entire house, and the pipe is behind the hot water pipe, so it will be harder to reach. That can wait until we are putting on the new taps.
I am quite pleased with how this worked out. I keep expecting things to go horribly wrong. :-D
So far, so good!
The Re-Farmer
While I was working outside with the loppers and lawn mower, in the area we intend to seed with wildflowers, the winds were pretty high. By the time I was done, I was dealing with double ear aches from it. :-/
It has since only picked up. I’ve just come back from a walkabout, picking up fallen branches and closing up the pump shack door that I found blown open.
There was a benefit to the high winds, when it came to the stuck trees I cut down.

One of them broke free and fell all the way down, right were I was intending it to fall! Which means I can start breaking it down to the lengths I want and clearing it out, and can access another dead tree in this group to cut down.

Unfortunately, the bigger tree is on the wrong side of the tree it’s hung up on. The winds are blowing it into the tree instead of away from it.
Getting this one out is going to be an issue. The only direction it can be pulled from is where I’m standing to take the photo. That leaves the stump in the way. A stump I want to keep, to use as the support for a seat or table.
The trunks will be cut into 10 and 4 foot lengths. What I figure I will do is first find something to support the trunk, then cut it at about 4 1/2 feet from the end. That leaves room to trim the end level. The rest of the tree would then be clear of the stump and can be pulled out, once I have something strong enough to pull it with.
Unless the winds shift, and it manages to fall. Unlikely, but one can hope!
The Re-Farmer
After breaking the lawn mower in the strip along the road, I finally got back to it, today.
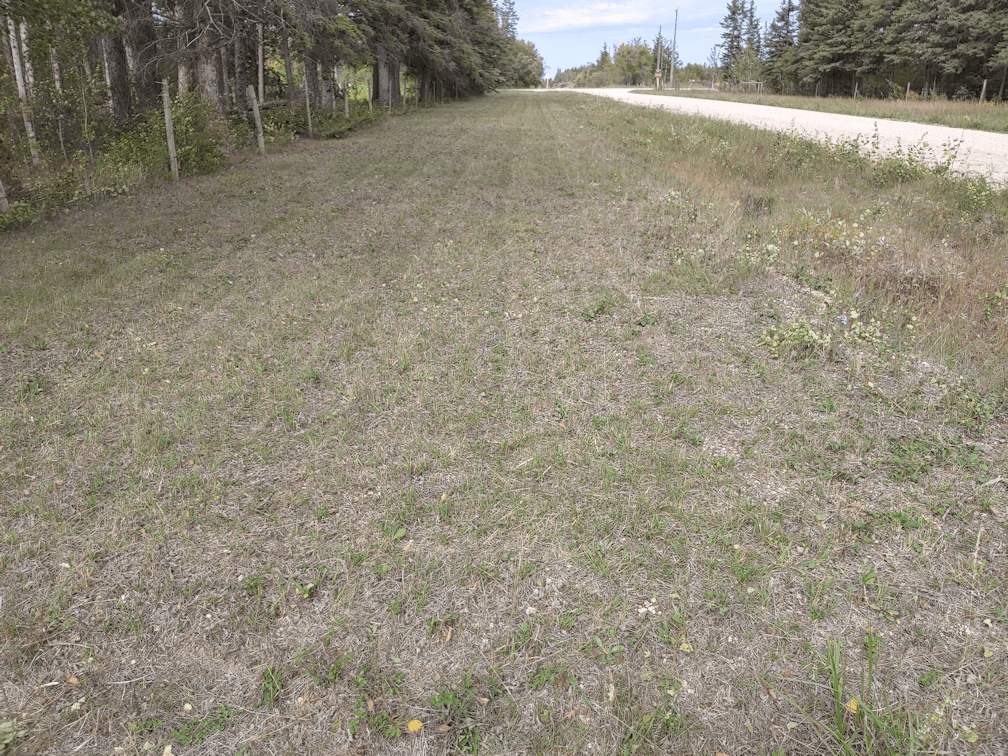
Here is how it looked before I started, from each end.
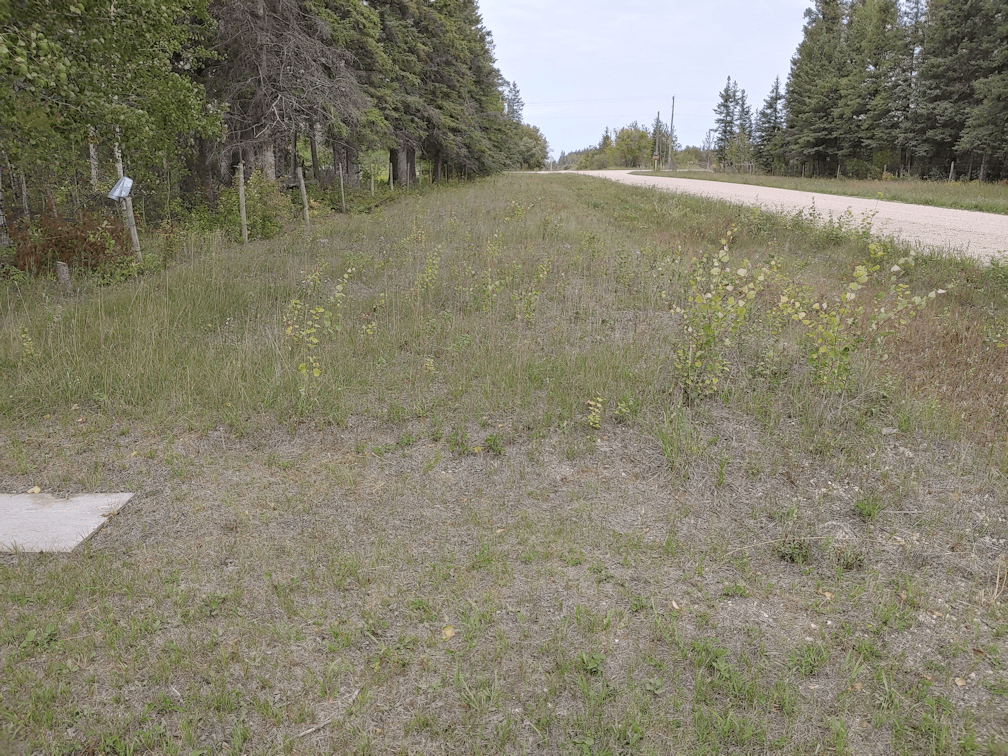
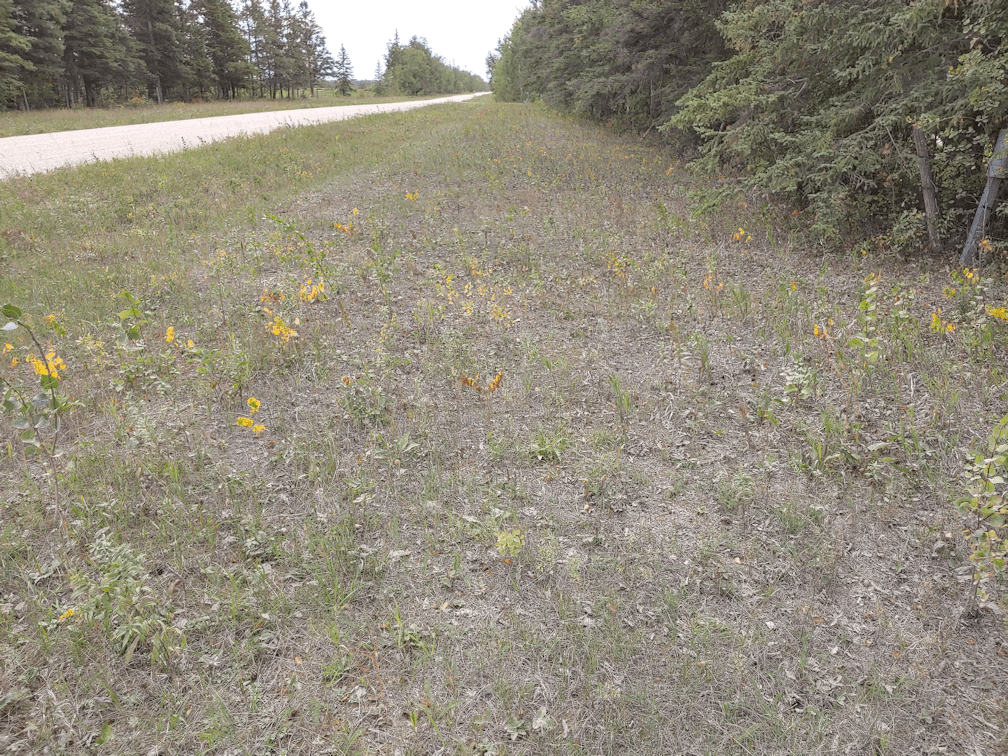
I suppose one good thing about the drought conditions is that this area has never gotten overgrown. There were saplings starting, so I went over the area with the lopper first, cutting them as close to the ground as I could. The last time I had to do that, we didn’t have loppers, so a lot of these saplings were growing out of the ragged ends of smaller saplings before, that had been mowed over rather than cut with pruning shears. The larger ones had been cut with pruning shears, and there was enough of them that I had needed a wheelbarrow to clean up. This time, I could just pick up the larger ones by hand and didn’t even get an armful.
Here is how it looked when I was done.

The plan for this area is to convert it to native wildflowers for the pollinators. The mix we have has 16 annuals and perennials, chosen for Western Canadian climates. We intend to start at the far end (where the lawn mower can be seen in the one photo), as that end is near the garden. Over time, I intend to continually scatter more seeds down the line, with a goal of this entire strip being full of wildflowers. Once that is established, we won’t need to mow it regularly any more, and we will just need to keep on top of cutting away any saplings that try to establish themselves, and do a single mow, at the highest setting, at the end of the year.
What we can’t do is follow the instructions. This is the method we had intended to follow.
Method Three involves more planning but requires no chemicals. Till in the late summer or early fall the year before planting. You may allow the soil to lie fallow or plant a cover crop after tilling. A cover crop may be important if your site is on a slope. A green manure cover crop such as buckwheat or annual rye grass will hold the soil until spring, help add beneficial organic matter and help snuff out germinating weeds. In the spring, light cultivation will be needed to loosen the soil and turn under all existing growth just prior to planting. ‘
https://www.veseys.com/us/westernmixwildflowers.html
Well, we can’t till this area. Even if we had a working tiller. You can’t see them in the photos, but there are several large rocks peaking through the soil, and I have no doubt there are more that cannot be seen. I had hoped to at least go over the area with a harrow, but we still need to figure out a safe way to get under the riding mower, which has a tow hitch, to put the chain back on, so it will move. It hasn’t exactly been a priority.
Then there are these instructions:
Sowing:
Once your ground is bare and loose, you are ready to sow. Following are a couple of tips that will make the whole process simple and successful. First, choose a nearly windless day and, second, separate the seed you’re planting, no matter the amount, in roughly two equal parts. Put the first half in a clean bucket or coffee can and add in roughly 10 parts of light sand or vermiculite. There are two reasons for the sand. It will dilute the seed and help you spread it more evenly. More important, since it is lighter-colored than the freshly-tilled soil, you’ll be able to see where you’ve been as you sow. You can simply hand-sow, keeping the seeding as even as possible. Or use a hand-crank seeder. The amount of seed you sow depends on the sort of flower display you want. Many people sow up to two or even three times the minimum seeding rates on seed packages to assure heavy bloom. Avoid planting higher densities since this will inhibit good growth. Sow the first half of your seed/sand mix over the entire area to be seeded. Then go back, mix the second half of your seed with sand and spread that seed over the whole area. This way, you’ll avoid bare spots. Once the seed is evenly sown, you can rake to barely cover the seed with soil. Or, simply compress the seed into the freshly-tilled ground. A lawn roller is perfect for the job, and for smaller areas, a piece of plywood laid down and walked on will do.
Okay, so we can broadcast the seed easily enough, but things like getting rid of all the roots of what’s already there, and having “bare and loose” soil first is out of the question. We’ll be lucky if we can loosen the soil at all. As for raking or tamping down to compress the seed into the soil? Ha! Nope. Not gonna happen. It’s just too large of an area. We will also not be able to do any watering here, at all. We have enough hose that we can reach the furthest corner of the furthest garden bed with the spray nozzle on the hose. I have no intention of buying yet another length of hose, to water outside the garden area.
Nope.
The instructions say to prepare the soil, then plant in the spring, after last frost. Since we can’t water the area, I’m going to throw caution to the wind and broadcast the seeds in the fall. I had expected to be doing that around now, but we are having relatively warm temperatures for the next while, and we’re also getting rain. I don’t want the seeds to germinate. I want them to go dormant before getting covered with snow. Then, when the snow melts in the spring, they will get their moisture.
This goes against all the instructions but… well, these are wildflowers. Wildflowers manage to propagate themselves without freshly turned soil, tamping down or clearing of other plant roots. I’m going to be trying to copy nature, here.
So we will do as much as we can first – which, unless we can get under the mower, is basically what I’ve done today. I’ll be using garden soil instead of sand to help broadcast the seed more evenly. Since I don’t want the seeds to germinate, I will probably wait until the end of the month, or even into October, to do it. Whatever survives, survives. If we keep broadcasting seeds, year after year, eventually the area will get filled. Hopefully with a good variety.
So that’s done as much as possible for today.
This is the first time I’ve been out this way, on foot, all year, which means today was the first time I was able to check out, and get a photo of, this.

This is the corner post of the property’s fence line.
It needs replacing, as does most of the fence, but that is not what I was taking a pictures of.
I was taking a picture of what isn’t there.
My father’s name.
Many years ago, my dad took a piece of red plastic and used gold coloured, metal, self adhesive, letters to put his initial and surname on it. The sign was mounted on this post. Back in the day, before any of these roads had names, and well before the driveway marker system was implemented, the sign was used as a landmark when giving people directions to our place.
We don’t go out often, and the sign can be easily seen only when we are on the return trip, but seeing that flash of red while turning the corner always made me feel good. It was a memory of my father.
Some time ago, however, I realized I wasn’t seeing that flash of red anymore. Today, I got to look around to see why.
There isn’t a trace of that sign. The reflector at the top got broken in half, though, and the rest of it is on the ground, but that’s all I could find.
The road that goes past our driveway has our family name, as well as a numerical name. When we first moved here, the road sign with our family name was at the top of the stop sign across the intersection. One day, the stop sign was lying broken on the ground, and the road sign with our family name on it was gone. I am 99% sure this was done by our vandal, and I’m just as sure that he is responsible for the sign on this fence post being gone. When it happened, I have no way to know.
What a childish, petty thing to do.
If we ever do get the road sign replaced (I’ll have to contact the municipal council again about that), or replace the sign on the fence, we’ll have to set up a trail cam on it, because I just know that our vandal will go after it again.
Switching out memory cards in this location would be much more inconvenient, that’s for sure!! But it would need to be done.
What a pain.
The Re-Farmer
You know, it’s a good thing that we labelled the things we planted in the garden beds, and left those labels there.
Because apparently, my memory sucks.
For the past while, I’ve been posting photos of our sunflower seed heads. Particularly the Mongolian Giant sunflowers.

The transplanted ones are much taller and stronger, and further along – at least in the row that wasn’t eaten by deer!
The other, direct seeded ones, next to the transplanted ones that got eaten, are developing their seed heads and blooming, but they are smaller and less robust plants. Even most of the eaten ones have been recovering and are producing seed heads. Their stems are stronger. They’re just shorter.
While checking on them this morning, I noticed the labels at a direct seeded row in one of the blocks was lying on the ground, so I picked it up to push it back into the ground at the end of the row it was at.
Which is when I noticed what was actually written on it.
Hopi Black Dye.
Hold on. I thought this bed was all Mongolian Giant…
So I went to the other bed and looked at the label.
Mongolia Giant.
Which is when I remembered; I’d deliberately planted the Hopi Black Dye seeds in the southern bed, regretting that I’d put the Mongolian Giant transplants in the southernmost row, because they would shade the smaller Hopi Black Dye sunflowers.
One of the flowering seed heads is starting to droop as it matures, so I took a closer look, brushing off the spent flowers.
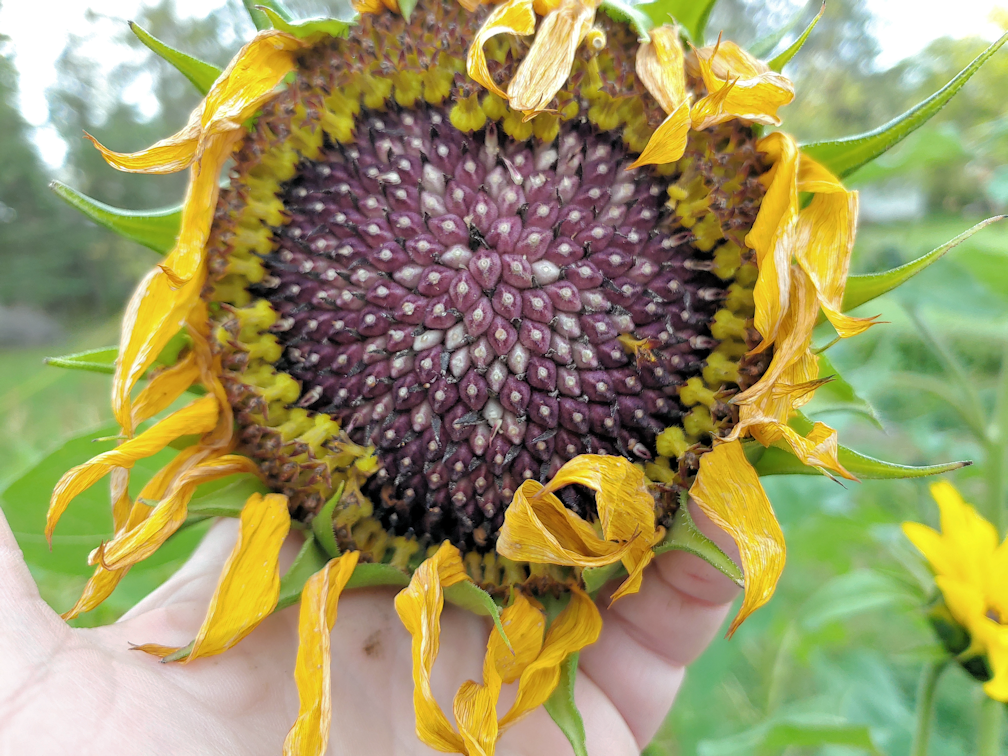
Yeah. That’s definitely purple.
For some reason, when I remembered transplanting the Mongolian Giants in the southernmost row of the two sunflower blocks, my brain decided that the southernmost block had also been direct seeded with Mongolian Giants. I’ve had it backwards for months. But now that I’ve actually looked at the labels after all this time, I remember that I’d direct seeded the Hopi Black Dye sunflowers in the southern block, where they would get more light, even with the taller transplanted Mongolian Giants shading them a bit. Which turns out not to have been an issue, since the transplants in that row were chomped by deer, and are now shorter than the Hopi Black Dye, so they are getting the most light of all the sunflowers out in these blocks.
Which means we have quite a lot of Hopi Black Dye sunflowers with seed heads open and developing, and only a few Mongolian Giants.
And that, my dear friends, is why I’ve gotten into the habit of labeling things, taking lots of photos, and using this blog as a journal for documentation, writing things down as soon as I can, as much as possible. Lord knows, I obviously can’t trust my own memory for things like this! :-D
The Re-Farmer
The old basement is the heart of the plumbing in this house. It’s where all the pumps and tanks are, plus we have a couple of sets of taps; one for the laundry sink, and one for where the washing machined to be, and pipes with shut off valves leading to the taps outside.
Until the plumber added a shut off valve to the hot water tank, those were pretty much the only shut off valves in the system. Otherwise, there is a main shut off valve at the well pump that shuts water off to the entire house.
One of the things my brother did was install a pool filter to the septic pump system. It has a filter basket that catches larger bits before they get into the pump and sent on to the outflow. It has to be cleaned out every now and then, so he got an extra basket, so one can be quickly switched out for the other, and the pump can be back in action right away, rather than having to stay off while the filter basket gets cleaned. Which is a big deal, since it basically turns black and needs time to soak in a detergent solution after the grit and odd bits of straw that fell into the tank while it was being emptied are cleaned out.
Handily, the laundry sink is right there, and that’s where I wash out the filter basket.
It is also where we shock our hot water tank with hydrogen peroxide every now and then, when the water develops a rotten egg smell. This is done using siphon action by attaching a short hose to the tap. After shutting water off to the hot water tank, then allowing it to drain until the vacuum created prevents more water from draining out, we can put the hose end into a container of hydrogen peroxide, turn on the hot water tap, and the peroxide gets sucked into the hot water tank. Unfortunately, the threads on the hot water tap are damaged, so instead of being able to screw on a short length of hose directly to the tap, we’ve had to use Gorilla tape and a length of aquarium hose. It doesn’t seal as well, but it works.
Those are pretty much the only times that sink gets used.
When I’d switched out the filter baskets at the septic pump, I noticed that the hot water tap had developed a drip. I have no idea how long it’s been dripping, but as I used the hot water to do a rough clean on the filter basket, then set it in a container to soak, it started to drop more. Last night, I switched out the soaking water, and the slow drip because a fast drip.
We already needed to replace both the hot and cold water taps, but until now, that wasn’t much of a priority.

Here, you can see the hot water tap, with the tape holding the bit of aquarium hose. The cold water tap has a length of hose screwed on – without the hose, the water sprays all over. The piece of hose across both taps is what I’d tried to screw onto the hot water tap, only to discover the threads were damaged.
This morning, I headed into town to hit the hardware store, just as it opened. After showing the photo to one of the staff, he found the right size replacement taps for me (I plan to take advantage of the situation and replace both taps). Unfortunately, these taps are soldered on. Which means, to change them out, I need to heat them with a torch, remove the taps, clean the pipes, then solder on the replacement taps.
We don’t have the tools to do that. Even if I wanted to cut the old tap off and put a new one on the remaining length of pipe, I’d still need a soldering gun – and I don’t want to shorten the distance of the taps over the sink, anyhow.
Of course, there are no shut off valves between these taps and the pumps. To work on it means, at the very least, shutting off the water to the hot water tank. To work on the cold water tap means shutting off water to the entire house.
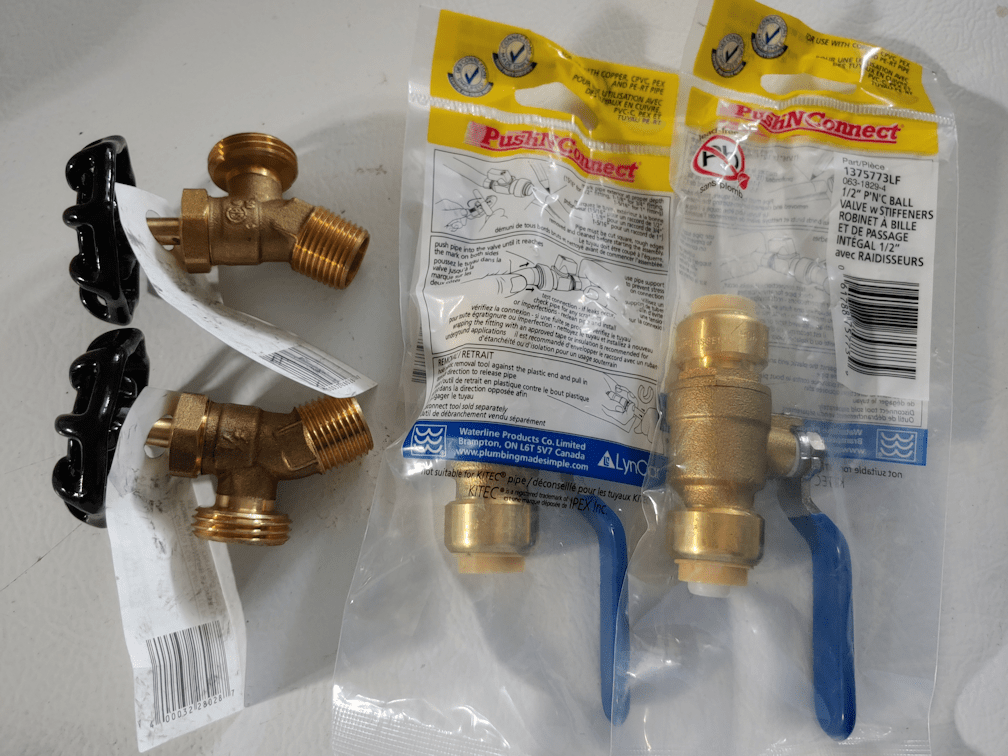
So I picked up a couple of Shark Bite shut off valves.
We have what we need to cut pipe, so we can install the shut off valves ourselves. That will allow us to shut water off to the taps and stop the drip, until we can replace the taps themselves.
I’ve already been able to talk to my brother about this, as he has the tools needed to replace the taps. As for the shut off valves, he had it in his mind to install them in the vertical pipes leading to the taps, but I am thinking of installing them in the horizontal pipes running along the ceiling, so that they will shut off water to the other set of taps as well. Those have never been used since the washing machine was moved upstairs, but considering how old they are, I can see needing to replace them in the future, too.
My daughters are still on “night shift”, though, so I don’t want to start any of this until after they’ve gotten up and had their showers. For now, I just want to install the shut off valve on the hot water pipe, but – as unlikely as it is – if something goes wrong during the install, we wouldn’t be able to turn the hot water back on until it’s fixed, and who knows how long that would be. It’s really a simple job, but I know how easily simple jobs can become major problems, in this place!! Hope for the best, plan for the worst!
One of the considerations for installing the shut off valves; unless we cut out about 3 inches of pipe, they will add to the length of the pipe. That would mean the taps would need to be shifted over by the same distance. Which I wouldn’t have a problem doing, except that parts of the copper pipe have been painted over.
Including the clamps and screws holding the pipes in place. Which is going to make loosening the screws a pain in the butt!
*sigh*
Still, it needs to be done, regardless. We’ve had issues with a loud noise that would start after the well pump kicks in to refill the pressure tank. It is very loud, and I can actually feel the floor vibrating under my feet when I am at my computer. It rather freaked me out because, at first, I thought the noise was coming from the well pump, and we’re already on borrowed time with that thing. Eventually, I was able to trace the noise to the pipes. The pipes run under the exposed floor joists, and have a mishmash of supports attached to the joists, holding them in place. In a couple of spots, there is a pipe that has a 90 degree turn and runs under the pipe it had been parallel to. One of those spots is the hot water pipe that runs from the hot water tank to the laundry sink. What seems to have happened is that, as the house has shifted, those pipes no longer have any sort of gap between them. When the pump starts running, it causes vibrations in the pipes, and with these two pipes now hard against each other, that results in the noise and vibrations I can actually feel in my feet. Right now, the vertical pipes are clamped so tight against the wall – with painted over screws – that there is no give at all. So while we are working on the taps and valves, I want to see if I can adjust the hot water pipe downwards a bit, so that they are no longer touching. Hopefully, I’m right that this is the cause of the noise, and it will stop.
If it doesn’t, and we still get the noise in this location, I’m at a loss as to what else the cause might be!
So we’ve got our work cut out for us this afternoon, just to be able to stop the drip until we can replace the tap itself. Once that’s done, there is no longer any sort of urgency.
The Re-Farmer
I just realized I had an achievement this morning.
For the first time, I got photos of all ten kittens this morning! Usually, they are running around or hiding so much, I miss a couple.

There are no adult cats in this photo. We’ve got seven kittens from three litters, including Junk Pile’s kitten that looks just like her.
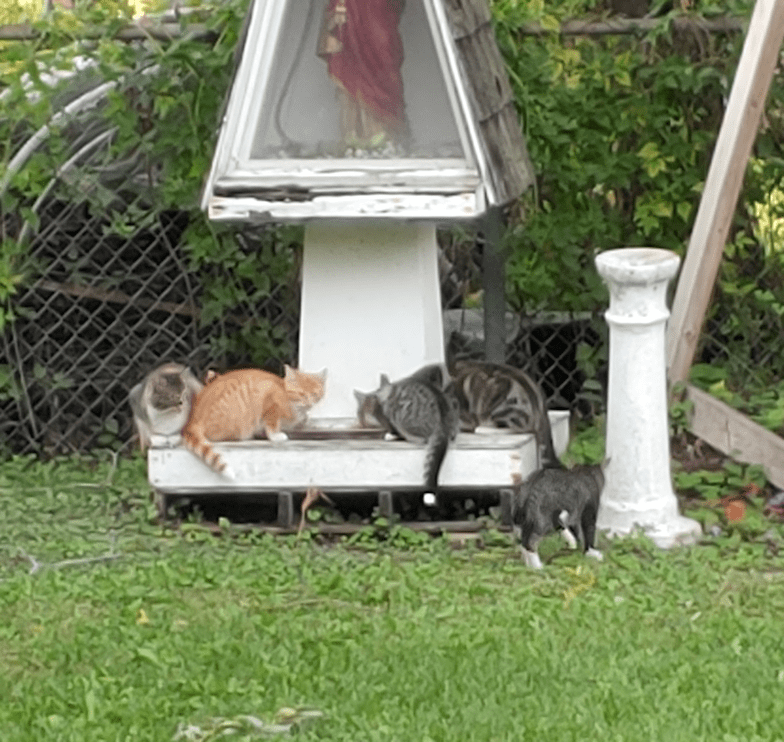
Under the shrine, we’ve got two adults and three kittens. The kittens that are at the food tray are from two different litters, Toesencrantz and Bradicous, but I can’t tell if the one on the ground is Chadicous, or Junk Pile’s tabby that looks so much like Bradicous and Chadicous.
Sadly, I did not get to touch any kitties, nor spend time trying, as I had to hurry to finish my rounds and make a trip into town.
But that will be for my next post!
The Re-Farmer
We have been really fortunate with the frost holding off so far. If the long range forecasts are right, we won’t get a frost for at least two more weeks, possibly longer. Other areas in our province have already had their first frost, so I am really thankful that it’s held off in our area so far.
The continued mild temperatures is giving the garden more time to recover and progress, and we even have some new little surprises this morning!

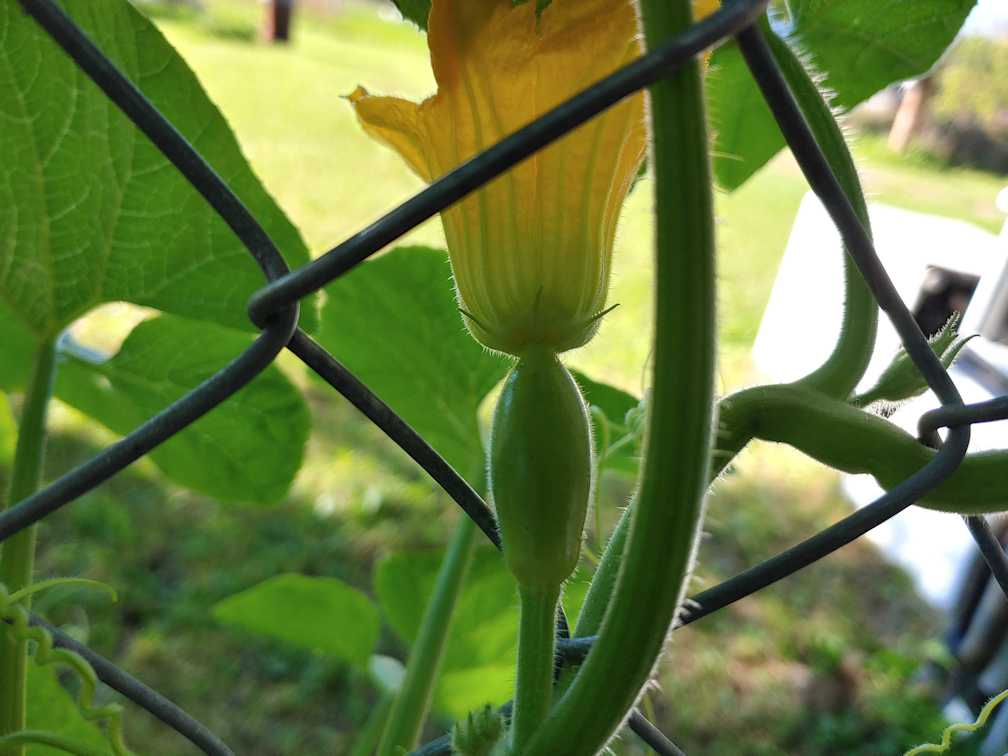
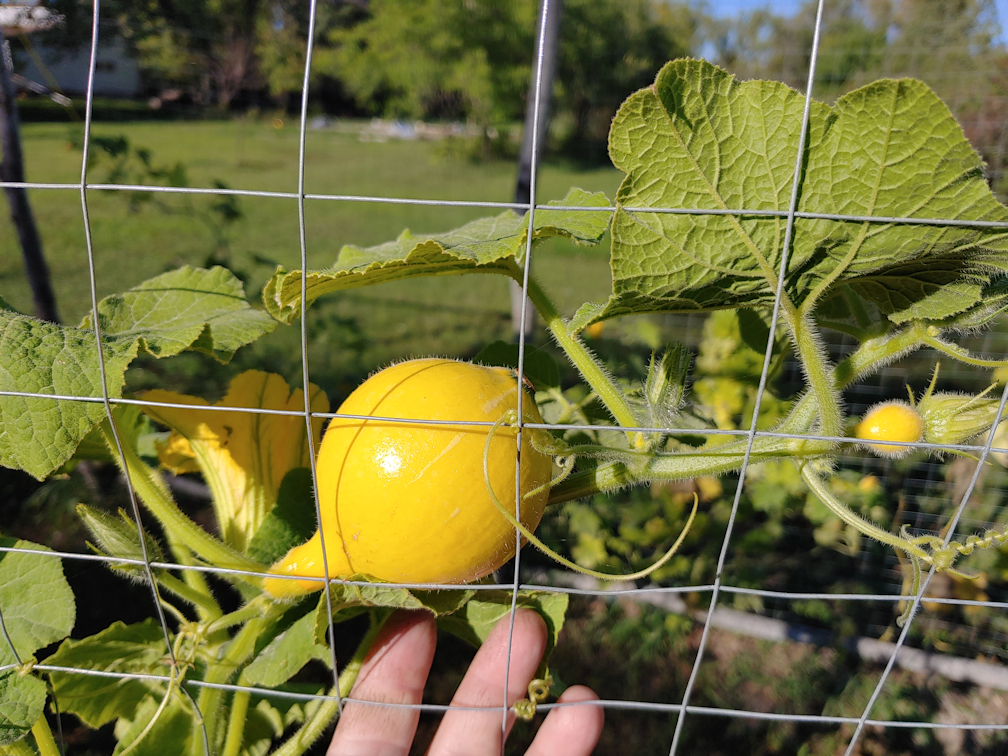
We’ve got two more Ozark Nest Egg gourds forming! That makes for a total of three. I did not see these two when I checked the garden beds yesterday evening, so this is pretty much overnight growth.

This is one of the new ones, from outside the fence. They have such pretty flowers. :-)
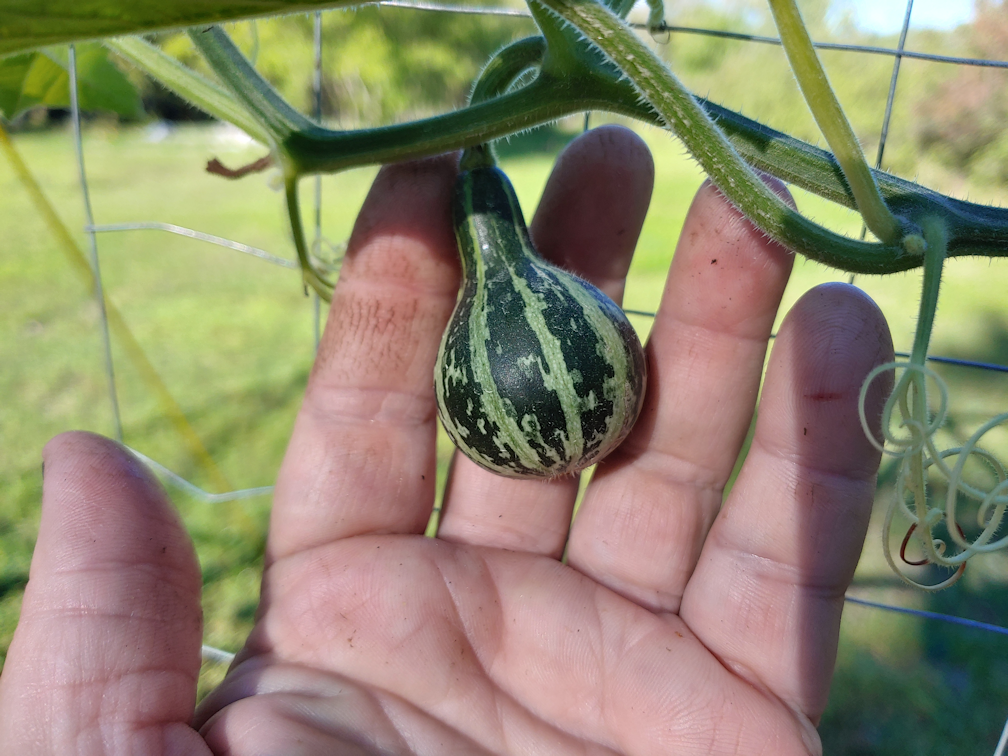
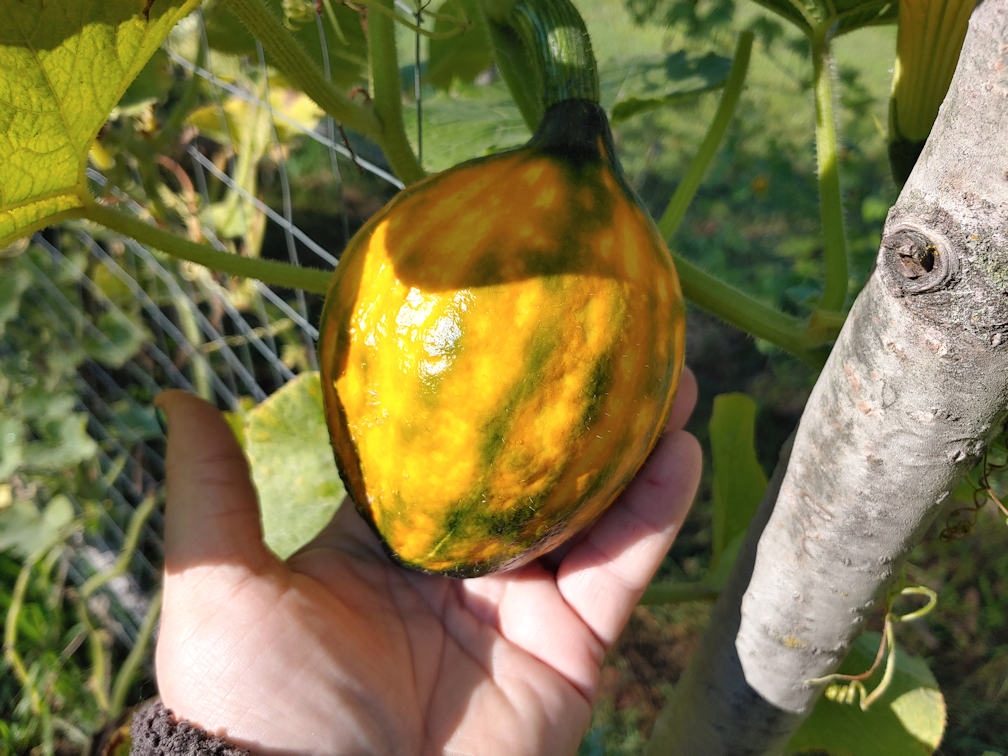
The Tennessee Dancing Gourds are one I don’t have much concern over. Though there are a lot of little gourds developing still, there are quite a few “large” ones like this, that have reached their full size, but are still ripening on the vine.

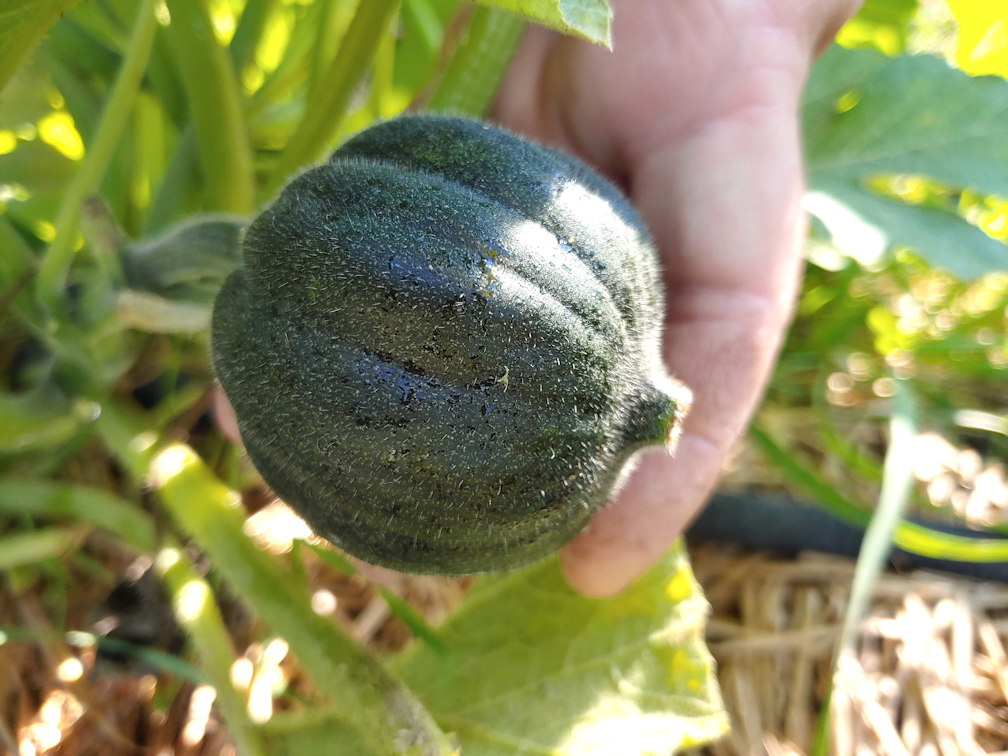
One of the few remaining Halona melons came off its vine this morning. There are a couple of somewhat larger ones left that might have enough time to fully mature, plus a few more tiny ones that won’t.
In the background of the photo above, you can see the biggest Pixie melon in its hammock. These guys could really use the extra time, it looks like.

We’ve still got Red Kuri developing, and they are growing fast at this stage – and you can even see a new squash developing in one of the photos.
The mutant is my favourite! :-D I’m just fascinated by it. It’s shape is different than the other Red Kuri, which can be expected with cross pollination, but it is also getting bigger than the others. If this is the result of cross pollination with the nearby Teddy squash, I would have expected it to be smaller, not bigger! The Teddy squash are a miniature acorn squash and their mature size should be smaller than the Red Kuri. For a hybrid to be bigger than either parent type seems quite unusual. I hope this has time to fully mature, because I really want to see how it turns out!
Speaking of Teddy squash…

We have another new baby! Of the two plants, the one that had only a single squash developing, now has two.
The other plant still has four developing squash, with the one in the photo being the biggest.

While checking the Crespo squash, I was able to find an open line of sight to get a picture of the one developing fruit that I’ve been able to see so far. It should be interesting to see how far it gets, before the frost kills it all. We certainly won’t get the large, green, lumpy pumpkins we are supposed to, but even a little one will be interesting to see.

The cucamelons are an odd one for this year. The plants are growing up the fence rather well, will plenty of blossoms and fruit beginning to develop. Unfortunately, most never get past the size you see in the photo above. They just drop off.

I did find a single, mature cucamelon. Which I ate. :-D It’s the first larger one I’ve seen in quite some time. This suggests a pollination problem, unfortunately.
And finally, we have our potato bags.
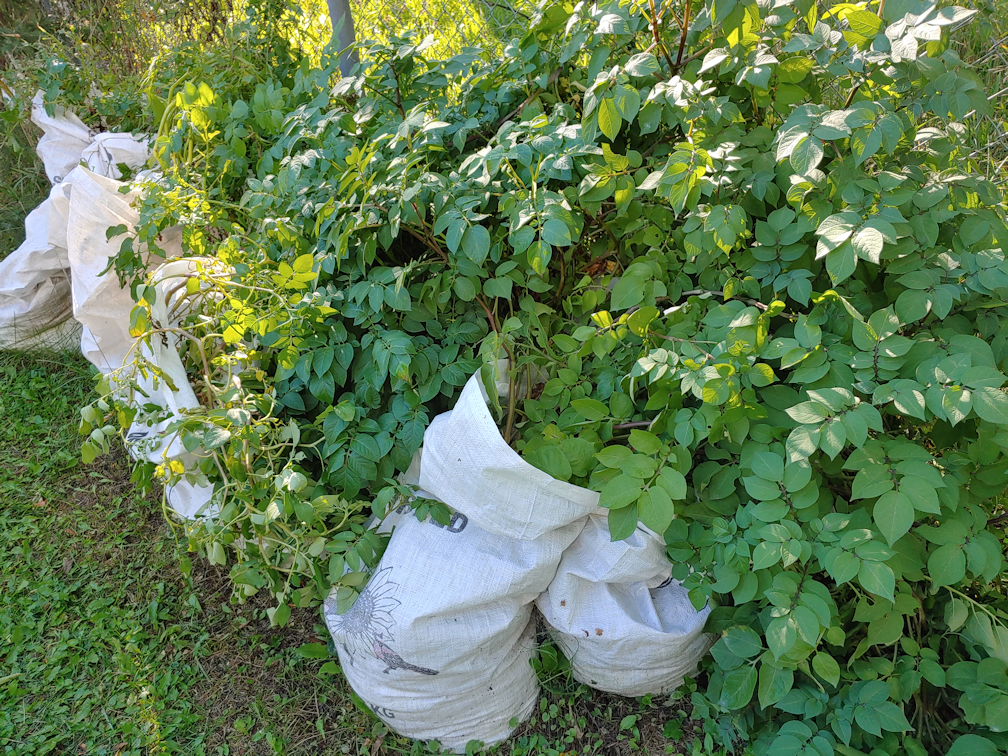
I’m not sure what to make of these! They just don’t seem to be dying back. Oh, the two varieties at the far end are looking a bit like they are dying back, but they also got hit the hardest by the grasshoppers. The two fingerling varieties just keep on growing!
When we first decided to use the feed bags to grow the potatoes, I expected to continually add soil over time. It was after learning that all four varieties are determinate, not indeterminate, that I changed my mind. They would not benefit from having soil continually built up along the stems, so only a single layer was added to protect the developing potatoes from light, and that’s it. The purple fingerlings, however, just keep getting bigger and bigger. Which leads me to think that these may actually be indeterminate potatoes, and would have benefited from continually adding more soil. I don’t know. It should be interesting to see how many potatoes we get when we do harvest them. I don’t image we will be getting many, but we shall see. If we decide to go with grow bags again next year, we will have to make sure to choose indeterminate varieties, which means finding a source for seed potatoes that actually labels them as determinate or indeterminate.
Until this year, I didn’t even know that tomatoes had those labels, never mind things like potatoes!
It has definitely been a year of learning!
The Re-Farmer
Yesterday afternoon, I headed out to gather a few vegetables from the garden. There were sunburst squash to pick, as well as some beans. We’re still getting enough purple beans to harvest to make for decent sized meal portions for the four of us. There were a few green beans, too, and about five yellow beans left. :-D

While heading back to the house, I just had to pause by the new tree stump bench and get a picture of these late bloomers. Normally, they would have bloomed about a month ago, and there are far fewer of them. With average heat and rainfall, this area gets filled with these flowers, and when they bloom, it’s just a mass of yellow. The bench will be mostly surrounded by them, once they recover. It’s going to be such a lovely place to sit in the shade. :-)
The Re-Farmer
Ginger let me take his picture this morning! :-D

He so loves his morning skritches!
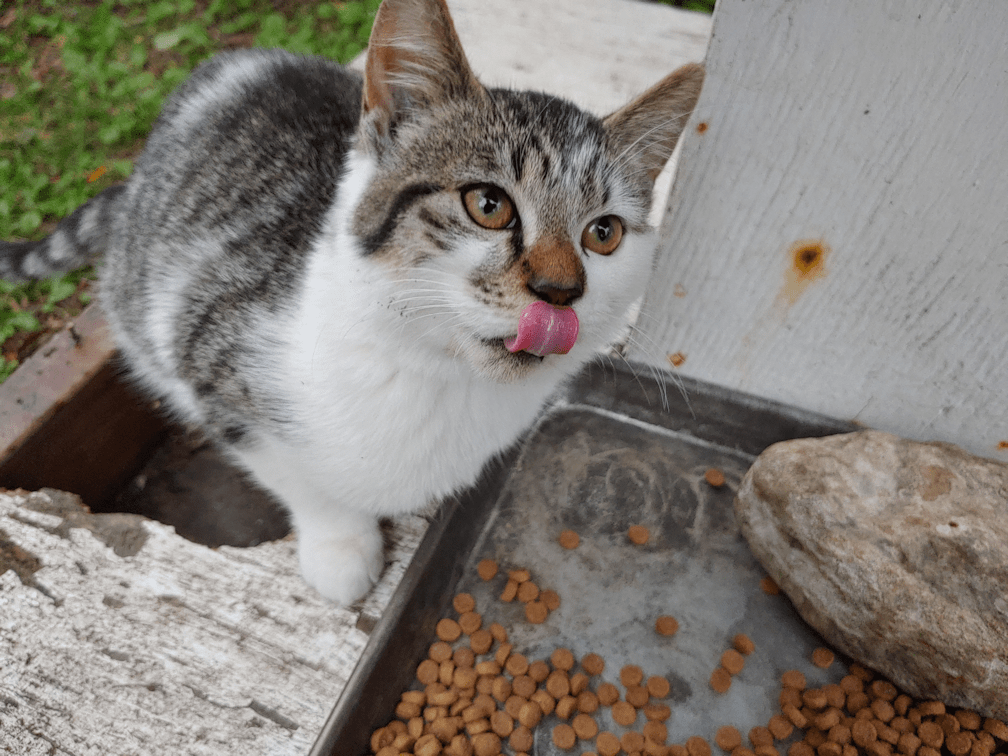
Outside, I had an avalanche of kitties come out when the kibble trays were filled.

Too funny, how Nosencrantz is fully in the pan. :-D She stayed with her cousins this morning, rather than dining with her mom and sibling in their usual spot under the shrine.
Potato Beetle is also in the photo, on the left. Ginger’s outside siblings, Nutmeg and Creamsicle Baby, seem to have been driven away by him, completely. They disappeared soon after Potato Beetle returned. I do hope they’ve found another home on a nearby farm.
Nicky the Nose is another one was haven’t seen in ages. He’s not one of ours; he was here for the food and the ladies quite often, but I haven’t seen him in a couple of months. Which I don’t mind too much, since he was not only going for the ladies, but fighting with the boys. Rolando Moon is another one we haven’t seen in a long time, but she typically disappears for weeks at a time. She was always pretty mean to the other cats, and more recently, they’d been increasingly aggressive towards her, so I wouldn’t be surprised if she decided to stay wherever else she’s been staying when not here.
The outside cat population is always pretty transient!
The Re-Farmer


