Well, I’d say today was a productive day, in a very positive way!
Quite early on, I started getting a whole bunch of messages.
Some were from my brother regarding our mother. She has come down with a cold, though they are still waiting for test results to confirm, and is currently in quarantine, and the staff made sure to let him know.
Then I started getting messages from the rescue. Domino, one of the cats they took in from us quite some time ago, has not been doing well with the foster. She has been staying in hiding this entire time. She comes out to eat when no one is around, and that’s it. She’s been seen by a vet and as medication no one has been able to get into her. She’s booked to be spayed this Friday, and would we be able to take her back?
After some back and forth messaging, it was worked out that Domino would be staying with one of the rescue people for observation, first, then she will be brought back here, where we can keep her in the isolation shelter she is so familiar with for her recovery period, and then she will be back with the other yard cats. While in the isolation shelter with no other cats, we will be able to give her the medication in her food, if that’s still needed. She should be back here some time next week.
Then they asked how we were doing for cat food. I told them, I need to pick up more kibble for the outside cats today, and that I will never say no to the offer of cat food! At first, they talked about bringing some with Domino, but then someone said that, if I can meet her in our usual spot (thankfully, that particular stretch of road is no longer closed from the recent flash floods) this afternoon. Which I was happy to do.
Today being Wednesday, the store the post office is in closes at noon, and I had some packages to pick up, so I figured I would do that, first. The rescue worker, however, said that she could meet me shortly after 11, if that worked. That worked out very well, since it meant I could pick up the mail and then keep on going to meet her.
Then I got a call.
In between all the messaging, I managed to call the garage and left a voice mail asking about the status of the truck, suggesting texting me might work best, since I was suddenly going to be out and about.
The owner phoned me back very soon after I left the message.
The truck is fine.
They checked it out and found nothing wrong, but a code was coming on on the diagnostic computer. They cleared the code and took it for a test run. Everything is working find. They figure that the code was triggered while the part was being replaced. The only change is that, with the new part installed, moving the shifter is a lot stiff than it was before, which is to be expected.
Also, there was no charge. !!! They don’t charge for diagnostics, and they didn’t charge me for their time. There was nothing for them to fix.
I made sure to let him know how much I appreciated that! We were pretty stressed out by the potential bill.
I told him I was meeting someone soon and would be in the area, so I could pick up the key afterwards but leaving the truck, as needed to work out when my brother and I could switch vehicles, which he was good with.
I messaged with my brother and SIL about the truck, letting them know the status of the truck, and I would get the key after meeting someone with a kibble donation, and we could work out switching vehicles by their schedule. Which was settled until they messaged again, suggesting I take the truck home and leave their car at the garage. They’d pick it up with their spare key, then get the other key back from me the next time we meet up.
Plus, if something went wrong with Damocles again, at least their car would be nearby and available!!
So that was all worked out, and I was soon on my way, with my first stop at the post office.
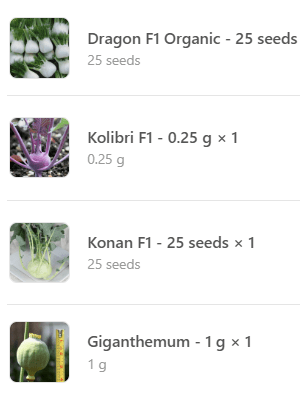
One of the packages I picked up was my order of replacement seeds.
I have different varieties of purple and white kohlrabi, plus a different variety of fennel, all to try next year. The Giganthemum poppies are to sow in the fall. The last packet I got turned out to not have a lot of seeds in it, so I was going to order two. That size was sold out, though, so I got the next size of packet up.
If you check out the label, this one gram packet has about 1,691 seeds in it.
I don’t think I’ll be running out so quickly this time!
These are also for next year, but I will be direct sowing them in the fall.
I didn’t check the package out until after I got home, of course. From the post office, I headed out to meet the rescue person at our usual intersection. She had six 8kg bags of kibble for us!!!
As we were transferring the bags, she pointed out that some of them were taped. It turned out to be exactly what I thought. These were damaged bags that could not be sold retail anymore. She has a family member that works in a warehouse and she’s been able to collect the damaged bags to donate to the rescue, instead. Which is great, except she is retiring soon, so that donation source is not going to be around for much longer. For now, however, they have lots of these damaged bag donations.
After we parted ways, I headed into town to fill my brother’s gas tank before going to pick up the truck. After talking to the owner about the truck for a bit, and he told me about the test drives and so on, I asked about being able to leave my brother’s car for them to pick up later. He was good with that, and told me where I could park it.
I just had to transfer stuff over, first. Including those bags of kibble.
I am so incredibly grateful for this. This should last us to the end of the month, and maybe a bit beyond!
Once everything was transferred over, I parked my brother’s car as directed, then took Damocles home.
Of course, with the way things have been going, I was absolutely expecting something to go wrong.
Nothing did! N warning lights or messages on the onboard computer. No alarms dinging. Everything was running smoothly.
Also, it felt so good to be driving the truck again. My brother’s car is a sweet ride, but I find I really prefer to drive a larger vehicle! This truck is just on the edge of being too large for my comfort, but that’s been okay.
Damocles has been that most bizarre combination of being the best vehicle we’ve ever owned, and the worst vehicle we’ve ever owned!
Once at home and unloaded, I headed out again, this time with a daughter to help out.
It was time to protect some walnut trees.
One of them already has protection, which left three surviving trees to protect. One of the unprotected black walnuts was untouched, another black walnut was down to a stick in the ground, as was the new Manchurian walnut. It had leafed out so well, too! Both of the deer damaged walnuts, though, were already showing new leaf buds.
Once we brought supplies over (and my walker), I paced around the Manchurian walnut to decide how long a piece of chicken wire to cut, then my daughter and I unrolled the wire onto the ground so I could pace out the length. The roll is getting close to the middle, so it kept wanting to roll into itself. Annoying, but still workable.
We cut out the three lengths we needed, then set them up.
Here you can see the two black walnut, and the Manchurian walnut way at the end. This time around, I didn’t skimp on the wire, so the protective ring is a lot larger than others I’ve made, Plus, I didn’t cut the width in half, like I usually do. Once we had the wire overlapped, it was pegged to the ground and we secured the overlapping cut ends as best we could. I had considered using bamboo stakes to secure them more and add to the visibility, but the ground it just too hard. The bamboo would have broken. I did, however, bring some high viz, reflective cord. Each cage got the cord wrapped around the top, making sure to use it to secure the overlap more, and tied off.
Once that was done, I dragged the back garden hose over – which I was able to do while using my walker – as my daughter put the wagon of supplies away and brought me a pair of watering cans. The hose from the back tap reaches a decent amount into the outer yard. I set my walker up near the end to use while refilling, and gave all the trees we’ve got out there a deep watering.
That done, I brought the hose back and started watering the garden beds. I did as much as I could with the back hose, then continued with the front hose in the south and east yard garden beds.
While watering in the east yard garden beds, I was considering whether I should cut my losses rework the kohlrabi and cabbage beds, or keep watering it. I’m not seeing anything in the kohlrabi bed, but I watered it anyway. Then I started to water the cabbage bed.
Which is when I finally saw them.
This bed was getting overgrown with what I thought were self seeded radishes or turnips, but they were already bolting and starting to bloom. Yellow flowers. The radishes I grew for their seed pods had white flowers.
I took the cover off and weeded the bed, finding a surprising number of cabbage seedlings.
They are hard to see in the photo. That these are a purple savoy cabbage helped identify the seedings from everything else, as they have a darker purple in them.
Unfortunately, while the raised bed covers protect the garden beds from cats and other critters, they don’t block the elm seeds. They are everywhere, and many are starting to germinate. They are practically everywhere and, in some places, they are starting to germinate and crowd out the plants I actually planted.
The watering done, I remembered one last thing that I wanted to do. Clear out some stuff in the garden shed, that the raccoons had knocked about and could potentially harm them.
They didn’t like the commotion at all. Too many things tangled around each other. I did move the felted grow bags from previous years to make a sort of bed for them.
When I checked again this evening, after doing my walkabout, they were gone. I guess it was too much for them, and the mama moved them. Which, technically, is a good thing, but I’ going to miss the adorable little buggers! I’ll check again in the morning, though. Maybe she’ll bring them back after things have quiteted down again.
Meanwhile, I’ve since received a message from my SIL. They have retrieved their car and got it home.
I am so thankful for them. I honestly don’t know what we could do without them at times like this!
I am also ridiculously tired.
Time to go to bed.
It’s been a good day, though, and I am happy we have Damocles home!
Even if I do expect it to break down every time I drive it…
….
The Re-Farmer