Back home, kibble math and some root cellaring

It’s been a wet and dreary day today. It started raining off and on last night, and has continued throughout the day. I was just getting the kibble ready for the outside cats when it started raining again! No surprise that many of the cats preferred to eat in the sun room. 😁

The squash we harvested was still on the table outside, so I brought it all in. I laid the winter squash out on the freezer in the old kitchen, but there wasn’t room for most of the squash from the compost pile. Those, at least, I could find room for in the sun room.

I left fairly early to get my daughter, since I wanted to make a couple of stops along the way, including a gas station, where I made sure to pick up an air freshener for the car! Having the garbage in the car from Thursday evening to Saturday morning was not a good thing. We can’t even leave windows open to air it out, since either critters or insects would get inside. The last thing we need is for a racoon to decide to get in and tear the inside apart, searching for the source of the smell.

I also wanted to stop at a Walmart long the way to pick up one more bag of kibble, as our supply was not going to make it to our first big shopping trip.

We have not been feeding the cats more than usual with the outside cats, and with the inside cats, we’ve been controlling their feeding a bit more. Instead of having dry cat food available throughout the day, and giving them wet cat food in the evenings, they are getting two feeding times with dry kibble, with a small feeding in between. At least we’re not running out of wet cat food, as I’d been buying extra for the kittens.

This is the first month I’ve really tried to keep track of how much kibble we’re buying. Usually, we’d buy 8 bags during the big shops, then just buy more near the end of the month a few times. This month, however, I got twelve 9kg bags of kibble from Costco. We thought that would be enough. This is, however, the second 10kg bag I’ve had to get.

That’s 14 bags, totalling 128kg of kibble for the month. Which is 282lbs.

With the Costco and Walmart prices, plus tax, that’s about $300 on just dry kibble, this month alone. Then there’s the canned cat food, plus the litter pellets. The litter pellets are cheap and the 40lb bags last a long time, so I’d say about $20 a month, on average. The canned cat food, between the large case we get at Costco, and the slightly smaller cases we get at Walmart, is about another $90

So we’re looking at $410 (US$304.18 at today’s exchange rate) we’re spending on the cats this month. On those months where we had to buy kibble in the middle of the month, wherever we could, it would probably be more expensive.

That would make one heck of a car payment.

Now, part of that can be blamed on inflation. The price of kibble has increased by almost 6% in the past couple of years. And that’s just going by Costco and Walmart prices. Other stores have seen steeper increases. Especially outside of the city.

It’s ridiculous, but the alternative would basically be to start putting cats down. With the outside cats, someone from the municipality would send someone over to shoot them.

I suppose we could just stop providing food for the outside cats, and they’d eventually go away, but considering how starved some of the cats look after they’ve disappeared for the summer, I don’t think there are a lot of options out there for them. More likely, the coyotes would get them. So… no. Not going to let that happen. Even if it means sometimes feeding skunks, racoons and blue jays in the process.

So, we keep feeding them, and looking for people willing to adopt. Thanks to the Cat Lady, we have actually managed to adopt out quite a few, though six of them are still with the Cat Lady, four of them permanently!

Ah, well. It is what it is!

Meanwhile…

When I got to my brother’s, I thought they’d be really tired and I would just be saying hello and good bye, but they were up for an actual visit. It was so wonderful to see them! We got caught up on how things went while they were gone, particularly with my mother. As we were leaving, I mentioned coming back to see their photos from the trip. My SIL told me she’s considering putting them together into a movie, like I used to do, years ago. Digital cameras were just starting to become affordable, and when we moved out of province, we started to basically document everything. Then, about once a year, I’d put them together into a DVD for my parents. Moving making software for home was also just starting to be affordable, but these were still little more than slide shows. Still, I had fun adding music and making captions, and sorting things into chapters. The idea was that these would be easy for my parents to see on the TV.

I did that for several years. Then I found out my parents never watched any of them. So I stopped.

Making DVDs, that is. I never stopped documenting things. It had become a habit by then, along with journaling. A habit that came in very handy when life suddenly got very complicated, and I found myself having to make witness statements, police reports and affidavits.

So glad to be away from all that now. Dealing with our vandal is small potatoes in comparison! It also made his attempts to intimidate me pretty comical, but that’s a whole other topic! 😂

But I digress!

I hope she does put something together. I’d love to see it!

After my daughter and I left, we made a couple of stops along the way, including to pick up the pizza order her sister made after we let her know we were leaving my brother’s. That was sweet of her to treat us!

We’ve had more take out this month than we’ve had in years!

My daughter enjoyed her time taking care of my brother’s place for them, but she was glad to be home.

Once at home, and before we settled in to eat, my older daughter and I were able to deal with the winter squash I’d left on top of the freezer. The first challenge was just to get through the old kitchen door, without any cats getting through. Then it was just getting them into the new part basement, where the root cellar is. Then it took the two of us to get them into the root cellar, but keep the cats out.

But we got it done!

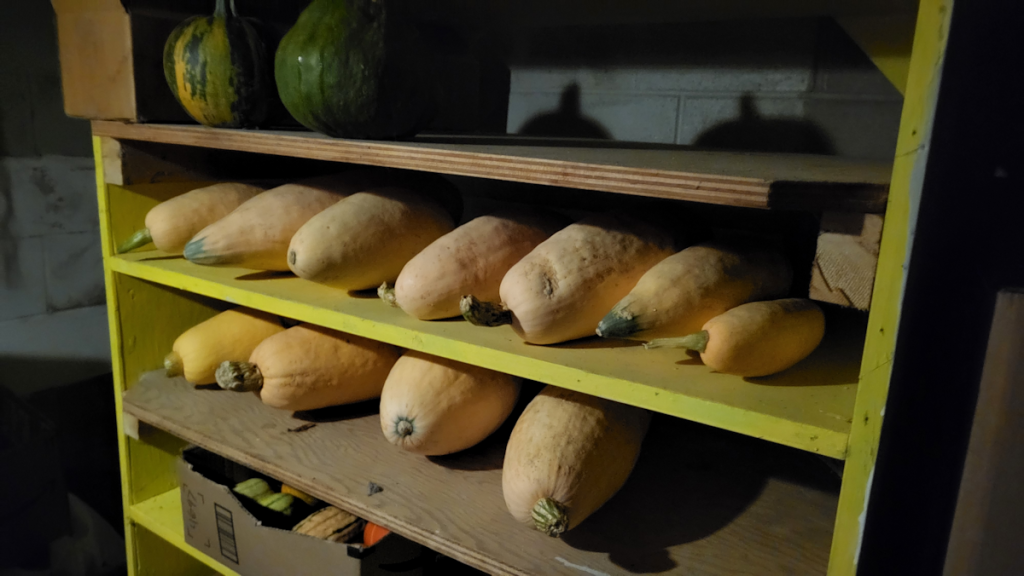
The two round, green pumpkins at the top are from the compost heap squash. All the smallest winter squash fit into a carboard box. The rest are the candy roasters and Pink Banana.

The root cellar is not a very good one, to be honest. We had considered turning it into a cheese cave at one point, so I set up a thermometer and a hydrometer in there, and kept track of the temperature and humidity for a year. Both fluctuate too much to make a good cheese cave – or a good root cellar! Still, my parents used this as a root cellar for many years. It works well enough!

Not that any of these squash can be left there for long. With the frost killing off the plants before the squash could fully mature, they won’t last as long, so they’ll need to be eaten fairly quickly. We are most eager to try the big ones!

The main thing, however, will be to make sure we don’t forget about them. I avoid going into either basement – or even the upstairs – because my knees and stairs are sworn enemies. We go into the root cellar even less often. It’s where we store our Christmas decorations away from the cats! Heck, we still have a couple of cases of mead down there that we keep forgetting exists.

But it’s done, and the winter squash is put up for the season.

We’re still processing tomatoes, too. We have whole tomatoes in the freezer, plus I’ve got a couple more trays dehydrating in the oven right now, and there are still more under the old market tent, slowly ripening. We’ve just been bringing in the ripe ones every few days or so. Thankfully, those are out of the rain, and no critters seem interested in them at all!

I was just yawning and thinking how it’s so late and time to go to bed, but I’m seeing it’s not even 8:30pm yet. It’s full dark out there, and feels so much later! Especially after being such and overcast and dreary day to begin with.

I might try going to bed early for a change.

Ha! Who am I kidding? I’ll probably get started on something, then suddenly realize it’s 2am again. Because I’m silly that way!

The Re-Farmer

My morning outside – including a harvest!

With the popcorn harvested, I needed to find someplace to put the box cover. While removing the chicken wire, I figured out a great spot for it.

The onions had a cover simply because I had one. It made weeding impossible, but with onion tops growing through it, it couldn’t be conveniently moved aside.

Since these covers are all 9’x3′, it fits perfectly on top of the box cover. This would be an ideal set up to protect taller plants! I just used the twist ties that were holding the chicken wire to fasten the two covers together. The onion bed is basically a storage spot for them, but now I can access the onions for weeding!

And yes. Those are new squash blossoms in the compost ring in the background!

While checking the other garden beds, I had a little surprise.

The largest melon had picked itself! 😆

I even found a pattypan large enough to harvest.

That’s the size we enjoy the patty pans best.

My daughter gets back from house sitting soon. We will save tasting the melon for when she gets back. 💚

In other things…

When feeding the outside cats, I tried to do a head count. It takes a while for them to all show up. I eventually counted thirty – then three more kittens ran into the yard!

After my rounds were done, I did a dump run. The car was already loaded, because when I tried to do it 2 days ago, it was closed.

I was glad to be able to air out the car, later!

As I was returning to the house, I spotted Nosencrantz slinking away from the kibble under the shrine, and disappear behind the pump shack. She is looking big and fluffy, and is acting incredibly shy. I wish I knew why! At least we know she’s still around.

Now, if only Butterscotch and Marlee would show up!

The Re-Farmer

Trellis bed progress: first end cap done

Finally! I was able to bring over my tools and equipment, which I just keep in the utility wagon now, over to the garden and get a bit more done on the first trellis bed.

The first step was to cut the two logs set aside into 4′ long pieces. I know for sure I’ll need two per end, but these logs are thinner than the ones in the side walls, so I cut extra just in case.

Before putting one of the end pieces down, I loosened up the soil where it would be lying and tried to level it off a bit, since there was a dip near the middle of the space. Because I want these beds to be 4′ wide on the outside, after laying down the first end piece and matching it to the outer edge on one side, I shifted the other side a bit to line up with the other end.

Steel toes boots are create for kicking logs and not breaking my toes!

I started with the thickest 4′ log for the base log on this end. Using the side wall logs to mark where I needed to cut, I removed wood from the ends to fit over the side wall logs.

What a pain.

For this job, I used the mini-chain saw, a hatchet and hammer to remove the bulk of the excess wood, and even the electric chain saw to remove the excess wood.

A pain, to be sure, but much faster and easier than when I started building the high raised bed and had only hand tools!

Once I was satisfied with how the end piece fit, it was time to secure it. A couple of years ago, I’d bought some plastic coated metal rods to use as supports in the garden. The rods were hollow, and they quickly bent and broke in our rocky soil. I’ve been using the broken pieces to secure things like hoops for garden beds, but I also used some to secure the corners of the tiny raised bed in the old kitchen garden.

I decided to use them to secure the end pieces on the trellis bed, much like I already used rebar to secure the side walls. I drilled matching holes through the end pieces into the side walls, then hammered the metal rods in place.

Then I went through the other 4′ lengths to find one that fit the best on top of the first log and repeated the process. This time, though, I was having to fit them over two very different sizes of log, so that required some extra angled cuts, as well as flattening the length of both logs a bit, so they’d fit against each other better. There’s still quite a gap in between them in one place, but that can be chinked later. Last of all, they were secured with more metal rods, though the top log was thin enough that I could break one of the rods in half and use the shorter pieces.

And here it is! The first finished end cap, viewed from inside the bed.

This all took quite a while to do, so once it was done, I stopped for the day. I’ve got too many other things that need to be worked on.

I’m quite happy with how it’s working out so far.

Since the vertical posts will be added to the outsides of the bed, not down the middle as I’d planned to do originally, I will fill the bed once the other end cap is done. That way the layers of material will have at least a bit more time to break down under the top layer of soil it will get. I may even decide to get more logs to build the next bed, first. We need beds to plant in next year, more than we need the trellis part of it. The trellis posts can even be added after planting, if necessary. The priority is to have more planting space. This year’s garden is so much smaller than I had planned on, simply because I ran out of prepared spaces to plant in. I don’t want to have that situation again, next year!

So, once this bed is built and filled, it’ll be time to cut logs to size from the two downs trees we have ready right now and drag them over. These trunks are so thick, the bottom 10′ will be set aside to be used as supports for the outdoor kitchen we will be building. Using such thick logs in the trellis beds would be a real waste of material.

The first day of fall is tomorrow, and time to get work done before things get too cold is running short!

The Re-Farmer

Our 2023 garden: critter damage and corn harvest.

While doing my morning rounds, I found some new critter damage around. Both corn beds were hit, though not too badly. A few other things were nibbled on, including the way too under ripe Boston Marrow that I had left on the vine. It had gotten about 6-7 inches long and was even looking like it was trying to ripen since the plant was hit by frost. Now, there’s just a bit at the end of the stem left.

Thankfully, the critters seem completely uninterested in the peppers, melons, carrots and onions!

So this morning, I harvested the corn, starting with the popcorn.

In the first couple of photos above, you can see the damage. The slugs were quick to take advantage of the situation!

I did gather all the fallen kernels I could find. I don’t want them reseeding themselves in this bed.

There were still a decent number of cobs to harvest. The stalks will be used in the layers filling any new beds we manage to get done this year.

I took advantage of the chicken wire on the box frame and set out the cobs to dry out in the sun and wind. I moved the pinwheels over, to keep the birds out. We’ll bring them inside at the end of the day, as we have no place to set something like corn to cure, outdoors. Things like onions and tomatoes get ignored, but the skunks, racoons and birds would have quite a good time with the corn!

Obviously, this is still not a lot of popcorn. This is a test crop. Once things are will dried out, we’ll make some popcorn from in and see if we like it. If so, we’d be wanting to plant a whole lot more than this, to provide enough popcorn for the family! If we don’t find it’s worth it, we’ll test other varieties until we find something we like enough to keep growing.

Next was the Montana Morado corn.

Even with having a few critter damaged cobs that were worth salvaging, the losses were a lot higher in this corn. Some of the stalks didn’t even develop cobs in the first place. The few cobs we had were also set out on the wire to dry. In the second photo, you can see spots of white in places. Those are kernels that were chewed on, revealing a snow white interior!

Again, there isn’t much there, but we’ll have enough to make some corn flower to try out. I still want to try growing the South American kulli corn and acclimate it to our area, but if this corn’s flour turns out nice, I’m certainly not going to turn my nose up to a glass gem variety that’s bred for norther climates.

When it comes to growing something like corn with the goal of self sufficiency in mind, once we have found varieties we like, we would need to grow a LOT more to have enough to preserve/store. This year, we didn’t even have the space to try any of the sweet corn seeds I got! If we are going to be growing sweet corn, flour corn and popcorn, not only would we need more space to get the quantities we would need, but they’d have to be kept well apart from each other, so avoid cross pollination. Which may not be too much of a problem, since the different types of corn would start pollinating at different times of the year, but it would still be a good idea.

The bed with the purple corn still has beans in it that survived the frost. They are just there to fix nitrogen in the soil, as corn is such a heavy nitrogen feeder. I don’t plan to harvest any more of them, and the plants and roots can be left in the soil to break down, when the bed is prepared for the winter.

On a completely different topic…

As I was about to bring the purple corn to the chicken wire, with the popcorn, when I saw Broccoli going by – with three kittens following along! This would be a second litter for her, as she was among those that had kittens really early in the season. One looked like a tortie, one looked like a tuxedo, and one seems to be a long haired black and white – more black than white. I saw that one later on, in the shelf shelter, where I’d put some kibble earlier in the morning. I was only able to get a brief video, but my hands shake quite a bit, which is greatly exaggerated when zooming in.

So… three more babies. 😑 I’ve lost complete track of how many there are this year!

My next surprise was not as adorable.

I came into my room to find a couple of small bins filled with crafting material, and the stuff that was on top of them, crashed onto the floor among other things that got dragged down as they fell. A couple of the kittens have discovered the top of the wall shelf and are very determined to get up there, no matter how much I try to block it off!

After cleaning that up, I went to my computer. I don’t know what they stepped on, on my keyboard, but all the shortcut icons in my task bar were gone. Even the start button was greyed out, like when you put the cursor over it. Except, the cursor wasn’t even near it. I tried clicking on the start button, and nothing. I did get that spinning icon that shows when the computer is busy with something, but it wouldn’t stop or go away. I ended up having to do a hard shut down and just hoped it would revert to normal when restarted. Thankfully, it did, and I was able to upload files from my phone and start this blog post!

We really need to start letting the bigger kittens out of the “isolation ward”. I’d hoped to have at least a couple adopted out by now, but still no takers. The problem with letting them out is, they’d eventually make their way into the new part basement, where we keep a number of litter boxes. The girls will need to kitten proof it as best they can, first. There are places the kittens could get into that the adult cats can’t fit in anymore, where they could potentially come into harm or just plain get stuck.

Speaking of the girls, my house sitting daughter will be home in a few days! It will be good to have her back. I’m not sure she’ll feel the same, though. She’s been in a cat free house, with no one to clean up after but herself, for several weeks now! 😂😂

They’ve already got plans for a Hannibal marathon when she gets back, so she’s at least looking forward to that! 😁

Well, time to grab a late lunch, then get back outside. It’s a beautiful day out there, and I want to get as much done out there as I can!

The Re-Farmer

Our 2024 garden: planting garlic Plus updates

Yes!!! The garlic is in!

On my way home from running errands yesterday, I was able to stop at the post office and found our garlic order had come in earlier than the tracking information has said, the last time I looked. Since I then ended up going to my mother’s to get her to a dentist, that meant the garlic went into the ground today.

Before I get into that, though…

I followed up with my mother and, sure enough, she isn’t going to fill her new prescriptions. She already takes sooooo many pills, you see.

She also feels great. My mother has an amazing constitution!

The pharmacy had called her about the prescriptions, she told them how she was feeling and what she was doing (at least she’s following the instructions about things like swishing with salt water), and he said he would hang on to her antibiotic prescription for her, just in case she needed it.

I brought up about getting her dentures done after things are healed up, to fill the empty spots, but she’s already hedging on that. When I mentioned she might have problems eating (she already was, with the top tooth breaking off), and she told me she’ll just eat soft food. *sigh*

We’ll see how that goes.

On another note, I also found a message from the financing company when I came in from planting the garlic. They’ve found a deal that fits our budget, and have already told our mechanic to look for a vehicle that fits the amount. Which is pretty much what I’d told our mechanic we could afford payments on, almost two years or so ago, when I first asked him about getting a vehicle. Whatever we get will be $10,000, maximum, after taxes. The only thing was the banking records I’d sent in to show proof of income. Since I logged in to my bank account, it only had my name on the statements, even though it was for a joint account. It looked like the income was in my name, instead of my husband’s. So we were able to get around that, and the final confirmations can now be made. After that, it’ll just be waiting for our mechanic to find a vehicle for us that’s within the price limits.

I’m really trying not to get my hopes up, but wouldn’t it be amazing if he found something in time for us to be doing our big monthly shops in the city?

So… that’s done as far as can be for now.

Meanwhile, I got some gardening for next year done!

We ordered only one type of garlic this year; three pounds of Purple Passion hard neck garlic.

Since the bed I’d intended to plant them in still has the Jebousek lettuce that I’m allowing to go to seed in it, we had to change our plans. I decided the old kitchen garden, where we’d planted the red thumb potatoes, would do.

I wasn’t sure how many cloves we’d have, so I decided to prep both the long, thin bed, and the end of the wattle weave bed. The old mulch was removed and the soil loosened. I’ve got one bag of sheep manure left. Though I kept the bag covered with a mat, it was still quite wet from the last time it got rained on, so I spread it out by the hand full. I used about half the bag on the two beds, then worked it into the soil. Once that was done, I gave the beds a deep, thorough soaking.

I then left the water to be absorbed and went inside for a while. When I came back out, I soaked it again, then moved over to the tiny raised bed. The shallots in there could have been harvested a while ago, but I was letting the self seeded poppy pods dry out, first. There were still a few tiny green pods, but I left those. Once the pods were trimmed, I could remove the cover and pull out the poppy plants, the self seeded dill, and some of the weeds, then gather the shallots. They’ve been there long enough, they’re already cured.

In the photo with the gathered shallots, you can see some seedlings above them. Those are Chinese elm. They have remarkably long and persistent tap roots. Once the shallots were gathered and removed, I made sure to carefully loosen the soil first, so I could get those out without breaking them.

This bed was redone last fall and, my goodness, the soil was so nice and loose! Almost no compaction at all. It was great! Once it was all cleaned up of weeds and roots, I worked in a few hand-fulls of manure, too.

While I was working on that, my daughter was able to come out and help. She started by separating all the cloves from the bulbs while I finished with the tiny raised bed. I figured it could be a back up bed, in case there were more bulbs than could fit in the other two beds.

By the time the tiny raised bed got a good soaking, my daughter had finished separating the cloves from one bag, though she did find one bulb had started to rot. Only one clove out of that one was salvageable.

In the past, we planted two types of garlic in a pair of low raised beds. By spring, one bed was almost a complete loss, while the other had maybe half of them survive. Since the ones that survived all seemed to be closer to the middle of the bed, it seemed that they had frozen, even under the mulch. We can mulch the top, but not the sides. So for these ones, I wanted to make sure they were planted away from the sides. I used a stick that had been used as a garden marker to make holes to put the cloves in. With the long, thin bed, I made three staggered rows. It took about 1 1/2 bags to fill them. In the wattle weave bed, it is wider at the end, then narrows a bit as it goes towards the corner, so I was able to get a couple of rows with 4 cloves, then the rest with 3.

I fit the rest of the second bag in there, with room for only 4 cloves from the next bag. My daughter finished planting those, then counted the rest, while I started making planting holes in the tiny raised bed. That bed could only hold another 17 cloves, in three staggered rows, and my daughter counted about 32 or 36 – they moved around in the bag, so she wasn’t sure.

There was only one place that made sense to plant the remaining cloves, and that was the bed with the volunteer tomatoes transplanted into it.

So while she planted in the tiny raised bed, I pushed aside the mulch in the bed with the tomatoes, made more planting holes at the end by the rose bush, then down the middle, working around the soaker hose, making sure I had more than enough, then watered each individual planting hole with the jet setting on the hose. In the end, the remaining cloves fit all down the middle, between the rows of tomatoes, and we didn’t need to plant closer to the wall at the end of the bed.

If we hadn’t been down that one bulb that had gone soft, we would have had to try and find yet another spot to plant a few last cloves! As it is, we just managed to fit them all.

After all the cloves were covered, they got watered again to settle the soil around the cloves, then lightly covered with mulch. The mulch itself got a light watering, just to dampen it. When things start to get colder overnight, they’ll get a thicker mulch but, for now, it’s more to protect the soil.

I am quite happy to have so much garlic planted! The only thing is that, if we get the mild fall being predicted, they might actually grow too much before winter hits. That’s where a good, thick mulch will come in handy.

It feels so good to be already started on next year’s garden!

The Re-Farmer

Our 2023 garden: still alive! (sort of)

My morning rounds still includes checking the garden beds, and there are still a few surprises!

The Tom Thumb popcorn could probably be harvested now, but I’m going to leave the stalks for as long as I can before we do that. Just to make sure the kernels get all the time possible to fully mature and dry out on the stalks. So far, the critters seem completely uninterested in both corn beds!

Today was not as hot as yesterday, but still quite warm, hitting 21C/68F while I was working outside. Which is good for the remaining beds that will not be harvested for some time, like the Red of Florence onions next to the popcorn, which still have a lot of growing to do.

A real surprise this morning was seeing a bright yellow flower in the squash patch! The yellow patty pan squash plant is still alive, in spite of all the frost damage, and one of the female flowers actually bloomed this morning. There are several more female flower buds, too, but there are no male flowers to pollinate, so nothing will come of it. The green patty pans have squash that were big enough to survive the frost, and they are getting bigger, too. Even on the green zucchini, we found one little zucchini that had gotten bigger and could be harvested!

Later in the day, I finally cleared the tiny raised bed in the old kitchen garden, which required snipping off the dried poppy pods that had grown through the wire cover. These self seeded poppies have openings in their tops, so when I put them upside down in the container, the seeds just poured out. It really shows how these self seed so readily. The Hungarian Blue poppy pods do not have these openings, so are less likely to self seed.

Another surprise is seeing flowers on one of the volunteer tomatoes that got transplanted! They’re still so tiny, but they seem to really like where they were transplanted to.

I was going to plant garlic in the bed by the chain link fence, after it was reworked, but the garlic came in yesterday. The Jebousek lettuce is blooming now and I want to save the seeds, so the garlic had to go somewhere else.

Which is what my next post will be about!

I’m just loving that we’re past the middle of September, and there’s still gardening happening!

The Re-Farmer

Trellis bed progress: stripping

The plan for today had been to get the ends onto the trellis bed. Just before I headed outside, however, the power went out.

All I’ve got is an electric chainsaw, so cutting logs to size was out.

Which was fine. I needed to strip the logs of bark, first. I can see into the house from where I’m working, so I could keep an eye out for any lights back on again, letting me know the power was back.

Three hours later…

I started with the 2 dead spruces intended for the end pieces, one of which you can see on the saw horse. Then I started stripping the poplar that will be the vertical supports.

The poplar was much easier to work with, for the most part. The spruces have been dead for quite a while, so much of the barks is dried stuck to the wood. The poplar is still quite green. The draw knife could slide between the bark and the wood quite nicely, and just glide through.

Except for the branch nubs and damaged bits!

I ended up stripping them completely, as I could see critters were already getting under the bark and causing damage. The shorter lengths made them easier to handle, too, though I ended up putting the larger of the spruce logs back on the saw horse, just to stabilize it. With the lighter logs, there wasn’t enough weight to counter using the draw knife, and the darn thing kept rocking back and forth, and threatening to tip over.

Once stripped of bark, I lay them across the log walls to stay dry. Some of the logs I picked up were so damp from the grass, the undersides were covered with slugs!

After I got 9 of them done, my back was telling me it was time to do something else. So I grabbed a rope and dragged over the last 3 posts, then went back for the odd pieces. Those were light enough that I could drag 2 or 3 at a time, so that was done faster. These odd ones may or may not be usable as part of the trellis. If not, they will go into the bases of the trellis beds and buried, to break down over time.

I had just finished dragging over the last pair of odd sized logs when I saw a light on in the house. By then, I was done with this job for the day. I’ll continue tomorrow.

As for the power outage, it was likely due to high winds. Not long after ours was back on, my house sitting daughter let us know the power went out at my brother’s place, too. He’s got multiple back up generators, though, so she is just fine!

The power loss was just for 3 hours this time, but it’s a reminder on how we need to get our back ups done. Like the outdoor kitchen. With the high winds we had today, we could not have done any outdoor cooking, if it came to that. The outdoor kitchen we have planned will allow us to cook outdoors in pretty much any weather conditions.

The other thing is to get that old well checked. If all we need is new leathers for the hand pump, we’re set for water, too. Plus the outhouse will do until we build the more comfortable outdoor bathroom with a composting toilet we have planned.

Little by little, it’ll get done!

The Re-Farmer

Trellis bed shift

I’ve been analyzing that side wall of the trellis bed with the bowed log on the bottom, and decided we needed to make a change.

The plan had been to cut joins into the horizontal logs and the vertical posts, then secure them in place. There will be four of posts, about 6′ apart but, the more I looked at it, the more I realized that in order for the posts to be in line with each other, I’d have to cut away far too much wood. It would weaken them too much.

There was one solution, though, that could be done before the end pieces were attached. The pairs of logs are attached to each other, but not to the ground.

So I snagged my daughter and some rope, and we reversed the wall.

I neglected to take photos at the start. To carry the logs, we wrapped some rope around the ends and used them as handles to lift and carry the logs around to face the other way. It was awkward, but it worked.

The rebar that joins the logs goes all the way through. At the end in the foreground, barely an inch goes through. At the far end, there’s almost 3 inches of rebar that could be jammed into the ground as we lined up and set the logs in place again. Since I cut the ends of the walls in line with each other, we had to make sure they still matched, so that the walls at the ends will be straight once they’re added.

This shows better, why I decided to switch it around. You can see where I used the chainsaw to flatten the top of the base log, for the other log to rest on! 😄 That worked out on the ends, at least! This is where the bow sticks out the furthest, pretty much in the middle. The vertical posts would have been on either side of this section. The top log is pretty straight, so I’ll probably just flatten the logs where they will come in contact, rather than actually cut joins.

But that will be done after the end pieces are added. Technically, once those are in place, we could still move the entire bed if we had to, but that would not be a very good idea!

The Re-Farmer

Pruning day

Well, I managed to get at least something done outside today!

The before and after pictures. I was losing light by the time I was done, so the second shot turned out pretty bad. Sorry.

My goal was to take care of the one at the end of the row of crabapples; far left in the photos. I’ve been tasting apples from different suckers, and there were two that have good apples on them. Everything else got cut away. Quite a bit of it was already dead. In the second photo, you can see the remains of the original tree that, from how rotten that stump is, died a very long time ago.

As I was clearing that one, I found quite a few branches from the tree next to it were entangled, so I started pruning that one, too. It has lots of little apples on it, but they are inedible. I was pretty ruthless in pruning it. The trees are too close together, and I don’t mind if we lose that one. The critters can eat the apples, though, so as I cleared away the branches, I made sure to shake off all the apples onto the ground. I’m sure the deer will enjoy them.

Since I still had some light, I did some work on the next tree. This is the one that has the really tasty little apples – a wonderful combination of tart and sweet. Unfortunately, this tree is dying. There were several large dead branches that I cut away, and wow did that ever open the whole thing up! One of the branches was so entwined with others, I had to cut it into three pieces, just to get it out.

All of the trees could use more pruning, but I did as far as I could reach. I could bring the little scaffolding over to work on them, but I think they’ve had enough pruning for this season. I don’t want to over do it. I’m not going to bother with the other crab apple trees, since they really should be cut down. One of them, diseased as it is, still has lots of tiny apples on it that the grosbeaks love to eat in the winter. I don’t want to remove a food source if I can wait. It will be a while before the silver buffalo berry start producing berries but, once they do, they are supposed to be quite prolific and should make up for the loss of crab apples as a critter food source.

Before starting on this, I went through all the tomatoes outside, boxed up the ripe ones and brought them inside. Tomorrow will be a day of preparing and freezing most of them, and maybe setting more up to dehydrate in the oven. We’re also supposed to be warm and dry over the next few days, so I hope to be able to get back to work on that trellis bed. Plus, our garlic should be arriving next week, so I want to make sure to have a bed prepared for them, too.

Lots of work to get done, before winter comes!

Oh, that reminds me. No word from the financing lady today, so I don’t expect to hear from her until Monday. It’s probably quite a challenge for her to find a deal that fits our budget for monthly payments!

Ah, well. What will be, will be.

The Re-Farmer

Our 2023 garden: still alive!

It’s always interesting to go through the garden after the first frost of the season, and see what survived and what didn’t. I’m rather used to finding things that end up dead after a few days, but it’s a real boost to my day when I find things that not only survived, but continue to grow!

The first photo is of the Ozark Nest Egg gourd, near the compost pile. All the volunteer squash in the compost pile were frost killed, and it looks like this little thing was, too, yet here it is, blooming!

The second photo is the yellow patty pan squash. There were some developing squash that were killed by the frost, but now I see that lower down the stem, there are both male and female flowers growing! I am not cutting back any of the frost killed leaves, since clearly they provided enough protection to keep the plant alive. In fact, I’m not pulling or cutting back any of the squash plants. Not even the winter squash. There’s no rush to do it, but who knows how many others are like this.

The last photo was a real surprise to see. The second light frost did damage the luffa leaves more, but they are still alive. What I did not expect, however, was to see fresh vines climbing the lilac, and new female flowers! I don’t see any male flower buds anywhere, but they might just be hidden among the lilac leaves.

The last couple of days has seen rain, off and on, especially overnight. Just enough that I’m not getting out there to do work that involves things like the electric chainsaw. We’re supposed to warm up again over the next few days, then get cool again.

We’ll see what actually happens.

The Re-Farmer