Our 2023 garden: first order in, with Veseys

We haven’t even done a thorough assessment of our 2022 garden, nor fully decided what we plan to grow next year, but I’ve gone ahead and made our first order for next year’s garden, today.

The main reason is, there are things I wanted to order before they have a chance to be out of stock. Particularly with trees for the food forest we are slowly developing. These will be shipped in the spring, and we won’t be billed until they are shipped. I ordered seeds as well, because I used a sponsor promo code from Maritime Gardening, which gives free shipping if there is at least one package of seeds in the order.

This is what I ordered today. All images belong to Veseys, and links will open in new tabs, so you don’t lose your place. 😊

The new Trader Everbearing Mulberry is the main reason I wanted to place an order right away. We tried a different variety before, that promptly got killed by an unusually cold night shortly after it was planted. Cold enough that even if we had this variety, it likely would not have survived, so soon after being planted.

Here is the description from the site (in case you’re reading this years later, and the link is dead).

Morus alba x rubra. There are so many things to love about ‘Trader’ Everbearing Mulberry! First, the tree itself is absolutely beautiful and can be grown as a single trunk or multi-stemmed shrub. Big, glossy black fruit are present throughout the summer and are an irresistible blend of sweet and tart. Even the leaves are starting to be considered a super-food and can be made into a powerfully healing tea. ‘Trader’ is winter hardy (Zone 3-4), vigorous, long-lived and disease and pest resistant.  We ship 8-12″ non-grafted tree.

Please note: Due to a crop shortage, we are not able to supply the Mulberry in a 3.5″ pot. We can supply in a 2.5″ pot. Since these are smaller, we will send 2 of the smaller size for spring 2023.

That last bit about pot sizes is another reason we wanted to order the mulberry right away. They may be smaller, but we’ll be getting two trees for the price of one. Which means chances are better for at least one of them to survive!

The other tree we ordered was Liberty Apple. From the website:

Malus. Superlative variety resistant to a host of diseases. This apple has outstanding flavour and is aromatic and juicy. The conical red fruit is among the very best and as an added bonus is excellent for cider. Crispy, juicy apples right in your back yard. Good Scab resistance, making them much easier to look after. For best results, two varieties should be planted. We are offering 1 yr. whips. approximately 18-24″ in height which have been grafted onto hardy rootstock. They should mature to about 15-18 ft. Hardy to zone 4.

Yes, it says zone 4 and we are zone 3, but we will just have to take extra care in where it’s planted, and to protect it while it’s small. We have crab apple trees, but no regular apples. One apple tree should be enough to provide for our needs, and the crab apples will be the second variety pollinator.

Then there are the seeds.

While we didn’t have much to show for peppers this past summer, that had more to do with our horrible growing year in general. My pepper loving daughter had thought we would be ordering several varieties for this past year, but I’d only ordered the one type. I think we learned enough about growing them to order more varieties, so I ordered a sweet bell pepper combo.

This is Vesey’s Sweet Pepper collection, and here is their description:

A few of our favourite sweet peppers! This collection contains 3 pkgs, 1 each of Early Sunsation, Early Summer and Dragonfly sweet peppers.

Early Sunsation: Bright yellow and big. Very heavy yielding with thick, juicy walls. This variety stays nice and crisp even when fully yellow. 3 lobed fruit. Resistant to Bacterial Leaf Spot races 1-3. 65 days to green; 80 days to yellow from transplanting.

Early Summer: Elite, early and extra large! Early summer is an early maturing, yellow bell pepper. The fruit are large at 5″ and an elite disease resistance package gives Early Summer a winning combination.

Dragonfly: Sweet and colourful. Dragonfly’s early production was a standout for our trial staff. Fruit emerges green and turns deep purple when mature. Dragonfly continues to produce fruit into the fall even after temperatures have dropped.

The Early Summer is new to Veseys for the 2023 growing season.

There was another new for 2023 item I just had to order.
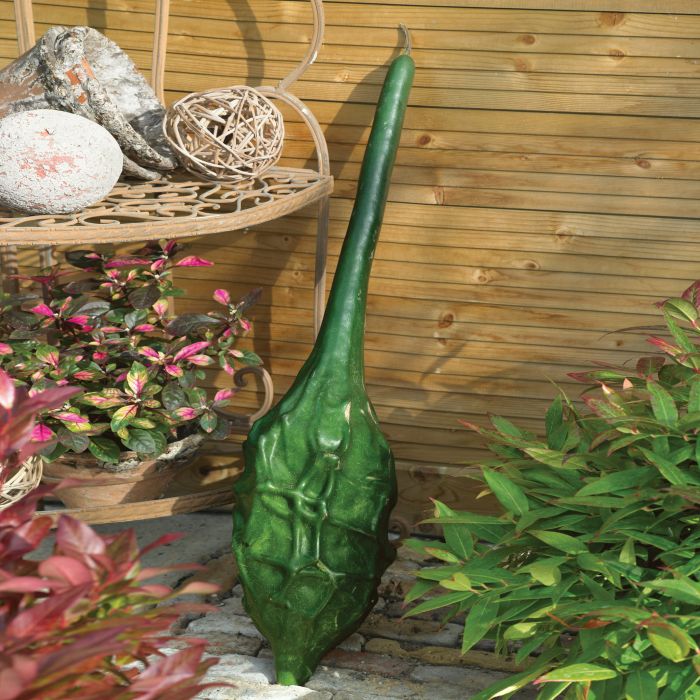
The Caveman’s Club Gourd! This is definitely something for the “just for fun” list. 😁

Truly different! This 12-16″ gourd produces a dark green, ridged, alien-like, bulbous fruit that are not like anything we have seen before! Growing them on a trellis ensures a straight neck. Plant early for best results. Matures in 120 days. Approx. 15 seeds/pkg.

I just couldn’t resist. This will be an ideal thing to try growing on the new trellis tunnels we will be building in the spring.

After we’ve taken the time to assess things from our 2022 garden, then gone through what seeds we still have, we’ll start making final decisions about what else we want to order for the 2023 growing season. One thing we will almost certainly be ordering are different raspberry bushes, that mature at different times. Any raspberries we order won’t start producing until their second year, so what we order to plant in 2023 will be to have raspberries in 2024. As we add to our perennial food producers, while still staying in budget, it’s a balancing act between ordering things that will take years before they start producing, like the apple and mulberry trees, and things that will start producing more quickly, like the raspberries.

Little by little, though, it’ll get done!

The Re-Farmer

Last day

It’s 2C/36F as I write this. The projected high of the day is supposed to be 4C/39F. This will probably be the last day above 0C/32F for the year.

I counted possibly 31 cats this morning. Even the little bitty baby toodled out of the cats’ house to check things out, even though he could have stayed inside to eat. When I checked later on, he was back in his favourite corner by the window – and even played with me through the window, trying to “catch” my fingers as I moved them around against the glass. (Actually, I think it’s Lexan, not plexiglass.)

In the above picture, you can just see the scrap pieces of insulation I added yesterday, under the water bowls, and the kibble trays under the water bowl house.

With the temperatures, we’ve done as much as we can in the garden beds, so this morning I went around gathering any remaining tools to bring into the sun room, where they can be cleaned, oiled, sharpened, etc. at leisure. When things warmed up briefly, we brought the hoses back out so we could give the trees and bushes we planted this year, one last thorough watering. It’s not too cold to roll the hoses up again, so they’re going to be laid out in the maple grove. As long as the ends are open, they’ll be fine. There are just the hoses at the front of the house left. We have enough hoses now that we were able to use them from the front tap and still be able to reach every transplanted tree and bush, including the Korean Pine in the outer yard.

I brought the poles for the carport into the yard, and we’re going to try putting it together with one or both of the covers we found, and see if it’s something we can use somehow. I was able to use the snow and a broom to sort of clean off the cover that’s on the ground, since we never had the right conditions to hose it down.

I’m a bit frustrated with how little we got done this year. Yeah, we got progress with things like the wattle bed in the old kitchen garden, but there was so much that needed to be done, and it just didn’t happen. Half the beds never got weeded and mulched properly. We have trellis tunnels to build and I’d hoped to get that started this fall, but that didn’t happen at all. I wasn’t even able to cut down dead spruces that I wanted to use to build more high raised beds. We were also supposed to dismantle the shed with the collapsed roof, and hopefully salvage materials to build a chicken cook, and we got very little progress on that at all. This entire year felt like I was constantly behind on getting things done.

On another note, I heard from the cat lady yesterday evening. Cabbages is doing great, and so are the bitties!

We talked a bit about the lysine. She says it takes about 6 weeks for the results to be noticed. The first thing we’ll probably see is that their coats will start looking shinier and healthier. The coughing and sneezing should be reduced by then, too. A study done by a humane society she was working at at the time found the lysine resulted in an 80% reduction in respiratory issues. She has one cat that has continuous respiratory issues, and the lysine has saved her many vet visits.

I must say, this woman is amazing. She has a house full of cats right now that no one is willing to adopt because of health issues. She has one cat that was literally thrown onto the road by her house. Another was a rescue that had been dumped by a closed gas station in the winter. This is the one that needs continuous lysine treatment due to respiratory problems. When she found it, it was unconscious and frostbitten. It had to have its tail and a foot amputated, and lost its ear tips. Worse, there was evidence of substantial abuse, from a broken pelvis that didn’t heal right and can’t be fixed anymore, to cigarette burns, and even trachea damage. After he eats, they have to hold him up so the food will go down. The vet thinks that damage is from abuse, too. This cat is the worst case she’s ever seen. She and her amazing family are giving all these high needs cats their best life now. I’m just blown away. They are such awesome, amazing people. They’ve given up renovations on their house, to be able to give cats the medical care they need. And that’s on top of having her own health problems to deal with! I’m so glad to have connected with them.

The Re-Farmer

I made a video

I put together images of the wattle woven raised bed and made a video out of it. This time, I borrowed my daughter’s microphone for the narration, and WOW was it better! I didn’t have to use background music to camouflage the background noises my headset microphone always made.

Something got glitchy when I saved it. I had to save it several times to get rid of some strange coloured stripes that showed up. They were only visible after I saved the file and checked it, never in the editing software. I uploaded the video, only to find the glitch had simply moved to the very beginning of the video. I had to re-save it and re-upload it, and I think this one worked.

Please let me know if you can view it all right!

The Re-Farmer

Our 2022 garden: surprise beet harvest!

While working on the wattle weave bed in the old kitchen garden, I had to go around the beet bed constantly. Our beets did not do well this year, and in the end, I hadn’t bothered harvesting anything. It just didn’t seem worth it.

While working on the other bed, however, I sometimes had to stick a spade or garden fork into the ground to have them out of the way for a while, and a few times that meant sticking them into the beet bed.

Which is when I noticed that some of them actually looked useable.

So I harvested them.

This was all I got, out of the three varieties of beets planted in that bed. They’re so small, but my daughters like them at this size. They’ll be able to use them for maybe one or two meals.

Which is a heck of a lot more than I expected to get out of that bed!

At this point, we’re not sure if we’ll grow beets again next year. We’ve only been gardening for three years here, but each year has been worse than the one before. Perhaps we’ll try again, after we’ve built up the soil more and have better raised beds. If we do grow beets again next year, I think we’ll only do one variety, and save trying multiple varieties for the future. It’s hard to know which of the ones we tried are types we like, when we’ve yet to have a really good growing year for beets.

I’ll take what we can get for now, though!

The Re-Farmer

Wattle weave bed – it’s finally done! Next!

I was going to post progress pictures, but I need to conserve storage space on WordPress until I go back and resize more old photos. I might do a start-to-finish photo video, instead. Until then, here it is! The L shaped wattle weave bed in the old kitchen garden is DONE!!

The insides of the woven walls were first lined with grass clippings. It turned out to be a very windy day, which made that job more challenging then it should have been!

Next, I used a hoe to make a trench down the middle, pushing the soil up against the grass clippings. The cardboard from the sun room I’d set aside for the burn barrel came in handy, as it was suitable for lining the bottom of the trench. With the bed being so narrow, the size of the boxes didn’t matter as much, since I had to cut them to fit, anyhow. The cardboard then got a soaking.

Next came a layer of corn stalks reserved from the garden clean up, which got a soaking. I raided the compost pile of half rotted kitchen scraps to put on top of the corn stalks, followed by a soaking. Then I raked some leaves off the grass nearby and added that on top, which then got a soaking. At this point, I climbed in and walked back and forth over it, to crush the organic materials. Whatever we decide to plant here next year, I don’t want the roots to be finding big gaps in the soil and drying out.

Finally, I headed out and uncovered the pile of garden soil we bought a couple of years ago. The cover kept the pile from washing away, but didn’t keep the light out, so the pile was covered with a matt of weeds!

I also realized the “tarp” I’d found to cover the pile had channels in it. We’d noticed them when we first dug it out, but only recently did I find the carport support peaces my brother said was in the hay loft. Some time after that, I’d dug out a tarp I thought we might be able to use to cover the hole in a shed roof, but when I unrolled it, I saw it was part of the carport. I figured it was a roof sheet or something, since it isn’t that big. Now I realize that this piece was part of it, too. So I dragged it off and lay it out on the lawn, with weights to keep it from blowing away. We’ll hose it down and see what we can do with it. The first sheet I’d found had a row of tears in it. This one does not.

I’ll have to find something else to cover the garden soil pile with.

It took 4 1/2 wheelbarrow loads of sifted soil (to get as many weed roots out as I could!) to cover the whole thing. In the process, I had to stuff more grass clippings higher up the wattles, so the soil wouldn’t fall through the gaps.

No, this time I did NOT give it a soaking! I didn’t want to compact the soil.

By this time, several hours had passed, so I took a break for a lunch the girls prepared for me, then it was back to work. There was a little bit of grass clippings left, so that got scattered over the soil – at least what the wind didn’t blow away while I was trying to spread it evenly! I then raked up and added a mulch of leaves. That did get a soaking, to keep the wind from blowing it away. Finally, I grabbed the wagon and filled it with as much wood chips as it would hold without spilling as I pulled it back. It turned out to be just barely enough to cover the entire bed with a thin layer.

Once that was done, the entire bed got a very thorough soaking. I wanted all the layers to be good and damp. I might even soak it a couple more times, before our highs start dropping below freezing. We hit a high of 18C/64F today (though with that wind, it didn’t feel like it!), but tomorrow our high is expected to be only 6C/43F, and that’s the warmest day we’ve got left. We are expected to have less than a week with highs above freezing. Which isn’t too bad, for November.

Anyhow. The more the bed gets moistened before things start to freeze, the better it will be for spring. With all the layers, the bed got filled to the top of the shortest walls. My intention was to have it a bit lower, and that will happen as the layers settle and the organic matter decomposes. I expect it to drop at least a couple of inches over time.

While working on this bed, I spent a lot of time going over and around the rectangular bed we’d planted beets in. Once the L shaped bed was done, I decided to work on that one, too. It is framed with logs, and I’d like to raise it a bit higher. This is how it looked, at the start.

The first year we had a bed in this space, it was a sort of triangle shape that was too wide at the end near the house. My daughter and I changed the shape of it, then grabbed some pieces of smaller dead spruces that had been cleaned up, to frame it on three sides and keep the soil in place. We planted carrots here last year, which the groundhogs decimated repeatedly. Amazingly, we still got a crop out of it. This year, we planted beets, which failed. Sort of. I’ll talk about that in a separate post!

There is a pink rosebush on the left, and this year – after pruning away more branches from the ornamental apple trees – it finally had substantial growth and huge numbers of flowers.

It’s amazing what a little sunlight will do!

This year, when we covered the rectangular bed, I had a board across the end by the rose bush to hold the mesh down, but otherwise, there’s nothing there. The ground slopes downwards from the house, so that end is lower than the end closer to the house.

That will be built up.

The first thing I did was dig a shallow trench across the bed near the rose bush. I still had some short logs I’d brought over for tiny log bed and border that didn’t get used (you can read about that here, here and here. Links will open in new tabs, so you don’t lose your place. 😊) I placed one of the shorter logs across, in the trench. Then I pounded in three stakes at each corner, to create upright supports. When I find logs long enough, they will be placed between the stakes. I want the long sides to go on top of the cross piece closer to the house, with a second cross piece to fit in between them, but have it the opposite way on the low side. One of the current side logs is a fair bit shorter than the other, but I think I find find something to fill the gap.

Though I plan to make the bed only one log higher, with the rose bush getting so big, the wall beside it is probably going to be three or four logs high to keep the branches out of the garden bed. I forgot to take a picture, but I’ve already added another log to that end. It’s slightly longer than the one in the photo, so that it is overlapping the longer side log. When I find a gap filling piece for the bottom, it will be tucked under that second log. The second log isn’t as thick as the bottom one, so I tied off the pair of uprights on either side of the ends, to secure them, and will do the same with each log that gets added. I made sure those pairs of upright supports where the tallest and strongest, since they’ll be holding the most logs.

And that was enough for today! I need to go hunting for long enough logs for those sides. If I can’t find any that are suitable, we might add more of those support stakes and use shorter logs instead. We have plenty of short ones that couldn’t be chipped, that were cut to roughly four foot lengths. The bed, however, is about nine feet long, so that might not work. We’ll see.

That done, I had time to work on emptying the rain barrel, which had enough water still in it to do the Korean Pine and Ash tree seedlings in the outer yard, as well as the haskaps and a currant bush in the south yards. So that’s now empty and ready for winter. Usually, I tuck it away in the old kitchen garden for the winter, but I think this time I’ll leave it where it is. It’ll get snow in it, which should be fine. I just don’t want to be chipping it out of the ice and snow again, to set it up to catch the snow melting off the roof in the spring.

While I was doing all this, I had the attention of so many yard cats! Even the ones that don’t like people, like to hang around while I work.

While I was putting things away for the night, I spotted this…

He was napping in the wheelbarrow at first, but I interrupted him while taking a picture. 😊

What a handsome boy! We have managed to pet him every now and then, but he isn’t a fan of attention.

I did get to give the bitty baby a cuddle, though! He came out to explore, and after several attempts, I was able to cat him. He put up quite a fight until I got him into snuggle position and started scritching his ears and he finally calmed down. I hung on to him for quite a while before putting him down, and he didn’t run away. Hopefully, he will become more accepting of cuddles as time goes by. We’ve had others that became less accepting of cuddles and attention over time. Ah, well. We do what we can!

The Re-Farmer

Old Kitchen Garden, wattle weaving progress

Oh, I am so happy!!! It’s almost completely done!

I went and borrowed my husband’s phone to take a picture. It’s my old phone, but of course he’s set it up to how he wants it – which turns out to include fingerprint scan to unlock it. I really hate that function. I find they don’t scan fingerprints well, and the last thing I’d want is to get locked out of my own phone because the thing can’t recognize my fingerprint. It could well be because my hands are so rough, it messes up my fingerprints. Either way, it looks like I won’t be borrowing his phone when I got into the city after all. It’s changed so much, I had to get him to tell me where the camera icon was! He does love his funky themes and designs. 😁

Anyhow…

Here it is!

I had enough long poles that I could do the back without having to overlap any. The only problem came when it was time to do just the taller posts. It wasn’t too bad when I was weaving around seven of them, but when it came to just the three at the turn, it was more difficult. I had the shorter pieces for it, but three poles just isn’t really enough to hold the wattles in place, though for some of them, I could push the more flexible tips into the previous wattles to lock them down.

There was lots left over when the inside of the L shape was done, and I wanted to use them while they were still green and flexible, so I went ahead and did the outside. The first thing that needed to be done was to hoe the soil out of the path and back into the bed, while also clearing and leveling where I estimated the uprights would go. Once that was done, I measured two feet from that long pole right in the corner, marking three places; the left and right are lined up with the back walls, while the center one is in the middle.

Knowing I would be working with much thicker poles, I spaced the uprights further apart along the sides, compared to the previous ones. That left me with four extra prepared posts. After using the pencil point bar and a sledge hammer to make holes for the posts, then sledge hammering the posts in place, I could see I wouldn’t be able to use the uprights at the ends, so I added another post at each end, just inside the posts supporting the end wattles.

When it came time to weave the wattles in, I used the longest poles first, with the thickest parts at the ends, so that the more flexible tops would go around the curve. Some of the posts were long enough to actually bend all the way around the curve! When I put in the second side, I was able to wrap the ends around the wattle in the first side. I was able to do this for the first several layers before I found myself having to weave a shorter third pole around the curve. Unfortunately, a few of the poles just couldn’t go around the curve without breaking.

With the more flexible ends going around the curve, this meant the ends built up higher, faster. Which I’m okay with. For the last few pieces, they weren’t long enough to go around the curve at all.

I will need more material to build up the curve, but I also want to build that corner higher, too. So what I need to look for now is a lot of thinner and flexible, pieces. If I can find enough of them, I might be able to not only build up the corner and the curve, but wrap a nice edging along the top, all the way around.

Finding appropriate materials to do this was surprisingly difficult, but I’m really happy with how it’s turning out. By the time this is finished, though, we probably won’t be able to accumulate enough materials to do it again anytime soon, except perhaps for some very small beds.

Once the walls are done, we can add amendments and more soil to this bed to build it up, and it will be MUCH easier on the back to work in it.

The Re-Farmer

Wet, wet morning

While the Western parts of the prairies got walloped with snow yesterday, by the time the system reached us last night, it was rain. Some places even got thunderstorms, apparently.

When I headed out this morning, it was still raining pretty heavily, so not a lot of kitties were coming out for kibble! Quite a few of them were inside the cat house, though, so that was good to see. As I went to switch the memory card for the driveway trail cam, I had to walk on the grass to the side of the driveway because it was covered in water.

We seriously need more gravel on that driveway.

While we have not finished winterizing the sun room, we did get the broken glass cleaned up, so I’ve been allowing the kittens to go in. When I topped up their kibble last night, some of them were still in the sun room, so I rigged the doors so that they were mostly shut, but the kittens could still get in and out. Then, because racoons remain a problem, even if we don’t see them, I used my husband’s walker to brace the kibble bin in its shelf, then took the two big bags of kibble my BIL and his family so generously gave us, and tucked them into the old kitchen.

Well, I forgot to put the breaks on, on the walker! This morning, I found the walker had been pushed aside, and the kibble bin open and almost knocked onto the floor. Thankfully, the bin was only half full, so while it was on its side, hung up on some buckets (with a kitten sitting in the kibble!), the kibble wasn’t spilled onto the floor.

Before moving things around, I’d had a shallow bin, designed to fit under beds, on the top of the shelf we used to hold the kibble bins to catch water from the leaking roof. Well, that shelf isn’t there anymore. I wasn’t expecting it to rain this heavily, so there was just stuff set aside against the wall until we could finish cleaning and winterizing the sun room. I had to move those out – and my husband’s walker that had been pushed that far back – so I could set up a bucket to catch the drips.

I will be so happy when that roof finally gets done, though my brother and I are both on pins and needles, afraid our mother will suddenly decide not to pay for it after all. She tends to do that at the last minute, though, so I expect that once the roofers are actually here and the final bill is being tabulated (the total will likely be higher than the estimate, as I expect them to find rot from leaks that needs to be repaired), she’ll try to refuse to pay it. Much like she tried to do after promising to pay for the movers so we would move out here to take care of the place for her.

There was water on the sun room floor, of course, but it’s a concrete floor and not going to be a problem. Seeing how it all flowed across the room to the opposite corner, though, really shows how much the room has shifted since the concrete was poured, and how much that one corner has been undermined.

Speaking of which…

Something knocked the diverter off the downspout above the rain barrel. It had not been full before, but it sure is now, and was starting to overflow. I got the diverter back in place, so it’s not an issue anymore. Getting that barrel empty and set aside for the winter is going to have to be done soon. The girls are going to have to clean the eavestroughs (aka: rain gutters) out again, too. I did pick up rolls of mesh to cover them, but those won’t be put on until after the roof is done. I also picked up a spray sealant to be used after they’ve been cleaned. There are a couple of places where they are leaking. The roof is supposed to be replaced, but I don’t think that includes the eavestroughs.

Looking at the short range forecast, we’re supposed to get a couple of chilly days, with highs barely above freezing, then it’s supposed to warm right up again for about a week, with several sunny and dry days. That will be a great time to get more progress on things, and to finally be able to finish cleaning out and winterizing the sun room. Cleaning the other half of the sun room will require removing the swing bench, the table saw, and a couple of shelves, along with all the stuff in them, outside. Because overnight temperatures have already been going below freezing in there, all the remaining squash have already been moved to the living room. Some of them are still ripening, so they won’t be going to the root cellar, yet.

In putting the stuff back, we need to keep in mind that we’ll be using the sun room as a greenhouse again in the spring. I want to come up with a way to be able to hang those lights we used last spring, more efficiently. If we do it right, the same set up can then later be used in the fall to hang things like strings of onions and garlic to cure.

Wow. I just realized that, if we’re going to be doing things like starting onions from seed again (which we likely will be), we’ll be needing to get those going in just a couple of months. Onions should really be started indoors in January in our area.

The girls and I will go over how the garden went this year and, taking into account the failures due to flooding and other issues out of our control, what worked, what didn’t, what we want to keep doing, what we will stop doing (if only temporarily), and what we don’t want to ever do again! 😄

We have lots of work to get done before the snow flies, and then lots of planning for next year to get working on.

It’s going to be fun!

The Re-Farmer

Old Kitchen Garden: Wattle weaving progress

After finishing up my morning rounds, I did as much as I could with the wattle fence, using what materials we had been able to gather. There wasn’t much I could do with the longer sections. With the shorter part of the L shape, I was able to use a few single lengths, but even there I had to start combining them in pairs.

The girls had gathered some really nice, even pieces of maple suckers, though, and they were the perfect length for the wider end bit.

The red barked lengths are the maple the girls had gathered. When I used those up, I went to the pile of small willow branches I’d set aside and brought over the pieces that were close in size to the maple. Those are the greenish coloured branches. Last of all, I topped it with two thicker pieces of maple that I’d pruned from the nearby maples that are now clear of the branch piles. Those are are lot tighter, and will lock everything in place. I didn’t trim the top one to size yet, as I might need to move it out while the other section of wall is worked on. However, as it is now, that is as high as I intend to go for most of the bed.

It would be great if the whole thing could have been done like this! It looks so much prettier, with smaller gaps and more consistent sizes. The only down side is that such small pieces will also break down faster than the larger ones. It will likely still take a few years, but it’s something to be aware of.

I used more of the maple suckers I had gathered at this end, along with more willow that was left, and locked it down at the top with two thicker pieces of maple.

This corner looks a mess right now! It will be built up, end to end, until they are the same height as the walls at the ends. After that, it will be build up higher to match the heights of the debarked posts. By time I’m working on just the three tallest posts, I’ll be working with much shorter pieces, and should be able to tidy up the whole thing a lot more. Right now, it’s looking quite the mess!

That piece of 2×4 is my mallet.

At this point, I am out of useable materials. I think I will go hunting around the spruce grove for more material, before I start wandering father afield. The Red Osier Dogwood that we have would make excellent, flexible pieces, but that’s something I’m trying to encourage as undergrowth. I might still be able to harvest some, though. There might even be some young poplar I can harvest. Mostly, I just want to find enough material to finish this back wall. The remaining sections can wait until spring, if we have to. Once the back wall is done, the soil that has eroded into the paths can be hoed back into the bed and tidied up. I will likely use grass clippings that we still have all along the bottom of the wattle wall to keep the soil from falling into the gaps. Slowly, this bed will be built up to the height of the lowest sections of wattle, which will make growing in it MUCH easier on the back!

That’s about all I’ll be able to get done today, though. We’ve had another change in plans, with company coming tomorrow. We’re hoping to be able to have a bonfire with the remains of the big branch pile that got chipped, but it will depend on the weather. The forecasts keep changing. Just in case, we need to be prepared to move indoors, so we’re going to have to start moving things like our canning supplies back into storage, and all that other stuff that just sort of takes over every flat surface! We’ll need to be able to expand the dining table, too, which will take up twice the space.

We are terrible house keepers. 😂

But I’m really looking forward to seeing my BIL and his family, and really appreciate that they are willing to make the long drive out here, knowing that my husband can no longer go to their place. It’s going to be awesome!

The Re-Farmer

Bitty Baby update, and a bit of progress

I was really concerned about the bitty babies last night! We dipped at least as low as -7C/19F during the night. I knew if the bitties were inside the cat house, they would be okay – especially if they had a mama to curl up with – but if any of them got caught outside, and the board ramp was knocked over, they couldn’t get back in on their own.

The board ramp was knocked over this morning. The brick it was braced against was frozen to the ground. I suspect we are still getting skunk visits during the night. We don’t see them around anymore, though I’ve seen the odd one on the security camera live feed at night. They go into the cat house entry to eat any kibble that’s left there.

Thankfully, I spotted all four of the bitties through one of the windows. The board ramp is back, but I didn’t want to hang around too much, or they’d be tempted to go outside.

There was no mama. I didn’t even see an adult cat come out of the cat house when I went outside. The bitties have the cat house to themselves; all the other kittens seem to be leaving it to them, other than when they pop into the entry to nibble on some kibble.

All the shallow water bowls were frozen, and the big bowl had a layer of ice on top, but I had some nice, warm water for them. The board ramp I set up for the water bowl shelter is being well used, with lots of little footprints in the frost.

I tried to do a head count, and I think I counted 21, plus the four bitties. Rolando Moon came around later. If any of the mamas came around, it wasn’t while I was there to see them.

With all those growing kittens and cattens, and the temperatures dropping, they are going through the kibble faster. We’re going to have to pick up more before the end of the month. The cat lady is going to try and get some donated cat food for us, too, though we don’t know when she’ll be able to do that.

Before starting on this post, I sent an email to her through her cat rescue’s email address. We usually text, but that’s always a pain out here. Especially if I want to send photos. My phone is supposed to link up to the wifi for calls or texts, if there is no data signal available, but it’s never been good at actually accomplishing that. So I sent the email, with a few pictures, explaining the situation. Hopefully, she knows of a foster family that can take in kittens that aren’t weaned yet. While the kittens don’t look like they are starving or dehydrated, that may just be a “yet”. At least the clones have figured out kibble is food, but I don’t know about the other two.

Hopefully, I will hear back from her soon.

In other things, I got some progress on those willow branches I’d pruned. I dragged them all over to where we’re building up a burn pile where the big branch pile that got chipped used to me, and sorted through them there. Only a few of the branches went straight to the burn pile. With most of them, even if the branches were kind of wonky, most had enough straight sections that I could still use them in sections. It’s still nowhere near enough to finish the wattle weaving, but there will be at least a bit more progress.

Though both today and tomorrow are supposed to have highs just above freezing, with tomorrow slightly warmer than today, we are no longer getting rain and snow. We will be nice and sunny, which makes it a good time to get some things covered. I’m glad I picked up the 3 pack of medium duty tarps at Costco a while back. One of the things that needs to be covered is my late brother’s post pounder that he built. It needs to be refurbished, and that’s not a job we can do right now, but we can at least keep it from getting worse. The trap I’d wrapped around it before was torn to shreds by the wind, and I finally cut the remains away completely, not long ago. The plastic that was covering the motor was also starting to tear, so I made a priority of at least covering that, first. The tarps I have are only 8’x10′, but that should be enough to cover most of it, if I do it right. I’ve learned from how and where the old tarp started shredding, where I need to put some sort of padding, first. Between that and being more strategic on how the tarp is tied down, I hope to be able to reduce the damage from high winds.

The other thing I need cover is the wood pile – formerly junk pile – near the house. The groundhogs absolutely destroyed the old tarp that was over it before, for nesting material – then disappeared. The top boards may be pretty rotten, but the further down we go in the pile, the better shape the wood, and I’d like to keep them from getting worse. This year, however, we had not been able to mow, weed walk or weed a lot of areas as we normally would have, and one side of the pile is among those. It’s completely full of mostly thistles right now. I’ll have to cut away enough of that to be able to reach the pile from all sides, so it can be re-covered with a new tarp. The old tarp was held down by whatever heavy things where handy. This time, I want to actually peg it to the ground.

There is still much to get done before the snow flies – and stays!

The Re-Farmer

Well, it’s a start

Since I wanted to keep an eye on the kitties anyway, I decided to see what I could do with the willow branches. After sorting the longest ones out, I started weaving.

This is all of the branches I have so far.

Minus one that was too bent to use. At least here. When we’re ready to weave the ends, we only need pieces less than 3 feet long, so I could probably salvage it.

As we get more branches to weave in, they’ll get pounded as low as we can, with each layer added keeping everything below in place. Right now, some of them just sort of pop back up a bit after they’ve been pushed down. Until it’s all tighter together, it won’t be holding much soil in place! One more layer along the short wall, and I think we can get away with no longer debarking the branches.

I really hope those maple posts that still have their bark won’t start growing.

I’m just itching to get back out there and cut more willow branches for this, but the weather out there really sucks.

I want to keep an eye on the bitty kitties, though, so maybe…

(glances out the window and tries to convince myself the wind isn’t that bad, and it’s not that cold out…)

The Re-Farmer