As I write this, we are back down to -22C/-8F, with the same wind chill of -33C/-27F that I was walking in, earlier today.
It could be worse. We could be Regina! They are at -31C/-24F, before wind chill!
We are currently under ongoing extreme cold warnings but, thankfully, we will be warming up over the next few days, so it’s really just tonight that’s expected to be severe like this.
I am glad that the truck it plugged in, though! 😁
In other things, I believe I’ve found the cause of our septic pump problem. Potentially. I went down to the basement randomly to check the pump, and found water pooled under the filter. The filter itself was pretty full, though. I couldn’t find the actual source of the leak, but I believe it is under where the pipe from the tank screws into the filter housing.
I ended up messaging my brother about it, as he installed the filter after we moved here – and the pump itself, the last time that was done. I’d told him we were looking into replacing the pump, and could only find one at a specific hardware store. Turns out, the nearest location is the one he’d bought this pump at, and he bought the most powerful pump he could get. Which is interesting, because when I showed a picture of our pump to one of the staff to show what I was looking for, he took a closer look at the label and commented that it wasn’t very powerful. I don’t know how long ago it was replaced – probably closer to 20 years ago. The newer pumps would have improved quite a bit since then, I’m guessing!
As for the filter, after I described what was happening, he told me this had happened before. A different filter had been installed at the time. My late father had noticed problems with the septic pump and my brother could not find the source. He ended up hiring and excavator to check the pipes to the tank, and they never found the problem there, either, though they did find some things that were loose that shouldn’t have been! That was fixed, at least. The plumber ended up having to leave without finding the problem, because he’d been here for so long. In the end, my brother took out the filter (it had been installed by another family member) and just put pipe back – and it worked fine again!
So when he got a new filter after we moved here, he went and got the best filter he could find. It’s a Jacuzzi pool filter, and pretty solid.
Well, I guess even the best stuff will wear out eventually!
This is not something that can be repaired, though. The entire filter would need to be replaced. I don’t know where my brother got it from, other than “in the city”. I don’t even know if they still make the same style of filter anymore. I’ve done a quick search and the closest I could find to what we have is attached to a pool pump – and it’s the pump that’s being sold in the image, not the filter. It may not be available anymore.
Replacing a filter, at least, would be more affordable than replacing a pump. Plus, it’s something we could do ourselves.
If we can find one, and I sure as heck am not going to be driving around looking, in this cold.
My daughter and I have joint medical appointments on Wednesday, which is supposed to be warmer. The hardware store that carries the septic pumps has a location just a couple of blocks from the medical clinic. I might want to pop over after our appointment to see what they have.
Now that we have the truck back and it’s no longer screaming at me, I was able to get quite a bit done today!
I’m happy to say that the problem with the sensor did not show up again, which was always on my mind as I drove. The oil pressure gauge stayed where it was supposed to the whole time, which was quite a relief!
Today was going to be another warm one – the predicted high was 0C/32F, but we at least hit 1C/34F again – so when I finished doing my morning rounds, which included setting up the new solar powered trail cam at the gate, I took the time to chip away the ice on the sidewalk and patio blocks around the house. They and the driveway were insanely slipper this morning, with a new layer of ice on top of the snow. Then I brought the truck into the yard and my daughter helped me load up the garbage for the dump. With everything going on lately, we haven’t been to the dump for a while, so there was lots. We left the recycling for another day!
The dump is far enough away that, if that sensor was going to be a problem again, it would start before I got there. Happily, it did not.
The only real good thing about not going to the dump for so long is, the area in front of the pit is packed with snow deep enough to cover any sharp things on the ground. I’m still paranoid about getting another flat tire. Even so, I had to stop backing up so I could get out and clear the area before I could get closer to the pit to unload. It’s like people don’t even try to toss further than the edge. 🫤
That done, I went home and got a few little things done before heading out again. I was hoping to connect with the Cat Lady en route, but the timing of things didn’t line up. She says she has more canned cat food her cats won’t eat to pass on to us. We are quite fortunate that her cats are so fussy! 😄
After a quick stop in town to get more gas, it was off to the nearer city, with me eyeballing that oil pressure gauge the whole time. I was happy to see the roads were nice and clear, if wet, though some parts of my route were shaded by trees, so they were still icy.
I had just one stop I needed to make, and that was the Walmart. I didn’t have much of a list, since we got so much during are trips earlier in the month. I don’t expect we’ll do another Costco trip until the end of January or the beginning of February.
I ended up getting most of the things on my list, plus some extras, taking advantage of sales. Thankfully, the store wasn’t any more insane than usual, too.
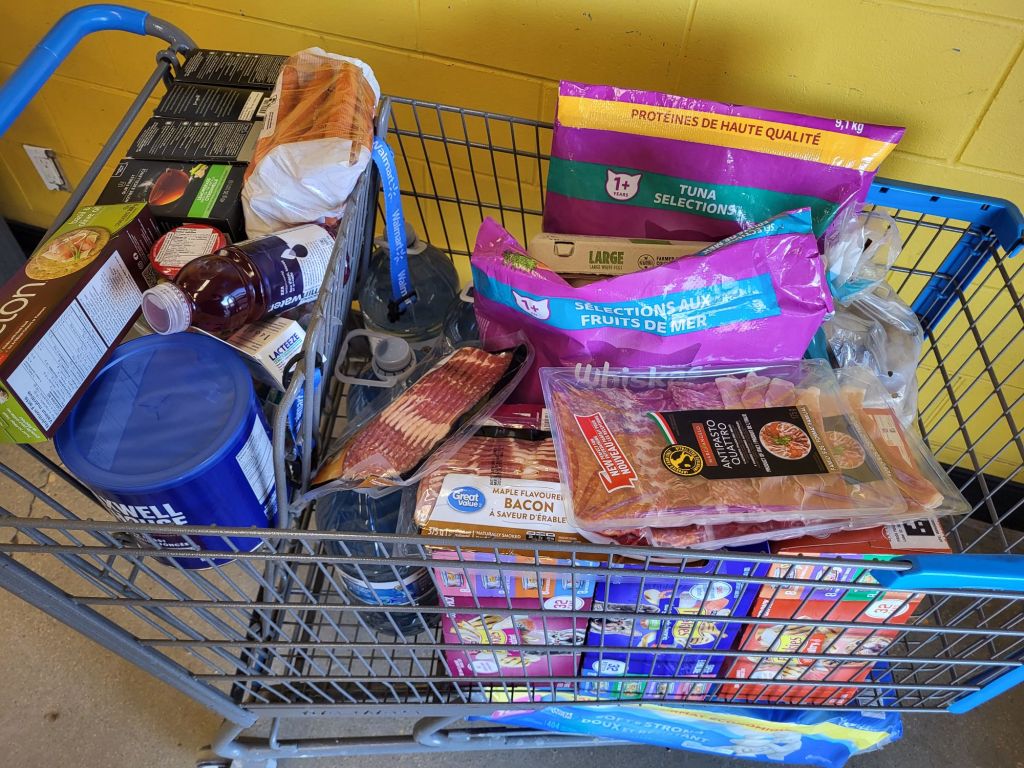
This is what $307.24, after taxes, looks like.
Even with the sale prices, that cart isn’t very full for $300
The 32 packs of canned cat food was on sale. They never go on sale! So I got three different variety packs. (Yes, we are actually out of the donated canned cat food!) I also got two 9kg bags of kibble. With so many cats, we can never have too much kibble!
Since I don’t expect to do Costco again today, I picked up a large package of toilet paper. It was on sale.
Probably the most important thing on my list was the distilled water for my husband’s CPAP humidifier. I hadn’t realized he was almost out! Four gallons should last him a while.
The 10 pound bags of Russet potatoes were on sale, costing the same as a 5 pound bag of red potatoes. The bacon was also on sale, so I got two packs of maple flavoured bacon. I also grabbed two variety packs of sliced meats for our New Year’s Eve munchies. I wanted to get more finger food type things for New Year’s, but the only things I saw that interested me, we already had. The pecan pieces are for a baked brie we plan to make, as well.
I got an 18 pack of eggs, because we can never have too many eggs, plus another can of dark roast coffee for the girls. The bag of carrots were the only fresh vegetables that looked appealing to me, that the family will eat.
There was a selection of teas for only 97¢ each, so I got four different flavours. I would have gotten a fifth, but they were completely out of vanilla rooibos. 😢
I got a small jar of artichoke hearts for our New Year’s spread as well – and Lacteeze for my dairy loving but lactose intolerant family! The package of crackers is also for New Year’s. I also got four tubs of sour gummies for my husband. They are a comfort snack for bad pain days. That and he’s been having low blood sugars lately, and these are cheaper than the glucose tablets.
Last of all, I got a drink for the drive home.
I had meant to get more rye bread as well, but decided it wasn’t worth the risk of the loaves getting squished on the way home. I meant to get bar soap, but got distracted while going back for it and completely forgot until I packed everything up. That’s something that can wait, though.
So that’s what I got at the Walmart. Since I was in town, I decided to pop across to the Canadian Tire to look for something. I found it but didn’t buy it, as I couldn’t justify spending the money for it, but I did get something else. The girls and I were talking, just last night, about getting a back up electric kettle. We like the glass ones that have a light when it’s turned on. The one we have now has lasted longer than expected already, to be honest, but our hard water is very rough on things like that. It’s starting to not automatically shut itself off at times.
While cutting through some displays on the way to somewhere else, I spotted a stack of boxes with glass kettles – for $29.99. This particular kettle is normally considerably more. So I snagged it. Plus, I used my Canadian Tire credit card, which has bonus Canadian Tire Money promos right now, basically tripling the amount such a modest purchase normally would have gotten. These little bits add up. I’ve got a goal set to save enough to get a septic pump for free, though it doesn’t look like Canadian Tire actually carries that type of pump. Once I reach my goal, I’ll get a staff member to see if they can find the type of pump I need. If not, I can use it to get things like a back up sump pump or a new table saw. Now that we’ve got credit cards again, I’ve been judicious about where I put our budget amounts specifically for goals like this.
So, between getting gas, having breakfast… er… lunch, the stock up shopping and the kettle, it was a bigger shop than I intended for today, but none of it was extraneous. Were it not the holiday season, I normally would be doing my big stock up shopping around now, anyhow, but with the extra stocking up I was able to do earlier in the month, that isn’t necessary.
Meanwhile, while I was gone, my daughter took advantage of the lovely day and opened up windows all over the house while she did the mopping and cleaning up. It was still just wonderful out there, while we were unloading the truck. We’ve got a few more mild days before the temperatures start dropping in January – just in time for when I need to start driving my mother to medical appointments, and get the truck back into the garage for a couple more fixes.
I will be much happier when we have the block heater cord replaced and can plug it in! We are expecting January temperatures with highs colder than -20C/-4F and lows dipping below -30C/-22F. After the mild temperatures we’ve been having this winter so far, that’s going to feel brutal!
But who knows. If there’s one thing about weather forecasts you can be sure of, it is that they are constantly changing, and almost never match reality!
Still, I’m happy that we are well stocked. If it weren’t for appointments and helping my mother out, we could probably just stay home for most of January and be fine!
Which is why I take advantage of days like today, and get a little extra, when we can.
Not that we’re getting much for our money, even with sales on, these days. 😢
The first thing to do is keep the deer out of your garden. FENCES are your friend. Why on earth would you allow cats access to your garden? Can’t you afford a litter box?
There is a site called All America Selections (AAS). Go there to find varieties that work. Most things I grow were AAS selections, I have only been burned by AAS varieties a couple times.
When it comes to seed viability the smaller seeds last the longest. I keep carrot seeds for 5 years or more and they sprout while pea seeds only last for 2-3 years.
Hint: a good carrot variety is Scarlet Nantes, an AAS recommended carrot from the 1930’s, a consistent reliable producer, make sure you thin them or you get crap as you will with any carrot that isn’t thinned.
Green beans, yuck!
Cleary, this is someone who hasn’t read anything else on this blog, or he wouldn’t have said what he did about the deer or the cats, for starters. Nor any of the other stuff, to be honest.
Randy, I don’t know how you found this blog (interesting that your user name is not linked, so you get to barf all over people’s blogs, and no one can follow you back to your own profile or blog – what a coward!), but you might want to actually spend some time reading it before making judgmental comments. Otherwise, you’re just making a fool of yourself.
Actually, you’re making a fool of yourself, just writing trash like this.
Also, do you really think that I’m going to read some random person saying “Green beans, yuck!” and think, “oh, no! Some dude on the internet doesn’t like green beans! That means I need to stop liking them or growing them!”
Einstein said the definition of stupidity was doing the same thing again and again and expecting a different result. You kept planting beans so the deer could continue to feast on your beans? STUPID!
Gardening is hard work and you don’t work hard to feed deer you moron! Put up some fences you dope.
Also, why would you create a blog to tell the world how stupid you are?
Wake up and die right.
Oh, Randy, you precious little snowflake. So stunning! So brave!
Thank for the laugh. You have no idea how much you’re embarrassing yourself.
Well, I’m back home now, and am really wrestling with myself.
I went to the old church again to see what was left. I saw a few things moved around, and a shelf in the entry that had been in the choir loft. Someone shattered a fluorescent light bulb, so there was new glass all over one area.
Someone managed to remove and entire window. They had simple stained glass panels in them; squares for the most part, with triangles to fit the semi circle tops.
Unfortunately, that leaves a big hole in the wall. It’s unlikely anyone will make any effort to board it up, since the entire building is going to be torn down.
Much to my surprise, the pair of candle sticks with red glass globe shaped tops were still there.
I decided to take them.
I went into the priest’s room and found the closet doors in there open, and vestments still hanging. The doors protected them, and they are not damaged by fire at all.
There’s a solid wooden shelf opposite the closet. I went through more of the drawers this time. They were a bit janky, trying to open them with one hand while using my phone as a flashlight with the other. Still, I hope someone takes the shelf. It’s big, heavy and incredibly solid. There is only smoke residue on it.
The drawers were for things like altar cloths, other cloths, and I even found the curtains that had been used as doors for these two tiny rooms on either side of the altar. At a bottom drawer, I found a cloth that looked very clean and picked it up. I am sure it is actual linen, not the usual cotton.
I decided to take it.
There were a number of glass items that I was very tempted by, but I left those for now. Instead, I grabbed the candles sticks and headed out.
My conundrum.
Should I take a pew? Plus a bench or two?
Five of them have already been taken. There are still eight left, plus a couple of benches. If no one takes these, they will be burned.
They are really solid. Even the ones in front seem to have only smoke damage, not flame damage. The benches in the back have the least damage of all.
They are all pretty long. Possibly longer than our truck box, though that is not a concern. I could just secure them with the tailgate down and put a red flag on the back.
With various projects we have in mind around the property, I can see being able to use these.
The problem is, where to keep them until then?
Ideally, we’d take them into the new part basement, where they could be cleaned over the rest of the winter. With how long they are, though, we couldn’t get them down the stairs. For the new part basement, we simply wouldn’t be able to maneuver them through the doors and down the stairs. Then, once at the bottom of the stairs, they would be too long to turn at the bottom. There’s a hand rail attached to a support pillar in the way.
Theoretically, we could take them straight through the house and to the old part basement doors, but we’d have the same problem at the bottom of the stairs. The space around those stairs is even tighter.
There are a few other things still there that I’m tempted to take but, again, where would I put them until we can use them?
After I was done going through the church, I went to the store the post office is in. Still no regular mail, but my daughters’ Christmas gift that I was expecting was there. The product packaging was wrapped in semi-transparent plastic, though, you could see exactly what was in it!
My daughter had sent me some funds and a request for some Crown Royal for the eggnog. Her sister had already picked up some booze when we were doing errands a couple of days ago, but she picked such good ones, they didn’t want to “waste” it on eggnog. 😄 The general store and post office has a booze section, too. After looking at the options, I chose a Salted Caramel.
As I was paying for our stuff, I asked the owner of the store if she knew when the church was going to be torn down. She didn’t know, but her husband happened to walk in while we were talking, and she sent me his way, as he was more involved with all the meetings and stuff.
It turns out he didn’t know, either, as that decision hasn’t been made yet. He thinks it would be in the spring, too. It just doesn’t make sense to do it in the winter.
We spoke for quite a while. He had been in the church this morning, while I had been there within maybe 15 minutes, and there were already some changes from between our visits. He himself had taken a couple of pews. I brought up the shelf in the priest’s room, with the janky drawers. He just laughed and said, they have always been like that! He agreed, though, that it is really solid, and hoped that someone could take it. It would not be easy to get out of there, but it would be worth it!
So we will have time to decide.
When I got home and brought things in, my older daughter met me at the door to help me come in.
…
Well, since she was going to see it anyhow, I handed her the box and told her, Merry Christmas!
We got them an Instant Pot.
My daughters had been talking about getting a rice cooker, and in my conversation with them, I suggested getting an Instant Pot, since it can do that, as well as being a slow cooker and a pressure cooker, among other things. We’re down to one slow cooker, so a second with be handy, and it would have more control than our little pressure cooker.
I got a positive response to the suggestion, so when we had the chance, I ordered one as a gift for them. We are a family that quite appreciates useful gifts like this!
So they got their gift early. I’m sure they’ll get good use out of it!
Then she helped me carefully take the candlesticks and their glass covers, which I had already taken off, to the cat free zone to join the other mementos. As she was going through the doorway into the living room, though, something fell and hit the floor.
Hard.
It was the insert from one of the candlesticks. The insert it meant to hold a long, straight candle and has a spring on the bottom so that, as the candle burns away at the top, it slowly pushes the rest of the candle up.
It still had most of the length of a candle in it!
After everything was put away, we started talking about what I found at the church and I told them about wanting to take a pew, and maybe a bench or two. They agreed that these were things we could definitely make use of but, again, where do we store them until then?
One possibility mentioned is the storage house, in the inner yard. That would be a good place where they would be protected from the elements, but there is already so much stuff in there, I don’t know that there is room for even a bench, never mind a pew.
Ideally, we could put it in the storage warehouse, which used to be my late brother’s workshop. That, unfortunately, is so full of stuff from my parents, there’s barely space to walk around.
A lot of what’s taking up space in there is bags and bags and bags of old clothing, bed pads and other fabric items. The clothing, at the very least, should be taken to the dump as far as I’m concerned. My mother, however is still very attached to her material goods and still frets over whether the door is locked, because someone might steel her stuff.
*sigh*
That building is the most structurally sound one in the outer yard, and we can’t even use it.
Either way, it would mean we couldn’t start to clean them until spring, at the earliest.
So … can we take a pew and some benches?
I think we could make it work. In fact, if we could find the space, I would take several pews. It would be a massive shame for them to be destroyed. They don’t make them solid like this, anymore!
Hopefully, I have enough data signal to post this!
We currently have no power.
Thankfully, we still have the old rotary dial phone hooked up. I had just answered a call for my husband.
From the newly opened pain clinic that is much closer to us!
The call got dropped when the power went out. Then the rotary dial phone started ringing, while I was still holding the dead cordless phone in my hand.
Oh! The power just came back!
Glad it was a short outage. With the temperatures we are having right now, a longer outage can be dangerous.
That’s -28C/-18F with a windchill of -38C/-37F, in case the image isn’t showing up.
Brutal!
The wind is coming from the northwest, though, and we are pretty well sheltered from those.
Our high for today isn’t supposed to be much warmer, either. We’ve got one more day like this, then things are supposed to warm up dramatically for a while.
Checking the critter cam, the cats in the sun room are active and prowling around, waiting for food and warm water. There must be something wrong with the wall thermometer, though. The needle is just below freezing. I didn’t have my glasses while looking out the bathroom window, but it looks like it’s reading around -5C/-23F and there’s no way it’s that warm in there.
The first screencap image is Celsius, the second in Fahrenheit. Instagram wouldn’t let me show the whole image, even though that’s what I set it for. Underneath, it gave the expected overnight windchill of -36C/-32F
I keep telling myself, the isolation babies are okay. They like to curl up together on the cat bed in the upper level. It is under the lounging shelf, so there is a low ceiling, the back wall is insulated, the side wall in that corner is insulated, and the box nest next to the cat bed forms another insulated wall. In front of the cat bed is the heated water bowl. All this, plus the insulation forming a ceiling, plus the heat lamp. They should be just fine.
$453.51, to be exact, plus $50 in gas and $18 for lunch.
Today turned out to be a good day to do our first stock up shopping trip to the city. The roads were clear, though some areas were wet with melting snow. The truck’s thermometer told me it was a mild -6C/21F while in the city, though our local high was supposed to be -4C/25F
I’ve discovered that our truck’s onboard computer not only flashes a text warning of “possible icy conditions, drive with care” warning, but it has a slippery conditions dash warning light that turns on. I’ve never seen it before, and this is our second winter with the truck.
It’s very distracting!
Even on the drive home, the road conditions were good, as I left the city early enough that the areas with melted snow weren’t freezing yet, even though my truck thought it was!
My first stop of the day (aside from getting $50 gas enroute) was Canadian Tire. The only thing on my list for there was the litter pellets.
During the drive in, however, I discovered I also needed washer fluid!
I got four bags of pellets at $7.99 each, and some super-duper, rated to -45C/-49F water fluid at $5.79.
The store’s layout has changed since I was last at this location, with one corner now a rather large Party City section. The pellets used to be in that corner, so it took a bit to find them again. When I did find them, I noticed I was near the outdoor supply stuff. On a hunch, I went looking for their lawn mower filter section. I’d been trying to find a new filter for our mower all summer – even after our push mower stopped working. It’s a Canadian Tire brand mower, so only they have the filter I needed, and every location I went to was out of stock.
They had some in stock today, so I grabbed one. If I had the budget for it, I would have grabbed two! They’ve increased in price since we got the mower, though, and now cost $22.99 Almost double what I remember them costing when I first bought the mower. 🫤
The grand total after taxes here was $65.79
My next stop was Walmart.
There were a few things not on my list that I ended up getting, because I was able to take advantage of sales. Here is what I got.
I got three loaves of rye bread. Rye bread is pretty much always on our list, since it’s a type we don’t make ourselves. I got a different brand this time, as the price was actually lower than the house brand I usually get.
I got some Q tips for now; later on, I’ll get the multi pack we usually get at Costco. My husband requested nacho fixings, and mentioned we were out of lactase, so I got the house brand version for my lactose intolerant family.
The 4L jugs of 5% vinegar was on sale, so I grabbed one. That’s something else we also usually get by the case at Costco. Next time, I’ll be looking for 10% cleaning vinegar.
I picked up four different types of cheese. I thought I was grabbing all four from the 2 for $12 selection, but apparently the Old Cheddar and Gouda were not. The Mozza and Havarti were, though.
I would have picked up a large jar of green olives, but the shelves were bare. So I got three small jars, instead.
I got two bags of the cheaper 7kg kibble for the outside cats and one 9kg bag for the inside cats to tide us over until we get more at Costco and the feed store. I did not get wet cat food because, thanks to the donation from the Cat Lady, we still have two unopened cases. I will get the bigger cases at Costco, later.
I notice cat food is never on sale at Walmart.
The nacho chips were 2 for $6, so I got four bags. I also picked up some deodorant for the girls that was on sale. Deo is really expensive these days!!! Canned beans were on sale at 3 for $5, so I got a case of them; three cans each in four different flavours. The coffee creamer is cheaper at Walmart, at 2 for $9, so I got some more of that for the girls. I was going to get them more coffee, but the shelves were empty of the dark coffee they like.
Cases of pop were also on sale at 2 for $14, so I got some Coke Zero for my husband and I, and root beer for the girls.
I ended up going through the self check out because the regular checkouts were going soooooo slow. There were plenty of them, but the lines just weren’t moving. Having worked as a cashier a few times over the years, I feel sorry for the staff. It looked like a lot of “I don’t work here, so I won’t use self checkout” Karens in all the lines. That and some “can I use this expired coupon from another store’s flier?” types. For a load like this, I would have preferred to go through a cashier, but after finding line after motionless line of customers giving the cashiers a hard time, taking forever to load their carts or slowly digging through their purses while ignoring everyone around them, blocking others from being able to unload their carts, I gave up, did it myself, and was out in no time at all.
There’s a reason the cashier position is a revolving door, and not just because it’s a ground floor position people move up from. I say this as someone who actually enjoyed the job!
Anyhow…
While finishing up at the till, I ended up adding a $5 donation to the Children’s Hospital, so the grand total, after taxes, was $219.91
By the time I got out of Walmart, it had started to snow, so I didn’t want to take too much longer. My next stop was the international grocery store, which is where I was also going to have lunch, first.
Normally, I would have had the dim sum, but the last time I was there, they had been over the steamer for too long, to the point some of it was falling apart. So I went to the Chinese buffet instead. It was very tasty! The only down side is that they no longer have plastic cutlery. Instead, it’s the “environmentally friendly” bamboo cutlery. I ended up eating half my meal with my fingers, because the tines on the fork couldn’t stab into the food, but if I tried to just scoop it up, it would fall off. Even the shanghai noodles were hard to get with it.
Anyhow; my large meal – which was both breakfast and lunch for me – plus a drink cost pennies over $18.
Then it was time to do some shopping.
There were a few things not on my list, too.
Since nachos were on the menu soon, I picked up some artichoke and asiago dip for my daughters and I – my husband requested the 7 layer dip. I got some frozen fish for my daughters, and the baby spinach was something they had asked for, too. For fruit, I just grabbed some bananas.
I picked up a pork line because the price was very good. We don’t need to get a lot of meat during our stock up shopping trips, as we will be getting our 1/8 beef pack soon, but extra for the freezer is always good.
The flavourings were on sale, so I got maple, caramel and rum. Teas were also on sale, so I got chamomile and Early Grey. There’s a 2L of 3% milk. With the rest of the family all being lactose intolerant, we don’t use regular milk enough to make it worth buying a 4L jug anymore, as my girls have been drinking oat milk lately. The soy milk we used to get has been going off really quickly, so we no longer get that.
The energy drinks were on sale, so I got 6 cans in 6 different flavours; two each for me and the girls.
I did get a new cheese to try: a smoked Irish cheddar. I also got a Redwood smoked cheddar, which we have had before. These are the only things that are more for our Christmas or New Year’s meals. I remembered to grab more powdered milk, as we were running low.
Oh! I forgot to grab cocoa. We’ve been making our own hot chocolate mix, so we’re running low on both the powdered milk and the cocoa. I should be able to get some at Costco, though.
I also remembered to grab some rolled oats, as we’re almost out of that, too.
Grand total after taxes was $167.81
Our grand total for the day, including gas and lunch, is about $521.51
Which is in budget, but … ouch.
By the time I was done, it was no longer snowing, so that was nice. The drive home was uneventful, other than my truck telling me to watch out for slippery roads the whole way.
Once home, I backed up to the house to unload. The sunroom doors were both tied off, so I couldn’t open them from the outside. I got my daughter to take care of that while I unloaded everything else at the main doors for her to bring in and put away, then started hauling the litter pellet bags to the old kitchen. The cats were all over the place, getting under my feet, waiting for their evening feeding! Once everything was in the old kitchen, including the new bags of kibble, I gave them a feeding so I could safely drive the truck out of the yard and park it in the garage. I think I counted 43 as I headed to the truck. When I came back, I counted 36 or so.
After wading my way through the cats in the sun room, I emptied the two new bags of kibble into the bin, then topped up the trays in the sun room again. The kibble in there disappeared fast!
We won’t be able to give them the warm and softened kibble in the mornings anymore. There was so much frozen kibble in their outside bowls! No wonder they were so hungry. It would be great if we could have heated water bowls for the warm, softened kibble, but we just don’t have anywhere to plug in more bowls anymore. At least they still have warm water. It looks like the heated water bowl in the sun room is working again, too!
Oh! I almost forgot.
While at the Walmart, I turned into an aisle and stopped to look at a display when a customer looking at soup cans on the other side said hello and asked how I was doing – then asked for help! He was trying to figure out the different displays (it turned out someone had stuck what he was looking for in the wrong spot, which he didn’t realize) and the prices. Of course, we started talking about how expensive everything is getting (condensed soup that used to be under a dollar a can not long ago is now almost $2 – and that’s the cheaper Walmart prices!) and he mentioned he’d read that a lot of house brands are the same as the name brands, made by the same companies, but just a different logo. You’re paying extra for a label. Which is true for some things, but not everything. As an example, I pointed to the kibble I was getting. I told him we are caring for a colony of cats, but even the outside cats won’t eat the no-name kibble from Superstore, if they could avoid it.
Well, that got us to talking about cats!
It turns out, his kids are asking for a cat, so he’s looking into adopting one. I told him about the Cat Lady’s rescue, what her adoption fee is (which is ludicrously low), and that includes the spay/neuter, vet check, vaccinations, treatment for ear mites, etc. I know the Cat Lady has had to actually stop putting her number out because she was getting too many calls from people that were basically looking for designer cats, so I gave him the URL to the rescue’s website. It has an address and phone number on there, but the website hasn’t been updated in a long time, and I don’t think the address (it’s just a box number, not a street address), is their current one. The email should still work, though, and probably the phone number, too.
Who knows. If he follows through with it, he may even end up adopting one of “our” cats! 😄
All in all, it was a productive day. Our Costco shop may not happen until next week; we shall see how things work out.
Tomorrow evening, I’m taking my husband to the hospital for his rescheduled CT scan. Hopefully, the weather will be good, because we’re going to be leaving pretty much at sunset, which is now earlier than 4:30 these days.
A large weather system has been slowly moving over us since some time last night. It’s been raining all day, and is expected to continue to rain through to about 4am. Some areas were getting rain and snow, but mostly, it is rain. Our temperature has remained steady at 4C/39F since the wee hours of the morning, so even though it feels like -2C/28F, there’s no snow right now, and the overnight low is supposed to remain above freezing. While there have been storm warnings for some areas, we’re just getting a steady and constant rain.
Image created by WP AI.
A good pajama day.
Not least of which because I got zero sleep last night. I don’t even know why! I was just awake and, strangely, feeling excited. Like something really great was about to happen.
Not a bad reason to be awake all night, I suppose!
I finally got up to join my daughters at about 5 or 6am. This is the time of the day when my older daughter is winding down from her work night, and my younger daughter is getting up to start her day, so they like to make a meal together – breakfast for one, supper for the other! They made a potato soup, using potatoes we still have left from our own harvest. It made the house smell so good! Since I didn’t sleep, I was, of course, already feeling hungry.
Once it was light out, past 7:30am, my younger daughter went out to do the morning rounds. I enjoyed some soup for breakfast, then managed to get a couple of hours of sleep. Which would be a lot easier if I didn’t have so many cats that like to use me as a bed! 😄
So it’s been a quiet day overall. Just the usual household stuff. Tomorrow, I’ll be heading to the town north of us to pick up more kibble and a few things at the grocery store. The day after, I’m taking my mother for her eye treatment in the city. I almost forgot about that! Things must be improving, because she has not been complaining about her vision, at all, for quite some time. I do hope she doesn’t try to cancel at the last minute, because she thinks she’s dying, again. Based on her last visit, her next treatment might be 5 or 6 weeks later, rather than 4 weeks.
For now, I just want to get a full night’s sleep for a change!!
I was able to get out with the chainsaw and work on that dead spruce tree.
It was still damp out, but more because it’s not warm enough for things to dry than because of any rain. We’re under a weather watch right now, as a large system is being blown almost straight North from the US, so the southern and eastern parts of our province are expected to get a storm. Locally, we’re expected to start getting rain at about 7am tomorrow morning. It’s then expected to continue to rain, off and on, through to the next morning, when it is supposed to become a mix of rain and snow.
Based on the current forecasts, today was pretty much my last day to get this done.
The first two pictures were taken before I got started. That’s basically how it has been since my daughter was last able to work on trimming away branches.
Which was the first part of what I had to do. I had my baby chainsaw (electric pruner) for most of that job. This part took the longest, because I took the time to break down the branches to fit into the wagon, then dumped them on the big branch pile in the outer yard. A lot of these were branches from the diseased crab apple tree, so they need to be burned. Previously, we were able to get the branch pile chipped, but this year we’ve been piling up diseased branches as well as things like squash plants that had powdery mildew on them.
While cleaning up the branches, I found the remains of an old bird’s nest.
When I finally got things clear enough to start using the chain saw on the crab apple tree, Syndol decided that would be a good time to climb the tree! I even cut away a broken section while he was up there, hoping the noise would have him jump down, but nope! In the end, I dumped another load of branches and came back before he finally made his way down.
Then it was more cutting and clearing and cutting and clearing. Crab apple tree branches are so bent and twisted, they took a remarkably long time to deal with. The wood is so much heavier, too. The difference is quite noticeable when I had pieces of apple tree cut quite short to load into the wagon and haul away, then tossing them on top of the pile, then started working on the spruce tree. I cut sections that were much longer than the apple tree trunk pieces, and the spruce tree’s trunk was at least twice as think at the top section of the tree, yet were so much lighter!
In the end, I had to stop because it was getting too dark. I left a section of the crab apple trunk alone, so that we could easily see it when we can finish cleaning it up later – likely in the spring. I was able to load three sections of the spruce tree’s trunk into the wagon to haul away (my apologies for the very fuzzy picture!) – that will NOT be going onto the burn pile, but will be stacked near the old garden shed – while a couple of larger pieces were left for later. The main thing is that there is now a cleared land that we can walk through – or drive through, if necessary.
Once the cut pieces of trunk are cleared away, the rest of the tree can be left for the spring. It’s going to take a lot more effort to clear that out, since it is in between other trees and in underbrush in the spruce grove.
In the end, I messaged a daughter to come out and help me put things away, because I was losing the light so fast, so the remaining logs have been left where they are until tomorrow. Hopefully, it won’t be raining too hard, and we can haul them away and stack them. We may be able to use these pieces for when we make a new garden shed as our cordwood practice building. We’ll need a lot more, but the walls for the practice building will probably be only about 8 inches wide, instead of the 12 – 16 inches more typical of cordwood building. I still want to use the method for when we build an outdoor bathroom (NOT an outhouse over a pit), but we need to clear some very large dead trees before we can work in the area I want to build it in.
We still have lots to do to collect and prepare before we can start building, but these logs could at least be a start, if the wood is in good enough condition.
All in good time.
For now, I’m just glad I was able to get that tree cleaned up and cut up enough to get that lane open again.