This morning, my daughter asked me if I’d read the packaging for the terrarium heater we got for the cat house.
I had not, so she read it to me, and I just have to share!
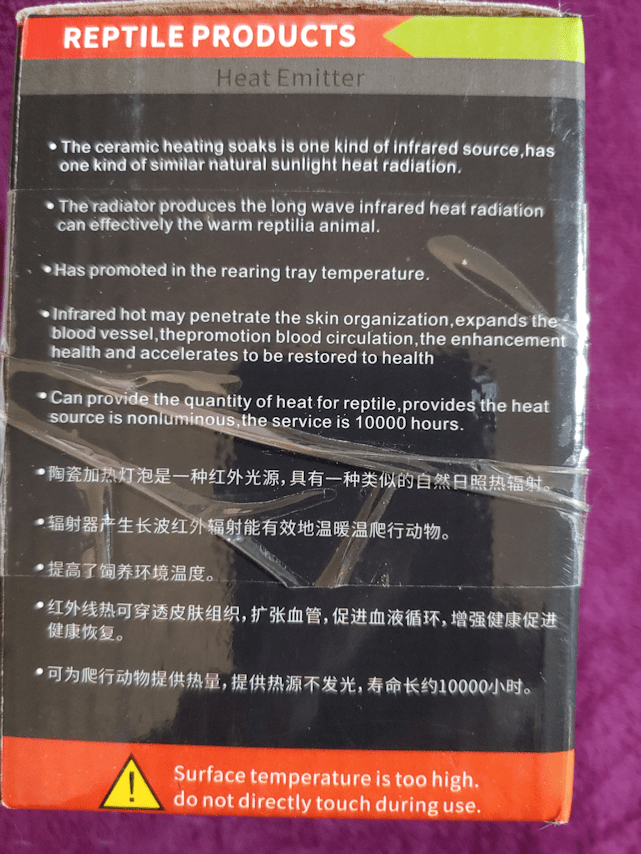
In case you can’t see or read the image for some reason, this is what is says, in “Engrish“.
Reptile Products Heat Emitter
. The ceramic heating soaks is one kind of infrared source,has one kind of similar natural sunlight heat radiation.
. The radiator produces the long wave infrared heat radiation can effectively the warm reptilia animal.
. Has promoted in the rearing tray temperature.
. Infrared hot may penetrate the skin organization,expands the blood vessel,thepromotion blood circulation,the enhancement health and accelerates to be restored to health
. Can provide the quantity of heat for reptile,provides the heat source is nonluminous,the service is 10000 hours.
Surface temperature is too high. do not directly touch during use
It sounds like it was put through Google translate or something! :-D I love it!
In thinking about putting this heater into the cathouse, I remembered we have something that will be useful.
We have a spare smoke detector.
I found it in the kitchen junk drawer, still in its package. We’ll test it to see if it works (it should, but I have no idea how long it’s been sitting in that drawer). We can then install it (or a new one, if it doesn’t work) in the cathouse. That will add some piece of mind for us, in the unlikely event something goes wrong with the heater.
Since we’re taking out the light source to do this, I’m thinking of getting an LED night light for in there, with a red or blue bulb that won’t affect their night vision. The light would be for us to see inside through the windows at night, and make sure it’s cats in there, and not a skunk! :-D
Today, the ceramic terrarium heaters we ordered came in, so when we had the chance, my daughter and I opened up the cat house to put it in.
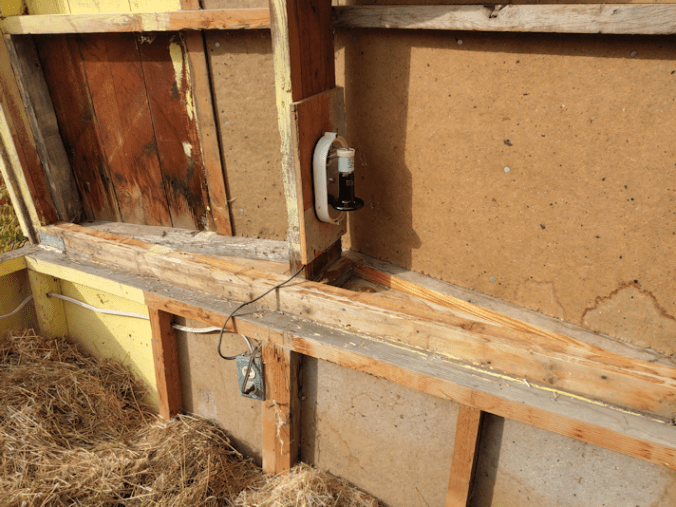
For some reason, I thought the light was mounted on the frame, not the roof! This is a waterproof light fixture of the sort that’s meant to be around pools. My brother had large dogs, and these made sure they couldn’t bang into the fixture and cause problems.
When we opened it up, I found it had an LED light in it. I was sure my brother had said it was a 100W incandescent bulb, that could add some warmth to the interior. There would be no warmth from this! But that’s okay, because we now have this!
It is ever so slightly wider than a light bulb. We can put the cage of the fixture back on it, but would have to add a spacer for about a quarter inch, so the metal cage won’t touch the heater.
While my daughter was fussing with the cover and putting in the heater, I did some clean up inside. The straw is covered with a large, heavy crocheted blanket – and the cats pooped on it. After getting that out, I decided there was just too much of flax straw in there for my comfort, so I took most of it out, pausing only to help my daughter set up the extension cord to test the heater.
After removing most of the straw, we also cleaned the windows, inside and out. They were looking pretty cloudy! :-D
Then my daughter spotted smoke.
!!!
Just a little puff.
She saw it again, several times, but as hard as I looked, I just couldn’t see it.
However, we also noticed that this thing was a lot hotter than expected! This is designed for reptile terrariums. I know reptiles like their heat, but not this much! With the heater being so close to the wood of the roof, this was definitely a concern.
So, we took it off – once it was cool enough for me to touch it with my gloved hands. That thing retains heat a long time, too!
For now, there is nothing there, and the cords are put away. My daughter lent me a lamp that I could use to test the heater and keep an eye on it while I worked on the computer.
Oddly, it doesn’t seem to get as hot inside, as it did outside. There is much less heat from the sides, while I could hold my hand a couple of inches from the flat surface for about 10 seconds before it got too uncomfortable. The base of the lamp is metal, and after it had been going for a while, I touched the base, and it was just a bit warm. I don’t know why it was so much hotter when we first tested it out.
Also, no sign of smoke.
With the way the fixture is oriented, the heat would be directed at the back wall of the cat house. I am thinking it might be better to orient it so the heat would be directed downwards, instead. There is a LOT more space under there, than between the heater and the back wall. Especially after having removed most of the straw, which is once again covered and weighed down by the blanket.
This is something that is intended to be left on overnight, so we really want to make sure it is safe.
Meanwhile there is something that I notice whenever we open up the cat house roof. With two people lifting, I can hear and feel how it is stressing the roof, as it twists and flexes. If I try to lift it by myself, I can fell that flexing so much, I stopped trying. I’m afraid of breaking something!
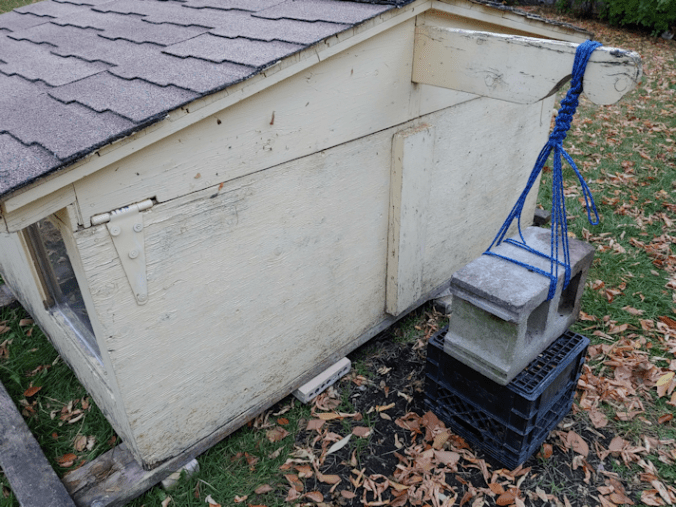
Because the roof is so heavy, my brother designed it so he could add a counter weight to make it easier to lift. He never added one, though.
Today, I did.
I dug up a cinder block and, with the crate to support its weight, tied it to the support, which runs the entire length of the roof.
Of course, I had to remove the crate and test it out!
It works quite well. I was able to lift the roof easily myself, and only when I first started to lift, did I feel that twisting that concerned me.
It could actually use a bit more weight, though, but it would be a simple matter to stick a couple of bricks into the openings or something.
The crate will stay under the block to support its weight, and we can just pop it out when we need to lift the roof.
Oh, that reminds me. Our plans to replace the skid under the cat house will not come to fruition. I found a steel pipe and tried to see if it would work as a lever by trying to shift the cat house on the skid.
Not only did it not move, but the pipe bent! The wood at the bottom edge, which is starting to rot a bit, was also crushed where the pipe was. The old skid is just going to have to stay.
The extension cord we have now is juuuuuussstt long enough to reach the cord on the cat house. I will be getting hold of a longer one, so that there is some slack, as soon as possible. We have also ordered a cord protector case – they aren’t available locally – to protect them when they get buried in snow!
Once we are set up to leave it plugged in all the time, I will be plugging in the heated water bowl in the second outlet inside the cat house. It has a long enough cord for the bowl to be just outside the opening. We’re expected to warm up again over the next week, but it won’t be much longer before the water will start freezing – and staying frozen!
I had really hoped we could use the ceramic heater in the cat house tonight. Ah, well. It’ll get done, soon enough! :-)
Little by little, I had been working my way towards the junk pile. With a litter of kittens living in it, it was not as high on the priority list. Still, I’d been clearing access to it, and had even gone digging into it to find scrap pieces of wood.
The junk pile is actually a wood pile, with lots of junk around it, too. The wood had been neatly stacked and covered with tarps, which have long since torn up and degraded, which means the wood at the top has a lot of rot happening, but the further down it goes, the better the shape of the wood.
Unfortunately, in sorting through the pieces to find the least rotten ones, I also discovered that many were also full of nails, screws or staples. I’d set those aside to deal with another time. With having to go through it so much more today, and having to set aside so many pieces, “another time” was today!
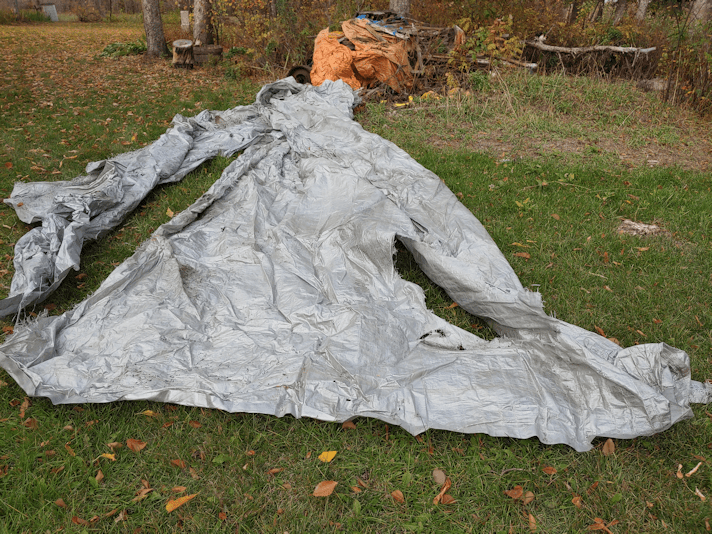
While trying to get at the wood to find better pieces, I ended up having to move the remains of old tarps to access it, and finally had to move the grey tarp that was draped across the end of the pile.
That was my first surprise.
It turned out to be huge!
I then had to remove the even more torn up orange tarp, though I found another, smaller orange one (it actually looks more like the remains of a larger tarp). There are also the remains of a blue tarp on the pile of wood, but it’s so disintegrated, I didn’t even try to dig it out, yet.
I also finally dug out the yellow tarp I was seeing just bits and pieces of. This one was so brittle, I could hear it cracking as I moved it.
When it came time to do something with the wood I’d set aside, I was a bit at a loss. I didn’t want to just make a pile on the ground. I also wanted to stack it in suck a way that no critters would hurt themselves on all the nails and such.
After thinking about it for a bit, I went over to the garden shed and hunted through the stuff we’d piled around it while cleaning out the maple grove.
I ended up bringing over an old metal bed frame – one of three I found in the maple grove. It has metal slats held in place with springs, so I put the longest boards I placed the first few boards in such a way that none of the weight was on the slats. After that, I layered the pieces in such a way that all the pointy bits were facing down or tucked away somehow. Critters can still get under it, without the risk of scratching themselves on rusty nails.
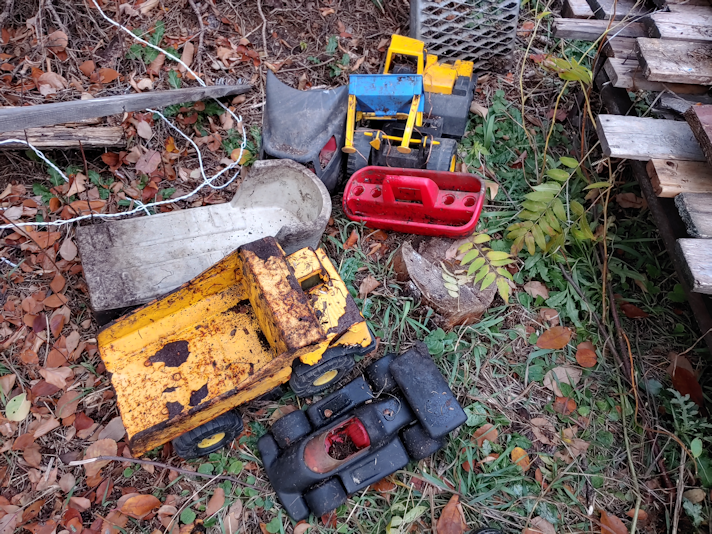
Once the rotted and dangerous pieces were stacked, I started to pull up the disintegrating orange tarp that was mostly on the side, tangled in the things that had been leaned against it to keep it from blowing away in the wind.
That’s when I started to see wheels.
By the time I was done, I’d pulled out all of these.
That’s a metal dump truck in there! Too bad it is so rusted out. The paint is coming off in chunks, too.
I think these might have belonged to one of my nephews.
All of my nephews are adults now.
I ended up tucking them part way under the pile of rotted wood, to partially cover them. I’ll figure out what to do with them, another time.
As I was pulling those out, I also found this…
A rather large white tail deer antler! The discolouring shows the parts that were in contact with debris that would have gotten wet, regularly.
While I was working, I was eventually able to get closer to a tree stump than before. Which is when I noticed something odd.
There were nails in the stump!
Looking closer, I could see the board on the ground. Assuming that was what the nails had been holding in the past, I’m wondering if maybe this had been a platform bird feeder at some point? It’s too high to be a seat, and too small to be much use as a table.
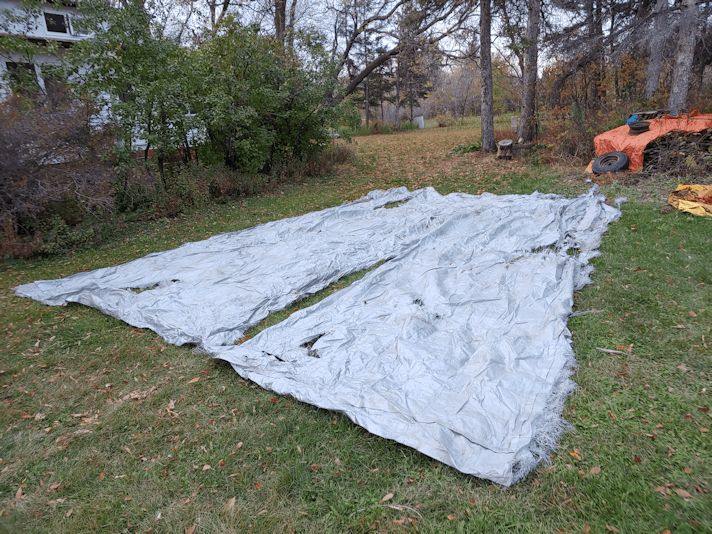
Once I’d done as much clearing as I was going to today, I put the partial tarp that was still useful over the wood pile, having thrown out the torn up one. Then I spread out the big grey tarp.
I’m not sure it’s actually a tarp. It might be a canopy cover of some sort. Whatever it was made for, it’s really big! It’s unfortunate it was left out the way it was, and got all torn up by the elements.
I ended up folding it up and setting it aside. It’s not much use at full size, but it’s big enough that, folded in quarters, I might actually find a use for it for one more winter, before tossing it.
At some point, I want to finish cleaning up the junk around the wood, then go through the wood itself to sort out the rotten pieces from the ones that are still useful.
Somewhere in there is a space big enough for Butterscotch to have a nest for her and her babies. I’m curious to see it!
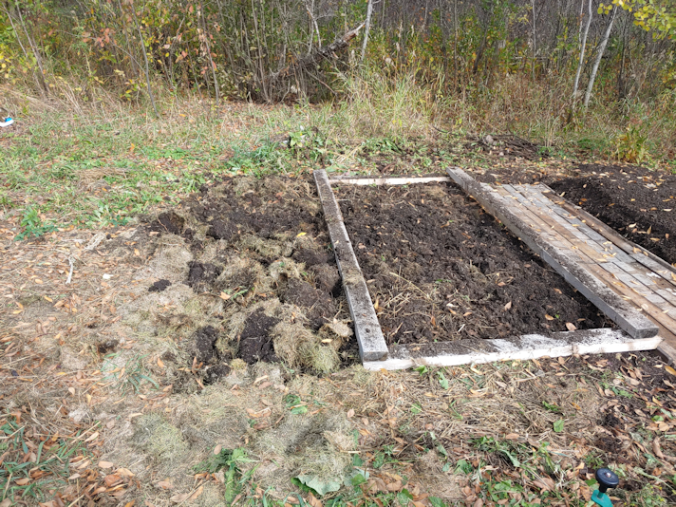
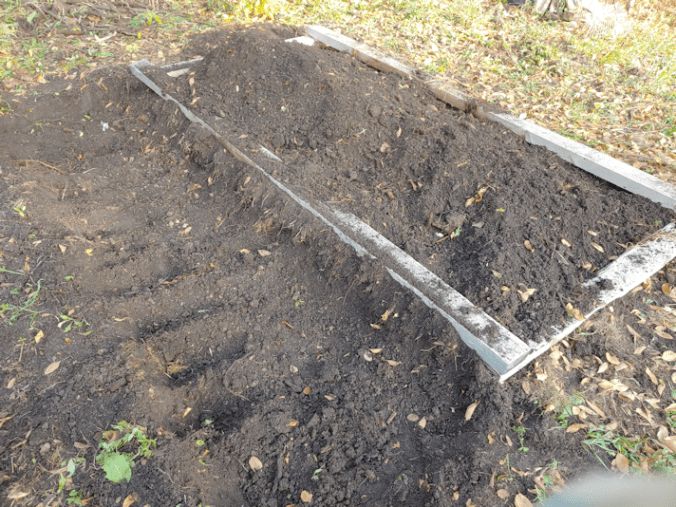
Since I went and build up a bed and walkway yesterday, I kinda had to continue today! :-D
Here is where I left off, yesterday.
The goal was to create another bed with compostable material buried in it, and make a second walkway.
The first thing that had to be done was to break up all the soil inside the frame and pull out any weeds and roots I found. Then I loosened the areas the walkway was going to go. This area had been mulched with grass clippings, so there weren’t a lot of weeks that needed to be pulled out of there.
Then it was time to dig out the new bed, just keep enough to start hitting gravel. Of course, there were more roots – and rocks! – to take out.
There wasn’t much in the new compost pile I could use for this, so I also loaded up a wheel barrow full from the old compost pile. That got topped off with another wheel barrow full of old, damp straw.
The compostable material got buried, with extra soil added from digging out the walkway. I wanted this one to be slightly narrower than the other, to give me more room for a third bed, if I decide to do another one.
I had to make many trips to the junk pile to find enough wood to do the walkway 3 layers deep, like the first one.
Once this was done, I went to clean up the mess I’d made digging for pieces of wood in the junk pile. A lot of the pieces were either too rotten, or too full of nails, staples and screws!
Cleaning that up led to finding all sorts of things, so that will get it’s own post!
So we now have to beds ready and waiting for the garlic to come in. Tomorrow, I will get one of the girls to help me move the frame and see if we can fit a third one in. I don’t even know if we’ll have enough garlic to need three beds, but if it’s feasible, I’d rather have it and not need it, then need it and not have it!
This morning, I was awakened by my husband, asking me if there was some trick to starting the washing machine.
I think it was a rhetorical question.
Our new washing machine, which we’ve had for only 2 1/2 months, simply stopped working. It won’t turn on.
Of course, my husband went through the usual check list. Breaker? It was fine. Outlet? Tested both plugins. Meter reads fine. While I went through the manual’s trouble shooting chart (which basically said, check the breaker, check the outlet), my husband went online and found that there’s a hard reset you can do, so we tried that. Still nothing. It simply will not turn on.
So I started looking at how to contact the LG to get it fixed, since we’re well within the 1 year limited warranty. I tried their website, first. Made an account, registered the item, started a request for getting warranty work done…
Got a note saying we were not under warranty, and we would be billed for the service call.
???
So I finally just phoned.
The good news is, the person I spoke to confirmed we are still under warranty; their website glitches sometimes. She was apologetic about that. Since I had just made an account on the website, she was able to find me in the system, so that made things faster.
They didn’t have any technicians available for where we are, but there is a local company that does warranty work for them, so they will contact this company on our behalf, and we will get a phone call from them.
Soon, I hope!
While I was working on this, I heard the well pump turn on and the noise it made really threw me. Since our plumber hasn’t gotten back to us, and I happened to catch the name of another plumber being recommended on a local Facebook group, I asked my husband to try contacting them.
It turns out that, this time of year, a lot of people are closing up their cottages for the winter, so he’s really busy with those jobs right now. So busy, he recommended we try someone else, because there was no way he could come in within the week. I don’t imagine other plumbers will be any different, so we might have to just wait until after Thanksgiving, which is next weekend.
By the time we got all that done, I was still earlier than usual to get the outside rounds done. I figured the cats wouldn’t mind being fed early! :-D
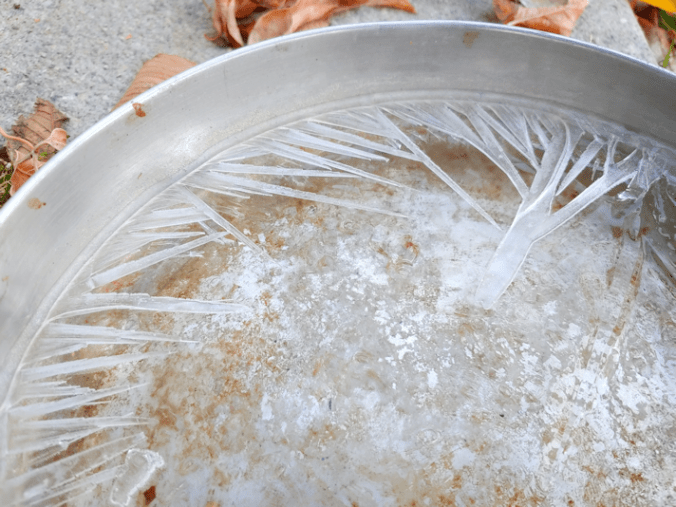
It was -1C/30F at the time. The cats’ water bowls had ice on them, and the ground was covered with frost. It was quite beautiful.
Cat paths!
Frosted burdock
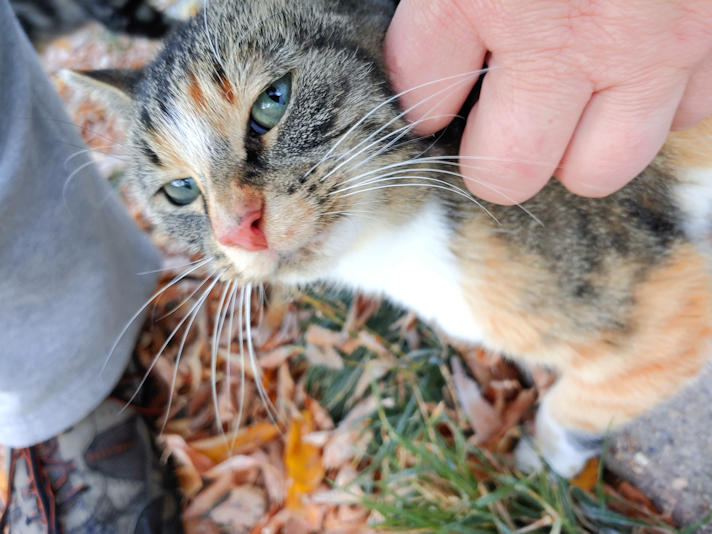
Rosencrantz was not impressed.
While going through the garden areas, I noticed the one sunflower with the seed head that was killed off by grubs looked… odd.
It looks like the grubs continued eating their way down the stalk – and then got killed by the frost!
When I cleared out the old wood pile from the yard last year, the soil I found below was a very pleasant surprise. Still, there was a whole lot of clean up that needed to be done this spring, before we could plant anything. We were still finding some pretty strange things in there! The biggest challenge was all the tree roots crisscrossing the area.
Now that we’ve had our first vegetables growing in there, it was interesting to see what was coming up along with them! After being buried by a wood pile for decades, there were still seeds and root systems that managed to survive and sprout. There was plantain (the weed, not the banana!), which is not surprising; that stuff can grow anywhere and is very hardy. Clover was more of a surprise, but there was also a lot of some long, delicate green plant that I didn’t recognize at all. I thought it might be a flower of some kind, but it never had any. There were flowers that came up, too, and since they came up where the khol rabi failed, to, I let them bed until today, when they were basically done blooming, anyhow.
All this meant that in digging over the beds, I was basically stopping with every fork full to break up the soil with my hands, so I could pull out as many weeds with their roots as I could.
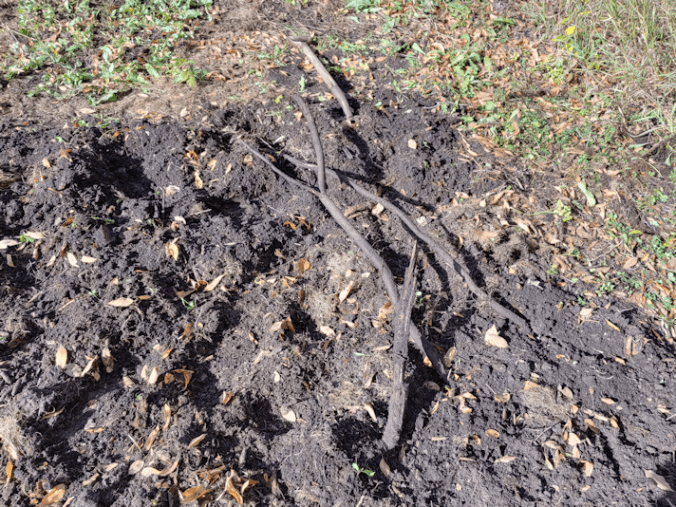
I also found tree roots I’d missed in the spring!
While fighting with the roots, my feet sinking into the soft, soft soil, I kept thinking about where and how we would plant the garlic. The spaces to walk on, in between the beds of carrots and beets we’d planted, was packed down harder than the rest, of course, and it almost seemed like wasted soil!
Also, I discovered that, like the girls had discovered when planting deep bulbs, it seems even here, there is only about 8 inches of topsoil before I started hitting a lot of rocks.
We’ve got three kinds of garlic coming, which meant three beds. How and were did I want to arrange them?
Then I remembered I still had a 4’x8′ frame from the goat catcher we’d built.
Those are coming in very handy!
I dragged it over, and the area I’d worked on turned out to be almost exactly the size of the frame!
That’s when I started to go a bit crazy.
I started to dig out the soil inside the frame.
Hitting more roots, of course.
By this time, plan had started to form in my mind.
All the stuff I’d added to the compost a little while before?
It ended up in the space I’d shoveled out, along with some damp straw that I raked up from around the old dog houses, where they had been used as insulation around them.
When it came time to return the soil to the space, I kinda went overboard again…
I kept digging.
The vague plan in my mind took into account walking paths, and I didn’t want to be sinking in the soil. The pieces of wood I’d used to walk on weren’t very stabled, but what if…
What if they were laid down on an area that was dug down and leveled to just above the gravel?
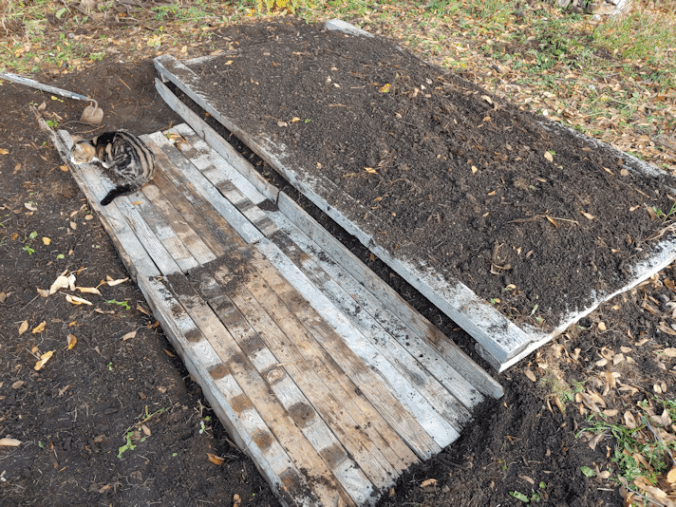
So after I used a hoe and rake to even out the mound of soil, I used them to even out the pathway and started laying down boards.
This is how far I got before stopping for supper.
This is where I pause to say how much I appreciate the girls. While I’m outside doing stuff like this – which I consider fun – they’re inside taking care of the cooking and housework – which I loathe.
Then I went back to finish the job, and this is how it looked.
The wood I was using was salvaged from the junk pile in the spring, and some of if was slightly wider. I used the wider ones to make “walls” on either side of the path, then laid down three layers of boards in the middle. This made them a lot more stable to walk on, and also made the path the same thickness as the height of the “walls”. I had to cut a few to size to fill in gaps at the ends, which worked out all right.
This is old wood, some of which was already starting to rot. If I’d had the option, I would have put down gravel or something. These will do the job for now, and perhaps some day we’ll replaced them with flagstones or something.
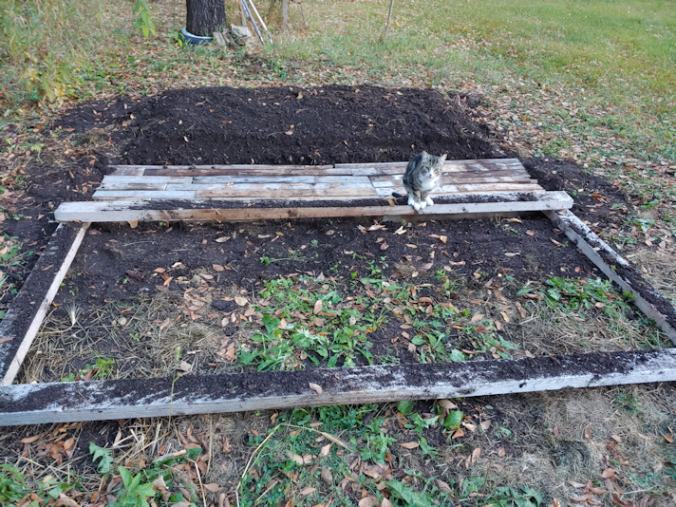
When the girls came out to see how it looked, I snagged one of them to help me move the frame to the other side of the path.
This is where the second bed will be.
With 3 varieties of garlic, it looks like I’ll have to make three of these. It looks like there is just barely enough space to do that, before reaching the metal ring around the compost, though I could put the third one at a right angle to the others, instead.
I don’t know if I’ll be up to doing three of them! I don’t know how many cloves we’ll get out of a pound of seed garlic, each. If I do only two, I could split one variety between the two beds.
We shall see, after the second one is done.
I made a whole lot more work for myself by doing this, but… I think I like it better!
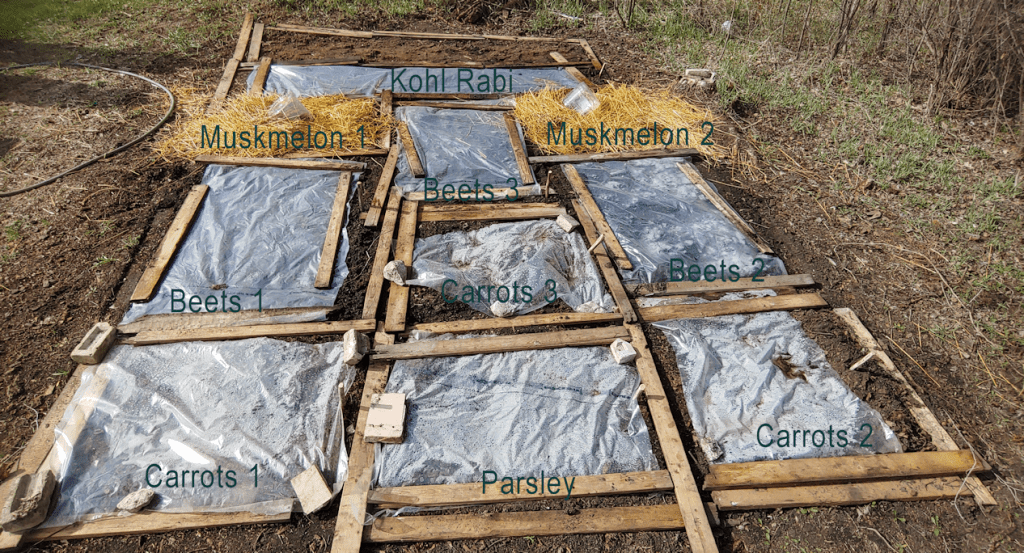
Today, I finally got to harvesting the garden beds we planted where the old wood pile used to be.
This is what we started with, in the spring.
You can read about how the garden plots were doing by August, here, so I won’t repeat myself in this post.
One of the things I’ve been thinking of, while working in the rocky soil of the old garden area, is that we need a soil/compost sifter. That would make clearing the rocks and debris out much easier.
While looking up different design ideas to build one, I suddenly realized…
We already did build one.
The screen “door” we made for the old basement doorway is basically the same idea as the steel mesh sifter my dad had made for gravel, decades ago. It just uses 1 inch mesh instead, and has a support bar across the middle. I’ll just need to reinforce the mesh before using it for something bigger or heavier, since it’s basically just stapled on in between where the wood holds it in place.
Last night, I realized it would also be great to use to lay out the carrots and beets after I harvest them.
It turned out to be perfect for the job.
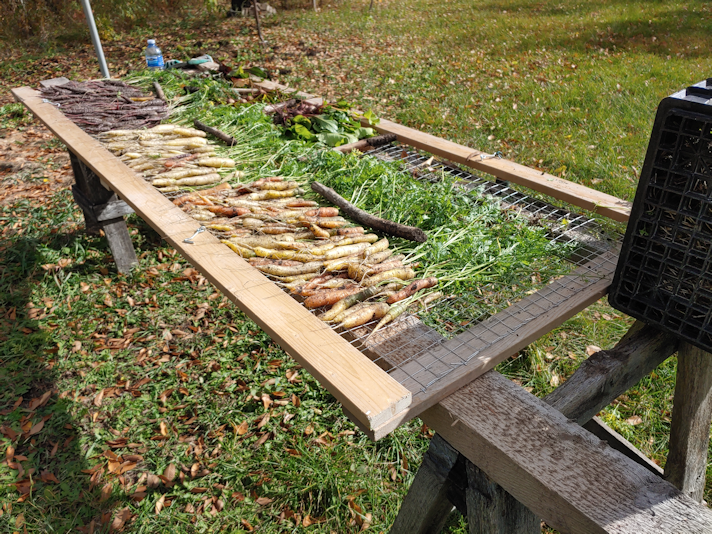
Here is how I set up to start.
The saw horses were too narrow to support the screen, so I laid out a couple of 8 ft boards we didn’t use when building the goat catcher this past summer, to support the frame. I set up near the new compost pile, as I figured there would probably be a lot going into there!
It turned out to be less than I expected.
The few kohl rabi plants went straight in. That was a disappointment. So few came up and, between the bugs and the deer, only two got big, and then they got eaten. For those, I knew there would be nothing to harvest, so there were no expectations in that regard. I do want to try growing it again, but I’m not sure we’ll try again next year. I think it would benefit from a cold frame to plant earlier, and definitely something to protect from deer. Nothing we grew got attacked by insects the way these were, so we’ll need to keep that in mind before we try growing anything in the cabbage family again.
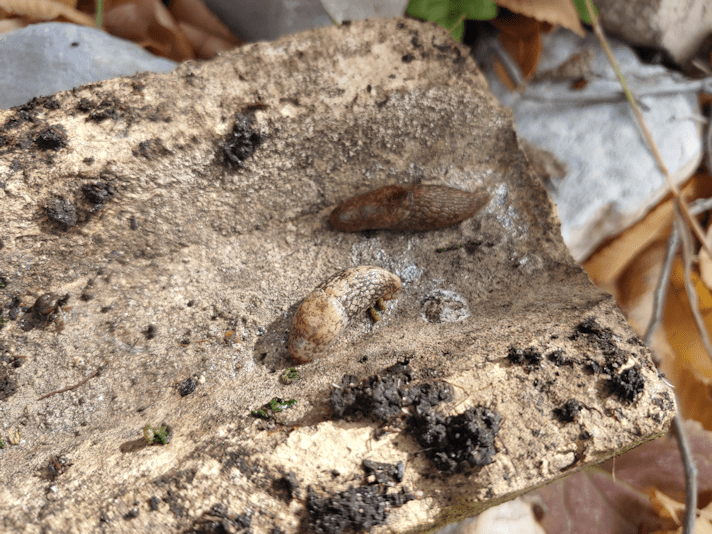
Of the one remaining musk melon, the frosts killed that off, and it didn’t even make it to the compost pile. It just shriveled away to almost nothing! When clearing away the bricks that were supporting the cloche that doubled as a slow watering container, I found some … friends…
Slimy friends!
That left the carrots, beets and parsley.
As far as expectations, I figured we would get a decent amount of carrots. We’ve been nibbling at them all summer, so I had a good idea of what I would find. I wasn’t expecting many, though, and not very many large ones.
With the beets, I was expecting nothing. Not long ago, the girls picked the biggest ones they could find and cooked them, and with the deer continuing to eat the greens, I didn’t expect any worth keeping at all.
I was pleasantly surprised!
We actually got quite a few decent sized carrots. Not the full size the varieties had the potential to grow to, to be sure, but still more than I expected.
As for the beets, I did actually find some of each variety that were big enough to not go on the compost heap. The smaller ones, this late in the season, were pretty leathery and not salvageable. I expected that of all of them, so getting the few we did was bonus. There’s basically enough for one meal, if we combine then all together. :-D
The last thing to harvest was the parsley.
Parsley is something that I could have left alone. They would come up next year, and I do plan to do that eventually. When I do, I will choose a permanent location for the plants. We don’t actually use parsley all that much, so these will be dried.
Since these were not hidden underground, I got exactly what I expected. A whole lot of parsley! I had to do some cramming to get them in that crate!
These all got left outside while I worked on cleaning up the garden beds – which ended up being completely different than planned, so that will get its own post! At the end of the day, because it’s been getting pretty chilly at night, we brought the entire screen into the old kitchen. The beets will be cooked soon, but we have to figure out what we want to do with all the carrots. :-)
The parsley, on the other hand, will have the greens picked over and trimmed, washed, then laid out on trays to dehydrate in the oven overnight. The new oven has a “warm” setting, which should be the perfect temperature for the job.
Once everything was harvested, the beds needed to be prepped for when the fall garlic finally comes in – hopefully, not too late!!
And… I went a bit nuts on that.
You’ll be able to read about that in my next post…
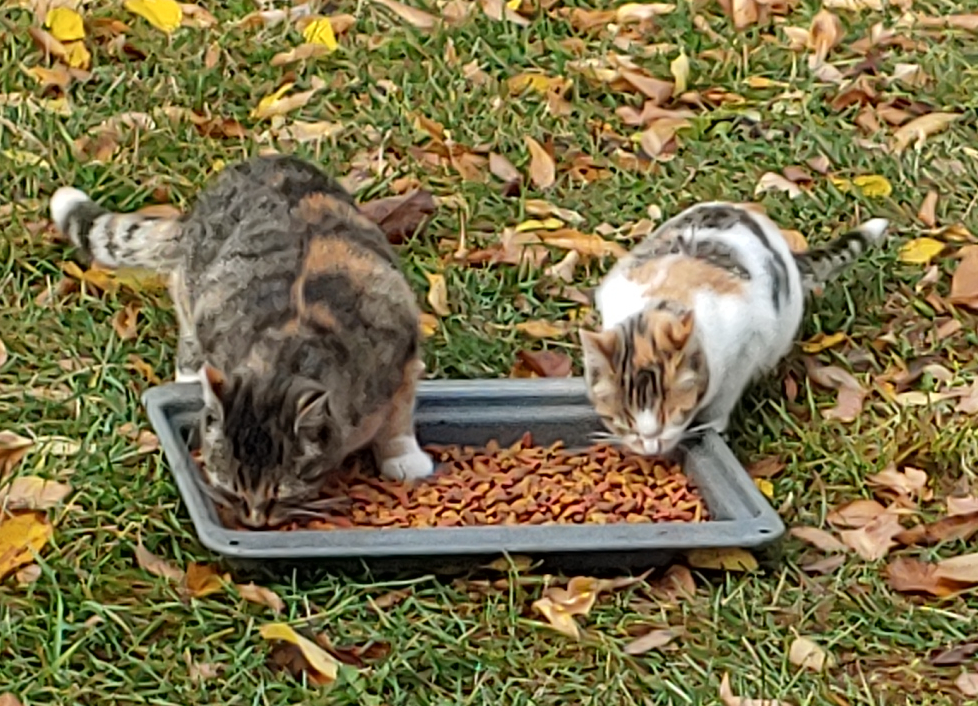
When I go outside in the mornings, Braveheart is usually the one to come running towards me. Then she stops and acts surprised that she’s so close to me and starts backing off. :-D This morning, however, she came up to me – and let me pet her! She even started purring! This is the first time she has allowed me to pet her, without her being at the food bowl and eating.
What a crowd!
I was very happy to see Butterscotch’s kittens hanging around – and to see a Creamsicle Jr. and the calico hanging out with the bigger ones! The two orange babies were with their mom at another kibble container, but I didn’t want to potentially scare them away from food, just to get a picture.
Rosencrantz and her baby, keeping their distance!
I got to pet both Braveheart and Nostrildamus while they were eating. Mystery kept running off and coming back before finally settling in to eat. The calico was doing much the same, but once she saw all the others staying to eat while I was so close, she finally joined them. I didn’t try to pet her; this was progress enough for now!
Yesterday, while working on the squash beds, I was thinking ahead to working on the beet and carrot beds today.
Braveheart (front) and Nostrildamus (rear) both allow me to pet them, and even skritch their ears now – but only after I’ve provided them with kibble in the morning!
Forgetting completely that today was our day to do our monthly shop.
Which turned out to be a good thing, since it also turned out to be a day of intermittent rain, so I wouldn’t have been able to get much done outside!
Rosencrantz (eating by herself) eagerly let me pet her this morning, but her babies and grand-baby won’t let me near them!
So my younger daughter and I made the trip into the city with our itinerary. It’s taken almost three years, but we’ve got the routine for ordinary stocking up down to a pretty efficient routine that also ensures the least amount of time for frozen and refrigerated items to be in the van. Ice packs and insulated bags are good only so far! We didn’t have any unusual things to get this time, so it was just breakfast (drive through, then eating in the parking lot) and the three regular stores we go to.
I was a bit concerned this time around, since the city’s “casedemic” resulted in mandatory masking, with fines, beginning rather arbitrarily two days ago. My views on the usefulness of masks aside, I really can’t wear one. (My daughter wears a home made cloth mask.) I’d heard some people had been given a hard time already. With medical exemptions, we should be able to just say we can’t wear one and that’s it. I’d heard that some people had letters from doctors demanded of them, which is ridiculous. For starters, as far as I know, doctors have been instructed not to give those out. Plus, it’s against PIPA to ask that information. Not all employees are told this, though, and some are are… shall we say… far more aggressive about it then they should be.
Thankfully, I had no reason to be concerned for the places we went to.
The first stop was Walmart, which is where we get some of our cat food. They have more flavours than Costco does, and we like to give the cats some variety. The last time we went there, there was someone at the entry that tried to offer me a mask, but was okay when I politely said I couldn’t wear one. This time, there was no one at that station at all. The sanitation station was still there, so I used some on my hands, but there wasn’t anyone at that station, either. Almost everyone in the store had masks, though I did see a few without. I might have gotten some startled looks from other customers, but with only half their faces visible, I’m not sure. :-/
The next store was a local international grocery store franchise that carries a few things we can’t find anywhere else. It’s also where we get our fresh produce in smaller-than-Costco quantities. This place has always been awesome. Aside from some signage, nothing had changed. I wasn’t really paying attention, but I think I only saw a couple of staff without masks, and that’s it.
The last stop was Costco. The last time we were there, there was someone at a booth offering masks. Again, there had been no issue with me saying I couldn’t wear one. Just a rather startled response. I think. Hard to tell behind the mask. In spite of all the booths, counters and cash registers being shielded, all the staff had to wear masks, though I did see a few face shields, instead.
Today, the woman in the booth with the masks, who had both mask and gloves on this time, immediately started using some kitchen tongs to pick up a surgical mask to offer me. I just told her “I can’t wear one, thanks”, and that was it. I think I saw maybe one or two other people without masks. I saw no staff wearing face shields this time.
In each place we went, things went smoothly. The only hitch was at Costco. The section where the toilet paper, facial tissues and paper towels usually are, was empty. Not a single product! Just a couple of pallets! I’d heard that people were starting to panic buy toilet paper again, but really? I wish I’d thought of it earlier and picked some up while we were at one of the other two stores. They had plenty of inventory. We have enough to last us a little longer, though. We’ll see if we have to make a second trip into the city later in the month. That partly depends on when we can get a plumber in to switch out the well pump, and how much that ends up costing.
Still, we managed to get pretty much everything we needed, and it was all nice and quick. No one gave me a hard time, which was greatly appreciated.
As we started heading out of the city, though, I did have to pull over and get my daughter to drive. My mystery pain in my side decided it was a good day to kick in. While shopping, I can use the cart as a walker, but it was getting difficult to sit up straight while driving.
The drive home saw us going through several downpours along with way, with wind gusts trying to push the van off the road. !! It sure felt good to get home – and to be restocked for at least most of the month, again.
Oh, I did have one splurge while at Walmart. I found and picked up a package of fermentation lids. I’ve never seen any other store with fermentation lids! These have a cap to fit a wide mouth jar, with a build in airlock and, instead of a fermentation weight, it has a spring to push things down.
Too bad we didn’t have these when we were pickling our squash! :-)
I’m thinking maybe we should pick up another cabbage and try making small batch sauerkraut again. :-)
Meanwhile, it looks like it will continue to be wet, chilly and unpleasant outside.
After three weeks (and a day) the crab apple cider vinegar has been strained.
For those new to this blog, you can catch up on the process by clicking on the following links. Each should open in a new tab, so you won’t lose your place.
While I have not been checking on them every day, I have been checking regularly, and the last I did, it they still looked like this.
So it was a bit of a surprise when I brought the jars over to strain them, and saw this.
Oh, dear.
Both jars appeared to have mold at the top.
Now, part of what we’re doing this year is seeing if there’s a difference using cheesecloth to cover the top, or an airlock. Theoretically, because the cheesecloth allows oxygen in and an airlock doesn’t, the one with the cheesecloth should have been worse.
When I opened them up, though, there really wasn’t much difference. They both looked like this.
Yeah. Gross.
It seems the glass weight I used was not large enough to keep all the apple pieces below the level of liquid. Why it was enough to do so for almost 3 weeks, I don’t know.
On taking out the glass weight, I found that the pieces still immersed looked fine.
After scooping out the pieces at the top, the ones below all looked fine. The photo on the left is the jar that had the airlock, the one on the right had the cheesecloth.
I see no difference at this point.
After straining the pieces out, I checked them, and everything still looked fine. It was only the very top pieces that showed mold.
Took keep the experiment going, I made sure to do each jar from start to finish separately, cleaning and sanitizing the jars (and the airlock with its lid) before pouring the baby vinegar back.
The vinegar on the left is from the airlock jar. The one on the right is the cheesecloth jar.
Again, I see no difference between them.
Both of them also resulted in 2L (about half a gallon) of baby vinegar. If I weren’t testing the two different tops, I would have poured it all back into just one jar.
One thing I noticed very quickly when straining them, is that they both have a surprisingly strong alcohol smell. A rather pleasant one! I might have a bit of hard cider going at the moment!
No, I didn’t taste them.
The question is, will the mold that was at the top be a concern? Will the continued fermentation – which is really just controlled decomposition – eliminate any potential problems?
There’s only one way to find out.
Back they go to the old kitchen, for another three weeks. Then it’s tasting time before deciding to let it ferment for longer or not.
These are supposed to stay out at room temperature. Room temperature in the old kitchen is a fair bit lower than the rest of the house – which isn’t particularly warm, either! When I brought the jars over to strain them, I used the temperature gun and they were both at 12C. If we were wanting to make an alcohol, that would be too cold, but is it too cold for a vinegar?