Well, that didn’t work

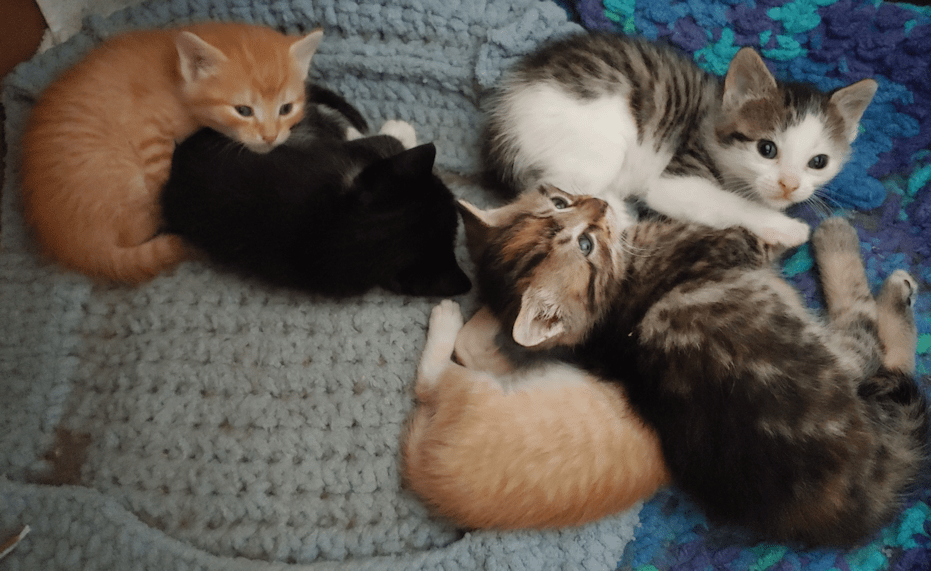
Feeling rather haggard this morning, so I’ll start with cuteness, first.

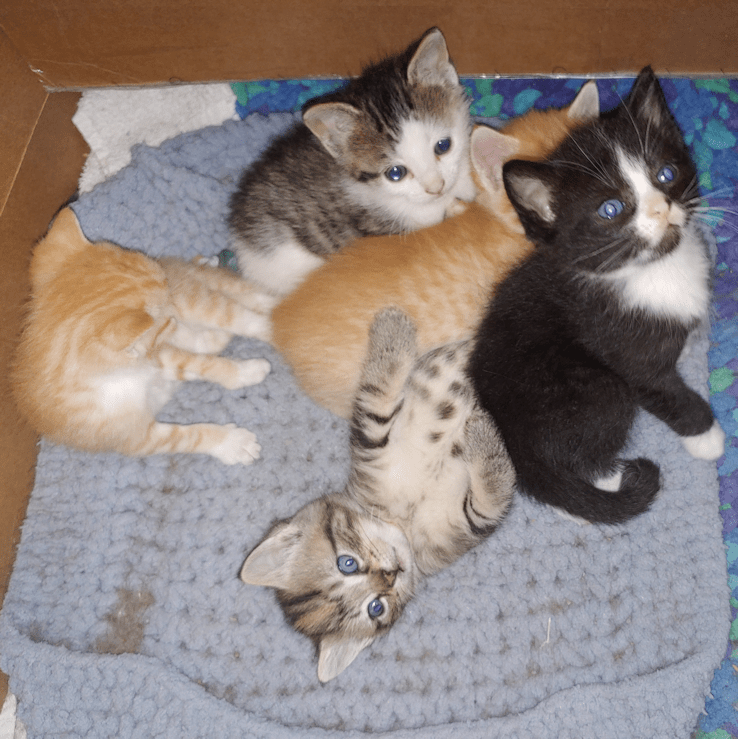
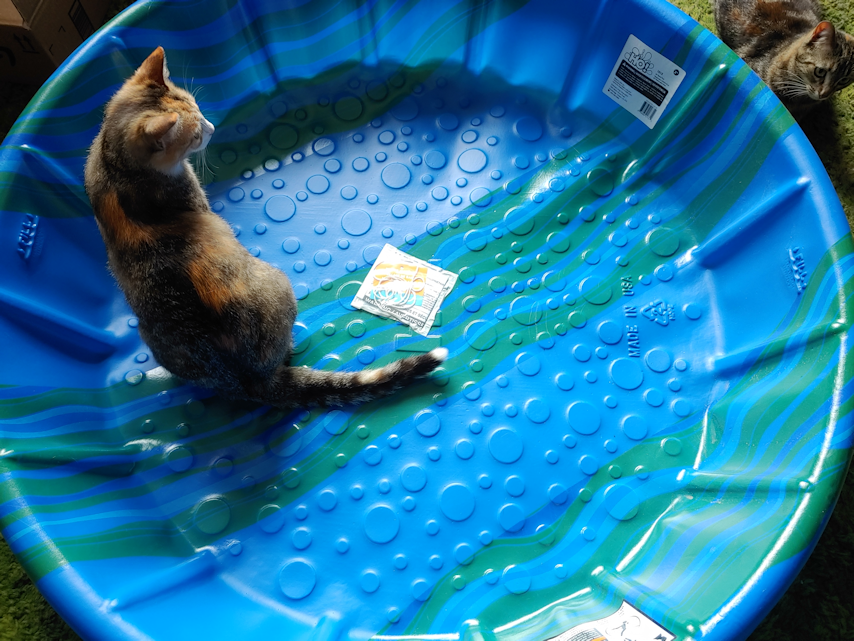
When I saw Big Rig lying on her back, sleeping, I just had to get a picture. Unfortunately, I woke her up in the process, but she didn’t move much. :-D

After rigging up walls around the kitty pool, we waited until the kittens were in run-around-and-play mode, rather than sleeping-in-a-pile mode, transferred their bedding and set them up. Which is also when we discovered that one of the cats that had jumped in to explore had tried to use the tiny litter pan, and peed right next to it, instead.

And that, my friends, is exactly why the plastic pool seemed like such a great idea! It was an easy mess to clean up. Especially since we set it up on the shag carpet in the living room.

Two Face was quick to join them.

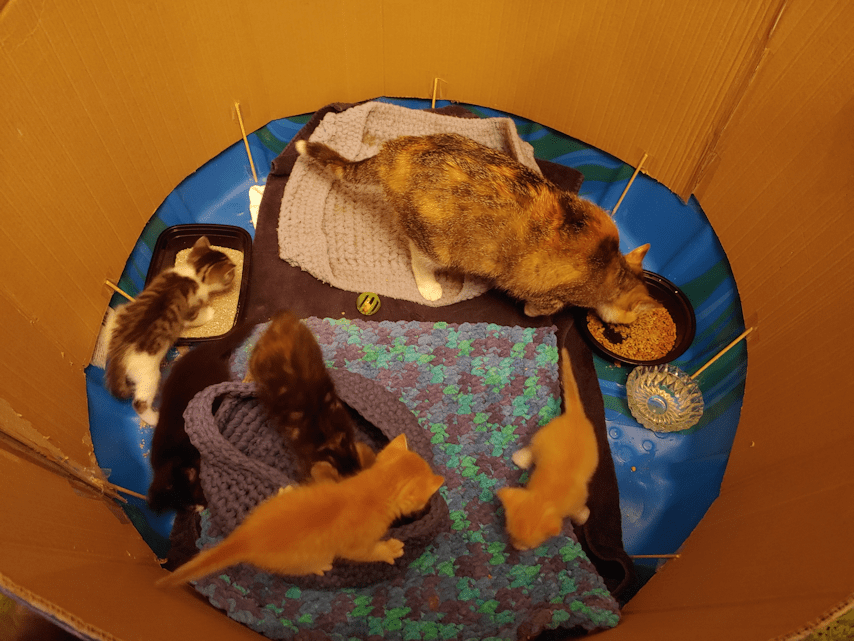
And eat their kitten food, while they explored new things. Like tiny litter pans.

Not much changed when Beep Beep joined them.

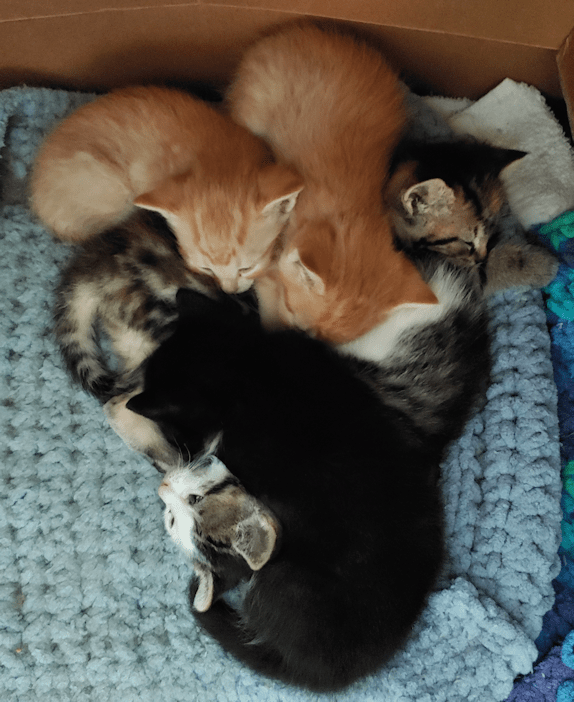
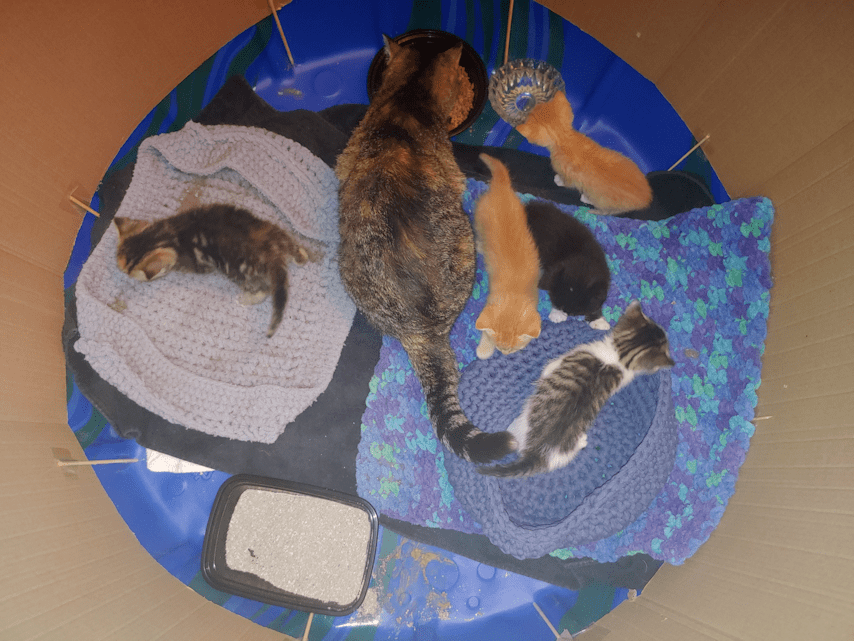
Things seemed to be working. The kittens had more room. They could explore solid food, water and a litter pan to their hearts’ content. They had their familiar bedding.

It did seem a bit too open, rather than the cave-like nests they were used to, but would it work?

No.

The walls were high enough the kittens couldn’t get out, but that also made them a bit harder for Beep Beep to get in. Which was not an issue until she started jumping out with a kitten in her mouth.

Yup. As soon as she could, she started moving the kittens.

She dragged Nicco into a corner of my closet, but in the time it took for her to return for another kitten, Nicco was exploring my bedroom. This is a large room. I’ve got my office in one corner, my crafting table in another, and there’s still lots of room for a king size bed, exercise bike and other furniture.

In other words, there is a lot kittens can get into.

After a while, we ended up moving the kitty pool into the bedroom, set up a litter box near my desk, put all the kittens back in the kitty pool, and shut Beep Beep in with me for the night. We even added one of the boxes that had been part of their next before, to create a cave inside, hoping that would satisfy Beep Beep.

That. Did. Not. Work.

Beep Beep eventually started moving the kittens back into my closet, and with all the squealing and squawling, I finally got up and took the last kitten out myself. They spent the rest of the night in my closet, but I ended up not being able to get to bed until about 4:30 am.

While getting dressed later, I had to fight kittens off my ankles and feet. I tried having the door open, which lead to a rush of other cats coming in. While Beep Beep immediately left, Two Face rushed in and began aggressively mothering any kitten that came with reach of her paws. As they went past her, she would grab them with her front legs and do a death roll, then groom them like mad while they struggled to squirm out of her grip!

Then there was David, who kept following kittens around, trying to sniff and groom them any moment they stopped moving long enough. Cheddar was also following them around. Especially the orange ones, just sniffing at them.

Fenrir, on the other hand, came in just to growl and hiss. Keith came in, but when a kitten came running up to him, he had a panic attack and ran away.

Keith is just a raw bundle of nerves, that boy!

The rest of the cats, thankfully, stayed away.

I finally managed to get all the kittens into the kitty pool again, hoping I could leave the door open and get to the daily routine. I left the room for less than 5 minutes, only to come back and find Beep Beep already moving the kittens back to the closet, while Two Face, David and Cheddar watched. I ended up taking the rest of the kittens out, because I’m concerned she will hurt them with all the jumping around, kicked the rest of the cats out and shut Beep Beep in with her babies. Now, I’m shut in with Beep Beep and the babies again. Which means being on constant guard for kittens around my feet, or the wheels of my office chair.

*sigh*

As soon as I’m done here, we’re going to set up some “caves” the kittens can get in and out of in the basement, then down they’re going to go. Until they get bigger, we’re going to have to keep the basement door closed to keep the other cats out.

*sigh*

Having that door open really does help keep the house a bit cooler.

Ah, well. We had it closed up for the past 2 summers. We’ll live. :-/

I had an energy drink with breakfast. I still feel ready for a nap.

It’s going to be a long day. :-/

The Re-Farmer

First attempt at wood carving

I just couldn’t wait to try out the new carving knives! I ended up using only two of them, though.

After looking at the bits and pieces in the basement, I chose a small piece of lilac to practice on.

It is resting on the leather breastplate my husband made for me.

I was not about to use the carving blades on that bark, though…

I used my K-Bar instead. The wood was surprisingly green, for something that was cleaned up from storm damage some 8 months ago!

I didn’t think to get a picture of the safety glove. There is a pair of them, and they can be worn on either hand. It fit remarkably well, considering I have big, wide man-hands.

Hhhmmm… that may be why it fit well… :-D

It was also very comfortable to wear. I thought it might be really coarse and scratchy, but not at all. It felt like a normal glove.

These are the two carving knives I used. I can’t remember what either of them are called right now.

I started by practicing push and pull cuts to flatten a piece at each end…

…though only one end showed the colours inside; the stick was slightly thicker at the other end.

Then I practiced different methods of making V cuts.

Detail work is going to need a lot more practice. ;-)

After that, I worked on the spiral around the piece, using that to practice different ways of cutting and switching up between the two blades.

I’m rather happy with how it turned out, considering I’ve never carved before. The lilac would was nice to carve with. The blades themselves…

I can see myself wanting to pick up higher quality ones in the future, if I find myself carving more often. While not the cheapest set I saw, it was hardly the highest end, either. I found myself sharpening them almost from the start. The edge held fairly well after I did, so it seems they didn’t arrive as sharp as they could have. Still, they did the job quite well for the learning process it is.

Next time, I’ll find something different to use that curved blade on. :-D

Altogether, I’m glad I picked this up!

The Re-Farmer

They arrived!

My new “toys” came in today – I wasn’t expecting them until next week!

I got myself a beginners wood carving set. :-) With all the interesting woods we’ve been pruning and clearing away, there are all sorts of things I’d rather be doing with them, rather than burning them or having them chipped.

I have no plans to carve figurines or anything like that; that’s just not my thing. But to carve small, useful things, like spoons, spreaders, tiny bowls and the like is right up my alley!

This kit includes safety gloves, three carving knives, including a curved knife for cutting bowls, a leather strop and polishing compound to use on it, and sand paper in a range of grits. Plus, a spoon blank to practice on!

I actually plan to use a piece of scrap wood to practice cuts on, before I start on the spoon blank.

Of course, I’ve been looking up how to use these, and noticed I would need a couple other things. One was a breastplate, so I can safely brace the wood against my chest as I work. My darling husband has already filled that need. He had some heavy leather scraps and glued a couple of pieces together to make an even thicker piece, and cut a couple of holes in the top corners. All I need now is some sturdy cord to put through the holes so I can hang it around my neck. So I now have a very strong, purple breastplate to use! The other thing is something I will need for when I want to carve bowls, and that’s a particular type of chisel to cut away waste wood. The curved blade in the kit is sufficient to carve spoon bowls, and while I will likely be keeping things small – at least for the first while – I will still want to go bigger than a spoon! Plus, I think I have some pieces that might make great cups, and for that, I definitely will want something more appropriate to chisel away the waste wood.

I am really looking forward to testing these out!

The Re-Farmer

Garden status, good and not so good

First, the good.

After giving the new squash bed a thorough watering with the sprinkler yesterday evening, I made sure to check them out this morning.

I’m happy to see that they are looking strong and healthy. A few were looking a bit haggard after transplanting and adding the straw mulch, but they have all perked up.

The not so good is that my plans to at least start on getting the sunflowers plants are still out. It’s just too flippin’ windy out there! The sunflowers are to be planted at the far end of where the old garden used to end. There, they will serve as both a wind break (one variety can potentially grow to 10 – 12 feet in height, the other 8 – 10 feet), but also as a privacy screen. Too many people slowing down to peer into our yard/garden area. Which I can understand, when there’s a herd of deer passing through, but with our past having included things like a paid union goon stalker, a crazy dude threatening us, nosy, gossipy neighbours that were diligently working to drive us away from the housing co-op we lived in, and now our vandal, we’re a little more sensitive to the creep factor of that than most!

That far from the house, though, means no shelter from these winds, and they just don’t seem to be dying down.

I really hope it calms down in the next day or two. The predicted thunderstorms have been pushed back a couple of days, and I’d really like to get the sunflowers planted before then. Plus, there are still the cucamelons and remaining squash that need to be transplanted.

Ultimately, though, I’ll be happy as long as I get them in by the start of June.

The Re-Farmer

The new kitty pool

With bringing a yard cat into the house to have her kittens, instead of using the sun room as a maternity ward, has us facing some different challenges.

In the sun room, as the kittens got bigger, they had a fairly decent sized room to run around in, and still be safe from other critters. Now, we obviously don’t have to worry about skunks or weasels or foxes or even feral toms coming into the house, there are other safety issues we need to keep in mind. The house itself is not at all kitten proof, so we can’t just let them run amok. Even if we could, however, there is the issue of other cats. At one extreme, we’ve got Two Face, who has been trying to mother them herself. Most are mildly curious or content to just ignore them. A couple, however, are not happy with having new adult additions to the household, never mind kittens. The adult cats can protect themselves, but the kittens can’t even run off and hide at this point.

The other thing is, we need to find a way to give them access to kitten food, water and a litter box, as they begin the weaning process.

We had considered a number of options. Even buying a play pen. Which, it turns out, cannot be found locally. We’d have to drive to the city! A wire dog kennel? The mesh is too wide for kittens, Mom needs to be able to get in and out, so the door would have to be left open. Though, I suppose, it could be used upside down. However, the kittens would be able to climb the wire mesh pretty easily. We could probably figure something out, but that would assume such a thing would be available locally. Once again, nope. We’d have to go to the city.

My daughter and I headed into town today and went to a store where I knew we could find decent cat litter at an equally decent price (the second Costco trip to the city we were planning looks like it’s just not going to happen). As we walked in, we saw a potential solution.

We bought a kitty pool.

The sides, of course, are way too low, but it’s big enough we can put in a litter pan and food and water bowls, along with their bedding, and they’ll still have room to run around.

As I write this, my daughters are building cardboard walls for it, at a height Mom can jump over, but the kittens can’t climb.

We’ll see how this works over the next few days! :-)

The Re-Farmer

Gardening progress: transplanting

Today, it was time to transplant some of the squashes we started from seed indoors.

I am really hoping we’re not jumping the gun, here, but many were outgrowing their Jiffy Pellets and really needed to get in the ground. In the future, for things that need to be started so early indoors, I am thinking it would be better to go straight into 4 inch pots, instead. That would give a more flexible timeline for getting them in the ground.

In going through the seedlings to see which ones had their true leaves and were ready to transplant, I counted out 16 in total, so I decided to do two rows of 8. I think most of them – at least the largest ones – are from the zucchini surprise mix, but after the trays got knocked over yesterday, they are all going to be a surprise! :-D

I used flags I picked up at the hardware store to mark the first row at 2 feet apart.

Though we mulched the area last summer, and the soil has improved quite noticeably, we are still dealing with lots of rocks and a soil in need of amendments. Several times, when placing the flags, I hit rocks and had to poke around to find somewhere I could push the wire in. We needed to figure out a way to get around that, and this is what I’ve come up with.

The first step was to open a hole in the mulch to the surface of the soil (removing any rocks I found in the process.

I also prepared a soil mix.

The wheelbarrow still had some straw on the bottom that I didn’t bother taking out when I dumped in a bag of garden soil I also picked up at the hardware store (only because they were on sale! *L*) and a couple of spade fulls of peat. This got mixed together with plenty of water. The dry peat was actually being blown away by the wind while I mixed! It took a while to get it wet enough for the next step.

Into each opening I made in the mulch, I added a spade full of the soil mixture. Then a hole was made in the middle of each one for the transplants, with more water added as well.

Each squash was then transplanted and secured in their own little “hill” of soil mix.

Then I mixed some more soil and peat and repeated the process for the next row, which was made about 2 feet away from the first.

Which was when I discovered I had 2 extra seedlings! LOL So I added them to the ends of the rows, taking a little bit of the soil mixture from each of the other plants, to transplant the extras into. So we now have a total of 18 surprise squashes transplanted.

Once both rows were planted, they were mulched with more straw. When we add a trellis, it will go between the two rows.

After the straw was placed – with the wind trying to take much of it away! – I gave the bed a fairly thorough soaking, to dampen the straw. Not too much, as I didn’t want to shock the transplants with cold water in this heat! I will set up a sprinkler over it this evening. Unless the predicted showers make it to our area. It’s been quite a hot day, and the rain will be most welcome.

When I was done and inside the house, I checked the weather. My phone app said it was 18C, (“feels like 18C”) (46F).

They lie.

I checked the app on my desktop and it said we were at 26C, with a “feels like” of 28C (79 and 82F). That was certainly the more accurate one!

Our barometer agrees.

Since we cleaned this out and refilled it, I have never seen it this high!

We had thunderstorms predicted for the next couple of days, but now those have been pushed back to Sunday. Whether the storms reach us is always touch and go, but I’d like to find some way to cover the transplants, if we do. The straw will protect them, but only so much.

Meanwhile, we’ll be keeping watch on what’s left in the seed trays. We won’t be transplanting as much as we hoped, but right now the only thing I’d say is a total loss is the fennel. I still have hopes for the gourds to emerge! Not that I’d be able to tell which ones they are at this point. :-D

Still, I hope we’ll have a couple more rows of squash in this garden bed by the end of the month. Tomorrow, however, the plan is to get the sunflower seeds in. :-)

We shall see if planting them in their own little islands of soft, stone-less soil will work!

The Re-Farmer

Smiles for the day

While walking around the far end of the old garden area, I found these little splashes of colour.

Such tiny little wildflowers! They were all over an area that is to dry, hardly anything grows there, and what little does manage to grow there, stays small. It’s nice to see what manages to survive there!

Of course, we must have a kitten picture, too!

An increasingly rare moment, when they’re all quiet instead of running, jumping, wrestling and playing around their nest. :-D

The Re-Farmer

Recommended: Townsends

Welcome to my “Recommended” series of posts. These will be weekly – for now – posts about resources and sites I have found over the past while that I found so excellent, I want to share them with you, my dear readers. 🙂 Whether or not I continue to post these, and how often they are posted, will depend on feedback. Please feel free to comment below, and if you have a favorite resource of your own, do share, and I will review them for possible future posts.

I hope you find these recommendations as useful and enjoyable as I have!

One of my favourite topics is history. Not the names and dates, conquerors and conquered type of history, but how ordinary people lived. Over the years, I found that the best way to learn about a people and their culture was to learn about their food, their clothing and their everyday items. It’s remarkable how tangential those areas are.

So this next recommendation is for something right up my alley – Townsends, with their focus on 18th century living in the US.

Jas Townsend and Son has been posting videos for 11 years! You’ll find period topics on everything related to everyday life of people in a variety of circumstances, including how men and women dressed in the period, everyday skills, such as weaving and cooking over an open fire, to building a log cabin!

Of course, food plays a big part of these, and this site is where I found out about the mushroom ketchup that we made ourselves.

We’ve used ours all up and need to make another batch! The ground is no longer frozen, so this time we won’t have to skip the horseradish. :-D

The videos also include a lot of interesting historical information, as well.

While their videos cover an amazing diversity of topics on 18th century life – even advice for reenactors! – their website is well worth visiting, too. Pretty much all of the items you see used in the videos are available on their website. Clothing, accessories, camping equipment, kits, books and more are all available, and all historically accurate to every detail available. It’s really amazing to see the variety of items they have!

One of the reasons I like historical recipes like the many that are recreated in these videos, as well as the cooking methods and tools, is that they tend to be really basic. People made these with the materials that were available, and learned to modify accordingly. A lot of modern recipes and cooking videos tend to involve things I either can’t get, can’t afford, or don’t want to use. I like to keep things simple – and cheap! We’ve gone through some very lean times over the years, and old-timey, cooking from scratch food preparation was pretty much the only option we had. Which doesn’t mean we have to sacrifice taste!

Townsends videos are really interesting, for their historical information and insights. Jas Townsend’s calm enthusiasm is infectious, and he is truly dedicated to authenticity and attention to detail. Recreating historical food is always a challenge, whether from recreating recipes that give little to no information on things like quantities, or even ingredients, to recreating foods where no recipes exist at all; just vague descriptions.

Since moving back to the farm, among the things we’ve had to consider is what do when – not if – we find ourselves without electricity, or unable to get to town to buy things we need, etc. It’s part of why we have been slowly working our way to being as self-sufficient as possible. Historical resources like this go a long way to help in planning what we want to work on, like having an earthen oven, etc.

Plus, it’s just really, really enjoyable to watch and learn from them!

The Re-Farmer

Gardening progress

We’re having another wild and windy day! Still, stuff needs to get planted. I made a quick trip into town and my errands included stopping at the hardware store. Their garden centre was open, so I checked it out.

I couldn’t resist.

I bought some muskmelon transplants. Muskmelon is a type of cantaloupe that I remember we grew here when I was a kid. I absolutely loved them. I only got 2 plants, and we shall see how they do.

In preparation for today, my daughter and I made a bunch of markers to label our plantings.

We made one for each variety of seeds or transplants we have, plus an extra. The cucamelon don’t need one, since they are going to be completely separate from everything else.

We… won’t need to use all of them anymore.

I’ve been hardening off our seedlings. Because of the high winds, I’ve been leaving the trays inside the mini-greenhouse with the flap completely open – that way, they’d get some wind, but still be protected from the worst of it. I also put the mini-greenhouse in front of the old basement window, where it is more sheltered from the wind, and still gets full sun. When I brought home the new melon transplants, I tucked them into an empty shelf in the mini-greenhouse.

When it was time to start planting in the garden, I came out and found this.

My initial thought was that the wind had done this, but now that I think about it, I have changed my mind. If there were a wind enough to knock those trays – and their shelves – down, the whole thing would have been blown over.

I am now thinking a cat decided to go exploring.

Unfortunately, the squash seedlings are now all mixed up. The gourds still haven’t emerged, so at least we can guess that if there is no seedling, it’s a gourd, but there were still some other squash that hadn’t germinated.

I think the few fennel seeds that germinated and promptly bolted are a lost cause. :-(

Most disappointing.

Still, I’ll transplant what I can, tomorrow. One of the seed packets I got was a “surprise” mix. Now, they’re all going to be a surprise! :-D

This is where we focused on today.

Even though this area is turning out to be pretty well sheltered from the wind, there is still enough to really dry out the soil. I watered it earlier in the day, then watered it again before planting.

I also re-arranged the pieces of wood to make different sized beds, taking into account that I now have kohl rabi seeds and muskmelon transplants.

This is how it looks after the girls and I finished.

We still have seeds from the 3 varieties of beets, and kohl rabi left.

One of the things I’ve been doing is keeping the large plastic containers from some treats we sometimes get at Costco; cheese balls and pork rinds. I took two old cheese ball containers, drilled holes all around the sides near the bottom, then cut off the tops. I have a wood burning kit that includes a knife, and I used that to cut the tops off. Much better than hacking away at it with a utility knife or scissors! :-D These are now being used as cloches for the melons, which are surrounded by a mulch of straw. The cloches are tipped a bit sideways right now, but I will put them down for the night, when I do my evening rounds. In the morning, I will tip them over again.

Before the melons grow much bigger, I plan to add a trellis of some kind for them to climb.

Once the seedlings emerge, we’ll remove the plastic and the boards. The seeds were planted with square foot gardening in mind, and after the boards are removed, I will most likely add straw in between the beds for foot paths. An odd problem to have here, is that the soil is so soft, we sink when we walk on it. Our usual problem is the opposite. :-D

Here’s a bit more about square foot gardening.

When we do get do building raised beds, they will be quite a bit taller than the ones made in the video, for accessibility requirements. For those, we plan to use materials to fill the beds that turn out to have a name. Hugelkultur.

Or maybe more like this…

Basically, we’ll use whatever we’ve got to fill the bases, then topping with a soil mix. It might be a few years before we reach this point, though.

There is still one section of the new garden plot with nothing planted, and that may just stay empty. Tonight, I’ll be prepping the area in the old garden, where we will be planting our squashes, so we can start transplanting tomorrow. Then we’ll focus on the sunflowers next. Depending on how things go, we might plant some of our leftover seeds from the beets and kohl rabi, elsewhere. There is still the old kitchen garden area available, so we’ll see how things turn out.

The Re-Farmer

Kitten adventures

The pharmacy my daughter works at now has a small yarn display. Yay! I saw some t-shirt yarn and grabbed it, because I haven’t seen t-shirt yarn in stores in ages.

I made a basket.

It’s 5 kittens big.

Beep Beep tried to get in with them, but it’s not 5 kittens plus mama big. :-D

For my fellow crocheters, the yarn is Madolinni, 97% cotton 3% lycra and 130 meters. It’s 100% “recycled product from the textile industry”. Unfortunately, it turned out to be much coarser and unpleasant to work with, compared to what I was expecting from a t-shirt yarn, but it does make a very sturdy basket.

The base is a disc done in single crochet, starting from 7 stitches, and increased rounds worked in a spiral until about 9 inches across. The first round for the sides is single crochet worked in the back loop only. The next 4 rounds were done in split single crochet, then I switched back to normal single crochet for the remaining rows. This resulted in an almost cauldron shape. The handles were made by making chains of 10 and skipping 7 stitches, on opposite sides. In the next round, a single crochet was worked into each stitch, including into each chain stitch. One more round of single crochet was done, then it was finished with a round of slip stitch worked into the sides of the final round of single crochet, to add stability and reduce stretch.

For those who are not into crochet, here are more kitties!

Of all the cats that were curious about the kittens, Two Face wasn’t really one of them.

Until we started taking the kittens out and putting them on my bed to run around.

She suddenly turned into a mother!

Beep Beep is her mother, but now Two Face is jumping into the nest to mother her mother, and her little siblings. The kittens are even trying to nurse on her! With her belly still half nekkid from being fixed, the nips are easy for them to find. :-D I think they are confused about not getting any milk, though. :-D

The kittens are almost big enough to start scrambling out of their nest! We’re going to have to find a way to get them back into the basement, and walling off a corner or something, where there is less for them to get into and potentially hurt themselves. Plus, they are going to need room for food/water bowls and a litter pan, so they learn how to use them, soon!

What a bunch of cuties. :-)

The Re-Farmer