Little bitty sprooooots actually showed up a couple of days ago, but they were so tiny, I didn’t bother trying to take a picture through the glass of the tank.
So far, only the Spoon tomatoes have started to show, not the Mosaic mix, though some of the bunching onions emerged even earlier.
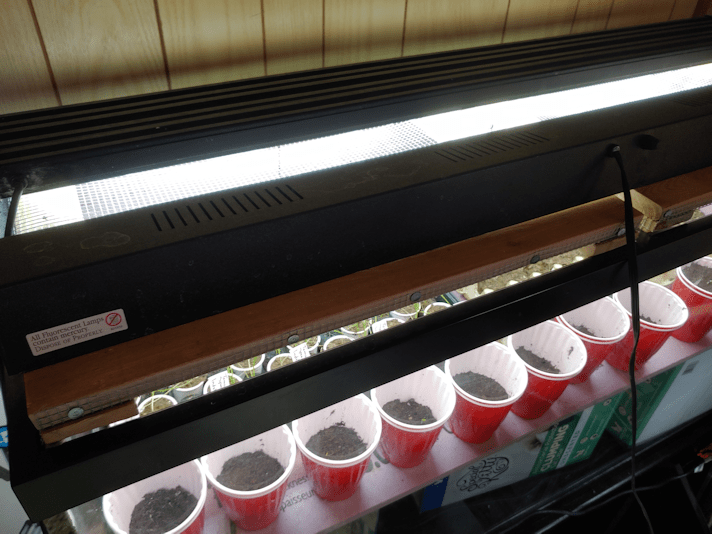
I unpacked the second light for the tank – this was the one that originally came with the tank kit – and set it over the red solo cups. It’s sitting partly on the wood of the mesh frames, to better light up the inside of the cups. That wood is way too wide, really, but it’s what I had available.
Sometimes, I will also put another light fixture on the tank covers, too. While it does have a full spectrum bulb in it, it’s more because it’s an incandescent bulb, which provides a bit of heat. The onions don’t need it as much, but from everything I’ve been reading, tomato seedlings need more warmth.
I look forward to when things warm up and we can start moving seedlings to the sun room (after Ginger has completed his convalescence in there!). By then, the tomatoes and, later, squash seedlings will get all the heat they need in there!
A while back, I used a satellite image to plan where we could plant our garden this year.
Getting a gasp of dimensions was difficult on this, though, but at least it could be used as a guide. Things need to be pretty flexible at this point, anyhow.
With the snow clearing away, we have been getting into the areas and realized that there was a lot more room to the West of the existing beds than there appeared to be, in the satellite image.
Here is the areas with the existing beds where we had planted squash last year.
The perspective makes it look a bit strange.
Two years ago, the area where the green marked beds are was mulched with straw, then covered with black … tarps? Possibly landscaping fabric? Whatever it was we salvaged when cleaning up the old wood pile. That log marks one of the corners of the area we mulched. This made a HUGE difference in the workability of the soil when we planted last year, as well as killing off a lot of the grass and weeds. This area was no longer hard as concrete, and could actually be worked, though we did still dig out pockets to fill with a soil mix that we could transplant into, because of all the rocks.
The long bed in the back has bamboo poles marking where I’d stuck the seed potatoes found last fall that, for some reason, didn’t sprout but still looked completely fresh. There is one more potato than I had poles to mark the spots with. :-D When the garden was prepped for winter, that bed was actually widened a bit, so even if the potatoes do miraculously start to grow, there is room for something in front. Which will probably not be use this year, but it’s an option. If we are unable to get rid of that row of self-sown trees, then we will likely create a series of long, narrower, bed with trellises on the North side, for any climbing plants we decide to grow in the future.
Then there are the three beds down the middle, which used to be pumpkin mounds, with longer beds on either side. The three beds down the middle are all the about same size, while the two on either end are almost exactly the same size as each other. With our current plan, the three smaller beds in the middle will have our three varieties of spinach, while the larger beds on either side will have two of our varieties of onions, which in turn will probably be interplanted with other things. Possible kale and kholrabi, as the onions will help protect them from insects. We shall see.
In the back of the photo is a purple block which is where we are planning to plant the Montana Morado corn. That leaves a surprisingly large space (in orange) that didn’t get marked on the satellite image, where we can plant something else. Perhaps one of the three bush bean varieties can go there.
After we dig out the huge rock that’s half buried in there. When this area was plowed last, the person who did it went around the rock, creating a hill in one area, and a low spot in the other. :-/ This is one of the roughest areas of the entire old garden space. Even where the Montana Morado corn will be planted in ridiculously rough.
As you can see, there is a substantial area in shadow, so there is quite a bit of space that can only have shade loving plants. Most of what we have requires full sun, and even the cool weather plants still need more sun than those areas get. An unplanned consequence of my parents crowding more and more trees into what used to be part of the garden.
Still, it is here that we are intending to make permanent, accessible, raised bed gardens. The plots we have now do not have the dimensions needed for that (which must include the paths as well as the raised beds), so even here, everything we do is temporary. One of the reasons this area was chosen for permanent gardening is its nearness to a water source, and to the house itself. Accessible raised beds will also be high enough to address the shadow problem, at least somewhat.
Now to the other side…
In the foreground is one of the old squash beds marked off in the earlier photo. The smaller two beds are where we had potatoes last year, and where we hope to plant the shallots and bunching onions, if the seedlings survive. Those two beds are a bit under 4″x8″ in size (or a little more than 1m x 2m), to give you some perspective.
All the orange area will be for new garden beds. Most of it was part of the old garden that had been plowed before we moved here. Of that space, the only area that has seen and mulching was where we planted the sunflowers. As with the squash, we dug holes and filled them with a soil mix, in which we planted the sunflowers, because of how hard and full of rocks the soil is. As we were able, we added grass clippings around the seedlings for mulch.
The furthest we’d planted the sunflowers are almost to the very end of the row of crab apple trees. Again, for perspective, we could just barely reach those ones with 260′ of garden hose – almost 80 meters.
Way in the back, at the corner, there is a large L shape inside the orange area that has never had any garden in it. We will be working this area for gardening for the first time. I would estimate the orange area, along the edge on the right, near the old potato beds, to be probably 250′, or about 76 meters, long. The far end, along the fence line, is probably 300’/91m.
Funny. It sounds so much bigger when I write that down. When I’m standing in the middle of it, remembering the garden of my childhood, it feels very… small.
The orange area gets full sun, up until you get close to the crab apple trees that are beyond the right edge of the photo. It gets very hot and dry, so we will have our work cut out for us to grow the corn, sunflowers, beans, peas, melons, radishes, summer and winter squash, and gourds we intend to plant there. Getting water that far out from the house is going to be the biggest challenge.
Part of the goal in breaking soil here is for the future planting of nut trees. Many varieties do very well in poor conditions, but not all. Any improvement of the soil will give them a better chance of survival, and when we’re talking about something that may not produce for at least ten years, any losses have much longer term effects.
The orange area closest to the green areas may become part of the permanent garden beds on this side of the house, but that has yet to be determined. Our plans still need to be very flexible at this point.
After taking these photos this morning, I also took photos of the spruce grove areas we need to work on.
Here are out garlic beds. Another bed will be created to the left, near the current compost ring location. There will likely be beets grown there.
The mess of little trees beyond the garlic beds all need to be cleared out. The ones with whitish trunks are poplar trees, and there are many, many, MANY more of them growing towards the garage, and then down towards the road. They also keep trying to come up in the yard. I had not realized how invasive they could be! These will become the materials to build trellises and arbors for our climbing plants.
The darker colours stems that you see are mostly cherry, from a parent plan from Poland. Something we saw happen since we’ve moved here, and probably happens often, is that the cherries start to bloom quite early in the spring, as soon as it warms up. This, however, is Canada, not Poland, and they got hit by a late frost. This killed off the trees that had bloomed. New shoots, however, come up from the base. So what we’ve got is a lot of dead cherry trees, surrounded by immature new growth.
Cherry trees, we’ve learned, also spread by their roots. I had to deal with that while clearing out the area under the old wood pile, so we could plant carrots, beets and parsley here, last year.
So we’ve decided all of that is going to be cleaned out, as far back as we can. It’s a huge area, and the clean up will likely be done in stages over several years. We don’t want to take too long on that, though, because this is where we would like to plant berry bushes and fruit trees.
Then there’s this area…
Every red line marks a dead spruce tree. The two on the left, by the junk pile, are the ones closest to the house that we were already looking to hire someone to take down for us, along with the dead spruce by the garage and outhouse. Counting that one, there’s a dozen dead spruces that need to be taken down, before they fall down, in this area. There are also plenty of fallen trees that need to be cleaned up, along with the junk pile and the spirea (which is hiding at least one, maybe two, fallen trees). There are Saskatoon bushes beyond the junk pile that we want to clean up around, including removing some chokecherries, which will provide them with the air flow and sunshine they need to thrive. So far, none of these has shown signs of disease.
In the middle of the photo, tucked into where there are so many dead trees, is where we planned to plant the mulberry tree that’s set to arrive later in the spring, in time for planting in our zone. We chose this location, because it’s a zone 4 tree and needs the protection the other trees will provide (the ones still alive, anyhow), and still get a lot of sunlight. With so many dead trees to take down first, however, I’m almost thinking we might want to put it in a pot until next year!
In the foreground, behind the compost ring, is where we intend to build the cordwood outdoor bathroom. I had been upset that we were not able to at least get started on leveling a foundation for it last year, due mostly to the excessive heat, but now that I’ve realized how many dead trees there are, I’m glad it didn’t happen. Any one of those trees could come down in a storm or high winds. Can you imagine doing all that work to build a cordwood shed, only to have a tree fall on it?
Oh, and along with these, I was able to make my way through the spruce grove near the fence line and take a closer look. I found five more dead trees. Those ones are not as urgent to take down, though. It’s the ones near the house and garage that have priority. Of course, there are the trees that have already fallen that need to be cleaned out, too. Focus that far out, however, will be on the south end of the spruce grove, along the driveway, where there are almost no spruces left. Lots of little poplars to take out, and probably some larger ones, too, and lots of underbrush, fallen trees and dead branches to clear away. Only then can we figure out if the crab apple trees my mother planted in there can be salvaged. They’re not as overshadowed as the other ones I found near the maple grove, but last spring, I only saw one branch bloom, and no apples produced. I think I would rather take those out and transplant more spruces in that area, and save the fruit trees for better locations. There are a number of little, self-sown spruce trees that I would rather transplant than get rid of. I’ve had to kill enough trees while cleaning up, already, and will have to do more. If transplanting some is an option, I will be happy to take it!
As we acquire the tools and supplies we’ll need to preserve the bounty we hope to have from our garden this year, we have been picking up canning supplies and the materials do to water bath canning.
We also want to can low acid foods, and were on the lookout for a pressure canner.
My family found something we thought we could use, but alas, it was not to be. We did decide to keep the pressure cooker, though. It’ll still be useful!
As I posted about our conundrum, I had some wonderful people leaving comments and helping me along with something we have never done before, which was greatly appreciated.
Then one wonderful person – you know who you are! – went above and beyond.
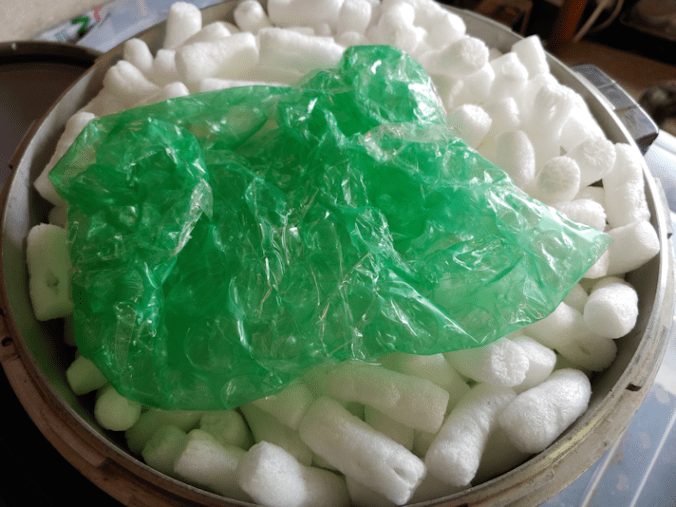
Today, we got a large, very well packed box in the mail.
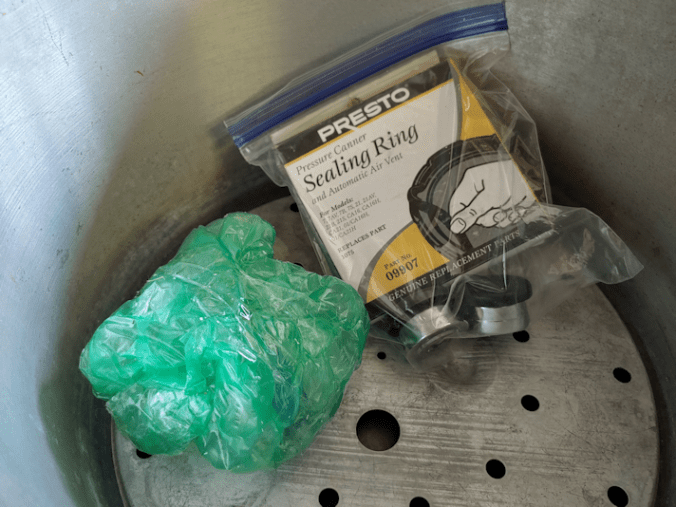
We have been gifted with a pressure canner!
The only thing that’s missing is the instruction manual, which can be downloaded online.
Did I mention it was well packed? :-D
There are even extra parts and pieces!
Also, the cats were very curious. Especially about those packing peanuts. Even after I boxed them up and closed up the flaps, I caught Susan sneaking a paw in and stealing a peanut. Twice!
The internet can be rather unpleasant, especially with all the crazy going on right now, but then something like this happens, and it reminds me that there are some very wonderful people out there, quietly making the world a better place. :-)
Yes! We managed to resist temptation, and not start the tomatoes too early. :-D
After a fair bit of research, plus an evaluation of our cat-safe spaces, I chose to start our tomatoes using the “double cup” method.
I’d already picked up a large package of the red beer cups, and those were the types recommended. The first thing to do was to make drainage holes in half the cups we’d be using.
These will later be used to start our squash and gourds, so I didn’t mind putting drainage holes in extra cups. I’ve got a bag of 250, so we’ll be putting holes in at least 125! :-D
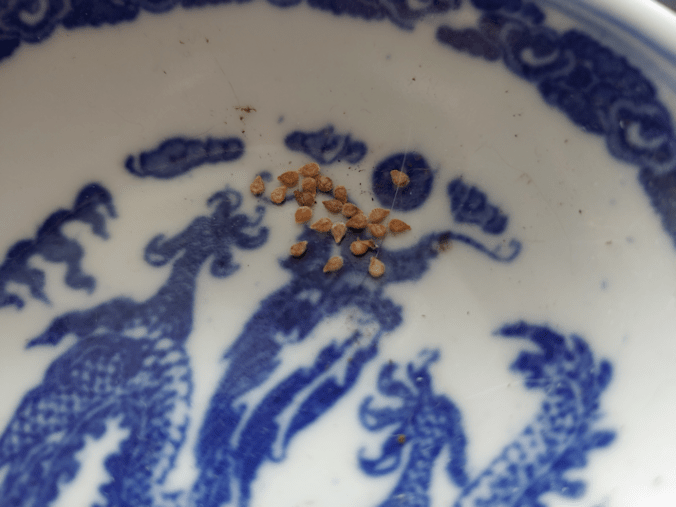
These are the seeds from one packet of Spoon tomatoes from Baker Creek. They are so tiny!!! And we didn’t even end up using them all!
Now, we’ve considered quite a few options for starting our seeds, including peat or similar pots, Jiffy pellets, starting trays of various types, and even looking at the pots of various sizes we found while cleaning out the basements. I settled on these cups for a few reasons. They are the size I want, you can get a LOT of them for a very low price, and I expect to be able to reuse them for many years. In some of the gardening videos I’ve watched, there are people who have been reusing these cups for as long as 10 years.
If I had the budget, I would prefer to use coir pots. I like the idea of those, or peat pots, as they can be put right into the soil with the transplants to break down, resulting in far less root disruption. The problem is, for the sheer volume of these that we would need, they’re just completely out of budget. Peat pots are fairly easy to find, but coir or any other biodegradable pots are things we’d have to seek out, and are far more expensive. :-/
The double cup method has added benefits. I can water them from below, using the outer cup, and not have to have them sitting in trays. That makes them more flexible for our spaces. Particularly since we’re using fish tanks as makeshift greenhouses. Using double cups means we can fit them inside the big tank, along with the trays of bulb unions and shallots.
Another benefit to using these cups for starting tomatoes is that we won’t need to “pot up” the tomatoes.
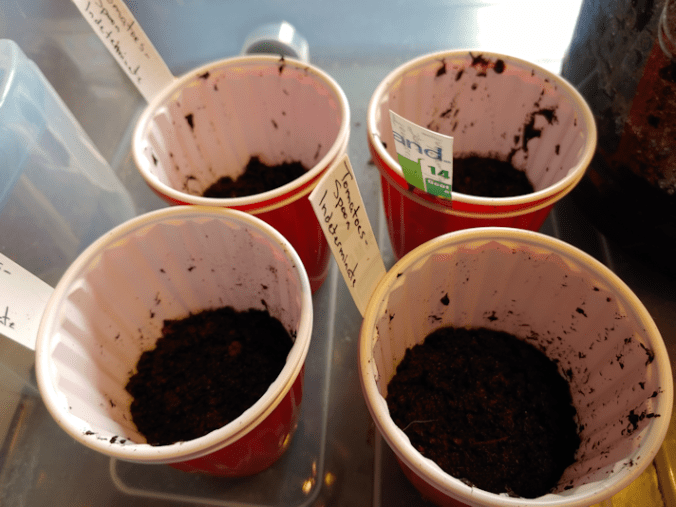
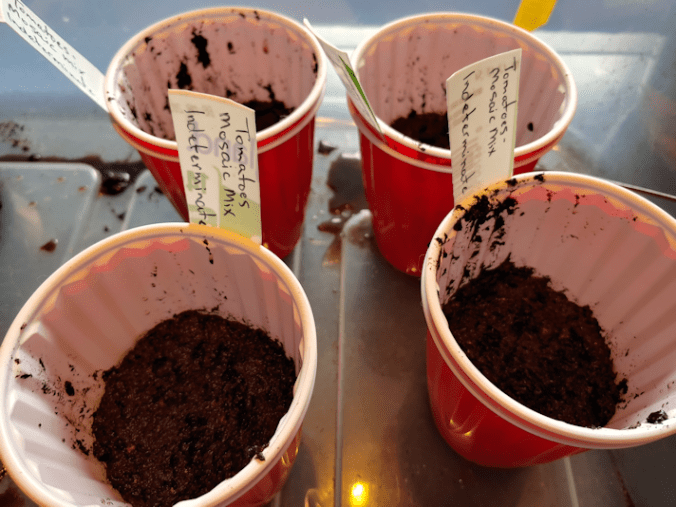
We filled the cups only half way with peat. The loose peat we’re using takes a long time to moisten, so I made sure to set some up in a container with water to saturate overnight, first.
As a bonus, the double cups hold the labels in place very well!
Once the seedlings reach a size large enough that we would be potting them up, we can just add more of the peat around the stems. No disruption of the main root, and the “hairs” on the stems will become new roots, making them hardier for when they finally get transplanted outside.
We planted 4 seeds in each cup. We shall see how many germinate, and how many make it to the transplant stage! The goal is for a total of 8 plants, but if we have extra… well, we’ll figure it out when the time comes. With the Mosaic Medley, it is a mix of cherry and grape tomatoes, so we will hopefully have several different varieties from the seeds that were planted, but I really don’t know how we’ll be able to tell until they start fruiting, really. There are plenty of seeds left in that packet, too.
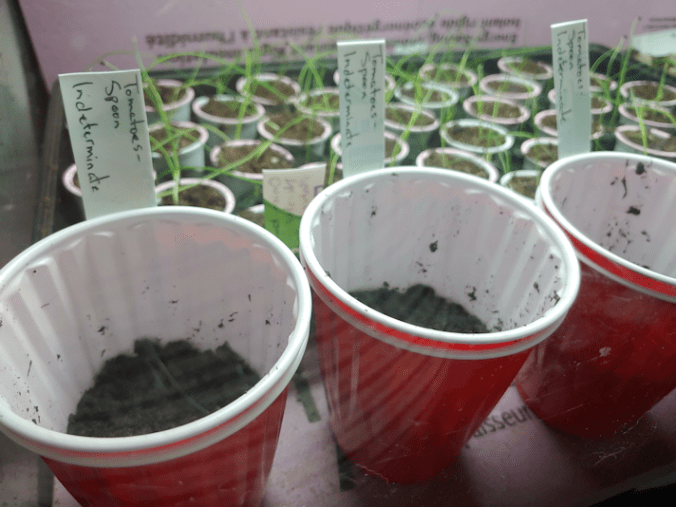
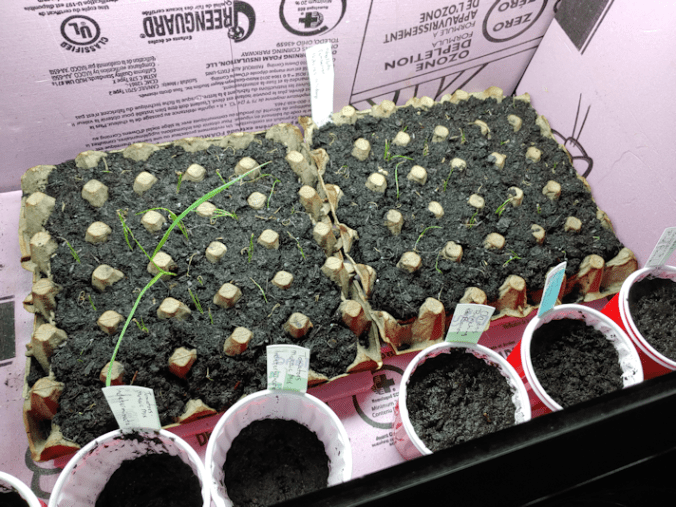
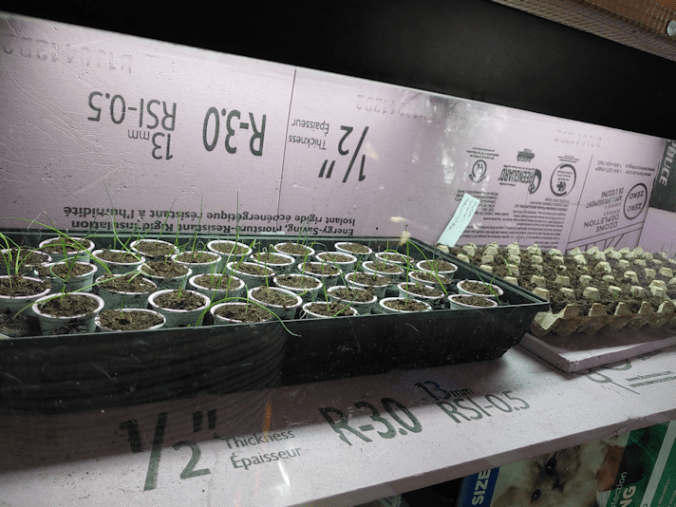
Here they are, all in a row along the front of the big tank. Once they start sprouting, if it seems they aren’t getting enough light, we can place the extra aquarium light over the tank above them.
At which point, I call your attention to the onions, behind them.
The bulb onions (Norstar) in the self-watering tray are doing all right. The K-cups are actually doing better than the ones in the Jiffy pellets, which was a surprise for me. In fact, so many seeded pellets didn’t germinate, I reseeded many of them (plus a few K-cups), and they seem to be doing better now. The K-cups dry out much faster, and don’t water from below as well as the pellets. Unfortunately, watering the taller K-cups without also over watering the pellets has been a challenge. In the future, I would not want to mix the two again.
As for the shallots in the egg trays… Hmm.
I had thought that the wet cardboard of the egg trays might help the plugs stay moister, longer, but they seem to have done the opposite. They seem to be drying them out faster, and with this set up, I don’t have the space to put trays under them, to be able to water them from below. I’ve been using a spray bottle to water them from above, but … well, they really seem to be struggling. And I can’t even plant more, because all of the shallot seeds were used up in these trays.
Then there are the bunching onions, in the small tank.
*sigh*
The cat damage didn’t just wreck a lot of plugs, but it looks like the peat was contaminated, too. On one tray, a white mold has started to grow, while on the other tray, there is what looks like a more yellowish mold. Lack of air circulation in the tank certainly wasn’t helping matters.
That will not be as much of a problem now, at least. The window screen I found in the shed to replace the lid seems to be working, even though it is bigger than the tank. The frame along one side juuuuussssttt fits in the narrow gap between the tank and the wall, which means the tank itself helps hold the screen in place. A couple of 5 pound hand weights on the back, and it seems to actually be working. Yes, we did have a cat knock it off by going on the overhang, but since the weights have been added, that seems to have solved it.
On removing the light fixture from the lid, I had a slightly different issue. There is no “back” to the light bars, and while the waterproof tubes the lights are in have a dark strip along where it would have been against the lid, there was still a lot of light in every other direction. For now, I’ve simply placed the fixture on top of the metal mesh of the screen, then placed a somewhat-cut-to-size piece of rigid insulation, wrapped in aluminum foil, on top. All that “wasted” light is now being reflected downwards. It seemed darker in the tank, possibly because of the mesh itself, so I put aluminum foil around the sides of the tank, too. The foil wrapped “backing” for the light seems to be working well, so I plan to attach the light fixture to it, rather than just have it sitting loosely on top. I had intended to mount the light to the underside of the screen, but it actually seems to be working okay, sitting on top. As long as the cats leave it alone. They don’t seem to like the overhang of the screen, though, and only a couple of the kittens have been willing to make the effort to get past it.
We have a very small, light fan that can sit right on the screen and provide air circulation in the tank. For now, we’ve been switching the little fan back and forth between the tanks, until we feel it’s time to start using the oscillating room fan that’s on a stand.
I’m pretty sure those bunching onions are a lost cause, though.
So we had two things to deal with; the too dry shallots, and the dying bunching onions.
The girls took care of the shallots for me, while I made a run to the post office. They had to get creative, because… cats.
They put the seedlings into baking pans with water in them, to water the seedlings from below. That needed time, but they found that the under-bed storage container that we’ve been using to contain our potting mess was large enough to cover and protect both trays.
They successfully foiled the cats!
There was room for three more cups in the big tank, though, and we still had seeds for the bunching onions. So when I got back from my errands, I decided to plant more of them.
The shallots were well dampened by then, so I slid them back onto the pieces of insulation we’re using tho carry them, and put them back in the tank. Then I filled three double cups with peat and put about a dozen seeds, at least, in each cup. The seeds are all about half an inch apart, so I’ll be able to easily thin them, if necessary, or separate them for transplanting, later on.
And I still have seeds for the bunching onions left over!
So that is done. Tomato seeds have been planted, shallots have been, hopefully, rescued, and new bunching onion seeds have been planted.
The next batch of seeds that we will need to start are the gourds.
But not for another month or so.
Hopefully, by then, it will be warm enough even overnight, that the onions and tomatoes can be safely transferred to the sun room, so we can use the fish tank aquariums for the next batch of seed starts.
As the temperatures have gotten warmer and the snow melts away, I’ve been able to expand my morning rounds. Today, I was able to reach the barn and a shed near it, for the first time in months.
I had a purpose in mind.
One of the things we have found all over the place, beside mirrors and tires, are windows. All kinds of windows.
If there are windows, could there be… ??
… yes there could!
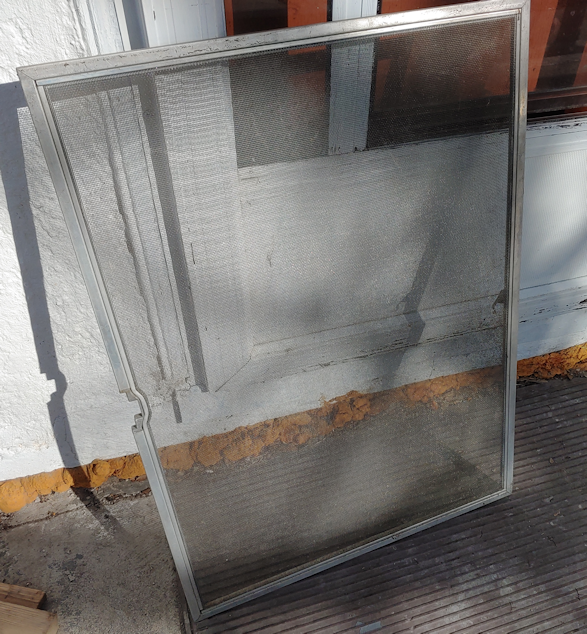
I found a fairly large screen at first, then found at least three like this one. It has an aluminum frame, and a very strong metal mesh.
This may work as a “lid” for the small fish tank greenhouse. It’s much bigger than the tank itself, but if I can secure it safely, I should be able to use it, even with the amount of overlap there will be at the front and sides. I can remove the light fixture from under the lid of the tank, and attach it to the underside of the screen – unlike the light on the big tank, this one can’t handle the weight of even one of our skinny cats on it. There is even a space I can use for the power cord from the light.
The screen itself is probably strong enough to hold even Dah Boy and Cheddar’s weights! As long as no jumping is involved. They don’t tend to try and get on the tanks in general, so I’m not too concerned about them.
The screen has been scrubbed and sanitized and is now set aside to dry. I have time to figure out what I can use to secure it to the tank, while still being able to open it easily to get at the seedlings inside.
Here’s hoping it works!!
Also, there are a LOT of old windows in the barn and shed. Some are broken, but others are still intact. I took a closer look at some in the barn. I am continually amazed by one group of reclaimed windows. They are so filthy with years of dust and grit, I actually didn’t realize they were windows until my brother told me that’s what they were! While some sort of canvas was draped over the middle one, to keep them from touching each other, they are thoroughly stuck to each other at the ends. I estimate them to be about 7 ft by almost 5 ft, and they are at least double pane. Possibly triple. There are a couple of others about 4 ft square that are double pane.
I am sure we will be able to find some use for these. Especially the big ones, if we can manage to separate them without breaking them. I see potential cold frames and mini greenhouses in them! :-)
In choosing garden seeds this year, we kept a lot of things in mind. Choosing food that we’ll actually eat, choosing foods for long term storage, choosing foods we would eat more of, if they were more affordable at the grocery store, and choosing foods just for the fun or challenge of it.
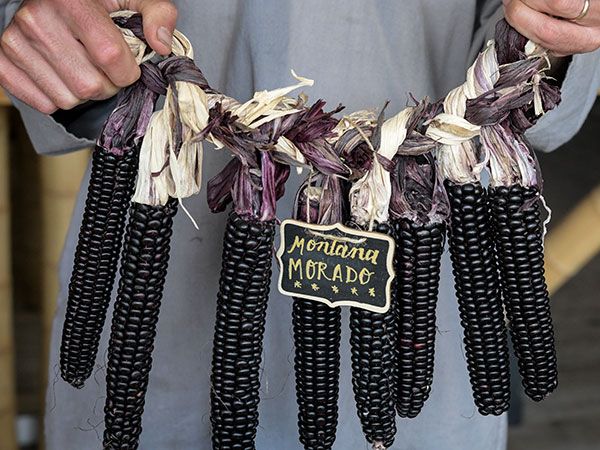
One of the things I picked for the fun and challenge of it is corn that is such a deep, dark purple, it looks black.
This image is from the Baker Creek website, where I got our seeds from. I chose it not only for it’s unique colour, but because it is a corn that can be used to make flour; something we have plans to do in the future.
Maize morado is a Peruvian corn, and I found the story behind how Baker Creek got their seeds to be really interesting.
The question is, how do I grow a Peruvian corn, in a Zone 3 prairie environment? So I started looking for people who had already tried to grow maiz morado.
I didn’t have much luck.
I did find things like this video from 2015.
Yeah. They didn’t do too well. I found an earlier video, and saw that these were the Kulli variety, also from Baker Creek.
I found a few other videos, and noticed one thing in particular. They started out with very few seeds. One guy had only five seeds, and of those five seeds, he got one corn plant that he had to hand pollinate, and only one ear of corn, which he intended to save the seed from to plant the next year. I found no follow up on that. Another person had planted 8 seeds, starting them indoors, but he deliberately intended to cross pollinate them with local varieties, to develop a hardier strain. He stopped posting videos soon after, so there was no conclusion to his experiment. All of these were older videos. Of the ones that showed the end product, they got very tall corn plants – 8 feet tall or more – very few cobs, and very few developed kernels on those cobs.
We have one advantage, in that our packet says it has a minimum of 75 seeds in it. At the very least, we should have plenty of corn plants and the wind can do the pollinating!
There is something else, though.
In spite of what the Seed Stories video from Baker Creek says, these are not Maize Morado.
This variety is a northern adapted homage to the legendary Maiz Morado/Kulli corn from Peru. Ed Shultz, the accomplished and passionate open pollinated corn breeder who spent 30 years selecting this dark purple variety, explains that Montana morado is was actually selected from the Painted Mountain corn.
These are shorter and stockier than the Peruvian Morado strains, and are bred for Northern gardens.
Except this is Montana, which means for us in Canada, it’s bred for Southern gardens.
Will this strain work here? Aside from a few articles about the development of the strain, I am finding nothing about people actually growing it, and how. It may simply be too new a strain. It’s all pretty much a mystery.
So we’re going to be flying by the seats of our pants on this one.
The plan right now is, we will start them indoors in the second half of May. As corn is not something that is normally started indoors, and their roots do not like to be disturbed at all, we will be using toilet paper tubes to start the seeds in. The tubes will be left open ended in a container, so that when it’s time to transplant them, they can be put into the soil, tube and all, with zero disruption to the roots. Hopefully. As their roots tend to grow more downwards than outwards, the open bottoms should mean no root constriction, while the cardboard tubes break down in the soil.
Unlike the one gardener whose video I found, we do not intend to deliberately cross pollinate, so these will be planted at the opposite end of the garden from the other varieties. With wind pollination, the only way to be absolutely sure no cross pollination happens anyway would be to put bags over the developing corn, and then hand pollinating.
I’m not that dedicated to preventing cross pollination.
I am hoping that this one packet of seeds will give us enough corn to be able to have some for fresh eating, maybe even freeze some, and hopefully even try making some chicha morada to drink, but mainly to keep some for seed to plant more next year. Then we will repeat the process until we eventually get a mill and can try grinding some for flour.
Along with the Montana Morado corn, I’d ordered a variety called Dorinny Sweet – a Canadian hybrid – from Baker Creek. We will be direct sowing the Dorinny Sweet, and plan to save seeds from those, too. The Veseys three pack of Peaches ‘n Cream varieties I also ordered was more because I wasn’t sure the Baker Creek order would make it past the border, and while we will have plenty of corn for fresh eating and preserving, Peaches ‘n Cream are just about sustenance, not any particular interest in the variety. They’re the Russet potato of the corn world, in my view. :-D
Well, that’s the plan.
Who knows. Things may even work out to the plan! Either way, I’m looking forward to trying out this variety of corn, and seeing how it handles our climate.
I needed to divert myself with positive thinking, and what better way to do that than to think of gardening!
Also, I am striving mightily to NOT start those tomatoes yet, so sitting here and writing about starting them is keeping me from starting them. :-D
I will explain shortly.
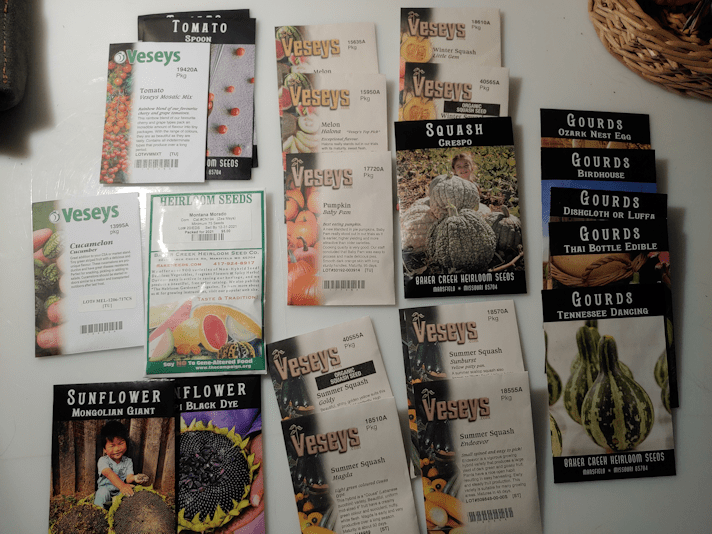
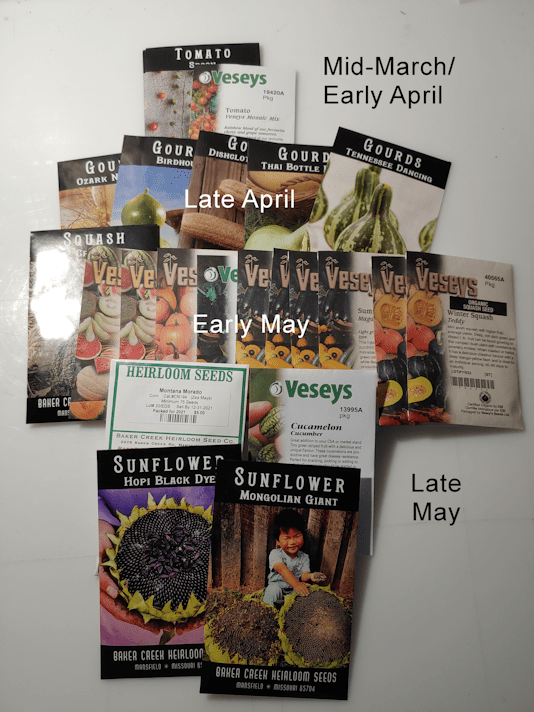
First, I went through the seed packs and took out the ones that need to be started indoors. Here they are.
Then I worked out which ones need to be planted when. Here they are, in order of when they should be started indoors.
You can probably see where I might be having some problems.
Right around May.
It’s the tomatoes that are teasing me. I’ve never grown tomatoes before, and the Spoon tomatoes in particular are a new variety. Even in the reviews, I saw no one in Zone 3 that grew them. In my research, I have found articles from people in our zone who experimented with different tomato starting times, and they generally found that starting them earlier did not benefit them in any way. And yet… there are Zone 3 gardeners who have already potted their seedlings up. The down side of giving up social media for Lent is, I’m no longer seeing the gardening groups about it! But there are other resources and, at the very least, waiting another week will not cause problems. However, if you are a Zone 3 gardener who has experience growing tomatoes from seed, please do feel free to leave a comment! I am eager for the voice and advice of experience!
Next on the calendar are the gourds, in late April. Ozark Nest Egg, Birdhouse, Dishcloth/Luffa, Tennessee Dancing and Thai Bottle gourds. How many we plant of each will depend on how prolific the variety is expected to be. I’ve read that the Tennessee Dancing gourds, which are quite tiny, are extremely prolific. We’ll probably plant just a couple of seeds of those, and shoot to have one plant, while we’ll probably look to have 3 or 4 Birdhouse gourd plants. I learned from last year, not to jump the gun on our frost date of June 2, but we also need to keep in mind that we could still get a frost after that date, so I’d rather have more plants than less.
All of these will be trellised in some way.
Then there is early May.
Oh, my.
All the winter and summer squash, pumpkins and melons need to be started at the same time! Our winter squashes are Teddy and Little Gem. They’re small and I expect them to be fairly prolific, so we probably won’t be starting the entire packets of seeds, but we will likely plant at least half, depending on how many seeds are in the packages. We also have the tiny Baby Pam pumpkins, and I expect them to be fairly prolific, so we’ll likely plant half a package. The Crespo squash, however (listed as a type of pumpkin on the website) get huge, and will likely have fewer fruit per vine, so we will likely plant the entire packet of seeds.
The summer squash include Magda (light green), Goldy (yellow) and Endeavor (dark green) zucchini. Last year, few of them survived the late frost, so we didn’t have many of them. Even the surviving plants were not as prolific as the varieties normally are. We definitely want to have at least 3 or 4 of each. As for the Sunbrust squash, I got an extra packet of those, and we intend to plant two packets of seeds. They were a favorite last year, and we look forward to having lots!
The melons, Pixie and Halona, are small fruiting varieties. There don’t seem to be a lot of seeds in the packets, so we will likely plant all of them. Hopefully, they will be prolific.
A lot of these will be staked or trellised.
Next are the cucamelons and Montana Morado corn in late May. By which I mean, mid-May, so they’ll be ready to transplant after June 2.
We will be trying the cucamelons two ways; I potted up tubers from last year, which should mean getting an early start on them when they are transplanted in the spring, but we will also start a few indoors. It should be interesting to see what differences there are between them. Assuming the tubers survived their winter in the un-insulated old kitchen.
As for the corn… I have been researching that and I’m going to save my thoughts on those for their own post!
Then there are the sunflowers; Hopi Black Dye and Mongolian Giant. This will be another experiment. I got two packets of each. Last year, we direct sowed our giant sunflowers, then sowed another giant variety to make up for the losses from the first batch. They never really had the chance to fully mature. This year, we will start one packet of each, indoors, then will direct sow the other packets when we transplant the first ones outdoors. It should be interesting to see the difference.
Finding the space for all these starts is going to be a challenge. I’m hoping that, by the time we need to start so many seeds in early May, we will be able to use the sun room instead of fighting for space in the aquarium greenhouses. Last year, it was a somewhat chilly spring, and that wasn’t an option. However, if we can provide some sort of heat overnight, it might work this year, even if we get another chilly season.
While all of these need to be started indoors, there are also some things we will be able to direct seed “as soon as the ground can be worked”, which means in mid to late May. The bread seed poppies, kale and kohlrabi, peas, etc. will all be direct sown before any of these are ready to be transplanted. A lot of local people start putting their gardens in on the May long weekend, including transplants. If we had the things necessary to properly protect transplants from frost, I probably would do the same, but we don’t. Our attempts to protect them last year were not particularly successful. :-/ So we will wait for June on the transplants.
Now I just have to hold off another week, before starting those tomatoes!! :-D
Last night, while checking on the onion seedlings, I decided it was time to lower the shallot and bulb union seedlings in the big tank. The seedling tips were looking a little dried out, likely because they were getting too close to the warmth of the light fixture.
Doing that required removing the trays and the “floor” they were resting on, then shifting the boxes holding them all from standing on end, their tallest position, to standing on their narrow sides, which is their second tallest position. Later on, if it seems necessary, we can turn the boxes onto their broad sides to lower the plants even more.
So that worked out rather well. For the trays, anyhow. Unfortunately, being the suck that I am, I tried to do it without removing a kitten that was staying warm on the light fixture. Saffron is a tiny thing that gets cold easily, and she’s taken to using the light fixture to stay warm. So I just slid the whole thing to the back of the tank. It wasn’t enough to get the “floor” out, so I pushed one end a bit further. And a bit further…
The next thing I knew, the whole thing fell behind the tank as a Saffron launched herself across the living room in a panic.
And the lights went out.
At first, I feared I had broken a bulb, but no. The light in the small tank had gone out, too. As the fixture fell, it swiped the power bar’s plug into the wall.
This house does not have many power outlets. In the living room, there is an outlet behind the big tank, though only one plug in it works. We can access the outlet through the cabinet tank’s cabinet, as it is completely open in the back.
Which requires getting down on my knees and crawling half into the cabinet to reach.
My knees did not appreciate this at all.
After straightening out the prong on the plug that got bent when the fixture landed on it, I managed to get it back in and everything was working fine. Nothing broken.
Phew!
Then I put everything back in place.
Almost.
I had been keeping a small plant pot in the tank with the trays. We’ve had to put various types of barriers on, over or around all our house plants that can’t be hung from the ceiling, to keep cats from digging in the dirt. One small succulent was completely covered with a clear plastic dome, like a mini greenhouse, but the cats kept managing to knock the cover off. The last time that happened, I found the poor little succulent on the carpet, along with a pile of soil that had been dug out of the pot. I replanted it and stuck the pot in the aquarium, so it could get the light and the protection the seedlings were getting and, hopefully, recover.
When I lowered the trays, I forgot to put the plant pot back.
This morning, I discovered my error.
I also discovered a half empty pot, and a pile of soil on the shelf and scattered all over the carpet.
What I didn’t find was the plant. There is no sign of it. It’s likely under another shelf, but it could just as easily have been dragged down to the basement.
I had to do my outside rounds, though, so I rescued as much of the soil as I could – it’s a soil mix specifically for succulents – then moved the pot to the dining table. The table is covered in stuff. Partly because all flat surfaces just seem to invite things to be piled onto them, partly on purpose, to keep the cats off when we’re not around. I tucked the pot against some other stuff, then dashed outside to do my rounds.
I came back to another pile of soil on the dining table, and on the floor.
*sigh*
So, that’s another plant lost to the cats. I am pretty sure the culprit is Cabbages, as she’ has been caught many times, trying to get into other plants, but others have been caught, too, so I can’t say for sure.
I really hope the temperatures warm up overnight and stay warm, soon. When we start having to get larger numbers of seeds started, they’re not all going to fit in the two tanks. We’re going to have to use the sun room as a green house. Right now, I’ve seen it reaching as warm as 20C/68F during the day, but it does go below freezing overnight. We’ll be able to fit some things in the big tank with the onion trays (like the tomatoes we will be starting very soon), but when it comes time to start the corn and squash seeds, those onion trays are going to need to be moved to the sun room. This won’t happen for probably another month, at the earliest, so we should hopefully be okay by then.
My daughter’s birthday gift is not the only thing that came in the mail today!
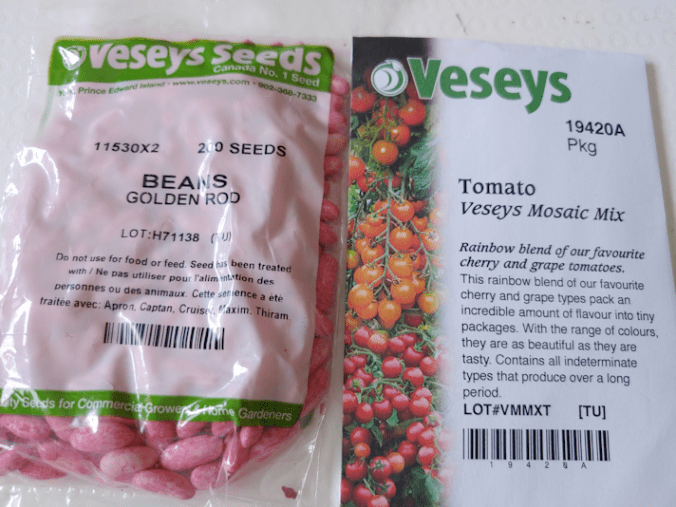
The very last of our outstanding seed orders are in.
Yay!!!
The yellow beans are the last of a three colour collection we ordered, so we will have yellow, green and purple bush beans to grow.
I’m really happy to have the tomatoes in now. They need to be started much earlier than most things. Based on our frost date, we would be starting them after the first week of April, but other zone 3 gardeners I know have not only started their tomatoes, but have already repotted them!
We won’t be planting all the seeds; just a few for our first year growing tomatoes. The space we intend to plant them will fit about 8 or 10 plants. More than enough to meet our needs, since they’re basically for just one person! While other things we need to start can wait until the onions we’ve got in the tanks now are moved to the sun room, there is space enough in the big tank to fit some tomato starts. A project for this weekend, perhaps.
We’ve got a lot planned for our second year of gardening since moving here, but I think the best part is overhearing a daughter saying, “I’m so excited about gardening!”. We’ve never been in a position to garden on this scale in their lifetimes, and I’m thrilled that they are so looking forward to it, too!
Well. Maybe Big Rig, in this case. I am sure David and Keith are not responsible for the latest damage.
I had issues with the small tank being used as a greenhouse for the bunching onions. With cats trying to get at the seed trays through the back, we’ve been diligent about catching them coming even close to that tank and chasing them off.
Unfortunately, with this tank having its hard lid with just a couple of openings I’ve had to block off, it’s been too moist in there. Yesterday, I spotted mold starting to grow on the egg carton trays and onto the peat; one patch on each tray, closest to the front, where there is the least air circulation.
So I took the mini fan out of the big tank and set it over the opening in the back of the small tank. The seedlings are getting big enough to need a fan on them, anyhow.
Several hours later, I came back to find the fan on the floor, the lid askew, and one of the trays half on top of the other.
*sigh*
This is what I’ve done.
I took out the box that raised the trays closer to the light. They’re now just a few inches from the bottom, on top of 18 count egg cartons. That puts them lower from the light than I would want them to be, but they are now also out of reach. I also turned the trays, so the areas with the mold were to the back instead of the front.
I had already replanted some of the plugs with more bunching onions, from the last time a cat messed them up. I still have some seeds left, so I could replant more, but some of the cells in the trays are so badly damaged, they’ll no longer hold the peat. I’ll see how it looks over the next few days, then decide if it’s worth replanting more. These poor seedlings have taken quite a beating!
Apparently, we only managed to train the cats to stay off the tank while we are not around to see them. :-/ I’m pretty sure it’s just one cat. I’m just not sure which one!
After doing as much damage control as I could, I was happy to find everything still intact by morning. One of my daughters accompanied me to the city to do the second half of our monthly shopping (though we only went to one place, so I’ll still need to get more cat litter and kibble, but I will go to the smaller city for that). When we got back, everything was still intact. Also, putting the fan on seems to be solving the mold problem. It’s barely visible now.
Oh, you might notice a single tall blade of green growing out of one of the trays. We have one growing in one of the trays in the big tank, too. They are oats! The peat bale was stored near the deer feed in the sun room, so a few seeds managed to fill into the packaging. When I used the peat, I did take out the ones I could find, but clearly missed a couple!
As an aside, the van’s check engine light is still on, but it’s behaving beautifully. While I thought the mileage was getting worse, based on watching the fuel gauge wile I was driving. Yesterday, it seemed to be dropping way faster, but during today’s drive, we burned about as much gas as I would have expected. When I checked the onboard computer, the average mileage has actually improved since before the EGR valve was replaced. Which I would expect, but it was still a bit of a surprise. If the valve were stuck, fuel efficiency would be expected to drop. So far, so good. I’ll have to talk to the garage about giving it a quick check, and manually resetting the codes.
But that will wait. We got back from the city early enough that I’ll have time to hit the post office while picking up more deer feed and bird seed.
Oh, that reminds me. Potato Beetle came over while I was doing the cat stuff this morning. When I first saw him, I was rather alarmed by how dirty the wound area was; just plastered with plant matter and …
… then I realized it wasn’t the wound area. Just near it. Potato got himself into a patch of burrs! He wouldn’t let me pull them out, but I did get to check the wound, which is looking noticeably better. And so is he!