I’ve been analyzing that side wall of the trellis bed with the bowed log on the bottom, and decided we needed to make a change.
The plan had been to cut joins into the horizontal logs and the vertical posts, then secure them in place. There will be four of posts, about 6′ apart but, the more I looked at it, the more I realized that in order for the posts to be in line with each other, I’d have to cut away far too much wood. It would weaken them too much.
There was one solution, though, that could be done before the end pieces were attached. The pairs of logs are attached to each other, but not to the ground.
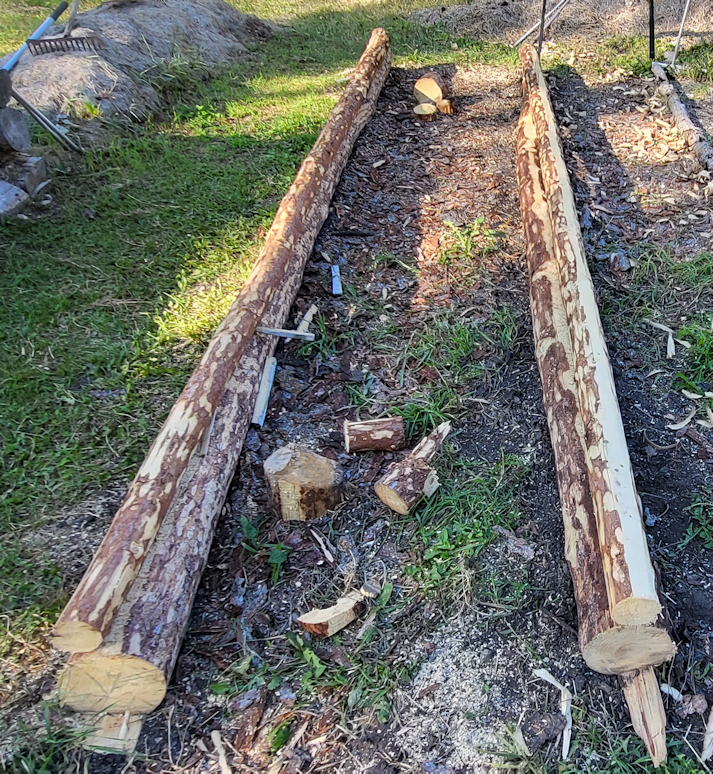
So I snagged my daughter and some rope, and we reversed the wall.
I neglected to take photos at the start. To carry the logs, we wrapped some rope around the ends and used them as handles to lift and carry the logs around to face the other way. It was awkward, but it worked.
The rebar that joins the logs goes all the way through. At the end in the foreground, barely an inch goes through. At the far end, there’s almost 3 inches of rebar that could be jammed into the ground as we lined up and set the logs in place again. Since I cut the ends of the walls in line with each other, we had to make sure they still matched, so that the walls at the ends will be straight once they’re added.
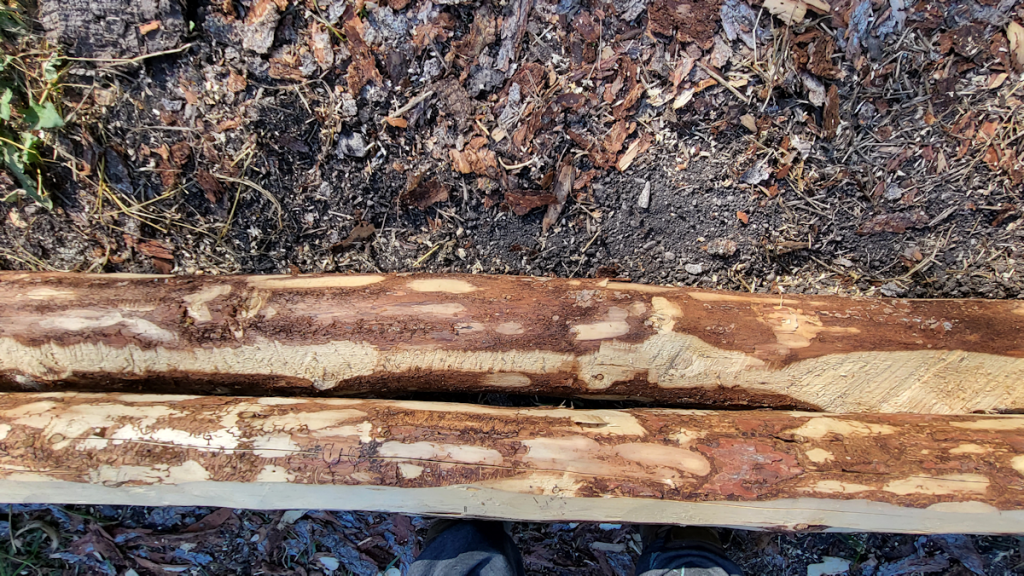
This shows better, why I decided to switch it around. You can see where I used the chainsaw to flatten the top of the base log, for the other log to rest on! 😄 That worked out on the ends, at least! This is where the bow sticks out the furthest, pretty much in the middle. The vertical posts would have been on either side of this section. The top log is pretty straight, so I’ll probably just flatten the logs where they will come in contact, rather than actually cut joins.
But that will be done after the end pieces are added. Technically, once those are in place, we could still move the entire bed if we had to, but that would not be a very good idea!
We picked as many as we could reach using the little household stepladder. The ground is too uneven to safely use the bigger A frame ladder, even with a spotter. Which is okay. We can leave the rest for the birds! We almost filled the colander we were using to gather them. Then my daughter used one of the window screens we found in a shed that have been so handy to lay them out. She gave them a good washing and picked over them to get rid of any damaged or bird eaten ones that got missed. I think we still had about 5 pounds of cherries when she was done. I’m thinking we might make a syrup out of them, but will look up different ideas to try, first.
There are SO many grape clusters! I’m still amazed. The most we’ve ever since since moving here. It will be some time before they’re ripe, though. The chokecherry tree by the compost ring and low raised beds will be ready to harvest soon. Actually, there are two of them, very close together. There’s a larger, healthier looking chokecherry tree by the main garden area, but with the tall trees beside it, it doesn’t get anywhere near as much sun as the one by the low raised beds. The berries on there are still mostly green, and there are far fewer of them. These trees are still pretty spindly, as they were quite choked out until we cleaned up around them, but they are just covered with berry clusters, weighing down the branches.
While checking the grape vines, I was on the lookout for more of those caterpillars, but accidentally knocked a big brown one onto the ground!
I tried to pick it up to put it back, but it kept flipping, uncurling and curling. It was remarkably strong! In my attempts to use leaves and twigs to move it, it flipped itself onto the step, which made it very convenient to take photos! I did finally get it on a grape leaf and back onto the vine.
Then I went to get one of the vines out of the spirea, where I found the green spotted caterpillar. So pretty! I was able to untangle the vine without disturbing it.
While I had the timer going for the sprinklers in the garden, I finally finished attaching the fence wire to the raised bed cover frame.
While setting up to work on it, I noticed that a screw in one corner – top right in the first photo – had snapped, allowing the pieces to rotate slightly. Not good!
Propping the frame up with boards helped steady it, but it was a real pain to attach that fence wire. Plus, Gooby decided that rolling around on the ground and sticking his head or feet right were I was hammering was a good idea.
It was not a good idea.
He was very determined, though!
I did finally get the fence wire attached. Between the snapped screw in one corner, and the likelihood of the U nails simply popping out while the frame is being moved, I decided adding extra boards to sandwich the fence wire was a necessity. I cut spare pieces to length, but by then I had worked my way through the sprinkler and soaker hoses, and needed to do the rest of the watering directly. My daughter was a sweetheart and attached the new lengths to the frame for me. That definitely made the whole thing stronger.
The lengths of fence wire for this was 5′, which made for a rather tall arc. This would be perfect for things like the bush beans on the high raised bed. For the next one, though, I’ll use 4′ lengths.
What I will not use, though, is that fence wire again! The twisted wire at every join is just too thick, making attaching it to the wood less secure. I still want to have something structurally sturdy, though, as it has to support any mesh, plastic or netting that is laid over it. Either that or I will need to add hoops to support the material. Hardware cloth or chicken wire would not be enough on their own.
With this one, I plan to cover it with the black netting we have, closing up the ends in the process. That will make sure no cats will get into the beds and lay down on our vegetables!
The buggers.
Meanwhile, the garden got a good watering. We hit 28C/82F today, as we did yesterday, but did not get any of the scattered rain showers that were predicted. Tomorrow, at least, will be a slightly more pleasant 23C/73F but it’s supposed to reach that temperature by noon and stay there until 7pm. To top it all off, we’ve got air quality advisories from all the wildfires. It was definitely on the hazy side, today! Just moderate air quality advisories for our area. Others are listed as extreme, so we don’t have much to complain about, that’s for sure.
I gave up trying to go to bed early today – at least not as early as the last couple of nights. Still debating whether I should try sleeping on the couch to reduce the interruptions by kittens.
Speaking of kittens, Question has absolutely glommed onto me today! She’s constantly climbing up me, whether I’m standing or sitting. While bending over to pick up the adult cat food bowls, I suddenly had a kitten hanging off my butt. Question had been on the bed behind me and went for it. When I stood up, she climbed her way up to my shoulders and stayed there! After feeding them, I sat down to work on the computer with my own supper. Even though she ate her own food enthusiastically, she was determined to eat mine, too! She was not happy that I would not let her! When we were done giving Leyendecker his medications, I settled at the computer again, only to have her climb up me again, to nap on my chest. As I write this, I’m leaning way back in my chair as she sits on my belly. I think she’s nodding off! None of the other kittens behave like this. Mind you, while her sister has been improving in health, Question is still really gooby, and doesn’t have as much energy as the other kittens.
What a handful the litter bugger is, though. Literally. She’s just a tiny little handful. They all are! Not for long, though. They sure are growing fast!
Well, I need to make up my mind on where I plan to sleep tonight.
This afternoon, my daughter and I were able to get the first raised bed cover done! The frame, at least. We worked on the one intended to go over the popcorn first, as it was the most involved.
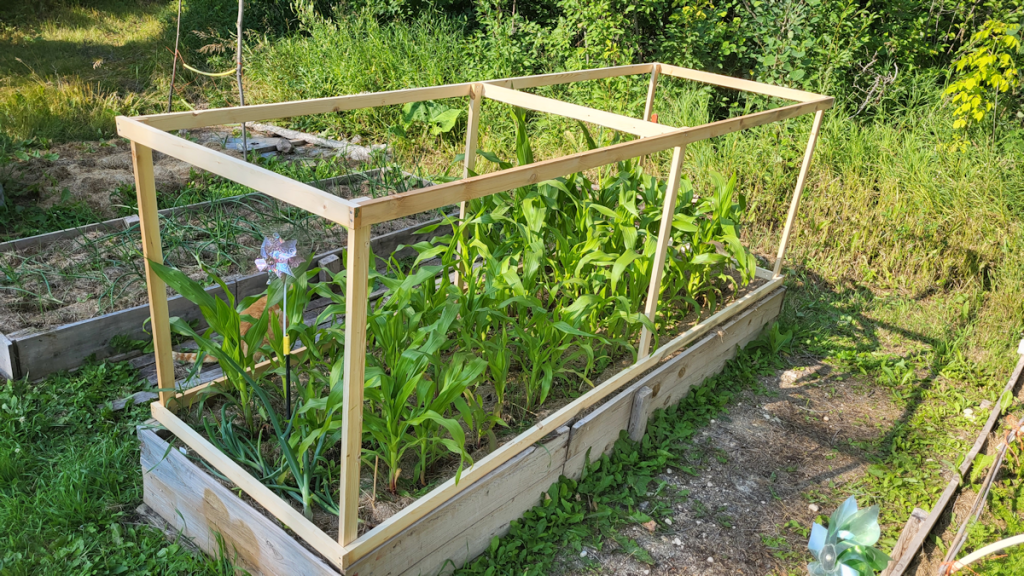
Here is the finished product!
It is now ready to support whatever cover material we choose for it. The question is whether or not I will be attaching something to it permanently, or if I want to attach something in such a way that we can take it off and attach something different, later.
Considering that this bed will need protection from deer and racoons, something permanent would be most logical. I have enough chicken wire to wrap around the sides, at least, but racoons will tear right through that. I might have to pick up some 1/2 inch hardware cloth. Until then, however, we could probably still put the chicken wire around it temporarily.
As you can see, the cover doesn’t fit exactly over the raised bed. That was expected. The bed itself has become wonky over time. Not only have the sides been bowing out, but some of the boards are warping. One warped board you can see in the photo has bent outwards enough, it actually snapped one of the screws that was holding it to the 2×4 join.
We will have to find a way to lock the cover onto the walls of the bed, too, or it could simply get knocked right off by a determined critter.
I’m pleased with how it turned out. The frame itself is lightweight, but sturdy. It can be carried by one person, though having two people is preferable, if only to lessen the chance of the frame being twisted or dragged.
We cut extra pieces when prepping the boards, and there are enough to make 3 more frames. I will be away tomorrow afternoon with my mother, but my daughter might be able to get it done while I’m out. They will be much easier, since it’s just the basic rectangle, exactly the same as the bottom part of the frame in the photo above. The only difference is that I plan to add eye hooks to the middles inside the long sides and use cord to keep it from bowing out. I’m still debating whether they will need corner braces. That will partly depend on how they hold up to having the fence wire attached permanently to them. I would rather add them after the fence wire is attached, anyhow. It will be easier to add braces with the wire in place, then add the wire with the braces in place. Since I have to go to the hardware store, anyhow, I will try to remember to look at metal corner braces as a possible alternative.
With last night’s storm, I was happy to see the tree my brother cut down that got hung up on other trees had fallen closer to the ground. It’s not going to drop any further, though. It’s now hung up between the trunks of a group of trees. We can, at least, reach most of it better, though, so we’ll be able to work on it eventually.
With today’s slightly cooler weather and a nice, clear day, I started working on getting those dead spruce trees my brother cut down for me, out of the bushes.
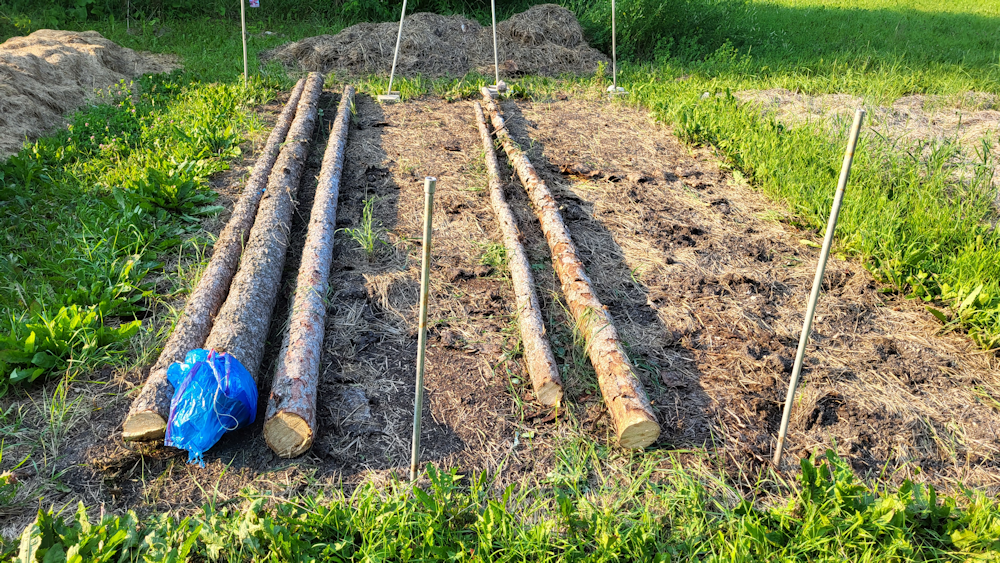
I took photos and will eventually put it all together in a video but, for now, this is what I managed to get done today.
Gosh. That doesn’t look like much, now that it’s done! 😄 It did, however, take a LOT of prep work before these logs could finally be dragged over.
The two trees that were on the ground were almost completely hidden by underbrush. I used the weed trimmer to clear a path to them first, then did a bit around the trees themselves. There were too many hidden branches, though, so I had to shift gears.
The top of the first tree extended a lot more than I thought it did. I used the little mini-chainsaw pruner to clear the branches, then remove the most crooked section of the top, before working my way down the trunk. I had the wagon nearby to put the branches in, and made a few trips to the branch pile near the fire pit, cleaning up as I went along.
Once I got it clear enough, I was able to pull the entire trunk out from under the stuck tree, then continue removing a few more branch stubs. Next, I measured 18 feet from the thick end of the trunk, and used the electric chain saw to cut it. I used a rope to drag the top part through the trees and into the garden, which was harder than it should have been. I neglected to roll it over and check it, first. There turned out to be a stub of a broken branch at the end, acting like an anchor!
Needless to say, I made sure to check the 18′ piece before I dragged that away, too!
The top of the tree is around 16-17′ long. Too short and thin to make the long walls of the beds, but it will do nicely, cut into 4′ lengths, to create the end walls.
The other tree that was flat on the ground was looking very crooked – spruces tend to be like that at their tops – and I thought it was shorter than the first one. As I cleared more dead branches and tried pulling it out from under the stuck tree trunk, I realized it was a lot longer, and thicker! In fact, when I finished clearing the branches and measured out 18′ from the end, I was still at the far side of the stuck tree! It was simply too big to pull out first, like I could with the first tree.
The top was moved first. I hadn’t bothered to measure it, since I figured it would be too short, but when I dragged it between the posts that are 18′ apart, it almost reached, end to end! The thinner top, though is still pretty crooked, so it will likely not be used as a side wall.
Then it was time to drag out the rest of it. I rolled it around to cut away any branch stubs that might cause problems, but the trunk was quite a bit larger and heavier, and getting caught on things. While I was working, I was constantly finding very old and rotting branches and pieces of tree trunks hidden in the undergrowth, that have clearly been there for many years. They made for a rough surface to drag on. I ended up tying a plastic bag around the end of the trunk, to reduce friction. It helped a lot but, by then, I was getting pretty hot and tired, so I got a daughter to pause making supper to come help me drag it out.
While working on this tree trunk, I found the fourth tree my brother had cut down. It is another big one, and he felled it in the opposite direction. It’s almost completely hidden, not just by undergrown, but other trees, and I’m honestly not sure how I’m going to get at it.
As for the tree that’s stuck, that one is even bigger. This is one that’s going to have the thickest 10′ cut off and taken to where we plan to build the shelter for the outdoor kitchen we plan to build. These trunks are far too thick to use for raised beds, as they would take up a lot of growing space. Rather than cut them in half or something, we will instead use them as vertical supports for the shelter.
But I was not about to work on either of those logs, today.
I started to put things away, but I really wasn’t happy with having done only two trees. Especially when there were other thinner dead trees, right there.
Yup. I ended up cutting down another tree.
Gosh, that thing felt so light, after fighting with the big one! Even though I used a hinge cut, it still fell off to one side and got a bit hung up on other trees. It was easy to get loose. I just put the rope around the trunk near the stump and pulled it until it fell the rest of the way. It also fell across the stuck tree, which made it much easier to work around.
Then it was just a matter of clearing a few branches – there weren’t very many at the bottom half – measuring out and cutting 18′ and dragging it out.
The top of the tree is resting on top of undergrowth, and I left it there for now. I am not sure how much of it will be useable. It won’t be useable for the walls on the raised bed, but it might be useful in other ways.
I’m still going to have to cut down one more smaller tree for this bed. There’s one that looks like it’s similar in girth as the log with the plastic bag on the end. I’m planning to make these beds 2 logs high, but I want the bottom logs to be the bigger, thicker ones.
This time I have the draw knife, so I want to de-bark the logs and cut away any remaining branch nubs, lumps and bumps. I didn’t do that for the high raised bed, and I can see that it would be much better to do it than not.
I want to get at least one bed built, with the vertical trellis supports in place, before cutting down more trees for the second one. Ideally, I’d put in the vertical supports for both beds, along with the horizontal supports to make a trellis tunnel, right from the start, but we’re going to have to work on things piecemeal for now. Plus, we will be building at least one, probably two, more of these, so this one is the learning experience!
I’m happy with the progress, and I’m paying for it now, but I’m actually not having as much trouble as I’ve had in the past. Of course, tomorrow might prove me wrong, but it seems my body is finally starting to handle things better. Yes, I’m stiff, my left knee tried to make an escape, and a thigh tried to go into a conniption fit, but I’ve certainly had far worse pain, stiffness and joint instability after far less work.
It just feels so good to finally be able to work on this!
It’s almost 6pm as I start writing this, and not only have we reached our predicted high of -10C/14F (my app says there is a wind chill of -19C/-2F, but I just got back from topping up the outside kibble, with no jacket on, and there was no wind), but it’s supposed to keep getting warmer overnight!
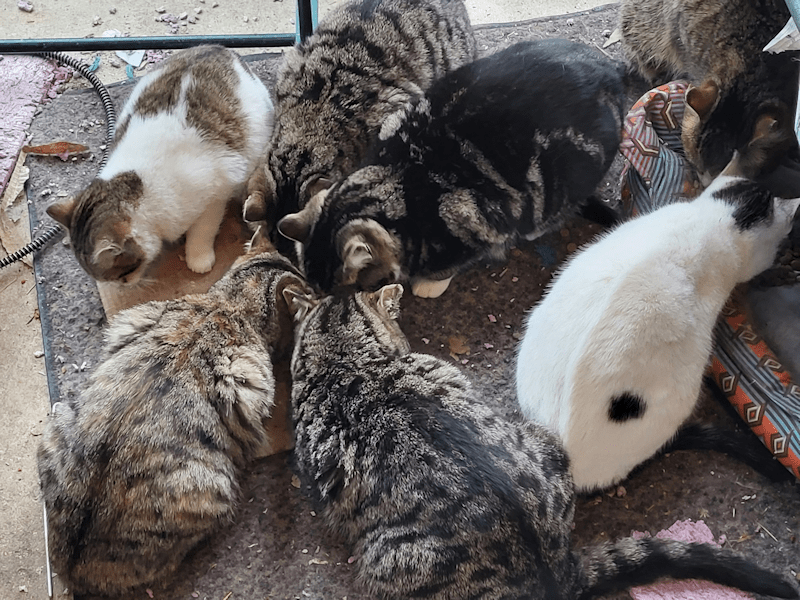
The grey tabby that has suddenly become friendly – it’s the one between the black tabby and the white and grey at the top – managed to sneak into the old kitchen while I was coming out with kibble. He not only let me pet him, but I was able to confirm he is male.
Now why can’t any of the females suddenly become friendly? They still won’t let us anywhere near them! The calicos and torties are pretty much guaranteed to be female. Not sure about the rest of the tabby cattens, besides Judgement and the newly friendly one.
They are just loving the warmer temperatures, and so am I!
I’d made arrangements to get some farm fresh eggs this afternoon. Then I got a message saying they had to make a trip to the city to try and find a part, so that got postponed until they got back. With the warmer temperatures, I’ve been feeling so energetic and antsy, I ended up going into town to pick up a few things, even though we were planning a trip to the city soon. I was home long enough to get a chicken carcass in the slow cooker to make stock when I got the message that they were heading home, so I was back on the road soon after.
Aren’t they beautiful? I love the green ones!
I am always so inspired when I visit this place. This is the same person we’ve been getting our cardboard from, to use while making new garden beds. Today, I got to meet their new additions – a pair of fainting goats, and two emus!
Emus are flippin’ huge!
This is in addition to their alpaca, horses, donkeys, hens, Guinea hens, and probably other birds I don’t know about. Once we have our coop, I’m hoping to be able to buy chicks from them, too.
While I did a small trip today, I’ve decided to do a big city shopping trip tomorrow. We’re expected to have a high from 0C/32F to 2C/36F, depending on which app I look at. I figure I may as well take advantage of the warmth. This time, we’ll be going to a different wholesale place, where I know I can get things like the big buckets of ghee and restaurant size bags of pasta. It’s time to restock pantry supplies we’ve been using when we weren’t able to make our usual big trips. We didn’t have the extreme cold we usually do, other than the past week or so, but with the holidays, December and January are always the worst months for making these trips. I’m actually looking forward to the outing, even though I’m not at all looking forward to the shopping!
My younger daughter has different plans for tomorrow. Getting back to cleaning the basement! The cats have made a mess of the new basement, and she’s using that as an excuse to do a deep clean and organization of the space. That basement, however, isn’t much warmer than outside, even with the extra insulation added around the base of the house in the winter. During our recent deep freeze, it simply got too cold to work down there. It should get much better, and stay better, from now on. She wants to get it to the point that they can paint the basement. White paint on the ceiling (which is the exposed beams of the floor above) and special anti-mold and mildew paint for the walls. I don’t know if they want to do the walls white, too, but definitely a light colour. There are quite a few lights down there, but it’s still really dark.
We have a lot of big projects planned for when things warm up. Too many, really. The girls are focusing more on the inside, and are also talking about getting flooring for the kitchen and dining room, and refinishing the kitchen cupboards. Outside, I want to get that mobile coop built (and if that isn’t possible, we’re supposed to be getting a shed given to us that can be used until we can do the mobile one). Another project that will take probably quite a long time, as we acquire materials, is the outdoor kitchen. First priority is the timber frame roof. Once there’s a roof, we can be more leisurely about what we build inside. One side will have a smoker, clay oven, a “stove” opening to fit a large wok, and a grilling area. Two sides will have moveable work stations, and the fire pit will be added. The eaves of the roof will be longer past the wall of one side, where my daughter wants to have a forge.
Since we aren’t able to build the outdoor bathroom where we want to, until after a number of dead trees are removed, I want to do another, smaller, cordwood practise building. We need a new garden shed, so we can build a smaller shed – about 6’x8′ on the inside – in the maple grove, where a couple of trees had been removed while the power lines were being cleared. That is less of a priority, but since things will need to be built in stages, as we get materials, we might actually be able to get started on it this year.
Of course, there are also the high raised beds that need to be built. The outdoor kitchen actually solves something I was trying to figure out. The dead trees that we need to take down are quite large around. Too large to be practical for the high raised beds. I was considering cutting them in half, length wise, but now I’m thinking they’d be extremely strong upright supports for the outdoor kitchen frame. We can cut the lower, thickest, part of the trunks to the length we want, and then use the rest of the trunk for the high raised beds. It’ll mean more trees need to be cut down, but we need to do that, anyhow. With more than 20 dead trees that need to be removed, that’s more than enough to do both uprights for the outdoor kitchen, and the high raised beds.
Of course, there is the garden that needs to be worked on, including building new, permanent trellis tunnels, and other mobile trellises and supports. Plus trees and berry bushes to plant.
Oh, and on top of all these projects, we still need to dismantle that shed with the collapsed roof. We’ll be salvaging parts of it for building projects, such as the chicken coop I want to build. Plus, if we get that done first, I can use the space to build the outdoor kitchen, leaving more space available for the eventual garden beds we’ll be making nearby, where we get much better sunlight.
Feeling so energetic as the weather warms is kind of dangerous. I’m starting to plan way too many things! In the end, how much we actually end up accomplishing will depend on weather conditions. Last year, the flooding prevented a lot of the work I wanted to do, and the year before that it was the extreme heat. But if all we manage is to dismantle the shed, cut down some dead trees, and start setting aside the logs to use for the timber frame, that would be good.
I am so praying for good weather conditions this year, for the garden and for all the work we need to do outside! The last two years have been so brutal, we could really use the break!
We had a light snowfall last night, making everything all white and fluffy this morning.
The outside cats didn’t mind it at all!
I counted 21 this morning.
Meanwhile, indoors, we have our first signs of spring.
When I checked the trays this morning, three out of four of them had onions sprouting. When I came back about an hour later, there were sprouts in the fourth tray!
I’m absolutely amazed by two things. One is, how quickly they started to germinate.
The other is, how much cat hair there is, all over the soil surface. These trays had lids on them. Where did all that cat hair come from? I mean, Beep Beep practically lives on top of the lights. She naps on them, rolls around on them, and even hugs them, so yeah… I can see some of her fur drifting down… but getting under the lids?
Yesterday, I marked on our communal calendar, two sets of dates. One was the number of weeks counted back from our last average frost date, June 2. This way, we can see at a glance that something that needs to be started 10 weeks before last frost, needs to be started around March 24, while something that needs only 4 weeks can wait until May 5th.
The other dates I marked was number of days counted back from our average first frost date, which is Sept. 10. We have exactly 100 days between our average last spring and first fall frosts. That’s the growing season we can mostly count on for frost sensitive plants.
For things that have really long days to maturity, it’s that “days before first frost” that we need to consider. If, for example, I have a gourd that requires 110 days to maturity, that’s May 23. If it needs 7-10 days to germinate, I would start them at least a week before that.
If I have something than need 90 days to maturity, that falls on June 12 and, by then, I could get away with direct sowing, instead.
One of the really useful tools I’ve found is the Farmer’s Almanac planting calendar. Most planting calendars just give number of weeks before first frost, because they’re meant to be generic. I can get that information from the seed packet. Farmer’s Almanac, however, lets you input your area code (or zip code, if you’re in the US). You can even put in your city (ha!) and province/state. It will find the climate station nearest you, then give you the calendar dates for starting indoors and transplanting, or seeding outdoors. It even gives you the choice of dates based on frost date, or on moon dates. Oh, and I discovered something very handy when I hit the print button on the web page. It allows you to remove things from the list that you aren’t growing, which greatly reduced the number of pages that got printed out!
It’s still a bit generic, of course, but the date range is pretty wide. For example, it tells me bell peppers should be started between March 24 and April 7. We have five varieties of bell peppers, and four of them are early varieties, so we could use the information on the seed packet to figure out which ones need to be started in March, and which can wait until April.
Of course, they can’t cover everything, so we still need to make adjustments. For example, their calendar says to start winter squash outdoors between June 16 and July 14. With some varieties, we could do that, but we’ve got some large varieties of winter squash that need more time to fully mature, so we would be better off starting them indoors. If we use the biodegradable pots that can be buried, that would reduce transplant shock.
We have always started summer squash indoors. I think, this year, we might direct seed them. The calendar says zucchini can be planted anywhere between June 16 and July 14, which is when we can expect the soil to finally be warm enough.
As for the things we’ll need to start the earliest, the herbs (except dill, which is direct sown) will need to be started at the same time as bell peppers; in March. The eggplants and tomatoes can be started in early April, melons can be started in early May, while pumpkins and watermelon can be started in mid May.
The direct sowing dates are pretty interesting for some things. If we decide to try growing radishes again, they can be direct seeded in early April – at the same time we’d be starting eggplant and tomatoes indoors. Carrots can be planted in late April, early May, which would be about the same time we’d be starting melons indoors.
All of which needs to be taken with a grain of salt. For example, the calendar says to start onion seeds outdoors in early May. Sets, sure, but seeds? Nope. There’s a reason people out here start their onion seeds indoors in January! Also, it has dates to start lettuce and chard indoors, but none for direct seeding. Who starts lettuce and chard indoors? I mean, sure, you can grow them indoors, but for transplant?
As it stands now, though, we won’t need to start anything else indoors until March 24, at the earliest.
That gives us February and most of March to get the materials we need and build a removeable door and frame, to keep the cats out of the living room, and out of the seedlings!
We’ll also need to build a barrier to block an opening in the shelf to the left of the door in the image.