I headed out to town this afternoon to get the cash donated for tomorrow’s spays. The girls and I will be heading out later this evening to get the two ladies closed up in the isolation shelter for the night, along with a wet cat food treat, before they have to start fasting after 9pm.
On the way home from town, I stopped at the post office to pick up a parcel, and found the insulated cat house I’d ordered was in as well.
The first picture in the slide show above shows the parts and pieces. The liner for the bottom, the roof and the sides are all lined with self-heating insulated material. It also came with two pegs to secure it to the ground.
The second picture shows it all assembled, plus I cut a couple of pieces from a long and thin scrap of rigid insulation we had left. They are slightly longer than the shelter itself.
When doing the evening feeding, I moved the box nests in the catio to make room for the new shelter. In the third picture, you can see it set up on top of the insulation. Since it is inside the catio, I am not bothering to use the stakes, but if I did, there is a loop at each end for them.
In the last picture, you can see it didn’t take long for it to get jumped on! I straightened it out but, if it continues to be an issue, I’ll move it under the floating shelf.
Hopefully, this will attract the more feral cats into staying in the inner yard more, instead of disappearing somewhere in the outer yard they’ve found nests in.
It was still pretty nice out, so I got another quick project done, in the water bowl house. I started off by emptying it of everything but the pieces of rigid insulation, and getting some measurements. I then went through our pile of scrap wood that my brother gave me when they were bringing all their stuff out here after selling their property, to find something I could cut to the right length for the sides, and something I could use for a shelf board.
I’d found a 2×4 long enough to cut two support pieces out of, and the shelf board is an actual Melamine covered shelf; the longest of the ones my brother passed on to me. It was actually a smidge too long to fit between the true-to-size 2x4s forming the frame in the back of the shelter, so I shaved off the width and length of a blade on each end with my miter saw. That was just enough for what was now the back of the board to fit between the frame. I did not bother to secure the board to the supports, though, so we can take it out as needed.
Then I added a couple of screws to that loose board in the wall. This structure is mostly nailed together and, for some reason, that corner keeps getting knocked loose. That will no longer happen!
In the second picture, everything is put back in again. The cats really love that cardboard box, so I put it back, too.
Eventually, I want to get another shelf board that is long enough to reach from wall to wall and add it in front of the board that’s there now. We do have some scrap pieces of plywood that could be cut to fit, but it’s thinner and would bow under the weight of cats without some sort of support in the middle. For now, the cat beds in the back have a little more shelter, the cats can sit on the shelf above – and the box will no longer be crushed by cats getting on top of it! We might even be able to pop open that cat cave again, so they can shelter inside it again.
According to the weather apps, we’re currently at -5C/23F, with the “feels like” at -9C/16F.
I don’t know where the weather station for that reading is, but it’s been mostly sunny today and feels much warmer than that, to me!
Warm enough that I decided we should go ahead and cover the portable greenhouse with the tarp so graciously gifted to us.
In retrospect, we should have removed the torn up plastic over first, but the tie downs are attached to it, so I didn’t think of it.
I had already adjusted the tie downs so that they no longer stretched away from the corners, creating tripping hazards. Instead, I wrapped them around the sides and and was able to secure them around the corners at the opposite end. They are long enough that the ones from the back corners wrapped around the doorway and were secured on the inside. Which meant there were no tie downs to work around while adding the tarp.
So this is a really high end tarp, which is so appreciated. It also is black on one side, so we decided to have the black facing out, so that it could warm up more in the sun.
As you can see in the second photo of the slide show above, the tarp is a fair bit bigger than the portable greenhouse frame!
I had the help of a daughter to get it unfolded, then up and over the frame. After that, I worked on it on my own, since I was figuring things out as I went along.
I deliberately put the tarp off center so that I could secure the side facing the kibble house to the ground, right at the base of the frame. I spend the next while trying to figure out how best to origami it in a way I thought would be least likely to get caught up in the wind. Once I secured most of it, I ended up tucking the excess on the side facing away from the kibble house, under the frame itself.
From the back and sides, it made a nice little package.
If you click through to the next couple of pictures, however, you can see the front was a very different challenge. I had considered and tried a number of options, and even considered turning that end into a sort of tent. Which probably would have turned into a wind tunnel, so it was probably good I decided it wouldn’t work . We need to be able to walk through there, shovel snow, etc, and it would have blocked things way too much. I ended up folding quite a bit of it under, tucking the edge back over the frame to secure it. Which left me with no grommets I could use to secure that anything around the doorway from the wind.
I had set up an old bench we found… in the spruce grove, if I remember correctly – that I’d had against the back to keep the wind from flapping the torn cover around. I also had our wire mesh door and folding table along the more exposed east facing side, for the same purpose. Those got put back, once the sides and back were done.
The doorway needs to be kept available, of course, and there was no way to shelter the doorway and still be able to get in and out as needed. I had to find another solution.
I tied one end of the twine to the frame on the inside on one side, wrapped it around the back, then secured the other end to the matching part of the frame on the other side, making sure all was snug and tight. If you click through the next couple of pictures, you can see how it was secured by twine, bench, wire mesh door and table. The bench has to be lying on its side, as it is too broken up to stay upright if there is any wind, or even if a cat just jumps on it. 😄
The door is wide open, and wind and snow will get into it. There is no getting around that, at this point.
As I was working in it, cats and kittens were very curious and checking everything out, so I am confident they will be comfortable using it for shelter. It is definitely warmer in there, too. Having it black side out is going to make a big difference, I think. Enough to make up for losing the greenhouse effect. It’s now quite dark in there, but the cats don’t mind that at all.
Now, if only we could find a way to make sure no cats try to jump up onto it! The tarp may be 10mm thick, but cat claws could still cause damage.
So that’s a bit more winterizing we found ourselves needing to do. I think it will work out all right for the most part. It’s only the front that concerns me. We don’t have any high winds in the forecast right now, though, so it will be a while before it gets a litmus test!
In the first photo, a support is being added to the back of the catio. The catio is sitting on one end, and I was able to reach inside through the open space in the back that was soon to be covered with wire mesh. I found a scrap piece of wood I cut to fit snuggly between the the middle of top and bottom frame pieces – snug enough that it stayed in place, even while the catio was on its side. Once it was centred, it was attached with screws. This will prevent any potential sagging in the middle – because I know that cats will be jumping on top! – as well as giving something extra to secure the wire mesh to.
,The catio is 5′ 3″ long. The roll of quarter inch wire mesh I got is 5′ long. Taking into account the width of the frame pieces, that meant I could cover the back of the catio, with half an inch on each side with which to secure it to the frame. In the second picture, you can see that I stapled the wire mesh in place.
You can also see, there is no way those staples were going to hold. However, stapling the new piece to the frame kept it where I needed it until I could secure it properly. I was also able to staple both old and new wire mesh to the new support in the middle, which kept things from wobbling around too much.
I then went nuts with pieces of wood lath, which you can see in the third image.
With the metal corner braces screwed onto the bottom of the catio, it now had metal bits that were not flush with the wood. I didn’t want to be dragging screw heads on the ground, or getting grass caught in the metal, if we had to move it. For now, I’ve added pieces of wood lath – which are exactly the same width as the frame pieces – to the bottom, flush against the metal braces. Eventually, we want to add something to the corners, over the metal braces, so that there is no gap for a cat to potentially reach under and dig its way out. We haven’t figured out what do use for that, yet. All in good time.
Once the bottom pieces were nailed in place, the catio got flipped onto its front. The wood lath comes in 4′ lengths, and the catio is 4′ high, so that worked out perfectly. The new vertical support inside the back of the catio is wider, though, so I centred two pieces to go over that.
It wasn’t until I’d already attached the pair of them to the frame at one end, that I realized one of them was shorter than the other by almost 2 1/2 inches! That was okay, though. When I added the horizontal pieces at the top and bottom, they were each marked and cut to individual lengths, so the gap was filled that way. Last of all, the vertical pieces attached to the frame.
Framing the mesh on the back had to be done rather carefully. There’s only that half inch of mesh attached to the frame, and I wanted to make sure there were plenty of nails that were inside the mesh squares, so that if something pulled or pushed onto the mesh, the nails would keep it from getting pulled out from between the wood. At the same time, the nails couldn’t go too close to the edge, or the wood lath would start splitting. Plus, the nails I was using were finishing nails I’d collected from what the cats had knocked onto the floor over the winter. I’d sorted out all the finishing nails from the rest, but only by type, not by size. A lot of them were thicker nails that would also split the wood, so I had to pick through the lid I was using as a tray to hold them, selecting those that weren’t too thick or too long or too short… there don’t seem to be a lot that were juuuuust right.
The main thing, though, is that the mesh is now securely attached to the frame. There is enough overlap between old and new wire mesh that I don’t think it also needs to be “sewn” together, but if it does, the wire that was used to keep the roll of mesh together was set aside for this, just in case.
That done, there were still a couple more areas to patch up. On each side, the bottom corner near the back was rusted out. You can see the larger rusted out area in the next photo of the slide show.
I didn’t have to break open the second roll of quarter inch wire mesh, though. I had a small amount left over from when I made the soil sifter, a couple of years ago. The rusted out areas of mesh were cut out. After determining how large the mesh needed to be to cover the holes, I made sure to cut them so that the two sides that would not be attached to the frame had the lengths of wire ends sticking out. When the new mesh was lined up with the old mesh, those ends were twisted around the old mesh to secure the patch in place. Then pieces of wood lath were cut to extend beyond the patches and nailed into place to secure them.
You can see the finished larger patch in the next photo – with Syndol on top! He was very curious about what I was doing, to the point I had to be careful not to hammer a paw!
So the wire mesh is now all patched up were needed!
That was where I stopped for the day, but there is still some repair needed. Along the hinge side of the door, some of the staples have popped off, and some of the wire mesh at the edges have become detached from each other. The easy way to fix it is with more wood lath, but the hinges have to be kept clear. The door also swings all the way open, and any wood lath added would prevent that. I need to come up with an alternative that is super thin. I do have some metal strips that I used on the raised bed covers, but the holes in that are larger, for screws, not nails. I don’t want to use screws for this, as I’d have to put in quite a few to secure the mesh, and I don’t want to be making that many large holes in the frame. The metal is soft enough, I might be able to nail through it, though. I’ll have to test that out, when I next get a chance.
Which won’t be tomorrow.
Meanwhile, with things as secure as they are now, I set the catio upright again and opened the door wide.
Syndol immediately found the door and started exploring. I lifted him onto one of the shelfs, and he promptly settled in the cloth hammock that is still secure. It took a bit longer for several kittens to find the door and explore as well.
I got rained on a few times while working on this, and we’re supposed to get more rain tonight, so I found a sheet of plastic and set up a temporary roof. This way, the cats can go inside and hang out on the shelves or the one secure hammock, and take shelter from the rain. In the last picture, you can see Syndol inside the covered catio.
There are a couple of fixes I’m going to have to get my younger daughter to do. I’m too broken to be able to go inside the catio to do them.
One is to add more corner brackets to reinforce the top corners of the frame, as has already been done in the bottom corners. We won’t be adding the flat plates on top of the corners, like the underside of the frame has, since the top will be covered with roof panels, and that will add its own layer of stability to the frame.
The other fix is to replace the torn cloth hammock. Those are stapled in place, but we’ll figure out some other way to attach the new cloth.
This won’t be done any time soon, but the very last thing we want to do is pain the whole thing – especially the new wood that was added – black. The wire mesh will be painted black as well, so that it’s easier to see through. We could probably get away with just a quart of paint for this job, too, which should be in budget.
For now, I’m happy with the progress made. With the last little fixes, we can use it as an isolation shelter right now, until the real one is finished. We don’t have to rush that job, now.
I’m so very thankful that the rescue was able to pass the catio on to us!
Okay, so after confirming that we didn’t have any flat tires this morning, then getting diverted with a trip to town before doing to the city, the trip to Costco has been dropped entirely for today.
When the Cat Lady and her husband caught up with me, I could see why they had to much trouble with the catio! With her husband’s short box truck, it was leaning against the tail gate. It is really quite light. No wonder it got blown off! They did get a strap for it, though, and ended up giving me the strap after it was transferred to our truck. She also gave me four bags of kitten food that fussy little Button won’t eat!
They’ve had to put a bell on him. He’s so tiny, he kept going missing!
I still used one of my new straps, along with the tarp and some bungee cords to secure it. The catio just barely fit into the box of our truck, between the fenders on the sides, and the rolled up cover by the cab and the tail gate. I did have to slightly bend the remaining roof panel to squeeze it forward, so we could close the tailgate.
The second photo shows it unloaded behind our garage.
The Cat Lady hoped we could at least use the parts and pieces. They’ve had this catio for a while. As we unloaded it, I did see that one corner on the bottom will need to be reinforced. The wind tore off part of one of the fabric cat beds, but my younger daughter is pretty sure she has some heavy duty fabric she can replace it with.
The mesh has a hole in the back that had been the entry through their basement window in their old house. That will need to be patched. It’s the same half inch hardware cloth that I just picked up for the isolation shelter I’m building, and we’ll have enough to patch that up.
I’m surprised that the wire is just held in place with staples! Definitely something heavier duty than what we’ve got. Any time I’ve tried to staple something like this down, the staples tend to pop out again, easily. I was a bit surprised to see that those shelves are just “floating”. They are attached to the wire only, not the frame!
You can see that there is some rust on the wire, too. Once we reinforce the corners and do any other fixes or modifications, we’ll give the whole thing a paint job. If the wire needs to be painted, though, I think I’ll go for black, so it’ll be easier to see through the wire.
We might add a second latch on the door, near the bottom, as it’s bowing out in that corner – reinforcing the frame should fix that. Racoons can figure out how to open those latches, though, so we’ll probably look for something different.
By this time, it was past noon, so instead of going to Costco, I went to my mother’s town and the feed store to pick up 40 pound bags of cat food for the outside cats. While there, I asked about lysine. The guy I spoke to before was there, and he said he found some in 1 pound buckets, so he got two of them for me. They will arrive on Tuesday (after the long weekend).
I was going to get 4 bags of cat food, but they had only 3 in stock. I paid for those, but when the guy went to get the bags to load into the truck, there were only two left on the shelf. More will be coming on Tuesday. I was going to come back for the lysine and another bag of cat food, anyhow, so I’ll get the bag that’s already paid for at the same time. The two bags I got are equivalent to four of the Kirkland brand I get at Costco, so we’ll be good for a while.
That done, I decided to swing by the hardware store. They also carry roofing supplies and materials, so I asked about clear roof panels. They don’t carry them in stock, but they do special order them. After looking at my options, I went ahead and ordered two 3’x8′ panels. They will be cut in half cross wise, and will be enough for both cat shelters, so I won’t be using the salvaged metal roof pieces that I was expecting to use. They couldn’t say exactly when the panels will come in, but will call me. At best, they might even be in by Tuesday, too.
Once home, unloaded and settled, I phoned the septic company that charges by the hour, to arrange to get the septic expeller area fixed. They won’t be able to come out for a couple of weeks, unfortunately, but the owner is going to be in the area on Monday. He will be swinging by to look at the area on Monday evening.
The good thing is, the renter’s cows are no longer here, so we can move the electric fence and chain away from the vehicle opening in the fence by the barn. It’s wide enough for heavy equipment. I should probably head out there in advance, with the extended pole pruning saw, and cut away the willow branches overhanging the expeller.
I was going to do it with the loppers, but I’m not tall enough.
So today turned out to be not at all as I expected it to be, but I don’t mind. We now have the ratchet straps and tie downs we meant to get for the truck kit anyhow. The tarp did get damaged by wind during the drive home, but it’s repairable.
More importantly, we have a cat shelter that can be used until the isolation shelter I’m building is finished. I plan to use some of the wood lath I have to reinforce the wire mesh, because I don’t trust staples, along with any other repairs it needs. Then we can move it closer to the house. Probably on the patio blocks under the kitchen window, so we can see it, though we’ll need to find somewhere else for a wood bench and the swing bench, if we put it there.. The clear plastic roof panels can be added, and any painting can be done, after it’s been moved. Once it’s in place, we can leave the door open and allow the cats and kittens to enjoy it. That way, when we have a cat that’s been spayed and needs to stay in there for two weeks, it will already be used to the shelter.
I might even be able to get some stuff out there done, while there’s still light out, since I’m not exhausted by a Costco shop.
I should probably eat something first, though! I keep forgetting to do that.
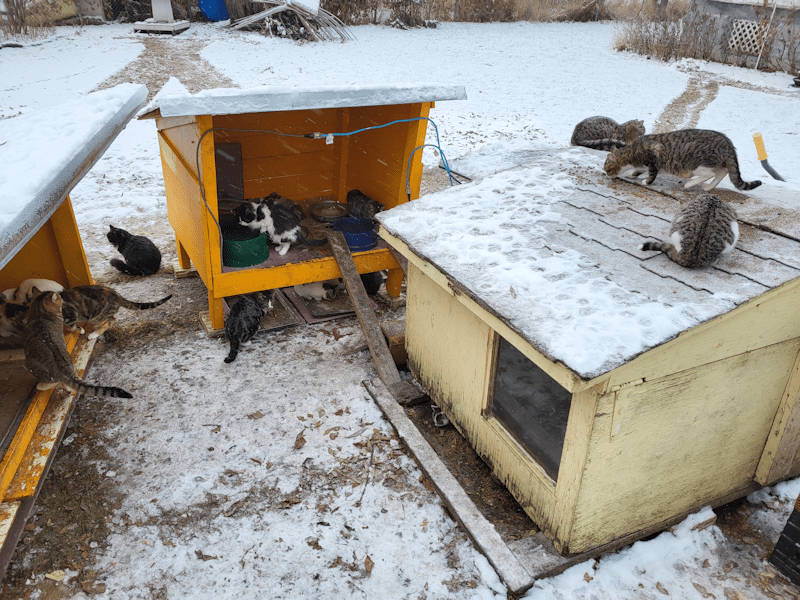
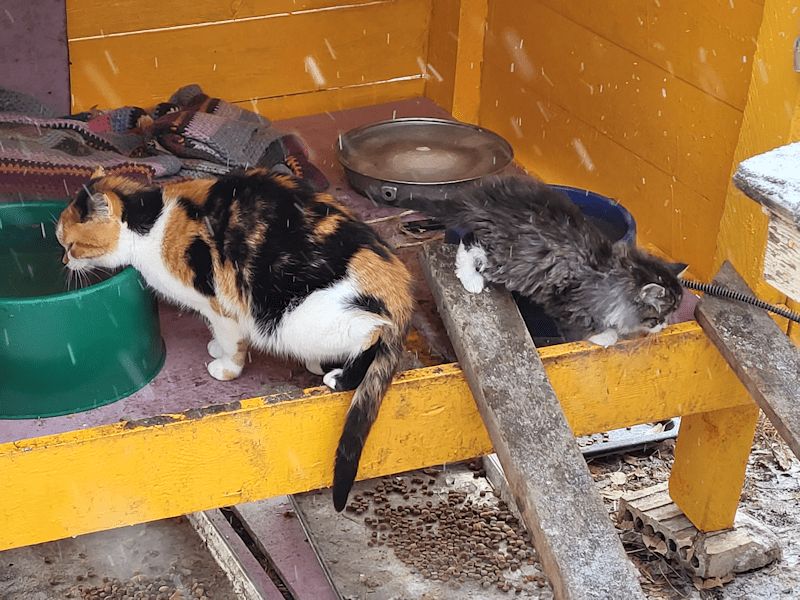
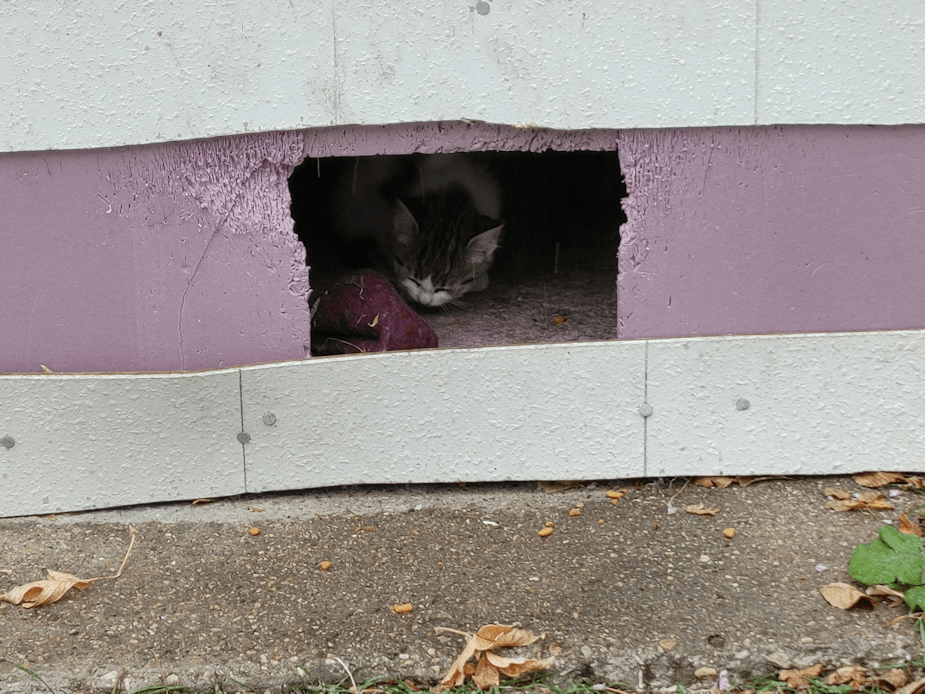
I’m happy to say that when I came out to do the cat stuff this morning (bringing 2 gallons of warm water, since we now have such a large heated water bowl), there was still liquid water left in BOTH heated water bowls!
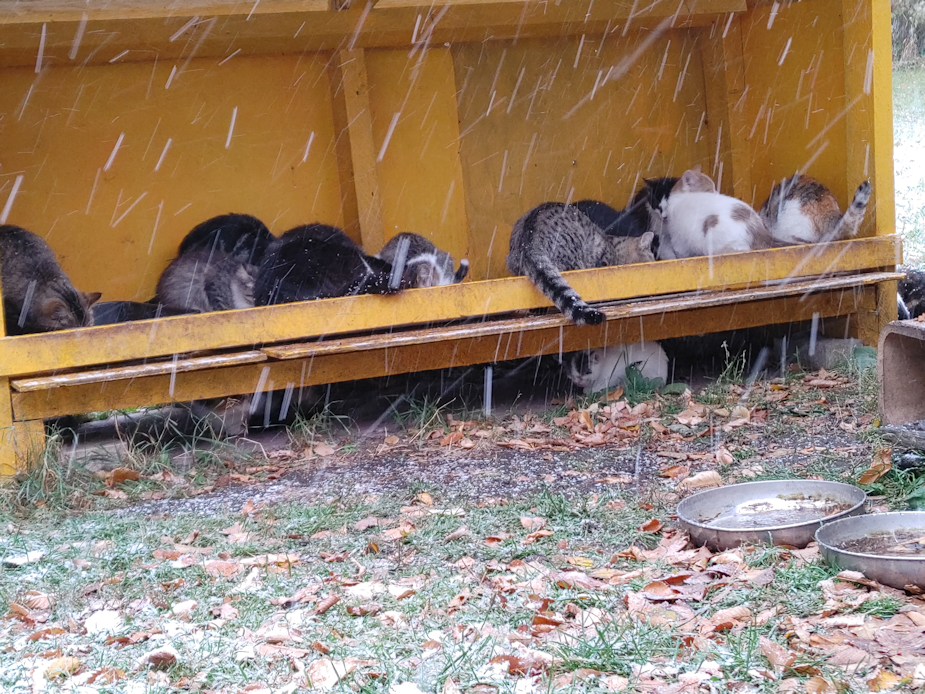
The smaller metal ones were, of course, frozen. At this point, I think maybe we don’t even need them anymore, other than it allows for more cats to drink at the same time. It’s less of an issue with the water than the kibble. They don’t usually all try to drink at the same time, so having the four water bowls so close together works out. When the kibble comes out, though, they are all after the food at once. Not only do they not all fit in the kibble house (I counted “only” 25 this morning), but some of them don’t get along with the others. To avoid aggressive behaviour, along with the trays in the kibble house, I put a couple of handfuls of kibble into two of the shelf shelter shelves, a long line of kibble on the cat house roof – sometimes two, if I can reach – handfuls at three openings to under the cat house, the two trays under the water shelter, a tray just inside the entry into the cat house, a tray just under the eaves of the water shelter (the same spot it was in when the kibble house was there), and finally into a bowl under the shrine across the yard. Rosencrantz in particular prefers to eat at under the shrine, well away from any other cats. She’s gotten meaner to the other cats this year!
It sounds like a lot, but it’s still just a gallon sized container of kibble that’s spread out. This way, even the littlest, shiest and most picked on cats still get some food.
When I was finishing up my rounds, I found the bitty baby and Broccoli in the water shelter. Those ramps are being well used.
Broccoli got her name because she looked so much like Cabbages. This year, Broccoli had two calico kittens. (I think they’re both hers, plus a tortie. I’ve lost track!) I’m thinking we should call the new calicos Brussel and Sprout.
But I digress!
The bitty seems to be handling the colder temperatures really well, and has no hesitation about going outside and playing. Unfortunately, I couldn’t see what the temperature was inside the cat house. The two south facing windows were frosted over on the inside, and the big east facing window…
… was full.
Actually, there was too much reflection in the window that I couldn’t see past, but it was really funny trying to peer in and realizing just how many kittens were crowded at the window! Including both of Broccoli’s calicos. Several had run away when I came close, but I can still see at least seven in the photo.
One of the things I made sure to do this morning was stir around the smoldering ashes from the branch pile, then bank it up again. The pile is slowly getting smaller! What’s interesting is that some of the cats have figured out that they can sit near it and keep warm. When I was first starting the burn, they were a problem, because they were so used to going into the pile and playing. Meanwhile, I’m trying to keep it lit, and had to keep chasing them out of the branches. Once it really got going, though, there was enough heat that they kept away. Now, it’s just a warm, smoldering heap, and every now and then I’ll look over, and see a cat or three, loafed on the snow-free ground around it, enjoying the warmth.
Speaking of warmth, I was just looking at the 10 day forecast on one of my weather apps. Apparently, we’re only going to have one day with the high dropping down to -10C/14F – but 10 days from now, we’re apparently going to get highs above freezing!
That would be a good time for the roofers to show up. So far, no word on when that is going to happen.
Well, it’s all done. The girls and I got things fixed up, moved around and set up with the cat shelters.
The first job was to open up the cats’ house and get things taken care of in there.
There was a whole bunch of incredibly shocked kittens looking up at us when we lifted that roof!
While one daughter was on safety duty to make sure the roof didn’t fall back, the other crawled in to put the heat shield back, then attach the holder for the thermometer.
Safety duty is extra important with so many cats crawling all over.
Including straight up the open roof to play gargoyle!
While they did that, I plugged in the second extension cord and got it through the entry with the other one, then checked to see if we could plug in the new heated water bowl.
As expected, nope! The bowl’s power cord wasn’t long enough.
Which meant a daughter and I did some shelter shuffling, while the other kept kittens distracted.
We really need to put handles of some kind on the water shelter and kibble house. They are really awkward to pick up and carry!
Here is the new set up.
I’d say they like it!
I’m going to have to get larger hooks to hold the cords up, but the small ones will have to do for now.
Once everything was in place, they were given their evening feeding and the water bowls were filled. The container we use to bring warm water out holds about 1 gallon/4L, and that was enough to fill the new bowl, with room to spare.
The board that was used for a ramp into the water shelter is too long for where it is now, so I found a short piece of scrap wood that I could set up near the entrance to the cats’ house. After I took this picture, I found a slightly longer one that is now set up in the middle and braced against part of the sledge under the cats’ house. The ramps are mostly for the bitty baby, since its the only one so small, it would have difficulty climbing our jumping up into the water shelter. Once the ramps were in place, they immediately had kittens using them.
After everything was done and the girls went inside, I hung around for a while longer, seeing if anything needed to be changed and playing with kittens. I ended up shifting one end of the kibble house closer to the water shelter. I’m debating shifting it more, to close that gap a bit more, but I haven’t decided yet.
When my daughter set up the thermometer in the cats’ house, she angled it so it could be seen from all three windows, so we can read it at different times of the day. This time of day, for example, the light is coming in through the smallest window in the entry, and reflecting on the plastic cover on the thermometer, so I couldn’t read it from the window you can see in the photo, but I could see it from the small entry window just fine. After being in there for a while, the thermometer was at about 5C/41F, which is what the temperature in the sun room was when I came inside. The outside temperature was -4C/25F. It should be interesting to see the temperature in there when things get really cold outside.
I think this new arrangement will work well. Everything is still easy to reach for refilling, and the two heated water bowls should make a big difference in the coming winter.
My daughter and I were able to get the metal roof onto the water bowl shelter, and it’s now all set up.
We cut the sheet of metal roofing in half, which was a challenge. We started off using an angle grinder, which did NOT work well at all, and was insanely noisy. The cats and kittens were very alarmed by it. We ended up using tin snips. Later on, when attaching the metal to the top edge, we had to use a drill. Not as loud, but still enough to scare many of the kittens. Not all of them. Gooby, the most socialized one (the friendly grey and white tabby has gooby eyes) would actually try climbing my daughter while she was working! Half the time, one of us would be trying to keep kittens away, while the other one worked.
Once the roof was done, we moved it right up against the kibble house. Then we had to pop open the roof of the cat house, so we could unwind the slack on the extension cord out the door. I put some hooks under the kibble house roof to hold it elevated. Unfortunately, the working heated water bowl has a shorter power cord. I ended up having to move the whole thing in about half a foot to get the power cord out of the way. The good thing about it being tucked so far under the overhang is, we don’t need to put a waterproof case around the plugs, like we do with the cord powering the cat house.
When we opened up the cat house roof, there were only two bitty kitties inside – the two we had been trying to snuggle and keep warm, before we could put them into the cat house and they would actually stay there.
I’m hoping the other two were hidden under the cat house, along with several other kittens I later saw peeking out. When topping up their food for the night, I put kibble at the various spots they use to get under there. Not a lot of kittens showed up when I topped up the food; most were still in hiding from all the noise and activity. I really hope the bitties are okay!
Once the snow starts accumulating, I’m hoping the set up will shelter the inner “courtyard”, and keep it from drifting in front of the kibble house, as it sometimes did last winter. We’ll still be shoveling the space out, of course, but it would be good if there will be less of that!
We’ve had the odd snow flurries before now, but this morning is the first real snowfall, where some snow actually stayed on the ground.
Most of which is already got at the time of this writing, but we’re still supposed to get more tonight and tomorrow.
For most of the yard cats, this is the first time they’ve seen a real snowfall!
There are at least two, maybe more, kittens hiding under the kibble house, where there is a sheet of rigid insulation to help keep their tootsies warm. It isn’t visible, but there is another sheet under the floor boards, so under the kibble house is a good little shelter for nervous babies.
A bit more work needs to be done on the water bowl house, but there will be no more coats of paint this year. I moved it to roughly where it will go to stay, and put the water bowls inside. Now the cats just need to figure out where the water is.
After the roof is done (you can see the piece of metal roofing for it, held down by stacks of rejected shingles to keep it from blowing away, behind it), I want to put hooks under the roof of the kibble house, and at least one under the water blow house. Once things are in place, we’ll run the extension cord that’s plugged into the cat’s house, up and under the roof edges, to power the heated water bowl in the water bowl house.
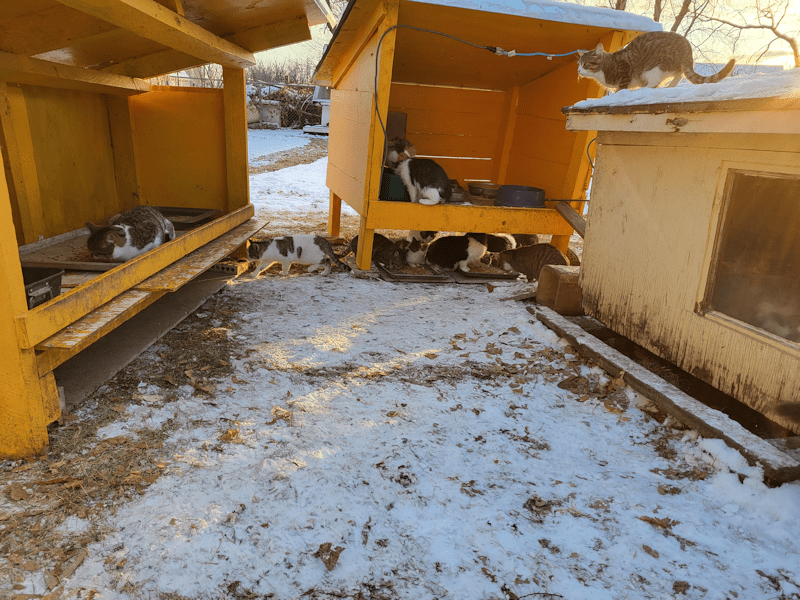
You can tell by where there is no snow on the roof of the cats’ house, that the heat bulb is doing its job! I am still putting kibble on the roof, usually on either side of the peak near the entry, but now I’m making a point of putting some over the warm spot.
I will no longer be putting kibble by the pump shack door. The kittens seem to have all moved closer to the house, so at this point, it will just attract things like skunks or raccoons. I brought over the kibble tray and will later tuck it just inside the entry into the cats’ house.
I’m seeing kittens inside the cats’ house through the windows, but they really seem to prefer the shelf shelter. I think they like the smaller, more enclosed spaces.
I’ve had to brace all three levels with some scrap fibre board, because they break the insulation when they get startled and rush out. I throw a handful of kibble into each opening, including the top shelf where one corner has been boxed off with insulation to form another little shelter. I’ve left us with about 2/3rds of 1 shelf for storage!
I’d like to find something sturdy to put at the top of this shelf. What I rigged up for last winter worked, but slowly broke apart over time. I want to put something more weather proof up there, that can also handle having cats jumping all over it. Every now and then, I’ll come out the door and startle a pile of 4 or 5 kittens all curled up and napping!
Who knew, when we took this shelf out of the house but found it too heavy and awkward to easily move to storage, that it would be used like this! It has come in incredibly handy.
The tuxedo was just loving playing in the snow on the water bowl house roof! Every now and then, he would start sliding down. 😂 I don’t think they’ll be playing up here as much once the scrap piece of metal roof is installed. The metal will be a lot colder in winter, and hotter in summer!
Looking at the security camera live feed right now, I can see we still have flurries, but I can no longer see any snow on the ground, anywhere. According to my phone’s app, we are at 2C/36F with a ReelFeel of -5C/23F. We’re still expected to get 3-6cm/1-2in of snow accumulation by tomorrow afternoon, before it turns to rain.
Hopefully, things will dry up enough that we can finish that water bowl house roof, and all the other little things that need to be finished up outside! I had hoped to continue working on that L shaped bed in the old kitchen garden yesterday, but it was just too wet and windy for the work. So I got my day off after all. Today will be another write off for the outside stuff, but we still have lots of tomatoes ripening faster than they can be eaten, so this morning, I started cooking them down for a tomato sauce. It’s mostly made with yellow pear tomatoes – it’s amazing how prolific those ones were! – but I used all four types of tomatoes we grew this year in it, including one last little Sophie’s Choice tomato.
Today’s high was supposed to be 19C/66F. I don’t know if we reached it, but with the blustery winds, it never felt that warm. I’ve been keeping a close eye on the weather, and my app on my desktop includes historical data for each day, including 30 year record highs and lows for various data. I noticed that today had a record high for snow of 14cm/5.5in in 2019. In fact, we set record highs for snow on the 10th, 11th and 12th, all in 2019. We were just coming to the end of our second year here, so I went looking at my blog posts for those dates.
Ah, yes. I remember that blizzard!
The amazing thing is that, just days later, all that snow was gone, and while we were still cleaning up storm damage, everything was back to green and sunny!
Depending on which app I look at, however, we might be getting a mix of snow and rain starting tomorrow night, and by Friday afternoon, we’re expected to get between 3-6cm (roughly 1-2 inches) of snow.
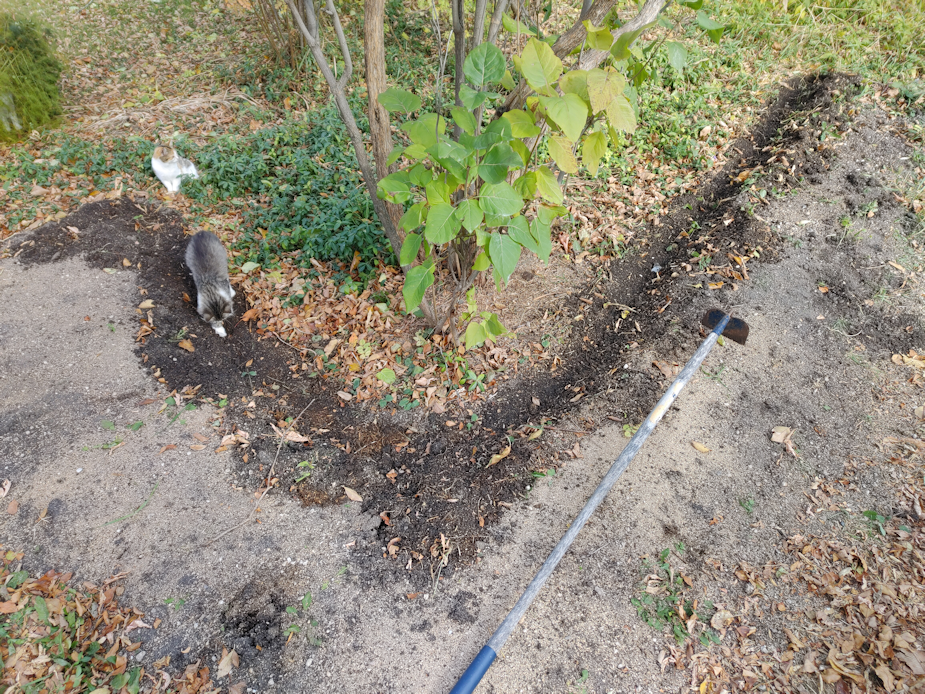
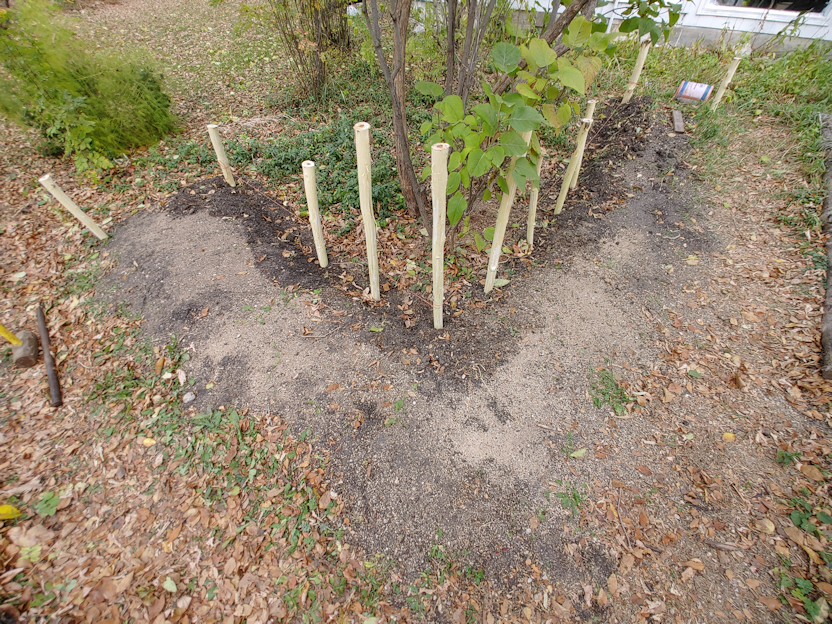
That meant my focus was preparing to build up walls around the L shaped bed in the old kitchen garden.
I went through the maple pieces I’d cut yesterday and started cutting them to size, cutting points on them, and debarking some of them.
I had lots of furry help. So much help, one of the kitties got plumb tuckered out!
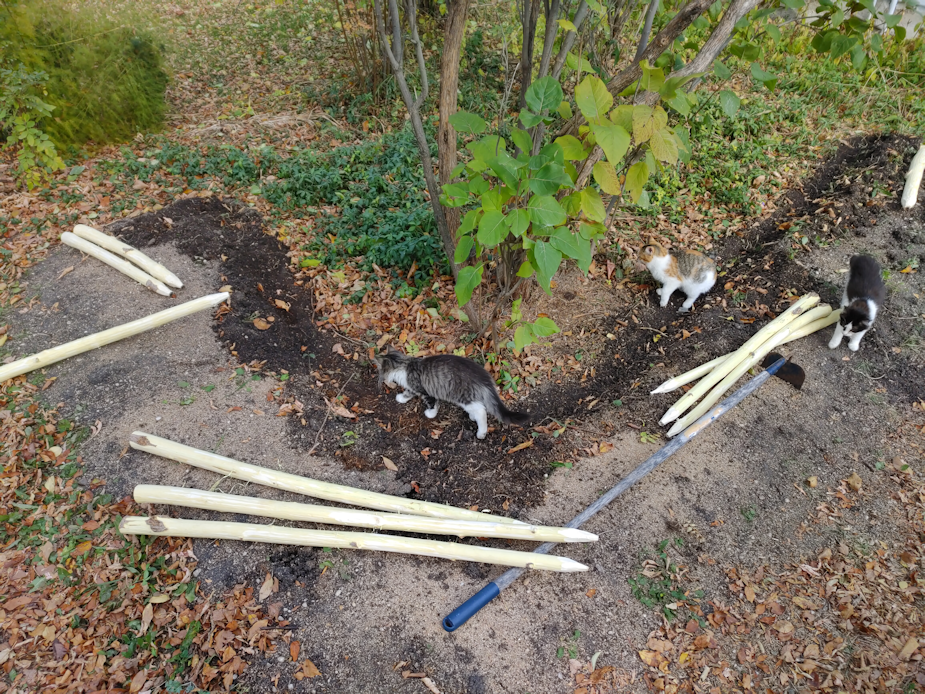
From the longest, straightest pieces of maple, I cut three into 4 foot lengths. Then I went through some of the strongest pieces to cut four 3 foot lengths, then four 2 1/2 foot lengths. After that, I just cut as many 2 1/2 foot lengths from the thinner straight pieces as I could get out of them.
I used a hatchet to cut the points on all of them. That was probably the most unpleasant part of the job. Not so much for the thinner pieces, but for all the thicker ones. I’m ambidextrous for most things, left handed when it comes to fine motor control, but for some things, I am completely right handed.
Using a hatchet is one of those things, and my right hand has been in terrible shape lately. I had difficulty gripping the hatchet, and had to stop frequently to give my hand a break.
The draw knife was awesome for debarking the wood. It’s still quite green and came off easily. I don’t have a way to secure the pieces I’m working on well, so there were quite a few times when I was pushing instead of drawing the blade – and it works just as well that was, too. For some of the thinner pieces, though, it was easier to just use a knife to debark them.
Also, no, that is not rust on the blade of the draw knife. It’s stained with tree sap.
The stack of the thinnest pieces did not get debarked. It would have taken forever and, at their sizes, it would have been awkward. The pieces that will be taking the most stress, however, have been debarked.
That all took a few hours.
Then it was time to get to the garden bed. I pulled the lettuce I’d left to go to seed (it looks like we’ll get seed from just one of them) and got ready to prep the bed. Without walls, soil was falling into the path and the inside of the L shape, and I don’t like wasting good soil!
I used a hoe to draw some of that soil back into the bed, and level off the edge, where the uprights will be going.
The three longest pieces will form a triangle at the inside of the bend. When we start weaving branches through the posts, these will be taking the most stress. Working out from there, one 3 ft piece will go along the short end, and three down the long end. If I have enough materials to do it, I plan to build up the wall higher at these posts, as much to wall around the lilac as to create a wall for the bed.
The four 2 1/2 ft pieces are for the corners at the ends of the bed.
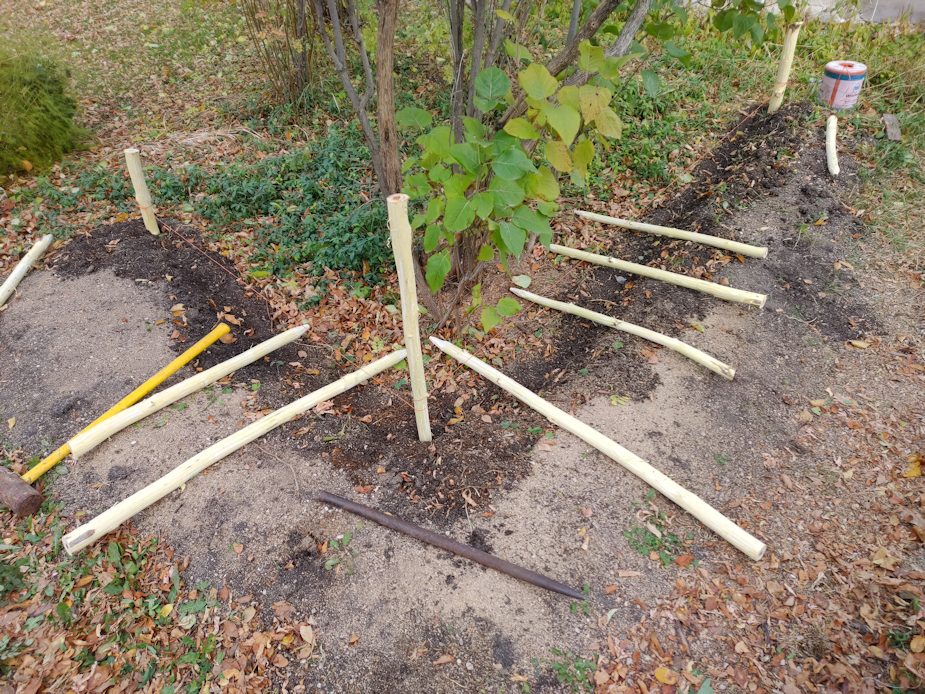
To install the posts, I used the pencil point bar and hammered it into the ground.
Unfortunately, that old hammer doesn’t have the right handle on it, and the head fell off again. I had to switch to a sledge hammer.
I really didn’t want to switch to the sledge hammer.
Ah, well. It worked better. I’m just going to be in a world of hurt, tonight!
I started by placing three posts in, then tied twine between them as guides for the rest of the posts. Then I laid out the spacing for the remaining two 4 ft posts, and the four 3 ft posts.
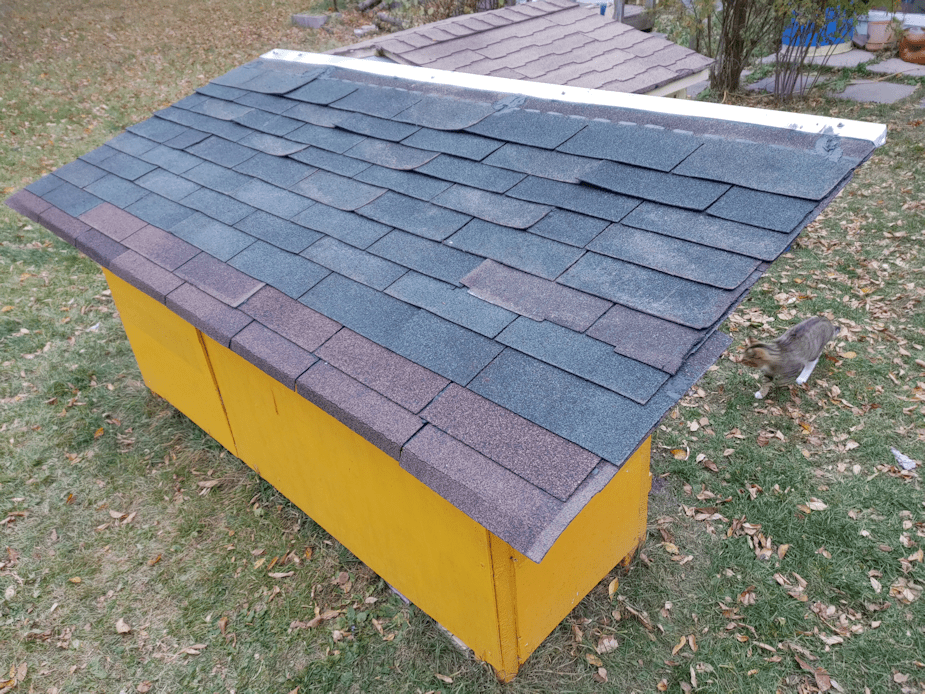
At this point my daughter, who had been working on putting salvaged shingles on the kibble house, ran out of roofing tar. I’d only picked up a small can for patch jobs, never expecting to need more.
So I left my daughter to continue pounding in the posts while I went into town to pick up more tar, and a few other things while I was there. When I came back, I found my daughter lying on a tarp on the ground surrounded by kittens. She is having much more success at socializing than I am!
She had even pounded the other two corner posts at the ends of the L shape.
The weather was starting to get worse, so I quickly filled in the gaps with the smaller 2 1/2 ft posts.
The long end of the L shape will be only 2 feet wide, so the end posts needed just one more added in between them, plus three more along the north side. The short end of the L shape needed only 2 more to fill the gap. Since this end can be accessed from three sides, we’re okay with it being wider than 2 feet, so the end posts there got two more in between. The rest of the posts will be for the outside of the L shape.
From the looks of it, I’m going to need to find more pieces to be able to finish the outside of the bed, but I’m not concerned about that right now. It’s the inside of the L shape that I need to get done first.
By this time, however, dark clouds were rolling in and it was starting to look like rain, so I left the job at this point and focused on cleaning up and putting away anything that might blow away. My daughter, meanwhile, finished the roof of the kibble house.
The green shingles are almost 50 years old and are in pretty rough shape. The brown ones are better, but they’re almost 30 years old.
The water bowl house roof is thinner plywood, so we’ll be using pieces of metal roofing that we’ve been scavenging for various things since we’ve moved here. If we used shingles, the nails we have would go right through by nearly half an inch, and that would be a problem! I dragged a piece of metal roofing out from the barn that we can cut in half and lay side by side to cover the roof of the water bowl house, but I also spotted a stack of corner pieces. I brought one over, and helped my daughter put it on the edge of the shingles on the kibble house. I found a bin of metal roofing screws in the warehouse, so I grabbed a bunch for when the water bowl house is done, and my daughter used a few of those to install the metal cap on the edge of the roof, using the screw holes that were already in the metal – after making sure to put some tar under each hole, first.
Almost everything about the kibble and water bowl houses has been done using scavenged bits and pieces we’ve found around the property, and a lot of it is pretty old and starting to rot. We don’t expect these to last long, but using paint and even decades old shingles will help them last longer. At some point, it’ll be nice to be able to build versions using new materials, all well measured and cut and leveled, etc. But this will do for now.
Once this was done, I set up a longer extension cord I found that was in good shape, and was able to plug in the cat’s house. We lifted the roof and put in the high density rubber mats I’d dragged out of the barn, which will help insulate the floor. There’s a thick scrap yarn crocheted blanket that is laid out on top of the mats, too. We will not be using straw this year. As much care as we have taken with the terrarium heater bulb, I would much rather not have straw in there! The heat bulb is working fine, with the heat shield still in place, and the timer is set to light sensor, so it will turn on when it gets dark, then off again when it gets light. The smoke detector was tested, too, and it’s working fine.
Once the water bowl house is done and set up where it will go, we’ll be able to plug in the heated water bowl through the cat’s house entry, too.
Tonight, the cats will have a warm and cozy place to stay if they start feeling too chilly. I especially hope the tiniest kittens will start using it!
As for me, I’ve pain killered up and hope I’ll be able to continue in the old kitchen garden tomorrow. For the weaving, I plan to cut the willow branches and use them right away, while they are still very green and flexible.
I really hope this works out. Otherwise, that’s a lot of work for nothing! Well. Not for nothing. Now that those posts are in, even if wattle weaving doesn’t work, I could still use them to hold whatever we find to use instead. It’s all fly-by-the-seat-of-our-pants work, anyhow!
It was a gorgeous afternoon and evening yesterday. Not only a pleasant temperature, but even the mosquitoes weren’t as bad. I didn’t want to go back inside when I was done what I needed to do!
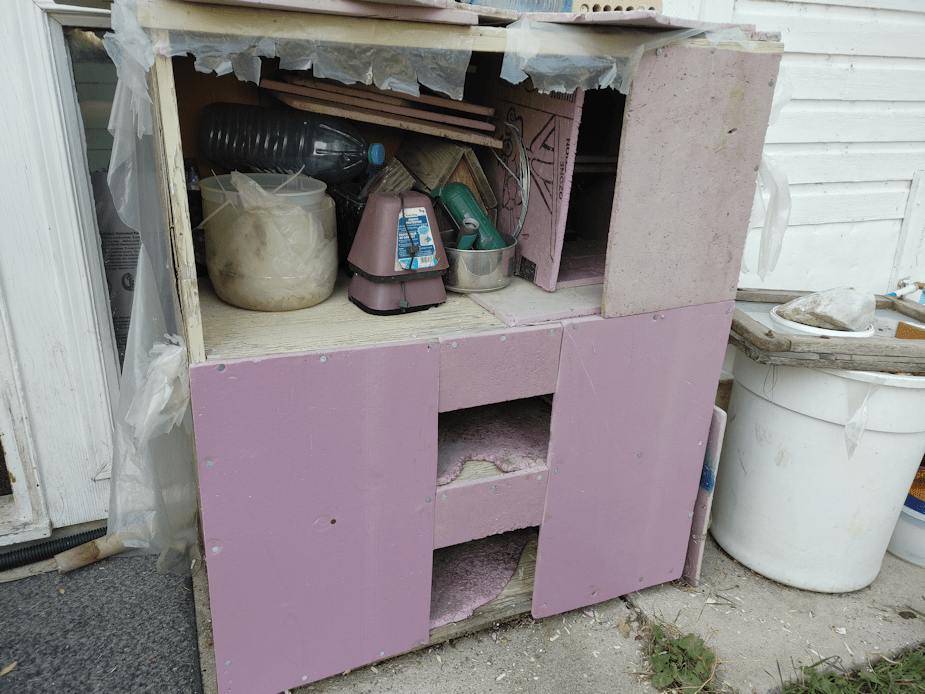
One of the things I did was re-do the shelf shelter for the cats. I noticed that the little kittens have been climbing all the way to the top shelf, which was actually use to store stuff, and have been snoozing in a corner, where I’d stacked some smaller pieces of rigid insulation.
The insulation over the bottom two shelves were getting ratty, so I decided to empty the whole thing, give it – and some of the insulation pieces – a hose-down and redo it.
Including making a next in the corner of the top shelf for the kittens, even though it meant not being able to fit everything back in again!
The sheets of insulation lining the bottom shelves were used again, since they fit the best and, aside from a few edges, still intact. When covering the fronts, I left the openings wider than before. When startled, the cats would dash out, catching on the edges of the insulation, sometimes hitting them hard enough to pull them right off the nails holding them to the shelf. I decided to try reducing the height of the openings. I want it open enough for them to easily get in and out, but small enough to let less of the weather in. Hopefully, they won’t get ripped right out by a startled cat!
As for the top shelf, I tucked a small pedestal plant stand in the corner and used it to support two levels with the rigid insulation for the kittens to lie on. There’s more space in front with an insulated floor, and there is insulation along the side and back walls, too. An extra piece across the front, and the kittens have their own little cubby hole to settle in.
Now I just need to clean up and redo the outside of the shelf. It had been wrapped in plastic to protect the wood from snow and rain, with an extended “roof” of rigid insulation, but the wind tore the plastic to shreds, and the cats have broken up the insulation. I’d like to find something sturdier to replace them with.
After I had emptied, swept and hosed down the inside, I had to give it time to dry before continuing, so I started another project.
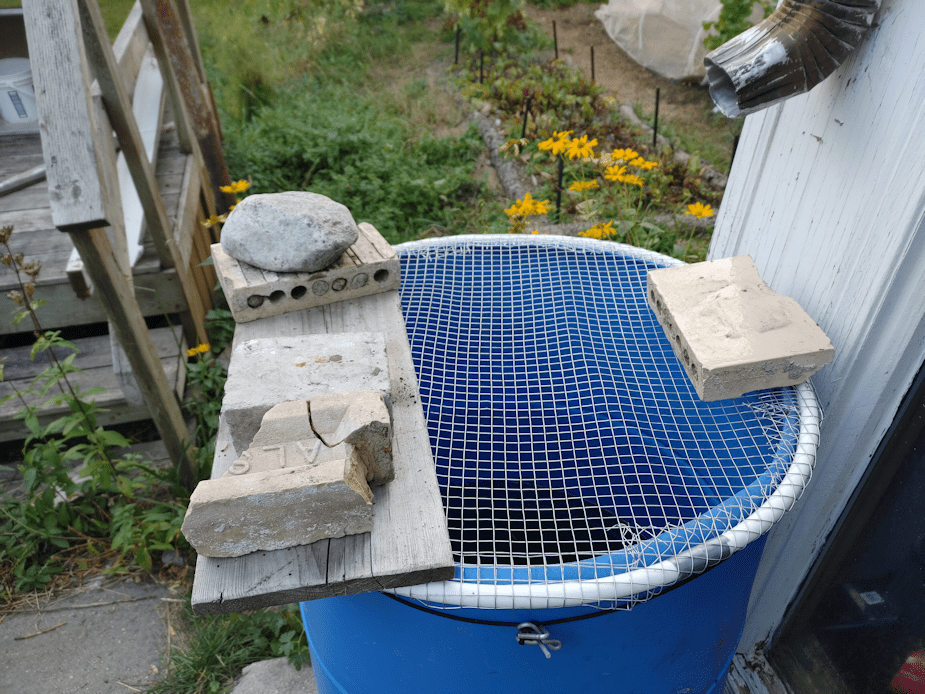
A new cover for the rain barrel.
A couple of years ago, we made covers for the rain barrels out of window screen mesh and hula hoops. One for the barrel at the corner by the sun room, and the other for the barrel we fill with the host, at the far corner of the garden. The covers were partly to keep debris out, but also to make sure no critters fell into the barrels.
After a couple of years, however, the plastic hula hoops became brittle and started to crack. The cover for the garden barrel had been stored in the old garden shed for the winter, and it looks like something chewed holes in the mesh, too.
The sun room barrel’s cover is held in place with a board weighed down with bricks. When the barrel is getting full enough that more rain would cause it to overflow, the board and bricks hold the rain diverter in place.
Not long ago, I found the cover and its mesh broken up. Something had jumped onto it or something. The mesh had torn, but thankfully whatever did it, did not end up trapped in the water. Then we heard a commotion one night, and I came out to find the board and its weights, and the rain diverter, all knocked off the barrel, and the cover damaged even further. I put the board and its weights back, then found some pieces of rigid insulation to cover the rest of the barrel, with weights to hold them in place, to ensure no critter could access the water, until a new cover could be made. Even that ended up being pusher around a bit, as if some critter was trying to get at the water below – even though we have several bowls of fresh water critters can drink from. A new cover had to be made quickly.
Which is what I did while the shelf shelter was drying.
The materials used are much sturdier!
I considered using some chicken wire, but the openings are too large and the wire too easily broken. I went with some half inch hardware cloth I had, instead. The hoop is the same PEXX tubing I used to make arches to support netting over the old kitchen garden beds you can see in the background.
I used the barrel itself to measure the size needed to make the hoop, then cut a square of the hardware cloth to size, removing excess mesh from the corners to make it closer to “round”. The hardware cloth is a lot stiffer than chicken wire, but the extra strength is, I think, well worth it being such a pain to wrap around the hoop. Definitely glad for gardening gloves! The last step was to use a hammer on the underside to get the mesh right up against the hoop as tightly as I could.
There was, however, one problem.
The top of the barrel is not round. It’s more of an oval shape, and a wonky oval at that. The old hula hoop I’d used before was quite a bit larger than the top of the barrel, so it didn’t matter, but this hoop was cut for a more snug fit. The less sticking out, the less likely a critter will knock it off, even with the weights. I thought I’d still made it large enough to fit over, but the barrel’s shape was just too wonky.
I ended up tying some paracord around it as tight as I could, then used a metal tent peg to twist the cord even tigher.
Yeah. That bend up piece of metal was a tent peg.
Between the paracord pulling the top of the barrel into a more round shape, and the hammering of the hardware cloth tight against the hoop, I was finally able to get it in place. The board and weights were added to support the diverter when we need it, and the extra brick at the back, just in case something knocks the board off again, so the whole thing doesn’t flip off.
I might still add window screen mesh to this, since things like small frogs or insects, as well as small debris, can get through the half inch mesh. As it is right now, a cat – or even a racoon – could jump onto the cover and it’ll hold their weight without issue. The PEXX tubing will also last a lot longer, too.
All in all, I think it worked out rather well for using stuff I got for other projects! 😁 It didn’t even take that long to do. It took long enough for the washed out shelf to dry, at least.
So we now have a shelf shelter for the cats all cleaned out and ready for winter – on the inside, at least – and a cat and other critter proof cover for the rain barrel.