Today has been an odd feeling day.
The assessor from the insurance company wasn’t going to come this morning, but we were still expecting the prescription delivery, so when I headed out this morning, I made sure to open the gate for him. While doing my rounds, I decided to check in the old garden shed to see if the raccoons were still there. They were, but the mama was on the seat of the rolling cart, and some of the stuff I’d moved from on top of their nest had been knocked back down. The mama hid in the back of the shed while I wrestled with a tomato cage and wrapped up balls of trellis netting to get them off the babies. They weren’t too happy about it, but they stayed. They are getting definitely getting bigger!
I was feeling really tired for some reason so, after breakfast, I tried lying down for a couple hours. It was a frequently interrupted attempt at a nap. Between my phone going off with notifications and cats wanting to nap on my head, I didn’t get much rest.
I did, however, get a message about our truck. The owner apologized for the delay, telling me they were having troubles with their new lifts. The truck would be ready today, though. I told him I’d have to work out transportation so we could return our borrowed vehicle, then messaged my brother. He had already asked me if we were getting power outages, which we were not. They have been getting brief outages off an on, and he was wondering. After a bit of back and forth-ing, we decided to do the vehicole switch on Monday, when they are coming out for the funeral. I passed that on to the garage, so that is now arranged.
One of the things I’d noticed while checking on trail cam files from the camera by our sign is that I was getting a LOT of images triggered by saplings. The open area between the fence and the road is slowly refilling with poplars and, now that they have their leaves, they are triggering the motion sensor when the wind hits them. I headed out there with the wagon and loppers to start cleaning things up.
Not all of the saplings are visible in the first photo. The second photo was after I was done in the area at the corner of the property, where the camera and the road intersection is. After hauling away the first load, I came back and did a smaller load, working my way towards the gate. That area had been done more recently than the corner by the intersection, so there wasn’t as much to clean up.
By the time that was done, I was already feeling way too tired, and starting to feel a lot of pain – in areas where I had the ultrasounds taken. It’ll be three weeks before my doctor gets the results. Should be interesting to see if I’ve got more cysts dancing around in there again.
It wasn’t too bad yet, though, so after I put away the stuff for this job, I got out a weed trimmer to finish clearing the edges around the house, pausing to do other things along the way, like help out the poor Mock Orange beside the dining room door.
What you’re seeing on the ground are the Virginia Creeper vines that I pulled loose from the branches. These can completely smother a bush, and I’ve found spruce trees that had been killed by them. Unfortunately, the bases of these are right in among the Mock Orange’s roots, so there’s no way to really get rid of them completely. I got as much as I could out, and set them in the fire pit to dry out so that we can later burn them.
These flowers right near the fire pit are coming into full bloom. There are so many things blooming right now!
I got done with trimming around the house and had just moved on to the fence around the tulips when the battery died. It was past 2pm by then, so I decided to put away the weed trimmer until after I got back from the post office.
I getting ready to go when the prescription delivery came. I asked the driver how the roads were; he is also a school bus driver, and his route is in our area. He said the gravel roads were quite good. Just a few places with barricades, though the one nearest us has been there since before the storms. He says he may have lost all his tomatoes, though, as his garden is in a lower lying area. It’s mostly under water right now. We’d talked before about how he was considering doing raised beds or Hügelkultur, and I’d told him that my own beds were a sort of combination of the two. When he said he was losing his tomatoes, I encouraged him to do even low raised beds, telling him about when we had that major flooding a few years back. I lost entire sections of the garden we still haven’t reclaimed, but beds that were even just 6 inches higher had survived. I think next year, he’s going to give it a try.
After getting my husband is prescriptions to him, I headed out to the post office to pick up some parcels. I got another hoop kit – another of the set with the slightly longer rods and metal connectors – and another package that turned out to be some insect netting I’d ordered. My cabbages and kohlrabi seem to be completely gone. I plan to at least get cabbage transplants and, when I do, they will have insect netting over them!
Along with the mail, I picked up another 40 pound bag of kibble for the outside cats. I’m so glad our general store now carries them. It saves me from having to drive further afield. Right now, I want to use the borrowed car as little as possible.
By the time I was loading the car up, I was in major pain. There was no way I was getting back to anything else outside, so I just took some pain killers and tried to lie down while my daughters took over, including feeding the outside cats. Most of the outside stuff is going to have to wait. We’re supposed to get more rain – possibly another thunderstorm – in about an hour. Just a short one. Tomorrow, it’s supposed to start raining from about 2 pm to 6 am the next day! After that, we should have about a week’s break from the rain. Time enough for farmers to see how many of their crops survived the flash floods.
Late last year, we were getting predictions for another drought year this summer. From the looks of it, that is not going to be an issue!
As for me, right now, I’m getting absolutely slammed with fatigue and overall body pain. I suspect much of it is a reaction to changes in barometric pressure.
It’s just past 8pm as I write this, and I am seriously considering going to bed shortly.
Again.
Before I do, I got some shipping notifications in my email.
Yes, I bought more seeds, and they are on the way.
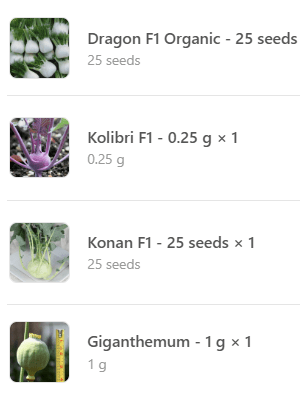
The first is an order from West Coast Seeds. I wanted to order more of the Giganthemum poppy seeds, since the bed I planted them in got flattened and dug into by cats. I have yet to see any poppies germinating. So I have a new package, which I will sow in the fall, and make sure the bed gets protected. For the winter, it will have mulch over the seeds, and I might just lay some chicken wire over the top, too. In the spring, when the mulch is removed, I’ll make sure to set up netting over the bed to keep the critters out.
I couldn’t just buy one packet of seeds, though, so I looked around. They have different varieties of kohlrabi that were on sale, so I ordered one each of the white and purple. Then I spotted a lovely, larger looking variety of fennel that I decided to try. These will all be started indoors in the spring.
My other order was from MI Gardener. Some are re-orders, some are new and, right now, everything on their site is on sale.
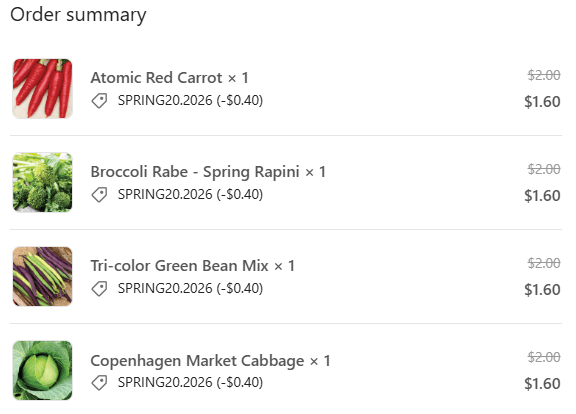
I can’t remember now if I’ve tried growing Atomic Red carrots before. If I did, they were from somewhere else. I ordered the rainbow mix before, and it does look like some have survived, but they’re still very tiny. I figured I’d try this variety next year. Unless I do some succession sowing. That’s an option, still.
The tri-colour green bean mix is a re-order, and I decided to try out the Broccoli Rabe next year, which is more likely to grow here than regular broccoli, and a relatively short season variety of green cabbage.

I also ordered more of the purple savoy cabbage – two packages this time. Next year, I’ll try starting the two varieties of cabbage indoors, and will make sure the transplants have insect netting on them.
The winter squash and pumpkin are all re-orders. After re-sowing the tray that got decimated by a mouse before we moved it outdoors, I ran out of seeds for several of them, and have only a few seeds left of the others. I want to try these again next year. It’s still possible our re-sown seeds might germinate, but it’s getting to the middle of June and, unless we have a super long and mild fall (which we have had before), they won’t have enough time to reach maturity.
Hopefully, for next spring, I will be able to have a better set up for seed starts. Our basement is just too cold, and we have a mouse that eats our seedlings. At least it’s most likely to be a mouse. I can’t think of anything else it could be, even though there is zero evidence for mice. Usually, if there are any, droppings are left all over the place, and there are none.
If we can reclaim our living room – the cat free zone – from all the stuff we’ve had to shove in there, I hope to start seeds in there again.
We really need to figure out what to do with the stuff from my mother’s apartment. Our other storage areas are already full of my parents’ stuff, plus more from my mother’s apartment, and now we have stuff in our basement that I had to find ways to elevate from the damp concrete because there was no room in the storage buildings to put them in, and more stuff in our living room. All of which was have been told to keep. My mother is finally in the nursing home she wanted to be in and can’t have much stuff at all, but she is adamant what we keep everything of hers. She also expects us to be able to know exactly where everything of hers is, and be able to dig things she suddenly wants out and bring them to her.
*sigh*
Our house is a disaster.
That’s part of why I enjoy working in the yard and garden so much. It actually feels like I’ve accomplished something out there!
The Re-Farmer


