Wood carving: lilac wood hair pin

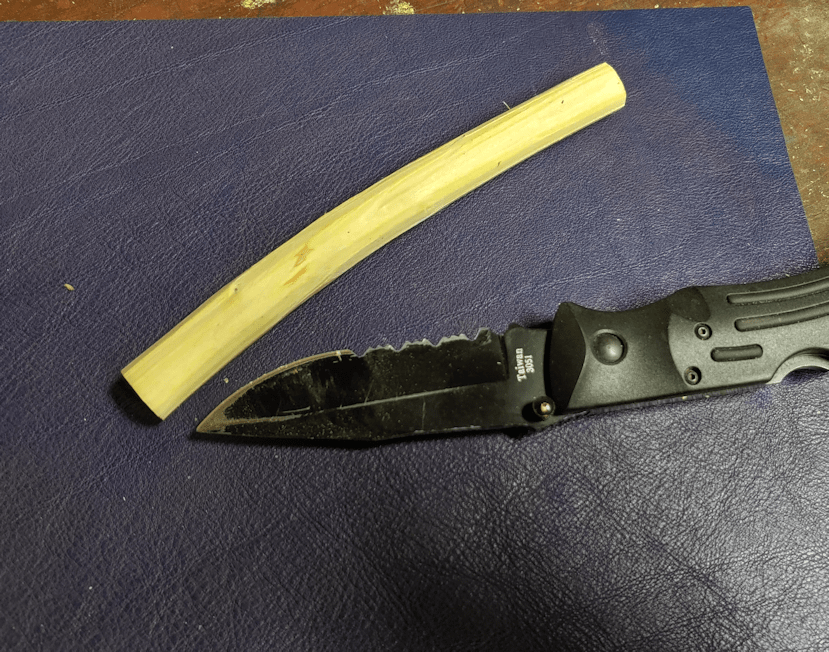
I am actually not sure I would even call making this hair pin “carving”! I used the natural shape of the piece of wood, and just sort of whittled away a bit. The wood was already very close to the size needed.

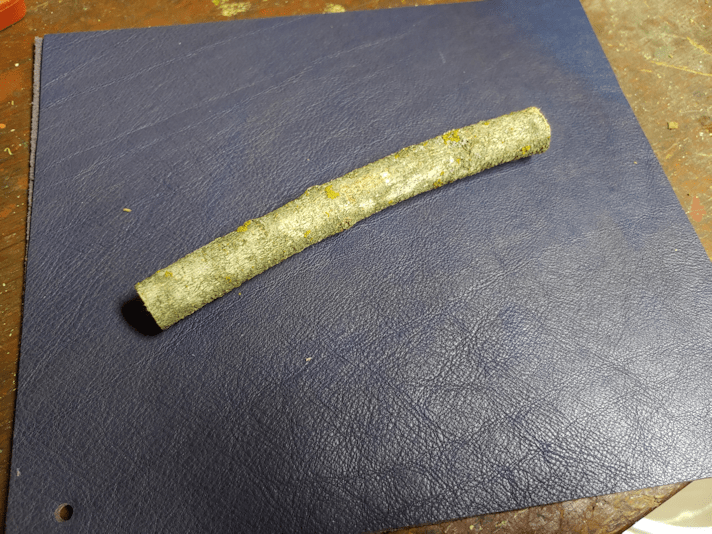
I didn’t take a “before” picture, but you can see what the branch I’d cut the piece from in this photo.

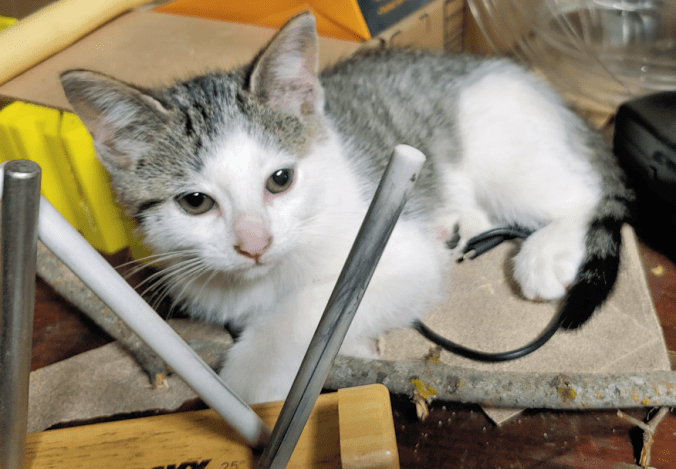
It’s being grasped by Nicco. :-)

Though the wood is from a branch that broke off in a storm more than 6 months ago, the bark was surprisingly green as I whittled it off. I think the humidity in the basement might actually have something to do with that.

Here is the finished hair pin, before oiling.

I cut the piece above where it branched off, to take advantage of the angled shape. You can see near the point, where there had been another bit of twig growing out.

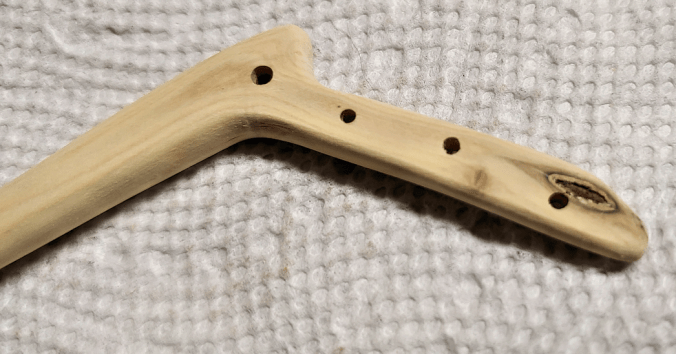
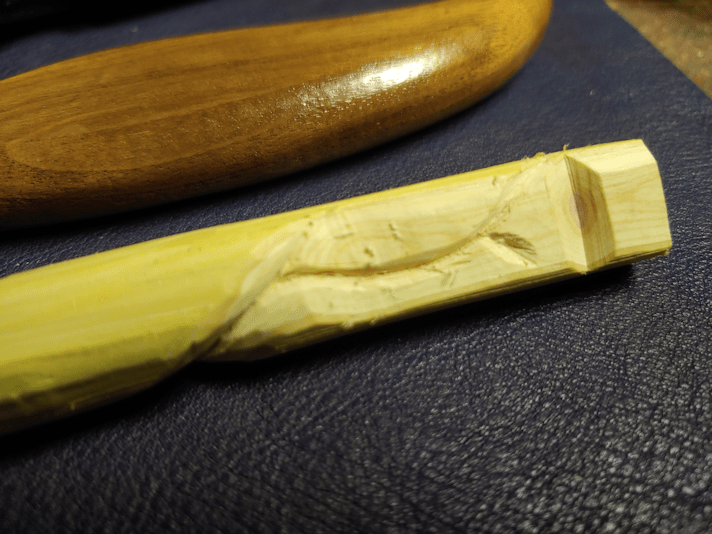
I used the Dremel and the engraving tip to create the holes, so my daughter can use them to hang dangle-y bits. The natural hole at the end was where another twig had been growing out, and I included it, without trying to sand out the roughness, just for interest.

The tiny knots from the twigs where the only thing that made it more difficult to work on.

After general shaping with a carving knife, I used the tiny engraving tip on the Dremel to make the holes, and a small drum sander tip to get into the bends, where it was more difficult to safely get into with a knife. After that, it was must a matter of sanding it smooth.

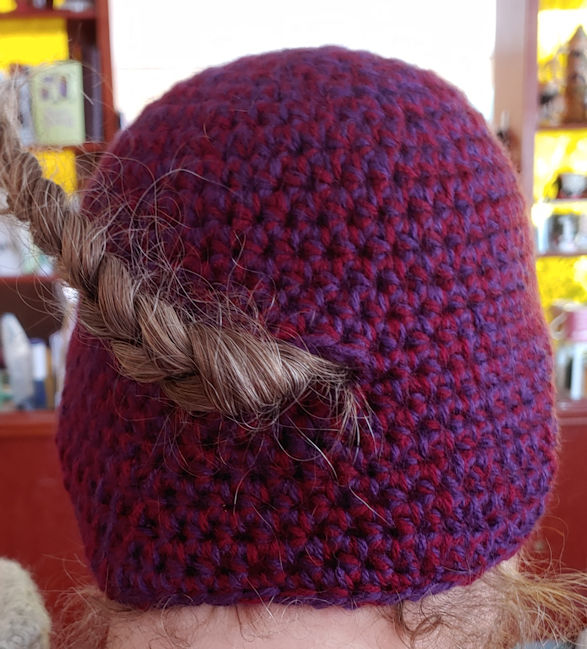
Here is how it looked after oiling.

I love how the oil brings out the details in the rings.

The whole thing, including time spent playing with kittens instead, took about 2 hours.

My daughter loves it!

I’m really happy with how this turned out, and how quick it was to make! I hadn’t thought of making hair pins (which can also be used as shawl pins), but they are prefect for some of the smaller pieces of branches. I think I’ll be making more of these!

The Re-Farmer

Spoon carving progress

Today, I got some really good progress on my practice carving, using the spoon blank that came with my carving kit.

Also, the basement is nice and cool. :-)

I was down to cutting the last few divots out of the morel mushroom on the end of the spoon, so that didn’t take long. I also tried to deepen the bowl of the spoon itself.

Working on the inside of the spoon is a challenge. The tip of the sloyd knife kept gouging areas I wasn’t working on. The direction the wood grain is also means that, in two spots opposite each other, the wood did not cut as well or as smoothly, leaving more gouges, no matter how carefully I tried to follow the instructions from the various videos I’d looked up for beginner carvers.

The rough shaping of the outside of the bowl and handle are… well… rough. LOL

Here is how it looked, after I finished with the carving tools. The next step, was to “cheat” and use my Dremel.

I have a Dremel engraver, which I tested out on the divots of the morel. That did not work at all, which is really what I expected. I figured it was worth a try, though.

Also, that thing is incredibly loud, and scare the crap out of the kittens and Beep Beep!!

The other Dremel I have is a basic low end rotating tool. (The engraver doesn’t rotate, so there is nothing interchangeable about them.) I used a drum sander to smooth out and shape the bowl and handle.

This also took off more of the excess wood to add more shaping.

For the details in the morel, I’m going to have to pick up a fine, abrasive tip. None of the tips that came with my kit are remotely close to being usable for this.

I decided on a swoopy handle, just for effect, but it has turned out to be a great thumb rest. It fits remarkably comfortably in the hand.

This is after sanding the spoon with three grades of sandpaper. Unfortunately, even the edges of the sandpaper tends to leave little gouges inside the spoon’s bowl.

I also had an unexpected issue to deal with, though not a surprising one. The humidity is so high in the basement, both the sandpaper and the wood itself was affected. The wood dust had a tendency to clump up. It wasn’t too much of a problem, but I think it affected how well the sandpaper was able to do the job. Some things actually work better with wet sandpaper. This is not one of them! :-D

This is now it looks after I stopped for the day. After I get a new Dremel tip to finish detailing the morel, I’ll continue to sand with finer grades of sandpaper, singe the morel to add colour, then finish with mineral oil. I did some searches on food grade oils for wood, and it basically came down to mineral oil. Other oils recommended are derived from nuts or seeds, and they go rancid over time. Beeswax is something else that can be used, but it can start cracking and flaking and, of course, you couldn’t use it with anything hot (among the things I hope to carve are cups and small bowls).

Once finished, I plan to offer it to my mother, since she requested I carve her a mushroom. Talking to her since then, it turns out she wants a Portebello (she didn’t know the English name for it), but I hope she’ll be happy with a morel for now. I know she likes morels, too. Most likely, she’ll reject it, but you never know. I might get her on one of her good days.

The Re-Farmer

ps: after finishing this, I checked the weather before heading outside. Turns out the temperatures are still going up, and we’re even hotter now, in the early evening, than before!

First attempt at wood carving

I just couldn’t wait to try out the new carving knives! I ended up using only two of them, though.

After looking at the bits and pieces in the basement, I chose a small piece of lilac to practice on.

It is resting on the leather breastplate my husband made for me.

I was not about to use the carving blades on that bark, though…

I used my K-Bar instead. The wood was surprisingly green, for something that was cleaned up from storm damage some 8 months ago!

I didn’t think to get a picture of the safety glove. There is a pair of them, and they can be worn on either hand. It fit remarkably well, considering I have big, wide man-hands.

Hhhmmm… that may be why it fit well… :-D

It was also very comfortable to wear. I thought it might be really coarse and scratchy, but not at all. It felt like a normal glove.

These are the two carving knives I used. I can’t remember what either of them are called right now.

I started by practicing push and pull cuts to flatten a piece at each end…

…though only one end showed the colours inside; the stick was slightly thicker at the other end.

Then I practiced different methods of making V cuts.

Detail work is going to need a lot more practice. ;-)

After that, I worked on the spiral around the piece, using that to practice different ways of cutting and switching up between the two blades.

I’m rather happy with how it turned out, considering I’ve never carved before. The lilac would was nice to carve with. The blades themselves…

I can see myself wanting to pick up higher quality ones in the future, if I find myself carving more often. While not the cheapest set I saw, it was hardly the highest end, either. I found myself sharpening them almost from the start. The edge held fairly well after I did, so it seems they didn’t arrive as sharp as they could have. Still, they did the job quite well for the learning process it is.

Next time, I’ll find something different to use that curved blade on. :-D

Altogether, I’m glad I picked this up!

The Re-Farmer

Recommended: XiaoXi’s Culinary Idyll

Welcome to my “Recommended” series of posts. These will be weekly – for now – posts about resources and sites I have found over the past while that I found so excellent, I want to share them with you, my dear readers. 🙂 Whether or not I continue to post these, and how often they are posted, will depend on feedback. Please feel free to comment below, and if you have a favorite resource of your own, do share, and I will review them for possible future posts.

I hope you find these recommendations as useful and enjoyable as I have!

My very first Recommended post was for the YouTube channel Liziqi. I love the video format that makes it accessible to all, including those who don’t understand any Chinese language. Since discovering this channel, I’ve found a couple others that I now follow that are similar, yet very different. This is one of them. XiaoXi’s Culinary Idyll, which focuses on both cooking and hand crafts.

I didn’t know that, when I stumbled on the first video I saw: How to make delicious braised chicken out of stone.

Out of stone? That certainly piqued my curiosity when it showed up in my feed, recommended by YouTube.

As I started watching the video, I was perplexed. Where is the chicken? What is he going to do with that rock he dragged out of a riverbed?

By the time I got to the cooking part of the video, I was completely hooked.

How do you braise a chicken out of stone?

First, find a rock and carve it into an exquisite cooking pot.

This is a very new channel, less than a year old at the time of this writing. So it didn’t take long for me to go through all of the videos.

The first videos started off with a very different feel. At first, it was straight up cooking videos.

Other videos featured a lot more people and activities.

Then the crafting portion came into the picture – with a sense of humor!

Are you having trouble making traditional noodles by hand? That’s okay – use a machine!

First, cut down a tree…

As I worked my way through the videos, from oldest to newest, I got the sense that the makers of these were kind of feeling their way around on the focus. Where the Liziqi videos started out with just her, filming herself until she could finally hire a couple of people to do the recording for her, these videos appear to have been made with a professional film team from the start.

I’m okay with that.

The format they seem to be settling on is basically just the one guy who first makes a thing, then somehow uses that thing to prepare a food. Both of which are gorgeous.

Then you get to watch him eat. :-D

I readily admit, every time I see the guy working in his shop, I suffer from an extreme bout of tool envy.

You’ll see him doing everything from forging a frying pan (one of the few videos where he cooks food, but you don’t see it being eaten at the end), to weaving various useful objects (I will never look at a bamboo steamer the same way again!), to making things with wood and resin and…

…succulents?

While there is a lot of focus on traditional crafts, there is definitely a modern, even high tech, side to some of these videos.

While these are hardly “how to” videos, they are still quite inspiring – whether you’re looking for ideas on things to make, or ideas for cooking traditional Chinese food!

Or going fishing with a woven, waterproof hat you just made.

Even if you have no interest making the things or cooking the food, the videos themselves are beautiful to watch, and seeing his exquisite attention to detail is a pleasure in itself.

I highly recommend working your way through all of the videos.

You might not want to do it while hungry, though. ;-)

More Lilac Wood, in progress

Our windy day continues! While we have a few millimeters of rain predicted for this evening, as I type this, I am hearing thunder rolling, and just saw a flash of lightning out my window!

Here’s hoping we don’t loose power while I’m working on this post! :-D

I have continued working on the section of lilac wood I’d experimented on earlier. I decided to try using the cutting tool on my Dremel to make the job go faster – if the Dremel was quiet enough not to disturb Beep Beep and her babies too much.

It was quiet enough, but… there were other issues.

The Dremel I have is not a particularly powerful one. Just a Walmart cheepie, really. Lilac is a surprisingly hard wood, and it was just too much for it!

I ended up stopping part way through my attempt to cut through the wood and finished with a hand saw.

You can see where the friction actually “burned” the wood as the blade ground to a halt!

So I did the rest using a carpenter’s saw, cutting the piece into slices. It took a while, but I eventually got into the rhythm of it, and things went fairly quickly. I cut slices off until I had exactly 3 1/2 inches left – the width of my miter box – to try something different.

It fit just right, and I was able to cut the piece into 4 lengthwise sections. Not as evenly as I would have liked, since it kept trying to roll on me, but that just adds to the interest!

Here are all the pieces I got out of the section of lilac wood.

I really like how the length wise cuts look.

Also… do you notice something about the pieces?

The next step was to take a wire brush to the edges to remove loose bits of bark and clean off any debris. As I worked, I kept noticing a soft spot in the middle of the slices. I finally stopped to take a closer look, and it turned out every round piece had it, as did the centre lengthwise cut.

I used a non-metal brush on them, and eventually decided to just poke at it with a very small screwdriver.

It was basically just wood dust and came right out.

So I cleaned out every disk. Some were small enough that I had to use a wire to clear them out, but every single disk now has a hole in the centre!

I was even able to use the wire to push through the centre cut piece, then use a brush to clean up the open section.

Oh! That was a quick little storm, and I noticed some crazy orange light outside. I just dashed out to see a gorgeous double rainbow!

Also, I got rained on. *shiver*

Now, where was I?

Oh, yes.

Tomorrow, I hope to be able to get back to these and start sanding them smooth and giving them a light coat of oil.

I’m still not sure what I’ll be doing with them, but they’re going to look very pretty when they’re done.

Since all of these had the holes in them, I double checked the first two I’d done, so see if they had that soft spot, too. They did. Barely big enough to use a sewing needle to clean them out. So those two pieces now have tiny holes through them, too. The colourful rings in one of them looks very much like an eye, and now the “pupil” has a tiny hole you can see though. It’s kinda like those “fairy stones” you find at the beach, with natural holes in them. :-)

I like it!

For the size if these, I’m thinking they might make nice pendants. The rings of colour are so dramatic, I feel doing anything more than sanding and oiling them is unnecessary. A possible exception would be to perhaps put a glass bead or something like that into the ones with the larger holes.

What do you think?

The Re-Farmer

Lilac wood

A storm last year damaged a lot of trees and bushes around the yard, including breaking off a large piece of a double lilac my mother planted in the little garden by the old kitchen. Noticing the beautiful pattern in the wood, I set the pieces aside for later.

Today was “later.” :-D

I brought one of the branches into the basement to work on it (I am really enjoying having this work space!!!) and started by cutting various sections off, then working on the thickest “trunk” part of it.

What striking colours!

The photo on the left is the base, where it had broken off in the storm, and I had cut off the split part. The one on the right is where I’d cut a pair of branches off.

That’s the end I decided to cut a couple of slices off.

With Beep Beep and the kittens nearby, I didn’t want to use any power tools, even though I now have a Dremel with steel cutting blades that would be perfect for the job. It’s way too loud.

Lilac wood, I am discovering, is a surprisingly hard wood! It may have been quieter, but it was a lot longer to do it by hand.

Since I’m just experimenting right now, I only cut two slices, then used a brush on the edges to take off any dirt or loose bits of bark.

Then I sanded them smooth. Here’s how they looked, after I finished with the finest grit of sandpaper I have.

Then I applied a light coat of mineral oil.

I am really happy with how these look! Those purple rings are really something.

The next question is, what do I make with them?

The Re-Farmer

A perfect fit

I made myself a hat today.

I’d made myself a ponytail hat last winter, but forgot it at the clinic during one of our doctor’s visits. No one turned it in to the lost and found. I finally got around to making a new one. :-)

I used two strands of medium weight yarn and a 6mm hook. The main body of the hat is just half-double (hdc; known as a half-treble in the UK) worked in a spiral. To figure out where to put the opening, I just kept putting it on my head until it was long enough to reach where I usually wear my braid, then did a chain 4, skip 4 stitches to make the opening.

Warm hats are, of course, a necessity for this time of year, but most hats irritate the heck out of me. If they’re long enough to cover my ears, they get into my eyes, and every time I move my head, the back of my hat gets pushed up. My ears get uncovered and the hat gets pushed into my eyes. My long hair, of course, also gets in the way of having it sit right on my head.

The joy of making my own hats, is that I can figure out how to work around that.

Along with the opening to pull my braid through (which then helps keep the hat in place), after a few more rounds, I switched from hdc in the back to dc (double crochet, or treble/triple crochet in the UK) on the sides, and sc (single crochet, or double crochet in the UK) across the front. The end result is a wavy edge with longer sides that snuggle warmly around my ears, while the slightly shorter back doesn’t get pushed up when I move my head around, and the even shorter front doesn’t get into my eyes, but it still long enough to keep my forehead warm.

I probably should have done this at the start of winter, rather than the end, but it’ll do the job just fine! :-D

The Re-Farmer