Red Sided Garter Snake!

We saw our first snake of the year!!

20180706.red.sided.garter.snake1

Can you spot it in the greenery?

Thankfully, it moved and stayed in a spot I could get better pictures of it. :-D  (There IS a red stripe along its sides; honest!)

20180706.red.sided.garter.snake2

Garter snakes are awesome to have around, because they eat insects, mice – even leeches. If you ever have the opportunity to visit Manitoba‘s famous Narcisse Snake Dens, either in May, when they first come out of hibernation, or September, when they return to the dens, I would highly recommend it.  There are dens in Saskatchewan and Alberta, too, but none as extensive as in Narcisse.  Sadly, people sometimes destroy the dens, thinking the snakes are some sort of pest, which they most certainly are not!

Judging from the size of this one, it might be a female.  They are quite a bit bigger than the males.

I am so happy to see it, and I hope to see more!

The Re-Farmer

What is this? The Answer is…

Here is the answer to yesterday’s guessing game.

The mystery equipment sitting in our maple grove is…

20180507.found.equipment1

… A garden row marker.

In the above picture, you see the handle.  One would step inside it, and hold the bar in front while dragging the rest behind.

20180507.found.equipment2

Do you see the points?  There are three of them that would drag on the ground, creating three lines in the soil.  When the next pass was made, one of the outer markers would be dragged along in one of the previously marked lines, so that the other two new rows marked would be evenly spaced.

Seeds would be planted in the resulting lines in the soil.

When I was a kid, I remember one of these my dad had made out of wood.  I don’t know who made this metal version, though I would guess it was my late brother, using bits and pieces from other equipment and whatever else was handy.

How close was your guess?

The Re-Farmer

What is this? A guessing game

Here’s a question for you, dear readers.

Can you guess what this piece of equipment is?

Here is a view of most of it…

20180507.found.equipment1

And this is what’s buried in the dried leaves.

20180507.found.equipment2

Do you know what it is?  Leave your guesses in the comments. :-)

The Re-Farmer

A Musical Problem

I have discovered a problem with the postcard records.

I can only listen to a track and a half, or so.

These are fascinating, by the way. I would love to hear all the songs in completion. I’ve lost much of my Polish, so the words are just on the edge of my understanding, but I have identified love sings, drinking songs and humorous songs.

Sometimes, all in one song.

I think.

The Re-Farmer

Happy Trails

As I went out to empty our kitchen scraps onto the compost pile at the edge of the garden area, I paused to look around and noticed something interesting.

There were trails, everywhere.

And not one of them made by human feet.

They were all deer trails.

They all lead to our feeding station!

deer.trails.garden

This is by far the most well worn trail of them all, cutting through an old section of the garden that hasn’t been in use for some time.

deer.trails.maple.grove

This pathway runs between the maple grove and rows of spruces that were planted much later.  You see that post in the mid-ground?  That’s where there is a water tap.  When I was a kid, the walking path around the edge of the garden was right up to that post.  All those trees to the right are growing in an area that used to be part of the garden.  Same with the apple trees in the opposite direction, near the spruce grove.  As big as the garden area still is, it is much smaller than it used to be.

I made my way through here, having to wind around broken branches and dead trees all over the place.  There don’t seem to be very many maples left in our maple grove. :-(  We’re going to have some major clean up to do in that area.

deer.trails.gate

This is one of the furthest ends of the garden.  This gate is where we could drive into the garden itself.

As you can see, it is no barrier for the deer!  Their tracks look as if they can walk right through the gate, as if it’s not even there!  I know they’re jumping over, but it doesn’t look like it from the tracks alone.

Going through the maple grove was a bit of an eye opener.  We have got SO much work to do to clear that area out!  It’s a lower priority over working on the house itself, of course, but I hope we will be able to do at least some of it over the summer.

At times like this, I think my family and I really got the short end of the stick with this deal we made with my mother to live here for “free.”

Ah, well.  We came here expecting to have work to do, even if we didn’t expect quite this much.

The Re-Farmer

Sourdough Bread Variation: Cheese and Olive Roll

Today, we made another variation of the Quick and Easy Sourdough Bread recipe.

For the last while, we’ve been making a Black Olive and Cheddar variation that has been so delicious.  With today’s bread baking, I did two loaves this way.

The other two loaves were made into rolled loaves.  The other change was that I used the liquid from our yogurt “cheese” making.

I also made another technique variation, by accident. :-D

20180201.ingredients

As I usually do when using sourdough, I pre-measured all the ingredients, using a doubled recipe.  At this point, the only change is the type of liquid.

Following the recipe, I added the yeast, starter, sugar, salt and 4 cups of flour into the liquid, mixing well.  It’s been a while since I’ve made it, as my younger daughter has been the enthusiastic bread baker for the last while.  The batter seemed thinner than usual, but so was the starter, and that was what the recipe said, so I went with it.  When it was well mixed, I covered the bowl and set it aside in a sun spot, then headed out for a quick run into town with my younger daughter to get some unexpected necessities.

While we were gone, my older daughter chopped up a can of black olives and shredded some Old cheddar cheese for me.

While out and about and chatting, I mentioned what I’d done with the bread so far, then realized…

I’d forgotten to double the quantity of flour.  It should have been 8 cups, not 4! :-D

No worries.  I knew that doing it this way would result in a sponge, and I was good with that variation.

This is what it looked like when we got back, about an hour later.

20180201.sponge

Look and that beautiful chemical reaction!  So bubbly. :-D

Normally, after rising, the soda is kneaded into the dough with 1 cup of flour.  Since I was working with a sponge, I stirred in 2 more cups first, then added the soda with the 3rd cup of flour.  By the 4th cup, I was mixing it in by hand and continued to knead in more flour, little by little, in the bowl until it was thick enough to start kneading on the table.

I didn’t add much more flour after that.

After well kneading the dough, I divided it in half and set one part aside.  With the remaining half, I cut it in half again for two loaves.  With each piece, I kneaded them a bit before rolling them out into rectangles.  Leaving an edge all around, I spread out some chopped olives and shredded cheese.

20180201.rolling

Typically, I would have brushed melted butter on the dough, first, but I didn’t feel like melting any butter, so I just used the cheese and olives alone.  After rolling the dough up, I pinched the seams to seal them and tucked the ends under before placing the rolled loaf into an oiled baking pan.  I started preheating the oven in between shaping the two loaves.

When the rolled loaves were done and waiting to go into the oven, I took the rest of the dough and kneaded in the olives and cheddar, as we have been doing normally for the past while.  The moisture of the olives does require adding a bit more flour as it’s being kneaded in.

20180201.waiting.loaves

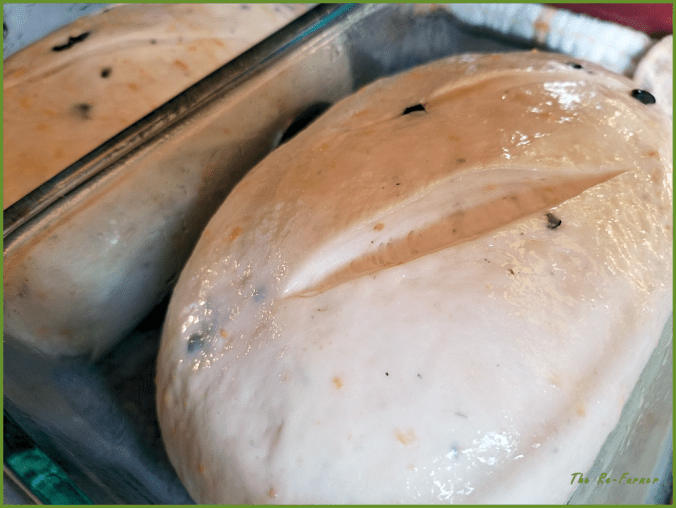
With these loaves, I slashed the tops so they wouldn’t split while rising in the oven.  I also rubbed the tops with oil (I’d forgotten to do that with the rolled loaves before putting them in the oven).

They took about 35 minutes to finish baking.

Despite my pinching the seams to seal the rolls, cheese still managed to escape and overflow on one side of each loaf, just a bit.

20180201.cut.loaf

Oh, did they ever turn out wonderful!

As of this writing, 1 1/2 loaves are already eaten.  It was basically supper! :-D

Oh, they were so good!

My daughters have asked me to keep doing these rolled loaves from now on.  They are liked even better than just kneading the olives and cheese into the dough.

While I was waiting on the loaves to bake, I posted a couple of pictures on my Facebook page.  A friend of mine asked me if I were interested in some whey in the spring, if she has any left over.

Of course, I said yes!

I have awesome friends.

As for the use of the yogurt liquid instead of water, there wasn’t a huge taste difference; the olives and cheese overpower it, really.  The texture was finer, though, and the bread moister and lighter.

This variation was a definite success!

The Re-Farmer

Hello, Deer

Today was a very busy bird day!  Especially the grosbeaks.  So many of them!

At least until the deer came.  It was continual back and forthing between the birds and the deer!

2018-01-28.bird.crowd.1

While there were plenty of chickadees, as always, and a blue jay also made an appearance, it was the grosbeaks that really stole the show!  There were so many red ones today, too.  Constantly flying in and out of the area.

2018-01-28.bird.crowd2

Also very busy today were the chipping sparrows.  Just masses of them!  They dash in and out a lot faster than the grosbeaks.

Then, out from the garden, a deer came loping enthusiastically in, and the birds took off.  Much to my surprise, it was the little hungry looking one!  The other one she usually follows came prancing in some time later.

2018-01-28.two.whitetail.deer.1

He did try to chase her off, but amazingly, this time she just shifted to another pile of feed, and they both ate together for quite some time!  A couple of times, she got chased off a bit farther, only to come back again, prancing in quite enthusiastically.

2018-01-28.two.whitetail.deer.2

It was so good to see her getting a decent amount of food, for a change.  And to see her being less skittish. I look forward to seeing her get all sleek and fat, like the other one.  That one clearly has seen no deprivation, this winter!

I wonder if the little one had gotten sick at some point?  Aside from when we had that polar vortex some in, with bitterly cold temperatures, it’s been a light winter, with very little snow to prevent deer from foraging.  There is lots of wild food to be had.

Eventually, he chased her off for good.  Then ran off, himself, later on.  He came back a couple more times throughout the day.

I’m thinking of calling the mean one, Barbecue.

The Re-Farmer


Home Made Yogurt – Day One

I hadn’t intended to make this again so soon, but my daughter and I were able to make a quick trip into town and she made a passing comment about how we should make yogurt again.  I’ve been thinking of it since I posted about using the liquid from making yogurt cheese in bread baking, so that was all it took to convince me to get what we needed to make some now.

Making yogurt is really pretty easy.  The main thing is to have a warm place for the bacteria to do its thing for the hours it needs.  I’ve found leaving it in a warm oven with the light left on overnight to be adequate, but there are other methods.

Since that is my preferred method, it’s a two day process.  I use a full gallon of milk, and plan to use half of it to make yogurt cheese tomorrow.

Along with the ingredients, a candy thermometer is needed, and containers you can sterilize to store the yogurt in, later.  Any container that can handle being scalded, with an air tight lid, of the appropriate size for your amounts will do.

The recipe I use is from Whole Foods for the Whole Family, from La Leche League International.  I have a 1991 printing of it.  It’s a very handy cookbook, if you like to make things from scratch.  I modified the recipe for larger quantities, so I’ll include both the original quantities, and my own variation (in brackets).

This recipe uses plain commercial yogurt as a starter.  Make sure you check the label to see that it says something like “active bacterial culture” or “live bacteria” on it.

Do not use the optional gelatin if you’re planning to make yogurt cheese.  The gelatin serves only to make a firmer yogurt.

20180128-yogurt1

4L milk, scalded

Yogurt

4 cups milk (4 litres/1 gallon)
1 cup powdered milk (4 cups)
2-4 Tbsp plain yogurt (1/2 – 1 cup)
2 tsp (8 tsp) unflavored gelatin, softened in 1/4 cup (1 cup) cold water – optional

  1. Scald milk.
  2. Cool to 95 – 155 degrees. (The recipe does not specify, but looking at my candy thermometer, it must refer to Celsius, not Fahrenheit)  Check with candy thermometer to be sure.

    20180128-yogurt2

    Yogurt starter and powdered milk stirred in.

  3. Stir in powdered milk and yogurt.  Add optional softened gelatin.
  4. Pour into sterilized jars, a baking dish with a cover, or a thermos rinsed with very hot water.  (Because I use an entire gallon of milk, I leave it in the same container I heated it in and cover it with a lid.)
  5. Place into or on a yogurt maker or use other heat source.  A thermos just needs to be wrapped in a towel.
  6. Put in a warm place and allow to incubate at 95-155 degrees until yogurt sets.  It can take from 3-9 hours, depending on your heat source.  Check after 3 hours to see if it is set by tilting the container or tapping it with the heel of your hand.  When set, refrigerate immediately.

Maintaining the temperature is vital; too cold, and the milk can go sour.  Too hot, and it will kill the bacteria.  The recipe lists several options for maintaining the right temperature, but a few of them a fire hazards, so I won’t bother including them. :-D

Yogurt cheese isn’t really cheese at all, but is has a texture similar to cream cheese and makes a wonderful spread.  To make it, you’ll need cheese cloth, and somewhere to hang it.

Which I don’t have.  So I have to figure something out for tomorrow.

Anyhow… to make yogurt “cream cheese”

  1. Line a colander with 2-4 layers of cheesecloth.  Place the colander over a bowl, then dump home made yogurt onto the cheesecloth.  Pull up the corners of the cheese cloth and tie them together so it can be hung.  Suspend the resulting bag of yogurt over the bowl and leave overnight. (Or just a few hours, depending on how thick you want it)
  2. Reserve liquid in bowl for bread baking.
  3. Remove yogurt cheese from bag and refrigerate.

Fair warning: getting the yogurt cheese off the cheese cloth can be a messy job!  Also, the outside will often be drier than the middle, so you’ll probably want to mix it together.  If you wish, you can mix in some dried herbs or garlic or otherwise experiment with it.

More, tomorrow!

The Re-Farmer