Trellis bed progress

Finally!

With last night’s storm, I was happy to see the tree my brother cut down that got hung up on other trees had fallen closer to the ground. It’s not going to drop any further, though. It’s now hung up between the trunks of a group of trees. We can, at least, reach most of it better, though, so we’ll be able to work on it eventually.

With today’s slightly cooler weather and a nice, clear day, I started working on getting those dead spruce trees my brother cut down for me, out of the bushes.

I took photos and will eventually put it all together in a video but, for now, this is what I managed to get done today.

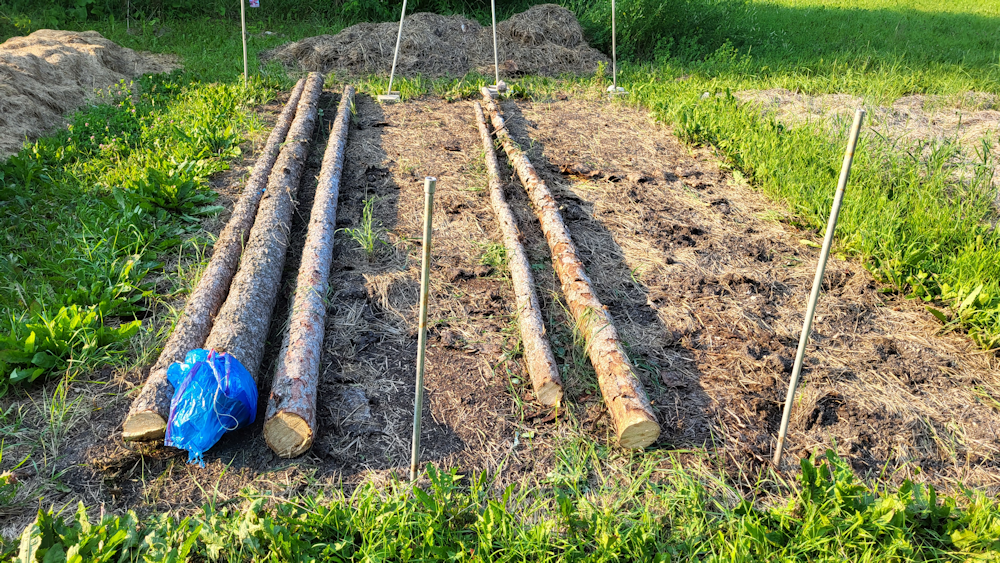
Gosh. That doesn’t look like much, now that it’s done! 😄 It did, however, take a LOT of prep work before these logs could finally be dragged over.

The two trees that were on the ground were almost completely hidden by underbrush. I used the weed trimmer to clear a path to them first, then did a bit around the trees themselves. There were too many hidden branches, though, so I had to shift gears.

The top of the first tree extended a lot more than I thought it did. I used the little mini-chainsaw pruner to clear the branches, then remove the most crooked section of the top, before working my way down the trunk. I had the wagon nearby to put the branches in, and made a few trips to the branch pile near the fire pit, cleaning up as I went along.

Once I got it clear enough, I was able to pull the entire trunk out from under the stuck tree, then continue removing a few more branch stubs. Next, I measured 18 feet from the thick end of the trunk, and used the electric chain saw to cut it. I used a rope to drag the top part through the trees and into the garden, which was harder than it should have been. I neglected to roll it over and check it, first. There turned out to be a stub of a broken branch at the end, acting like an anchor!

Needless to say, I made sure to check the 18′ piece before I dragged that away, too!

The top of the tree is around 16-17′ long. Too short and thin to make the long walls of the beds, but it will do nicely, cut into 4′ lengths, to create the end walls.

The other tree that was flat on the ground was looking very crooked – spruces tend to be like that at their tops – and I thought it was shorter than the first one. As I cleared more dead branches and tried pulling it out from under the stuck tree trunk, I realized it was a lot longer, and thicker! In fact, when I finished clearing the branches and measured out 18′ from the end, I was still at the far side of the stuck tree! It was simply too big to pull out first, like I could with the first tree.

The top was moved first. I hadn’t bothered to measure it, since I figured it would be too short, but when I dragged it between the posts that are 18′ apart, it almost reached, end to end! The thinner top, though is still pretty crooked, so it will likely not be used as a side wall.

Then it was time to drag out the rest of it. I rolled it around to cut away any branch stubs that might cause problems, but the trunk was quite a bit larger and heavier, and getting caught on things. While I was working, I was constantly finding very old and rotting branches and pieces of tree trunks hidden in the undergrowth, that have clearly been there for many years. They made for a rough surface to drag on. I ended up tying a plastic bag around the end of the trunk, to reduce friction. It helped a lot but, by then, I was getting pretty hot and tired, so I got a daughter to pause making supper to come help me drag it out.

While working on this tree trunk, I found the fourth tree my brother had cut down. It is another big one, and he felled it in the opposite direction. It’s almost completely hidden, not just by undergrown, but other trees, and I’m honestly not sure how I’m going to get at it.

As for the tree that’s stuck, that one is even bigger. This is one that’s going to have the thickest 10′ cut off and taken to where we plan to build the shelter for the outdoor kitchen we plan to build. These trunks are far too thick to use for raised beds, as they would take up a lot of growing space. Rather than cut them in half or something, we will instead use them as vertical supports for the shelter.

But I was not about to work on either of those logs, today.

I started to put things away, but I really wasn’t happy with having done only two trees. Especially when there were other thinner dead trees, right there.

Yup. I ended up cutting down another tree.

Gosh, that thing felt so light, after fighting with the big one! Even though I used a hinge cut, it still fell off to one side and got a bit hung up on other trees. It was easy to get loose. I just put the rope around the trunk near the stump and pulled it until it fell the rest of the way. It also fell across the stuck tree, which made it much easier to work around.

Then it was just a matter of clearing a few branches – there weren’t very many at the bottom half – measuring out and cutting 18′ and dragging it out.

The top of the tree is resting on top of undergrowth, and I left it there for now. I am not sure how much of it will be useable. It won’t be useable for the walls on the raised bed, but it might be useful in other ways.

I’m still going to have to cut down one more smaller tree for this bed. There’s one that looks like it’s similar in girth as the log with the plastic bag on the end. I’m planning to make these beds 2 logs high, but I want the bottom logs to be the bigger, thicker ones.

This time I have the draw knife, so I want to de-bark the logs and cut away any remaining branch nubs, lumps and bumps. I didn’t do that for the high raised bed, and I can see that it would be much better to do it than not.

I want to get at least one bed built, with the vertical trellis supports in place, before cutting down more trees for the second one. Ideally, I’d put in the vertical supports for both beds, along with the horizontal supports to make a trellis tunnel, right from the start, but we’re going to have to work on things piecemeal for now. Plus, we will be building at least one, probably two, more of these, so this one is the learning experience!

I’m happy with the progress, and I’m paying for it now, but I’m actually not having as much trouble as I’ve had in the past. Of course, tomorrow might prove me wrong, but it seems my body is finally starting to handle things better. Yes, I’m stiff, my left knee tried to make an escape, and a thigh tried to go into a conniption fit, but I’ve certainly had far worse pain, stiffness and joint instability after far less work.

It just feels so good to finally be able to work on this!

The Re-Farmer

Finally, some progress!

It’s so bright out right now, I didn’t realize it’s past 9pm, and I haven’t done a blog post yet!

I’m tired.

A good tired!

I finally got the chainsaw out and cut down trees that will be used to build our trellis tunnel.

I started out doing some clean up, first. Several of the apple trees that were discovered when I first cleared this area were dead or partly dead. I cut away the dead parts, which left only a couple of spindly trees.

Then I dropped a poplar on one of them!

It wasn’t supposed to work out that way. The tree was actually falling exactly where I meant it to. Then some branches got hung up on another poplar, which just kept bending and bending until the tree I cut down rolled off, directly on top of the apple tree!

I can’t say it’s a loss, though. As far as I know, these trees have never produced fruit, because of where they are. My mother says she planted them, but they were whatever crab apple seedling she found, so it’s unlikely any fruit they produced would even be edible. My mother had no understanding of how apples need to be grafted, not grown from seed, until I explained it to her. To her, it was all about them being “free”. I know my dad grafted apple trees but most of those died, and only the suckers remain.

Anyhow.

Cleaning things up opened the space to get at the trees I was after. Some of them could only fall in one direction – onto the fence! The fence is already breaking apart, so I wasn’t too worried. It actually handled having trees drop on it several times, surprisingly well! The power line that runs from the garage to the outlet on a fence post I was using had a lot of slack, so there was no risk to it.

A couple of the trees that fell over the fence had to have their trunks cut into two shorter pieces so I could get them free of the fence. I made sure to cut them in such a way that the straightest parts of the trunk were still at a useable length for both. Altogether, I’ve now got about a dozen logs, most of which are long enough that I can get at least a couple of lengths for vertical supports out of them.

While cutting down select poplars, I was also able to finally cut up and removed a dead, rotten tree that had fallen three years ago. I needed to clear it to access the last tree I wanted to cut down. While it was too rotten to be useable for building something, it was still solid enough that the wood can be used as fire pit fuel. 🔥🌭 I was even able to remove some of the little stumps I’d left all over the place, waiting until I had the tools to cut them to ground level. I kept them high, so that they could be seen and avoided, though I still found myself almost tripping over some of the shorter ones!

It was 24C/75F when I finally had to stop – and we were still expected to get warmer! The next step for the logs will be to cut them to length for the vertical supports on the trellis tunnel, then drag them over to where the tunnel will be built. We also need to cut down some of the thinner dead spruce trees, which will be used to form mid-height raised beds at the bases of the trellis tunnel. Once we have the materials, hopefully the build will go quickly.

I gotta tell ya, by the time I was dragging that last tree over to the pile, then cleaning up, I was moving real slow! I was certainly glad I remembered to bring a water bottle out with me. Getting dehydrated in this heat would not have been good.

Tomorrow is supposed to be a cooler day, but we’re also supposed to get some rain, so we’ll see how much I’ll be able to get done while using an electric chain saw.

In other things, the transplanted squash and gourds seem to be handling their transition well. Even the Sweet Chocolate peppers are showing no signs of transplant shock at all! That’s quite encouraging. If the weather holds, I might start transplanting out the biggest, oldest tomatoes. The beds they’ll be going into still need preparation, though, so we’ll see. Ultimately, it all depends on the weather.

I think some pain killers and an early bed time are in order, now!

The Re-Farmer

Cold progress

Well, today has turned out to be a pretty miserable day, weather wise. It’s 9C/48F right now – as warm as we’re going to get today – but the “feels like” is at 6C/44F. After the heat we’ve had in the last while, this is sweater weather. A few weeks ago, it would have been t-shirt weather! 😄

There was some wind, but the direction changed, so I felt I could bring the transplants out for a few hours. They need to get used to the chill, too, before getting in the ground.

I had intended to take down some trees to use to build our trellis tunnel, and was planning to haul out the electric chainsaw and an extension cord. We do have a power outlet on the fence along the road that I could hook up to. There was, however, a constant threat of rain. The trees I singled out are not very large, but straight and tall. I could take them down with hand saws, but I really wasn’t up to that.

So, I worked to solve a problem, instead.

This one.

This is the bed the shallots were transplanted into.

Which the cats promptly started to lie on.

I put the largest of the old window screens we use for things like curing onions, etc. in the fall to cover it. It’s not quite bit enough, and I kept having to put it at more of an angle because, of course, the cats still went on top of it. Sometimes, I’d find one corner pressed down inside the bed. No damage to the shallots, but that’s just been luck, so far.

So this bed needs protection from the cats, with a decent amount of height to it. I rifled through some material we used to make covers for the long, low raised beds in the main garden area for wood. Those frames had started to break apart over the winter, but I was able to take them apart, and some of the wood was still useable. I brought over three lengths, which you can see in the background of the photo.

This bed is 4′ x 2′ in size, and the boards I brought over were 8′ long, so I was able to cut one in half for the sides of a frame, choosing the board with the least damage. From a second board, I was able to cut the end pieces, which are 2′, minus the thickness of two boards. Nothing is exact, so after marking 2′, I used the edges of the boards to mark of the actual length needed.

This would have been a good day to use the miter saw I got at the garage sale awhile back, but I would have had to bring it outside to use it, and I didn’t want to risk it getting rained on.

I took progress photos and will probably make a video of the process when it’s done, but I had to stop before it was finished. This is what it looks like, now.

The chicken wire and hula hoop pieces were salvaged from the old frames. You can also see that I used small pieces of wood to reinforce the corners, using 3″ long pieces of wood. I had planned to just nail them in place, but didn’t have good nails for it (I’ve never seen the tip of a nail bend like that before… 😲), so I had to use screws for those, too. I did break out the drill to make pilot holes. Thankfully, the rain held off while I was using it.

Gooby really wanted attention while I was working. Not good when using cutting implements or power tools!

To finish it off, I need to add chicken wire to the ends, plus add a support across the top – because you just know that a cat will try to climb or jump on it! I’m still debating whether I want to add a third hoop in the middle. For such a small frame I normally wouldn’t bother, but with the cats… it might just be worth it.

I had to stop because it finally started to rain too much to stay out in it. I had already brought the transplants back into the sun room.

What I’ve done here is basically a miniature version of what I want to build for the box beds the carrots and spinach are planted in, so in a way, this is a test run. Doing the ends is going to be a finicky, to work around the curves. Chicken wire is nice and flexible, at least.

So for now, the shallots are still not really protected, since the cats can just walk right through the open ends, but with the weather the way it is right now, I think they’re more likely to be hiding out in various warm shelters. This is the coldest it’s been outside since they were kicked out of the sun room, so we could use it as a greenhouse.

I don’t know how long this cover will last, but I used the least damaged wood and made sure to reinforce the frame at the corners. Given the small size, it has a pretty good chance of lasting a few years, I think.

The one last thing I’ll need to figure out is the best way to secure it to the frame. I don’t need to latch it or anything like that. I just need to make sure it doesn’t get pushed off. I had considered making the frame sized to fit inside the logs, but with their uneven surfaces and dimensions, I decided against that. Plus, having contact with the soil will make the wood rot faster, and it’s old and weathered enough as it is. I might take advantage of those corner braces and make “legs” that extend down the outside of the bed, so that if something does push against it, it won’t move more than a little bit.

But that can wait until later. For now, it really needs those ends closed off!

The Re-Farmer

Our 2023 garden: early outdoor prep, and making seed tape

Yesterday, we made some seed tape, and – best of all! – were able to do some outdoor garden prep. While the main garden area is still buried in snow, the south yard’s garden beds are almost completely clear of snow, and even thawing out a bit.

Here is our progress, so far.

Hope you like it!

The Re-Farmer

Pretty much done…

We’ve got a beautiful day today! Bright and sunny and mild. While we did have high winds and blowing snow last night, there was just enough new snow on the ground for the fresh deer tracks around the cat houses and paths to stand out. Unlike other parts of the province that got hit with blizzard conditions last night!

I counted 23 yard cats this morning.

Perfect timing. Not only did I catch that grey tabby on the top left, just as he jumped up onto the roof, but I got a perfect tongue blehp on Pinky! Gosh, His fur looks so orange in the picture.

I picked up more cat food at Walmart yesterday, though there was still almost a whole bag left of the kibble I got at the feed store. For the outside cats, I got a 10kg bag of Meow Mix (they were out of stock for the 11kg bag in another brand), which is still pretty cheap per kg. I mixed up the two brands in the kibble bin, so they got a bit of both, and I can really see how much they prefer the other brand to the feed store branch.

Yesterday, I also finished assembling the cat barrier for the shelf, but as its held together with wood glue, I had to let it sit overnight.

I have only one clamp, so I taped the halves together, put the clamp over the side that was wonkiest, then weighted it down with the told tool box on boards laid across the frame. I did that in the morning, then in the afternoon, I removed the clamp and tape, flipped the frame around, then put back the boards and weight to finish drying.

The space it goes into has moulding on each side that made putting the frame in a bit tricky. I’d tested it out when I made the box frame half, but the extra thickness after adding the flat frame almost made it too much! I ended up not needing to add the self adhesive foam to a narrow end, and only one strip across the top to hold it in place. I pushed the box frame side right against the moulding on the living room side. This let me run the cord for the salt lamp – which is completely hidden by David in the photos! – through the wire. There are a few things we keep on that shelf, which is now all organized in a box, but otherwise, the space is available for the cats to sit on.

The girls finished the door for the entry, which took way more adjusting than it should have. There are large gaps around the door at the top and at the latch side. With the space so wonky, and even the floor being crooked, the gaps are noticeably different in size! The only problem remaining is that, when fully open, the weight of the door pulls on the box frame and it starts tipping at the top. Hooks will be added to the ceiling, and the box frame secured to the hooks, to keep the frame from tipping, while still being easy to remove when we need to.

With the door closed, only the more agile cats were getting in and out of the living room, through the shelf opening. Once I had it open to work on the small barrier, the cats took advantage of the situation. When I was done, Beep Beep was on her favourite spot on the warm light fixture over the big aquarium greenhouse, Tissue was in the sun spot on the seat of the exercise bike, with four more cats sprawled on the sun spots on the carpet below, like giant puddles, and two more on a shelf in the mini greenhouse frame at the window, all sleeping peacefully!

Oh, and two more were in the baskets on the piano.

They really missed not having access to the living room!

Well, they’re going to have to get used to it!

Once I have the heart to kick them all out again.

The Re-Farmer

Another step forward

First, here’s a beautiful lady, saying hello!

Tissue is quite enjoying the warmth of the sun – and so far, none of the cats seems to have tried to destroy the smaller plants that have been temporarily moved onto the shelves that will soon be holding seedlings.

Soon, she will not be able to spend time on the window sill in this room! My daughter and I finally made it to the city to pick up what we need to make the cat barriers (which my other daughter is paying for, sweetheart that she is!).

And I’m looking forward to having a carpet that doesn’t get completely covered in cat hair and the bits of rope torn off their scratch tower, immediately after vacuuming.

We’ve got three sizes of boards. We were going through the cheap contractor grade pieces, and it was hard to find any that weren’t damaged, or wonky.

We also got chicken wire, aka: hex wire, instead of the hardware cloth I wanted to get. It was the only thing they had that was wide enough and long enough for this.

We’re actually doing a simplified version of our original plans. Instead of a box frame for the entry, then a door frame inside, and finally the door, we’re just going to do a box frame and a wide door.

For the box frame, we’ve got 1″ x 4″ boards. The frame is meant to slide into the entry into the living room, with self adhesive foam on the sides to hold it in place, but still allow us to remove it, if necessary. The problem was, we couldn’t find the thickness we needed. There is moulding at the top and bottom of the entry, so the foam was supposed to fill that gap. After debating our options, we decided to go with the thickest they had, and we’ll remove the molding from the bottom of the entry and make the box fit top to bottom more snugly. It won’t be completely snug; when the girls measured the space, they found a half inch difference between the top and the bottom!

For the door, we’ve got 1″ x 3″ boards. We will also need to create a barrier for an opening in one of the shelf dividers, so we got 1″ x 2″ boards as well – one of which will also be used a side jamb.

We spent some time looking at our latch options and ended up going with a simple hook and eye latch. We decided against getting a handle. We had use the latches as handles, but if we really wanted a handle, I’m sure we’ve got something lying around the house somewhere.

Unfortunately, it does look like the hinges I picked up will be too wide. Possibly. If we do have to get smaller ones, I’ll be sure to pick up three hinges, not a set of two.

Securing the chicken wire was another thing we had to consider. We’d both bounced around the idea of sandwiching the wire between boards, but we’d basically double the wood need for the door, so we’re going to make it the same was as the barriers we’ve made for the basement doors; The horizontal boards will overlay the verticals, with the wire sandwiched between, and the rest of the wire will be secured with something else.

My thought had been to use small U nails (I think some places all them staples), but they didn’t have any small ones. The alternative is to use actual staples, but our staple gun isn’t very strong, and we’ve found the staples pop out way too easily. So we looked at staple guns, only to find that ours was there, and is a heavy duty gun. So we ended up getting stronger staples, instead! We’ll see if that works. If it doesn’t, I know where to go in town, where I can get what I was originally thinking of, in bulk.

I might need to go into town, anyhow. I think what we have at home is all too large for the size of wood we are using. The cats have knocked most of the boxes off the counter in the sun room, anyhow, along with all sorts of other things now scattered around the floor in there – and we won’t be able to clean it up until we can take things like the table saw and my husband’s walker, outside, so we can get at it all.

Meanwhile, construction starts tomorrow. Hopefully, we’ll be able to get both the doorway and the shelf opening done, and we can finally have cat free space for more seedling trays, and not worry about them being destroyed! And hang the shop lights we will be using as grow lights from the ceiling without worrying about cats jumping on top of them. We have seeds that need to be started indoors 12 weeks before last frost, and that’s in four days.

In other things, I got an email from my bank this morning, congratulating me on getting approved for the low limit credit card I applied for (and approved for) last week, and letting me know it just got mailed. I was also informed that I could start using it right away – if I just get the Apple Pay app and set it up through my online banking.

No, thankyou!

For the card I chose, there is no annual fee, however there is also a 21 day interest free grace period on new purchases. As long as I pay off any and all new purchases within 21 days, and never use cash back, I could theoretically never pay interest on this card. Since I plan to only use it for purchases within budget, and pay it off right away, that should actually work out.

On another unrelated note…

One of the things we got done today was set up an eye exam appointment for my younger daughter. I was going to wait until my husband and I got our tax returns, and we’d get glasses for all four of us (which we planned to do last year, but ended up with unexpected bills, instead). Unfortunately, my daughter’s glasses have gotten so scratched up, she can actually see better without them than with! I’d been told that in our current province, eye exams are covered by the provincial health care plan, once every two years. When I called and asked about it, however, it turns out that it’s only partially covered – and the remainder that we would pay is $105. !!! I hate to think how much it would cost if it wasn’t partially covered! That is massively more expensive since we last got our eye exams. At least I’m still covered 90% by my husband’s health insurance, and I confirmed that they direct bill.

We just have to get our taxes done. I picked up different software than the TurboTax we usually use and did try to get it started, but quickly gave up. I had to manually include the T4A to their list of different T4s (I had no idea there were so many), but while I could input how much he paid in taxes, there was no line for his disability income. The line number on his T4A simply doesn’t seem to exist in the software, which makes no sense at all. There was also nowhere I could input that I qualify for the caregiver’s tax benefit, nor anywhere for my husband to include that he gets the disability tax credit.

It takes a lot to be even worse than TurboTax.

Frustrating.

Ah, well. It’ll get done, and the sooner the better!

The Re-Farmer

Scrap wood cat shelf

I have been having major issues with Nosencrantz in particular, trying to get at the north window in my room. My craft table is under half of the window, and that end of the table has my tea station and phone base/answering machine, among other things. They keep trying to get to the top of a set of shelves I have to hold supplies. The selves are repurposed wire shoe racks, so they can’t handle having cats jumping on and climbing them.

In trying to keep the cats out of my craft stuff, I’ve basically rendered my craft table useless, filling it with stuff to discourage them from jumping on it. Most cats have learned to stay off, but Nosencrantz won’t. She keeps digging into things, clambering over the stuff I’ve put on the table to block her, and basically driving me rather bonkers.

The thing is, I have no problem with them having access to the window. There just isn’t any way for them to get to it, without knocking things about or even collapsing my shelves of craft supplies.

Today, after repeatedly having to chase Nosencrantz off my craft table, I just got tired of it, went into the basement and scrounged together supplies to make her a shelf at the window, that will also protect my stuff on the table.

This is the result!

At some point, I’ll probably sand it some more, maybe paint it, and make a more padded cushion for the top, but for now, it does the job! The other cats are oblivious to it, but Nosencrantz has tentatively gone onto the table, which I’ve cleared enough for her to get to it. She has yet to jump onto it herself. Instead, she’s tried to get into a container behind my phone! I’ve figure out what she was after and have tucked them into a tin, so hopefully, she’ll stop doing that and just use the shelf to sit and watch things outside the window!

The Re-Farmer

Home made lotion

Now that we’ve got so much lard available, we can do things with it that have nothing to do with cooking.

Yesterday, my daughter looked up some lotion recipes and picked a really, really basic one.

It was too messy an involved a job for her to take process pictures, so here’s the finished product!

She use one pint (500ml) of lard and beeswax.

We just happen to have some cosmetic grade beeswax, left over from when my husband was making his own mustache wax for a while. Expensive stuff, that’s for sure!

The instructions my daughter found were pretty vague, so she didn’t measure how much beeswax to use. She melted the lard on a makeshift double boiler, then added the wax until she felt there was enough. She things the might have used a bit too much. It doesn’t take a lot.

She also added a bit of Jasmine, from the Demeter Scent Library, that she had. Once it was all melted, she beat it with an electric blender until it was cool, the poured it into sanitized 250ml jars. Of course, with 500ml of lard, there was extra, but not enough to use another jar, so that’s just in a bowl to be used first.

The lotion seems to work well. It doesn’t absorb very well, but then, I find the commercial lotions don’t absorb well, either. The Jasmine scent is very light. I like it! I look forward to other such experiments.

The Re-Farmer

Rendering lard, first batch

I started working on the pork fat well before it was thawed out, as it’s much easier to cut it while it’s partially frozen. I have two large slow cookers, and I was planning to use both of them to render the fat out. It should be done over low heat for a long time, and I wasn’t about to monitor a pot on the stove all night.

Thinking back, my mother never rendered lard on low heat. She didn’t have the time for that. I remember it being quite hot by the time she scooped the crispy cracklings out. I’m pretty sure I’m remembering burned bits, too! 😄

Having a large slow cooker or two would have made the job much easier for her!

Part way through cutting the fat up, I changed my mind.

I wasn’t going to do two slow cooker’s worth!

To fill this bowl, I finished off all the smaller pieces I could find. All three of them. 😄 I started cutting into the larger pieces, but they were still too frozen. Plus, I didn’t want to push my hands too far. They’ve been relatively pain free of late, and I would rather they stayed that way!

The small bowl on the side is the janky bits, with blood vessels or meat and the sliver skin. That was saved as a treat for the outside cats, which they were very happy to get!

There was enough pork fat left in the giant bowl that the lid still didn’t quite fit all the way closed, and I had to use the foil to cover it completely again. It’s now sitting on top of the freezer in the old kitchen. It’s going to be a very slow thaw in there! Which is okay. While I was cutting, the outside of the fat would be getting too soft to cut easily, while the inside of the bigger pieces were still too hard. A slow thaw won’t have the two extremes, and it should be easier to continue cutting up tomorrow.

They kinda look like cheese curds in there! 😄🧀

For a moment, while filling the slow cooker, I thought I’d have to dig out the second one, after all! I squished it just flat enough to make sure nothing would touch the underside of the lid. As it renders, it’ll get lower.

The slow cooker is now set on low for 8 hours, and then it’ll automatically switch to warm. It might need more time, so I’ll be checking it off an on throughout the night. I did add a small amount of water to get it going, and make sure it the bits don’t start burning before the fat starts rendering out.

Once it’s getting close to done, we’ll sterilize some jars – probably in 500ml sizes (pints) – to store the lard in. If we do decide to go with a larger size, I’d go with the 750ml jars, rather than the 1L/quart jars. I don’t see us using it fast enough to warrant that large of a jar.

Based on how much is left that needs to be cut up, we might actually be doing two more batches! It’s a shame the meat grinder I found while cleaning out the old kitchen has parts missing. A grinder would make the job much easier, and more fat would render out of the smaller pieces, too.

No matter! The job is getting done, and we’ll have a good supply of shelf stable, high smoke point, flavour neutral fat for our pantry.

The Re-Farmer

I made a video

I put together images of the wattle woven raised bed and made a video out of it. This time, I borrowed my daughter’s microphone for the narration, and WOW was it better! I didn’t have to use background music to camouflage the background noises my headset microphone always made.

Something got glitchy when I saved it. I had to save it several times to get rid of some strange coloured stripes that showed up. They were only visible after I saved the file and checked it, never in the editing software. I uploaded the video, only to find the glitch had simply moved to the very beginning of the video. I had to re-save it and re-upload it, and I think this one worked.

Please let me know if you can view it all right!

The Re-Farmer