All the areas needing mesh were done, with the mesh first tacked on with staples. For the short sides, I started securing the mesh with wood lath across the bottoms. I then spent a bit of time working out how best to start framing for the clear panels that will be sliding doors, while further securing the mesh on the bottom half.
The clear panel, which still needs to be cut to the sizes I need, is a quarter inch thick. The wood lath is also a quarter inch thick, though individual pieces have variations in width, so that will work out perfectly for sliding channels.
For this side, I added long, vertical pieces of wood that would both secure the wire mesh on the bottom, while also starting to form a frame around the opening that the clear plastic will be covering. This is so that the panel will slide towards the back, over the section that’s insulated and covered.
If you click through to the next photo, though, you’ll see my problem on this side.
The floor boards were placed flush with the edge on the other side. A couple of boards were slightly longer. When covering the section on this side, I took advantage of that and rested the first piece of wood lath right on top of the parts that stuck out, then worked my way up.
There was no way a door panel could slide across with those there. Mostly, it was the one piece that stuck out the furthest, but a second piece had to be dealt with, too.
Thankfully, I have a pull saw with a very thin and flexible blade – a Bear Saw, which I think is a model, not a brand. You can see how flexible the blade is in the next photo of the slideshow. I was able to saw off the parts that stuck out, then use a rasp to take off any bits that were left.
In the last photo, you can see the rest of the framing in place. Some of this will be hidden from view when the sliding channels are complete.
For the sliding door’s channel, I will need to set pieces across the top and bottom, positioned so they will be flush with the panel. I’ll need to find the thickest and straightest pieces for this part!
I am pretty sure I’ll need to add more framing pieces, but I won’t be positive until I have the panels as a guide.
I’ll probably give a bit of extra space for the panel at the top, so it’s not too snug – but not too much space, or it’ll wobble when being opened and closed. Once those pieces are fixed in place – and I’m sure the panel can slide over the covered and insulated section unobstructed – two more vertical pieces will be added that will overlap the top and bottom of the panel, holding it in place.
If we need to remove the panel for some reason, it can be slid right out one end.
The mesh for this section was just a square, but I made sure not to secure it too high. There needs to be enough space for the clear panel that will cover the front of the top level to have the overlap it needs to be screwed in place.
The covered section is over the opening to the second level, so there are no floor boards at the bottom. The bottom piece of wood covering the insulation was lined up with the horizontal frame piece, which made the whole thing slightly lower than the cover on the other side. That gave me room to put a long piece of wood lath across the top as well as the bottom. The rest was done pretty much the same as the other side.
That was it for today. Tomorrow, we need to get the table saw set up so we can cut the clear panel pieces.
Once the clear panels are in place, the door/ramp on the bottom will be installed. Last of all, the roof will be assembled. I have some handles I can add to the sides to make it easier to move it around, too. They were meant for something else, but are needed here, more.
After that, it’s done until we can pick up more paint! With or without paint, though, we can bring it over to the house and set it where the cats can start checking it out and getting used to it.
We’ll need to pick up more heat lamps so that we can have one to set up inside the upper level of the isolation shelter during the winter. Even with insulated walls, the plastic room and clear panels have no insulation. They may be good for passive solar heat during the day, but not very good at night!
I just checked online and the lamps I had in my wishlist are on sale right now, so I’ve just ordered a pair of clamp lamps and a pair of ceramic heat bulbs. I think we still have a timer laying around, too. If it has a light sensor, we can set it up like the one in the cat shelter, so that it will automatically turn the heat on at dusk, then off during the day.
Hopefully, the cats will get to enjoy the shelter soon. Especially the ladies we’re building it for, and their post trap and spay recovery period!
Today started off as an open day. No appointments, no running around planned… It was a day to catch up on things around home.
Which is mostly what happened!
My day started off sluggishly. With thunderstorms on the forecast, I got up and fed the outside cats before any potential storms, then went back to bed.
Well. I tried to. I finally gave up.
There was one errand that did have to be done, though. We were running out of kibble for the outside cats. I was considering where to go to get enough to last a week that would be in budget, and was thinking a trip to the feed store in my mother’s town might be in order. It was either that, or Walmart, but it’s not worth the cost of gas to get just a bag or two of kibble.
While I was checking Facebook while having breakfast, I caught a share from livestock supply store I follow, even though I’ve never been to that store. They are just outside the town to the North of us, and I’ve simply never had cause to find them. From the photos shared, they just got new pet inventory.
Including 40 pound bags of cat food.
In two different brands we haven’t seen before.
I decided to give them a try, heading out in the early afternoon. After finding the place, I asked about the kibble and got prices, then checked the rest of the store out.
I will most definitely be going back there for other things in the future!
Of the two brands of cat food, I chose the less expensive one, though even the more premium brand was a slightly lower price that the 40 pound bags I was getting at the feed store in my mother’s town. While looking around I noticed they have live traps of various sizes. They had the size for cats that I was looking at in Canadian Tire – at a better price, too! The rescue was going to lend us a trap, but I think the last person they lent it to is still ghosting them.
On the way back, I stopped at the post office, expecting some packages for my husband. Nothing was there, though. I just looked up the orders and they changed from arriving by 8pm today, to “now expected by September 26”.
Ah… I see why now. They’re being sent by Purolator, not the mail. They’re apparently in the city, but delayed “due to external factors”, whatever that means!
After I got home, I made a point of giving the outside cats a light feeding with the new brand of cat food, to see how they like it.
They all but inhaled it!
I guess this will be a brand we’ll get more often! The only down side is that this town is in the opposite direction of anywhere we normally go. So we’ll still be getting kibble at the feed store in my mother’s town, but special trips to this place for kibble will also happen.
While considering my issues with the cat isolation shelter and the materials I wanted, in contrast to the materials I have, I remembered something.
I do have clear plastic.
We found two of what looked like some sort of sliding door to me, in the barn. We’d brought them to the house, cleaned off years of dust, then put them in the basement. When we were still letting the cats down there, we kept the “bar” area closed off for the breakable stuff, and used one of these as a door to the entry.
I decided to bring one of them over to the cat isolation shelter and see.
I don’t know if it’s Plexiglass or Lexan or what. What I do know is, it’s big enough to cover the top front of the isolation shelter – and there should be enough left over that I might be able to cover a section on each side, too. Perhaps not as a sliding door, as I had been considering, but at least as a window on each side.
I’m really loathe to cut take the frame off and cut it up, though. It’s really well constructed.
I decided to think on it while working on the catio hammock.
I brought out a black plastic mesh, measured and cut it to size, then used steel strapping to secure it in place.
The ties are attached to the metal supports on the A frame trellis. I tried to lift the squash up at least a bit, in the process, so get some of the stress off the broken cross piece. I used Mason’s line as ties, as it was thin enough to thread through the mesh. It’s strong, but that squash is going to get heavier. I may need to supplement them.
We’ve got some cool nights coming, so it was time to get the eggplant and hot pepper bed set up. I picked up clear table vinyl table protectors for the job. I got two for the garden and two for our dining table.
It’s a good thing I had four, because I needed them all.
The bed is 9′ long and 3′ wide, so I needed a minimum of 24′, plus overlap. I thought I could get away with three of them, but that only gave me about 20′
In the end, I decided to use some clear Gorilla tape I picked up, and connect the sheets in pairs.
The kittens were very interested in what I was doing!
The wind made laying them out so the ends to be taped together were on the sidewalk, and all nice and even, quite a challenge! I got it done, though.
While I was working on this, I started getting messages from my SIL.
She and my brother were going to make a trip out to drop stuff off today! They had a small trailer to haul out, and were going to load up as much other stuff as they could in the process. I was surprised that they would make the trip out after my brother got off work, given how quickly things are starting to get dark, but they still have a lot they need to bring out here. She kept me up to date on their progress, as she was able, while I continued with the preparing the vinul.
Once the pairs were taped together, it was time to wrap the box frame over the eggplants and peppers.
When we had it wrapped before, we made a point of covering the length first, and having the overlap at the ends. I recall the wind really seemed to catch on those ends. This time, I decided to centre the vinyl sheets at the ends, and have the overlap in the middle of the long sides.
The box frame has a wire topped frame on top, and I was able to use that to hold the top of the vinyl in place, wrapping the excess over the top of the box frame and into the middle. The wire topped frame, however, isn’t secured in the center, and it starting to twist and bow out. We’ll need to set a line across and pull it in, but not today.
After the vinyl was in position, I used paracord to secure it to the box frame around the top. That one I made very tight, since it needs to not move at all. I added more paracord around the bottom and the middle, to keep the wind from blowing it around. Those are snug, but we will still be able to move the vinyl to reach into the bed, then tuck it back under the paracord again when we’re done.
The only problem is that the box frame has a cross piece in the middle. With the excess vinyl sitting on top of it, I could see the wind was going to be a problem. In the end, I ended up just using more clear Gorilla tape to secure the vinyl to itself on the inside. Hopefully, that will work!
With my brother and SIL on the way, when that was done, I went to open the gate for them. I think took advantage of the situation, grabbed a pair of loppers and the wagon, and headed to the end of the driveway.
If you click through to the second photo in the above slideshow, you can see my first wagon load. That’s all poplar saplings, spreading through roots. They were starting to obstruct visibility as we leave, making it hard to see if any vehicles are on the road, coming towards us.
I did three wagon loads like that!
While I was working on that, my SIL kept me updated. Then ended up driving into a storm with the rain coming down so hard, they had to pull over. When the could finally start driving again, they stopped at a gas station in town along the way to check on things before continuing on.
They still hadn’t arrived when I finished my third wagon load of saplings. At that point, it was getting hard to see the stems I was trying to cut!
My brother may have driven through torrential rain, but we got nothing all day, save a few spatters now and then.
After tossing the saplings on the burn pile and putting things away, I realized I hadn’t taken a picture of the wrapped garden. If you click through to the last image in the slideshow, you can see how that looks. Should we expect to get an actual frost, we can toss a cover on the wire frame on top. For now, the vinyl will act as a sort of greenhouse, keeping them warmer as our daytime temperatures start to drop. The open top should keep it from getting too hot. This bed has the only plants we have that like things quite a bit warmer, even during the day.
The real test will be how it holds up in high winds.
With my brother soon to arrive, and a smattering of rain starting, I headed into the garage to see what I could do on the isolation shelter.
I cut lengths of wood lath to use to secure the mesh on the bottom level, against the frame. I was just putting the last nail into the front section when they arrived.
It was pitch black out by then, and I ended up using the flashlight on my phone to help them see to open up the back of the trailer and unload the piece of equipment that was on it. That went into the barn, while the trailer itself got parked to the side.
Then they back the truck up to the barn and we unloaded it, assembly line style. That sure made things go very quickly!
They even had a couple of things they knew I could use in there, and I was very grateful for them! Those went into the garage.
We worked quickly to unload, and then they had to leave right away. They had a long drive home, and my brother still has to get up for work tomorrow. His job has him working with people in time zones around the world, so sometimes the hours get very unusual!
Before they got home, though, I got another message from them. They forgot their wooden ramp on the ground, that they were supposed to take home with them. My brother was concerned it would get rained on, so I went back out to put it in the garage.
It’s 16C/61F out there right now, and absolutely gorgeous. I’d be sleeping outside right now, if we had the set up for it!
Meanwhile, in the middle of all this, I got a voicemail message from home care about my mother. For some reason, they called my cell phone number. I was in the garage at the time, so my phone never rang. I started listening to the message as I went into the house, and promptly lost the signal. I had to go back outside to listen to the full message!
My mother was getting her first home care visit at suppertime, to help her with her medications. They will be coming in the morning and at supper, then one more time for her before-bed medications. The person calling me wanted to make sure to tell us that they wouldn’t have someone available for a supper and before bed visit this Sunday.
So I made sure to call my mother right away. It turns out they had called her, too, but didn’t mention to her about the day they wouldn’t be able to come. As we talked about her meds and the times, she started to get mixed up with things, and confused. I’m so glad we were able to get her to allow home care to come in to help with her meds!
The next thing will be the meal prep visits. Those are supposed to be every two weeks for bulk cooking. We’ll have to have some idea of what they can and can’t do for that, and plan my mother’s grocery shopping accordingly. Usually, I’ve been helping her with her groceries every week or so – sometimes, my sister is able to do it for her. With the bulk cooking every two weeks, that will change things, but I don’t know how, yet.
We’ll figure it out.
Meanwhile, I am now scheduled to go to her place tomorrow. She’s need to go to the bank this time – the one thing I can’t do for her – so she’s going to have to climb in and out of our truck.
I’m still amazed that she can do it. When we got the truck, I thought for sure, it wasn’t going to happen. With her car out of commission right now, we don’t have much choice. We do have a foot stool for her, and I have to give her a bit of a boost, and she manages it!
Still, it’s something we want to do as little as possible!
With that in mind, it’s time for me to finish this up and get to bed. It’s coming up on midnight right now!
Until next time, I hope you have a fabulous day! Or night. Whatever time it happens to be for you as you read this. 😁😁
I’m glad I was able to get work done on the cat isolation shelter today! I’m hoping to get more done tomorrow, too, but we shall see.
Next week, I won’t be able to get much of anything done.
On Monday, I’ll be taking my mother to a hospital in the city. Thankfully, she found the letter they’d sent her about the appointment. We now know that this test was something her previous doctor had written her up for, before he moved to another clinic. I believe that makes it more than a year, waiting.
I will have to go to her place quite a bit earlier, so I can go over the letter and figure out where we need to go. She’s supposed to arrive half an hour early, for time to register. This hospital is where the heart clinic is, but that part of the hospital can’t be accessed from the inside of the building. My husband and I had to go through the emergency entrance. Where my mother’s test is going to be will be in the main part of the hospital, but it can be so confusing to find places, they sometimes have volunteers available to act as guides and take you straight to the right place. Other times, we follow colour coded lines painted on the walls.
On top of that, this place is right in the middle of the city, across the river from downtown. I’m going to have to drop my mother off at the main entrance, find somewhere to park, then come back for her. With my husband, I often found myself parking blocks away, as the parkades were all full, as well all the nearest streets. I’ll need to factor in the time that will take, too.
It’s going to be an all day thing.
Then, a couple of days later, I’m taking my mother to an eye clinic, then the day after that, we’re bringing a male cat – whichever one we can catch – to the vet clinic to get snipped.
All that driving around isn’t going to leave much time to get things done at home, including working on the cat shelters.
It had been my intention to see if I could reinforce the mesh that is popping loose on the catio with the steel strapping I have, but I couldn’t find it. So no progress on the catio.
I got quite a lot of progress on the isolation shelter, though!
Here is a slideshow of things at the end of the day.
In between other things, I opened up the roll of 3/4 inch welder wire and cut off a piece to cover the back of the bottom level. At this stage, the mesh is held in place with a few staples. I’ll be covering the edges with wood lath to secure them, later.
I started cutting pieces for the lower level door/ramp to size, and prepared to cover the back of the upper level. I’ve decided I will cover the back first with some rigid insulation. It will probably get scratched up by cats, but that won’t matter too much. The sheet I was using today already has cat damage on it. I cut a section of insulation to size, and will then cover the whole thing with 4′ pieces of wood lath to secure it.
Once I measured and cut and prepared what I needed, I started painting, which you can see in the second photo. The first thing was to cover the edges of floor pieces that weren’t pre-painted, as they were not supposed to be exposed before I had to make changes to the floor plan. The scratching post/ramp to the second level got its ends painted.
In the next photo, you can see the pieces of wood lathe that got painted. Only one side of those need to be painted.
The pieces for the door/ramp need to be painted on both sides. I didn’t have room on the saw horse for all the pieces, though, so I found things on my work table that could support the door/ramp pieces as they dried.
The other thing I did was build the insulated cat “nest”. This is the box that is made to fit under the shelf on the second level. Once it was assembled, and the insulation secured, I framed the entrances for both the insulated and uninsulated boxes with pieces of wood lath. This is not just to them look more finished and pretty. We will probably be adding some sort of cover over the openings that will keep the weather out, and give a potentially frightened cat someplace cave-like for them to hide in. My husband has some leather that he will cut to size to cover the front. Part will be kept solid to be attached to the top of the opening, while the rest will be cut into strips that a cat can push through to get in and out.
I hadn’t intended to paint the cat boxes, but since I was painting things anyhow, I painted them, too.
Tomorrow, I will flip the things that need to be painted on all sides, including the boxes, and finish painting them, then continue working on the back of the shelter. I should be able to start adding wire mesh to the sides and front of the shelter, but not until after I’ve secured the scratching post/ramp in place, and then added anything else I can think of. Once the wire mesh is in place, Nothing more can be build into the bottom half, so I need to make sure I’ve done everything I want, first.
I still haven’t decided how to make the access panels into the top half, nor how to finish enclosing it. I really hoped to be find some clear plastic panels for parts of it, at least. Not just so we can see inside, but so any cats inside can sit in the sun and look out if they want. Plus, depending on how we position the shelter, it can add passive solar heat.
That is something else I want to make sure we can do – heat the upper half of this! I’d like to be able to hang a heat lamp off the frame somewhere, or even the centre support for the roof, and run the cord out the top somewhere. If we are going to have mostly feral cats isolated in there for a couple of weeks in the winter, we most definitely want to have a heat source of some kind in there.
That’s one thing about the clear plastic roof we plan to put on there. It will be thin, so it will have almost no insulation of any kind – but it can also be a source of passive solar heat on sunny winter days.
This whole thing is a complete experiment, and a learning experience, that’s for sure!
I’m glad I set up shop in the shade of the garage to work on this, because even in there, it got so very hot!
I got progress done on the isolation shelter, but also discovered some things I neglected to take into account. I am definitely getting tires, though, as I made some pretty silly goofs today, too. Nothing that couldn’t be worked around, but still… Yikes!
I won’t be able to do much on it over the next few days, though. I will be heading out over the next three days, and while I might have time to do something before I have to leave, I don’t want to be getting covered in paint or sawdust or getting all sweaty before I need to go out in public!
Anyhow.
The first thing I needed to work on today was adding the verticals. They are not needed, structurally, but they will be needed to attach things to, whether it’s a door or access panel, or to support the welded wire, etc.
I’m not going to go into too much detail right now, but gosh, some of them were a pain to put in! I had painted the cut ends, and on a couple of them, I had to sand the paint off to get them to fit. In others. I actually had to use the miter saw to shave off some of the wood.
I did want them to be very snug, and most of them were. I used a piece of scrap wood and a hammer on some of them, to tap them into place without damaging them.
Then I had to cut out a chunk from the floor board that was to go against the back wall.
I don’t really have the tools to do that properly, but I managed.
That was my first goof.
I measured out the hole to fit around the vertical, forgetting that the board was not intended to fit flush with the back, but flush against the next board. So I ended up cutting a deeper opening than needed.
Ah, well. It’ll still work.
After setting the long floor boards across the back half of the shelter, I realized something else I didn’t take into account. I’d added an extra, narrower, board that straddled the center line, with the vertical 2×4 placed in the middle, the 1×4 boards fit exactly in between the new vertical and the outside frame.
The long, narrow board could no longer fit.
A 1×4 could fit, but there was nothing to support it at the vertical.
After debating it for a while, I ended up attaching one of the triangle blocks I’d made out of regular 2x4s (not the true to size 2x4s) and attached it to the horizontal bar, to support a floor board, and I just had to cut one of the pre-painted boards a bit shorter. That worked out fine.
But I was then left with a gap.
If I cut a new floor board to fit the space between the two “floor joists”, I’d have to just barely trim off a bit at one end, to fit around the corner post. That would leave a gap between the frame and the front horizontal piece. Or the wide board was cut to fit between the frame could still be added, with a corner cut out to fit around the front vertical piece, but that would leave a gap between it and the next floor board.
At that point, I decided to leave it and work on other things while I decided what to do next.
Which was to make a shelf.
I had a short length of true-to-size 2×4 that I could cut in half with opposing 45° angles to make shelf brackets.
I had piece of 1×8 board that I’d brought from the barn some time ago, with plans to make a shelf against the garage wall. It was pretty damaged and needed to be scrubbed down with water. I was able to cut a 4′ length, and the most damaged part will be the underside.
At that point, I decided to leave a large gap in the floor at the front, but to add a small shelf under it that a cat could use to access the second level like a step. So I cut a piece to fit, and will use a couple of 2×4 triangle blocks to support it.
Then, since I had to wait for the board I scrubbed to dry in the sun, I started working on the “nesting box”.
I measured the space under the shelf that will go across the back, as I wanted to make the box to fit under the shelf. It was 11 inches, so I decided to make the box 10.5 inches tall.
I took some of the 12.5″ long pallet wood pieces I cut yesterday, picking out the least damaged ones, and cut them to 10.5 inches. The longer pallet wood pieces are 13.5 inches, so that would be the length of the board.
After some consideration, I decided to make the box 3 of these boards deep. I had some scrap 1x2s and I cut a bunch to match the width of 3 boards to be used as cross pieces. I was going to make 3 short sides and two long top and bottoms, so I cut 8 cross pieces. The idea is that the cross pieces would be on the outside, and rigid insulation would be cut to fit in between them.
I started by using cross pieces to join the shorter boards using glue and nails. All those finishing nails I’d sorted out of the pile the cats spilled on the garage floor came in handy, but I had to watch not to grab any that were too long – after accidentally nailing it to the table with my very first nail!
After the two side pieces were done, I was going to do the same thing with the 13.5″ pieces, but realized I could just attach them across the top and bottom of the short pieces, using the same cross pieces.
Which worked perfectly fine…
Except…
Yeah, I goofed.
With the longer pieces attached this way, the whole thing is now higher than will fit under the shelf.
No matter. It can still be used. It just won’t fit under the shelf across the back.
I also decided it will be a “summer” nesting box, and not have insulation added. I’ll make another one – this time, one that will actually fit under the shelf – another day.
By then, the shelf board was dry, so I painted the new pieces, as well as the shelf supports that were already attached, then went around finding spots to touch up. After the painting was done and put away, I added a back to the “nesting” box.
I still wasn’t sure how to do the front. This is supposed to be a closed up, cozy space for a nervous cat do feel secure in – but also fully accessible. After showing the photos to my husband, he suggested leather. He has some really thick leather that he isn’t able to use for the projects he had in mind that I can use. A piece cut large enough to cover the front, then cut into strips or flaps that a cat can easily push through, would work just fine!
The inside of the boxes will also get something soft put inside. We’ll just have to make sure whatever we put into the insulated box is breathable, since the insulation will hold in moisture as well as warmth.
Once the shelves and boxes are built, I need to work on the door and access panels. I took measurements of what will be the main door/ramp in the front, but I have absolutely nothing suitable to make it with. There was one thing I thought I could salvage, but it’s full of nails that won’t come out, and it’s not worth it to cut them, either. Of all the things I have that are large enough, they are too thick and heavy. I might have to get creative with the lath that I picked up, but that is really thin. For a door that will double as a ramp, it would break too easily, I think.
I’ll figure something out. I’ll have a few days to think about it. Since I’m going to meet with the Cat Lady in the nearer city tomorrow, I might do some window shopping and look for inspiration.
So that is my progress on the isolation shelter for today. I still have to track down some half inch welded wire for the open sides, and figure out what to use for access panels on the second level. What I’d really like to do for the upper level is enclose it more. The question is, how to do that, and still be able to see inside. None of the salvaged windows I’ve looked at will work. Ideally, I’d just use some Lexan or Optix (both handle UV light better than Plexiglass), but even Optix is pricey.
Ah, well. We’ll figure something out.
As long as it gets done before we start trapping cats for spays and neuters!
As soon as I was done tending to sick kitties, doing my morning rounds and grabbing a quick breakfast (a piece of pie my daughter made using that winter squash we had to harvest early – breakfast of champions!), it was back to work on the isolation shelter.
The horizontal piece that will be supporting the second level floor needed to have its other side painted, plus I needed to cut the horizontal pieces and paint them, too.
Well, I didn’t quite get to start on that right away. I had to clean up a cat mess, first!
Among the things I brought to the garage, just in case I might need them, was a container full of odds and ends that the cats had knocked onto the floor over the winter. When the girls tried to clean it up in the spring, they didn’t have the chance to try and sort through everything. When I brought it to the garage, I dug out the cardboard base that had been under the wood chipper when we unboxed it – a large, flat surface with sides on it that I could use as a tray. I dumped it all into there and took a look, then set the whole thing on top of the stack of scavenged lumber I’d brought over.
Of course, I had to move it while digging for pieces I could use, and set it on top of the lath bundles above.
Then forgot it there.
Some time during the night, some critter – likely a cat – knocked it upside down.
Since I was picking them up anyhow, I brought over a bunch of repurposed sour candy containers (my husband had bought a case of them) I had intended to use for seed and sorted them as best I could. Some odd things ended up back in the cardboard “tray”, some of the screws were the same as what I was using on the isolation shelter build but, mostly, it was finishing nails of various sizes – some ridiculously tiny. I ended up filling three containers of those!
Getting them out of the dirt floor was the worst. Eventually, though, I was able to grab handfuls and just lay them on my work table. Once everything was clear of the lumber, it was much easier on the back to go through the last of them on the table!
I think it took me at least an hour, just to clean up all those nails. When I’m done building the shelter and cleaning up so we can park the truck in the garage again, I’m going to have to make sure to rake the dirt floor towards the walls, and triple check to make sure nothing got missed. The last thing we need is for a nail or screw in one of our tires!
That done, I could finally access the lumber I needed! Specifically, the two pieces of standard size 2x4s.
Unfortunately, both pieces were so dirty, I had to bring the hose over and actually scrub them clean. One of them looked like it was covered with ashes.
I first measured around the bottom half of the shelter, where the verticals will go. Those were all about 18″. I say “about”, because one side is, for some reason, slightly different, and I had to cut one piece about an eighth of an inch longer. Then the top half got measured. It was the same thing; I needed 22″ pieces, except for one, that needed to be just a tiny bit longer.
I was able to cut all the 18″ lengths, but after cutting three 22″ length, I ran out of 2×4 The remaining piece left over was way too short. I did have one piece of true-to-size 2×4 left that I could have cut a 22″ piece out of, but I didn’t want there to be a single piece with different dimensions.
So I went hunting in the barn.
I didn’t find any scrap 2×4’s, but I did find a pair of large baking trays, like the one we found in the basement and are now using under the water bowl shelter for kibble. I figured we might find a use for them, so I brought them out. Then I checked the shed near the barn. Happily, I found a single piece of 2×4 long enough that I could cut a final 22″ length. It needed to be scrubbed clean, too.
Once all the pieces were cut, I set them outside to dry in the sun.
Since painting them was out of the question until they were fully dry, I decided to drag out the leftover boards from when we build the raised bed frame covers, and start cutting floor pieces. For some reason, I had it in my mind that they were 1×6’s, but they were 1×4’s. They’ve been stored against a wall in the side of the garage my mother’s car is parked in. Normally, that would have been fine, but we’ve had such wet weather, the dirt floor got damp, even that far into the garage, so they needed to be brushed clean, too.
At least they weren’t as bad as the 2x4s I had to scrub with water!
I thought I would have to rotate my work table to fit the 12′ lengths, but it turned out I didn’t have to. I was able to move the miter saw to the far end of the table, which gave me just enough space to fit a board. Most of the floor pieces for the back of the shelter needed to be 4′ long. Once the first cut was made, space was no longer an issue.
With the first board I used, though, there was too much damage in one area, so one of the 4′ lengths couldn’t be used. I might still be able to use part of it, though, for something else.
One board needed to be cut shorter, as it will go between the frame pieces. With these being standard 1x4s, while the frame is true-to-size 2x4s, that one board has a bit of wiggle room. I set the others where they will go in the shelter, and found they were about 2″ short of the centre line.
I then had a decision to make. I could leave it as is, and have a slightly larger opening for a cat to access the second level, or I could cut another piece and have a smaller opening.
Then I remembered, I has some old 1×3 boards we found in a shed some years ago. Was one of those long enough to cut 4′ off of it?
Why yes. Yes it was!
So now the floor will extend just an inch past the centre mark.
Once those were all cut, I painted them, along with the second half of the 2×4 that will run across the centre, to support the floor boards. The floor boards only need to have their tops and ends painted, except for the two boards that will be at the ends, which needed to have one of their edges painted, too.
At that point, since the verticals were still drying, I was pretty much done for the day – but I was then left with a conundrum.
I was expecting to use triangle blocks to attach the vertical pieces, but I would need 32 of those. I had a few from earlier cuts I’d set aside, and cut as many as I could out of some of the other scrap ends I had left. I ended up with 16 triangle blocks in the true-to-size 2×4 scraps, and only 4 in the regular 2×4 scraps. The vertical pieces are all regular 2×4, so if I used those 16 pieces, they’d all be wider than the pieces I was using them to join.
Plus, I’d have to cut gaps in floor board pieces to fit around the verticals. If I were to use the triangle blocks, I’d have to cut much larger gaps, and I am not about to try and go all journeyman on things, to cut them to fit over the angles on the blocks.
There was an alternative, though.
Inside I went, did some searching, then made a call to the local hardware store, for a pocket hole jig.
Then had one small kit in stock! Plus, it was only about $20, so quite affordable.
I asked them to set it aside for me, then headed into town.
Once I had the kit, I just had to use it right away!
I did a few test drills on some scrap wood, then drilled pocket holes on all the vertical pieces. They’ll be joined from the narrow sides.
Tomorrow, they’ll be painted, including inside the pocket holes.
That done, I checked on the boards painted earlier. They were pretty much dry!
So I set the horizontal piece that will support the floor in place at the centre marks. Unfortunately, it turned out to have just the slightest twist to the board, but not enough for it to be a problem. It’s still a nice, tight fit, so I didn’t need to add wood glue, or even anything to hold it until I could screw it in place.
I then laid the floor boards on top. They won’t be permanently attached for a while yet, but I’ll be able to measure things and see how many boards will be needed to cover one side of the remaining space.
While working on all this, I decided to make some major changes to the inside of the shelter.
My original plan was to have an insulated shelter box, with an access door, on one side of the back half, while the other side, with an access door, would have a litter box. The front would be open screen, except for the front door, which would swing down to form a ramp when open.
Then I decided to make a separate insulated box that can be taken in and out of the shelter for cleaning. That way, it could be smaller and more cozy.
The top half was going to be open, with spaces for cat beds, food and water bowls and whatever. It would also have an access door to reach the food and water bowls.
Altogether, that would have made for three access doors on the bottom level, and one for the top level.
As I was setting the floor boards and seeing how things fit, it occurred to me.
There’s really no specific reason to have the shelter box on the bottom, other than I happened to draw it that way.
Building all this on the bottom level would be rather more difficult than on the top level.
Instead, the bottom level can be screened in on all sides, except for the door/ramp. The litter box can still be kept in the bottom level. Any spilled litter can just be swept through the gaps in the pallet base. If I want, I can still add a shelf or two between some of the vertical supports for a cat to lie on, but nothing that would need more than reaching with a brush to sweep off through the doorway.
The top level can have the solid back wall, plus an access panels on each side. One to take the shelter box in and out. We can even make two of them. One, an insulated winter one, and the other a more airy summer one. A second access panel would be to reach the food and water bowls. I’m still trying to work out how to make these as sliding doors, rather than swinging doors. I still don’t know what I have available to make the doors out of.
I wonder if we have some small pieces of half inch plywood hiding in one of the sheds somewhere? I’ve gone through them so often, looking for specific things, I would not necessarily have noticed other things.
All that, and I’m still not 100% decided on how to do the roof of this. Ideally, it would be hinged for access, too.
That can wait, though. Gotta do the interior stuff, first!
In the end, I had to force myself to stop and leave painting the verticals for tomorrow. I’d been out there for most of the day and was getting really tired and hungry, but I wanted to keep on going! I want to get this thing ready as quickly as possible.
Oh, that reminds me. While at the hardware store, I looked at their supply of hardware cloth (welded wire mesh). They only had quarter inch size. I am looking for half inch. That will be the one thing we have no choice but to buy, as there is nothing suitable that we can scavenge here. I think I do have a small amount left in the sun room, but not enough for the entire shelter, that’s for sure. We probably won’t have a budget for until the end of the month. Still, that’s one of the last things that will need to be done, so that’s okay.
I’m rather pleased with today’s progress – and with my new “toy”!
I’m not going to go into too much about the assembly now; I’ve decided I’ll be making a voice-over video of the process when it’s done, so I can go into more detail. For now, here’s the short form.
The first thing I did was mark the centers of all the cut lengths on all sides. I even remembered to bring my carpenter’s triangle this time – and I got a lot of use out of it, today!
The front and back panels, which will be 4′ square, got assembled first. These used the true-to-size 2x4s for the outside, with a single regular 2×4 across the middle.
Of course, that didn’t turn out as easy as expected.
The regular size 2x4s turned out to be a fraction of an inch too long. With the first frame, I ended up recutting it too short, but was able to use the piece I’d cut off, sanded down until it fit, to fill the gap. With the second piece, I used the miter saw’s blade to basically shave off a bit at a time until it fit, so I didn’t have to fill a gap again!
Once the front and back panels were done, I used the side pieces and the centre marks to work out where to attach the triangle blocks. Once those were attached to the front and back panels, the panels were attached to the pallet, with the cross pieces to make sure they were spaced properly.
Once the first panel was attached flush with one edge of the pallet, that officially became the front of the shelter. The bottom cross pieces were set in place along the short sides of the pallet – making sure all the corners were at 90° – before the back piece could be attached, then the side pieces were attached to the pallet as well.
The top cross pieces were then added, which also set the front and back panels correctly, and finally the middle cross pieces were added.
Once it was all together, I rolled the whole thing out of the garage and through the grass. The wheels handled the grass just fine, and it was quite easy to move around! One of the last things I’ll do is add some handles to use to move it around but, for now, I can just grab the frame.
None of the joins are prefect, of course. In fact, some of them are downright messy. But, the corners are square and the whole thing is extremely solid and stable, and that’s what’s important!
Once that was done, I was able to use the funky calipers my daughters got me for Christmas a few years ago to measure the distance inside the frame, at the centre mark. A 2×4 was cut, checked and double checked for it, then got half painted. Since I had the paint out anyhow, I covered a few spots on the frame that needed touching up.
This cross piece will support the floor. The floor in the back half will be from one side to the other, while the front half will be from one side to the middle, leaving an open space for any isolated cat to access the upper level.
That was as much as I could get done today. Tomorrow, the other half of the cross piece will be painted. Until that’s dry, I won’t be able to measure and cut pieces for the floor, but the bottom half of the back panel will be walled in, so I should be able to start measuring, cutting and painting boards for that, as well.
The boards I have that are left over from another project are 12′ long, though. I’m going to have to rotate the table I have the miter saw on, to have the space to work with them!
As I’m doing all this, I’m always turning things around in my mind about what should be, or can be, done on the inside before the whole thing gets the welded wire mesh added, since none of it can be done once the mesh is in place. I find myself thinking of adding something across the front or side to hold food and water bowls, slightly elevated and secured somehow, so they don’t end up knocked about. If I do that, I might change things up so that the front door, which will be made to swing down and become a ramp when left open, is in front of where the litter box will be, instead of in front of where the sleep cubby will be.
I’ll think more on that, as the floor boards are added, as well as the vertical pieces that will need to be added to support the access doors and panels. I also want to include things like a scratching post and other spaces for cats to lie on.
I wonder if we have any scrap carpet somewhere that can be used for this? I know we have a roll of carpet in the barn, but it’s been sitting there for probably at least 10 years, of not longer, and I doubt it would be useable. There might be something in the storage shack, but it would be hard to find anything under all of my parents’ belongings.
Still, it might be worth a look!
If we have cats that have to be in this thing for possibly weeks at a time, I want it to at least be fun and interesting for them!
I’ll be honest, here. We’re really just winging it on this build, even though it’s going to be quite a bit more complex than the kibble house and water bowl shelters. It all comes done so what materials we can scavenge.
The original plan was for a 4′ x 4′ cube, divided up inside to have an enclosed shelter that will be insulated, a not quite enclosed shelter for a litter pan, and two levels with space for food and water bowls, and just hanging out.
We had a couple of pallets that were left by the roofers. My original intention was to dismantle them and use the wood mostly for the floor.
That did NOT work out!
The pallets are nailed together mechanically. The nail heads are deeply embedded in the wood – and the wood is quite thin. When I tried to pry them off, the wood started splitting.
Time for plan B!
The pallet will be the floor, more or less as is.
I measured the pallet’s length and width at the boards inside, and each side was slightly different. I brought over the circular saw and cut the ends flush to the outside boards. The most damaged side will be the bottom of the floor.
I could still work with 4′ lengths on two walls, and the other two will be 40″, to fit on the pallet. The shelter will still be 4′ tall.
For the main parts of the frame, I’m using the true-to-size salvaged 2 x 4 lumber in the barn. There’s hardly any of that left, but there’s enough for this project. It feels like a shame to “waste” it on something like this. The wood is old and the ends have started to rot a bit, but it’s really solid and heavy wood. It is, however, what we have, so that’s what we’ll use. Other parts of the build will have more modern, standard 2×4’s, which are not true to size, and are quite a bit lighter. We have even less of that, so we’ll have to plan accordingly.
For now, I’ve cut lengths to make the front and back panels, which will be 4′ square. The frame will be attached directly to the pallet once put together, but that won’t happen quite yet. The dirt floor of the garage is pretty level, but not flat, mostly due to shallow tire ruts. Right now, the pallet can’t lie flat on the ground. I’m heading into the nearer city tomorrow, and will be looking at what wheels are available, and affordable.
Once the pallet has its wheels, it will be able to straddle the uneven parts of the floor, and be sturdier to work on.
Once the “box” is framed out, the interior will be worked on, including things like extra surfaces for cats to lie on, something they can scratch at, and so on. Once that’s all figured out, access panels or hinged doors will be made so that the litter box, food bowls and enclosed shelter can be reached from the outside. For the enclosed shelter, what I will probably do is make an insulated box that can be removed completely, if necessary.
I haven’t fully decided on how to do the roof. It will most likely be a low slope metal roof. I just haven’t decided how I want to make the slope while not having any gaps.
Last of all, the welded wire hardware cloth will be added to those walls that are not enclosed with wood. We might not be able to pick that up until the end of the month, though. Unless we find something on hand that we can use.
Anyhow. That’s progress so far. Reworking the plans and making the first cuts for the frame.
I counted 37 this morning! As I was returning to the sun room after doing my rounds, Syndol kept reaching out and grabbing at me, until I finally picked him up for a cuddle. He so loves to be cuddled!
If this morning is a sign of how our year is going to be, it’s going to be a messy, destructive one!
I woke to discover a cat threw up on my bed. It’s a good thing it’s such a big bed, or I would have rolled over, right on it. So I’m doing laundry right now!
My husband woke to find his mouse on the floor and his cowboy hat knocked over. His wired ear buds the hat was protecting were completely chewed up.
He’s keeping his door closed now.
Which reminds me: the door the girls were measuring for is not for between the rooms uo there, as i thought. It’s for over the stairs.
When my parents were still living here, a frame of 2×4’s was made around the bottom of the bannister to hold a plywood cover that was flush to the floor upstairs. This was so that they weren’t heating the upstairs in winter, when they weren’t using it. We’re not sure what happened to that plywood cover. So the girls want to cut a new cover to size so that they can keep the cats out while they sleep, and have it hinged and rigged to easily open and close as they need to use the stairs.
Oh, we don’t have a land line anymore. For about a week or two, people have been having trouble reaching us by phone, getting crackling noises, or it would go straight to machine. Then, a couple days ago, a light started blinking on the phone base I’d never seen before. It’s the “hold” light. The display says “home line busy”. Apparently, the phone thinks we’ve got it put on hold, but it won’t turn off. When I try listening, there’s just a crackling noise.
Something similar has happened before. The repair man replaced a jack in my husband’s room to fix it. My husband used to have a corded phone set up there, but he unhooked it and has no phone hooked up at all, now.
We suspect it’s the same jack that is the problem, and that it got sprayed by a cat, though to be honest, I can’t really see signs of that. The problem is, my husband has his room set up in such a way that it’s not really accessible. We are going to need to rearrange things. That room is so small, it means actually taking things out of the room. Except his hospital bed. Because it’s extra long, it can only be taken out by dismantling it. It can’t be moved around in the room without taking pretty much everything else out, first.
So we have to clear all that up, just so we can see what we are dealing with, and for a repair man to access the jack to test it. We also need to arrange it so we have access to the section of wall against there the bath tub is. We still need to replace the tap and faucet, but are not sure it can be accessed from the front, once the tub surround is removed. If it can’t be accessed from there, we’d have to access it from the bedroom, and right now, it’s blocked by a wardrobe. There is a closet in this room, but it’s currently being used to store some of my late father’s belongings. Between my husband’s hospital bed and the little table that’s holding his medications fridge, the closet it completely blocked off.
It will be a huge job, but one that’s overdue. We haven’t been able to clean that room properly in ages.
To be honest, I need to do the same thing in my room. How I have it set up, with my “office” in one corner, and my craft table completely covered with stuff to try and keep the cats from getting into things they shouldn’t, it’s a disaster. I would love to be able to get the wall shelf out and replace it with more functional selling, but aside from not having replacement shelving, I’m not sure how to take it out. I’ve asked my mother about it, but all she could tell me was that she thought it was brought in, in two parts. Which I figured it had to have been. I just can’t figure out where it came apart! What I’d really like to do is set my bed up on the other side of the room, but there’s a heat vent there.
Today is the third Sunday of Advent; the day of Joy.
For me, at this point in my life, Joy is having a quiet, boring life!
We don’t have any running around and errands to do, so it’s another day of domesticity. I am considering whether or not to run an errand today or tomorrow, as it looks like we don’t have quite enough kibble to wait until I do the city shopping on the 20th; my husband’s CPP Disability comes in early in December, so we’ll be doing the bulk of our stock up shopping for January before Christmas.
We are at -4C/25F right now and might warm up another degree. We’re getting light snow every now and then; just enough that it looks like fog in the distance when I check the live feed on the garage cam.
I’m happy for the milder temperatures, for the outside cats.
The older and larger ones are fine. It’s the youngest ones that would probably not have survived this long, if we had more typically average temperatures for this time of year.
I counted 35 this morning, I think. It could have been 34. As I was finishing my rounds, I spotted Sad Face by the old dog houses near the outhouse. This is the closest thing to evidence I’ve seen that those old dog houses are actually being used for shelter.
With the inside cats, we’re having a “fun” time. Though we had spent well over $600 on medication for ear mites to treat all 16 cats we had in the house at the time (not counting the kittens, yet), it seems it didn’t take. We had two types of medication. One type was drops squirted into the ear, but they didn’t have enough doses for that many cats on hand, so the last few doses were the (more expensive) type that is applied to the skin between the shoulder blades.
We’re pretty sure those were the ones that didn’t take.
So now they all have ear mites again, including the kittens. Plus a couple of the cats just have a really hard time cleaning their own ears. Poor Ginger. He’s got it the worst. Particularly in the ear he can’t clean at all, on the side he’s missing a leg. Somehow, Toni is managing it with just one front leg – for now. Then there’s our old grandma that moved out with us. She’s getting on in years, and we can see she’s starting to show her age. So she’s not doing as well with cleaning her own ears, either.
We certainly can’t afford to buy medications for all of them again. The clinic wouldn’t even be able to sell them to us without seeing at least one cat first, because it’s been more than 3 months since we’ve brought a cat in to that clinic. The kittens that got fixed recently would have been treated for ear mites while they were getting spayed/neutered if the vet saw any, but those would come back rather quickly if all the other cats have them.
I’ve been told that an alternative is to treat their ears with mineral oil, every day for 10 days, and that should kill off the ear mites.
Which means doing all the cats, every day, for 10 days.
I just had to make a list to count and, unless I forgot someone, we’ve got 21 cats in the house right now, including 8 kittens. This, after losing three kittens, Marlee escaping and disappearing, and adopting Nosencrantz out after her escape and unwillingness to come back indoors.
We’ve decided to give it a try. If nothing else, it’ll help clean their ears.
So my younger daughter and I have taken on the task. She holds the cats down while I use mineral oil and some paper towel to clean out their ears. It’s only been a few days, so far, and I can already tell the difference. Some cats actually looked really clean and clear from the start. Others… it’s rather horrible!
Some of the cats are good about it. We have a couple that fight us off quite a bit. Then there are the ones that complain loudly, because their ears are so bad, it’s uncomfortable. Ginger has started to connect the unpleasantness of being manhandled with some relief, afterwards, so he’s already becoming more co-operative.
All of the cats look hilariously bedraggled, with their oily ears and heads.
The mineral oil we have is pharmacy grade (we’re going to need to pick up more, before we’re done!), so it’s safe for them to groom it off. It’s sold as a laxative, though, so… we may have some explosive results after a while!
Between the cost of food, the lysine, vet treatment, etc., is getting ridiculous. Yes, we do have a rescue that’s helping us, but it’s basically just one person running the show. There is the huge rescue in our province that the Cat Lady left that will work with rural communities like ours, but there’s a reason she left them. It seems the bigger the organization gets, the less they become about the animals, and more about the money and the politics. 😥 That and it turns out, when the Cat Lady was still with them (and paying out of pocket for things they were supposed to cover), they had issues with us, and claimed we were just “breeding cats” – as in, on purpose, instead of doing the best we could to prevent just that. Heck, population control is one of the biggest reason we’ve got so many cats indoors! And why we sought help to adopt cats out, get them fixed, etc. Nothing like connecting with a rescue, only for them to get upset with us for having cats that need to be rescued… When they tried to adopt out a pair of kittens from us to someone in BC that turned out to be a hoarder, she left them, started her own rescue, and found local homes for them, instead.
With the Cat Lady in the middle of moving right now, plus it being a time of year with so many holidays, we can’t expect to accomplish much right now.
So what options do we have? I’m not prepared to call the municipality had have them send someone out with a gun.
One option has come to mind.
We could become a rescue, ourselves.
I’m not entirely sure how it works, but if we could start a non-profit rescue, we would have access to resources we don’t have, on our own, including funding and tax benefits, and maybe being able to support fosters, etc. that would help us find forever homes for the cats. Not all of them, of course, since we do need yard cats out here in the boonies, but they need to all be fixed!
Oh, my husband just came by and reminded me of another cat I forgot to count.
We have 22 cats inside.
Once things have settled down for the Cat Lady, I will talk to her about it and see if that is a reasonable option. Perhaps we could even become a branch of her own rescue or something like that.
Well, time to get my butt off the computer. It’s almost time to oil up some ears!
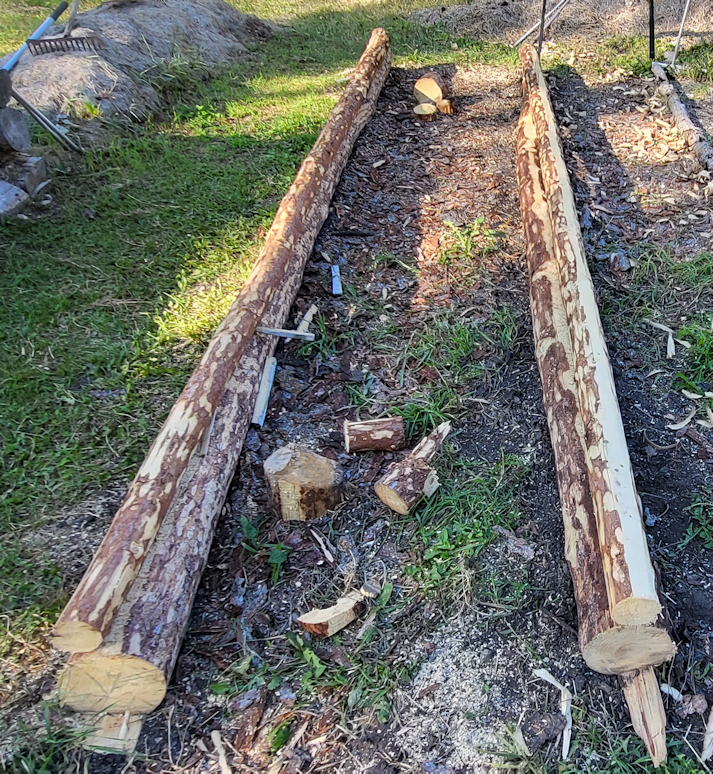
I’ve been analyzing that side wall of the trellis bed with the bowed log on the bottom, and decided we needed to make a change.
The plan had been to cut joins into the horizontal logs and the vertical posts, then secure them in place. There will be four of posts, about 6′ apart but, the more I looked at it, the more I realized that in order for the posts to be in line with each other, I’d have to cut away far too much wood. It would weaken them too much.
There was one solution, though, that could be done before the end pieces were attached. The pairs of logs are attached to each other, but not to the ground.
So I snagged my daughter and some rope, and we reversed the wall.
I neglected to take photos at the start. To carry the logs, we wrapped some rope around the ends and used them as handles to lift and carry the logs around to face the other way. It was awkward, but it worked.
The rebar that joins the logs goes all the way through. At the end in the foreground, barely an inch goes through. At the far end, there’s almost 3 inches of rebar that could be jammed into the ground as we lined up and set the logs in place again. Since I cut the ends of the walls in line with each other, we had to make sure they still matched, so that the walls at the ends will be straight once they’re added.
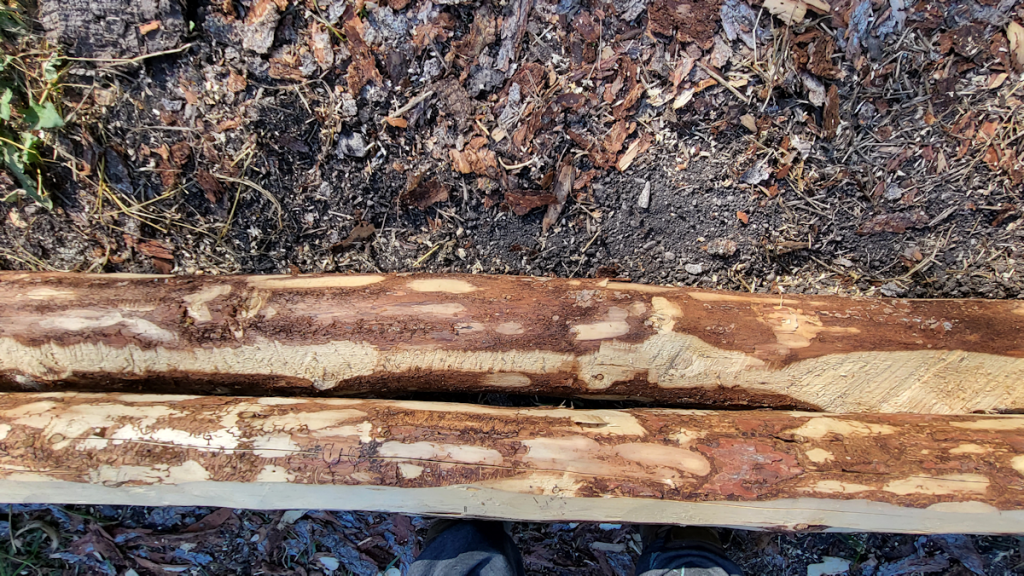
This shows better, why I decided to switch it around. You can see where I used the chainsaw to flatten the top of the base log, for the other log to rest on! 😄 That worked out on the ends, at least! This is where the bow sticks out the furthest, pretty much in the middle. The vertical posts would have been on either side of this section. The top log is pretty straight, so I’ll probably just flatten the logs where they will come in contact, rather than actually cut joins.
But that will be done after the end pieces are added. Technically, once those are in place, we could still move the entire bed if we had to, but that would not be a very good idea!