Eggs, three ways!

Today, we did the final preparations for our Easter basket.  Which required an extra trip into town to get more eggs!

We eat a lot of eggs.

I see chickens in our future.

We tend to do eggs at least 2 ways.  This year, with the pickled pink eggs, we have 3 varieties.

First up, here is how the pickled pink eggs turned out.

Pickled pink eggs

Pickled Pink eggs, after 3 days in the pickling liquid.

Of the 12 eggs we pickled, I went over them and picked the 8 best, leaving 4 for us to taste test.

They are quite delicious.  The pickling gives the eggs a very solid, dense feel, and the tang after 3 days in the pickling liquid is just right.

We then got two pots of 18 eggs each going.  One included the onion skins I’d been setting aside for the past few months, along with a splash of vinegar and a dash of turmeric, for extra colour, in the water.  Onion skin dyed eggs for the Easter basket are called kraszanki (kra-SHAN-kee) in Polish.  The turmeric is my own addition.  The eggs are hard boiled until they reach the desired colour; these were boiled for probably 45 minutes.

Onion skin dyed eggs

Always cook extra, in case of breakage!

Of the 18 eggs, 6 broke, leaving an even dozen for the basket.  It’s unlikely we’ll be able to fit all of them in.

The other batch of eggs were boiled for 10 minutes.  The hot water was replaced with cold until they reached a temperature where they could be handled.  Using the back of a spoon, the shells were cracked all over.  After that, they were returned to the stove to boil again, this time with 3 Tbsp black tea leaves, 1 tsp sugar, a tsp of five spice mix (or, as we did today, the equivalent spices I had on hand) and 1/2 cup soy sauce.  They were then cooked for another 45 minutes or so – again, it’s until the desired colour is reached.  The original recipe I’d found for these said to cook them for 3 hours!  We’ve never cooked them that long.

Here is what they looked like, after being drained and rinsed.

Tea dyed eggs

Once they were cooled down, it was time to peel them.

Out of the 18, 7 got damaged while being peeled.

And that is why we cook so many extra eggs! :-D

Peeled, tea dyed eggs

In all the years we have done these eggs, including years when we’d cooked them for much longer, the coloured parts have never looked this intense!

I wonder if our well water has something to do with it?

Meanwhile, I dug out some of my collection of little bowls (I adore little bowls, so I’ve got quite a few) and other pretty dishes to hold the other basket ingredients.  Some of the vinegar and olive oil were transferred to small pitchers with liquid tight stoppers.  For the butter, we whipped some with parsley and fresh garlic.  The salt we’re using this year is Himalayan sea salt.  We are including a mustard this year, too.

Each item in the basket has symbolic meaning.

The bread symbolizes Jesus, who is the “bread of life.” Eggs symbolize the resurrection and new life.  Kielbasa (sausage) represents God’s favour and generosity.  Ham is a symbol of joy and abundance.  Bacon (which we don’t usually include, though sometimes we include prosciutto, instead) represents God’s mercy, as well as generosity.  Butter is a reminder of the good will we should have to all.  The butter is traditionally shaped into a lamb, but we usually have plain or herbed butter decorated with a cross made of cloves.  Some years, we’ve had a lamb made out of marzipan.  The lamb, of course, symbolizes Jesus.

Horseradish, with its strong, bitter flavour, reminds us of the Passion of Christ.  When made into a spread sweetened with beet juice, it represents both the pain of Christ’s crucifixion and the sweet joy of resurrection.  Salt is a reminder for us to be the “salt of the earth” and symbolizes prosperity and justice.  Cheese symbolizes moderation.

We’ve included olives and olive oil in our baskets, symbolizing peace, wisdom and hope.  Vinegar is there to remind us of the crucifixion, when Jesus was given vinegar (also translated as sour wine) on a sponge to drink.  We sometimes include mustard – preferably a type in which the seeds are still visible – to represent faith.

A candle can also be included, to symbolize Christ as the Light of the World.  The baskets can be decorated with spring flowers, greenery and ribbons to represent new life and the resurrection.  A bottle of red wine is also appropriate to include, to symbolize the blood of Christ.  Then the whole thing is covered with a fine embroidered or lace cloth.

The blessing of the baskets, called Święconka (shvye-CHONE-ka is a rough approximation of how it’s pronounced) in Polish, happens on Holy Saturday.  The blessing of the baskets is one of my fondest childhood memories.  Some years, I would have my own tiny little basket to carry (okay; tiny is a relative statement in our family…) for the blessing.  They would all be laid out at the front of the church, on the steps leading up to the altar.  I loved looking at all the different ways people did their baskets, and the different things they would include.  There is plenty of room for variety in this tradition!  I saw all kinds of breads, fruit, and eggs decorated in all sorts of ways.  With so many baskets, the church was soon smelling so good!  There was such a sense of anticipation – so very appropriate, as we anticipated celebrating the resurrection of Christ.

Whatever traditions you have for Easter, I hope that it brings you much joy and peace.

The Re-Farmer

Basic Sourdough Rye Bread

The following is the Rogers Basic Rye Bread recipe, modified into a sourdough version.

We have never used lemon juice in bread baking before, but the packaging for our rye flour recommends it as a conditioner for no-additive flour.  In fact, the packaging is very enthusiastic about the use of lemon juice in bread baking! :-D

We did not use the optional caraway seeds.

This time around, I decided to use our pizza stone.  It’s been ages since I used it, and I wanted to see how it worked for bread baking.  The stone cannot be oiled, so the surface is dusted with only corn meal to prevent sticking.

Basic Sourdough Rye Breadsourdough.rye.prep

1/2 cup warm water
1 tsp molasses
1 Tbsp Yeast

  1. Dissolve yeast and honey in warm water and let stand for 10 minutes.

2 Tbsp molasses
1/4 cup vegetable oil
1 Tbsp salt
1 cup water
1 cup rye sourdough starter
1 Tbsp lemon juice
3 cups rye flour
2 1/2 – 3 1/2 cups all purpose flour

Optional: 1 Tbsp caraway seeds
Optional: egg wash (1 egg beaten in about 1 Tbsp water)

Note: honey can be used in place of molasses

  1. In a large bowl, mix molasses, oil, salt, optional seeds, warm water, lemon juice and starter.  Add the yeast mixture and mix well.
  2. Add the rye flour and beat with an electric mixer on low for 2 minutes, or by hand for about 200 strokes.
  3. Add all purpose flour by the half cup full until a stiff dough is formed.
  4. Turn the dough onto a floured surface and knead thoroughly, adding more flour as needed.  Knead for about 5 minutes, or until dough is smooth and elastic.
  5. Form the dough into a ball and place into a greased bowl, turning the dough to coat all sides with oil.  Cover and place in a warm spot to rise until doubled; about 1 – 2 hours.
  6. Punch down the dough and divide into two pieces for regular sized loves, or four pieces for mini loaves.
  7. Lightly knead and shape the pieces into loaves and place onto prepared baking pans.  Cover and let rise for about 20 minutes.  Score the loaves with a sharp knife.  Add optional egg wash.
  8. Place in centre rack of oven preheated to 350F.  Bake for about 40 – 45 minutes for regular sized loaves or about 25-30 minutes for mini-loaves.
  9. Allow finished loaves to cool on rack.

sourdough.rye.baked

Braided Egg Bread

Today, we made our bread for our traditional Polish Easter basket.  Though paska is usually associated with Easter, this lovely bread is also traditional.

One of the things that’s important for this bread is for the eggs to be at room temperature.

dried blood orange zest

Zest of 2 blood oranges.

This year, we added a new ingredient; dried orange zest.  I like to dry my own zest, and this time I had some from blood oranges.  I deliberately chose the reddest ones to get a much darker coloured zest.

If you have a zester, it makes it really easy to quickly zest your fruit over a paper towel.  Spread the zest thinly and leave to dry.  When dry, store in an air tight container.

Easter Bread

Easter bread ingredients

Not pictured: flour

2 cups milk
1/4 cup butter
2 tsp salt
2-3 Tbsp sugar
3 Tbsp yeast
saffron; a few threads
optional: orange zest
2 eggs
5-6 cups all purpose flour


  1. Proof the yeast in warm water (about 1/2 – 2/3 cups) in a large bowl for about 10 minutes.
  2. Soften the saffron threads in a small amount of very warm water.
  3. Scald the milk, then add in the butter, sugar and salt.  Stir until butter is melted.
  4. Allow the milk mixture to cool before adding it to the yeast mixture.  While it’s cooling, stir in the saffron and optional orange zest, then add the milk mixture to the proofed yeast.
  5. Stir thoroughly, then mix in the eggs (if the mixture seems too warm still, the eggs can be added after the first cup or two of flour).
  6. Add 3 cups of flour and beat thoroughly with an electric mixer for 2 minutes, or by hand for about 200 strokes.
  7. Add more flour by the half cup-full until a stiff dough begins to form.  Turn dough onto a floured surface and knead thoroughly, adding more flour as needed.  If kneading by hand, knead for at least 5 minutes.
  8. Clean and oil the large bowl.  Add the kneaded dough to the bowl, turning it to coat all sides with oil.
  9. Cover loosely and place in a warm place to rise until doubled in size.
  10. Once the dough is doubled in size, turn it onto onto a lightly floured surface and knead gently a few times.  Divide the dough in half, and return one half to the bowl.
    Braided egg bread

    Braided loaves, ready for the oven!

    Braided loaves, after rising and ready for the oven!

  11. To form a braid, divide the remaining half into 3 equal pieces.  Knead each piece a few times, then form into a rope about 12-18 inches.  Join the three lengths together at one end, then braid the dough.  Tuck under the ends to hide them, then transfer the braided loaf onto a well oiled baking sheet.
  12. Repeat with the second half of the dough, or use it to create other shapes.
  13. Cover and allow to rise again for about half an hour.  Preheat oven to 350F.
  14. Optional: glaze the loaves with an egg wash (2 egg beaten with about a tablespoon of water) to get a nicely browned surface.
  15. After the loaves have risen, place into the centre of the preheated oven and bake for about 30 minutes.
  16. When done, allow the bread to cool slightly before carefully removing from the pan to a cooling rack.

Egg.Bread.baked


Pickled Pink!

Today, we started our pink pickled eggs for our Easter basket.  They are now in jars, where they need to pickle for 2-3 days.

Pickled Pink Eggs

We made more of them, this year; most likely we’ll only use 8 for the basket itself, but extra is always good!

My older daughter was a sweetheart and boiled a whole bunch of eggs for us while her sister and I went shopping for basket ingredients.

Here are the ingredients for making pickled eggs that are an incredible pink colour!

These are quantities to pickle a dozen eggs, though we probably could have done closer to two dozen in our jars.

For the beet liquid, I used the liquid from both a jar of pickled beets, and a can of beets.  The pickled beets are, of course, in pickling liquid and add their own flavour.  The canned beets are in water, so that just adds colour.  You could use just one or the other, to your own preference.

For the 12 eggs, I used 2 quart size jars.  They probably could have held about 10 eggs each; maybe 12, if I wasn’t concerned about them getting squished.  Only the most perfect ones will go into the basket. :-)

Pink Pickled EggsIngredients for pink pickled eggs
for 12 hard boiled eggs

Ingredients:

1 cup cider vinegar
1 can beets
1 jar pickled beets
2/3 cups granulated sugar
1 tsp salt
8 whole cloves
1 onion, chopped (optional)

Also: 2, quart size, canning jars with lids.

  1. Peel the hard boiled eggs.  (It’s handy to boil extra, in case some get damaged while being peeled.)
  2. Drain the beet liquid through a sieve into a measuring cup.  There should be about 2 cups liquid in total.  If you wish, you can chop up some of the beets and include them as well.
  3. Divide the eggs into jars.  Add 4 whole cloves into each jar.
  4. Mix the remaining ingredients together until salt and sugar is dissolved.
  5. Pour the pickling liquid over the eggs.  Seal tightly.
  6. Place in the refrigerator for at least 2-3 days.  As the eggs tend to float, gently invert the jars once or twice each day.
  7. After the eggs have pickled for several days, remove the eggs from the pickling liquid.  Discard the pickling liquid.

When ours are done in a few days, I will post new photos! :-)

The Re-Farmer


Oatmeal Flax Bread

It was bread baking time today.  My younger daughter usually does most of it, but she wasn’t feeling well, so I got to do it this time.

I ended up doing three different 2 loaf recipes. A white sourdough, in loaves, sourdough rye, as 4 smaller rounds, and a new one; two loaves of oatmeal flax bread.

I think it’s the first non-sourdough bread we’ve made since the move!  The only real reason it wasn’t also a sourdough was because the large plastic bowl I have was being used for the plain sourdough to rise, and the only other bowl I had that was large enough was stainless steel.  Not something to use with sourdough!

The recipe I used was modified from Two-Way Oatmeal Bread in Whole Foods for the Whole Family, from La Leche League International.

I am quite pleased with how it turned out!

Here is my modified recipe.

20180309outmeal.flax.bread2 cups boiling water
2 cups rolled oats (thick or steel cut, not quick oats)
1 cup ground flaxseed (sold as Flaxseed Meal)
1/4 cup brown sugar
1/2 cup oil
2 tsp salt
2 Tbsp yeast
5-7 cups flour


  • Pour boiled water over oats, flaxseed, brown sugar, oil and salt in a large bowl.  Mix and allow to cool to lukewarm.
  • Dissolve yeast in warm water.  Add to cooled oat mixture.
  • Beat in flour to make a soft dough.  Knead 5-15 minutes, adding more flour if necessary.  (I added only 5 cups of flour total; amount will change based on humidity and temperature.)
  • Let rise until doubles; at least 1 hour.
  • Punch down dough and divide into 2 loaves.  Shape and place in greased loaf pans and let rise until slightly over the edge of the pans.  (Or let rise in the refrigerator overnight.)
  • Bake at 350-375C for about 45 minutes (with my glass loaf pans, I used 350C), or until golden brown.
  • Cool in racks.
  • Recipe can be halved or doubled, but do not double amount of yeast.

As an aside, ground or crushed flax seed soaked in warm water can be used as an egg substitute in some recipes.

I just really like it in bread.

The Re-Farmer


Luring the Deer – and yogurt!

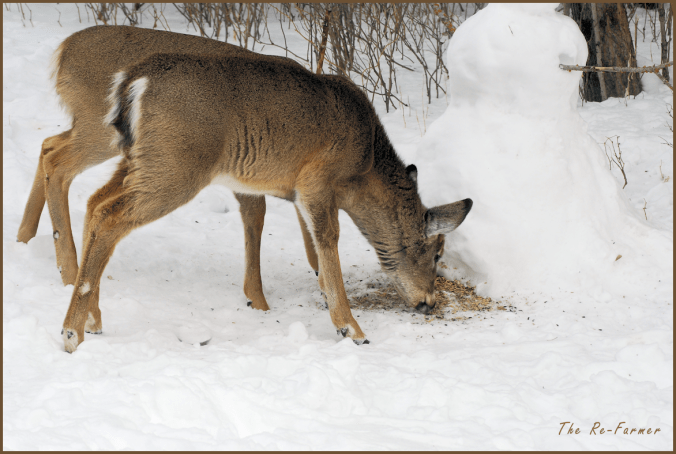
This morning, when putting feed out for the deer, I’d put some at the bottom of Eunice, the scary snowman, that has been making them so nervous.

It had a 2 out of 5 success rate. :-D

Before I saw any of them, though, I took care of the yogurt I had started last night.

I did things differently this time.  First off, I splurged and got some Greek yogurt as the starter.  Not my preferred brand, but there wasn’t any plain Greek yogurt in my preferred brand.  Which is fine.

Then I discovered that I didn’t have enough powdered milk for the quantity of liquid milk (a gallon/4L) that I was using.  I made it anyways.  Then decided to add the last of my whipping cream to see if that would help.

When I took it out of the oven, where it had been left overnight to ferment, it was thick, but it seemed almost as if it hadn’t set.

Other than being runnier, it seemed fine, though, so I filled my 4 containers for yogurt, then used the rest to start a yogurt “cheese”.

That’s when I discovered that my cheese cloth to do the yogurt “cheese” had shrunk, and folding it in quarters was too small.

So I lined my colander with a large clean tea towel, then put the cheesecloth, in a single layer, over that.

After letting it sit for a while to drain, I knotted the corners, laid a plate on it, then weighted it down with a marble mortar I’ve got.  After a fair amount of whey drained out, I transferred the thickened yogurt to a bowl, rinsed out the cheese cloth, folded it into quarters and lined the colander again, stirred up the thickened yogurt so it was consistent in texture, then poured it back into the lined colander to drain some more.  This time, I tied the corners, put the handle of a ladle under the knots, then hung it over the colander.  It was just enough to hold it up, but it was still touching the base of the colander.  I didn’t dare rig it up to hang by its full weight.  It still wanted to drain through the cheesecloth.  After several hours, it didn’t drain much whey at all.  Eventually, I turned it out into a bowl again, scraping and squeezing as much off the cheese cloth as I could.

I’m not happy with the amount of waste.  It’s a shame.

The taste and texture is very different than usual.  When ladling the yogurt into containers, it was almost stringy.  The flavour is incredibly mild – more like fromage frais than yogurt.   Even after being in the fridge for several hours, it was still thin.  After tasting it, my daughter poured herself a cup full, mixed it with vanilla and a touch of honey, and drank it!  It is so good!

The thickened yogurt is also delicious, and I love the smooth texture, even though it’s not at all what it’s supposed to be.  It’s actually a lot like clotted cream, in both texture and flavour.  It would be awesome over fruit!

So that was my culinary adventure of the day.

Meanwhile, outside our window, we were first visited by Hungry Girl and Barbecue.  They gave Eunice the scary snowman a wide berth, though at times they did seem tempted by the feed at its base.  Not enough to actually go near it, though.

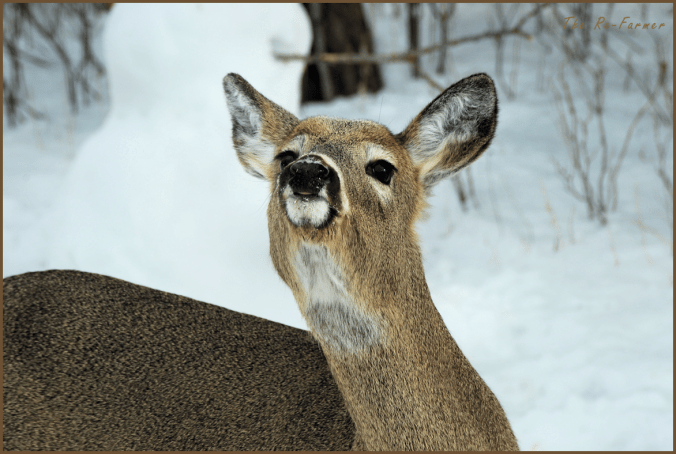
I ended up taking so many photos today, but I settled on two goofy pictures of Hungry Girl to start with.

2018-03-08.goofy.deer2

I can’t help it.  These split second captures just make my day!

2018-03-08.goofy.deer1

So silly!  I love it!

Okay.  I’m done with the goofy pictures.

For today.

2018-03-08.3.deer

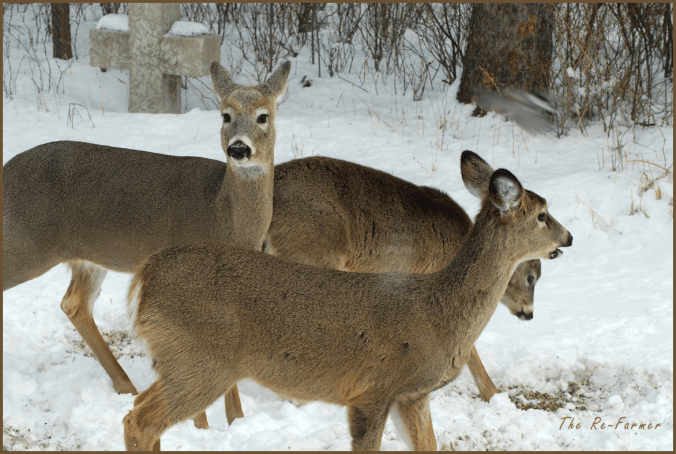
Later on, Mama and the twins came by.  They, too, gave Eunice the scary snowman a wide berth, though the twins were more curious.  In the end, though, it was something else that spooked them off.

I ended up having to quickly take the camera off the tripod and get right up into the window to be able to get this picture…

2018-03-08.butterscotch

Butterscotch did NOT want her picture taken!

She seemed interested in getting up onto the stairs to the front door we don’t use, but the snow proved too much for her.  She stuck to the path made by our boots.

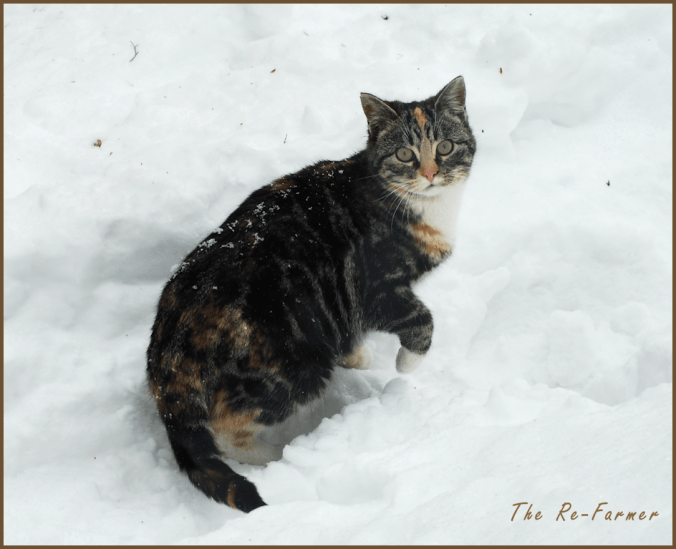
After she left, the deer still seemed nervous, so I look again and found…

2018-03-08.trulbus

Trüllbus the Crime Eater had moved in, and was checking the deer out.

I always find it funny how the deer get so skittish around the cats, but the cats are not at all intimidated by those much, much bigger animals with hooves!

2018-03-08.deer.looking.up

Mama, as always, was on high alert, including checking out the roof.

I wonder what’s up there that they keep looking at?  Birds?  Noise from the branches?  Falling snow from the upper floor?

After much back and forthing, on of the twins finally went for the feed at the bottom of the snowman.  That made the other comfortable enough to come over, to.

And even chase his sibling away a few times, even when he didn’t go for the feed pile himself!

Meany.

Other times, they ate together in peace.

2018-03-08.deer.twins

By the end of the day, between the deer, squirrels and birds (who really enjoyed perching on Eunice’s limbs), that area was picked clean!

I think I’ll add more there again, tomorrow.

The Re-Farmer

Sourdough Cornmeal Muffins

It’s been a while since I posted a recipe!

Last night, I decided to do another recipe I haven’t made in a long time.  Normally, I would have done a double recipe, but I didn’t have enough cornmeal left.

Alas.

Here is a recipe for:

Sourdough Cornmeal Muffins
adapted from The Sourdough Cookbook by Rita Davenport

sourdough.cornmeal.muffins1Ingredients:

1 cup flour
1 cup cornmeal
2 tsp baking powder
1/4 tsp baking soda
1 tsp salt
1 tsp sugar
1 egg
1/2 cup sourdough starter
1/4 cup oil
1 cup milk

  • Prepare tins for 12 muffins and set aside.
  • Preheat oven to 400C.
  • In a large bowl, mix try ingredients together.
  • In a medium bowl, beat egg, then stir in remaining ingredients.
  • Pour wet ingredients into dry ingredients and stir until just moistened.
  • Divide batter into 12 muffin cups (about 3/4 full each).
  • Bake 15-20 minutes, or until golden brown.
  • Remove from muffin tins.  Serve hot.

sourdough.cornmeal.muffins2


They’re good cold, too!

If they last long enough to become so. :-D

Excellent with a nice cup of rooibos tea!


Sourdough Rye Bread

Recently, I was finally able to find a bag of rye flour.  Of all the things I knew would be harder to come by after moving here, rye flour was not one of them!

In anticipation of baking day, I got a rye sourdough starter going last night, using 2 cups rye flour, 2 cups warm water, and about 1/3 cup of our usual starter.

Allow me to introduce you to…

Overnight Rye Sourdough Starter

…The Rye of Sour-on.

My kids are hilarious.

Sourdough starter

Sir Sour Alot is looking good!

Because our original starter has aged so well, it can be shared or used as a base for “overnight starters”, which some recipes call for.

The girls didn’t bother looking up any rye bread recipes.  They just modified their usual Quick and Easy Sourdough recipe (minus the optional garlic and Parmesan with herbs).  With their usual double recipe, they used 2 cups of rye starter, substituted the sugar with molasses, and added 3 cups of rye flour before switching back to all purpose.

Rye sourdoug bread loaves

Rye sourdough bread

The result was a denser bread that didn’t rise as much during backing.  Which is good, because it means they slices will fit completely in the toaster, unlike our usual loaves, which sometimes need to be flipped. :-D

Slices of rye sourdough bread

Still warm from the oven!

Hearty and delicious!

I like the idea of using multiple kinds of flour when baking bread, but that requires having multiple kinds of flour on hand.  Which we really don’t have the space for, anyhow.  So we usually just use all purpose flour, since it gets used for so many other things as well.  I think I’ll make an exception for rye flour – which was only available in a small bag, anyhow.

It looks like we’ll be maintaining two sourdough starters now; Sir Sour Alot and the Rye of Sour-on.

The Re-Farmer

Sourdough Cornmeal Pancakes

It’s been ages since I’ve made these, and they are absolutely my favourite pancake recipe, ever.  They’re just a bit of a PITA to make. :-D

The original recipe called for sour cream.  I substituted yogurt “cheese”, which my daughter described as “sour cream 2.0 – like sour cream, but MORE”. :-D  I was out of yogurt cheese, but I still had some of our homemade yogurt, so I quickly made some.  It took two batches to get the amount I needed for a double recipe, and I also have some whey for our next bread baking.

So I’ll start with instructions on how to make small batch yogurt “cheese” for a sour cream substitute.

Needed:
About 1/2 cup yogurt
2 coffee filters
fine sieve/strainer that will fit over a measuring cup
2 cup measuring cup

  1. Place the strainer over the measuring cup.  (If yours has a heavier handle like mine does, you might need to have something next to it to prop it up.)
  2. Line the strainer with 1 coffee filter
  3. Pour in the yogurt.  Let sit to drain long enough that, when you pull the coffee filter inwards, then let it fall back again, the yogurt stays behind cleanly.  About an hour or so.  You will find the outer edges are thicker and the middle is still soft.
  4. Draw edges of coffee filter in and lift out the yogurt.  Place the second filter into the strainer.  Gently roll the yogurt into the new filter, so that the softer middle is mostly on the bottom of the filter.  Leave to drain until desired thickness.
  5. At this point, if you want it to drain faster, or want a thicker “cheese”, fold the filter sides over the yogurt to completely cover it.  Place a small, flat object (I used one of the many tiny dishes in my collection) over the filter, than add a weight, such as a can of beans, on top.
  6. When at desired consistency, remove from coffee filter, place in a sealed container and refrigerate.
  7. Reserve the liquid for bread baking.

The 1/2 cup of yogurt will yield about 1/3 cup yogurt “cheese”, depending on how long you let it sit to drain.

And now… on to the pancakes!

This recipe is modified from “Cornmeal Pancakes” in The Sourdough Cookbook by Rita Davenport.

ingredients

The amounts pictured here is for a DOUBLE recipe of Sourdough Cornmeal Pancakes.

Here is the ingredients list for a SINGLE recipe.

1/2 cup cornmeal
1/2 cup all-purpose flour
1 tsp baking powder
1/2 tsp baking soda
1/2 tsp salt
2 tsp sugar
1 egg
1/2 cup sourdough starter
1/2 cup milk
1/2 cup sour cream (or thick yogurt or yogurt “cheese”)
1 1/2 Tbsp vegetable oil

20180220sourdough.cornmeal.pancakes

Sourdough Cornmeal Pancakes

  1. In a medium bowl, combine all dry ingredients, then set aside.
  2. In a small bowl, beat the egg, then mix in milk and starter.
  3. Add egg mixture to the dry ingredients and stir until just moistened.
  4. Fold in oil and sour cream or sour cream substitute.
  5. Preheat and oil frying pan.  Cook 1/4-1/2 cup of batter per pancake for a minute or two, each side.

Note: kitchen chemistry!  When the wet and dry ingredients combine, the acidic sourdough starter and sour cream/yogurt cheese will react to the baking powder and baking soda, causing it to bubble up.  The batter will still be very thick, but light and fluffy at the same time.  Be gentle with it, to keep those bubbles for light and fluffy pancakes!

I like these with nothing but a bit of melted butter on them, but of course you can top them with whatever you want.

I hope you enjoy these as much as we do!

The Re-Farmer

My Non-traditional Slow Cooker Chili

I do love my slow cookers!  I’ve got two 8 quart sized cookers, and have found they are the perfect size for us.  Especially for making something like chili; it’s enough to feed us for a couple of days, making life much simpler!

The chili I make is not at all traditional.  In fact, I’m sure it would horrify true chili aficionados!  :-D  I’ve looked through various recipes and they either use ingredients I never tend to have – or ones I can’t use.  My chili has no heat to it.  At all.  You see, for some reason, I have these massive crevasses in my tongue.  It seems to be a hereditary thing, as my father had them, as does one of my daughters.  The oils that cause that spicy heat gets into them, and once there, there’s nothing I can do to alleviate the pain of it.  So as much as I love the taste of spicy food, I can’t actually eat it.

Which makes me sad.  Because I love Indian food.

Ah, well.

So here is my non-traditional, totally mild (though you can make it spicy, if you want), slow cooker chili.

Remember; this is for a big slow cooker, so feel free to cut the recipe in half.  I’m pretty loosey-goosey with the quantities, too.

chili-groundbeef

First up, start browning the ground meat.

I like to use lean or extra lean ground beef, but I’ve also made it with combination of beef and pork, or beef and turkey, since those three ground meats are all pretty inexpensive at Costco.  I used a family size pack of lean ground beef, which was about 5 pounds, and browned it in batches and transferred it to the slow cooker liner using a slotted spoon, so what little fat there was in the pan, stayed in the pan.

chili-onion

While the beef was browning, I chopped up a large yellow onion.  I like leaving the chunks a bit on the large side.  Just because.

I added the onion to the last batch of browning beef.

chili-carrots

Next on the chopping block; 4 or 5 small carrots.

I usually use about 5, but used only 4 this time.  I finished off one bag and didn’t feel like starting another.  I like to chop carrots smaller, too.  This made just under a cup of chopped carrots.

chili-sweetpotato

Then I chopped up 2 small sweet potatoes.

Yes, sweet potatoes.

I don’t think I’ve ever seen a chili recipe with them in there, but it was something I decided to try some years ago, and it’s been a permanent addition, since.  I like to chop these even smaller than the carrot.  The idea is for them to be so soft that they disintegrate into the chili when you mix it at the end.  There’s something about the creamy smoothness of it that really appeals to me.

chili-crockpot.prep

After the meat and onions were browned, I added the chopped carrots and sweet potato, then 1 can of mixed beans and 1 can of white kidney beans (both 19 oz cans, drained and rinsed).

I like to change up the can with one type of beans, but I always include 1 can of mixed beans.

chili-crockpot.ingredients

Next up is a large tin of crushed tomatoes, a small tin of tomato paste, seasonings and water.

The seasonings are typically whatever I have handy; usually a steak spice mix and garlic. Slow cookers are where dried foods are in their element, so I used dehydrated garlic pieces that I’ve been able to find.  Strangely, I hardly ever saw them before our move, but our local grocery store carries it!  In refill packages, too, so it’s really cheap. :-)

The 4 of us have very different preferences when it comes to seasoning, so I tend to use a light hand with it, then everyone can add their own later on.

chili-crockpot.readytocook

Then mix it all together!  Not an easy task, with the crock so full!

Add more water, if needed.

The water is another one of those loosey-goosey measurements.  Food in slow cookers release their own moisture, so they need less added to begin with.  How much to add is a judgement call.  I find it’s safer to add less at the start, then check after it’s been cooking a while.  If it seems to need more, I’ll add boiling water, so it won’t cool the slow cooker down too much.

I then set the slow cooker on low for 5 hours.  I did end up adding more water part way through.  In the time it took to finish adding the water and stirring everything, I increased the time a bit to compensate for lost heat.

chili-crockpot.withoutcream

This is what it looked like when we got back from town.  There was a bit over half an hour on the timer at this point.

This would be the time to give it a taste and adjust the seasonings, then give it a good stir.

I then stirred in my final ingredient.

chili-crockpot.withcream

Whipping cream.  About 3/4 cup.

That was another one of those “Hmm… I should try this” experiments I’d made some years ago that stuck around.

At this point, I like to stir it very thoroughly to break up the sweet potato pieces.  I then returned the cover and left it for the last few minutes to make sure the cream was warmed through.

Between the sweet potatoes and the cream, we have ourselves a wonderfully rich and saucy chili.

chili-bowl

Top your bowl with some shredded cheese, sour cream or some yogurt cheese (which, sadly, we are now out of), and enjoy!

Here’s the recipe:

Non-traditional Slow Cooker Chili
for: 8 quart slow cooker
cook on low for 5 hours

Lean or extra lean ground beef (family pack; about 5 pounds)
1 large onion, chopped
4-5 small carrots, chopped
2 small sweet potatoes, chopped small
1 tin mixed beans (19oz), drained and rinsed
1 tin white kidney beans (19oz), drained and rinsed
1 tin crushed tomatoes (796ml – 26oz)
1 tin tomato paste (170gm – 6oz)
4 cups water (to start)
Seasonings to taste (steak spice mix, dehydrated garlic or garlic granules, salt, pepper, etc.)
hot water, as needed during cooking
3/4 cup whipping cream, or to taste
shredded cheese for topping (or sour cream, or yogurt cheese)

  1. Brown beef and onions.  Drain and transfer to slow cooker liner.
  2. Add chopped vegetables, beans, crushed tomato, tomato paste, 3 or 4 cups of water and seasonings.  Mix. Cover.
  3. Set slow cooker to low for 5 hours.
  4. Check after a couple hours to see if hot water is needed.  Add if necessary and stir.
  5. Shortly before done, taste and adjust seasonings as desired.
  6. Stir in whipping cream.  Cover and let warm through for final cooking time.
  7. Serve topped with shredded cheese, sour cream or other toppings of choice.