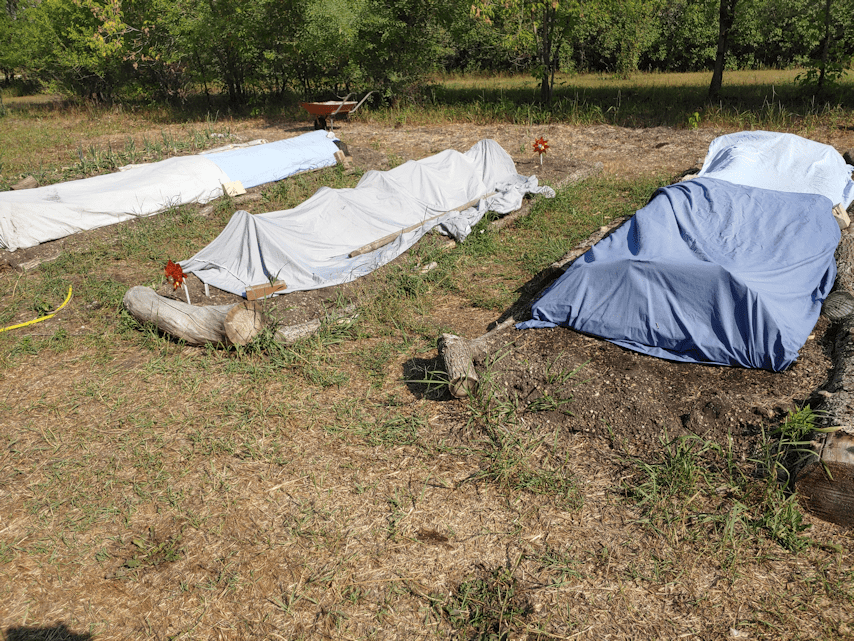
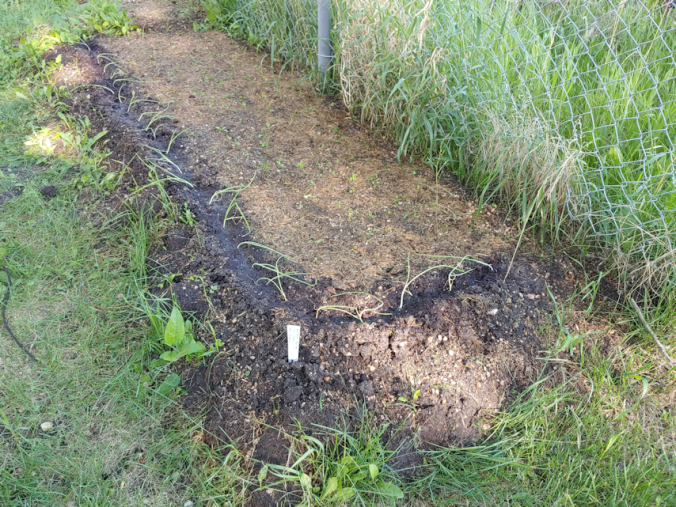
When we planted for a fall harvest, we did as much as we could to make row covers to protect our seedlings. We had enough materials for only two chicken wire covers, then made do with other materials for the third bed.
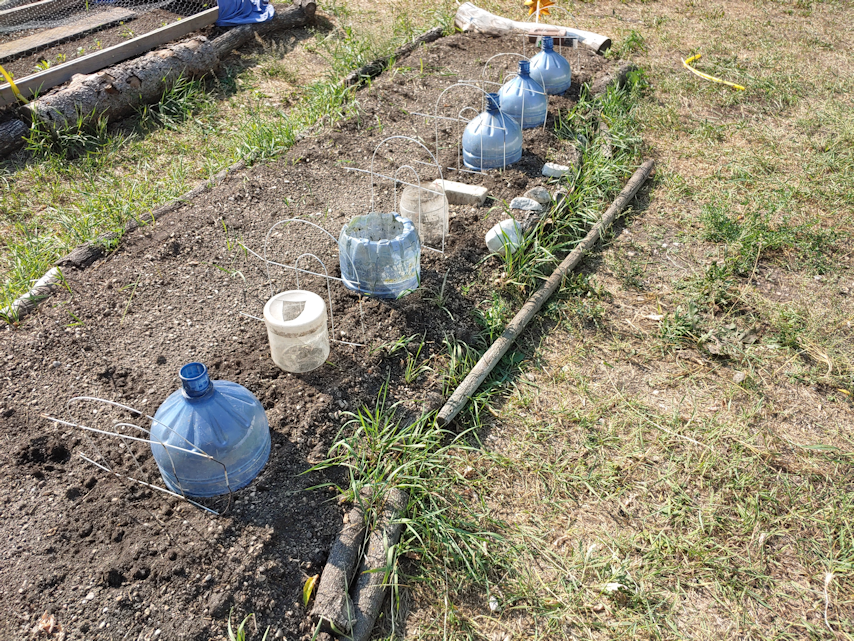
We rigged what we could to protect the last bed, but the grasshoppers really did a number on the seedlings. I ended up using old water bottles with their bottoms cut off to protect the remaining bits of seedlings, hoping they would recover. As you can see by the green in some of the bottles, there has been growth!
They can’t stay under the bottles, though, as they need wind and air to be strong. However, if we just took off the bottles, they’d only get eaten by critters.
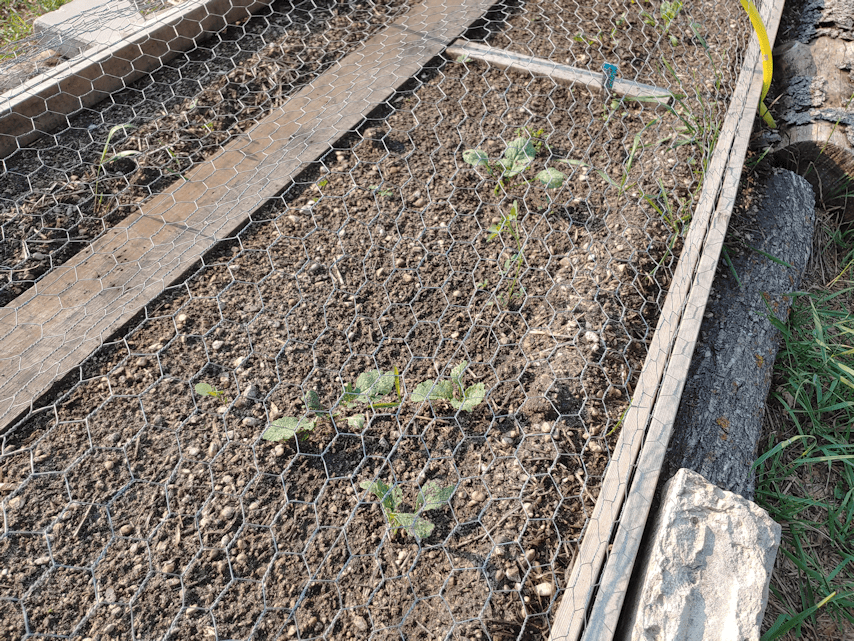
The bed nearby was pretty much wiped out by the grasshoppers.
Even though the ends of the covers were open, the critters didn’t seem to want to go under them, but there is no such barrier for the grasshoppers!
The third bed is doing a bit better. The radishes may have lots of damage to them, but they’re the biggest ones we’ve got right now. The only surviving chard is in this bed, too.
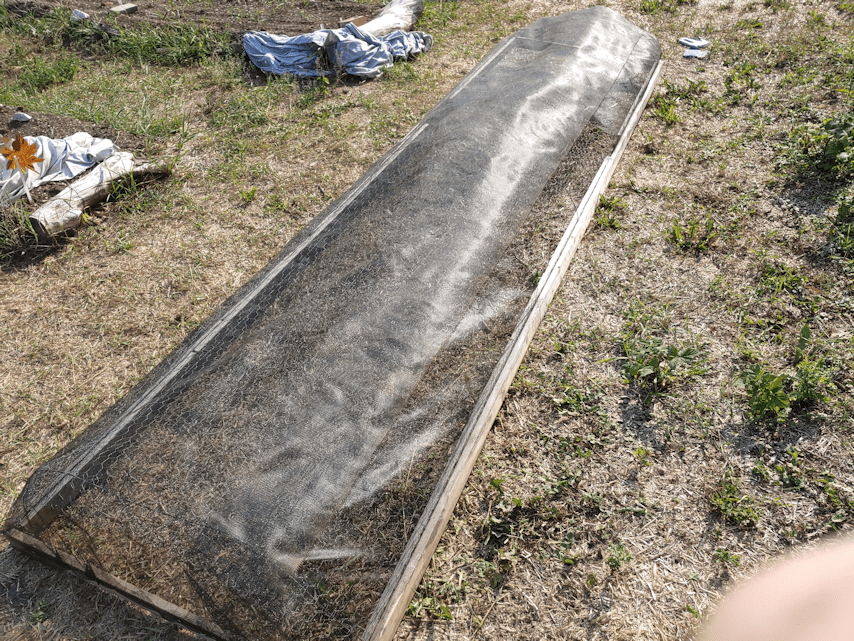
Since the middle bed was the most damaged, I decided to modify the cover and move it to another bed. In cleaning up the new part basement, we found a roll of window screen. I’d used some of it to make covers for the rain barrles, but there was still quite a bit left.
The cover is wider than the mesh. One length of it was enough to cover most of the chicken wire, but after cutting the remaining mesh in half and adding it, I was left with a small gap.
The edges of the screen were stapled to the wood frame, including enough to cover the ends. I tided down the mesh to the chicken wire just enough to keep it from moving.
A dear friend had sent us a couple of those mesh curtains that are meant to go over doors. The idea being, the mesh would keep the bugs out, but still allow wind in. They are tacked to the door frame, and the middle is held closed with magnets. The hope was that we could set them up in the old basement door, to keep the cats from going in there, but they could just push their way through the magnets. :-(
One of the panels was perfect to cover the gap.
The outer edge is stapled to the frame. The fabric is reinforced there, since it’s supposed to be tacked onto a door frame, so there is no damage there. Amazingly, the magnets are holding to the chicken wire enough to keep it one!
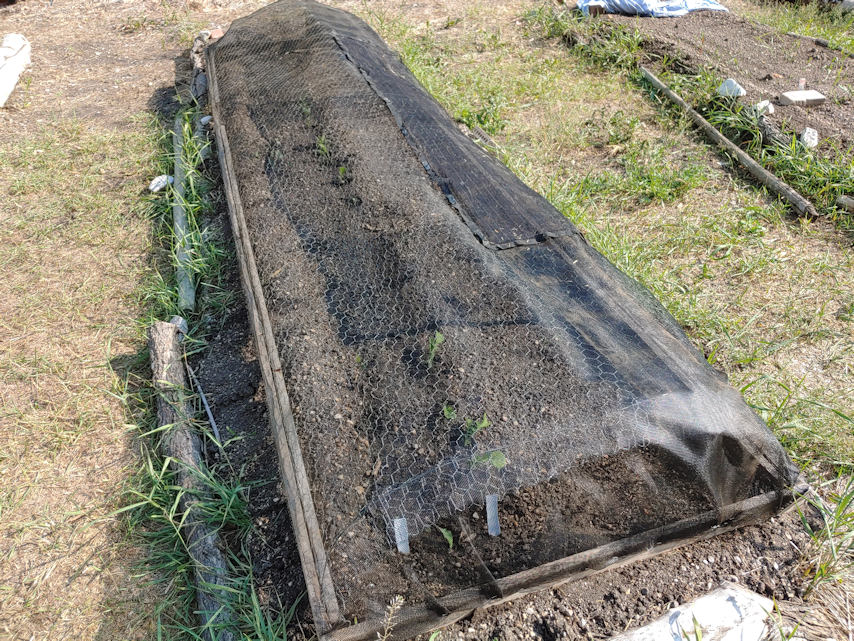
Once it was ready, it was time to set up the garden bed.
Even covered by water bottles, there was still grasshopper damage!! Some had never recovered from being eaten, at all. While removing the bottles, the soil wanted to stick to the them, too, and that quite nearly pulled up several of the plants. :-(
After making sure those that had been disturbed had soil pressed in for supper, it was time to add the new cover.
I’m quite happy with this.
It will be worthwhile to get more window screen mesh!
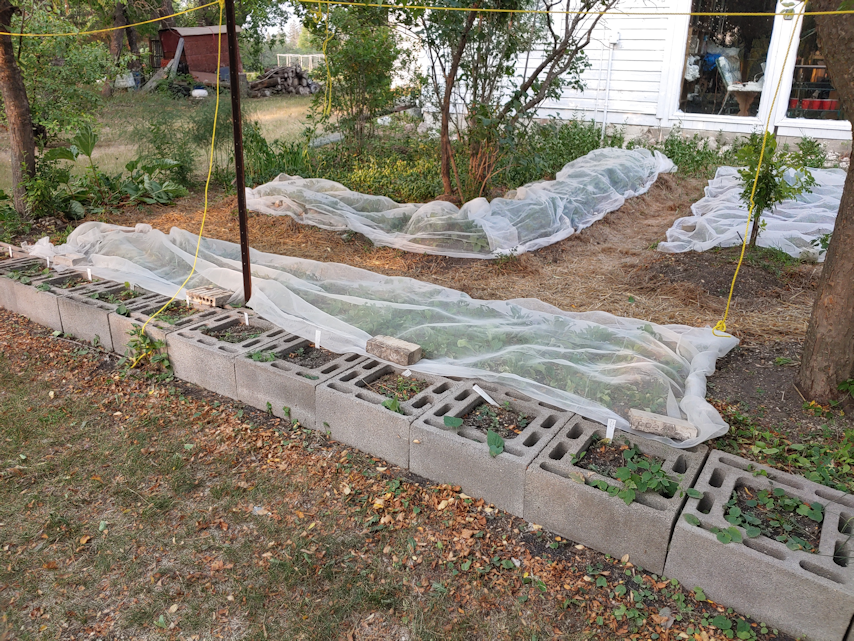
Since the ends are covered with window screen, it made it easier to add the shade cloth.
The surviving seedlings in the now-uncovered bed to things much bigger than little water bottles to protect them. The grasshoppers can still get in, but it’s still better than nothing.
Then all the beds got their shade cloths to protect them from the heat of the day.
When we make our permanent raised beds, they will be shorter. I actually like the length of these – they’re about 15 feet long – but it makes the protective covers awkward to handle, and we just didn’t have the materials to make them the same length. The covers are only about 13 feet long. I’m thinking 10 feet will work better, but we shall see when the time comes.
Until we can get the materials to build them, it’s a moot point, anyhow!
Whatever we end up with, having window screen mesh on a frame to keep the insects out seems to be more practical than the mosquito netting we’re using as floating row covers.
While going through the old kitchen garden this morning, I was seeing more of our beets, slowly being nibbled away. We’d added stinky soap, cat fur, hot chili flakes, and a motion sensor light. The only thing they seem to be doing is spreading out the damage, as the various things get avoided.
So today, we tried something else.
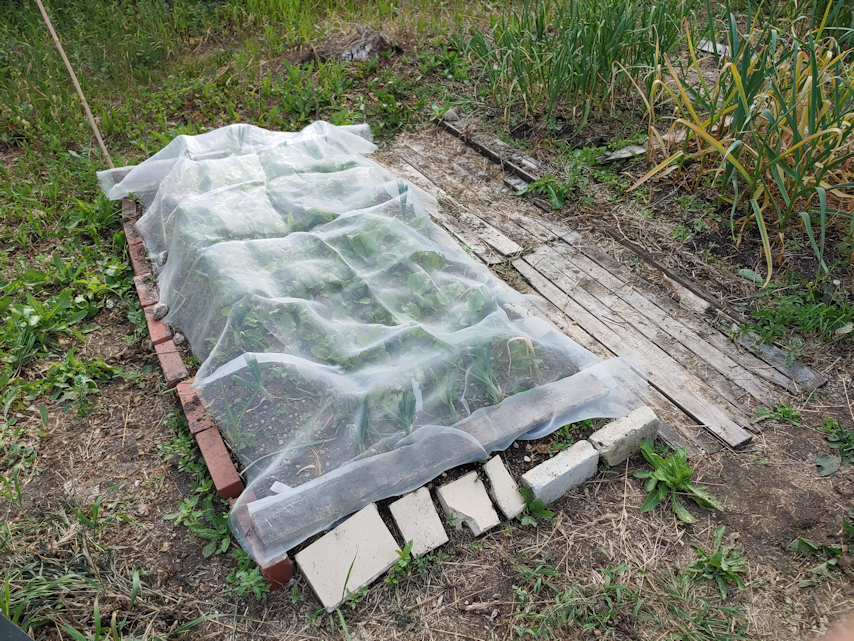
Since there’s no point keeping the mosquito netting wall up to keep the deer away from the lettuces that the groundhog decimated, it was taken down. The sheet was then torn in half, lengthwise, to be used as floating row covers.
One half was used to cover the L shaped beet bed. The other half was cut into two pieces, with one covering the beets by the retaining wall, and the other covering the carrot bed. The edges are weighted down with bricks and whatever rocks we could find that had some weight to them.
It won’t stop a determined critter, but it might be enough to convince it to not bother, and move on to easier pickings.
My only concern about that is, “easy pickings” would be the poppies and the couple of sunflowers growing next to them. They’re too tall to cover with anything, without damaging them, but not too tall for a critter to reach.
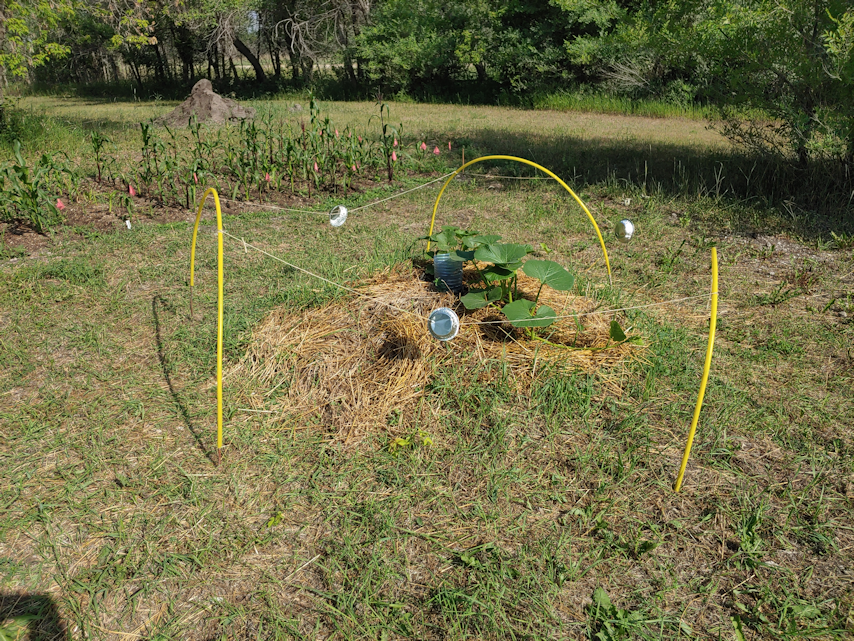
That done, we moved on to the cucamelons and gourds.
For this, we rigged a chicken wire “cage. The top is laced to the chain link fence with twine, above the cucamelons. Over the gourds, it’s just tacked in place at the end, so that a gap can be make for the plants to grow through. The ends were cut and folded in to close them off, and the bottoms are tacked down with tent pegs.
Again, this is not going to stop a determined critters. But it is better than nothing.
As I write this, it was past 9pm, and we are still at 30C/86F, with the humidex at 33C/91F. Tomorrow’s forecasted high is 34C/93F, with the humidex at 38C/100F. Hot, though not quite as hot as the previous heat wave. The girls have been diligent about the evening watering, though I think we’re going to have to keep it to just one watering a day, after something concerning happened last night.
The sweet corn and sunflower beds have been the most difficult to properly water, so we have started to use a sprinkler, turned on for about an hour before the rest of the watering is done. It reaches almost all of the corn and sunflower beds, leaving only a row and a bit at each end that need to be watered manually. Yesterday, as one daughter headed out to switch the hose from the sprinkler to the spray nozzle, my other daughter started to use the front hose to water the old kitchen garden.
This is something we have done before without issue, but this time, all pressure was lost. My younger daughter went into the basement to check the pump, and found it making that grinding noise we have managed to avoid for quite a while now, and the presser was down to zero. By the time she called me over to look, the pressure was back up to 30psi, which is where it should be, but the taps to outside were shut off, anyhow. After the pump shut itself off again, we turned the taps back on, and the girls continued watering, but with just using the back tap.
Now, when we first noticed the pump making that noise and we would lose all water pressure, it was quite a concern. There was a possibility that the foot valve was leaking. We had two plumbers look at the pump, and one even crawled into the well shaft, and my brother even bought a new pump to replace this one, which is about 20 years old. The problem is, the system is so old, neither plumber was willing to chance doing the work, because the risk of something breaking in the well and losing our water completely was too high. At the very least, we’d have to hire someone to find parts for a system that’s almost 50 years old and are in different sizes than modern wells, break the well cap to access the well and replace the parts, or dig a new well.
Digging a new well was the recommended course of action.
None of this is an option for us, so basically, we’re being really careful. The main thing is that problems would start when water was being used faster than the pump could refill the pressure tank. As long as we don’t do things like run the bath as full pressure, or use multiple sinks at once, etc., we can keep it from happening. We know we’re on borrowed time, though.
The hoses do not use a lot of water at once, and even with both taps being used, we never had issues with the pressure before. So why did it happen last night?
I can think of only one thing.
The water table is dropping.
I don’t remember this even happening before, but I can’t think of anything else. It’s not like someone decided to take a shower or something at the same time – and we’ve even the shower get used by someone not knowing the hose was in use, with no loss of pressure.
So for now, we’re going to stick to watering just once a day.
Hopefully, it will be enough.
This is when we could really use more mulch! In the future, when we build our permanent garden beds, a drip irrigation system is also very much in the plans.
I got a couple of photos of what we did yesterday, to try and protect parts of our garden.
There is plenty of slack in the cover for things to grow, and if it ever reaches a point where it needs more, we can unroll the netting wrapped around the scrap wood weighing it down on the ends. It won’t stop small critters like skunks or the woodchuck, but they don’t tend to go here, anyhow. Deer are the ones that seem to find beet green delicious. :-D
While walking towards the Crespo squash mound, those tart tins were flashing away, and there was hardly any breeze at all, so that was good to see.
As for the woodchuck, I’m now 99% sure it has a new den under the garden shed. The only reason it’s not 100% is because we have no way to see under there to confirm.
A couple of times today already, the brazen bugger parked his adorable furry butt under the bird feeder and was eating sunflower seeds. Which, I guess, is better than him being in the garden and eating our vegetables! Still, I went out to chase him away, startling a skunk away from the cat kibble. :-/
On a more positive note, I saw Junk Pile’s kittens again. It does seem like there are 4 of them in total, but they ran off as soon as they saw me. The only one I did not see was the little grey and white one. The tuxedo dashed under the storage house, while two mostly grey kittens ran past the fire pit and out the yard near the old threshing machine.
Those little guys are FAST!
Most of the kittens are getting braver, and wandering around the yard more. Butterscotch’s kittens were seen around the old compost pile. No surprise that they went in that direction, as Butterscotch frequents the old farmyard across the road. Rosencrantz’ kittens have been playing in the white lilacs and climbing the willow tree.
It would be good if we can convince them to stay close to the protection of the house and inner yard!
The weather forecast said that we would be cooler today.
They lied.
When I did my morning rounds, it was already above 20C/68F, and we easily hit 28C/82F this afternoon, with a humidex above 30C/86F. Which meant that we spent as much of the day indoors, out of the heat, as we could. Thankfully, the way things are oriented, we can keep certain windows open to allow a cross breeze without heating the house up.
The cats appreciate that.
Yes, we leave the little step ladder at the door, just so they can look out the window! It was so funny to watch these to, with their matching positions, heads turning and tail tips twitching, in unison! Hard to believe that little Layendecker is now just as big as Cheddar! With the smaller cats, three of them can fit up there, but these big boys fill up the whole stop step! :-D
I did have to make a run into town, as we ran out of kibble for the outside cats. While I was there, I picked up some ingredients for my daughters. Yesterday, they finished off one of the giant bowls of spinach to make a spinach soup.
We’d already finished off one giant bowl, mostly through dehydrating (using the screens in the sun room didn’t work, so we did batches in the oven). When making the soup, that huge bowl cooked down to a remarkable small amount in the stock pot! :-D With my trip into town, the girls have enough to make a huge batch of baked spinach dip, which we plan to enjoy while watching watching Sherlock Holmes, with Jeremy Brett and David Burke.
It’s going to be a late one, though. We didn’t get back from working on the garden until past 10pm. I had tried going out a bit earlier to start prepping the spinach beds to plant in again, but those beds are in full sun. I wasn’t interested in getting heat stroke! It didn’t get cool enough to head out again until past 8:30pm.
The girls did the evening watering while I worked on the beds.
The logs were added after we’d started making the beds, so once I’d cleared away the remains of the spinach plants and the weeds, I took advantage of the situation to level the beds out, and create a bit of a ridge around the edges, to help keep the water from draining down the sides – and taking the soil with it. I used a garden fork to loosen the soil, to more easily pull the roots out. I was most pleased with how keep the tines could go, without any sort of resistance. This bed would handle root vegetables very well!
I had “help” while I was working.
Nutmeg could not get enough attention! :-) While I was pulling out roots and weeds, he kept getting under me, demanding pets, and rolling around in the freshly turned soil, sometimes rolling right off the edge of the garden bed – just like his brother does on our beds, indoors! Unfortunately, when I was using the garden fork, he had a terrible habit of suddenly lunging at the fork to “catch” it, even as I was stabbing it into the soil.
This bed was surprisingly different from the first one. When pushing the fork into the soil, I would quickly go through the raised part of the bed – about 8 inches – then hit solid. I wasn’t hitting rocks. Just rock hard soil! The last bed was much the same, though not as bad as this one. There is a difference between them. The first bed I worked on had been a squash bed, mulched with straw, last year. These two beds were a last minute change. When I’d prepped the area last fall, I’d made three smaller beds oriented East-West, where three pumpkin hills had been. This spring, I decided to make these two larger beds, oriented North-South. The soil beneath would be a mix of soil that had been turned in the fall, and walking paths. It’s remarkable what a difference that one season of use the previous year has made in the soil of that first bed.
All three beds are now prepared and ready for planting! We will be planting lettuces in succession along one side of each bed.
Since the radishes we interplanted with the corn all disappeared, and I ended up picking up more. Three different varieties to try, though I couldn’t find a daikon type that my daughter likes. They are fast maturing, so we should be able to grow some radishes, and still be able to grow more spinach in these beds for a fall crop.
We’re not actually fans of radishes in general, so we won’t be planting many. I do want to leave some to fully mature. I’ve read that radish pods are very tasty, but it’s not something available in stores, and I’d like to try them. From what I’ve read in the past, radishes used to be grown for their pods, not their roots, and the pods can be canned as well. It should be an interesting experiment. I’m still disappointed that none of the ones we planted earlier survived, even though they did germinate so quickly. I had specially ordered those varieties for my daughter. :-(
We’ll just have to try them again, next year!
Well my other daughter had just swung by to inform me that the baked spinach dip is ready! I am really looking forward to it! :-)
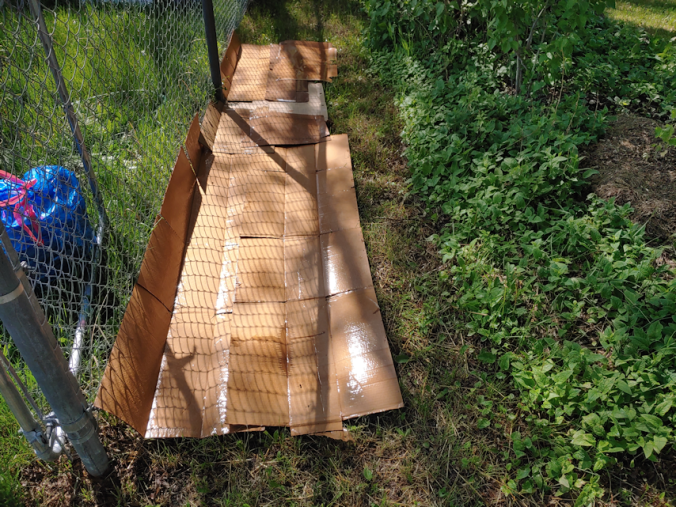
Today, I built what should be the last garden bed for the year. This one is for the climbers.
Here is what the space looked like when I started.
The original plan was to use the remaining chimney blocks, like the one in the photo, as planters along the chain link fence, but they remain in the basement until we can figure some thing out, and it is not a priority.
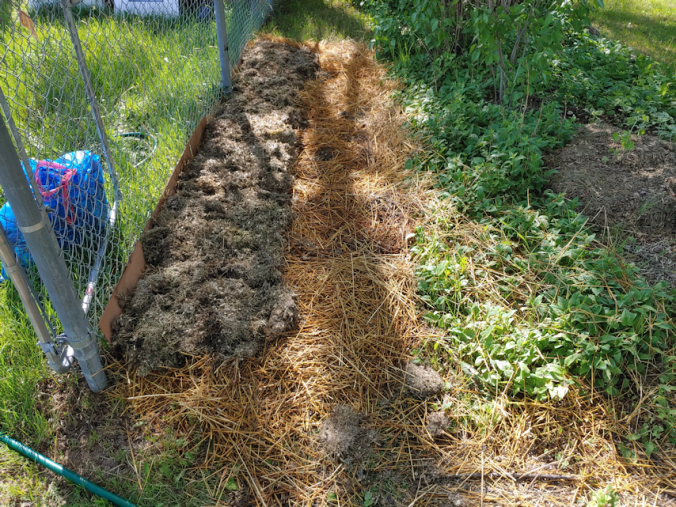
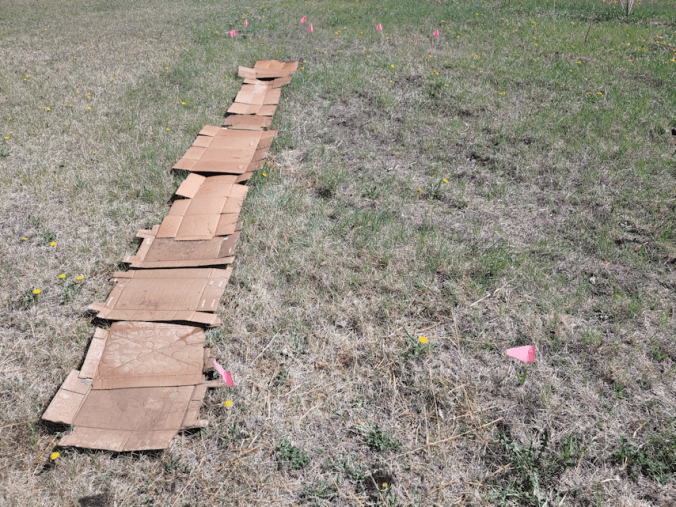
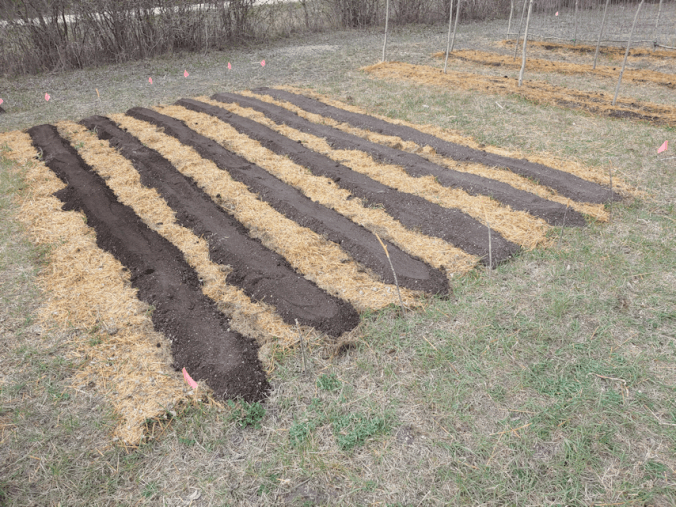
We’ve been saving up our cardboard, and had just enough to create a barrier layer, which got a thorough soaking.
The next layer was the straw, which is also the mulch to cover the path between the new bed and the flower bed beside it. I was able to get some of the straw at the bottom of the bale that has had time to start breaking down, too, which was great! This layer, like all the layers, got a thorough soaking – after I beat it flat with the back of a fan rake.
Then, because we had some, I emptied our kitchen compost along the fence line, which got tromped on before a soak.
There wasn’t much. We don’t get a chance to accumulate much for the compost pile. It tends to get used right away!
We still have grass clippings, so a thick layer of it got laid down.
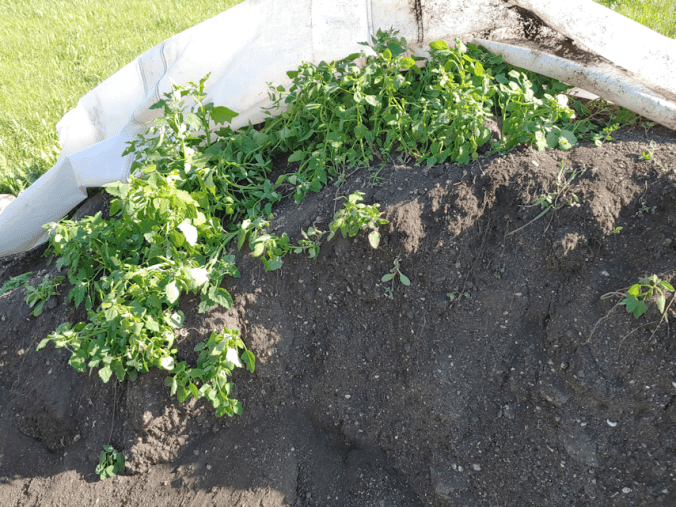
We’ve been keeping our compost-safe paper for shredding, and I had a bag full to add for another layer. After giving it a soaking, my daughter tromped it down for me, while I went to get a load of soil. This was from the nearby tarp covered pile in the outer yard. When I pulled back the tarp, I just had to call the girls over to take a look!
The white tarp allowed enough light through for the weeds to start growing, and grow they did!! They were huge!
These are mostly lambsquarter, which are supposed to be edible and very healthy. Better than spinach!!! At least that’s what the breathless Pinterest images that have started to show up in my feed are all exclaiming. Maybe some day we’ll try them, but for now, they are growing in places we want other things to be growing (or, in the case of our soil pile, nothing to be growing!), so we’re pulling them. Still, it was something else to see how big they got under that tarp! It actually is encouraging, since we plan to build polytunnels and high raised beds in the outer yard, eventually.
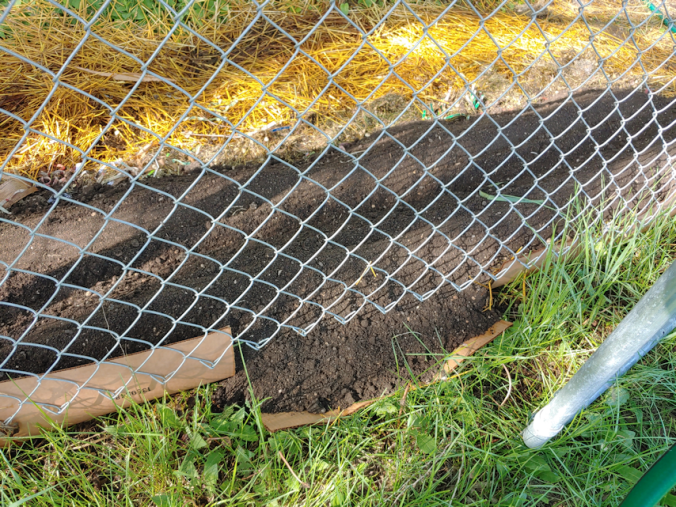
Finally, a thick layer of garden soil was added to the new bed, with a trench down the middle to hold water. My daughter did catch me before I made the new bed too wide. With the one we made for the tomatoes, we’re finding it a bit hard to reach, even though we ended up narrowing it down when we added more soil for the transplants. We’ve noticed the same issue with the beds of spinach, carrots and onions. They’re only about 3-4′ wide, but they are low beds right now, and we’re short. It’s hard to reach the middle while bending down so far; our balance goes off kilter. Especially for my daughters who, unlike me, have not had their generous proportions surgically reduced. That really affects center of balance! It would not be an issue with the tall raised beds we plan to build, but we need to remember that, for low beds, they need to be narrower. Especially if we can reach from only one side, like these along the fence.
One thing that was an unexpected issue is that the chain link fence on this side is higher above the ground at the bottom than on the other side of the gate.
Which means that the damp cardboard flaps against the fence couldn’t quite hold the soil in some places! Which is fine. We’ll work around it.
After filling the trench in the soil with water to soak it, I brought over the cucamelons that have sprouted (most did not, but that’s okay; we planted way more than needed!), as well as the gourds. The bucket and plant pot have the cucamelon tubers in peat that I dug up from last year, to see if they would grow this year. Time to dump them out and find out if they survived!
They did not.
Aside from a few wispy root clumps and what may have been the dried outer skin of a tuber, I found nothing. They had completely decomposed.
Well, that just left me with some peat I could make use of.
So I widened the trench I’d made before, added some peat to it, and watered it again.
Then it was time to do the transplanting.
The cucamelons were all in their own Jiffy pellets, so they were easy to space out. I planted even the tiny ones. If they make it, great. If not, at least they had a fighting chance! Our cucamelons from last year were quite prolific, even in less than ideal conditions. This location gets much more light, so I expect them to do even better, here. If all grows well, this fence will be completely covered with climbing vines!
Of the gourds, the pot that had 2 Ozark Nest Egg seedlings had sprouted a third! I’d forgotten I’d planted 3 seeds in the cups. The pot that first sprouted still had only one, plus there is the one Thai Edible Bottle gourd. These are in Jiffy pots, so the ones with just one seedling in them got planted whole. The one that had three in them, I gently broke it open along one side and sort of unrolled the contents to separate the seedlings. One of them just sprouted today, so it’s unlikely to survive, but who knows? It might do even better than the others. :-) I believe in you, little sproot!
That done, I had some more transplanting to do. I’d put the last of our Norstar onion seeds into a Solo cup, and they not only sprouted, but are starting to form bulbs!
The girls and I had talked about where to put them, and the border of the asparagus bed seemed the best place.
The onions are shallow growers, and there’s plenty of space between them and where the asparagus are, so this should be fine. At this stage, I doubt they will reach full maturity, but they will help deter critters and insects. There were more seedlings than would fit here, so I added the last of them in front of the Mosaic Mix tomatoes. There had been some bunching onions transplanted there before, but they were the tiniest, wimpiest ones that we probably shouldn’t have bothered with, and only 3 were still alive. Which is fine. There are more bunching onions in front of the Spoon tomatoes. We’ll see how these ones do!
That’s pretty much it for the transplanting. We should probably plant the one Hopi Black Dye sunflower that finally sprouted. Since there’s just the one, I’m thinking of planting it somewhere else, like in the old kitchen garden. The pink celery will go into a pot that we can move in and out of the sun room, as needed, but they are way too tiny to do anything with, yet.
Which means that tomorrow, it’s back to the other garden beds. The pea trellises need to be finished, the squash tunnel needs to be worked on, and the summer squash needs a garden soil top up, before getting mulched with straw. Somewhere in there, I need to actually mow around the main garden beds. It’s getting pretty out of control around there! For the old garden area, I’m seriously considering using the weed trimmer, instead. It’ll take longer, but I won’t have to worry about hitting rocks or lumps of soil with the lawnmower. Also, of course, weeding. Especially in the corn and sunflower blocks. All the stuff that barely grew there before have had the most moisture and inadvertent tending since… ever, and they’re really liking it! :-D
The main thing is that, aside from the pink celery and that one sunflower, we’re done the transplanting! Anything else that didn’t germinate by now, isn’t going to. We won’t be tending those pots anymore.
Aaaannnndd….
It was getting late, so I paused and took the pink celery seedlings indoors, then went ahead and transplanted the one Hopi Black Dye sunflower in the old kitchen garden, in the bed we planted the poppies in. So that’s done now, too!
We’re taking a break from our push to get the squash and corn transplanted today. Lots has been done, with lots more to do, but we just had to stop for a while.
My daughters didn’t take any photos of what they were doing, so I just have “after” pictures to show.
This is the summer squash. We have only 15 transplants; quite a few did not germinate, but we do have some of all 4 varieties. There’s an extra hill. Later on, straw will be added around the hills for mulch, and I will be adding stakes near the transplants, to train them to grow vertically. This is supposed to help prevent fungal infections or rot from touching the soil, increase air circulation, make it easier for pollinators to get to the flowers, increase yield and make it easier to harvest. The bottom leaves are supposed to be pruned away, and it will also be easier to water them at the roots.
At least, that’s how it’s supposed to work. We shall see!
Next, they started building the beds at the squash tunnel. Priority for planting here are the luffa and dancing gourds and the winter squash. Oh, and the little pumpkins. We have quite a lot of melons to transplant, too, but if there is no room here, there is a lot more space where the sunflowers were planted last year.
What they were working on those, I worked on the new corn block.
I had turned about 2/3rds of it last night, so I didn’t expect it to take too long to finish.
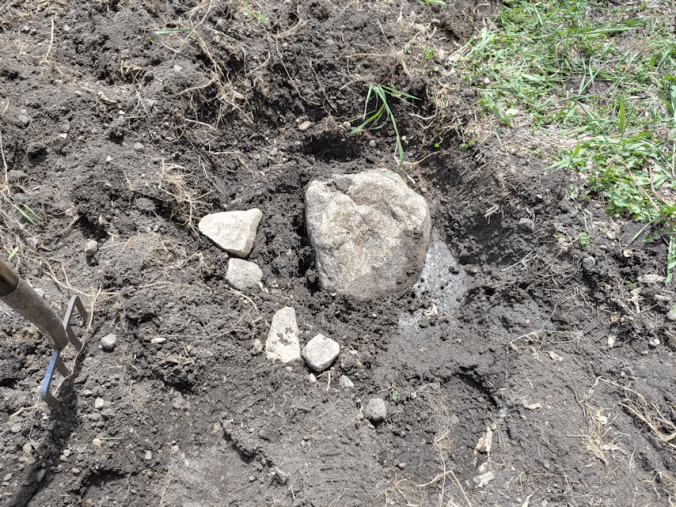
Then I hit something, right near the end. Of course, I was hitting rocks the whole time, but usually I could just move the fork a few inches and keep going. Not this time!
I ended up using a space to dig around the rock. I dug up a few other rocks, but part of it seems to continue below where the soil is still undisturbed.
I used water pressure to clear the stone and try and see how much further it went, but that wasn’t much. My younger daughter decided to give it a try, and ended up bending the fork, trying to move the rock!
So… it will stay. :-D
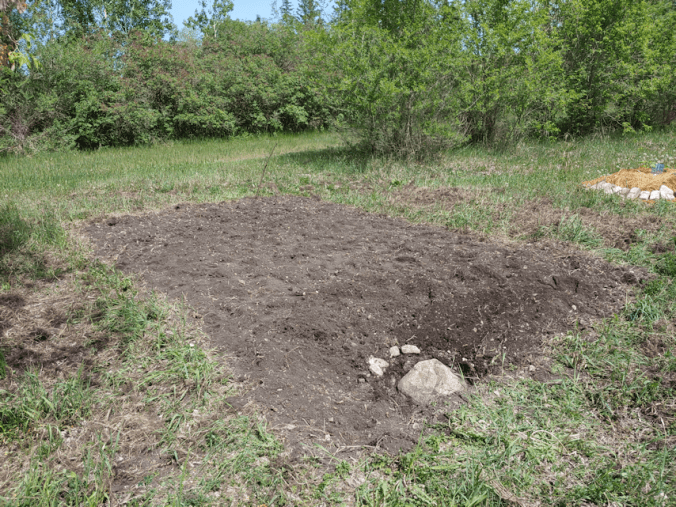
The next step was to take out as many roots, rocks and start leveling things off.
That stick coming out of the ground in the background is a tree root. I have to grab something to cut it with!
For this part, I had a garden claw with a long handle we found in the basement when we were cleaning it out. What a back saver! You can see, all around in the grass, where the roots, crab grass and weeds were tossed. Rocks got tossed under trees, so they wouldn’t be “found” with the lawn mower. Of course, it’s not possible to get all the roots out, but I got most of them.
Finally, I could go over it with the thatching rake, which picked up a few more roots that I missed, as well as some rocks, and leveled it off a bit. I chose not to bury the big rock again, as it was so close to the surface. I’d rather see it and know it’s there, than forget about it and plant something on top by mistake.
One thing about this area; it has the deepest top soil of any part of the old garden, yet! I didn’t reach gravel until I started digging deeper to try and get around the big rock, and while I found other chunks of rock, I just barely reached the gravel layer. This is the soil my mother is talking about, when she talks about how great the soil used to be. Except for the rocks. She didn’t remember the rocks! :-D
The next step was to mark out for planting. I counted the corn plants this morning, and there are 65, plus a couple of bitty ones that probably shouldn’t be transplanted, but I likely will, anyways. I wasn’t sure if I’d have enough space, but with rows 2 feet apart, and the transplants 1 foot apart in each row, I will have enough space.
While the soil may appear good, all the soil tests I did showed a lack of nutrients, so it will still be amended. I used the flags to lay down grass clippings. I lay them out in rows, but I don’t mind them spilling over into the paths in between, to help keep the weeds down.
After this photo was taken, I used a watering can and rainwater to wet down the grass clippings, since the hose and sprinkler were needed at the other end of the garden.
Then we headed inside. We reached 30C/86F while we were out there! So we will take a few hours indoors and let things start to cool down before we continue.
We have predictions for rain tonight, and possible severe thunderstorms by tomorrow afternoon. They might even hit us. :-/ If it does look like we will get a severe storm, we have things we can use to cover the squash to protect them, though the corn would be on its own. It is, however, in a more sheltered area of the old garden. We shall see.
We might still hit our goal to get all the transplants done here by this evening! After that, we have transplants for the south yards, but they are not as urgent and can wait a bit longer.
As for me, I’m seriously thinking of joining all the cats on my bed for a short nap. I’m so tired, I have been falling asleep while writing this!
I’m going to be hurting so much by the time all this done, but it’ll be worth it!
We had a cold, wet night last night, and this morning, all of the outside cats where there to greet me.
Even the shy ones!
Ghost Baby, in the back, is the shiest of them all, still. We still don’t know if Ghost is a he or a she, but if it’s a she, she likely has babies somewhere.
Do you see how Nutmeg, in the foreground, is positioned, with his chest so low to the ground like that? Ginger does that all the time. It’s one of those mannerisms that I thought was due to the missing leg, but both brothers do it. I haven’t seen if Creamsicle Jr. does it, too; he’s more likely to move away from any people than maintain his behaviour with other cats.
As large as we made the kibble house, and with so many food bowls spread out inside, we still get some minor battles between the cats. Rosencrantz and Ghost Baby tend to not be able to eat until after the more aggressive cats, like Butterscotch and Rolando Moon, have moved on. The plan was to make a second, smaller, shelter for the water bowls in the winter. I am now thinking to match the size (if we can scrounge the materials), and split the food and water bowls between the two shelters. That should reduce feline fracases.
Once the critters were fed, I went to check on the tulips and switch out the memory card on the trail cam.
Yes, the tulip carnage continued.
More flower buds were missing, though it didn’t look like any more leaves were eaten away. I was very disappointed to see damage to this Bull’s Eye tulip. Of the 8 bulbs planted, three had come up, and then this fourth one finally emerged, way in the back. It looks like the damage done to it was from something digging next to it, though, not from something trying to eat it. The flower bulb is still intact, if somewhat the worse for wear, and only one leaf was torn right off.
After switching the memory card out on the trail cam still at the driveway, I made sure to check the rest of the garden beds. I saw no signs of frost this morning, though there could have been some during the night. I think we had rain, though, so that would have helped. I’m happy to say that I saw no signs of frost damage on anything.
Unfortunately, I did find other damage.
The Heritage variety of raspberries that I got for my daughter had been doing very well in their newly planted location. I guess they still are, except that something has started to eat them!! They will recover – so long as the munching does not continue.
We still have some 1″ wire mesh in the basement. It might be enough to put a barrier around each of these raspberries.
Interestingly, the old raspberry plants, on the other side of the garden, under the shade of a crab apple and chokecherry tree, show no sides of nibbling. They aren’t as healthy as the new plants, though, and are just barely managing to leaf out right now. In the fall, we should transplant them into a sunny location. For now, whatever critter ate the new raspberries seems uninterested in the old ones.
I also found this.
It looks like something walked right through a couple of our beds. I’ve seen tracks similar to this before, but those tracks were so small, it was likely a cat. These much larger tracks line up with each other across the two beds. There is nothing to show if they were made by hooves are large paws (like a dog or a coyote), but with the nibbled raspberries, it does seem more likely to have been a deer. Or we could be looking at two different animals. The angle of the tracks don’t go to or from the raspberries, but at an angle well aside from them.
*sigh*
Once inside, I checked the trail cam, and nothing at all triggered the camera facing the tulips. Aside from files with me checking the angles and adjusting it, there was one other file, and it got triggered by wind blown branches.
So I went back and moved the camera. It is now on the crab apple tree at the “corner” of where the tulips are. I tried a couple of different branches, so when I next check the files (which I will probably do later today, rather than wait until tomorrow), I can see if one works better than the other. The problem is, I think the camera is now too close. It may be covering just a small part of the tulip area, rather than the whole thing.
Meanwhile, as I was tightening the strap and adjusting the camera position, Creamsicle Jr. came by, walked up to a tulip plant that was still taller (having had just a flower chomped off, leaving the stalk and leaves), grabbed it with a paw, and started biting at the leaves!!! The little s***! Now, I don’t think the cats did the damage we’re finding, but it’s adding insult to injury for him to start chomping on the already damaged tulips!
The girls and I have been talking about what we can try to protect these. The problem is, there isn’t a lot available. I made a point of looking in garden centres, and have not been finding what I remember seeing just last year. I’ve seen some “deer fencing”, which is basically a stronger plastic mesh, but no netting. The closest I found were pop-up mesh covers for individual plants. Which would be fine if we were trying to protect just a couple of plants, but completely unusable – and insanely expensive – for our set up. In researching options. I’ve read that smaller birds can actually get tangled up in the bird netting, so I was looking for something finer. Unfortunately, there was nothing. I found that very odd, as this was something that used to be easy to find. In the end, we ordered a roll of mosquito netting, online, courtesy of my daughter. It’s a 10′ x 30′ roll, and we were going to try it over the beets, first. I think it would be fairly easy to set up on the hoops I put over the beet bed next to the carrots, and my daughters were thinking of using the T posts along the retaining wall in the old kitchen garden to support netting over the lettuces and beets planted there. If this works out, we’ll pick up more mosquito netting.
I also want to pick up more 1″ wire mesh, which is relatively cheap (at least I hope it’s still cheap!). I think that will work better for some of the beds. I’m thinking of getting some PVC pipe to use as hoops, too, though I’ve been looking for that for a couple of years now, and not finding the right size that will bend well. We might have to order that online. We’ll have to come up with something much cheaper to put around the corn and sunflower beds, though. I’ve read that deer don’t have good depth perception, so two low fences, a few feet apart, works as well as one tall fence. We might be able to get away with picking up more of that yellow rope and making a double “fence” around that far garden area. We can also tie flappy, spinny and shiny things to it, to keep the birds away, too.
I’ve been looking at ideas for protecting garden beds from insects, birds, etc. for some time, and in many ways, it has been very … perplexing. I suspect it has to do with the difference between countries. For example, I often see ways to make various structures by re-purposing “free” wood pallets. Where on earth are people getting free pallets? My daughters both worked at a major hardware store. Pallets were always returned to the company that supplied the product, to be used again. They did have “extra” pallets that customers could have – at a price, not for free. By the time pallets ended up at the back by the garbage bins, they were no longer usable. Not much left to salvage from those (we’ve grabbed some in the past and did what we could with them). No one just tosses out good pallets! At least, not that I have been able to find.
Then there are the PVC pipe projects. PVC is so cheap! You can make things for almost free!
Well, not really. I mean, PVC pipe is relatively inexpensive, compared to other things, but clearly our prices are much higher than whomever is writing articles about these projects I’ve found. Also, I’ve looked for the type of pipe used in the projects, and I’m not finding them. What I am finding is far too rigid to be used the way they are in the projects. Then there’s the electrical conduit. I’ve seen these used to make strong, lightweight frames for trellises. Again, I’m not finding them in local stores. The type I am finding is flexible, not rigid. I suppose we might find it in the city. Yes, I know; we could try ordering online and pick them up or something, but the few times I’ve tried that, what showed as available in a store on the website often turns out to not actually be in stock at the store. Plus, when buying something I’m not familiar with, I like to be able to actually see the product to make sure it will do, before I buy it. For my fellow yarn crafters, it’s like buying yarn online. It’s one thing to buy yarn you’re familiar with. Caron Simply Soft is Caron Simply Soft, wherever you get it, but when buying new type of yarn, it’s very much a touchy-feely thing. I recall a friend of mine who spent $200 on yarn intended for some charity projects, but when it came in, she found the texture to be so course and awful, she ended up spending another $200 on yarn at the store I was teaching at, at the time. For me, it makes no difference whether it’s yarn, or PVC pipe. I need to see and handle the product, first. I find ordering online to be a bit of a crap shoot for many things. Like when my daughter ordered a XXL hoodie, thinking it was be safe to order a much larger size than needed, only to get something labeled as XXL, but would barely have fit a child! Or the keyboard my husband bought for me that I ended up not being able to use.
By I digress, yet again!
We have to figure something out, to protect our garden beds from critters. We have so many, so spread out, however, it becomes difficult to find affordable, practical solutions! Particularly since so much of it is temporary. It will be much easier when we are ready to build our permanent accessible garden beds.
Until then, we do the best we can to reduce the carnage!
Having slept in this morning, I was back in the garden far later than I intended, and it was already getting quite hot. Thankfully, I didn’t have a lot to do to finish the last corn block, and I got it done before the shade was gone.
It’s going to be a real challenge, gardening here. Especially the new blocks for the corn and sunflowers, since we ran out of materials to layer under the soil. Thanks to the rain we’ve had, we will be able to mow the lawn soon, so we will start having grass clippings to mulch with. That will help. Especially since, once the morning shade is gone, this area gets baked. Anything that helps keep the moisture and cool the soil will help!
The next thing to do was measure and mark off where the winter squash, melons and gourds will go.
This is next to the Dorinny corn. While I didn’t need to water anything this morning, it was so hot and windy today, that I watered things this evening. While watering the Dorinny corn, I actually saw corn sprouting!!! Just the very tips, breaking through the soil. I’m very excited to see them!
But I digress…
I measured the first row of flags to be 5 ft away from the corn bed; about 1 1/2 meters. After the soil is added – and whatever we manage to scrounge up to layer under it – there should be a path of 3 – 4 feet between the corn bed and the squash.
We are also going to need to clear out some roots. It looks small in the photo, but this is a partially exposed root in what will be the inside path of the squash tunnel. The girls had tried to take out what appeared to be a small poplar sapling, which are all over this area, only to find it was attached to a thick root. We just never got back to it with the tools needed to cut through the root.
Each flag marks where we will be digging post holes (hopefully, without having too many roots in the way!). The two rows are 5 ft apart, and the flags are 5 ft apart in each row. We will need 10 upright supports that are 7ft/2m long to get a squash tunnel that will be 6 ft high and 5 ft wide.
For that, we need building materials.
Which meant doing more clean up in the spruce grove.
Temperatures were supposed to cool down today. I suppose they did, since we didn’t reach 30C/86F , however as I write things – at almost 7:30pm – the temperatures have dropped to 25C/77F, from 27C/81F, earlier. :-/ At least we did get a bit of rain early this afternoon; between that and the wind, it was enough that our seedlings that are being hardened off had to be brought back indoors. Still not the thundershowers we were promised. Those have been pushed back to the end of the week.
Then the sky cleared, and the heat returned. *sigh*
The crazy thing is, the weather system that’s coming our way has already brought snow and overnight temperatures of -5C/23F in other areas. Other zone 3 gardeners in the groups I’m in have been scrambling to save their gardens. Meanwhile, our long range forecast now goes as far as June 2 – our last frost date – which has an overnight low of 12C. The lowest overnight low before then is 5C/41F, an increase since the last time I looked.
Well, no matter. Today, we had to work on the beds for the beans, regardless of the heat. They can be planted any time now, since they won’t sprout until after our last frost date, so they should be safe.
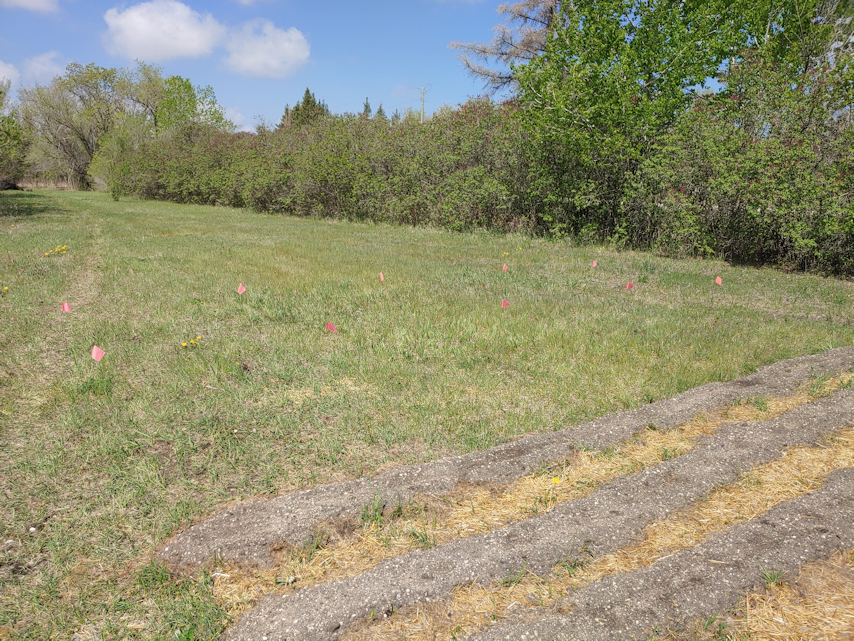
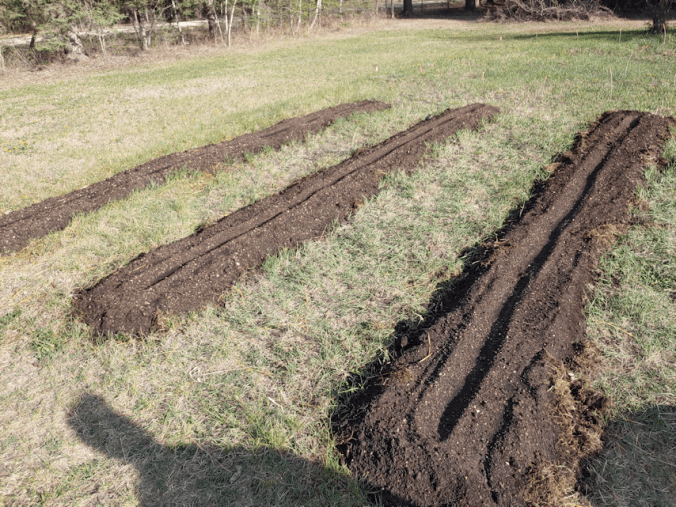
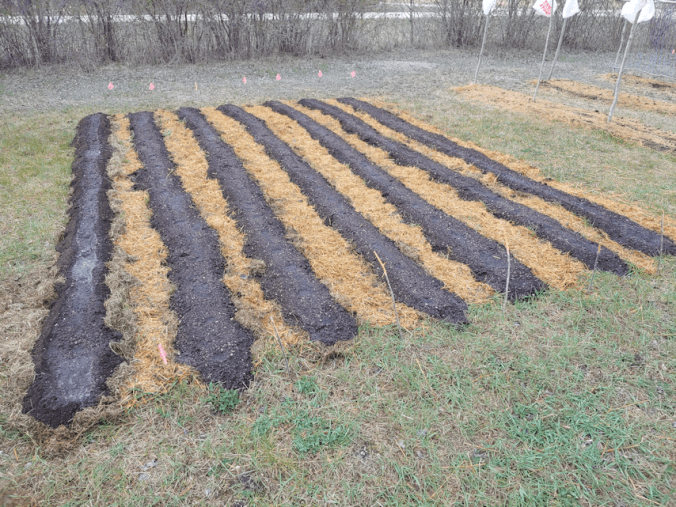
We have three areas marked off at 3′ x 20′ (just under 1m x just over 6m). We’ve managed to scrounge enough cardboard to line one of the areas, plus a little bit more. The rest was covered with a layer of grass clippings, all of which was watered down before we started adding soil.
We will be planting double rows of bush beans in each strip. The trench in the middle is to help hold water. It turns out we can just manage to water even the furthest strip with the hose, so we won’t be needing to use watering cans from the rain barrel for these. Though we marked off 3′ wide strips, the soil is only about 2′ wide (about half a meter).
I’m tempted to go out and sow the beans now! I will wait until the morning, though.
The next area we need to work on is where the sweet corn and sunflowers will be going, which is to the left of the bean beds in the above photo. This is going to be the farthest we’ve had to haul soil, so far, and I’m still not even sure how we need to space things. We started half the sunflowers indoors, and none of the purple sunflowers have germinated yet. Only the Mongolian giants. Of the packets we will be direct sowing, neither have a lot of seeds in them (which is why I’d ordered two of each). So the areas needed for the sunflowers will be smaller. The packets of corn seeds, however, have plenty in them, so we’ll be looking at blocks at least the same size as the one the Dorinny corn is planted in, which is 20′ long by about 14′ wide (about 6m x 4 1/2m).
We have some calculating to do.
Either way, that’s a lot of soil that will need to be moved, and we don’t want to waste any of it. We don’t even have anything to put under the soil as a barrier and amendment anymore; not in any useful quantities.
Ah, well. We’ll work it out!
Meanwhile, on a completely different topic, while we were working in the garden, I got an email notification from a family member. It had a link to a news article. Someone in our little hamlet won a Lotto jackpot! I read the article and realized I know them! (The article only mentioned the husband’s name, and it’s his wife that I know from years ago.) I am so incredibly happy for them! It couldn’t have gone to a more deserving family! It’s also wonderful to hear that someone local has had such a great blessing.
Maybe I should start buying lottery tickets again? :-D
But I digress.
Time to go back to figuring out our corn and sunflower area!
My goal for this morning was to get the soil over to where we’re planting the Dorinny corn, before things got too hot. Normally, I don’t have breakfast until after I’m done my morning rounds, but I cut those short to quickly eat before I started hauling dirt. I probably should not have taken the time to eat, first! I got just over two rows done before I had to go inside. I couldn’t believe how quickly it got so hot!!
I didn’t get back to it until well into evening. While one daughter took care of the evening watering, and the other helped me prepare the corn block, things went much faster, too.
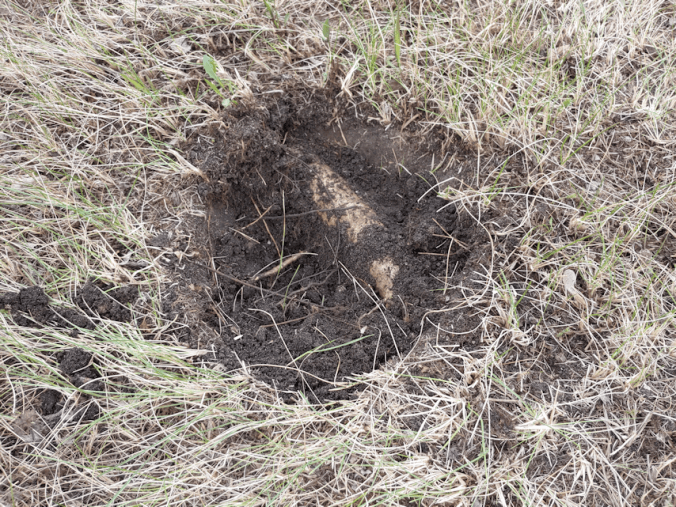
Once the soil was in place, my daughter dragged the hose over to give it a soak, while my other daughter and I checked out different locations and decided on where to plant the mulberry tree. It’s going in the strip between the garage and the road. Since we’ve already started cleaning up there, this spot will have the full sun it needs, while still being surrounded by enough mature trees to protect it from the harsher winds. We found a little cedar there, when we first started cleaning up in the area. Like the mulberry, it is not a zone 3 three. Nothing has been done to protect it over the winter, but it has survived, though it’s still very small. This, at least, tells me that the mulberry will have a chance of making it, in this location.
After picking a spot and raking away the thatch, my daughter started digging and immediately hit a huge root!!
So we moved the hole over a bit. :-D
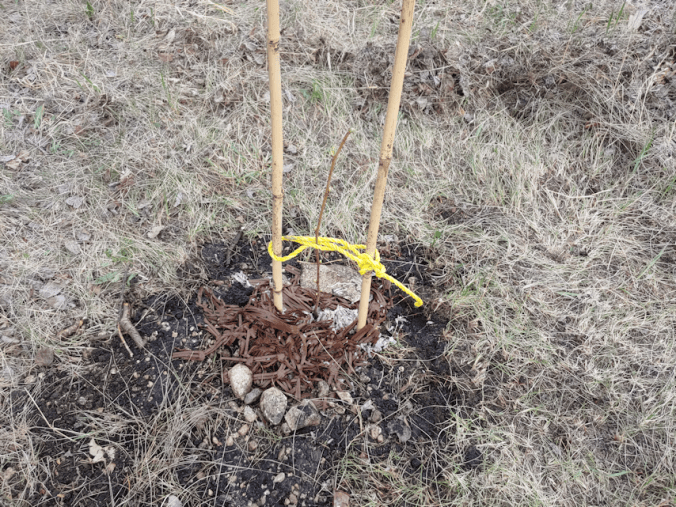
While she dug the hole, I got the mulberry sapling, along with the rest of the pre-soaked peat we still had in the sun room, and a bucket of water. When I got back to my daughter, she had already hit gravel and was struggling to get out a larger rock. Between me with the spade and her with a trowel, we managed to get it out. Thankfully, it turned out to be wide and flat, which made it much easier to get out. Of course, for some reason, it got moved and didn’t end up in the picture. :-/
We certainly won’t have to worry about drainage here. Like everywhere else, there wasn’t a lot of topsoil. After that, it’s gravel.
We filled half the hole with the damp peat, added more water, planted the sapling with more peat, and placed a pair of bamboo stakes beside it for supports. The soil was returned and the cardboard packing material the mulberry came in, including what was keeping the root ball damp, was placed as a mulch. We even put the bigger rocks around to help keep things in place. Then I wrapped some cord around the sapling and the supports. Hopefully, this will also make sure no deer will eat it! I also picked the yellow rope deliberately. I’ve read that using ordinary yellow rope like this, strung in a rope fence around a garden, has worked to keep deer out, even though they can easily get by it. Apparently, there’s something about the yellow rope they don’t like. I figure it’s worth a try to use it, since I happened to find some in the sun room. If not the colour, then the stakes, should act as a deterrent.
By this time, my daughter that was watering things had brought the hose over as close as she could. We gave the mulberry a final watering – and then watered the cedar, too! Since we’ll be tending the mulberry now that it’s here, we’ll take the time to tend the cedar, too. Later on, I’ll bring some garden soil to place around both of them.
While I stayed to water things, my daughters put things away for the night, but I decided to go ahead and plant the Dorinney corn tonight, rather than wait until tomorrow.
After setting the seeds in water to soak, I used the handle of a trowel to make holes about a foot apart. Though my daughter had been able to set the sprinkler over the area for some time, the soil was still pretty dry further down, so I used a watering can to give the rows a deep soak before planting the seeds.
By deciding to put the soil over the grass clippings mulch, instead of the chopped straw, we lost a row – and it turned out there were enough seeds in the packet to need it! Since I’d soaked all the seeds, and I didn’t want them to go to waste, I made another row, instead. Once all the seeds were planted, I gave them another watering.
By then, the water barrel was needing a refill, so I set up the hose and hung around while it filled.
I got company.
Rolando Moon came for a visit today! I haven’t seen her in about a week, but this evening, she decided to keep us company. She even joined us while we were planting the Mulberry tree – and kept trying to drink the dirty water! At least here, she’s drinking the clean water that’s in the watering can. It’s kept filled, so it doesn’t blow away, and she had her head stuck right into the opening. Silly girl! :-D
With the corn planted here, we are done with the early planting, until the potatoes come in next week! Since those are going into grow bags, there are no beds to prepare for them. Everything else doesn’t get planted until after June 2.
As for the other garden beds, the girls checked under the plastic covering the beets and carrots in the old kitchen garden and saw sprouts, so those got taken off. The lettuces are also coming up; the seedlings are still tiny, but big enough that we can be sure they are lettuce sprouts, and not weeds! LOL My daughter planted her Black Form Iris near the poppies, which is right along where she planted her other irises in the fall. I was also able to confirm that we are seeing pea sprouts in all three beds. Just a couple, here and there, but they are clearly not weeds that have made their way through the straw and soil. There are some of those, too!
Looking at the long range forecast, we’re going to keep getting hotter for the next few days, then the temperatures will drop down to a more sane level for the last couple of weeks of May. If those temperatures keep steady through to June, there will be no frosts at all. Still, we will wait. We will use that time to finish preparing the other beds. The climbers will be doing in a bed next to the corn that was planted today; this is where we will be building a squash arch. It looks like the only gourds will be including there will be the dancing gourds and luffa, as there is still no germination in the other three types of gourds. It looks like we’ll have plenty of Halona melons to transplant. I’m seeing quite a few sunburst squash have germinated, but not very many of the other summer squash yet. I’m really excited by how quickly the Mongolian Giant sunflowers and Montana Morado corn have germinated! There are so many things sprouting in the sun room, it’s going to be a challenge hardening them all off at the same time. I’ve got the platform set up where the cats won’t get them, but there’s not that much room on it. We’ll have to work something else to use as well.