First up, some good news in progress that made it worth being up way too late again.
At around midnight, I was contacted by someone from the new rescue. Some spaces are opening up, and she was wondering what friendly yard cats might be available to take in for fostering and adoption?
She had a few in mind from pictures I’d sent before, but requested more up to date photos and videos that she could show to potential fosters. My daughter and I did that while doing the morning cat feeding. Unfortunately, a couple of times when I thought I was taking video, it turned out it wasn’t recording. Instead, I had a second or two of video of our feet or whatever, taken at either end of what was supposed to be a video for the rescue! We have a whole bunch of adult males in particular that are so friendly, it’s almost impossible to get still shots of them, as they are all over each other, trying to get pets.
So I will have to try again later today. If all goes well, we might be able to have our tiny girls that are friendly, but still too small to spay (even though they are almost a year old) be taken in. Or Sir Robin. Sir Robin desperately wants to be an indoor cat! I haven’t even seen some of the adult feral females in a few days which, unfortunately, means they may well have just had kittens somewhere in their hidden places.
Tis the season.
Speaking of the season, here is how our seedlings are looking.
Two snail rolls have graduated to the upper level and are now under the shop light, giving them a few more inches of space that I couldn’t give them with the gooseneck light fixture they were under.
The Golden Boy celery is thriving since being “potted up” to the snail roll! That poor little luffa is getting its true leaves, but is looking pretty sickly. The summer savoury is looking very leggy and weak, but the tarragon – the very few there are – are looking stronger.
The second picture is of the eggplant and peppers tray. Those seedlings are looking very sad and weak, and there are so few surviving. I’ve already resown them, but I won’t try again. They are short season enough that I might try direct sowing, instead.
With how few there are, I’m seriously considering “potting them up” into a snail roll. I could easily fit them all into a single roll, with room to spare. I’m just not sure how well they’d handle being transplanted. It can’t be much worse than they are doing now.
In the first picture, you can see quite a few more of the hollyhocks now. There are still two or three seedlings disguised as vermiculite in there.
In the next picture, you can see a second Orange Currant tomato is up – plus there’s another elbowing its way up that I didn’t even see until I looked at the photo, later.
It’s the same in the next picture. I could see one Manitoba tomato had emerged, but looking closely in the photo, I can see the stem of another, pushing it’s way up.
Still no sign of anything in the Chocolate Stripes or Blueberry tomatoes, and still no Florence Fennel visible.
All in good time.
Tomorrow is the last business day of the month – payday – so we are expecting to do our Costco stock up trip in the city. I’ll see what they have for seed starting mix. I only got one bag and it’s pretty small. I might only get four seed snails out of it. I won’t be starting more seeds for a couple more weeks, but I will probably be starting more. Costco carries the big Pro Mix bags, which would last me for the rest of the seed starting season. I might have to sift it before using it. I haven’t heard people talking about needing to do that with their seed starting mixed this year at all, though, so it might not be an issue. I might need to get more potting soil, too. I still have some but, with so much material getting sifted out, I don’t have as much potting soil as it appears in the bag! Any time I pot something up, I would be using potting soil rather than seed starting mix.
We really need a better set up for starting seeds indoors.
I did a lot of prep in advance. I had enough bubble warp to make the eight snail rolls that I needed, so I went with that, this time. The bubble wrap has perforations to make 12″ square sheets. I made strips 3 sheets long, then cut them in half, giving me strips that were 3′ long and 6″ wide, using clear packing tape for where I needed to join pieces together. I saved the masking tape for holding the rolls together, labelling half the strips I needed in advance.
Then I used hot water to moisten the seed starting mix. I had a bit left over from last time, plus added the new bag I got. No sifting needed! It took almost a gallon of water to get it sufficiently damp! I also set up a heat mat and a plastic tray under the shelf the seedlings are on, to hold the rolls.
Once everything was set up, it was time to make the seed snails and plant some seeds.
I had a bit of a surprise with the tomato seeds. Specifically the seed counts. I always empty the packet of what I’m working on into a bowl to make it easier to grab the seeds, one at a time – usually with the tip of a damp bamboo chopstick for small seeds. The Orange Currant packet said 25 seeds, but there were only 18. I normally would have planted about a dozen seeds and saved the rest; I chose varieties with growing seasons short enough that I could try again if germination or survival rates were low. I ended up using the entire packet.
The Blue Berries tomato had a seed count of 10, but there was only 9. I even double checked the packet to make sure nothing was stuck inside. Not a bit deal.
The other two varieties, meanwhile, had more than what the packet’s seed count said. I planted a dozen seeds each of those and have some left over if I need to try again.
I’m not complaining about the seed count. MI Gardener even did a video on Instagram, I think, talking about why they do see counts instead of weights, and that they always try to have over counts, but mistakes sometimes happen. Their seed packets are only $2 each, so I’m really not worried about it.
The strips I made for the seed rolls were all quite a bit longer than needed. This is deliberate. It gives me enough slack that I can “pot up” the tomatoes more than once, as the seedlings get bigger.
With the Florence Fennel, I made that roll bigger because I wanted to plant quite a bit more. Those can also be succession sown. We don’t normally buy bulb fennel, even though we enjoy it, because it’s one of those “treat” vegetables, rather than a staple. Hopefully, we will have lots to enjoy. I’ve tried growing them once before in the old kitchen garden and they were mostly a fail (the leaves could be used, but we never got bulbs). We didn’t realize, at the time, just how much the ornamental crab apple trees shaded everything. That’s been largely dealt with but, this year, I’ll be sure to set them where they will get more light!
With the flowers, I plan to direct sow some of the left over seeds later on, to extend the blooming season. They are going to be scattered all over the garden areas, rather than into dedicated flower beds.
I’m a little perplexed, though. I had wanted to start some of the aster seeds I saved from a packet of memorial seeds. I distinctly remember labelling a paper seed envelop (from some of the free ones we got with our seed orders) for them, as well as one for the asparagus seeds I’d collected. Now, I can’t find either. The other seeds I’d collected were larger so they went into little spice jars. I have those. They all should have been together in my seed storage bin, and I just can’t find them anymore!
I really want to plant those memorial asters again.
But I digress…
Once I got all the seed rolls done – which used up all the seed starting mix I had! – I topped them with a bit of vermiculite. Even the hollyhock, which the packet said not to cover. I just dusted a bit for the benefit of the seed starting mix surface; not enough to actually cover the seeds. After that, they all got a thorough misting.
The first was the tray they were in. All those rolls were heavy enough I had to be very careful not to break the tray when moving it.
Then there was the problem of light.
Once they were under the shelf and on the heat mat, I tried to set up one of the full spectrum lights I have. Unfortunately, the only place I can clamp the fixture onto is the edge of the table, and the lights didn’t quite reach under the shelf. I had to pull everything out and set things up closer to the edge, which I had hoped to avoid doing. It leaves me very little work space on my table.
I was just finishing up when my daughter came down to see how I was doing (she’s been taking over the outside cat feeding of late, letting me sleep in in the mornings, and get jobs like this done). I took advantage of her and got her to help me transfer the seed rolls out of the plastic tray and onto one of the metal baking sheets I had been using to hold seedlings in the Red Solo Cups. They are too wide to go under shelf were I’d originally intended the tray to be, which is why I hadn’t used one in the first place. In the second picture, you can see how it’s now set up, on a strong and sturdy metal tray over the heat mat and with the lights.
I had not intended to do so many seed snails but, for this year, they are the most practical way to do it, and they really do save a lot of space.
The next group of seeds that will need to be started are in the 4-6 weeks before last frost category. I’ll do those around the middle of April or a bit later. More than enough time to get more seed starting mix.
Hopefully, we’ll have a good germination rate – and the mouse or whatever that ate my pepper seedlings won’t like anything growing here!
The yellow celery (Golden Boy celery) had outgrown their tray. They needed potting up.
The question was, how to do that without damaging their roots?
That’s the down side of scatter sowing such tiny seeds. Especially when the germination rate was so high!
I decided the best way to do it was to set them into a seed snail roll.
As with the onions, I wanted to use potting soil rather than a soilless seed starting mix. That meant, more sifting. Which had its own challenge. Wearing a dust mask again was out of the question. I just can’t wear a mask anymore, and trying to last time was really awful. Yet not having some sort of protection was also out of the question because of how much dust sifting the dry potting soil would raise up.
My solution turned out to be pretty simple. The clear plastic garbage bag I use to protect my work surface is large enough to cover the entire bucket, and have enough slack that I could grip the handles of the colander I am using as a sifter and shake it. Yes, small amounts of dust did come out from below, but this was at floor level and it wasn’t an issue.
Before I started, I emptied the old, cracked tray I was using to collect the big pieces. This is what I got.
The depth of the soil barely reached my second knuckles. Meanwhile, just look at all those pieces that got sifted out! Totally insane. This bag was purchased last year, and I’ve heard that a lot of people were having the same issue. A few sticks is pretty normal, but nothing to this extent. It wasn’t even just one brand, either. Hopefully, the companies have gotten better at making sure their raw material is properly composted before bagging it up and sending it out!
The first picture is the “before” shot. You can see how dense they are. The tray is bottom watered, and roots are showing out the opening. Roots that would be quite entangled. How to get the seedlings out and apart, then transplanted, gently?
In the second picture, you can see what I decided to do. I had a tray (a thoroughly cleaned and repurposed meat tray that we’ve had for a few years now) that was wider and flat. I carefully moved the whole clump over into the tray, then very gently started to loosen the seed starting mix to untangle and free up the roots a bit.
Then I got some hot water and thoroughly moistened the sifted soil. The seed starting mix the seedlings was in was really quite cold. Not good! I wanted to transplant them into soil that was at least a bit on the warm side.
I had prepared a strip of packing material – this time, using a clear repair tape I happen to have, instead of painters tape, to join three sections to make one long strip. I started out by laying a thin layer of soil over about 3/4 of the strip, as I wasn’t sure just how much of it I would need to use. Then it was time to VERY carefully and gently pull apart and set out the seedlings.
I was able to get all of them in, and did add more soil to the roll to fit them all.
The remaining seed starting mix got added to the bucket of sifted soil. I added more hot water and mixed it all up before adding another layer of soil to the roll; just enough to cover the roots.
Before rolling it, I added strips of masking tape to the end, so it just needed to be lifted into place, with the tape already handy to close up the roll.
With the two layers of soil in there, the result was a pretty thick roll. I could use the plastic underneath to hold the soil in at the bottom, but there wasn’t much that could be done at the top, and soil was falling out. Once it was taped closed and the roll set upright, I found a few seedlings had fallen out with the soil. I found some gaps and carefully set them back in. I then used some of the soil that fell out to fill in the top of the roll and support some of the seedlings that seemed to need it more.
Now, it’s back in the tray under the shop light. Both trays were empty of water, so I added warm water to the trays to maintain bottom watering.
While I was doing all this, I had the heater going. It’s aimed under the shelf I have the trays on. The thermometer is kept at the far end, and the temperature was only about 13C/55F. Holding my hand under the shelf, though, I could feel it was a lot warmer just under the trays. So I set up the thermometer next to the tray with the snail roll, which is at the far end from where the heater is.
The first picture shows the “potted up” celery back in their tray. After setting up and leaving the thermometer for a while, I got a reading, which you can see in the next photo above.
It’s just barely touching 25C/77F! This is great, as cold is the big issue here. The ambient temperature really should be about 20-24C/68-75F
Since the heat is under the trays, that will warm up any water that is in them which, in turn, will warm up the soil and seed starter mixes. Not by a lot, but enough to hopefully keep the chill off the roots. Plus, it will be better for the fresh pepper and eggplant seeds I sowed to hopefully replace the ones eaten by a mouse or whatever it was.
The hygrometer reading is low, though. Ideally, it should be between 50% and 60% – even 70% for some plants. Hopefully, the bottom watering and occasional misting helps counter the ambient humidity at least a bit.
The celery seedlings now have a nice deep roll to spread their roots into, so they should be good in there for a while.
Hopefully, they will survive this! I seem to remember that I used the entire packet of seeds for this, so there’s no trying again if they don’t make it.
My first goal was to “pot up” the onions in their seed snails. For this, I wanted to use potting soil, rather than more seed starting mix. I have a bag of potting soil from last year with plenty still left in it, but I knew it was really full of sticks. Which meant I needed to sift it, first, because there was no way it could be used in the snail rolls as it was.
I got out a bucket and a colander that I use for harvesting in the summer, and started sifting in batches. The potting soil was bone dry which made it easier to sift, but also meant there was a LOT of dust. Even misting with water didn’t really help much. I did try to use a dust mask, which is difficult all on its own, since I can’t wear masks anymore. It was either breathing dirt without it, or struggling to breathe with it. Definitely a no-win situation. It didn’t actually help much, to be honest, but it was better than nothing.
I was blown away by just how many sticks I sifted out.
That pile on the side? That’s what I sifted out of what you see in the bucket. I poked my finger in to measure, and it was up to my second joint, so about 2 inches deep. Good grief! It was almost more sticks than soil!
The next step was to moisten the sifted potting soil. I used hot water for that, so it wouldn’t be a shock to the plant roots. It took a remarkable amount of water to moisten it, and I was just aiming to get it wet enough to be able to stick to itself.
This is how they looked to start with. These rolls all fit into one bin, and the seedlings are looking pretty good.
The length of them did make unrolling the snail a bit of a challenge! They were tangled together, and wanted to twist around each other as I unrolled the snail.
In the first photo above, I unrolled the first seed snail. These were bottom watered, and you can see that the soil is moist all the way through, and the roots are all the way to the bottom. Some of them seemed a bit crowded, so I did adjust a few of them to space them out a bit. In the second picture, you can see where I’ve added the potting soil on top. From there, it got rolled up and taped closed again.
It was a lot bigger, of course. Only two could fit in the bin I was using, but I did have a second, slightly smaller one, available.
Here are the “potted up” onions. In the second picture, you can see that one of the snails is a lot smaller. That’s the bunching onions. It’s a good thing those didn’t need as much soil, because I was scraping the bucket to get every last bit out for that roll. I really didn’t want to have to sift more!
These are now back in the living room. They are the only things I have space for there, this year.
In order to do this, I had to completely clear my work table. That meant taking away the trays, lights, heat mats, and everything under and around them.
With the onions done, I could then arrange the work space to be ready for the next batch of seed starts. I have the top shelf from a plastic shelf that was too tall to fit in the old basement, and it was used last year to hold trays higher up. That’s what I am using it for again now.
Hopefully, the new seeds I sowed yesterday will germinate – and won’t get eaten! I had some concerns about not having heat mats under them anymore, but before I set up the shelf, I made sure to create a wall of cardboard around the back and at one end, then moved the heater so that it was blowing under the shelf. That made a big difference, and the warmth is kept under the shelf enough to warm the trays from below. Not that the heater is on all the time, but even when the furnace is on, now that the opening between the basements is uncovered again, there is heat blowing in and the cardboard, etc. holds it around the plants surprisingly well.
The insulation leaning at one end it just there until it’s needed later; the cardboard forms a “wall” behind it, out of frame. I’ve got the flaps of the cardboard box under the back legs, so I had to put something under the front legs to level the shelf. Then I set up the insulation pieces, which protect the cutting mat from warping, and the heat mats, ready and waiting. With the seedlings so close to the shop light, the plant lights aren’t needed for now, so they’re just clamped to the table in the front. There is no place to clamp the lights to use them on top of the shelf, anyhow. Everything gets plugged into a power bar with USB ports that I have set up above my work table.
As for our next seed starts, I don’t think I’ll be using the seed trays again. They are all smaller seeds, and for the space, I think I will do more seed snails. I wouldn’t me making them as deep was what I used for the onions, though. More like a third of that height. I have lots of that packing foam available.
I need to remember, though: do not use painters tape to attach them together to make a longer strip. One of the onion rolls started to split at the tape while I was rolling it back up again. It doesn’t like moisture. I’ll have to see what alternatives we have.
That won’t be needed for another week or so.
For now, I’m just glad I don’t need to sift more of that potting soil for a while!!
With our seedlings starting in the basement, I make a point of checking on them at least twice a day. In the evening, I turn on the heater and spend some time down there, getting my steps in if I need to. The celery is doing particularly well, and I’ve been seeing new seedlings coming up, including from the “extra” seeds I added to the pre-germinated ones, just in case. There was one little eggplant seedling that had its seed case stuck on the tips of the seed leaves that I ended up very carefully removing and was surprised to see three seed leaves unfurl instead of two.
In other words, I’m keeping a close eye on things.
Which means I immediately noticed something wrong this morning.
The first picture in the slide show above is the seedling that had 3 seed leaves. You can see part of one of them nearby. The other two, and half the stem, are gone.
I tried to zoom the next picture in, but the stem of that Sweet Chocolate pepper is cut right to the surface. The next picture is also a Sweet Chocolate, while the last one is a California Wonder.
If these were outside, I would be thinking that insects got to them. But these are trays in my basement. One of my daughters suggested it might be mice. We do have at least one mouse in the ceiling of the addition – the skittering drives the cats nuts – but there has been zero evidence of mice in the basement. There was also no disturbance in the soil that a mouse would cause if it was moving around the top of the tray. Plus, these damaged seedlings are sort of all over the place on the tray, and it would be odd for a mouse to get just those ones and not, say, the entire tray.
I had been thinking to start more seeds tomorrow, but I expect to be out and about and decided to just go ahead and do some today.
There are flowers and herbs that can be started in February in our climate, but I had only four in mind. After reading more on what the flowers – cosmos and hollyhock – needed to be started indoors, I decided to hold off on them. Instead, I went through two of my herb seeds that needed the longest start up time before our last frost date. Russian Tarragon and Summer Savory.
The seeds for both are very tiny and would have been ideal for the seed starting kits I got a couple of years ago. The cells are quite small and there is a USB powered full spectrum light disc for each dome.
I couldn’t find it.
It had all been stored in the original box in the sun room, but the sun room got completely emptied and cleaned out in the fall. I thought I’d put it in one of the storage shelves or one of the storage bins, but I couldn’t see it anywhere. I didn’t pull the bins out completely to look, as that would require far too many cat-blocking things to be moved out of the way, but they are semi-transparent, and I couldn’t see anything through the sides. It’s possible the box was buried in one but, for the size of it, it is highly unlikely it was in one of the bins and I wouldn’t see it.
I also didn’t want to use my new 72 cell tray for just two items. In the end, I grabbed a biodegradable seed starting strip I had left from previous years. It had two rows of five cells that I separated.
The drain tray with the cardboard buffer between it and the heat mat had space available, so I removed the buffer. The strips got filled with seed starting mix pre-moistened with hot water – which cooled down fast, but was still warm by the time the seeds were sown. With their tiny size, I scattered tiny pinches of seeds over the surface, then topped them with vermiculate. I keep a smaller amount of vermiculate handy in a covered container I refill as needed. Over time, a vermiculite dust has started to accumulate, and I tried to use more of that, rather than all larger chunks.
I also made sure the drain tray had water in it for the peat cells to absorb. One of the issues with the biodegradable pots and seed strips is that, as they dry, they tend to suck the moisture out of the growing medium inside. I try to keep them moist through bottom watering to prevent that. It does mean they become pretty fragile and difficult to move around, but that’s something I can work around.
Without the cardboard buffer over the heat mat, I wanted to have some sort of buffer for the things that are already germinated – the celery and the one luffa, in this tray. Something that wouldn’t disintegrate in the drain tray’s water. You can see in the photo that I put a piece of rigid insulation under the celery, but I was not happy with that, as it prevents bottom watering. I ended up rearranging things so the celery was on the far side, with the one sprouted luffa beside it, and then put a carboard buffer under the heat mat only on that side. That helped to push the water in the drain tray more towards the biodegradable strips, which will help them retain moisture longer.
Over the next few weeks, there will be more herbs started, plus there are some that I intend to buy as transplants rather than try to start them from seed, myself. We’ll see if the thyme, sage and oregano from last year were mulched well enough to survive the winter. Little by little, the old kitchen garden will be mostly herbs with a few vegetables, rather than mostly vegetables with a few herbs. 😁
The hard part for me will be not starting too many of any one variety! It’s always good to sow extra and then thin the seedlings, but I have this terrible habit of repotting the “spares”, because they’re usually all really strong and healthy looking! 😄
My biggest concern is having to use the basement for all this. It’s just too cold down there! Granted, the temperature is very steady, but the ambient temperature should be about 20-24C/68-75F, not 13-15C/55-59F. Even if we were using the living room, like we’ve done in the past, it’s only a couple of degrees warmer, but at least we could use the aquariums as greenhouses to keep a controlled area at a better temperature until things got large enough to handle being moved out.
Aside from not being able to safely move the tanks to the basement, we have got to figure out what to do with all the “stuff” that’s being stored in the “cat free zone”. We can barely move around in the living room anymore. Some things will be moved into the storage house, but they still have to be gone through, first, and the storage house is where my mother’s furniture went, so it’s got barely any room left – and I have very strict instructions, not to throw anything out!
*sigh*
One thing about gardening, starting seeds and planning it all out. It is a healthy distraction from the other stuff and keeps me from feeling overwhelmed!
I’m glad I didn’t decide to just wait until the post office reopened in the afternoon. I forgot today is Wednesday. The store the post office is in closes at noon, every Wednesday, for inventory.
I was expecting the chicken coop to come in several large boxes, but there was only one small box. Only one package slip in my mail box. No coop. There was no “attempted delivery” this morning at all.
Hmmm.
Something to look up when I got home, and after I checked out my new stuff.
Two new heat mats, two 4 light clamp lamps and one 5 light tripod pedestal lamp, with full spectrum lighting.
This gave me a chance to do a few things all at once.
Right now, my work table is covered with a gain self-healing cutting mat my darling husband got for me some time ago. Unfortunately, the heat mats make it warp. So I cut some pieces of half inch rigid insulation to size, to go under the heat mats.
The heat mat with the germinated plants in it got a piece of carboard between the mat and the tray as a buffer. Normally, I would stop using a heat mat as soon as the seeds germinated, but it’s so chilly in the basement, that’s not really an option. Especially since I will no longer use a light fixture that puts off a small amount of heat. The buffer will keep the seed starting mix warm, but not too warm.
The large celled tray now has a new heat mat under it. I’ve filled the last empty cells with seeds that were set to pre-germinate, even though they were not germinated yet. Then, just in case, I added a couple of fresh seeds into each cell. I did actually see a single Caspar eggplant starting to break through the surface, but nothing in any of the other cells. It’s entirely possible the seed starting mix, not being on a heat mate, but getting some heat from above, was too cold.
I also added new luffa seeds to the three Red Solo cups where nothing has shown yet, including the one where I couldn’t find the pre-germinated seed at all.
The new lights have a controller with several settings. There are five brightness settings – I put them at the highest. They can also adjust from red, blue or white light, or all three. I have it on all three. It can also be set to shut itself off after 6, 12 or 16 hours. I set it to 12 hours. Each lamp also came with an adapter, so they can be plugged in as usual, or can have USB. I have a power bar hanging above that has a couple of USB slots in it, so I decided to use that.
The only problem is that these are clamp lamps, and cannot stand on their own. Which means I had to move the tray set up to the front of the table for the lights to reach. Only at the front of the able is the surface narrow enough for the clamps. This worktable has a sheet of plywood on top of a narrower table top. The ends are too thick for the clamps.
With a full tray of cells, plus a second tray that’s only partially full, I set things up so that the full tray has five lights over it, and the other has only three.
I’ve still left the shop light above on. That light is manual, so I’ll need to shut it off and on, but that’s okay.
I am looking to pick up more seed starting mix when we are out and about tomorrow then, either on Friday or the weekend, I’ll start more seeds. Specifically, I’ll be starting herbs.
The tall light fixture will be set up in the living room. The onions in their seed snail rolls are getting plenty of light, with the shop light lowered to their level, but the other plants around them could really use better light! That room gets the morning light, and that’s it. It’s pretty dim, the rest of the day. We don’t have a lot of plants anymore, after repotting and donating most of them to the large animal rescue that took Poirot’s orphan kittens last summer. That, at least, will make it easier to give them proper lighting with this new lamp.
The lights themselves were very reasonably priced. The smaller lamps were under $25 each. It was actually cheaper for me to buy as a quantity of two separately, than to buy a single 2pk, which is weird. The larger lamp was under $40, regular price, and I got that one on a 10% off sale.
That done, I went looking to see what happened with that coop delivery.
Now, when placing the order, I was really surprised that would be delivered by Canada Post. When checking the tracking for the two packages I was expecting, they were the same. They even went through the same delivery depots at the same time, though the lights were ordered several days before the coop was.
Any time an order arrived, the trackers say “delivery attempted”. Of course, no delivery is attempted at all. The packages are just left at the post office for us to pick up with the regular mail.
Today, however, the coop’s tracking now said “undeliverable” and “location unknown”.
It also said, Fed Ex.
*sigh*
If I’d known is was going to be Fed Ex, I would have used our physical address. They have actually found us and delivered to us before.
I tried using the “contact shipper” link on Amazon, which took me to a page with a list of delivery companies.
None of them, Fed Ex.
So I went to their website and eventually found a customer service number to call.
After going through the robot sentinel, I actually got to talk to a real human being! Not only that, but he was awesome!
I gave him our physical address, including both the name and the numerical designation for our road. He put me on hold to work on it, then had to come back to ask more confirming questions. I told him, our address doesn’t exist on Google maps. He did, however, find a road with the numerical designation – but under the name of our municipality, not our little hamlet. So I had to explain that that section of road ends at a crossroad, then restarts a short distance off before continuing for several miles. It’s those several miles that are the empty void in the map, and we are in the void. In the end, he was able to take directions and instructions on how to get to us, and how to find our driveway – with the warning that if they miss our driveway, they’re not going to find the next one to turn around in for another mile. I also told him about the sign we have, with our physical address on it, and arrows pointing the way, at the turn off. Because we’ve had this problem before!
We had a lot of laughs while working this out.
I asked if they would be delivering tomorrow, and he said it was very likely. So I told him, I’ll be out for most of the day, though there will be someone home. I let him know we would leave the gate open, and the garage, and the package can be delivered into the garage. I don’t know how many boxes this is going to go into, but it’s warm enough that I don’t mind not parking the truck all the way into the garage, so make room for the boxes.
We will need to figure out where to assemble the coop. It needs to be relatively close to the house, on level ground, and in an area that doesn’t get flooded out in spring melt. Wherever we decide to set it up, we’ll probably have to level the ground. We really don’t have level ground anywhere!
On the plus side, this is a relatively small coop. It would be easy to move, if we ever need to. It could even get set up in the main garden area, where we can let the chickens help prepare the soil for us, where more raised beds are going to be built. The coops is just under 4′ wide, and just over 6′ long. The raised beds we will be building in the main garden area will all be 4′ x 18′. It could be set up where a new bed is planned and either moved 6′ every few weeks, or an extended run could be built to cover the 18′. I’ve got enough chicken wire for that. I’d just need to find the materials to frame it out. The coop design I got has the eggs boxes and roosts above and an open run below, with wire mesh walls. It would be easy to make a door to access an extended run. The only hitch is that access to the nesting boxes are at the ends, so a run on the end would make it harder to reach.
Hmmm… Things to think about.
We’ll have snow on the ground for quite a while yet, though, so there’s plenty of time to figure it out.
First up, this is my first order from West Coast Seeds, a Canadian seed source that comes highly recommended. I used the Gardening in Canada affiliate link, so Ashley gets a cut. I gain so much from her videos, it’s my little bit to support her.
The other reason I wanted to order from here is because of my current seed starts. When I turned the light on over the trays in the basement, I decided to check on my luffa. Of the four pre-germinated seed, only one has emerged and it still just as seed leaved.
Yes, I dug around to check the others.
With the first one, I started off gently moving the seed starting mix aside, but there was nothing. In the end, I was digging around aggressively, and there was no sign of a seed. Which means it rotted away. The remaining two seeds, I did find when I initially, very gently, most the seed starting mix aside, stopping as soon as I touched a seed. There is no side of growth, though.
It may be that, even on the heat mat, the basement – and, therefore, the seed starting mix – it just too cold.
These seeds were ones I got from MI Gardener and have a days to maturity of 120. Thanks to Gardening in Canada, I learned that West Coast Seeds has a variety of luffa that needs only 55 days to maturity! I could actually direct sow those and get luffa!
Of course, I can’t just order a single pack of seeds, so I went looking.
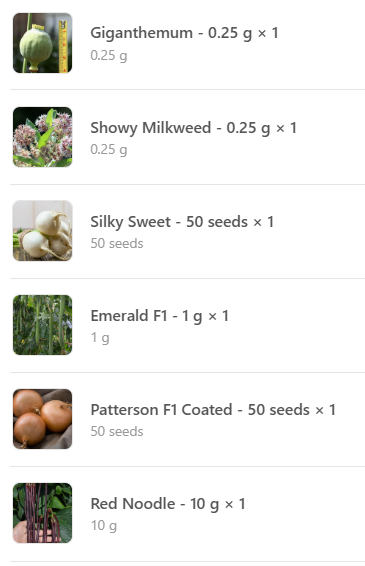
This is what I ended up getting.
From the top (all links will open in a new tab):
Giganthemum: This is something that Ashley from Gardening in Canada had in her recent seed haul video. Yes, I already have bread seed poppies. This variety, however, is supposed to get seed heads as large as a baseball! It has edible seeds, which is the main reason for ordering them. I have a space selected to grow bread seed poppies as a perennial, where I will allow them to re-seed themselves. What I will probably do is find another such location, in another part of the yard, and grow both varieties.
Showy Milkweed: this is the main variety of milkweed for Monarch butterfly conservation efforts. I’ve got an orange variety of milkweed that I have not been successful with. Hopefully, we’ll be able to get this variety established as part of our efforts to attract more pollinators.
Silky Sweet turnip: I already have some white turnips winter sown. I chose this variety because it just sounded like it would be really tasty. It matures in only 35 days and is a cool weather crop, so this can be succession sown throughout the spring, and again in the late summer/fall, if we want.
Emerald F1: This is the luffa gourd that matures in only 55 days! It’s listed as a dual purpose gourd, as the immature gourds can be eaten, but I think that’s true of all luffa varieties. We might try eating some, but that I want are those sponges!
Patterson F1 onion: Okay, yes, I have my own saved onion seed, plus red bunching onions and red bulb onions started. My saved seed is a mix of red and yellow bulb onions. I chose these because I wanted to be sure of yellow onions, and they are described as being exceptional storage onions. Unless I start them as soon as they arrive, though, these will be for next year.
Red Noodle bean: I couldn’t help it. I just really, really want to successfully grow the red noodle bean at least once! When I tried to grow them last year, I had an amazing germination rate, the seedlings exploded into growth, got to about 6-8 inches tall, and then stopped. They never got any bigger, and I don’t know why. I can make guesses, considering the horrible growing conditions we had last year, but they are still just guesses. I have quite a variety of bean seeds, both bush beans and pole beans, as well as varieties for drying, so we will have lots of choices, once the soil warms up enough for direct sowing.
There we have it. My first West Coast Seeds order.
Oh, my goodness! I just checked my Amazon tracking. My chicken coop and my lights and seed mats have arrived!
If I leave right now, I can get there before the post office closes for 2 1/2 hours over lunch.
A couple of days ago, on checking the seeds I’ve set to pre-germinate, it looked like some were just starting to show radicals. Nothing ready, but it seemed they soon would be.
So I grabbed one of my deep celled trays and prepared it in advance. These trays have 21 cells, and I’m looking to have 1 row of each of the seeds I have pre-germinating right now. The seed starting mix in the cells are all pre-moistened, ready and waiting.
When I tried pre-germinating seeds last year, I let them sit for probably too long. Their roots started to go into the damp paper towels and had to be very carefully pulled free. From what I’ve been seeing online, they really should be potted as soon as the radicals appear.
So that’s what I’ve already done with the luffa.
Yesterday, that first seed I saw that looked like it was starting to show its radical – a Caspar Eggplant – had started to germinate. Just the one. So I planted it into a prepared cell, then topped it with vermiculite, partly so I could easily tell which cell has a seed planted in it.
Today, I found another eggplant, plus some Sweet Chocolate peppers.
I would prefer to have these on another heat mat, but I only have one. The light fixture above them, however, does put off some heat. With smaller seeds closer to the surface like these, it will actually be enough to affect them.
I did have to raise the light fixture another inch to fit the large celled tray under it, but that should be okay. I’ll keep transferring seeds over as they germinate. With these larger cells, I should be able to avoid potting them up for some time, if at all.
As long as the pre-germinated seeds survive the transfer, I should have 7 plants each by using this tray. If I’d been using the Red Solo cups, I can fit 9 cups in each of the bins I have to hold them, so that’s what I would have been shooting for as a total. Seven should be enough, and I am not expecting 100% germination rates, nor 100% transfer survival rates.
Normally, today would be my day to go into the city for our first stock up trip for February. With the truck having issues and an appointment to get it checked tomorrow morning, today was a home day, instead.
Which turned out to be a good thing.
I didn’t think I’d pushed myself yesterday, but the pain started hitting last night, and this morning I could barely walk. I managed to feed and water the outside cats, grab a quick breakfast, pain killered up and went back to bed for a couple of hours.
Thankfully, that seemed to help a lot.
Which meant I was up to setting things up in the basement to start more seeds.
That included testing out the heat mats. I’d bought a new one last year, because the old one stopped working, but I tested it again anyhow. For a while, I thought I’d need to buy another heat mat, but the new one did eventually warm up quite nicely. The basement is always between 13-16C/55-61F, though it does feel warmer after we removed the cat barrier in the “window” between the two basements, now that we don’t allow the cats down there anymore. I set up just one of the lights, choosing the one that actually warms up a bit when it’s on.
Then it was time to get the set of seeds to start this early. I decided against starting thyme. I’ll see if the varieties we planted last year survived the winter under their thick mulch and blanket of insulating snow. If they didn’t, I will buy transplants, instead.
I also decided against trying the Sweetie Snack Mix peppers again, and will start more of the other two varieties, instead.
There’s the luffa, of course. I probably could have started those at the same time as the onions. There are sprouts in all four onion seed rolls now.
Then there’s the Caspar eggplant, a new variety I’m trying this year. The Golden Boy celery is the first time I’ll be trying to grow celery. The Sweet Chocolate peppers are a variety the girls suggested. They grew well when we had them before. When it comes to flavour, they really don’t find much difference between any of the varieties we’ve tried. The California Wonder Bell pepper is a new variety for us that I chose specifically because they are described as being thick walled.
I decided to pre-germinate the peppers, eggplant and luffa, as the seeds are larger and will be easier to move and plant, once the radicals appear. I could also use a damp wooden chopstick to pick up the pepper and eggplant seeds.
With the peppers, I was thinking a total of 9 plants. When it came to pre-germinating the seeds, though, I ended up going for 9 seeds each – though the California Wonder got an extra when one of the seeds I grabbed looked like it was damaged. We’ll see how many actually germinate.
I also started just 9 seeds of the eggplant. I’m hoping to get 4-6 transplants out of those.
I was seriously tempted to pre-germinate more than 4 luffa. Even with pre-germinating, they do struggle to survive. We’ll see how many germinate – and how many survive until transplant time. Last year, I started with four, three pregerminated, one didn’t survive being planted, and of the remaining two, only one really grew much at all.
When it came to dampening the paper towels for this, I made sure to use warm water, too.
As for the celery, the seeds are so tiny, I decided not to pre-germinate them. Instead, I repurposed a clamshell from strawberries. The holes on the bottom are fairly large, so I set a paper towel on the bottom to keep the medium from washing out the bottom. Normally, I pre-moisten the starting mix in a large bowl I have for that purpose, but for such a small amount, I filled the container with dry mix, then used the warm water to thoroughly soak it, first, making sure there were no dry spots. Then I pressed it down to get rid of any excess water, and ensure there were not air gaps.
I have a little seed dispenser that I used to scatter the seed lightly over the surface. With seeds that small, the hard part is keeping them from being too densely sown. Also because they are so small, I didn’t top them with more seed starting mix. Instead, I added a layer of vermiculite. That got a thorough spray with warm water.
All of these fit into a seed starting drain tray and are now set on the heat mat, under the light. The light has “legs” that fit on the ends of the aquarium we originally got it for, so it only needed a couple of the fire bricks I’ve been using as supports. The other light we have rested directly on the aquarium frame, so if we need to bring that one out, it’ll need twice as many bricks to get the same height. The handy thing is, as things grow taller, we can just add more bricks to raise the lights by an inch per brick.
For the peppers and eggplant, I’ve got some deep cell trays I can plant them into. The less potting up, the better.
In the beginning of February, I will be starting tomatoes. I will probably pre-germinate, then use the Red Solo cups for those. I’m still torn between starting three, or all four, of the new varieties I got.
Oh, who am I kidding. I’ll be starting all four.
It would also be the time to start herbs, such as tarragon and savory.
Hopefully, this will work out. Aside from the luffa, these varieties have a relatively short days to maturity on them. It’s not just frost free days we need to think about though, but soil temperature. Last year, we had such warm days in May, but the overnight temperatures were so low, we still couldn’t transplant our seedlings until well into June.
Hopefully, this year will be a much better growing year, without the drought, heat waves and smoke!