Okay, after going through their website more, I made some decisions and placed an order at Vesey’s. It was mostly for our future food forest, but I did order a couple of seed packets so I could take advantage of a promo code for free shipping.
As I was preparing to write this post, however, I got a phone call.
From home care.
Guess who has to go to my mother’s again this evening, to do her med assist?
Two nights in a row. Apparently, someone just called in sick.
My mom is going to be furious.
*sigh*
I will just have to deal with that, later.
Meanwhile, here is what I ordered today. (Links will open in new tabs)
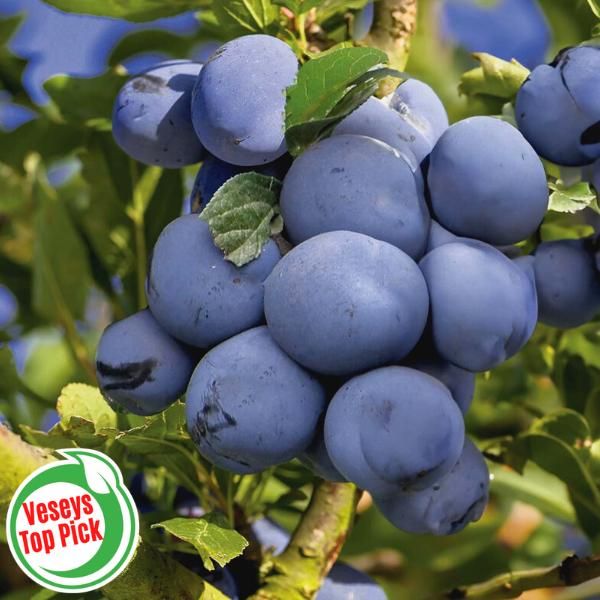
These were the one thing we absolutely wanted to get this year. The Opal Plum tree. The description from the website:
Prunus spp. Opal stands alone as the hardiest European type Plum available on the market. It is vigorous, productive and self-fertile. Even in short summer seasons, the fruit will reliably ripen. The plums are round, red-purple with a golden flesh and have a complex and sweet flavour, fresh or dried. Hardy to zone 3. We ship 18″ trees
The key points were that it is self fertile, so we don’t have to plant it next to our dying wild-type plums, but can plant it in the section we’ve designated for a food forest. It’s hardy to our zone, so we don’t have to do like we did with our zone 4 Liberty apple, and tuck it into a sheltered area. (Hopefully, it survived the polar vortexes we got this winter!)
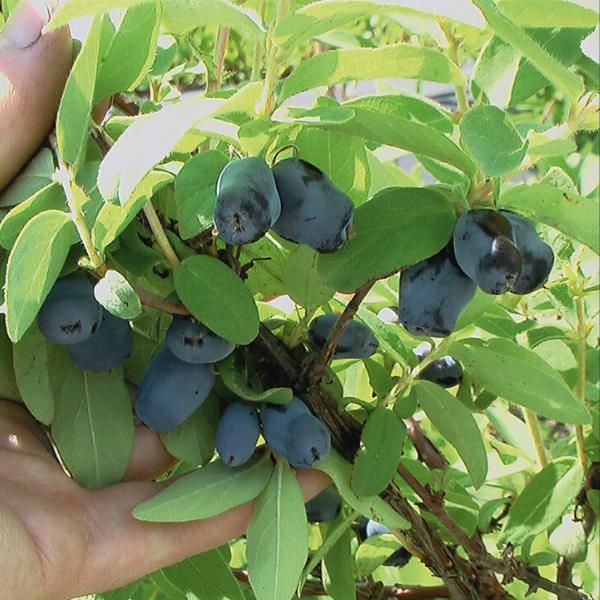
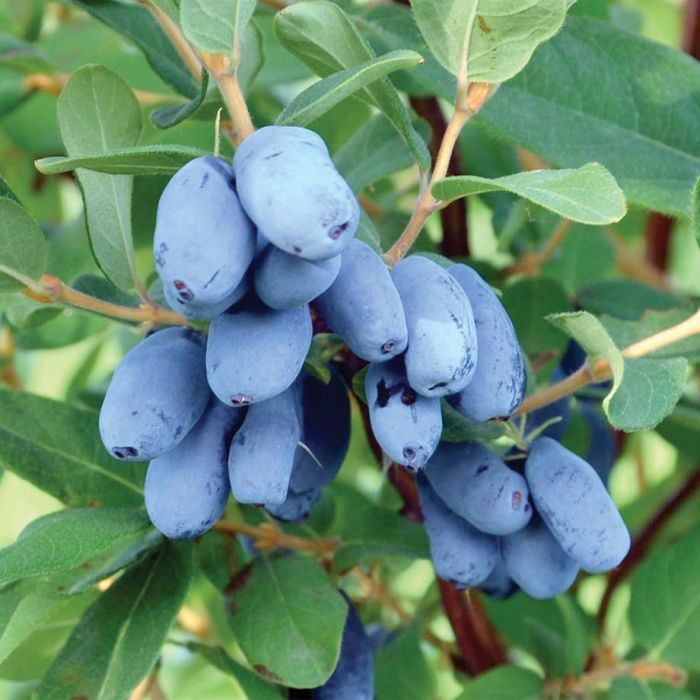
I decided to also order some more haskaps. We already have three, but they have not been doing well at all. While I should probably transplant them, I’ve decided to get a couple more that will be planted in the food forest area, this time.
The second is Boreal Blizzard, an early producing and largest fruit variety.
We currently have “Mr” and “Mrs” haskap varieties, where are sold as cross-pollinating varieties. The “Mr” is an Aurora, and seems to bloom too early to pollinate the “Mrs.” variety, so I am hoping that the early Boreal Blizzard variety will work out better.
If these haskap do well, that will confirm that the ones we have now are not producing because they are in a bad location. Which I am 99% sure of, but it really is a good location – for us!
To use the free shipping promo code, I needed to have at least one packet of seeds.
I had been looking at these last night, while planning my order, but they were listed as sold out. This morning, they were back in stock! So I snagged them.
This is the Sweetie Snack Mix of small sized peppers. They have a short growing season, too, so they should work out. I think my family might like them better than the larger bell peppers we’ve been trying so far.
Last of all, I got some flowers for the girls. 😄 The Jet Black Hollyhock. These are pollinator attracting biannuals and should be self seeding, so we will plan out where to sow them with that in mind!
There we have it. Another order in for our 2025 garden, and our food forest.
The grand total for this, after tax, came to $137.08, however we will only be billed for the seeds when they get shipped in the next day or two. The sapling and haskap plugs will be shipped closer to our last frost date of June 2, and we will be billed for those, then.
The flower seeds were not that expensive, but that packet of mini peppers cost $8.75, with only about 20 seeds in the pack. That’s almost 44¢ per seed!
Still cheaper than buying them at the grocery store, but what a huge leap in prices for vegetable seeds! During the illegal lockdowns, with people panic buying and prices going up and up and up, so many people decided to try growing their own food, a lot of seed suppliers were completely sold out. They are still recovering from that. I know some smaller Canadian seed growers had to back out of the consumer market completely and only sell commercially in bulk. Add to this, in the years since, more people are trying to grow their own food because the grocery prices have gotten so high. That increased demand puts a major stress on supplies, too. Which is why I’m seeing the cost of vegetable seeds skyrocketing, while the number of seeds in the packets are going down, but not with flower seeds. I haven’t been looking at herb seeds lately, so I don’t know how they are doing for pricing.
With this order in, the next thing we’ll need to decide on is what variety of potatoes we want to grow and where. Anything beyond that is just gravy.
Okay, I wasn’t really planning to buy more seeds this year. Not exactly.
With our winter sown beds, which are detailed in the video below, we actually have a lot already planted for this year’s garden…
… that’s IF they survived the winter.
If they didn’t, then we’re not going to have a whole heckuva lot at all, because I finished off seed packets in doing this method.
There are a few things that I am thinking to start indoors – especially now that we have the portable greenhouse – but other things I will likely buy as transplants in the spring. Decisions will be made in the spring for that.
In the end, though, I broke down and made an order with MI Gardener. I’ve been looking at Canadian seed sources but, in the end, it came down to price. I’ve been really shocked by how expensive some seeds have gotten, even with very low seed counts in the packages, at a number of the sites I’ve bought from in the past. Plus, some of the things that interested me were either sold out or no longer available.
I didn’t even make a large order. Just a few things, some of which I probably won’t even plant this year.
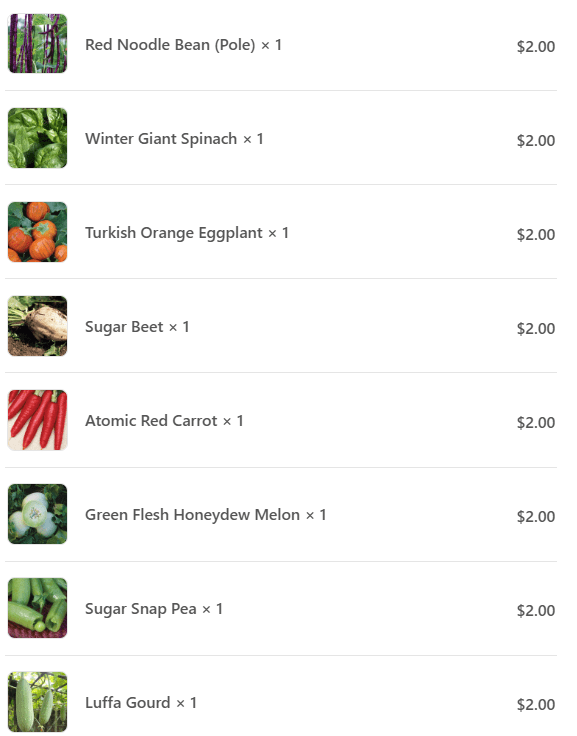
The first item in the list is red noodle beans. We tried growing these a few years back and ended up having a drought and heat waves that year. They grew, but I only found a single pod when I was cleaning up for the end of the season, and it was the saddest, skinniest little thing! Along with the bush beans I have winter sown, I want a pole bean and a shelling bean. We have plenty of bean seeds, but no red noodle beans, and I’d really like to try those out.
Next is Winter Giant Spinach. I winter sowed all our spinach seeds so, if they don’t take, this will be our fallback planting.
Next is Turkish Orange Eggplant. We grew Classic and Little Finger eggplant last year. This year, I want to try a different variety. I’m not sure we’ll grow them this year – we’ll see if the order comes in early enough to start them indoors – but it will be an option. If nothing else, we can try the portable greenhouse to extend the season.
I got a package of sugar beet, but don’t expect to plant them this year. I want to actually try and make sugar with them, so this is going to be one of those “fun” things I like to include in my garden every year.
We have more than one variety of carrots winter sown. We still have more Uzbek Golden carrot seeds, if the winter sown ones don’t take, but it would be nice to have another variety as a back up seed.
We did the Summer of Melons mix last year. This year, we still want to grow at least one variety of melon. My younger daughter prefers honeydew types over cantaloupe types, and this Green Flesh Honeydew variety seems to have a short enough growing season to make it worth trying. We have other melon and watermelon seeds already on hand we can try this year, but we will definitely be scaling back from the number we grew last year!
Next are some basic sugar snap peas. I have shelling peas already, and want to have both types.
Last of all…
Yup.
I’m going to keep trying!
I ordered some luffa seeds.
If they come in early enough, I might try them this year. I’m not completely decided on where we will set up the portable greenhouse but, once we do, I will try growing the luffa there in pots, rather than transplanting them into a garden bed.
That’s it, that’s all. A whole 8 items.
All of these together came to a grand total of US$23.50, including shipping. Granted, with our Canadian dollar tanking so much right now, it will probably be closer to Cdn$50, but that would still be less than if I’d try to order these, or similar varieties, anywhere else.
[update: the order was processed, and it came out to Cdn$34.82]
The other things we will need to order or buy for this year’s garden will be things like potatoes and fruit trees. They wouldn’t be shipped until closer to our local last frost date of June 2, so we have time. We just have to settle on what we will be getting this year, first.
I have never ordered from MI Gardener before, but have heard nothing but excellent things about them, so I look forward to getting and trying out these seeds this year!
It’s cold AF out there, which means I’m thinking of the garden!
We are doing things very different this year, though.
The first major change is that I winter sowed a number of garden beds in the fall. You can see what and where, in this last garden tour video of 2024.
In previous years, I would have already at least started onions and shallots by now, and possibly some peppers. With the winter sowing, however, I have – hopefully – a head start on all these. I combined old and new seeds in various combinations into shakers before scattering them onto prepared beds and deep mulching them.
This is what I’ve got already sown.
Garlic – saved cloves
Seed combo 1: root vegetables Carrots: Uzbek Golden and Napoli Beets: Bresko, Merlin, Cylindra and Albino Turnip: Purple Prince Radishes: French Breakfast, Champion, Cherry Belle and Zlata Onions: saved seed (mix of red and yellow bulb unions) Note: left over seeds from this mix were planted in a final bed with saved Jebousek lettuce seeds added in
Seed combo 2: Summer squash mix Sunburst pattypan White Scallop pattypan Magda Green zucchini: Endeavor Yellow zucchini: Goldy
Seed combo 3: Kitchen Garden mix Swiss Chard: Bright Lights and Fordhook Giant Spinach: Space, Lakeside, Bloomsdale and Hybrid Olympia Kohlrabi: Early White Vienna and Early Purple Vienna Bok Choi: Hinou Tiny (saved seed) Shallots: saved seed Onions: saved seed
Seed Combo 4: tall and climbing (mostly) Sunflowers: Mongolian Giant and Hopi Black Dye Peas: Dalvay shelling peas (not saved seed) and King Tut purple peas (saved seed) Bush beans: Royal Burgundy Corn: Montana Morado (saved seed) Onions: saved seed
Flower Combo 1 Nasturtium: Dwarf Jewel Mix Butterfly flower: Orange Shades (milkweed) Forget Me Not
Flower Combo 2 Western Wildflower Mix
Perennials: Strawberries: Albion Everbearing and an unknown variety of small strawberries, plus whatever survives in the asparagus bed Purple Asparagus Sunchokes Onions for seed
So that is quite a lot of stuff that’s already been sown!
In theory, because they were heavily mulched, plus have an added layer of snow to insulated them, these seeds should start germinated as soon as the soil warms up enough.
In theory.
There are two things that I expect will reduce the germination rates.
First, I used this as an opportunity to use up some older seeds. Most of the summer squash, for example, is seed that’s 3 or 4 years old. The white scallop squash were new for last summer, so those should have a higher germination rate. Considering how many seeds were scattered in one bed, having a lower germination rate is not a bad thing. It would have me from having to thin them.
Second, these polar vortexes we’ve been hit with. While all the beds were mulched, the temperatures got so cold, it’s entirely possible a lot of these seeds have been killed off. I still expect some to come up – the onion and shallots, beans and peas are, I think, most likely to survive the cold. At this point, however, I will be amazed if we get anything. In fact, I’ll even be surprised if our Liberty apple tree survived, for all that we made sure it was planted in a well sheltered microclimate.
In the spring, once the snow starts melting away, I will need to remove the mulch so that the soil can warm up faster. With some beds, like the one in the old kitchen garden, I am hoping to be able to put one of the covers over them with plastic to warm them up faster. With the summer squash bed in particular, I’m hoping to arrange enough hoops or something so that it can be covered for its entire 18′ length. That bed will also need extra protection from slugs.
Aside from these winter sown beds, this is the space we still have available.
In the main garden area.
There is the low raised bed that will eventually be paired with another bed, yet to be built, to form a trellis tunnel. Right now, one half of that bed was cleaned up and replanted with onions that we gathered seed from, last year. I was able to do all red onions along one half, and all yellow onions along the other. The other side of the bed is where we had melons last year, and that half is still open for planting.
That leaves three other 18′ beds that are available. One has the logs to frame it, and those will be permanently joined once things thaw out in the spring. The other two have no log frames, yet. We have some dead spruces that are either cut down or have fallen down that we can use for that, but that will be worked on throughout the summer, or until whatever we plant in the beds are too big to work around.
There is also the bed with the Albion Everbearing strawberries in it. Those should survive the winter. Given the trouble we had with deer eating them, what I will probably do, once the ground is thawed out enough, is transplant them into the old kitchen garden – more on that later. Once that’s done, the bed will be available for something else.
As we are able, we intend to add many more beds to this area, focusing first on the trellis beds to the East, then reclaiming what has been a squash bed for the past few years to the West. This will require harvesting more dead spruces for materials, so it may be slow going. Last year, we got very little progress done, largely because of the weather!
In the Old Kitchen Garden
There is just one rectangular bed in the old kitchen garden that is winter sown. That leaves the tiny raised bed, the retaining wall blocks and the long, narrow bed against it, and the L shaped wattle weave bed.
For the long bed at the retaining wall, I will be doing some changes. Along the inside of the bed, it is bordered with a couple of logs to make it a lower raised bed. The top log is too crooked, so we can’t raise the soil level any higher, as it ends up falling through the gaps. I’ve decided I will remove that crooked long, but keep the straight bottom log, and then harvest willow branched and coppiced maple to wattle weave on top of it. This bed also has some short logs on the ends of the retaining wall blocks. The vertical sticks we used to hold those in place have started to break up, so I will probably replace those with a wattle woven wall, as well. Once this is done, we can add more soil to make it a slightly higher raised bed and not have soil falling into the path anymore.
The short side of the L shaped bed is where I am thinking of transplanting the Albion Everbearing strawberries. Considering how well the strawberries we grew from seed are doing there, I think that will work out.
As for the strawberries that we grew from seed, in the long side of the L shaped bed, while they are doing very well and are very prolific, they aren’t that good of a strawberry. Those will be transplanted out, but I haven’t decided where, yet. It will be somewhere that they can be left to grow wild and spread naturally.
That bed also had thyme we transplanted in, and chamomile that self seeded, in it. It’s unlikely the thyme survived the winter, but it’s possible the chamomile self seeded again. We shall see in the spring.
The tiny raised bed needs no work on it. Just the cover needs some maintenance from the cats using it as a hammock.
Then there are the retaining wall blocks. A lot of them have mint in them that we expect will come back. The ones with chives in them will come back, for sure. As for the remaining empty ones, they don’t get a lot of light and the growing space gets overtaken by an invasive flower that comes in from below, very quickly, so we will need to give a lot of consideration over what can be planted in there.
Chain link fence
We have a similar issue with the chimney block planters at the chain link fence, except it’s elm tree roots, not flowers, that have invaded those blocks! These need to be treated as a container garden, when it comes to what gets planted in them. Nothing really seems to do well there. Partly because of the invading roots, but also the blocks themselves would also be making the relatively small amount of soil they hold more alkaline. We will need to make sure to continue to amend the soil with sulfur granules or other acidifiers, more than other areas (our soil is already quite alkaline).
The other chain link fence bed is winter sown, but in the fall, I’m hoping we can finally redo the bed with permanent walls. Right now, we have scrap boards against the chain link fence to hold the soil in, and bricks around the other side and the end that are simply resting on the soil. I want to make this bed higher – to make it easier on my back, if nothing else! I need to come up with something better to go along the chain link fence; the old boards I found were already starting to rot, so they won’t last much longer. For the rest of it, I wouldn’t mind doing more wattle weaving, but that needs a LOT of long, straight, narrow, flexible branches, and we just don’t have that. What we do have will probably be used up this spring when I add wattle weaving to the narrow bed in the old kitchen garden.
The next area at the chain link fence is the asparagus bed and the sunchokes. The sunchokes should be fine, and need almost no maintenance. The purple asparagus is likely a lost cause. We should have been harvesting asparagus for the past two years and, while some are coming up, spring flooding has really set them back. The strawberries interplanted with them try to do well, only to get eaten by deer, in spite of protective measures. There is nothing we can do about the spring flooding, even though it doesn’t flood there every years. We could try making a higher raised bed but I really don’t think it’s worth the effort to dig up the asparagus, build a higher bed, and replant them, in this location. Especially with elm trees so close, as their roots are so invasive. I still want to grow asparagus. We’ll just have to find a better place to do it.
The East garden beds
We currently have one winter sown bed in the East yard. That leaves two more 9’x3′ beds, plus a new 4′ square bed, available.
The compost ring is in this area, and I fully expect lots of things to start growing out of there this year! One year, we had lots of mystery hybrid squash show up. Last year, it was almost all tomatoes, though some potatoes (which never got harvested) also showed up. With what we’ve been tossing in there after preserving the harvest, I wouldn’t be surprised if more tomatoes, squash, melons and even bell peppers started to grow in there.
Those are the areas we will have available to plant in this year, right from the start.
There are a few things that I will want to start indoors for spring transplanting. Others, I will probably buy transplants, instead. Here are some things I’m considering.
Tomatoes: We ended up growing a lot more tomatoes than intended, and way more than we use. For this year, I’m thinking we will just grow a cherry or grape tomato for the family to snack on. We don’t need to do paste or sauce tomatoes again this year. If we do grow a slicing tomato, it will be just a couple of plants. We do have tomato seeds we can start, but are severely limited in space for starts this year, so I might just buy transplants. We shall see.
Peppers: we’ve been experimenting with short season varieties to figure out what the family likes, which had us growing away more than needed. We’ve saved some seed but, again, we don’t have a lot of space to do starts. If we grow peppers again this year, I will probably buy two, maybe three, transplants and that’s it.
Corn: last year, I tried a super short season variety. This year, I have seeds for another short season variety to try. Just enough to see if we like them. This year, I will see what I can to do set up supports around the corn before they get big, as we have a real problem with the stalks being blown over by high winds. We also need to find a way to keep the raccoons from eating them!
As for the Montana Morado corn that was winter sown, there were very few seeds. I’d collected the kernels from what plants survived when we grew them a couple of years ago, and we were intending to test them out as a corn flour. Before we could do that, the cats knocked the container over during the night, spilling it all over the floor. I’d swept them up and threw them away, not thinking that they could still be used as seed. Over time, I would find a few kernels here and there that got missed and saved those. If any of these winter sown seeds survive, I am hoping to use them to collect more seed. We shall see.
Peas: we have the shelling peas winter sown, but I would like to grow some edible pod peas, too. The family likes those better.
Beans: we have bush beans that are winter sown. I would like to grow at least one variety of pole bean, and one variety of shelling bean. We have lots of bean seeds to choose from.
Melons: we do love our melons, but this year, I think we will plant only one variety of melons, and one variety of watermelons. These would need to be started indoors, in late April.
Winter squash: last year, we tried the Wild Bunch mix and had such a high germination rate, we didn’t have the space to grow any others! Two 18′ beds were filled with winter squash. Last year, we also bought two varieties of winter squash my daughters wanted to try, so I want to try those this year. They will need to be started indoors around the end of March or mid-April. I’ll have to check the seed packets again to be sure.
Potatoes: normally, I would have ordered my potatoes by now, for spring delivery, but just haven’t done it. We do want to grow potatoes – and a lot more of them. I’m just not yet sure where we could plant them right now. If worse comes to worse, we can buy our potatoes from stores in the spring, instead of ordering them online.
Salsify: we got seeds for these a few years ago, but never got around to actually growing them. This year, I’d like to finally do that! I’ll have to double check the packages to see about starting them indoors or not.
Herbs: I have quite a few varieties of herbs. I need to check which ones need to be started indoors. The long term plan is for things like herbs, greens and other things we use in the kitchen frequently, to be grown in the old kitchen garden, since it is closest to the house. The problem is, we keep forgetting to actually use them!
Flowers: my daughter particularly want to grow flowers but, in my seed cache, I have a packet of Crego Mixed Colour Aster seeds. These were given out in the memorial cards of an old friend that passed away suddenly, last year. I would like to find someplace to plant them in her memory, this year.
Wheat: a few years back, I got a rare, heritage variety of Marquis wheat seeds. If we have a free bed, I would like to finally plant them. I only have a couple of packages, so we won’t have enough to use them for anything. I will be growing them solely to save more seed for future planting. At some point, we hope to reclaim enough growing area to plant a small field of wheat and have enough to actually use to make flour, and still save seed. Mostly, though, I want to keep a heritage variety alive.
So that’s the general plan for now. Very little is going to be started indoors this spring.
If the winter sowing doesn’t pan out, we’re going to have a much smaller garden!
It will be a few months before we will know of they survived these cold snaps. Hopefully, we’ll be able to tell early enough to know what seeds or transplants we’d need to buy to replace them, before it’s too late in the season.
For now, we have reached our high of the day; -20C/-4F, with no wind chill.
Time to warm up the truck and go to the post office!
For the next while, I’ll be going through my old posts and videos about our 2024 garden, looking at how things worked out, and use that information to decide what we will do in our 2025 garden.
Our plans for herbs and strawberries have had some rough times!
The Original Plans
Strawberries and herbs are among those things we intend to have as our more perennial food garden items. Most herbs can’t survive as perennials where we lived, but some might, and others will reseed themselves, if left to their own devices. Over time, we plan to use the old kitchen garden as… well… a kitchen garden, since it’s right against the house, so it will eventually have a lot of herbs in it. As for strawberries, these are something we expected to interplant in various areas, as well has having dedicated beds of them.
How it started
Herbs
Last year, we started tried a few herbs, in pots and in the wattle weave bed. We had a single oregano seedling survive, some spearmint, a non-specific thyme variety and lemongrass in pots. In the wattle weave bed, we had chamomile and German Winter thyme.
This year, we started only oregano and German Winter thyme indoors.
None of the oregano germinated.
On removing the mulch in the spring, I had some hope that the thyme in the wattle weave bed had survived, but they did not. So that’s where the new thyme got transplanted.
The chamomile, however, had reseeded itself!
We also have mint in the chimney block retaining wall, which trace back to my late grandmother’s garden, plus chives in one corner of the retaining wall, that come back every year.
Strawberries
We had four strawberry plants in the asparagus bed. They should have spread their runners and expanded by now, but the deer kept eating them. They did, however, survive the winter, and started growing again as soon as the soil warmed up.
The real surprise were the tiny strawberries we grew from seed last and transplanted into the wattle weave bed. As they were planted near the outside edge of the bed, I had some doubt that they would survive the winter, even under the mulch. They not only survived, but they thrived!
This year, I did buy some bare root strawberries, and they got their own bed. You can see how that worked out in this video I made.
Thanks to those elm trees, what started out as a very productive squash hill (the first place we tried growing Crespo squash) was barely recoverable. I could only hope that those layers of cardboard would keep the capillary roots from spreading upwards.
The main thing, though, is that we had some new, everbearing strawberries planted that I hoped would do better here, than the ones by the asparagus did!
How it went
Not too bad, for the most part.
Herbs
The German Winter Thyme did well again, in the same spot we grew them last year. We had the Black Cherry tomatoes growing behind them, and filled in empty spots with Red Wethersfield onion around them. The cats rolled all over the onions, but didn’t roll on the bushier thyme.
The chamomile grew and bloomed, but there wasn’t as many as last year. The Red Wethersfield onion was also planted around them and got rolled on, but the chamomile survived the cats.
The mint did okay but actually had to fight off an invasive flower (possibly creeping bellflower, but we never let them grow big enough to confirm) that keeps trying to choke them out, even in the chimney blocks! Which is saying a lot, since mint us usually the invader. I was able to do limited weeding, but these are growing in from below and it’s pretty much impossible to get them out completely. Basically, I just had to weed them enough for the mint to be able to get bigger, then they could crowd out the weed.
The chives, on the other hand, were their usual enthusiastically growing selves.
Strawberries
I was surprised at how well the ones by the asparagus did. They’re a few years old and normally past their prime, but we did get a few ripe berries out of them.
Then the deer ate them.
Deer really seem to love strawberry leaves!
Even putting a makeshift fence around them was not enough to deter the deer.
*sigh*
The new Albion Everbearing strawberries did really well. They grew and spread runners, which I spread around and set the leaf clusters against the soil to root, so we could expand them to other areas in the future. I had thoughts to use them as a ground cover in our budding food forest, for example. They bloomed and developed berries, and we even had a few ripe ones to taste.
Then the deer got them.
I didn’t have a fence around the bed, but I did have poles with flashy pinwheels to startle them away, but it wasn’t enough. I put a net around the bed and they started to recover, only for a deer to actually tear through the netting and get at about half of them. I had a short length of chicken wire I could put around the side with the hole, but by that time, there just wasn’t much season left for them to recover in. There was new growth, though, so I’m hoping they survived.
*sigh*
The runaway success story, though, is the tiny variety of strawberries we grew from seed. Being in the old kitchen garden, the deer don’t get to them, I guess. Too close to the house? I don’t know. They got big and bushy, strong and healthy, and were very prolific! I was really impressed with how they did.
Conclusion and plans for next year
Herbs
I had visions of having fresh culinary herbs to use with our cooking as needed throughout the summer, and gathering blossoms and leaves for herbal teas.
The problem is, we keep forgetting we have herbs in the garden.
With the chamomile, I didn’t want to harvest any blossoms as there weren’t that many this year, and I wanted them to go to seed, instead.
I did remember to use the thyme a couple of times, but that was it. I didn’t even harvest any to dehydrate.
In past years, we gathered fresh mint leaves to make fresh mint tea, but just never got around to it this year. In past years, we used chive blossoms to make infused oils and vinegars, but that didn’t happen this year, and I ended up deadheading them so they wouldn’t spread seeds all over the grass outside the chimney blocks.
Basically, we had so many things happening this year, including lots of things breaking down, that we just didn’t have the spoons left to do this stuff this year. We also went from a very wet late spring to a very hot summer that made doing anything outdoors more difficult.
As for the strawberries, those wonderfully prolific little strawberries – I don’t know if they are a while strawberry, or an alpine variety – the seed kit didn’t name them – that did so well…
The berries themselves just aren’t that big a deal. We have native wild strawberries in the maple grove that manage to produce berries even while choked out by creeping bellflower, and those have an intense strawberry taste. They’re just really tiny. These ones are larger, but they don’t have that intense wild strawberry taste. If they’re not perfectly ripe, they’re actually rather bitter. For that brief time of perfect ripeness, they’re good, but not as good as, say, the Albion Everbearing strawberries.
So while they are a success, they are essentially taking up space that we can grow something more suitable for a kitchen garden.
Which means that, in the spring, I will try and find a good place to transplant them, where they can grow wild.
I might actually transplant the Albion Everbearing strawberries into the old kitchen garden, where they will have better protection from the deer! I really want to expand our strawberries, because we love them so much. The ones with the asparagus, I’m considering a lost cause at this point, but if we can keep the Albion everbearing ones going and spreading, that would be fantastic.
We currently have the larger rectangular bed in the old kitchen garden winter sown with the “greens” mix – spinach, chard, kohlrabi and tiny bok choi, and if the strawberries get transplanted, they will likely go into the long, narrow bed along the retaining wall. So that leaves most of the wattle weave bed (assuming the chamomile reseeds itself successfully again) and the tiny raised bed potentially for herbs.
I’ve picked up seeds for basil and fern leaf dill, though I have seeds for other dill and herbs as well. I don’t know that I will try growing thyme again this year, and oregano just doesn’t seem to want to germinate for us, so I think I will try different varieties this year. If the winter sown greens actually survive and grow, and we have things to harvest, I think we will be more likely to remember to harvest herbs, too.
We will definitely have to find ways to keep the cats off the garden beds, though. I’ll need to build a cover to fit over the larger rectangular bed. The wattle weave will probably get hoops and netting.
The problem with all these barriers to protect our garden from cats and wildlife is, it makes it hard to weed and water them, too!
Next year, however, the old kitchen garden will be a lot further along in being a kitchen garden, too, so that would be another step towards long term goals. It’s slow going, but we are managing to eek our way towards them!
For the next while, I’ll be going through my old posts and videos about our 2024 garden, looking at how things worked out, and use that information to decide what we will do in our 2025 garden.
I first looked over our plans for perennials, our food forest and the fall garlic, which had already been planted by then.
The garlic hasn’t really changed. We’ve got next year’s garlic already planted – this time using garlic we harvested, rather than buying more.
The crocuses… that was an experiment that I’ll talk about more, later.
For fruit and berry trees, we just didn’t have the budget to buy more, but we did at least get the two Trader mulberry saplings transplanted. Of the other things we hoped to be able to do, getting everbearing strawberries were the only thing we managed.
For root vegetables and tubers, we did have the potatoes, which turned out different than planned. While we intended to skip things like beets, radishes and turnips this year, I had intended to plant a lot of carrots. Instead, we planted very few, simply because we never got the space to plant more.
The plans for onions and shallots were hit and miss, but we did get them in, with some bonus onions that I will talk about later.
We intended to scale back on tomatoes, but ended up with way more than planned! There were some distinct differences among them that I will have to note for the future.
With corn, peas and beans, that changed a lot. I had intended to plant many different varieties of beans, including shelling beans, but that just didn’t happen. Among the ones that did get planted, much went wrong. It was similar with the peas. As for the corn, we did plant one short season variety that actually did pretty well, under the circumstances. There are things I would want to change with growing corn that way, though, and while I’d like to plant another short season variety next year, we’ve already jumped the gun in other areas – more on that when I write about our winter sowing!
With peppers, herbs and greens, that was all over the place. We ended up planting more peppers than intended, and they did quite well, even if they were behind in maturity, like just about everything else was this year. We ended up planting very few herbs and had issues with the greens.
It was our melons and winter squash that really changed how our garden went this year, as we ended up with so many! Way more than expected, even though we ended up not planting some varieties at all. The summer squash, however, was a very different story. We did try a couple of gourds. One of my regular experiments that our spring weather did not give a chance to succeed.
We did manage two types of eggplant, with moderate success. We wanted to try salsify, sunflowers and possibly cucumbers for fresh eating, not pickling, but that didn’t pan out.
So many other garden related things ended up not happening. More raised beds, rebuilding the garden tap, starting a new garden shed build… none of that happened.
I’d hoped to start reclaiming garden beds in the main garden area from the previous year and continuing on the trellis tunnel builds. Instead, a priority was put on shifting the existing beds to what will be their permanent positions. That gave us longer, narrower beds, as they await the logs we need to harvest to frame them. We still managed to fit quite a bit into them, and the narrowing of these low raised beds made them easier for me to reach into.
All in all, this turned out to be a very different year than expected, with spring weather playing a major part in slowing down growth. Every year, we learn a little bit more about what we need to do to better protect our garden from the elements, with even the low raised beds turning out to be a major element that saved our garden.
And so, to start, here is our spring garden tour video for 2024, taken on what turned out to be a rather cold day!
I hope you enjoy this series of garden posts. Do feel free to leave feedback in the comments, too!
While winding down for the night, I’ve been watching some videos, including this new one from MI Gardener; a resource I have recommended before.
This is an interesting video, since I fairly regularly see these concrete blocks being recommended to make raised beds. He lists the reasons he believes they should not be used.
I found it really interesting, and wanted to talk about some of them.
One of the first things he brought up was the weight. The ones he uses in the video are 8″x8″x16″ This is the size of most of the blocks we’ve been finding all over the place, though I think I’ve found some that are 10″x8″x16″
He also adds that they are cheap, and says they cost about $2 each.
So, of course, I had to look it up!
It turns out, one of these concrete blocks weighs about 30-35 pounds. The ones he’s using has flat ends. Some have shaped ends, and from what I found on the Canadian Home Depot page, they weight 42 pounds (19kg). The 10″ ones weigh 45 pounds (20.4kg).
I’d never really thought about how much they weighed. I found them heavy to carry around, but not that bad, really.
As for being cheap, interestingly, the 8″ ones are listed as just under $5 each – and are more expensive than the 10″ ones, which are just over $4 each. The last time I looked at their prices, at an actual store, not online, was a few years ago, and one 8″ block was priced at over $8 each, which shocked me. This was before inflation went nuts, too. Very odd.
This got me wondering, since we are using concrete chimney blocks as planters. So I had to look those up, too. I found plenty of links, but not one of them included a price. The closest I could find was an old image with a price on it, but the link was no longer active. Other than that, I found some on FB Marketplace were someone lists a whole bunch of things, not just chimney blocks, with a $4 each price listed. I don’t think that price was the same for all the wide variety of items listed, so I still don’t know how much they sell for here.
The chimney blocks we have are the standard square size of 16.75″x16.75″x7.62″
That measurement is so odd, I thought it would make more sense in metric, but not really. That works out to 42.5cmx42.5cmx19.35cm
What caught my attention was the weight.
Each one of those chimney blocks weighs 68 pounds (30.8kg)
So… I was lugging almost 70 pound blocks around the yard when I built the retaining wall and the chain link fence planters.
Okay, so weight was one of his reasons not to use them, but the other was height. They’re only 8″ high (slightly higher than our chimney blocks), making only 8″ of growing space.
I found that curious. His sample concrete block raised bed is on top of soil. Granted, it looks like the area was just leveled and has been driven over, so it might be compacted, but it’s still open soil, not a concrete pad or something. Any plants could send it’s roots lower. We have maybe 8″ of top soil – 10″ in a really good spot – before we hit gravel, clay and rocks. An 8″ high bed gives us about 16″ of growing space. We have been using modified hügelkultur, so the first couple of years would have sticks and branches at the bottom, so we don’t plant root vegetables in them right away.
I would find 8″ too low for accessibility reasons, and when I see people doing raised beds with concrete blocks, they are often two, three or even four blocks high. He talks about adding a second level, and demonstrates how easily the block spins around, since the base row is not perfectly level. He mentioned that people have suggested rebar to hold them in place.
I agree with him on the rebar. It seems almost counterproductive.
I’d just use concrete glue. AKA construction adhesive. It’s really cheap, one tube goes a long way, and can be applied using a caulking gun. Granted, that makes it permanent, but most raised beds don’t get moved around once they’re built, anyhow.
He makes a point about breakage being a problem, but not in the way he talks about. Where we are, we have temperature extremes. Pretty much all the concrete blocks we’ve been finding have been outdoors. Most of the chimney blocks we’ve used were stored outdoors since my parents bought this farm in 1964. Yeah, they have dings and chips, but they are still sound. The only blocks we’ve had actually crack and split where the two we put into the fire pit to hold old oven racks over the coals to cook on. It was exposure to high heat that lead to them cracking, not outdoor temperature fluctuations.
He mentioned that concrete is very porous, and that the edges of beds would need extra watering. True enough, though with our chimney blocks, there isn’t any centre space that would hold water longer than the edges. We still watered them as often as the other beds. We just have them more water. It’s been a few winters now for the retaining wall blocks long the old kitchen garden, and not one of them has cracked due to water absorption and the fresh thaw cycle. I’m not saying it can’t or won’t happen. Just that is hasn’t happened to us.
He then mentions that concrete absorbs a lot of heat. More so than even metal raised beds.
That may indeed be a problem in a lot of places.
Where we are, that’s a selling point! Even in the heat of our summers, it just makes them better for heat loving plants that might normally not grow well here.
There is another element to using concrete blocks he doesn’t mention, and that is the effect on soil pH. I’d read before that concrete can help lower the pH, which would be great for our alkaline soil.
As I was looking it up just now, though, I found one article that said concrete can lower the pH, but that was it. Other articles, however, said that concrete will increase the pH.
Which is the last thing we need!
Given the smallish growing space inside our chimney block planters, it wouldn’t take much to affect the pH in the soil there. Granted, I did amend the soil with sulphur this past year, as well as with peat, but with our pH already at 8 or higher, it’s going to take a long time to adjust the pH even slightly lower. Getting it to be slightly acidic, which most of the things we want to grow do better in, will take years. Looking up what vegetables grow well in alkaline soil, the list is pretty long, but most of them have an upper limit of 7.5. If we can get our soil at least down to that, it would be good, but it is harder to lower the pH than it is to increase it.
Well, the mint I transplanted into some of the retaining wall blocks seems to be handling the high pH quite well, as are the chives. Our biggest issue, however, is roots growing in from below. With the blocks at the chain link fence, it’s the nearby elms that took over the soil in the blocks. In the retaining wall, it’s some sort of invasive flower we haven’t been able to get rid of. It’s almost killing off the mint, in some blocks!
So when it comes down to it, whether using concrete blocks for raised beds is a good idea or not really depends on a lot of things. Stuff he saw as negatives, are positives for us, or non-issues.
Would I use concrete blocks for a raised bed?
Probably not.
We’ve got all those dead spruce trees that need to be cut down that can be used. For other raised beds, I’m liking the wattle weave idea and want to build more, though it’s surprisingly hard to gather enough suitable branches to use for the weaving. If we did happen to have enough concrete blocks to make raised beds, there are other things I’d much prefer to use them for.
When it comes to gardening, it is such an individual thing. We all just have to figure out what will work for our own gardens in our own regional area and microclimate, and use what materials we have access to.
Hearing what works or doesn’t work for others and why can still be a huge help. Which is why I like videos like this one. Not only did I find what he had to say very interesting, it got me checking things out and looking things up to learn more.
And now I know how much those chimney blocks weigh, too!
Today’s weather was pleasant enough that I was able to work on the low raised bed that will, eventually, be a trellis bed.
This is the bed that had the Summer of Melons mix along one side, onions that we found in other beds and transplanted for their seeds, and a few bush beans, on the other side.
Where the melons were did not need much done. The melon transplants were mulched with layers of cardboard, tree bark and grass clippings. Not much got through there, so all I did was pull the vines loose and spread them out on top of the mulch.
Where the onions were planted, however, was a different issue. There was quite a bit of grass growing among them – both crab grass and lawn grass! – along with the usual dandelions and other weeds.
I decided I would pull up the onions so I could weed more thoroughly, then transplant them back again.
In the first photo, I’d already started pulling up/digging out the first onions I’d found. Along the way, I found some of the seed stalks, and those got set on top of the melon vines. I even found a couple of seed heads that got missed.
Interestingly, there were even fresh, new onions starting to grow! Onions sure are hardy!
Once I pulled all the onions I could find (of course, I found others I’d missed, later on), I sorted them between red and yellow bulbs. The red would have been the Red Wethersfield onions that seemed to die off entirely last year, only for us to find them starting to grow again, when we prepared the bed this spring! The yellow are probably Oneida onions, and I think there may even have been a couple of shallots in there, too.
The seeds we collected are all mixed together, which means we’ll be getting both red and yellow onions growing in the winter sown beds.
The south end of the bed was the worst for grass and weeds. That was also where I transplanted a flower that might be a salsify. I was very curious to see what the root was like, as salsify is supposed to have a long tap root that tastes a bit like seafood. We got seeds specifically for that, which we never got to planting, but the seed company images only showed the roots, not the flowers.
Well, whatever this flower was – and it may well be a different variety of salsify – it didn’t have the long tap root at all. In fact, it had very shallow roots.
Curious.
I used a hand cultivator to weed most of the bed, stopping before I got to the end where I’d piled up the onion bulbs. Then I got out the garden fork and worked over things again, finding plenty more roots to pull out, while loosening the soil. All the grass clipping mulch was added to the melon vines on the other side.
When I got close to the other end, I paused to plant all the red bulbs, starting at the south end, in a double row. Some of the bulbs had divided into twos or threes, and those got split up for planting. These reached to about the middle of the bed.
Next, I moved the yellow bulbs aside, cleared the grass clipping mulch off the corner, and finished weeding and loosening the soil.
I uncovered a frog!
The poor thing was trying to hibernate in the soil. It barely moved when I so rudely uncovered it, and then just stayed there. I worked the soil at the end of the bed some more, dug a shallow hole for the frog where I knew I would not be planting the onions, then very gently set the frog in place and covered it with loosely with soil again.
Once the north end of the bed was ready, the yellow bulbs got planted in another double row, working my way to the middle – and there was just enough to reach the other onions! I marked the divide with a piece of broken bamboo stake.
This is way more seed onions than we will ever need, but that’s okay. These are being planted as protectors. Next spring, we might interplant around them; maybe with some greens or bush beans, or something like that. Whatever we plant, the onions should help protect them from the deer.
Once the onions were all transplanted, I raked up some leaves to mulch them for the winter, then raked the path around the bed clear. It’s not a priority for this fall, but eventually the path will be covered with cardboard, then a layer of wood chips.
Once that was done, I went into the overgrown area nearby to find the poplars I’d debarked to be used as vertical supports for the trellis and set them across the bed. They’re not the straightest, and need to have their branch nubs cut away, but … it’ll be rustic. Yeah. That’s it! Rustic. 😄
I’ve got eight of them that are debarked. They were to be lined up in pairs along two raised beds for the future trellis tunnel, but the other bed has yet to be constructed. If I use four on this bed, that means one at each end, two along the side, and they’ll all be six feet apart.
I think that might be too far apart.
If I add one more, that would have the posts at about four and a half feet apart. I think that will work out better. It’ll be easier to find straight (ish) horizontal cross pieces for that length, and the whole thing should be stronger This is expected to someday hold the weight of things like winter squash, so I don’t want to skimp on sturdiness.
Getting those up is not the priority right now, though. Before I work on that, I want to finish assembling the log frame around the low raised bed we put together this spring, and get that weeded. With the peas and beans on trellised on each side of that bed, I wasn’t able to weed around the winter squash, so it got very overgrown!
The next priority is clearing away the fallen spruce tree and the crab apple tree it fell on. That will require the chainsaw, though, which means waiting for a dry day. From the current forecast, that looks like the next two days, and then we get rain again for another two days. After that, I think it’ll just be too cold.
Which means the next two days is probably the last chance we’ll get to do some of the outside stuff. That will include moving the giant hose my brother lent us to use to divert the septic away from the house, if we had needed to, into the barn and covering the septic tank for the winter. I was still hoping to hose off the insulated tarp again, but it’s still damp. It would have been good if we could hang it on the clothes line, but it’s just too big and too heavy for that. Ah, well. It’ll still do the job. Technically, the tank doesn’t actually need to be covered, given how deep it’s buried, but I’d rather be safe than sorry! We’ve had another septic problems without potentially adding more.
At least now we don’t have to worry about the leak at the expeller anymore! My brother has also expressed great relief that it is finally done.
We’re managing to get quite a few things done this year, that will make next year easier!
Including planting one more garden bed with seed onions. 😊😊
I fit in the 10 large bags I loaded last time, when the truck’s onboard computer started blaring at me, plus three more smaller recycling bags of cans from the house. I still have three large bags that I need to sort through with a magnet.
In the second photo of the slideshow above, you can see the return I got for the cans.
Last time, the weight was also just over 200 pounds, but had mixed metal in with the aluminum.
We got about $17 and change last time.
Basically, having a few non-aluminum cans mixed in last time cost us about $100.
Lesson learned!
We still have all the old batteries that can be brought in, but my brother has had to shove so many things into the barn, they’re inaccessible right now. My brother will be coming out as he is able, to organize things. So those will wait until spring. I’d hoped to get the scrap guys in this year, but until my brother can move things around, they can’t even get at some of the old vehicles anymore.
Ah, well.
After dropping off the aluminum, I headed out to the nearer Walmart to pick up a few things my husband requested. I hoped to meet up with the Cat Lady, as she has cat food, a scratch tower and cat bed donations for us. Unfortunately, she wasn’t able to meet me this time. Hopefully, we’ll be able to connect next week. Her husband would like to have the stuff out of their car! 😄
She also hopes to be able to get some spays booked for us, soon. She will let us know the dates as soon as she has them.
Now that we have the truck back, we’ve got another outing tomorrow that’s been put off – a trip to the dump! After that, we need to winterize things around the house. The insulation that gets set around the base of most of the house has been brought from the barn, but we need to clear out leaves and other debris, first. That will require the catio being moved away from where it is now.
The catio sides will get wrapped in plastic for the winter. I am thinking a good place to set it up for the winter is near the shrine, for the cats that are shier.
I put the latch on the isolation shelter ramp/door. It will just need a carabiner to keep it closed – something racoons shouldn’t be able to open. I also prepped some plastic to go around the mesh enclosed lower level for the winter.
We will need to attach something sturdy across the middle, under the roof, to hang the clamp lamp heater from. After much consideration on how to get power to the isolation shelter, I’ve decided we won’t be able to set it up near the other shelters by the house. There’s just no practical space for it. So I am thinking of setting it up under the kitchen window, where the catio is now. There is an outlet around the corner of the house that it can be plugged into. We could plug in a heated water bowl, too.
There are other winterizing things that will need to be done. The forecast has us being fairly warm over the next while, even reaching highs of 10C/50F over the weekend. After that, we’re getting to where the daytime highs will be closer to freezing, and even dipping below.
It’s still relatively mild for this time of year, though. We haven’t had any blizzards – it’s not unusual to have a blizzard in October, so this is good. Especially if we’re going to be keeping cats closed up in the isolation shelter to recover from spays. Yes, it has insulation in the upper level, and passive solar with the window. Yes, the bottom level will be covered in plastic. Yes, we will even have a heat source in there. It’s still not the same as being inside the sun room, or the cat house!
Once the winterizing is done, it’s back to cleaning up the garden beds and, if all goes well, finish assembling the new log framed raised bed, now that I no longer have to worry about harming squash vines.
That should go relatively quickly, since the bed walls are just one log high. I’m still holding out hope that I’ll be able to start on the permanent trellis supports, but those will be more complex to assemble. They have to support themselves until the matching raised bed is built, and they eventually become part of a trellis tunnel.
The squash was roasted plain, so we could try them in different ways. I first had a chunk as a savoury side dish, just adding some butter and salt and mashing it up on my plate. I quite liked it. Then, I had another piece, mashing in a bit of butter again, along with brown sugar, cinnamon, cloves and nutmeg. That was also very good, though I think I liked it as a savoury dish better.
The description for the seeds described Crespo squash as a particularly delicious variety of pumpkin. I’ll be honest, here. While I quite enjoyed it, it doesn’t compare to, say, the Red Kuri, Candyroaster or Pink Banana squash we’ve grown before. However, I’m not entirely sure the Crespo squash reached full maturity, given how much green there was under the flesh when we cut it open. Plus, some types of winter squash taste better after being in storage for a while. I would definitely want to grow it again, but if we could only choose one or two winter squash varieties, I would choose something else.
I had started a tomato sauce in the crockpot and decided, since it was handy, to include some of the roasted squash. This sauce included San Marzano tomatoes ( I had enough that there was no room to add more tomatoes from the freezer), with maybe two Forme de Couer in the mix, plus a yellow bell pepper from the ones ripening in the living room, a few shallots, and the pieces of roasted squash. It was seasoned with salt and pepper, plus dried sage, thyme and basil. Last of all, I added a splash of Krupnik (not an affiliate link) – simply because we happen to have some right now.
When the tomatoes got to the stage where I could blitz the whole thing with the immersion blender, it was left to cook down overnight to thicken it, though we would dip into it to use with our meals every now and then. Before I started writing this post, I decided it was thick enough to jar up. By then, we had enough to fill two 750ml jars, plus one 500ml jar. Once they are cool, they will go into the fridge to use right away.
My taste buds are far from refined, so I honestly couldn’t tell you if adding the squash or the booze made any difference! 😄
As for the rest of the roasted squash, I can hear my daughter in the kitchen right now. She’s making pie out of it!
I’m really looking forward to seeing how it turns out!
There were four harvestable squash out of the three vines, though the first one to develop sort of stagnated early on, stayed dark green and never got very big. In the photo above, you can see it in the front row, third from the left.
The largest squash with the damage visible is the big Crespo squash we wanted to make sure to cook first. However, with losing our hot water and having to constantly heat water for washing anything, we didn’t get to it until now.
It was remarkably easy to cut into! I expected to have a harder time of it.
The colour is not only quite a deep orangey-yellow, it actually stained my hands a bit, by the time I finished scooping out the insides and removing the seeds. Which suggests to me that this squash has quite a bit of beta carotene in it.
I cut it into quarters, then cut out the stem, which you can see in the next image, before putting it in the oven. Aside from adding a bit of water to the bottom of the pan, nothing else was done to it. I want to be able to give it a taste without any seasonings, first.
In the last image, you can see the seeds, washed and draining. There were very few seeds that got rejected. I supposed we could roast some for eating, but I don’t actually have any interest in doing that. Later, these seeds will be laid out on a parchment paper lined tray to dry out.
I set the oven for 350F for about an hour before stabbing the pieces with a fork, then adding another 45 minutes. As I write this, they are soft and appear to be cooked through. I’ve shut off the oven and left them in there, just in case there were some undercooked parts I couldn’t reach.
Today, I was actually planning to get some stuff done outside but, while it is warmer than yesterday, it has turned out to be a rainy day.
Sort of.
It’s been raining off and on since last night. It’s supposed to start raining for real at about 7pm and continue raining through to about 10am tomorrow morning. Since some of what I hoped to get done today involved power tools, I decided to postpone it!
There is a bit of concern about the winter sown garden beds. When the seeds were sown, the beds were completely dry and did not get any watering. It’s cool enough that it’s unlikely they will germinate, but if they get wet and don’t germinate, the seeds may rot. If they get wet and do germinate, they may freeze. The heavy leaf mulch, however, should protect them from both possibilities.
I hope.
So today I’m focusing on indoor stuff, but still garden related. We had a box of San Marzano tomatoes in the living room that were fully ripe. Those are now soaking in vinegar water. Later on, I’ll remove the tops and tails, and get them in the crock pot for the night to make tomato sauce. There might be room enough to use some of the whole tomatoes we have in the freezer right now.
Once the oven is free, we have lots of peppers that have ripened and are starting to dehydrate in the living room. Those will get set onto trays to dehydrate fully and faster in the oven. Except, maybe, the hot peppers. There are so many of them. We might instead string them up and hang them above a heat vent, instead.
There was also a large colander in the old kitchen, full of tomatoes that were further along in ripening. Every now and then, I go through the bins and pull out the ones that are blushing and set them in the colander until it’s full. I went through those, setting more San Marzano, and a few mystery compost tomatoes, into a bin for the living room to continue ripening. The cherry tomatoes went into a small colander for general use and snacking in the kitchen. These are the Chocolate and Black Cherry tomatoes in there, a lot of which still need more time to ripen, plus a couple of little red tomatoes from the mystery plant that self seeded among the Red Thumb potatoes. When we harvested the tomatoes before our first frost, that plant had many small tomatoes on it, all still very green. I’m glad to see that they are actually ripening now. Judging from the colour and the size, I am guessing it is from the Mosaic Medley mix we grew in that bed a few years ago. That was a mix of cherry and grape tomatoes. These are so small, though, and with how the clusters were formed, I’m tempted to think they might be Spoon tomatoes. They’re big for Spoon tomatoes, but as something that has self seeded, it’s possible they reached a size they might not reach when grown as transplants.
Well, whatever they are, they are a tomato, and my family likes tomatoes, whatever the variety!
Aside from all of this, I hope to take advantage of today being an indoor day and start editing a couple of videos, including the October garden tour video using footage I recorded on Nov. 1. 😄
But first, lunch – and maybe a taste of that Crespo squash!
I really wanted to push to get the rest of the seeds in for our 2025 garden. I still had to wait until the afternoon to start, so the ground had time to thaw from overnight frost. From there, it was a race against time to finish before I lost light. I even managed to get some quick footage for an October garden tour video. I haven’t checked the files yet, though, to see if they are worth using.
The first area I worked on was along the chain link fence. The long bed in the first image above was mostly done already, since I’d harvested potatoes out of it. I even found a couple of little potatoes that I’d missed when harvesting.
It still took a remarkably long time to prepare it, though. The section that had the purple caribe potatoes that never grew was compacted like crazy, even though I’d loosened at least part of it, to plant the kohlrabi.
Those actually had some leaves trying to grow! If they hadn’t been eaten by flea beetles, they’d still be growing now.
There was also the lone Jabousek lettuce that had seeded itself and survived being munched by deer. I got a bucket to use to collect the seeds. There was a lot for just one plant! I ended up putting a healthy scoop of them with the remaining root vegetable seeds, giving it a shake to mix them in with the other seeds, potting soil and vermiculite.
I also cleaned up the chimney block planters along the other section of chain link fence a bit. I just took down the tomato supports and cut the tomato plants at their bases, leaving the roots. I will be leaving those as is until spring.
As for the narrow bed, once the soil was loosened, weeded and leveled, I scattered the seed mix. This mix has Dalvay shelling peas, a few King Tut purple peas we saved, Royal Burgundy bush beans, Hopi Black Dye and Mongolian Giant sunflowers and a few black Montano Morado corn seeds I’d saved, plus onion seeds.
The onion seeds are so much smaller, though, I scattered the larger seeds first, which probably included a few onion seeds as well, then went back over the bed to scatter the remaining onion seeds. There wasn’t enough to do the entire bed, though, but I made a modification, later.
First, though, I went over the bed several times, looking for the larger seeds and pushing them into the soil, spreading them further apart, if necessary. When I found the bush beans, I pushed them into the soil closer to the brick edging. If I had to move peas, I pushed them into the soil closer to the chain link fence. The Mongolian Giant seeds were easy enough to see, but the corn and black dye seeds are so dark, they were much more difficult to spot. I’m sure I missed quite a few. I also replanted the two little potatoes that I’d found.
If all goes to plan, the peas will be able to climb either the fence, the corn or the sunflowers, the beans will have room to get bushy along the outside edge of the bed while doubling as ground cover, and the onions will dissuade hungry deer.
Once I’d pushed in as many of the larger seeds as I could find, I got some of the shallots and onions I’d set aside earlier for replanting. I transplanted them around the outer edge of the end that did not get the scattered onion seeds. These shallots and onions are there to go to seed – and to dissuade any hungry deer, I hope! Everything in this bed, except maybe the corn, is stuff deer love to eat!
After planting the shallots and onions, the soil was gently raked to make sure everything was covered before getting mulched with leaves topped with grass clippings.
That left the root vegetable – and now Jabousek lettuce – seeds to sow. Those went into the low raised bed that the German Butterball potatoes had been in, which is in the second photo of the slideshow above.
When the potatoes were harvested, the bed was weeded, and hadn’t been touched since. All it needed was to break up soil clumps, pull out any weed roots that got missed, soil clumps broken up and leveled.
With this higher bed, I did things a bit different. Anything along the walls of the bed would freeze, since the mulch can only protect from the top. So I focused on making sure the middle of the bed was readied for seeds, leaving about 6 inches from the walls unplanted.
This seed mix has Uzbek Golden carrots, Napoli carrots (an orange variety), Merlin, Bresko, Cylindria and Albino beets, French Breakfast, Champion, Cherry Bell and Zlata radishes, Purple Prince turnips and our saved onion and lettuce seeds in it.
It sounds like a lot, but this was finishing off packets of older seeds, so there wasn’t much of each variety, plus I don’t expect a high germination rate for any of them.
Once the seeds were scattered and gently raked over, they got mulched with leaves topped with grass clippings.
That is the last of the winter sowing vegetables to do! The only thing that could still be sown before winter is the wildflower mix, and that could even wait until spring, if I wanted. The space I’ll be planting them is still covered with an insulated tarp, and that won’t need to be moved to cover the septic tank for a while, yet.
While I was working on this, my younger daughter was taking care of things in the house, including re-installing the arm based over the new tub surround. She was able to find a way to fit the big L shaped bar in, as well, though it does make one of the corner shelves in the surround of limited use, now. Which is fine. The arm bar is needed more.
Now that the arm bars are in, my husband can finally use the shower! Even with the bath chair, he can’t get in and out without the arm bars.
My older daughter is not well today, and we’re all pretty broken and hurting, so my daughter offered to get us take out, if I were up to it.
Yes. Yes, I was!
Meanwhile, my brother and his wife were coming over for one last trip – to drop off the trailer they’ve been using to bring everything from their property to wherever it needed to go. They arrived after I left for town, but I was able to see them before they left. Tomorrow is the possession date for the new owners, so they not only pushed hard to get their own stuff out, but to make sure the new owners had things like flax bales to cover their septic field, and a few other things that got set up for them.
One thing they did was take off their “road sign” at their driveway. When the road past our driveway was named for our family, the municipality made five signs, but only needed four, so my brother was allowed to take the extra. They’ve had it at their driveway ever since. It has now been removed.
That sure made things feel a lot more final!
It would be good if we could use it at our intersection. There was one when we moved in, but then the stop sign it was attached to was knocked down and the road sign stolen. We’re pretty sure our vandal did that, but have no way to prove it, but like we can’t prove he stole the sign with my father’s name on it off the corner fence post, or that he stole the trail cam we had mounted on that post.
The municipality never replaced the road sign. I suspect that if we put this one up on the stop sign that got repaired, it would just get stolen, too.
Well, we’ve got our own painted sign at the corner, with a camera on it in case there are more vandalism attempts. That is working out just fine.
There is, of course, still lots more work to get done in the garden, but getting this winter sowing done was the thing that had to get done first. Now, we just do as much as we can while the weather holds. At the same time, my brother will be coming out as often as he is able, as he wants to sort things to their more permanent locations. Particularly the farm equipment, now that the storage trailer is in place. A lot of small things just shoved into the barn that will need to be sorted into the storage trailer or bread truck (which will be a workshop). He also has a dismantled shelter he needs to rebuild over the tractor that got its radiator damaged while lifting the discer off the trailer. It will need to be replaced, and he’s planning ahead to be able to do it during the winter, so having a roof over the tractor will be very important.
Anyhow…
They got here after I left to pick up the food, but I got home fast enough to at least give my brother a hug – my SIL was so exhausted, she fell asleep in their truck! – before they had to go.
We’re going to be seeing a lot more of my brother and, hopefully, his wife from now on!
That makes us very happy.
Getting the last of the winter sowing done today also makes me very happy.