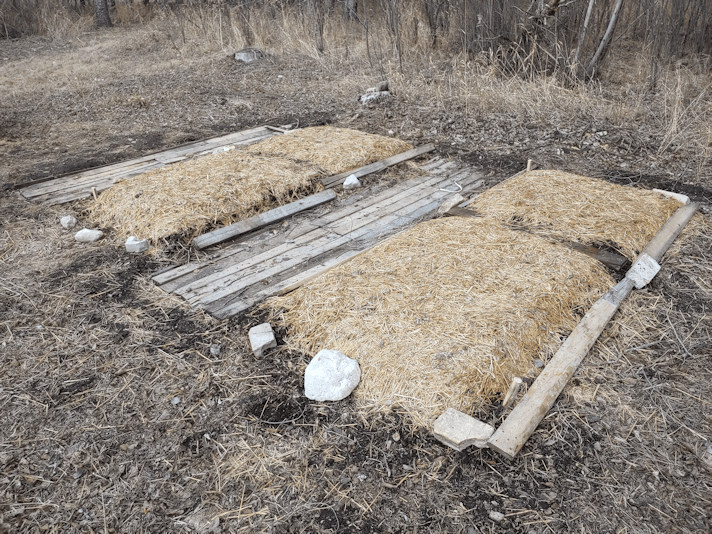
My older daughter and I headed out for a walk, and we decided to go ahead and remove the plastic covering our garlic beds.
When looking up how to plant winter garlic, all the resources said to cover the garlic with a heavy layer of mulch.
What none of them did was mention when to take off the mulch in the spring. I knew the mulch was removed, because all the videos and photos I saw that were taken later in the growing season showed the garlic growing out of bare soil. No mulch in sight. It took some dedicated searching, but I finally found resources that said to remove the mulch after overnight temperatures were consistently above -6C/21F. Looking at our long range forecasts, we seem to be at that point, as overnight temperatures are generally supposed to stay above freezing. We’ve started by just removing the plastic for now, though. We’re supposed to get some much needed rain tomorrow, and have decided to leave the mulch a bit longer. Right now, it’s keeping the beds from drying out, like everything else has done this spring. With so little snow over the winter, and very little precipitation so far this spring, every little bit of moisture is precious.
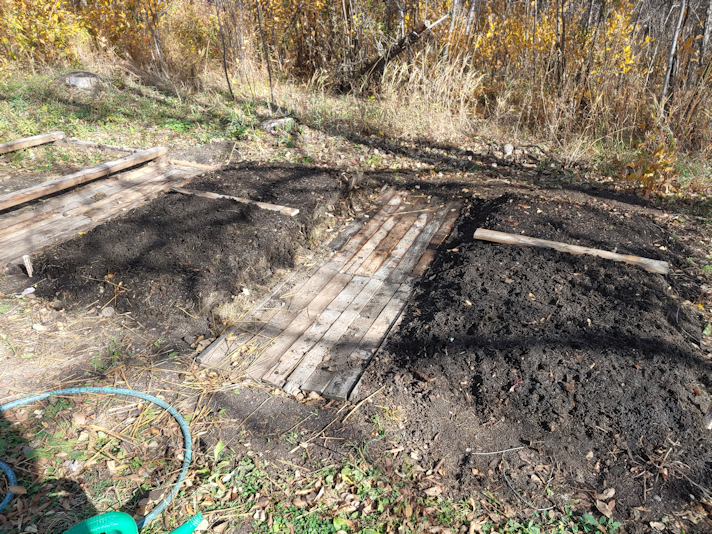
When I dug these beds out, I moved the soil to one side, put the contents of our compost heap on the bottom, added straw on top, then put the soil back, including the soil that was in what are now paths. I dug those areas down to the gravel, using it to raise the garlic beds higher, then filled the space with scrap wood to create the paths.
I won’t be adding another path on the other side of the third bed, which means I’ll only have what soil I take off the top. I’ll be emptying out our compost heap into the bottom, then add in the mulch from the garlic beds, before putting the soil back. I don’t think it’ll be as high as the other beds, but hopefully we’ll have our loads of garden soil delivered soon, so I’ll be able to top it off with that. The mulch will probably be removed before then, and I’ll just move it onto the paths at first.
We’ve had quite a few warm days. I think I’ll call the company up in the next day or two and see if their soil is thawed out enough to load into their trucks or not.
I might be just a little bit excited about getting that soil! :-D
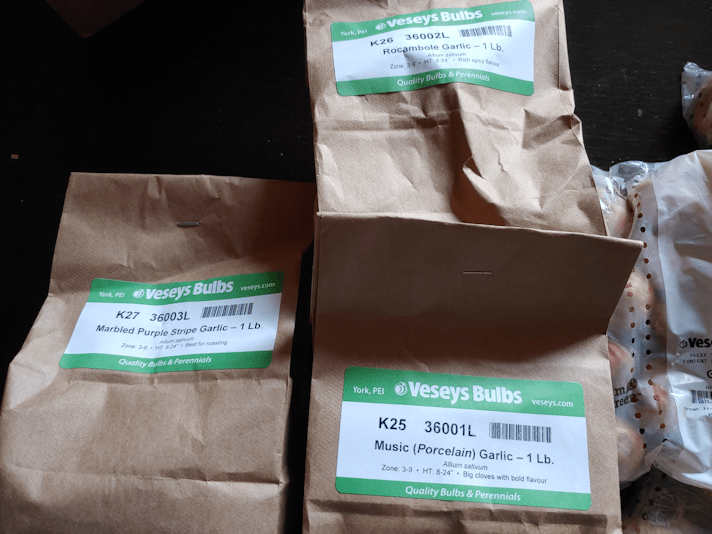
I was so excited to finally get our bulbs this morning!
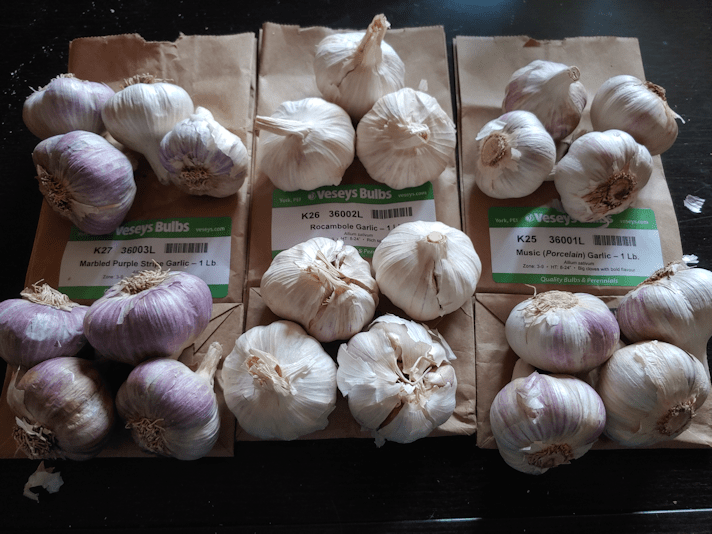
Here are the three varieties of garlic we ordered.
I appreciate how they add things to the label, like “best for roasting” , “rich, spicy flavour” and “big cloves with bold flavour”.
This is what 1 pound of each variety looks like. I wasn’t sure how many bulb heads or cloves that would translate into. That was the main reason I wasn’t sure if the two beds I’d prepared for them would be enough. At least I was reasonably sure it wasn’t going to be too much space! :-)
Today turned out to be a very windy day, so my daughter and I broke apart the cloves inside the house.
Those old take out containers were perfect for keeping the varieties organized!
Also, they made the house smell absolutely amazing!
I had been watering the prepared beds, to try and get moisture down to the layer of compost and straw buried inside. Unfortunately, I wasn’t able to do that as often as I’d wanted to, so I gave them another thorough soak.
The frame used as a guide to dig 4′ x 8′ beds fit in the next space, inches to spare between it and the ring around the new compost pile. It was ready, just in case I needed a third bed.
Thankfully, I didn’t!
Porcelain Music Garlic
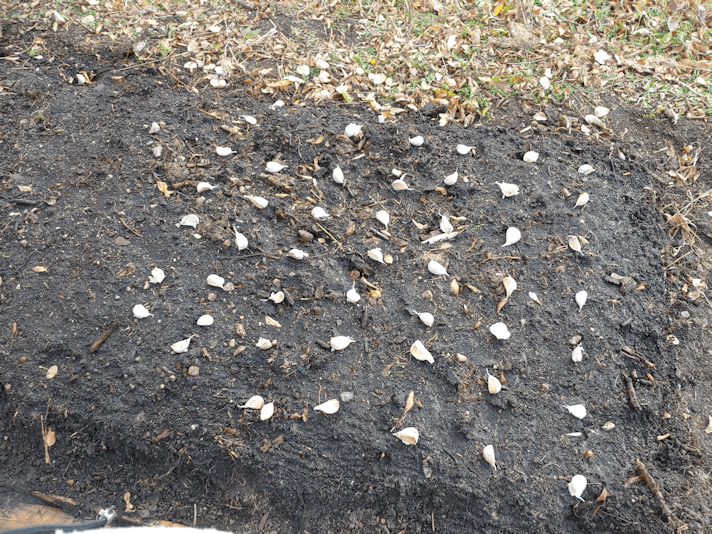
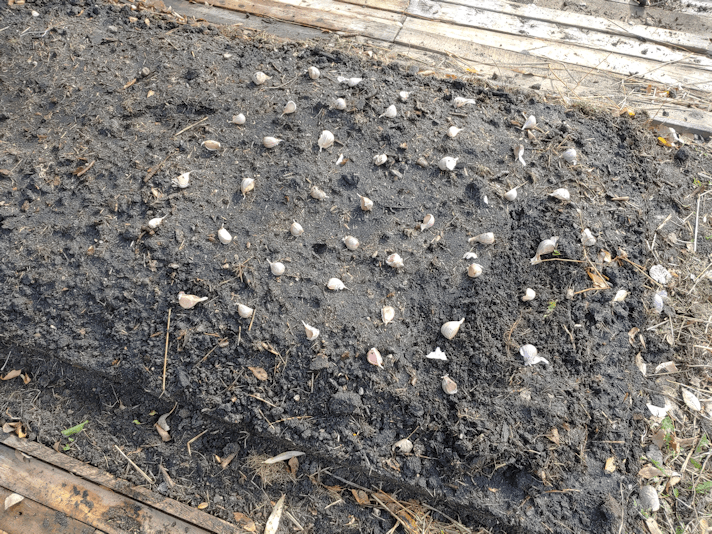
The first variety I planted was Music. Directions for planting hard neck garlic I have looked up, say to plant cloves 4 – 8 inches apart, in rows about 12 – 18 inches apart. Since we are doing beds rather than rows, I laid them out in a roughly 6 inch grid. The soil is so soft here, I was able to plant the by just pushing my gloved fingers in to the correct depth, without the need for any tools.
Purple Stripe Garlic
With the number of cloves we got from the Purple Stripe, my grid wasn’t quite as even at the end. :-D The corners on this bed seemed like they would collapse a bit, so I moved the cloves that would have been planted there to the other side.
Once the two varieties were planted, I added boards to mark where the grid ended, and the third variety, which would be in both beds, started.
Racombole Garlic
The last ones to plant were Racombole. Which sounds like a Pokemon.
The Racombole turned out to have a lot more cloves, including more smaller ones. It was almost like soft neck garlic that way. So these were planted slightly closer together. More like 4 inches apart, rather than 6. I probably shouldn’t have bothered to plant the smallest ones, but I didn’t want to waste a single clove!
Those boards across the beds also came in very handy to put a foot on to brace myself, making it easier for my short little arms to reach the middle. ;-)
Planting in these beds really demonstrated for me that building much higher raised beds for accessibility is a very good idea!
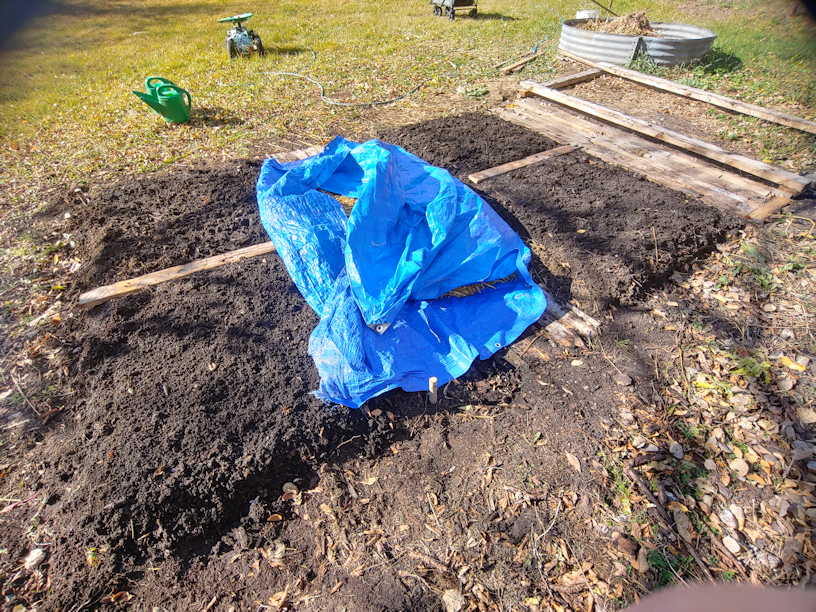
The next step was to add the mulch, and this is where the wind became a real potential problem.
Thankfully, I thought to put the chopped up straw on a tarp.
It was easy to slide the whole thing into the path between the beds. I could then grab handfuls, keeping them low and out of the wind as much as I could, to spread out.
I then had to rush to give the mulch a soak with the hose, more to weigh the mulch down than anything else! As you can see, the wind was already starting to blow the straw away!
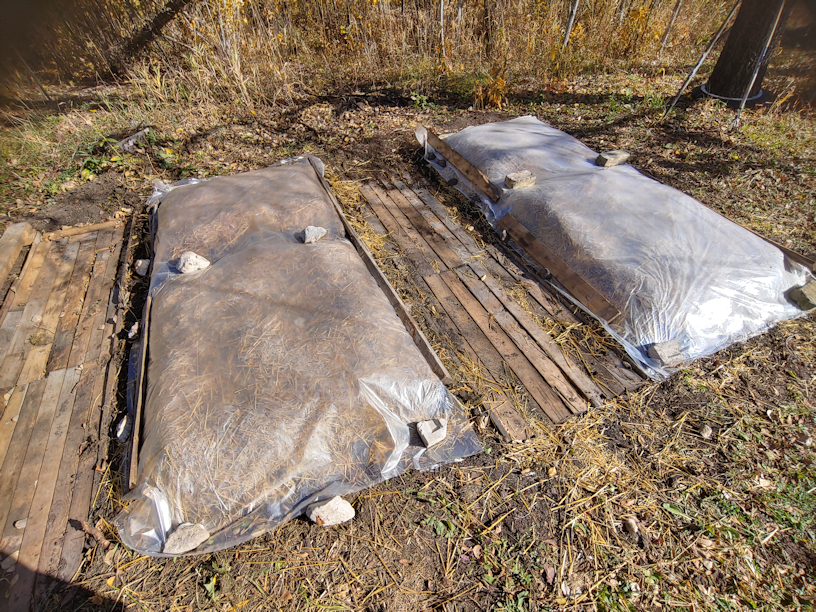
The last step was to cover the beds with plastic – which the wind certainly made challenging! Thankfully, we’ve found a couple of rolls of plastic while cleaning up the house and basements, so we have plenty, and I could unroll it directly on the mulch, adding weights as I did.. The plastic is actually folded in half on the roll, and I didn’t bother to unfold it, so this is a double layer of plastic on the beds.
As you can see, those board across the beds came in handy for the weights, too!
The plastic isn’t something I’ve seen suggested, in general, but we are in zone three, and most of the places I’ve looked up are in at least a zone 6. While October is the month for planting hard neck garlic for them, we probably should have planted these at the end of September – and would have, if they had not been back ordered.
The issue is overnight temperatures. We’re consistently hovering just below freezing. In the long range forecasts, our highs for the day will be just barely above freezing.
There are a few things going for these beds that should help with our planting this late in our zone. Burying the organic matter at the bottom of the beds means there should be some warmth generated as they break down, just as it would have if it were in a compost pile. The mulch will also help regulate the temperatures and, finally, the plastic should help keep things a bit on the warm side. I don’t want it warm enough for the garlic to start sprouting, but they do need to start their growth below ground before winter temperatures set in.
I might remove the plastic later on. Snow also acts as an insulator, plus these beds should not need any watering throughout the growing season. Between normal precipitation and the mulch, they should have enough moisture. Letting the snow cover the beds would give them that first burst of moisture in the spring, and the beds being slightly raised means they should thaw out faster than the ground surrounding them. However, the plastic will also keep the moisture they already have from drying out before the snow falls, and will help the soil warm up even faster in the spring, giving the garlic a chance to start growing a bit earlier. I would then remove the plastic once I saw that greens were making their way through the mulch.
My mother grew garlic in the old kitchen garden, but she never used mulch or plastic or any of the other techniques I am using that irritates her so much. :-D So I can’t go by how she did things, in past years.
So if there are any experienced garlic growers here, I would love to hear how you have done it! And would you leave the plastic, or take it off before the snow falls?
I’m really looking forward to seeing how these do. When it comes time to harvest them next year, we will be looking to save the largest bulbs for planting. Hopefully, we’ll have enough large ones to have more to plant than what we started with.
Just minutes ago, we saw our mystery critter again – this time out by the compost pile!
We ended up bringing the DSLR, with it’s 700mm lens, and tripod over to try and zoom in for some pictures.
Unfortunately, the window we were looking through is the one that was not replaced, when all the others were. It has a sheet of plexiglass mounted on the inside, to keep the drafts out. Which means that there was nothing we could do to keep the auto focus from focusing on the glass, instead of the critter. I even tried manual focus, and the pictures I got were actually worse.
So these are the best of the bunch. I cropped the photos and resized them, but that’s it.
The question is: what is it?
It was eating grass and what I think were dandelion leaves. In one of the photos, it looks like it has a stuffed cheek!
It’s surprisingly large. About the size of our big skunk, but bulkier. Almost as big as a beaver! It kinda has a beaver shape, too, but the tail is completely different.
So it is a gopher? Groundhog? Prairie Dog?
Whatever it is, it’s adorable!
In other things, I just finished making our fall plantings order from Vesey’s. This is what we have ordered (all links should open in new tabs, so you don’t lose your place!):
Fall garlic collection 2: This collection of hard neck garlic includes Porcelain Music, Rocambole and Marble Purple Stripe. The Purple Stripe is supposed to be really good for roasting. The collection has 1 pound of each. We are planning to plant these where we currently have the beets and carrots.
The rest that we ordered are flowers.
Muscari: aka Grape Hyacinth. I’ve wanted these since I was a kid! When we lived in Victoria, BC, they grew everywhere, like weeds. I loved them! We’ve ordered 2 packages of 100 bulbs.
The girls picked the rest.
Snow Crocus Collection: “This collection contains 105 bulbs including 25 Dorothy and 20 each of Blue Pearl, Tricolour, Snowbunting and Spring Beauty Snow Crocus.” Our plan is to mix these bulbs with the Muscari, then plant them randomly in the areas we have picked for them.
Double Tulip Collection: “This collection contains 58 bulbs, 8 of Black Hero, Pamplona & Vanilla Coup and 10 each of Pinksize, Orca and Brownie Double Tulips.” The girls aren’t big fans of the typical tulip shape, but they really love the more unusual shapes.
Speaking of unusual tulip shapes, definitely click on the next link!
Bulls Eye Tulip: We got 1 package of 8 bulbs of these. What an unusual tulip! I can hardly wait to see how they grow.
Eye of the Tiger Iris: They could have had so many punny names for this one… :-D This one comes in a package of 15. We do have some irises in the flower garden the bird feeder stand is currently in. They’ve been there for as long as I can remember! Only 2 of them bloomed this year, and they were done so fast, my daughters never saw them!
Gardenia Daffodil: These come in a pack of 6, and quite different from the usual yellow daffodils I’m used to seeing. When we lived in a PMQ in Victoria, BC, there was a field between our duplex and the military hospital that was just filled with bright yellow daffodils. It should be interesting if these will have the same spreading habit!
And spreading is something we actually want, and they will be planted with that in mind. Especially for the muscari and crocuses. For those, we are hoping they will form a floral carpet to fill in areas between trees, so we don’t have to mow such awkward places.
For our zone, we expect these to be shipped to arrive in the second half of September, in time for immediate planting.