Home Made Yogurt and Yogurt “cheese” – Day Two; finished

Here are the final results of the yogurt and yogurt cheese making process.

You can visit the first part here, with the recipe, and the second part here, with the step-by-step to make the yogurt cheese.

First up, let’s compare the finished yogurts.

20180129-yogurt6

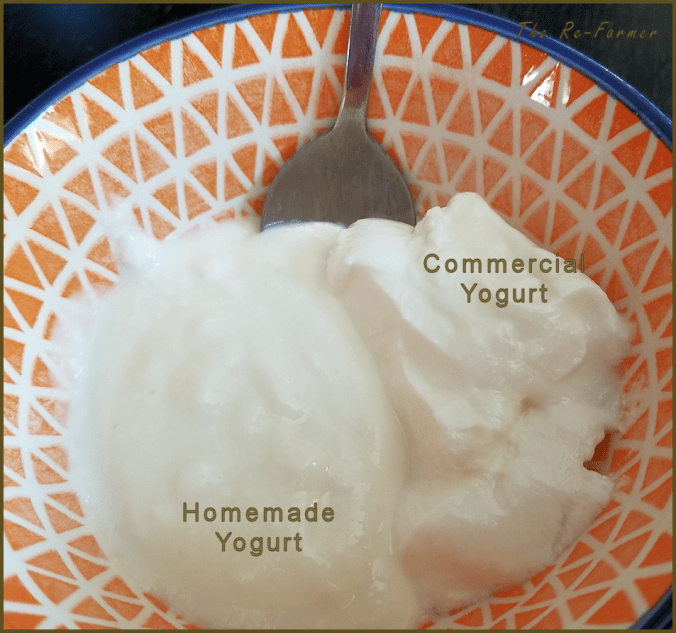
This was after the home made yogurt was in the fridge for several hours.  It did thicken somewhat from when I first put it in the containers, but as you can see, it’s still quite a bit thinner than the commercial yogurt I’d used as a starter.  That yogurt, by the way, was just a house brand of plain “Balkan” style yogurt.  I normally buy Greek yogurt, but it was more than twice the price!

As far as texture went, the only difference was that one was thinner than the other.

I couldn’t really taste any difference in flavour.

After taking the photo, I mixed both together with a bit of brown sugar and cinnamon.  It was quite nice!

One of my daughters promptly claimed the container that wasn’t quite full for herself, and ate it straight. :-D

Now, on to the yogurt cheese…

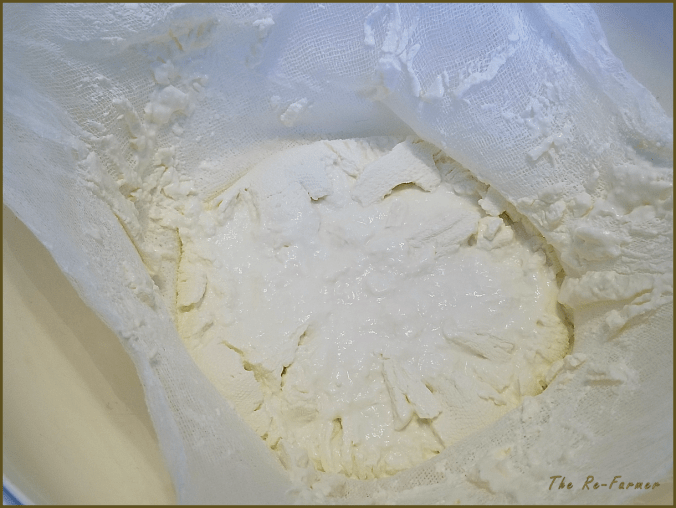
After hanging for about 3 hours, there was quite a lot of liquid in the container.  Enough that I poured it off into the container I’d already started in the fridge, almost filling it, so that the bag wouldn’t be sitting in so much liquid.

When very little more drained out of it after another hour or two, I decided to take it out and finish the process.

20180129.yogurt.cheese9

Look how much liquid there is!  I can hardly wait until our next bread baking day. :-D

Once the bag was on the plate, I could really feel how the middle was thinner than the outside.  If I had a cheese press, I would have been able to get more liquid out, more evenly.  Maybe some day.  For now, I’m happy with doing it this way.

20180129.yogurt.cheese.10

And here is my yogurt cheese baby.  With the outside being drier, it allowed me to gently roll the cheese out of the cloth.  If that part had broken up more, the softer middle would have got on the cloth and made it much more difficult to get out of the bag.

Guess how I know that? :-D

20180129.yogurt.cheese.11

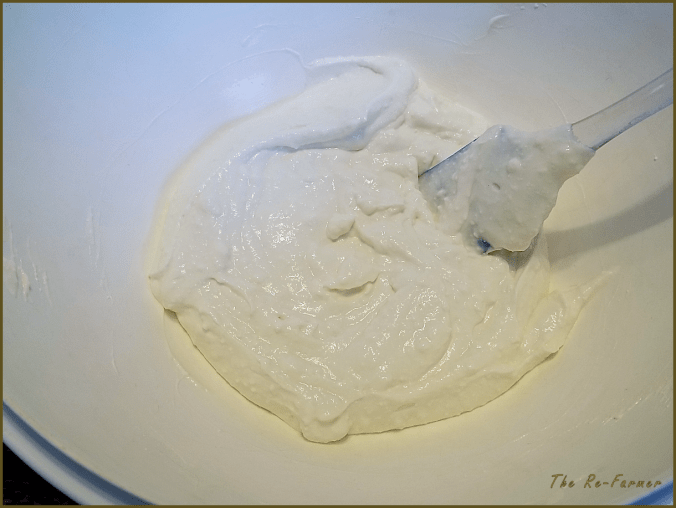
Once out of the cloth, I mixed it thoroughly to make it an even texture.  This is a bit on the thin side to be a “cream cheese.”  More like a really thick sour cream.

I had a couple of smaller containers waiting for it…

20180129.yogurt.cheese.12

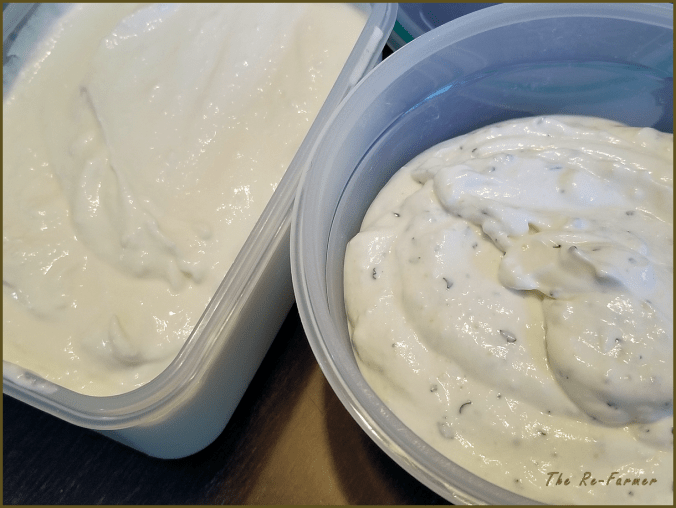
I filled one with the plain yogurt cheese, then added some garlic powder, onion salt and parsley to what was left in the bowl.

I admit, I licked the spatula after doing this, and the onion and garlic one was sooo good!

Like the plain yogurt, it thickens a bit in the fridge, but not by much more.

If I had wanted to, I could have left the bag to hang longer to drain more liquid out and have more of a cream cheese texture, rather than a sour cream texture.

We are looking forward to trying some of this on pierogi soon!

If you try making this yourself, please to pop by and let me know in the comments, how yours turned out, and what you think of it!

The Re-Farmer

Home Made Yogurt – Day One

I hadn’t intended to make this again so soon, but my daughter and I were able to make a quick trip into town and she made a passing comment about how we should make yogurt again.  I’ve been thinking of it since I posted about using the liquid from making yogurt cheese in bread baking, so that was all it took to convince me to get what we needed to make some now.

Making yogurt is really pretty easy.  The main thing is to have a warm place for the bacteria to do its thing for the hours it needs.  I’ve found leaving it in a warm oven with the light left on overnight to be adequate, but there are other methods.

Since that is my preferred method, it’s a two day process.  I use a full gallon of milk, and plan to use half of it to make yogurt cheese tomorrow.

Along with the ingredients, a candy thermometer is needed, and containers you can sterilize to store the yogurt in, later.  Any container that can handle being scalded, with an air tight lid, of the appropriate size for your amounts will do.

The recipe I use is from Whole Foods for the Whole Family, from La Leche League International.  I have a 1991 printing of it.  It’s a very handy cookbook, if you like to make things from scratch.  I modified the recipe for larger quantities, so I’ll include both the original quantities, and my own variation (in brackets).

This recipe uses plain commercial yogurt as a starter.  Make sure you check the label to see that it says something like “active bacterial culture” or “live bacteria” on it.

Do not use the optional gelatin if you’re planning to make yogurt cheese.  The gelatin serves only to make a firmer yogurt.

20180128-yogurt1

4L milk, scalded

Yogurt

4 cups milk (4 litres/1 gallon)
1 cup powdered milk (4 cups)
2-4 Tbsp plain yogurt (1/2 – 1 cup)
2 tsp (8 tsp) unflavored gelatin, softened in 1/4 cup (1 cup) cold water – optional

  1. Scald milk.
  2. Cool to 95 – 155 degrees. (The recipe does not specify, but looking at my candy thermometer, it must refer to Celsius, not Fahrenheit)  Check with candy thermometer to be sure.

    20180128-yogurt2

    Yogurt starter and powdered milk stirred in.

  3. Stir in powdered milk and yogurt.  Add optional softened gelatin.
  4. Pour into sterilized jars, a baking dish with a cover, or a thermos rinsed with very hot water.  (Because I use an entire gallon of milk, I leave it in the same container I heated it in and cover it with a lid.)
  5. Place into or on a yogurt maker or use other heat source.  A thermos just needs to be wrapped in a towel.
  6. Put in a warm place and allow to incubate at 95-155 degrees until yogurt sets.  It can take from 3-9 hours, depending on your heat source.  Check after 3 hours to see if it is set by tilting the container or tapping it with the heel of your hand.  When set, refrigerate immediately.

Maintaining the temperature is vital; too cold, and the milk can go sour.  Too hot, and it will kill the bacteria.  The recipe lists several options for maintaining the right temperature, but a few of them a fire hazards, so I won’t bother including them. :-D

Yogurt cheese isn’t really cheese at all, but is has a texture similar to cream cheese and makes a wonderful spread.  To make it, you’ll need cheese cloth, and somewhere to hang it.

Which I don’t have.  So I have to figure something out for tomorrow.

Anyhow… to make yogurt “cream cheese”

  1. Line a colander with 2-4 layers of cheesecloth.  Place the colander over a bowl, then dump home made yogurt onto the cheesecloth.  Pull up the corners of the cheese cloth and tie them together so it can be hung.  Suspend the resulting bag of yogurt over the bowl and leave overnight. (Or just a few hours, depending on how thick you want it)
  2. Reserve liquid in bowl for bread baking.
  3. Remove yogurt cheese from bag and refrigerate.

Fair warning: getting the yogurt cheese off the cheese cloth can be a messy job!  Also, the outside will often be drier than the middle, so you’ll probably want to mix it together.  If you wish, you can mix in some dried herbs or garlic or otherwise experiment with it.

More, tomorrow!

The Re-Farmer